remove seats TOYOTA LAND CRUISER 2021 Owners Manual (in English)
[x] Cancel search | Manufacturer: TOYOTA, Model Year: 2021, Model line: LAND CRUISER, Model: TOYOTA LAND CRUISER 2021Pages: 632, PDF Size: 13.87 MB
Page 57 of 632

571-1. For safe use
LC200_OM_OM60T03U_(U)
1
For safety and security
WARNING
■Front passenger occupant classification system precautions
● Do not recline the front passenger seatback so far that it touches the rear
seat. This may cause the “AIR BAG OFF” indicator light to be il luminated,
which indicates that the SRS airbags for the front passenger wi ll not acti-
vate in the event of a severe accident. If the seatback touches the rear
seat, return the seatback to a position where it does not touch the rear
seat. Keep the front passenger seatback as upright as possible when the
vehicle is moving. Reclining the seatback excessively may lesse n the
effectiveness of the seat belt system.
● If an adult sits in the front passenger seat, the “AIR BAG ON” indicator
light is illuminated. If the “AIR BAG OFF” indicator is illuminated, ask the
passenger to sit up straight, well back in the seat, feet on the floor, and
with the seat belt worn correctly. If the “AIR BAG OFF” indicat or still
remains illuminated, either ask the passenger to move to the re ar seat, or
if that is not possible, move the front passenger seat fully re arward.
● When it is unavoidable to install a forward-facing child restra int system on
the front passenger seat, install the child restraint system on the front pas-
senger seat in the proper order. ( P. 60)
● Do not modify or remove the front seats.
● Do not kick the front passenger seat or subject it to severe im pact. Other-
wise, the SRS warning light may come on to indicate a malfuncti on of the
front passenger occupant classification system. In this case, contact your
Toyota dealer immediately.
● Child restraint systems installed on the second seat should not contact the
front seatbacks.
● Do not use a seat accessory, such as a cushion and seat cover, that cov-
ers the seat cushion surface.
● Do not modify or replace the upholstery of the front seat.
Page 72 of 632

721-2. Child safety
LC200_OM_OM60T03U_(U)■
Child restraint LATCH anchors
LATCH anchors are provided
for the second outboard seats.
(Buttons displaying the location
of the anchors are attached to
the seats.)
■When installing in the
second outboard seats
Install the child restraint system in accordance to the operati on
manual enclosed with the child restraint system.
Adjust the seat
If there is a gap between the child seat and the seatback, adjust the
seatback angle until good contact is achieved.
If the head restraint interferes with the child restraint syste m
installation and the head restraint can be removed, remove the
head restraint. ( P. 158)
Take off the covers between
the seat cushion and seat-
back, then confirm the posi-
tion of the LATCH anchors
below the symbol in the seat-
back.
Child restraint system fixed with a child restraint LATCH ancho r
1
2
3
Page 76 of 632
761-2. Child safety
LC200_OM_OM60T03U_(U)■
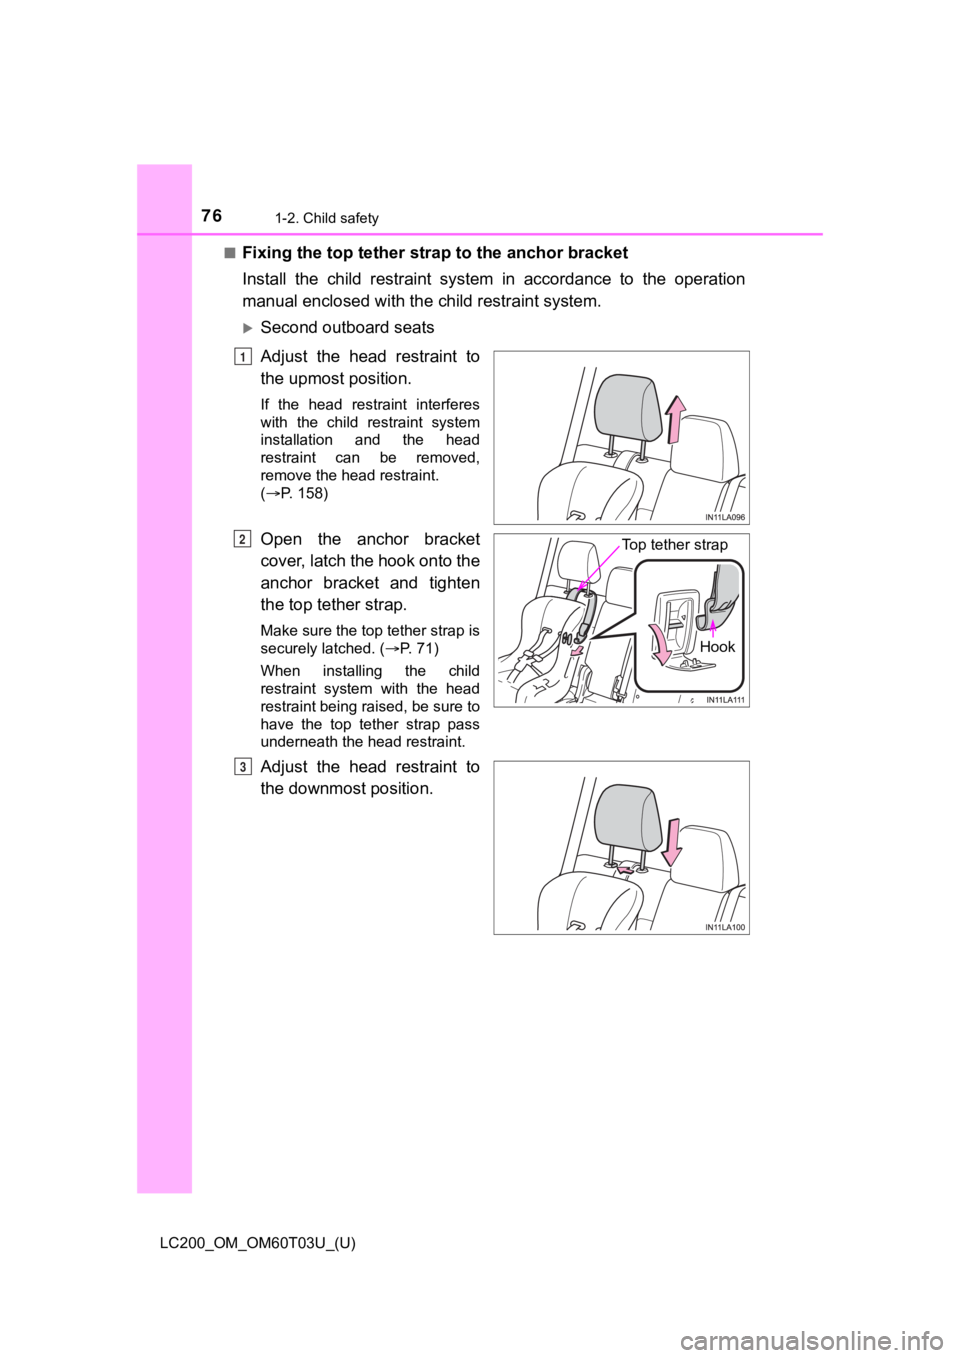
Fixing the top tether strap to the anchor bracket
Install the child restraint system in accordance to the operati
on
manual enclosed with the child restraint system.
Second outboard seats
Adjust the head restraint to
the upmost position.
If the head restraint interferes
with the child restraint system
installation and the head
restraint can be removed,
remove the head restraint.
(P. 158)
Open the anchor bracket
cover, latch the hook onto the
anchor bracket and tighten
the top tether strap.
Make sure the top tether strap is
securely latched. ( P. 71)
When installing the child
restraint system with the head
restraint being raised, be sure to
have the top tether strap pass
underneath the head restraint.
Adjust the head restraint to
the downmost position.
1
Hook
Top tether strapO
P
Page 148 of 632
148
LC200_OM_OM60T03U_(U)
3-3. Adjusting the seats
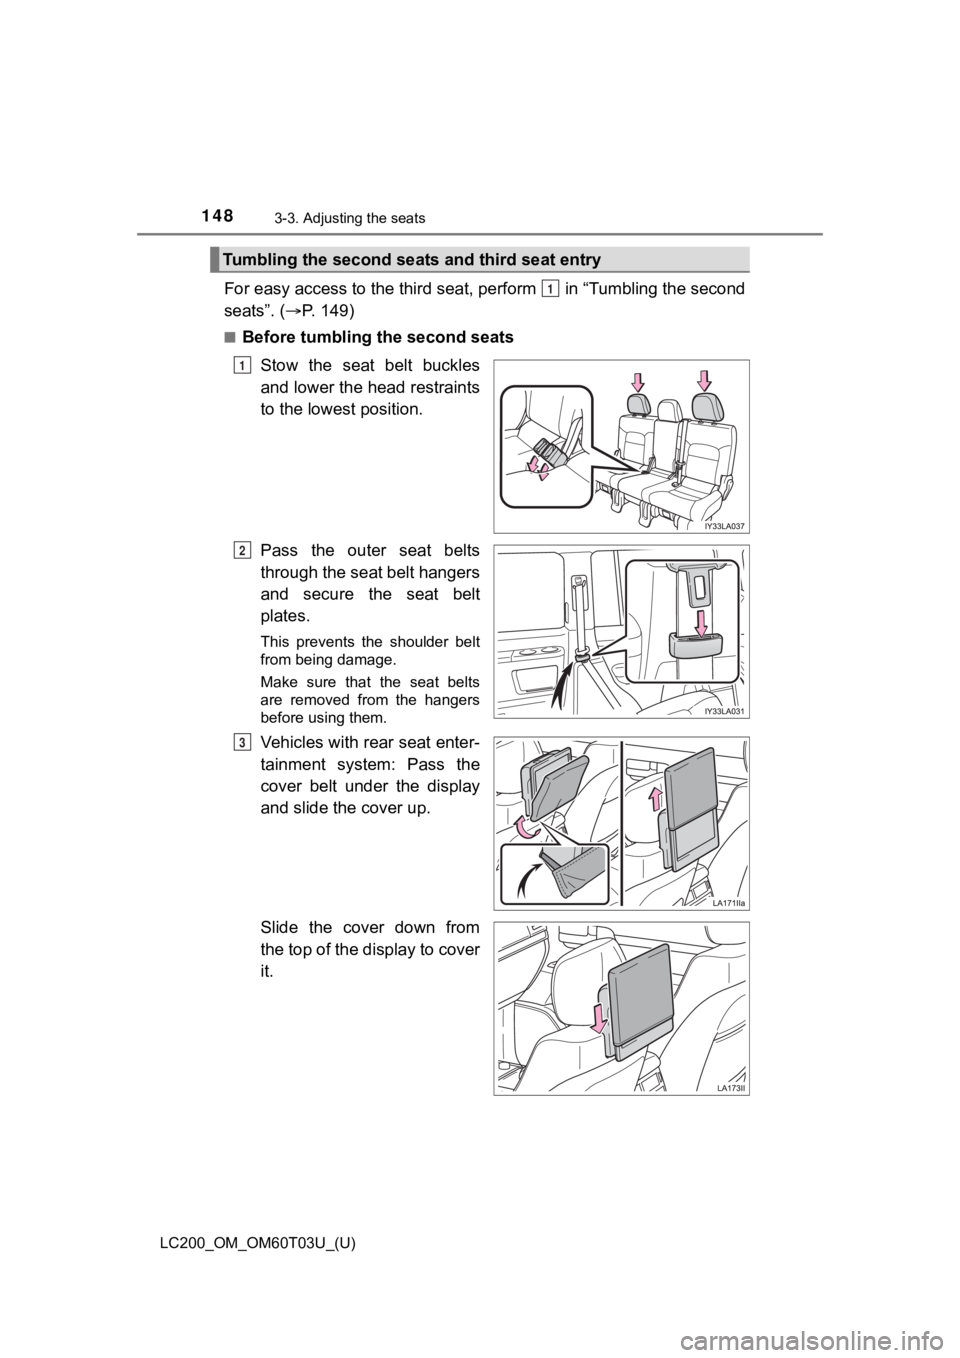
For easy access to the third seat, perform in “Tumbling the se cond
seats”. ( P. 149)
■Before tumbling the second seats
Stow the seat belt buckles
and lower the head restraints
to the lowest position.
Pass the outer seat belts
through the seat belt hangers
and secure the seat belt
plates.
This prevents the shoulder belt
from being damage.
Make sure that the seat belts
are removed from the hangers
before using them.
Vehicles with rear seat enter-
tainment system: Pass the
cover belt under the display
and slide the cover up.
Slide the cover down from
the top of the display to cover
it.
Tumbling the second seats and third seat entry
1
1
2
3
Page 149 of 632
LC200_OM_OM60T03U_(U)
1493-3. Adjusting the seats
3
Operation of each component
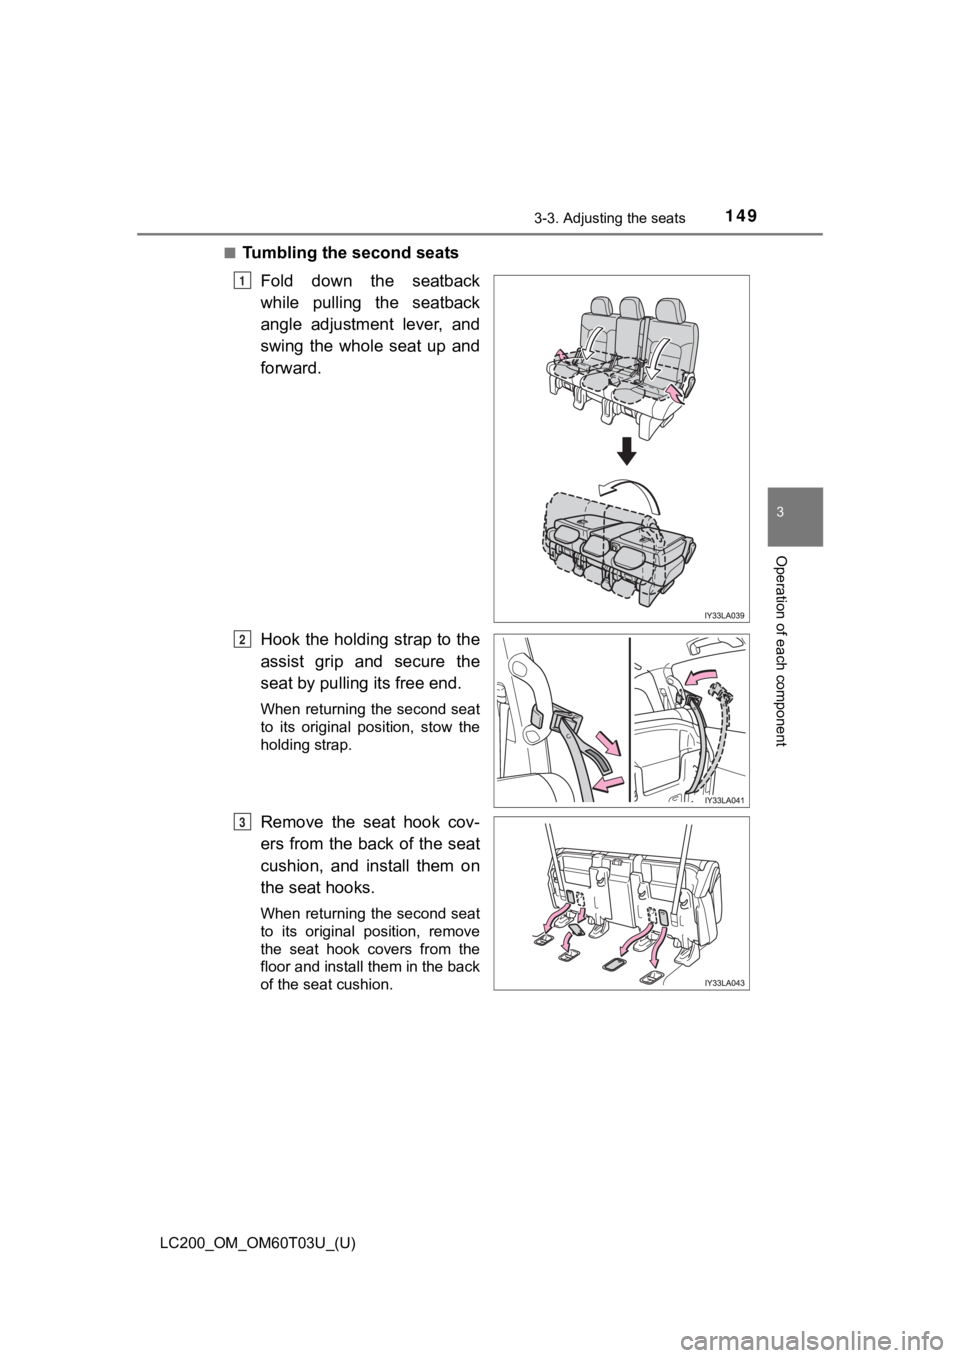
■Tumbling the second seatsFold down the seatback
while pulling the seatback
angle adjustment lever, and
swing the whole seat up and
forward.
Hook the holding strap to the
assist grip and secure the
seat by pulling its free end.
When returning the second seat
to its original position, stow the
holding strap.
Remove the seat hook cov-
ers from the back of the seat
cushion, and install them on
the seat hooks.
When returning the second seat
to its original position, remove
the seat hook covers from the
floor and install them in the back
of the seat cushion.
1
2
3
Page 150 of 632
150
LC200_OM_OM60T03U_(U)
3-3. Adjusting the seats
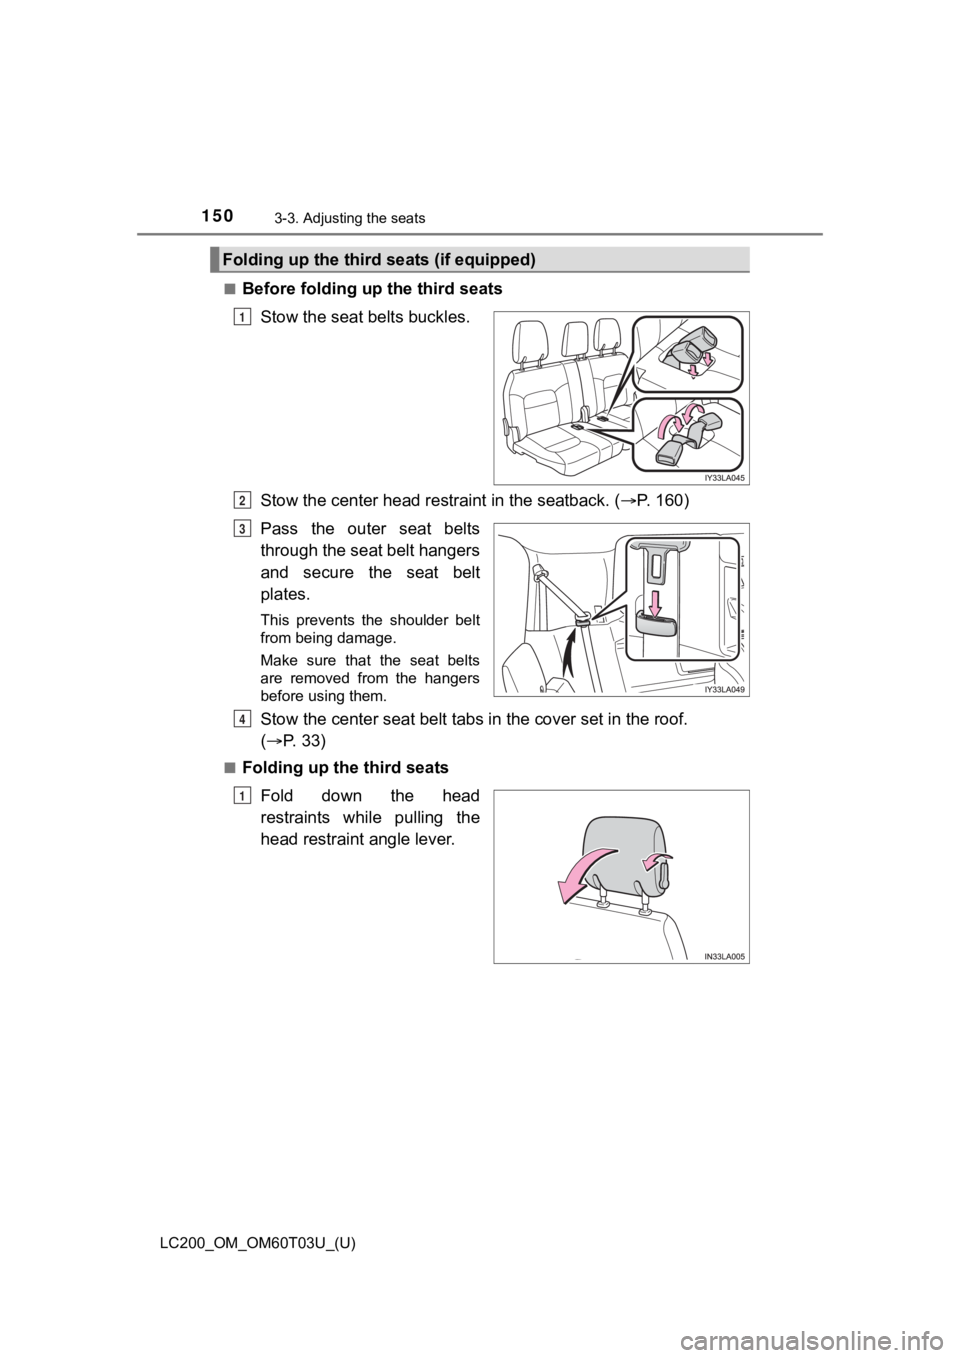
■Before folding up the third seatsStow the seat belts buckles.
Stow the center head restraint in the seatback. ( P. 160)
Pass the outer seat belts
through the seat belt hangers
and secure the seat belt
plates.
This prevents the shoulder belt
from being damage.
Make sure that the seat belts
are removed from the hangers
before using them.
Stow the center seat belt tabs in the cover set in the roof.
( P. 33)
■Folding up the third seats
Fold down the head
restraints while pulling the
head restraint angle lever.
Folding up the third seats (if equipped)
1
2
3
4
1
Page 151 of 632
LC200_OM_OM60T03U_(U)
1513-3. Adjusting the seats
3
Operation of each component
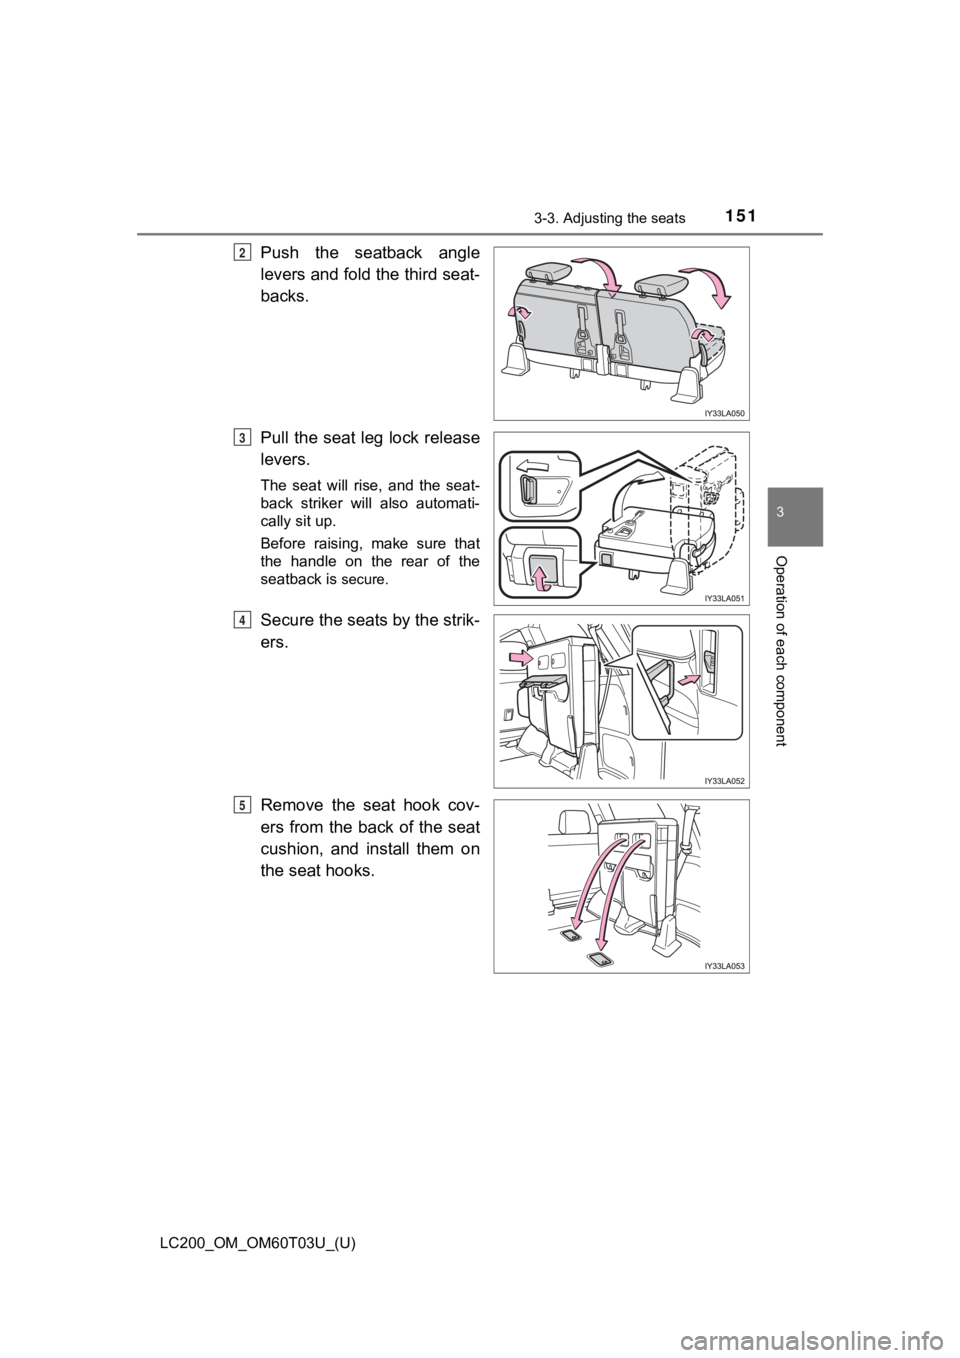
Push the seatback angle
levers and fold the third seat-
backs.
Pull the seat leg lock release
levers.
The seat will rise, and the seat-
back striker will also automati-
cally sit up.
Before raising, make sure that
the handle on the rear of the
seatback is
secure.
Secure the seats by the strik-
ers.
Remove the seat hook cov-
ers from the back of the seat
cushion, and install them on
the seat hooks.
2
3
4
5
Page 152 of 632
152
LC200_OM_OM60T03U_(U)
3-3. Adjusting the seats
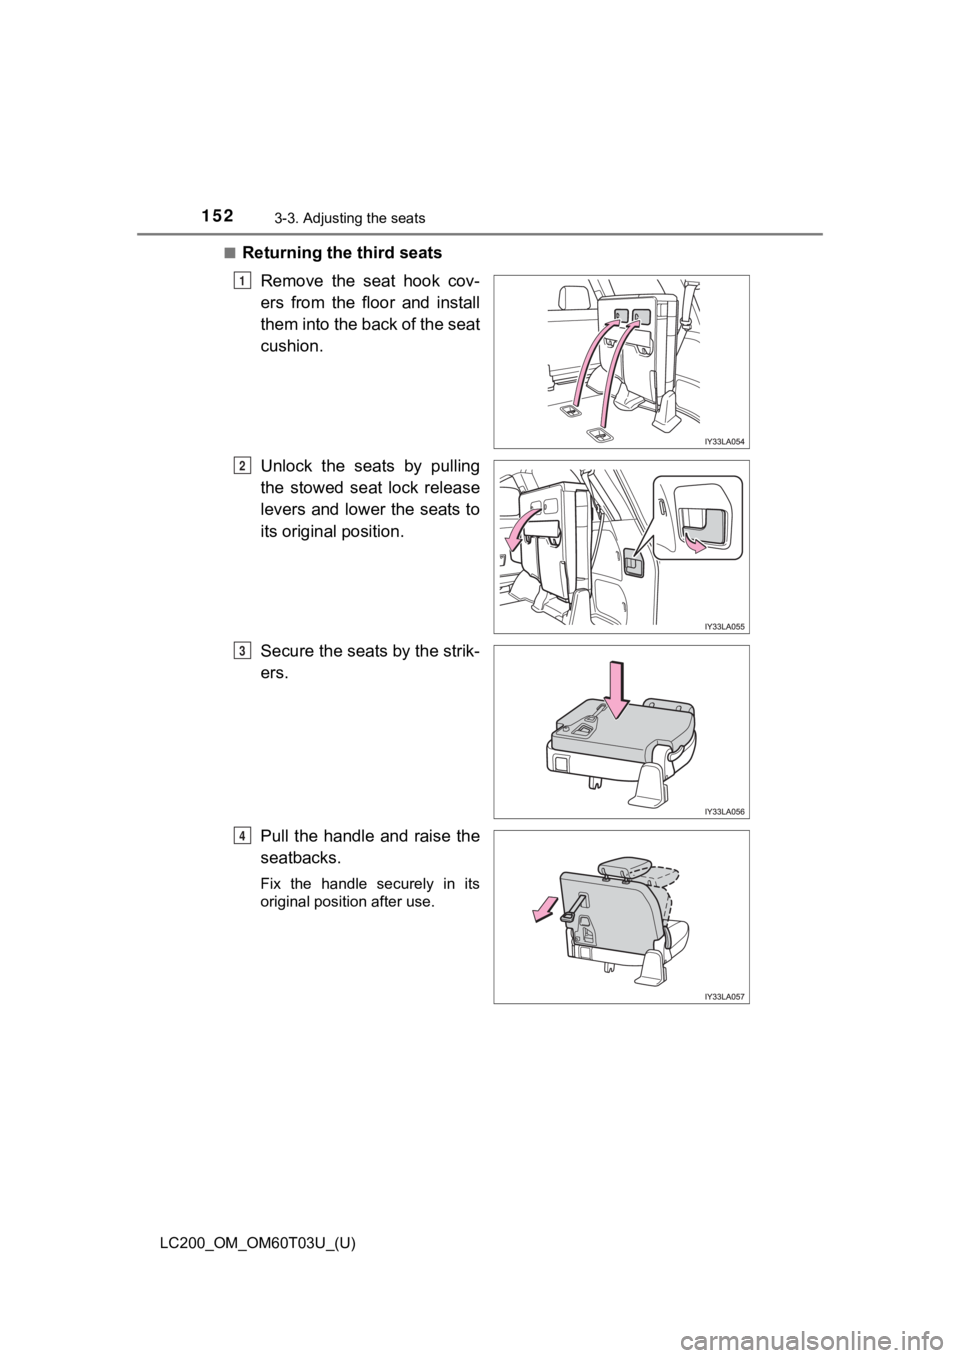
■Returning the third seatsRemove the seat hook cov-
ers from the floor and install
them into the back of the seat
cushion.
Unlock the seats by pulling
the stowed seat lock release
levers and lower the seats to
its original position.
Secure the seats by the strik-
ers.
Pull the handle and raise the
seatbacks.
Fix the handle securely in its
original position after use.
1
2
3
4
Page 160 of 632
160
LC200_OM_OM60T03U_(U)
3-3. Adjusting the seats
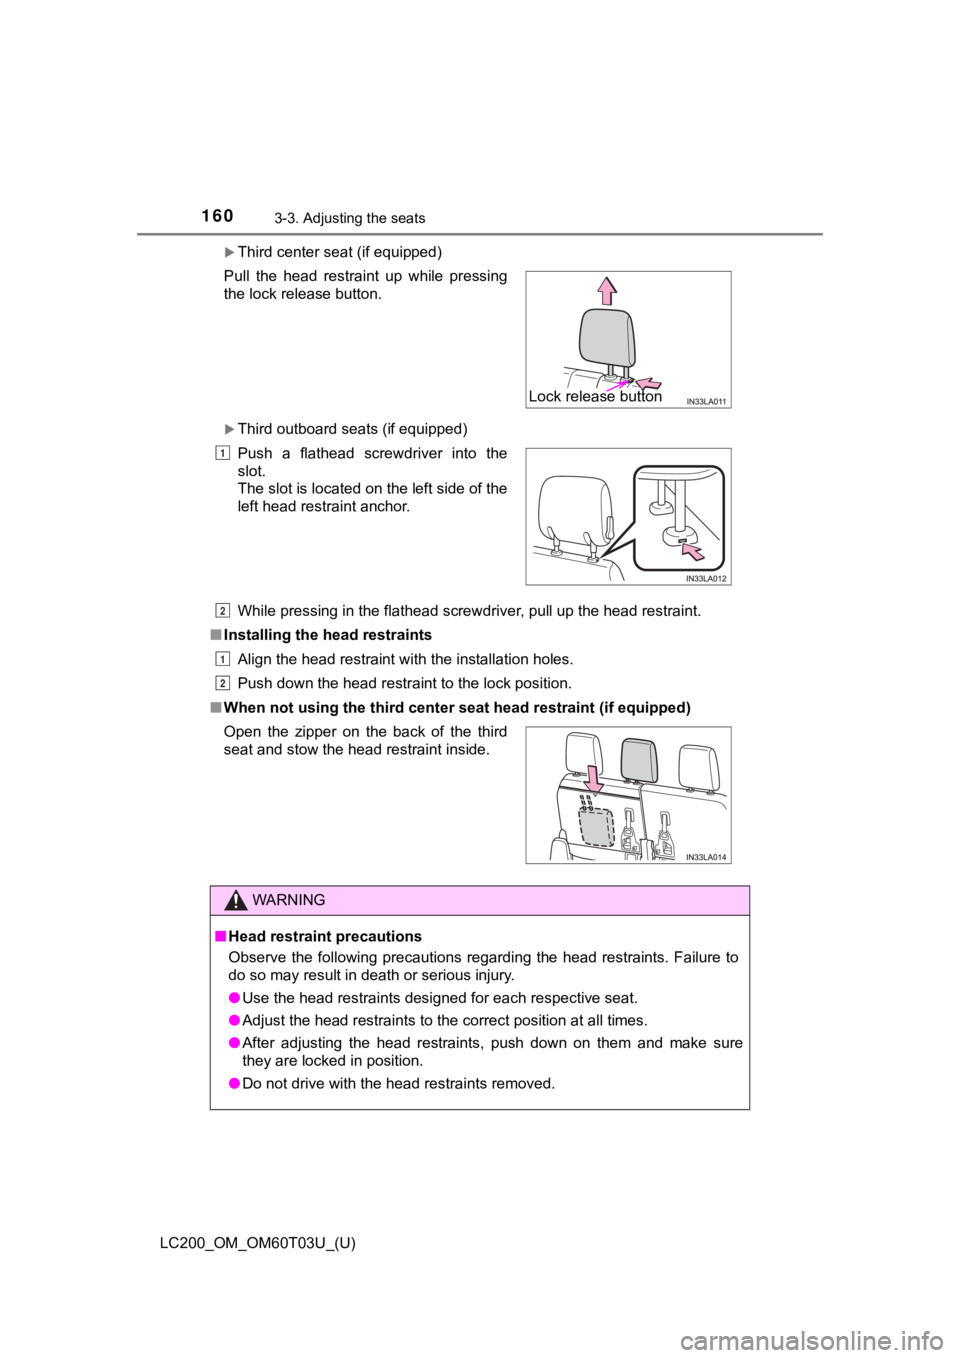
Third center seat (if equipped)
Third outboard seats (if equipped)
While pressing in the flathead screwdriver, pull up the head restraint.
■ Installing the head restraints
Align the head restraint with the installation holes.
Push down the head restraint to the lock position.
■ When not using the third center seat head restraint (if equippe d)
Pull the head restraint up while pressing
the lock release button.
Push a flathead screwdriver into the
slot.
The slot is located on the left side of the
left head restraint anchor.
Open the zipper on the back of the third
seat and stow the head restraint inside.
WARNING
■ Head restraint precautions
Observe the following precautions regarding the head restraints. Failure to
do so may result in death or serious injury.
● Use the head restraints designed for each respective seat.
● Adjust the head restraints to the correct position at all times.
● After adjusting the head restraints, push down on them and make sure
they are locked in position.
● Do not drive with the head restraints removed.
Lock release button
1
2
1
2
Page 396 of 632
3965-1. Using the air conditioning system and defogger
LC200_OM_OM60T03U_(U)
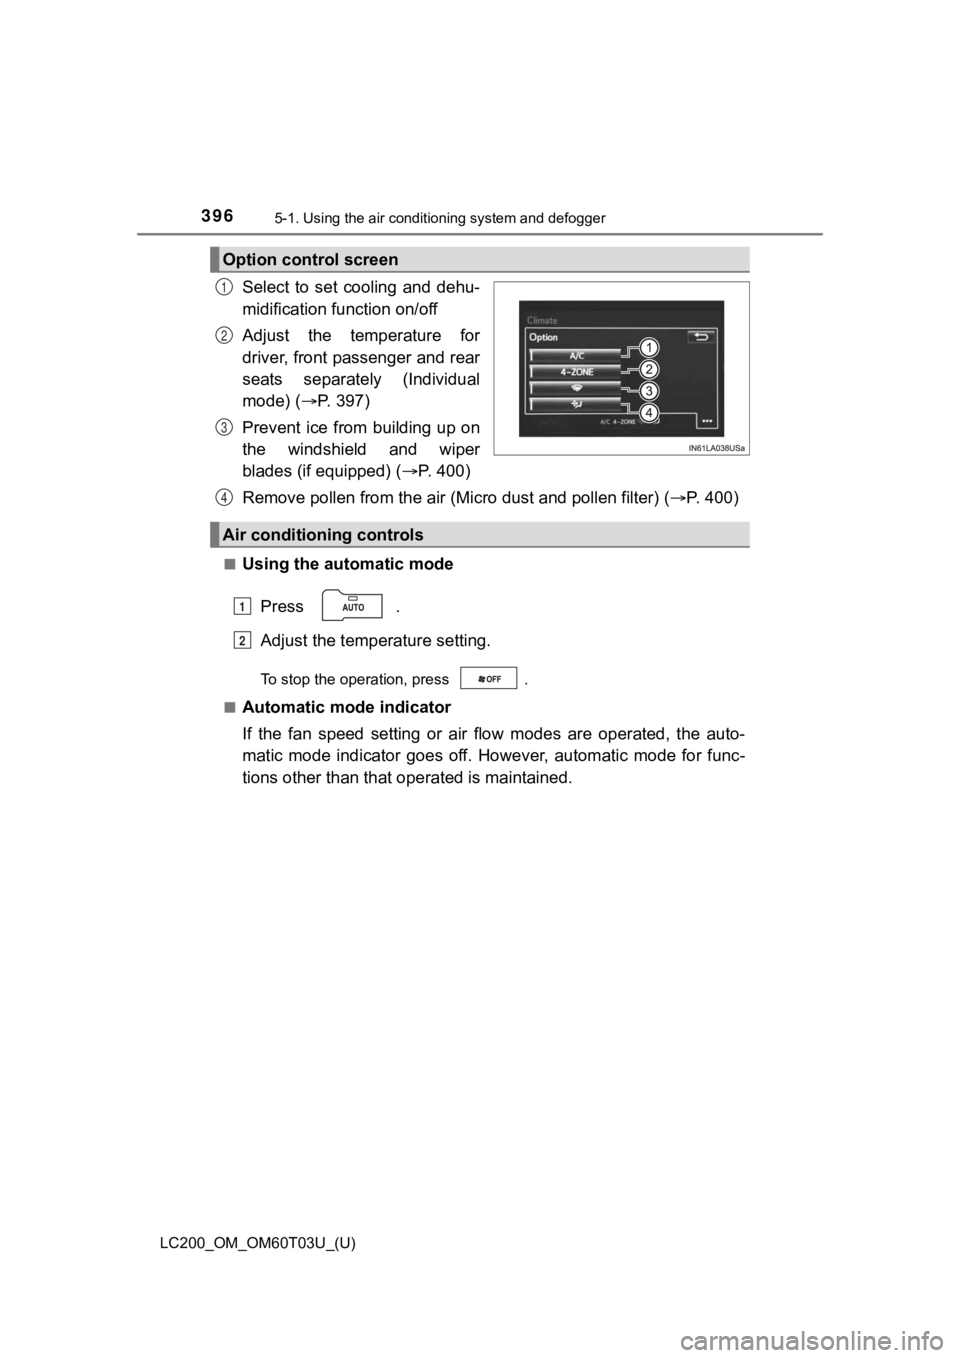
Select to set cooling and dehu-
midification function on/off
Adjust the temperature for
driver, front passenger and rear
seats separately (Individual
mode) (P. 3 9 7 )
Prevent ice from building up on
the windshield and wiper
blades (if equipped) ( P. 400)
Remove pollen from the air (Mi cro dust and pollen filter) (P. 400)
■Using the automatic mode
Press .
Adjust the temperature setting.
To stop the operation, press .
■
Automatic mode indicator
If the fan speed setting or air flow modes are operated, the au to-
matic mode indicator goes off. However, automatic mode for func -
tions other than that o perated is maintained.
Option control screen
1
2
3
Air conditioning controls
4
1
2