ECO mode TOYOTA MATRIX 2009 E140 / 2.G Owners Manual
[x] Cancel search | Manufacturer: TOYOTA, Model Year: 2009, Model line: MATRIX, Model: TOYOTA MATRIX 2009 E140 / 2.GPages: 440, PDF Size: 9.39 MB
Page 26 of 440
26
1-2. Opening, closing and locking the doors
Wireless remote control (if equipped)
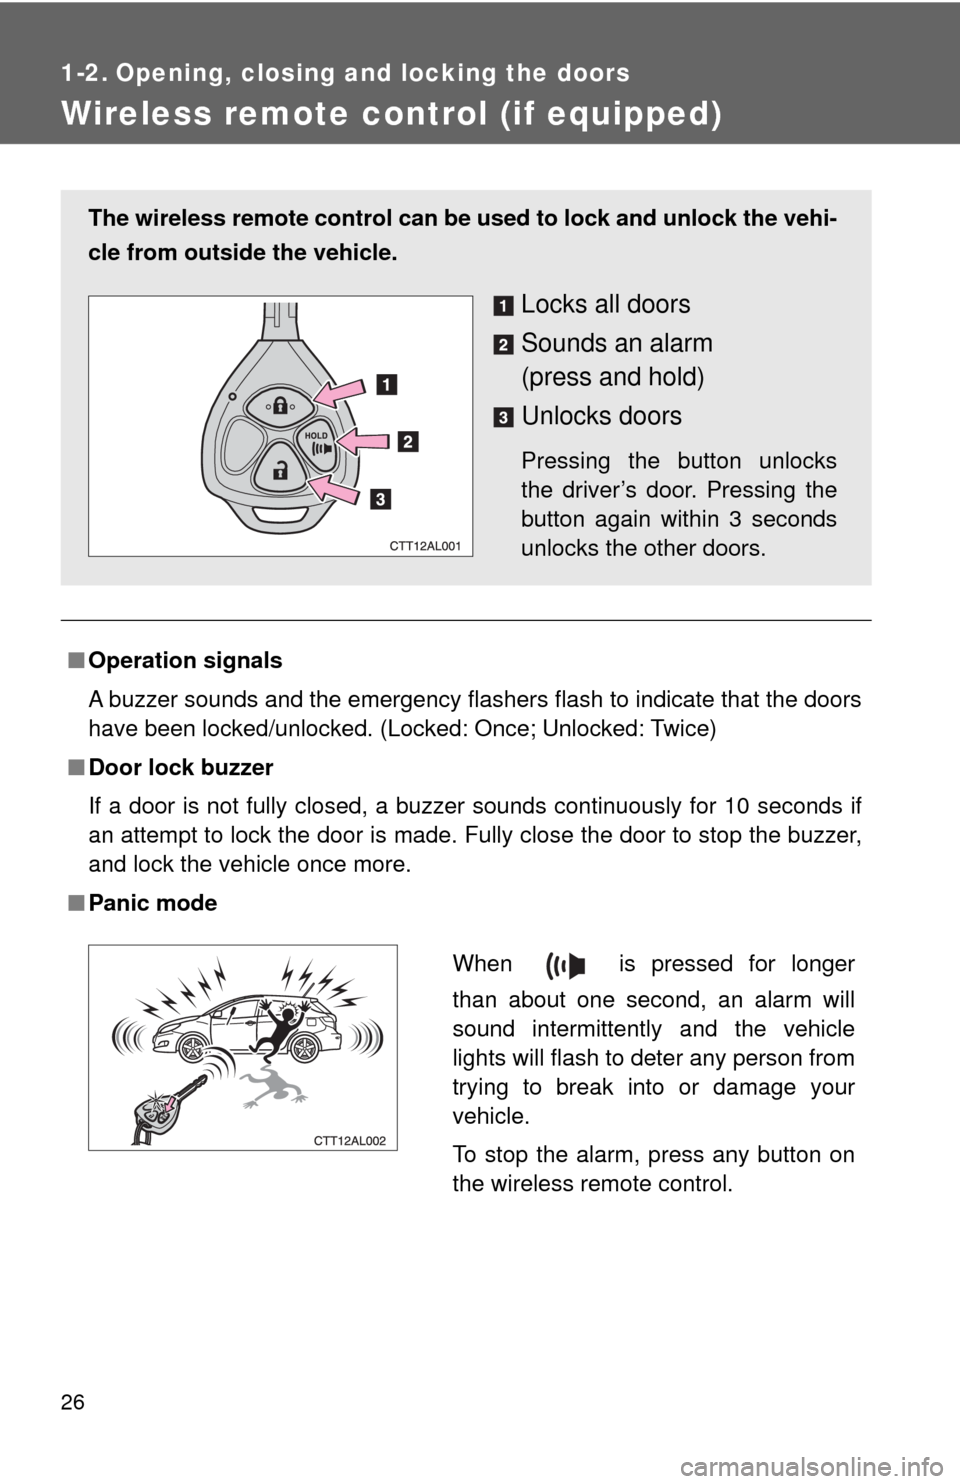
■Operation signals
A buzzer sounds and the emergency flashers flash to indicate that the doors
have been locked/unlocked. (Locked: Once; Unlocked: Twice)
■Door lock buzzer
If a door is not fully closed, a buzzer sounds continuously for 10 seconds if
an attempt to lock the door is made. Fully close the door to stop the buzzer,
and lock the vehicle once more.
■Panic mode
The wireless remote control can be used to lock and unlock the vehi-
cle from outside the vehicle.
Locks all doors
Sounds an alarm
(press and hold)
Unlocks doors
Pressing the button unlocks
the driver’s door. Pressing the
button again within 3 seconds
unlocks the other doors.
When is pressed for longer
than about one second, an alarm will
sound intermittently and the vehicle
lights will flash to deter any person from
trying to break into or damage your
vehicle.
To stop the alarm, press any button on
the wireless remote control.
Page 103 of 440

103 2-1. Driving procedures
2
When driving
CAUTION
■When taking a nap in the vehicle
Always turn the engine off. Otherwise, you may accidentally move the shift
lever or depress the accelerator pedal, which could cause an accident or fire
due to engine overheating. Additionally, if the vehicle is parked in a poorly
ventilated area, exhaust gases may collect and enter the vehicle, leading to
death or a serious health hazard.
■When braking the vehicle
●When the brakes are wet, drive more cautiously. Braking distance
increases when the brakes are wet, and may cause one side of the vehicle
to brake differently than the other side. Also the parking brake may not
securely hold the vehicle.
●If the power brake assist function does not operate, do not follow other
vehicles closely and avoid downhills or sharp turns that require braking.
In this case, braking is still possible, but it will require more force on the
pedal than usual. Braking distance may also increase.
●Do not pump the brake pedal if the engine stalls.
Each push on the brake pedal uses up the reserve for the power-assisted
brakes.
●The brake system consists of 2 individual hydraulic systems: If one of the
systems fails, the other will still operate. In this case, the brake pedal
should be depressed more firmly than usual and braking distance
becomes longer.
Do not drive your vehicle with only a single brake system. Have your
brakes fixed immediately.
■If the vehicle becomes stuck or bogged (AWD models)
Do not spin the wheels recklessly when any of the tires is up in the air, or
stuck in sand or mud, etc. This may damage the drive system components
or propel the vehicle forward (or in another direction) and cause an accident.
Page 130 of 440
130 2-3. Operating the lights and wipers
■The windshield wipers and washers can be operated when
The engine switch is in the “ON” position.
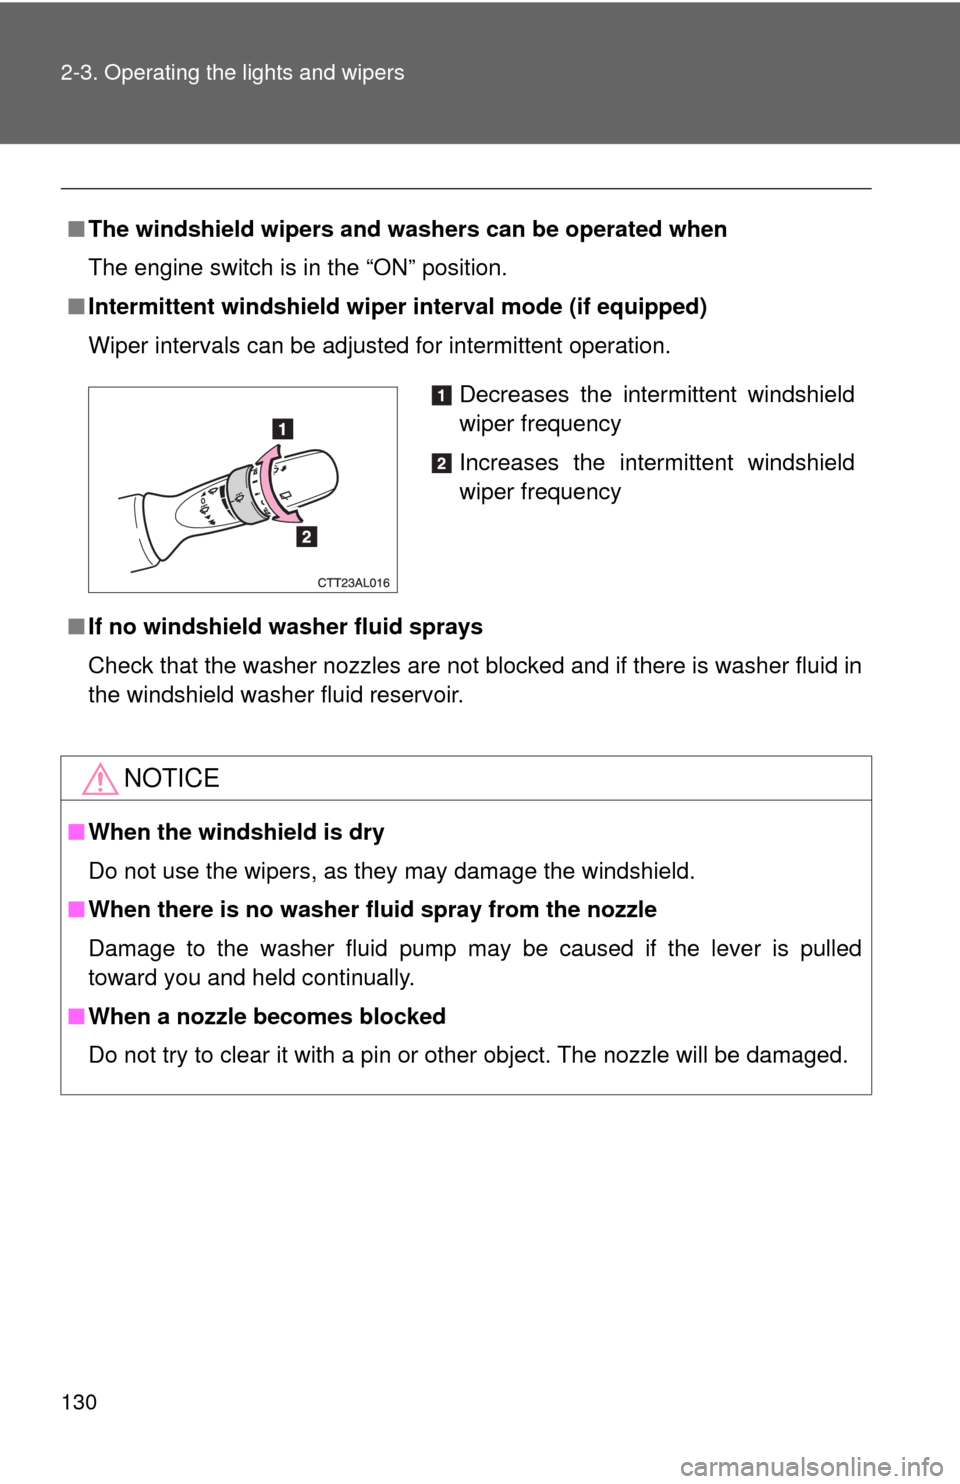
■Intermittent windshield wiper interval mode (if equipped)
Wiper intervals can be adjusted for intermittent operation.
■If no windshield washer fluid sprays
Check that the washer nozzles are not blocked and if there is washer fluid in
the windshield washer fluid reservoir.
NOTICE
■When the windshield is dry
Do not use the wipers, as they may damage the windshield.
■When there is no washer fluid spray from the nozzle
Damage to the washer fluid pump may be caused if the lever is pulled
toward you and held continually.
■When a nozzle becomes blocked
Do not try to clear it with a pin or other object. The nozzle will be damaged.
Decreases the intermittent windshield
wiper frequency
Increases the intermittent windshield
wiper frequency
Page 172 of 440
172
3-2. Using the audio system
Using the radio
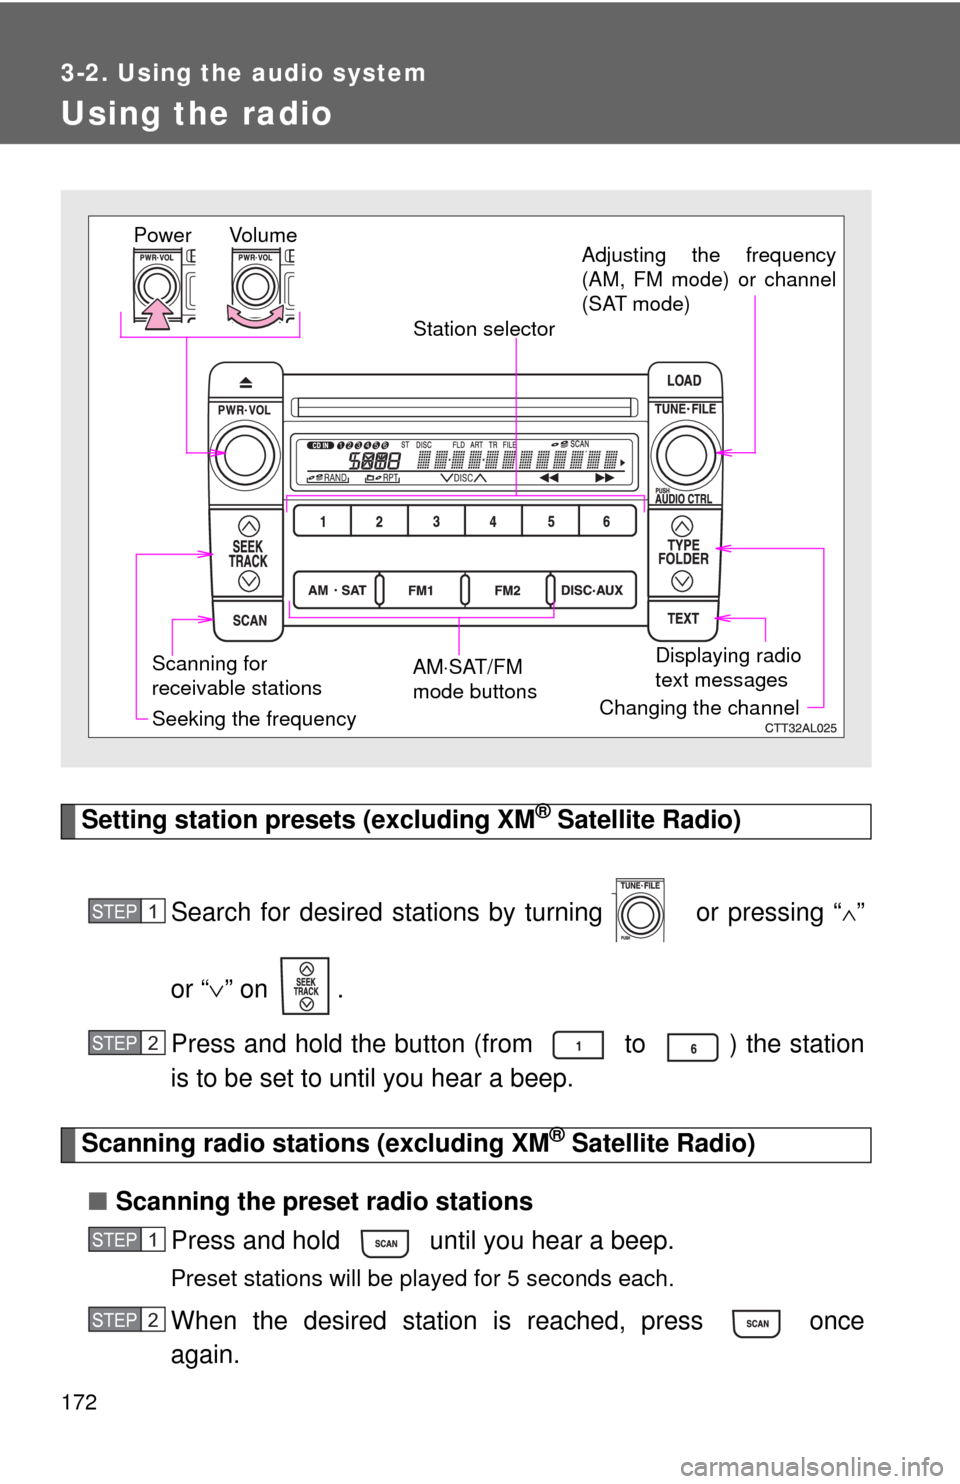
Setting station presets (excluding XM® Satellite Radio)
Search for desired stations by turning or pressing “
∧”
or “∨” on .
Press and hold the button (from to ) the station
is to be set to until you hear a beep.
Scanning radio stations (excluding XM® Satellite Radio)
■Scanning the preset radio stations
Press and hold until you hear a beep.
Preset stations will be played for 5 seconds each.
When the desired station is reached, press once
again.
Vo l u m e
Scanning for
receivable stationsStation selector
Seeking the frequencyAdjusting the frequency
(AM, FM mode) or channel
(SAT mode)
AM⋅SAT/FM
mode buttonsPower
Displaying radio
text messages
Changing the channel
STEP1
STEP2
STEP1
STEP2
Page 189 of 440
189 3-2. Using the audio system
3
Interior features
■MP3 and WMA files
MP3 (MPEG Audio LAYER3) is a standard audio compression format.
Files can be compressed to approximately 1/10 of their original size by using
MP3 compression.
WMA (Windows Media
TM Audio) is a Microsoft audio compression format.
This format compresses audio data to a size smaller than that of the MP3
format.
There is a limit to the MP3 and WMA file standards and to the media/formats
recorded by them that can be used.
●MP3 file compatibility
• Compatible standards
MP3 (MPEG1 LAYER3, MPEG2 LSF LAYER3)
• Compatible sampling frequencies
MPEG1 LAYER3: 32, 44.1, 48 (kHz)
MPEG2 LSF LAYER3: 16, 22.05, 24 (kHz)
• Compatible bit rates (compatible with VBR)
MPEG1 LAYER3: 64, 80, 96, 112, 128, 160, 192, 224, 256, 320 (kbps)
MPEG2 LSF LAYER3: 64, 80, 96, 112, 128, 144, 160 (kbps)
• Compatible channel modes: stereo, joint stereo, dual channel and
monaural
●WMA file compatibility
• Compatible standards
WMA Ver. 7, 8, 9
• Compatible sampling frequencies
32, 44.1, 48 (kHz)
• Compatible bit rates (only compatible with 2-channel playback)
Ver. 7, 8: CBR 48, 64, 80, 96, 128, 160, 192 (kbps)
Ver. 9: CBR 48, 64, 80, 96, 128, 160, 192, 256, 320 (kbps)
Page 190 of 440

190 3-2. Using the audio system
●Compatible media
Media that can be used for MP3 and WMA playback are CD-Rs and CD-
RWs.
Playback in some instances may not be possible, depending on the status
of the CD-R or CD-RW. Playback may not be possible or the audio may
jump if the disc is scratched or marked with fingerprints.
●Compatible disc formats
The following disc formats can be used.
• Disc formats: CD-ROM Mode 1 and Mode 2
CD-ROM XA Mode 2, Form 1 and Form 2
• File formats: ISO9660 Level 1, Level 2, (Romeo, Joliet)
MP3 and WMA files written in any format other than those listed above
may not play correctly, and their file names and folder names may not
be displayed correctly.
Items related to standards and limitations are as follows.
• Maximum directory hierarchy: 8 levels
• Maximum length of folder names/file names: 32 characters
• Maximum number of folders: 192 (including the root)
• Maximum number of files per disc: 255
●File names
The only files that can be recognized as MP3/WMA and played are those
with the extension .mp3 or .wma.
●Multi-sessions
As the audio system is compatible with multi-sessions, it is possible to play
discs that contain MP3 and WMA files. However, only the first session can
be played.
Page 207 of 440
207 3-3. Using the hands-free phone system (for cellular phone)
3
Interior features
Using the hands-free phone system for the first time
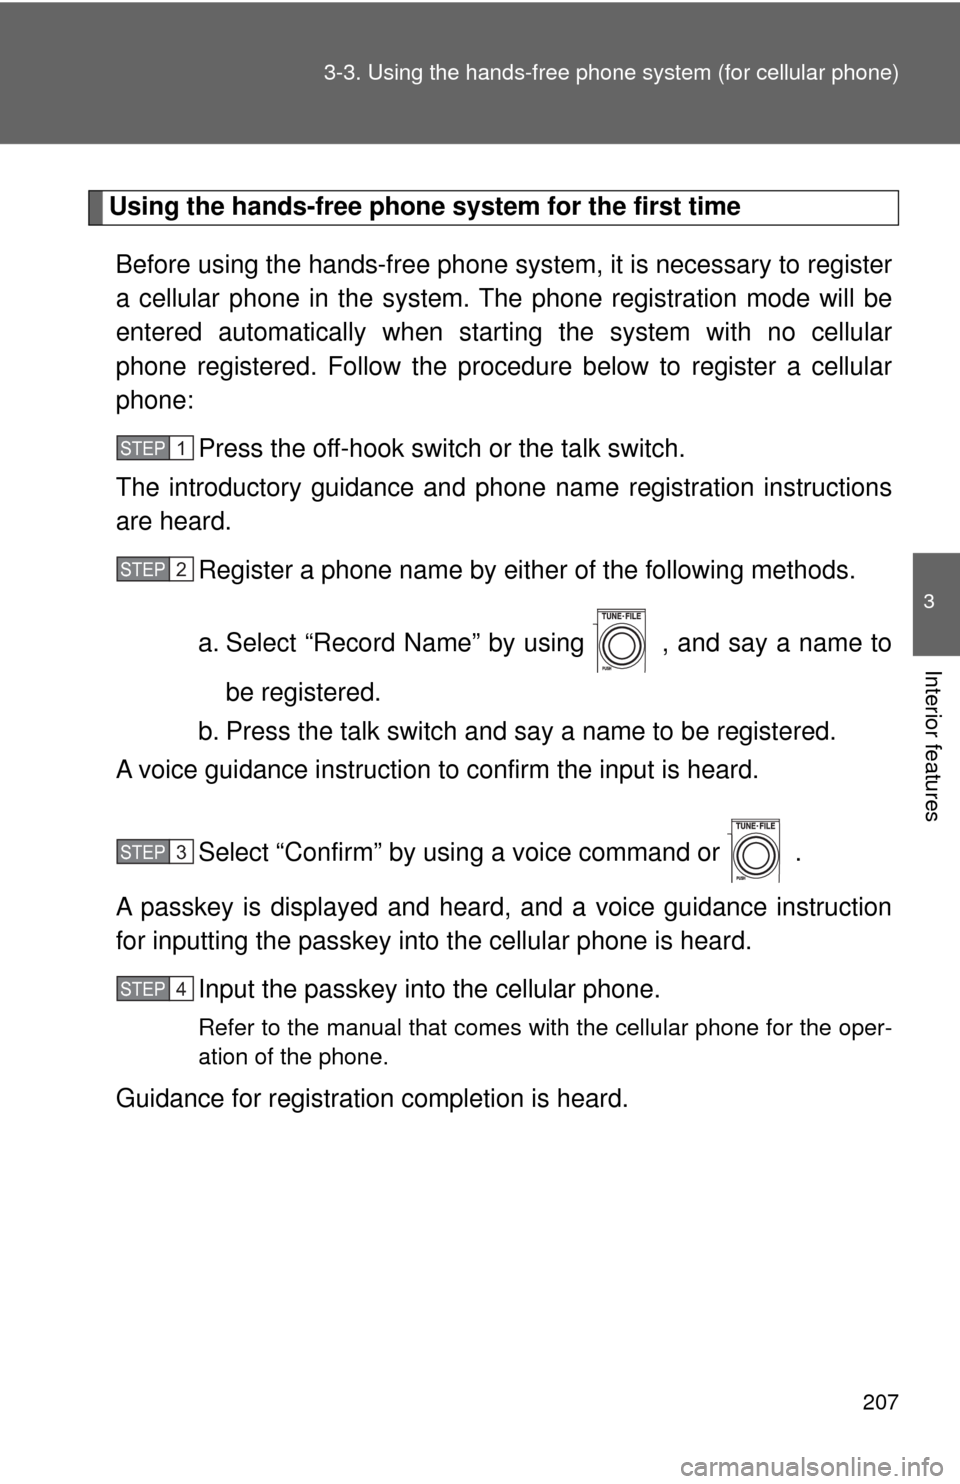
Before using the hands-free phone system, it is necessary to register
a cellular phone in the system. The phone registration mode will be
entered automatically when starting the system with no cellular
phone registered. Follow the procedure below to register a cellular
phone:
Press the off-hook switch or the talk switch.
The introductory guidance and phone name registration instructions
are heard.
Register a phone name by either of the following methods.
a. Select “Record Name” by using , and say a name to
be registered.
b. Press the talk switch and say a name to be registered.
A voice guidance instruction to confirm the input is heard.
Select “Confirm” by using a voice command or .
A passkey is displayed and heard, and a voice guidance instruction
for inputting the passkey into the cellular phone is heard.
Input the passkey into the cellular phone.
Refer to the manual that comes with the cellular phone for the oper-
ation of the phone.
Guidance for registration completion is heard.
STEP1
STEP2
STEP3
STEP4
Page 303 of 440
303
4-3. Do-it-yourself maintenance
4
Maintenance and care
Tires
Replace or rotate tires in accordance with maintenance sched-
ules and treadwear.
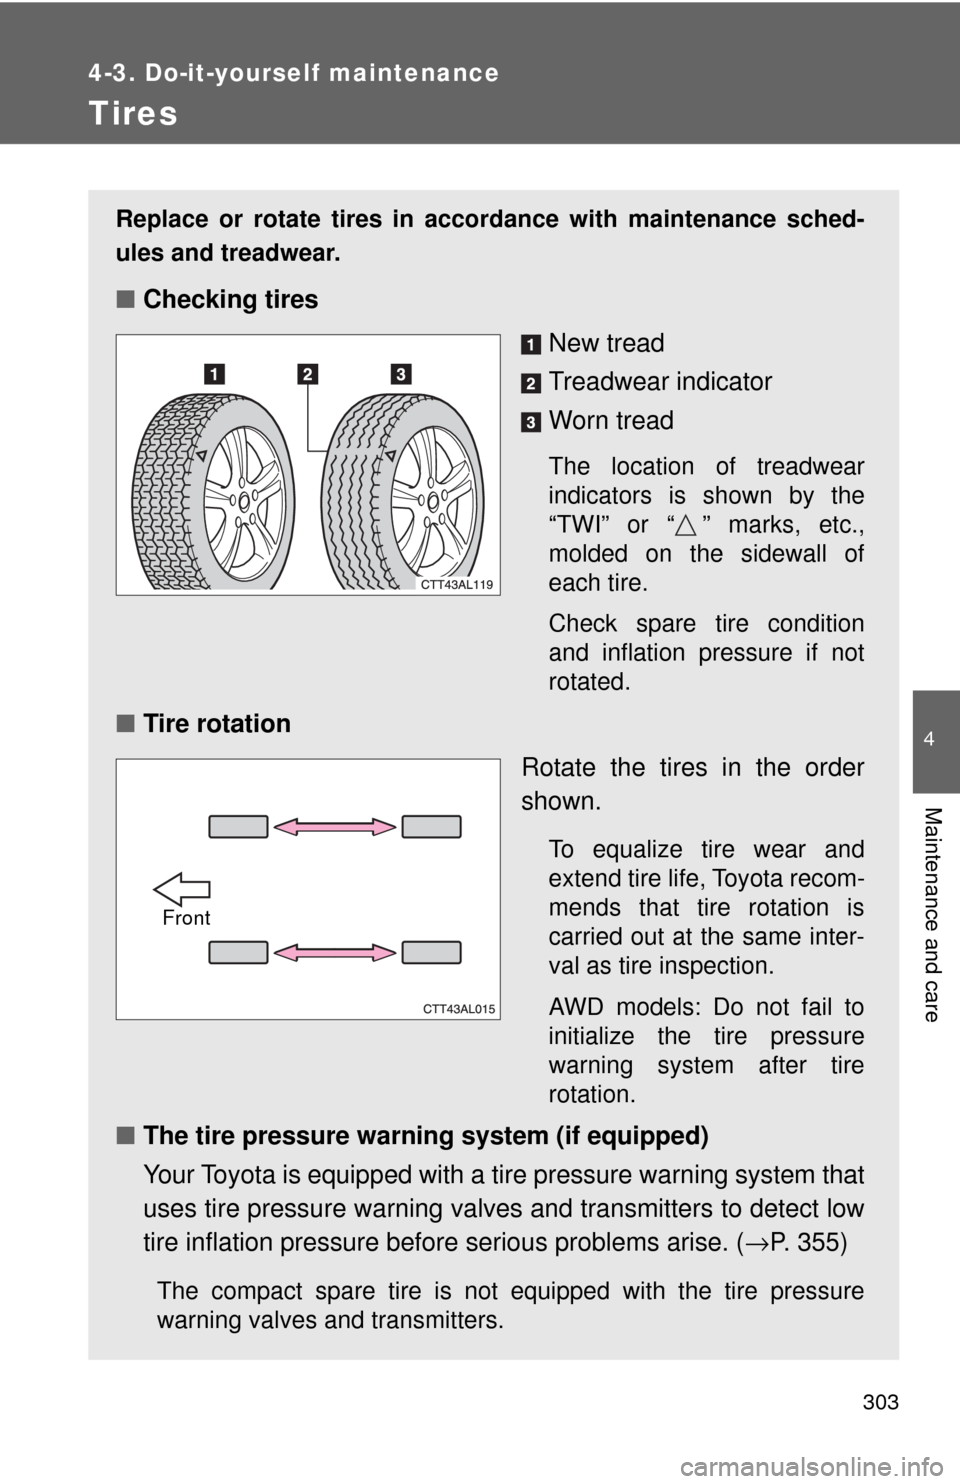
■Checking tires
New tread
Treadwear indicator
Worn tread
The location of treadwear
indicators is shown by the
“TWI” or “ ” marks, etc.,
molded on the sidewall of
each tire.
Check spare tire condition
and inflation pressure if not
rotated.
■Tire rotation
Rotate the tires in the order
shown.
To equalize tire wear and
extend tire life, Toyota recom-
mends that tire rotation is
carried out at the same inter-
val as tire inspection.
AWD models: Do not fail to
initialize the tire pressure
warning system after tire
rotation.
■The tire pressure warning system (if equipped)
Your Toyota is equipped with a tire pressure warning system that
uses tire pressure warning valves and transmitters to detect low
tire inflation pressure before serious problems arise. (→P. 355)
The compact spare tire is not equipped with the tire pressure
warning valves and transmitters.
Front
Page 310 of 440

310 4-3. Do-it-yourself maintenance
CAUTION
■When inspecting or replacing tires
Observe the following precautions to prevent accidents. Failure to do so
may cause damage to parts of the drive train, as well as dangerous han-
dling characteristics, which may lead to fatal or injury accidents.
●Do not mix tires of different makes, models, tread patterns or tread-
wear.
●Do not use tire sizes other than those recommended by Toyota.
●Do not mix radial, bias-belted, or bias-ply tires.
●Do not mix summer, all season and winter tires.
■When initializing the tire pressure warning system
Do not push the tire pressure warning reset switch without first adjusting
the tire inflation pressure to the specified level. Otherwise, the tire pres-
sure warning light may not come on even if the tire inflation pressure is
low, or it may come on when the tire inflation pressure is actually normal.
Page 346 of 440
346 5-1. Essential information
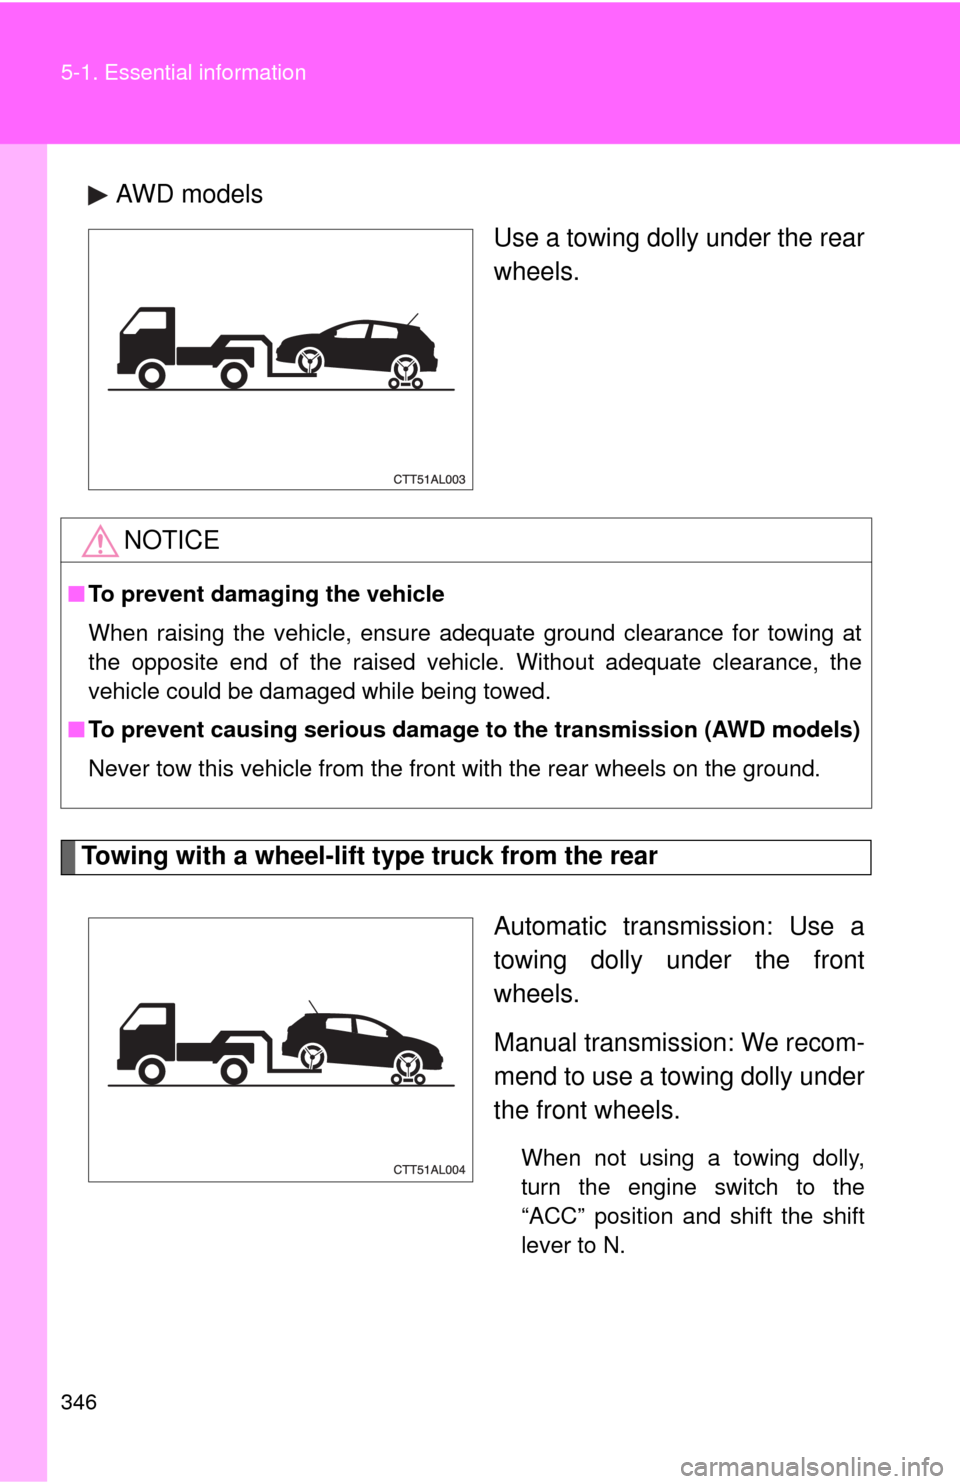
AWD models
Use a towing dolly under the rear
wheels.
Towing with a wheel-lift type truck from the rear
Automatic transmission: Use a
towing dolly under the front
wheels.
Manual transmission: We recom-
mend to use a towing dolly under
the front wheels.
When not using a towing dolly,
turn the engine switch to the
“ACC” position and shift the shift
lever to N.
NOTICE
■To prevent damaging the vehicle
When raising the vehicle, ensure adequate ground clearance for towing at
the opposite end of the raised vehicle. Without adequate clearance, the
vehicle could be damaged while being towed.
■To prevent causing serious damage to the transmission (AWD models)
Never tow this vehicle from the front with the rear wheels on the ground.