jump start TOYOTA MATRIX 2009 E140 / 2.G Owners Manual
[x] Cancel search | Manufacturer: TOYOTA, Model Year: 2009, Model line: MATRIX, Model: TOYOTA MATRIX 2009 E140 / 2.GPages: 440, PDF Size: 9.39 MB
Page 379 of 440

5
When trouble arises
379
5-2. Steps to take in an emergency
If the battery is discharged
The following procedures may be used to start the engine if the vehi-
cle's battery is discharged.
You can call your Toyota dealer or qualified repair shop.
If you have a set of jumper (or booster) cables and a second vehi-
cle with a 12-volt battery, you can jump start your Toyota following
the steps below.
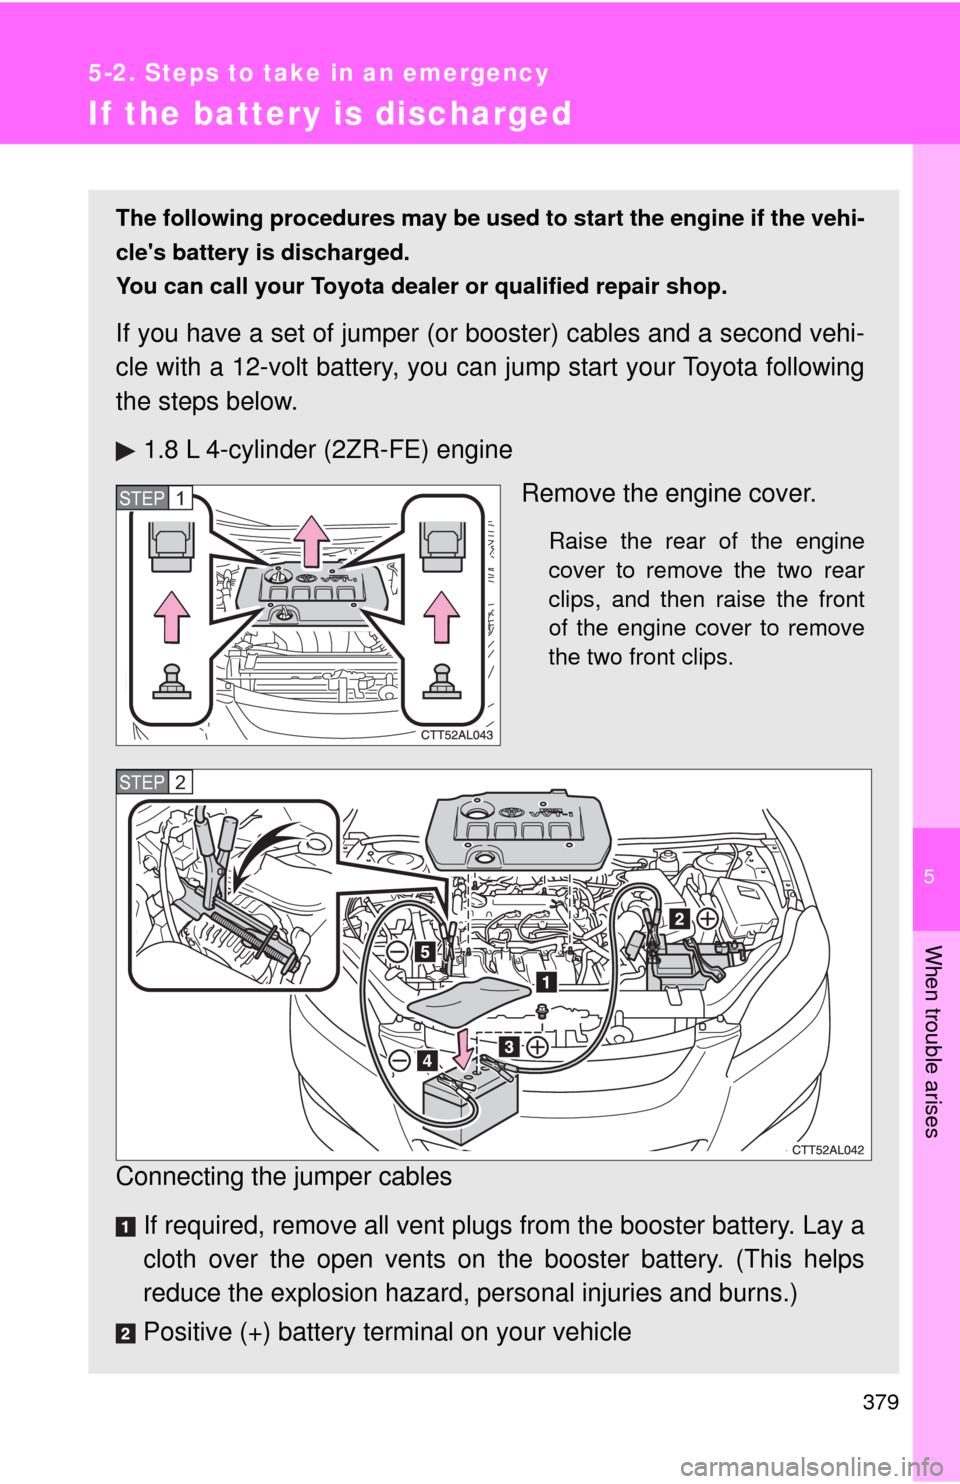
1.8 L 4-cylinder (2ZR-FE) engine
Remove the engine cover.
Raise the rear of the engine
cover to remove the two rear
clips, and then raise the front
of the engine cover to remove
the two front clips.
Connecting the jumper cables
If required, remove all vent plugs from the booster battery. Lay a
cloth over the open vents on the booster battery. (This helps
reduce the explosion hazard, personal injuries and burns.)
Positive (+) battery terminal on your vehicle
STEP5STEP1
STEP2
Page 380 of 440

380 5-2. Steps to take in an emergency
Positive (+) battery terminal on the second vehicle
Negative (-) battery terminal on the second vehicle
Connect the jumper cable to ground on your vehicle as shown in
the illustration.
Start the engine of the second vehicle. Increase the engine
speed slightly and maintain at that level for approximately 5
minutes to recharge the battery of your vehicle.
Maintain the engine speed of the second vehicle, and turn
the engine switch to the “ON” position then start the vehi-
cle's engine.
Once the vehicle’s engine has started, remove the jumper
cables in the exact reverse order in which they were con-
nected.
Once the engine starts, have the vehicle checked at your Toyota
dealer as soon as possible.
STEP3
STEP4
STEP5
Page 381 of 440

5
When trouble arises
381 5-2. Steps to take in an emergency
2.4 L 4-cylinder (2AZ-FE) engine
Connecting the jumper cables
If required, remove all vent plugs from the booster battery. Lay a
cloth over the open vents on the booster battery. (This helps
reduce the explosion hazard, personal injuries and burns.)
Positive (+) battery terminal on your vehicle
Positive (+) battery terminal on the second vehicle
Negative (-) battery terminal on the second vehicle
Connect the jumper cable to ground on your vehicle as shown in
the illustration.
Start the engine of the second vehicle. Increase the engine
speed slightly and maintain at that level for approximately 5
minutes to recharge the battery of your vehicle.
Maintain the engine speed of the second vehicle, and turn
the engine switch to the “ON” position then start the vehi-
cle's engine.
STEP1
STEP2
STEP3
Page 382 of 440

382 5-2. Steps to take in an emergency
■Avoiding a discharged battery
●Turn off the headlights and the audio system while the engine is turned
off.
●Turn off any unnecessary electrical components when the vehicle is run-
ning at a low speed for an extended period, such as in heavy traffic, etc.
■When the battery is removed or discharged
The tire pressure warning system must be initialized.
(→P. 304)
Once the vehicle’s engine has started, remove the jumper
cables in the exact reverse order in which they were con-
nected.
Once the engine starts, have the vehicle checked at your Toyota
dealer as soon as possible.STEP4
Page 384 of 440

384 5-2. Steps to take in an emergency
NOTICE
■To prevent damage to the vehicle
Do not pull- or push-start the vehicle, because the catalytic converter may
overheat and become a fire hazard.
■When handling jumper cables
Be careful that the jumper cables do not become tangled in the cooling fans
or any of the belts when connecting or disconnecting them.
■When attaching the engine cover
Ensure that the rubber grommets remain attached to the engine cover. If the
grommet is attached to the bolts, transfer grommets to the engine cover.