check engine TOYOTA MATRIX 2010 E140 / 2.G User Guide
[x] Cancel search | Manufacturer: TOYOTA, Model Year: 2010, Model line: MATRIX, Model: TOYOTA MATRIX 2010 E140 / 2.GPages: 448, PDF Size: 9.74 MB
Page 128 of 448
128 2-2. Instrument cluster
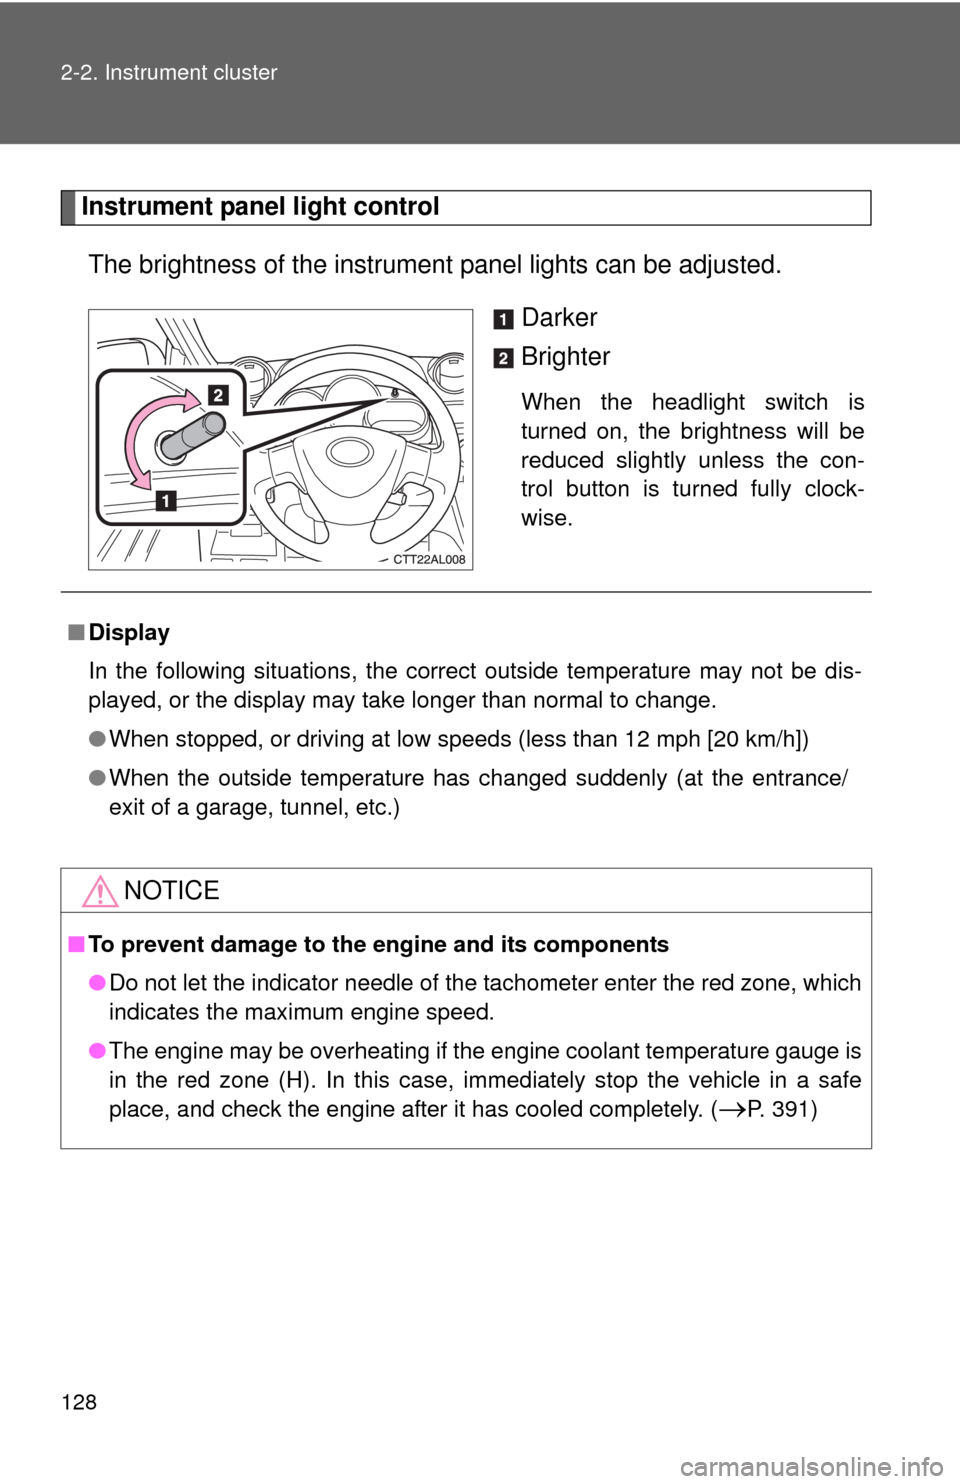
Instrument panel light control
The brightness of the instrument panel lights can be adjusted.
Darker
Brighter
When the headlight switch is
turned on, the brightness will be
reduced slightly unless the con-
trol button is turned fully clock-
wise.
■Display
In the following situations, the correct outside temperature may not be dis-
played, or the display may take longer than normal to change.
●When stopped, or driving at low speeds (less than 12 mph [20 km/h])
●When the outside temperature has changed suddenly (at the entrance/
exit of a garage, tunnel, etc.)
NOTICE
■To prevent damage to the engine and its components
●Do not let the indicator needle of the tachometer enter the red zone, which
indicates the maximum engine speed.
●The engine may be overheating if the engine coolant temperature gauge is
in the red zone (H). In this case, immediately stop the vehicle in a safe
place, and check the engine after it has cooled completely. (
P. 391)
Page 131 of 448
131 2-2. Instrument cluster
2
When driving
CAUTION
■If a safety system warning light does not come on
Should a safety system light such as the ABS or the SRS airbag warning
light not come on when you start the engine, this could mean that these sys-
tems are not available to help protect you in an accident, which could result
in death or serious injury. Have the vehicle inspected by your Toyota dealer
immediately if this occurs.
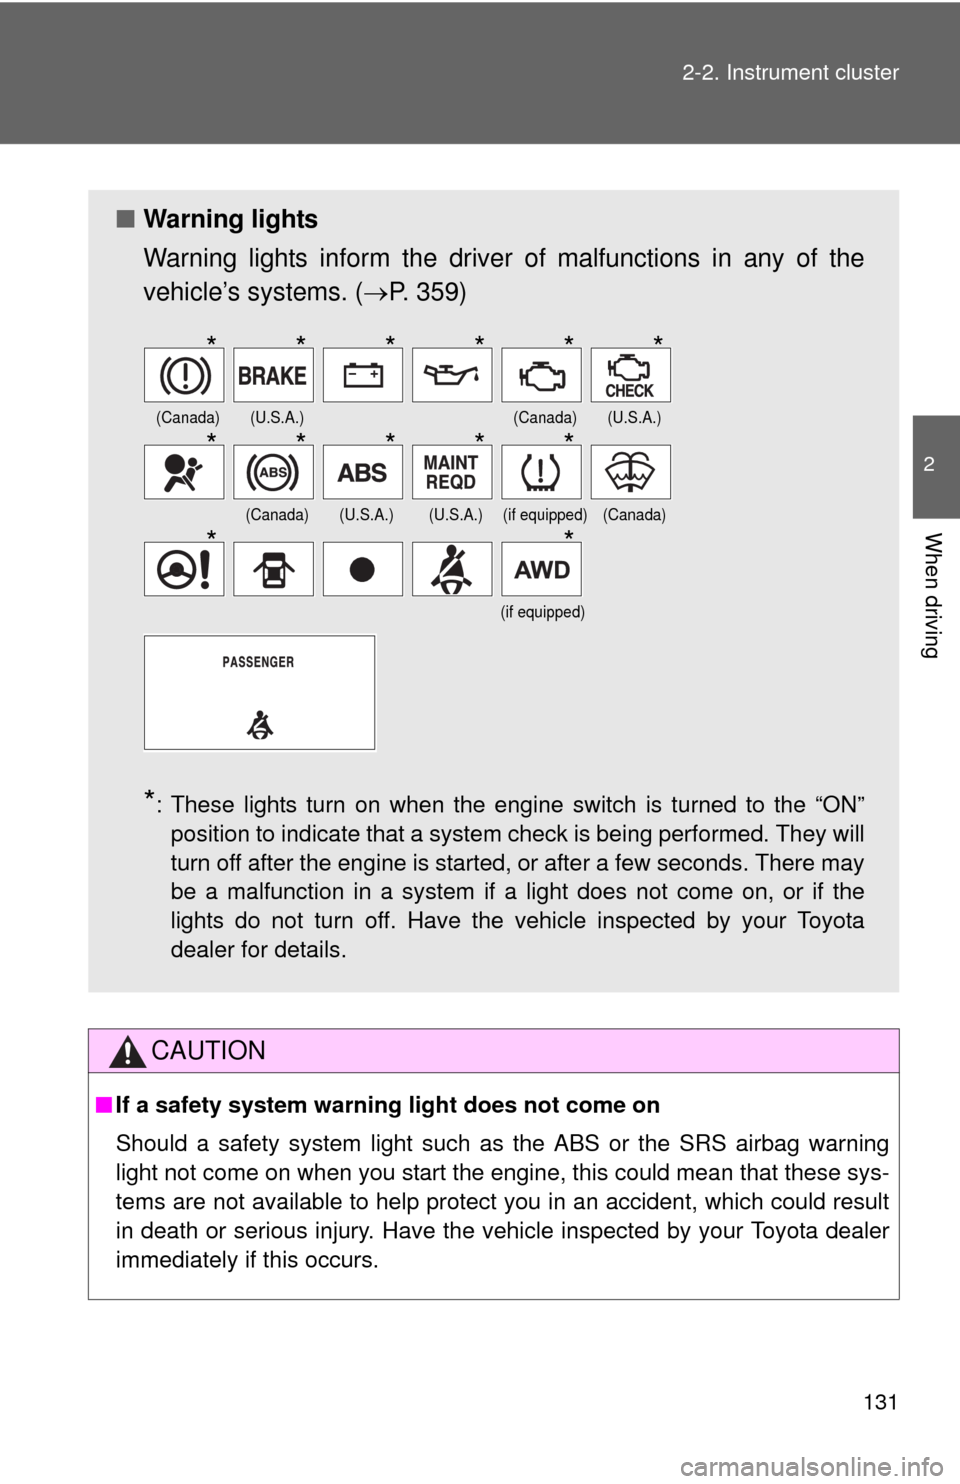
■Warning lights
Warning lights inform the driver of malfunctions in any of the
vehicle’s systems. (P. 359)
*: These lights turn on when the engine switch is turned to the “ON”
position to indicate that a system check is being performed. They will
turn off after the engine is started, or after a few seconds. There may
be a malfunction in a system if a light does not come on, or if the
lights do not turn off. Have the vehicle inspected by your Toyota
dealer for details.
(Canada)(U.S.A.)(Canada)(U.S.A.)
(Canada)(U.S.A.)(U.S.A.)(if equipped)(Canada)
(if equipped)
******
*****
**
Page 137 of 448

137 2-3. Operating the lights and wipers
2
When driving
■The windshield wipers and washers can be operated when
The engine switch is in the “ON” position.
■If no windshield washer fluid sprays
Check that the washer nozzles are not blocked and if there is washer fluid in
the windshield washer fluid reservoir.
NOTICE
■When the windshield is dry
Do not use the wipers, as they may damage the windshield.
■When there is no washer fluid spray from the nozzle
Damage to the washer fluid pump may be caused if the lever is pulled
toward you and held continually.
■When a nozzle becomes blocked
Do not try to clear it with a pin or other object. The nozzle will be damaged.
Page 151 of 448
151
2-5. Driving information
2
When driving
Winter driving tips
Carry out the necessary preparations and inspections before driving
the vehicle in winter. Always drive the vehicle in a manner appropri-
ate to the prevailing weather conditions.
■Pre-winter preparations
●Use fluids that are appropriate to the prevailing outside tem-
peratures.
• Engine oil
• Engine coolant
• Washer fluid
●Have a service technician inspect the level and specific grav-
ity of battery electrolyte.
●Have the vehicle fitted with four snow tires or purchase a set
of tire chains for the front tires.
Ensure that all tires are the same size and brand, and that chains
match the size of the tires.
■Before driving the vehicle
Perform the following according to the driving conditions.
●Do not try to forcibly open a window or move a wiper that is
frozen. Pour warm water over the frozen area to melt the ice.
Wipe away the water immediately to prevent it from freezing.
●To ensure proper operation of the climate control system fan,
remove any snow that has accumulated on the air inlet vents
in front of the windshield.
●Remove any ice that has accumulated on the vehicle chassis.
●Periodically check for and remove any excess ice or snow
that may have accumulated in the wheel well or on the
brakes.
Page 157 of 448

157 2-5. Driving information
2
When driving
■Before towing
●Ensure that your vehicle’s tires are properly inflated. (P. 317)
●Trailer tires should be inflated according to the trailer manufacturer's rec-
ommendation.
●All trailer lights must work in order to be legal.
●Confirm all lights work each time you connect them.
●Check that your vehicle remains level when a loaded or unloaded trailer
is hitched. Do not drive if the vehicle is not level, and check for improper
tongue load, overloading, worn suspension, or other possible causes.
●Make sure the trailer cargo is securely loaded.
●Check that your rear view mirrors conform to any federal, state/provincial
or local regulations. If they do not, install rear view mirrors appropriate for
towing purposes.
■Break-in schedule
Toyota recommends that you do not use a new vehicle or a vehicle with any
new power train components (engine, transmission, differential, wheel bear-
ings, etc.) to tow a trailer for the first 500 miles (800 km) of driving.
■Maintenance
●If you tow a trailer, your vehicle will require more frequent maintenance
due to the additional load. (See “Scheduled Maintenance Guide” or
“Owner's Manual Supplement”.)
●Retighten the fixing bolts of the towing ball and bracket after approxi-
mately 600 miles (1000 km) of trailer towing.
Page 273 of 448
Maintenance and care4
273
4-1. Maintenance and care
Cleaning and protecting
the vehicle exterior......... 274
Cleaning and protecting
the vehicle interior.......... 276
4-2. Maintenance
Maintenance
requirements .................. 279
General maintenance....... 281
Emission inspection and
maintenance (I/M)
programs........................ 2844-3. Do-it-yourself maintenance
Do-it-yourself service
precautions .................... 285
Hood ................................ 289
Positioning a floor jack ..... 291
Engine compartment ........ 294
Tires ................................. 308
Tire inflation pressure ...... 317
Wheels ............................. 321
Air conditioning filter......... 323
Key battery ....................... 325
Checking and replacing
fuses .............................. 328
Light bulbs........................ 337
Page 281 of 448
281
4-2. Maintenance
4
Maintenance and care
General maintenance
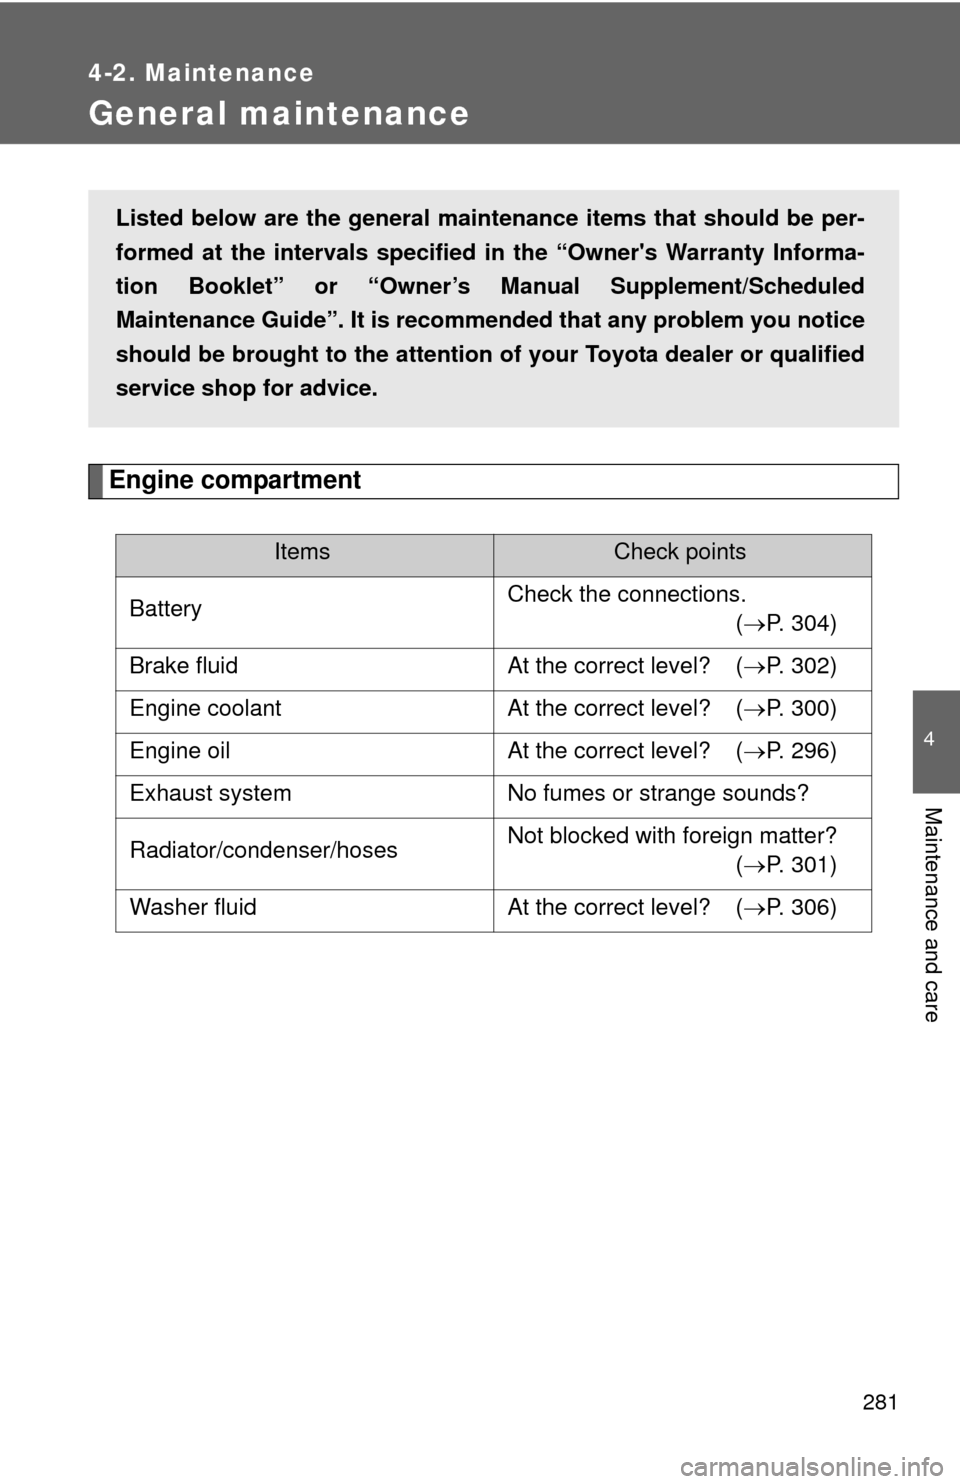
Engine compartment
ItemsCheck points
BatteryCheck the connections.
(P. 304)
Brake fluid At the correct level? (P. 302)
Engine coolant At the correct level? (P. 300)
Engine oil At the correct level? (P. 296)
Exhaust system No fumes or strange sounds?
Radiator/condenser/hosesNot blocked with foreign matter?
(P. 301)
Washer fluid At the correct level? (P. 306)
Listed below are the general maintenance items that should be per-
formed at the intervals specified in the “Owner's Warranty Informa-
tion Booklet” or “Owner’s Manual Supplement/Scheduled
Maintenance Guide”. It is recommended that any problem you notice
should be brought to the attention of your Toyota dealer or qualified
service shop for advice.
Page 283 of 448
283 4-2. Maintenance
4
Maintenance and care
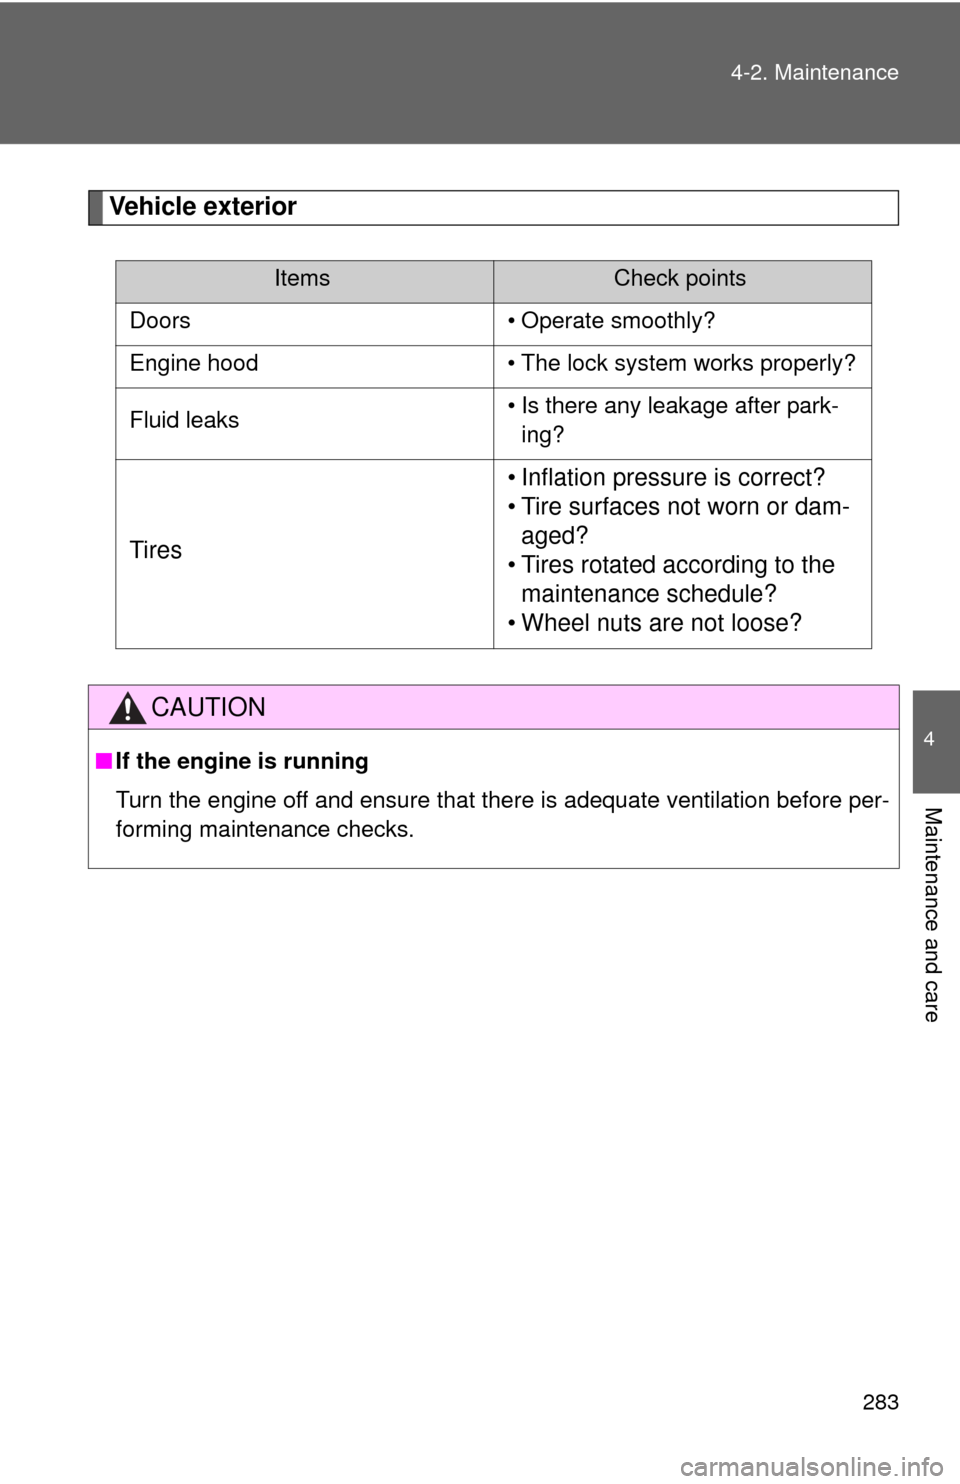
Vehicle exterior
ItemsCheck points
Doors • Operate smoothly?
Engine hood • The lock system works properly?
Fluid leaks• Is there any leakage after park-
ing?
Tires• Inflation pressure is correct?
• Tire surfaces not worn or dam-
aged?
• Tires rotated according to the
maintenance schedule?
• Wheel nuts are not loose?
CAUTION
■If the engine is running
Turn the engine off and ensure that there is adequate ventilation before per-
forming maintenance checks.
Page 296 of 448
296 4-3. Do-it-yourself maintenance
Engine oil
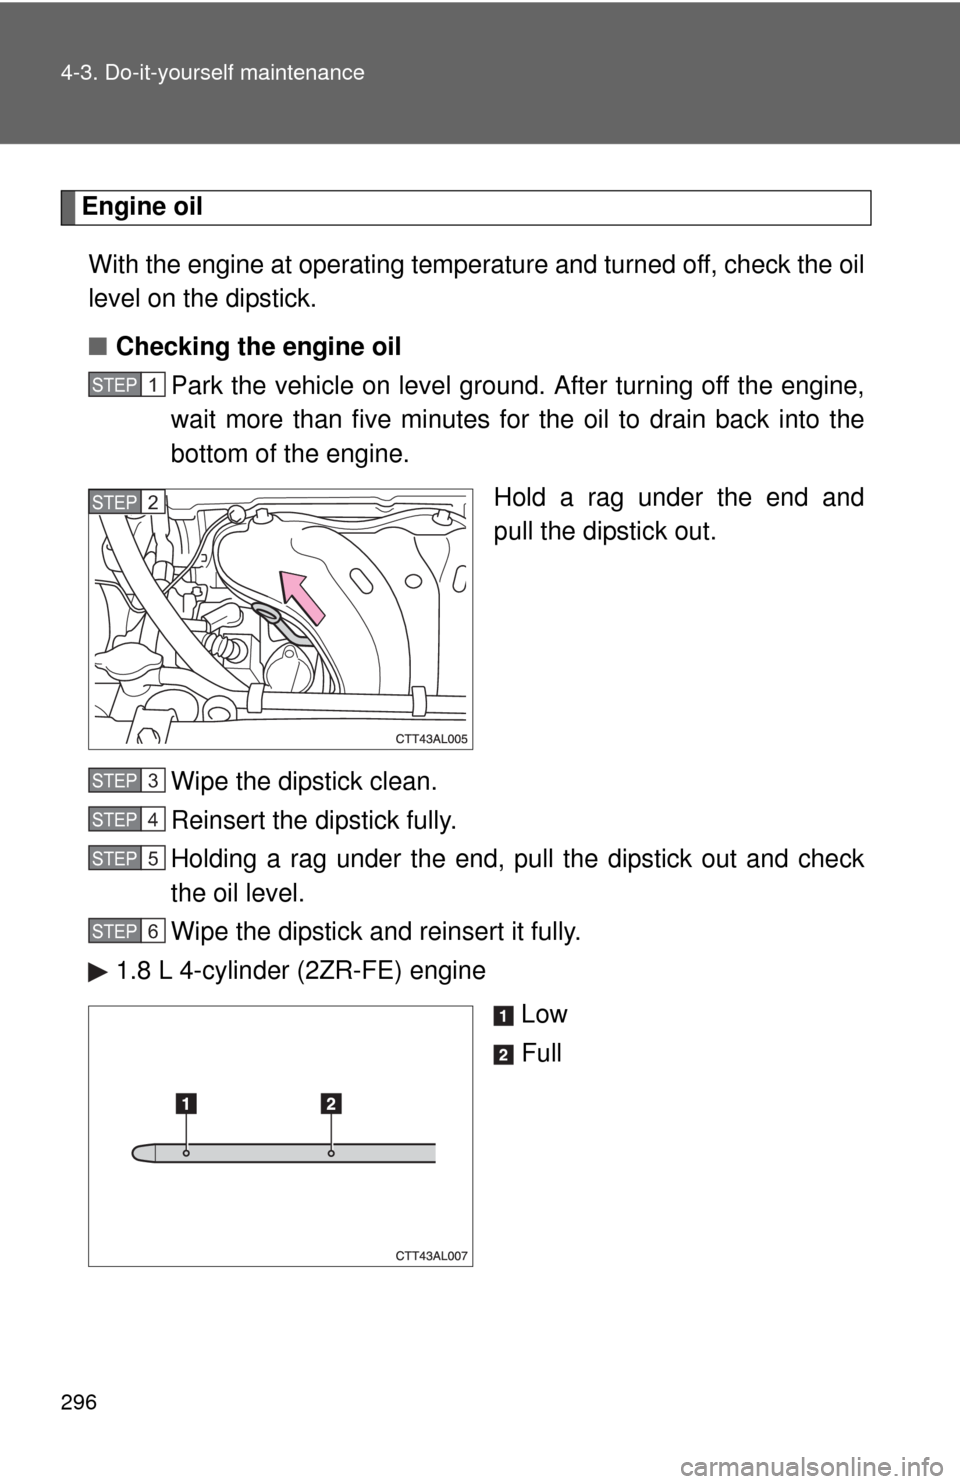
With the engine at operating temperature and turned off, check the oil
level on the dipstick.
■Checking the engine oil
Park the vehicle on level ground. After turning off the engine,
wait more than five minutes for the oil to drain back into the
bottom of the engine.
Hold a rag under the end and
pull the dipstick out.
Wipe the dipstick clean.
Reinsert the dipstick fully.
Holding a rag under the end, pull the dipstick out and check
the oil level.
Wipe the dipstick and reinsert it fully.
1.8 L 4-cylinder (2ZR-FE) engine
Low
Full
STEP1
STEP2
STEP3
STEP4
STEP5
STEP6
Page 297 of 448
297 4-3. Do-it-yourself maintenance
4
Maintenance and care
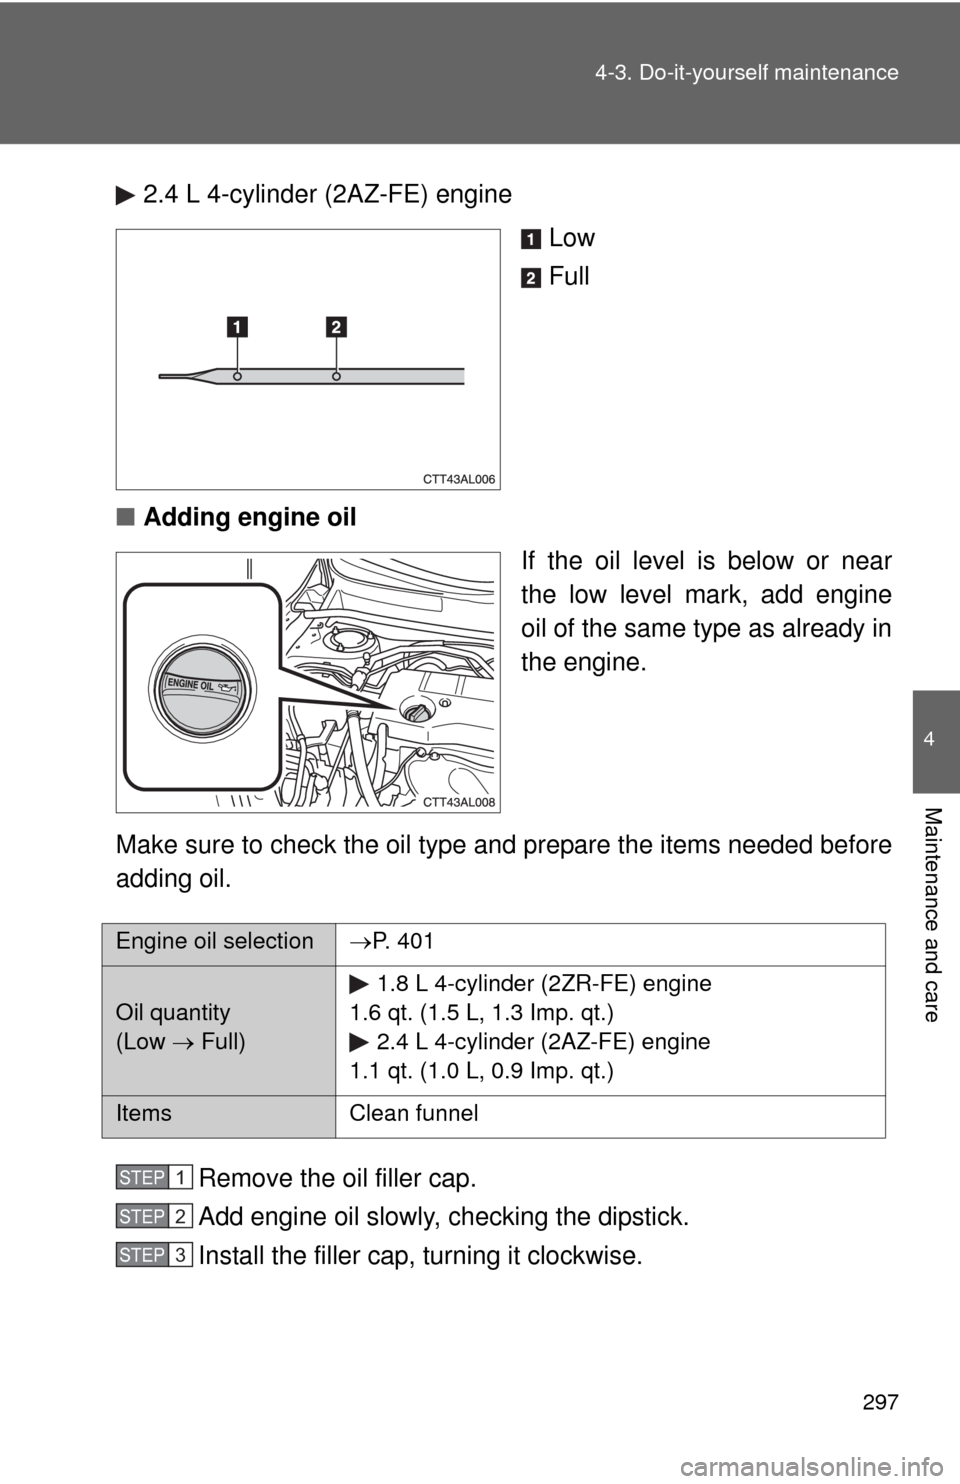
2.4 L 4-cylinder (2AZ-FE) engine
Low
Full
■Adding engine oil
If the oil level is below or near
the low level mark, add engine
oil of the same type as already in
the engine.
Make sure to check the oil type and prepare the items needed before
adding oil.
Remove the oil filler cap.
Add engine oil slowly, checking the dipstick.
Install the filler cap, turning it clockwise.
Engine oil selectionP. 401
Oil quantity
(Low Full)1.8 L 4-cylinder (2ZR-FE) engine
1.6 qt. (1.5 L, 1.3 Imp. qt.)
2.4 L 4-cylinder (2AZ-FE) engine
1.1 qt. (1.0 L, 0.9 Imp. qt.)
Items Clean funnel
STEP1
STEP2
STEP3