inflation pressure TOYOTA MATRIX 2013 E140 / 2.G Owners Manual
[x] Cancel search | Manufacturer: TOYOTA, Model Year: 2013, Model line: MATRIX, Model: TOYOTA MATRIX 2013 E140 / 2.GPages: 500, PDF Size: 14.83 MB
Page 4 of 500

TABLE OF CONTENTSIndex
4
3-4. Using the hands-free
phone system
(for cellular phone)
Making a phone call ........... 262
Using the “SET UP” menu
(“Bluetooth” menu) ........... 267
Using the “SET UP” menu
(“Phone” menu) ................ 273
3-5. Using the interior lights
Interior lights list ................. 279
• Interior light ...................... 280
• Personal/interior lights...... 281
• Personal lights ................. 282
3-6. Using the storage features
List of storage features....... 283
• Glove box ......................... 284
• Console box ..................... 284
• Cup holders ...................... 285
• Bottle holders ................... 287
• Auxiliary boxes ................. 288
3-7. Other interior features
Sun visors .......................... 290
Vanity mirrors ..................... 291
Clock .................................. 292
Ashtrays ............................. 293
Cigarette lighter .................. 294
Power outlet ....................... 295
Grocery bag hook............... 297
Seatback table ................... 299
Assist grips ......................... 300
Floor mat ............................ 301
Luggage compartment
feature .............................. 302
Compass ............................ 3094-1. Maintenance and care
Cleaning and protecting
the vehicle exterior ........... 314
Cleaning and protecting
the vehicle interior ............ 317
4-2. Maintenance
Maintenance
requirements .................... 320
General maintenance ......... 322
Emission inspection and
maintenance (I/M)
programs .......................... 325
4-3. Do-it-yourself maintenance
Do-it-yourself service
precautions ....................... 326
Hood ................................... 330
Positioning a floor jack........ 332
Engine compartment .......... 335
Tires.................................... 349
Tire inflation pressure ......... 358
Wheels................................ 362
Air conditioning filter ........... 365
Key battery ......................... 367
Checking and replacing
fuses ................................. 369
Light bulbs .......................... 378
4Maintenance and care
Page 7 of 500
7
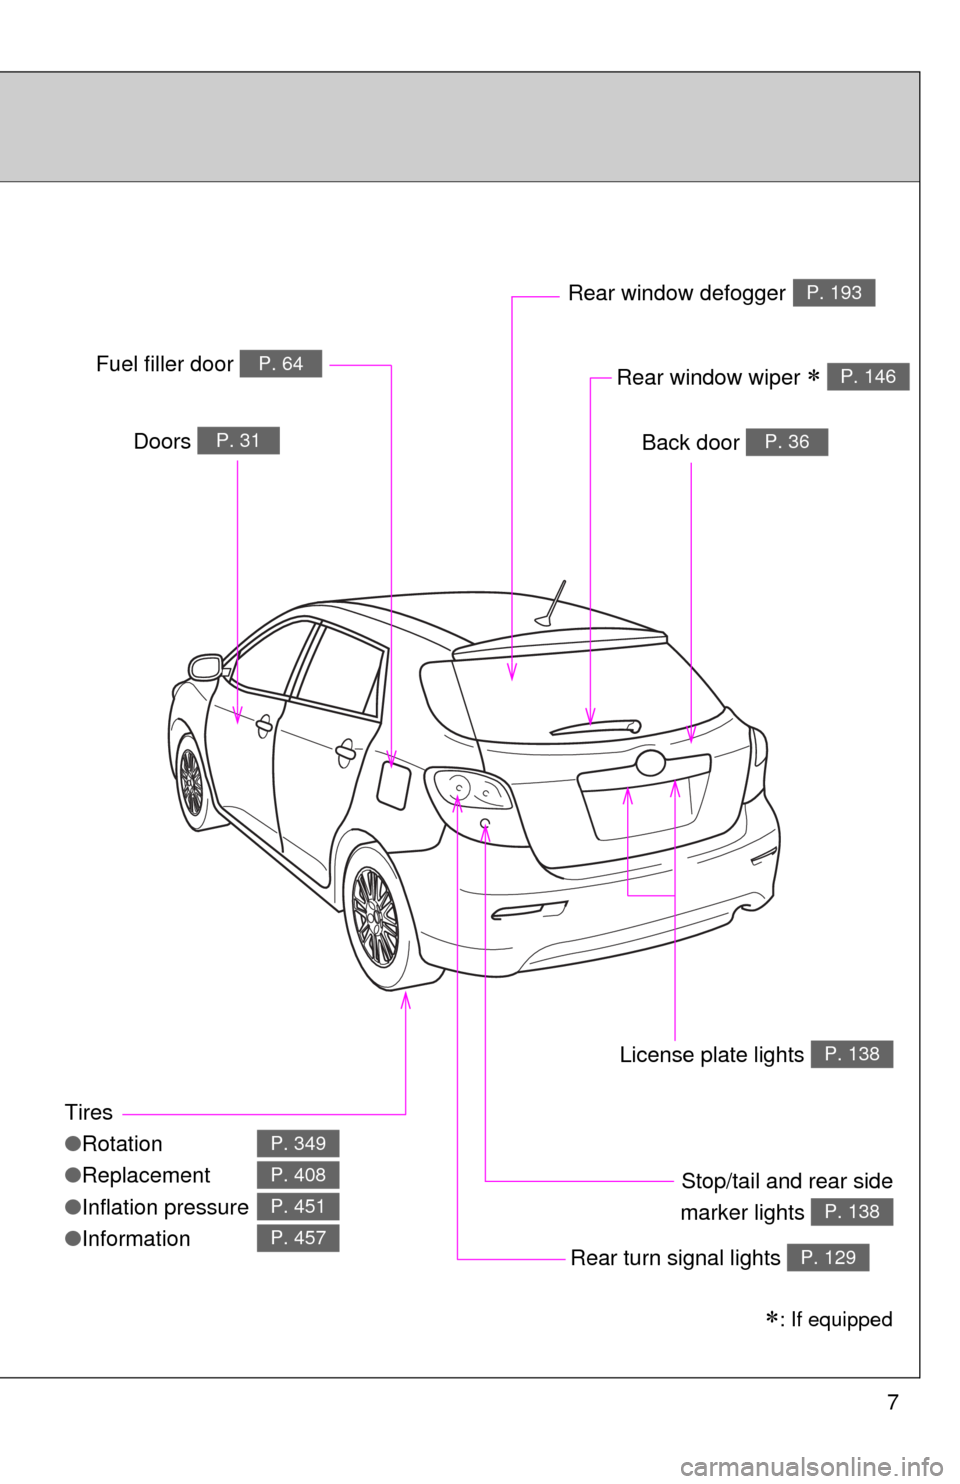
Tires
●Rotation
●Replacement
●Inflation pressure
●Information
P. 349
P. 408
P. 451
P. 457
Back door P. 36Doors P. 31
Fuel filler door P. 64
Rear turn signal lights P. 129
Rear window defoggerP. 193
Stop/tail and rear side
marker lights
P. 138
Rear window wiper P. 146
License plate lights P. 138
: If equipped
Page 313 of 500
Maintenance and care4
313
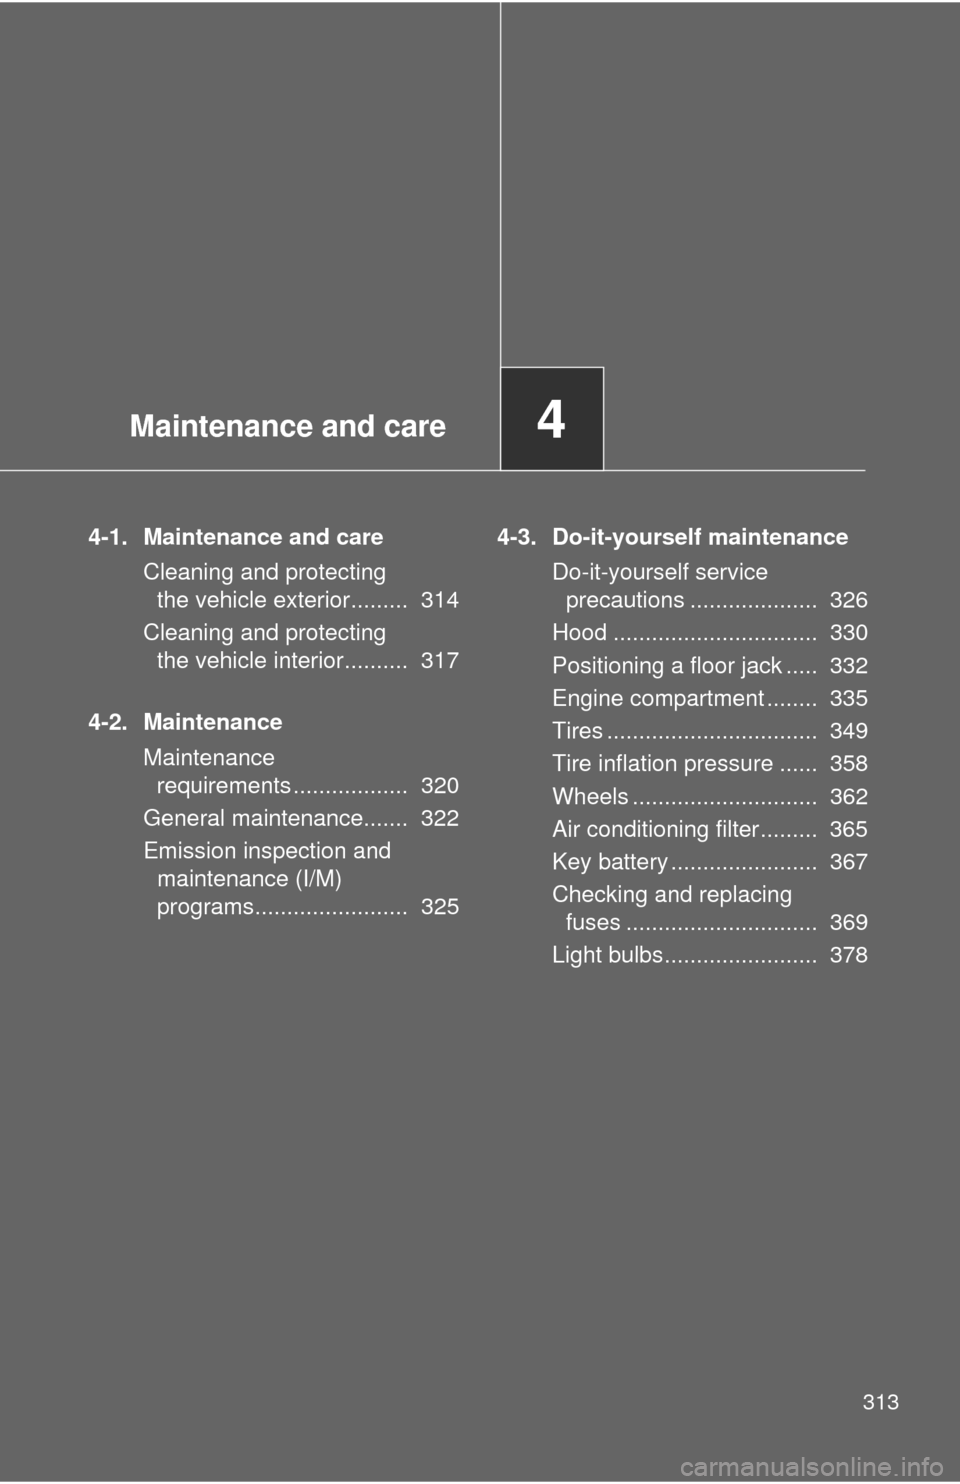
4-1. Maintenance and care
Cleaning and protecting
the vehicle exterior......... 314
Cleaning and protecting
the vehicle interior.......... 317
4-2. Maintenance
Maintenance
requirements .................. 320
General maintenance....... 322
Emission inspection and
maintenance (I/M)
programs........................ 3254-3. Do-it-yourself maintenance
Do-it-yourself service
precautions .................... 326
Hood ................................ 330
Positioning a floor jack ..... 332
Engine compartment ........ 335
Tires ................................. 349
Tire inflation pressure ...... 358
Wheels ............................. 362
Air conditioning filter......... 365
Key battery ....................... 367
Checking and replacing
fuses .............................. 369
Light bulbs........................ 378
Page 324 of 500
324 4-2. Maintenance
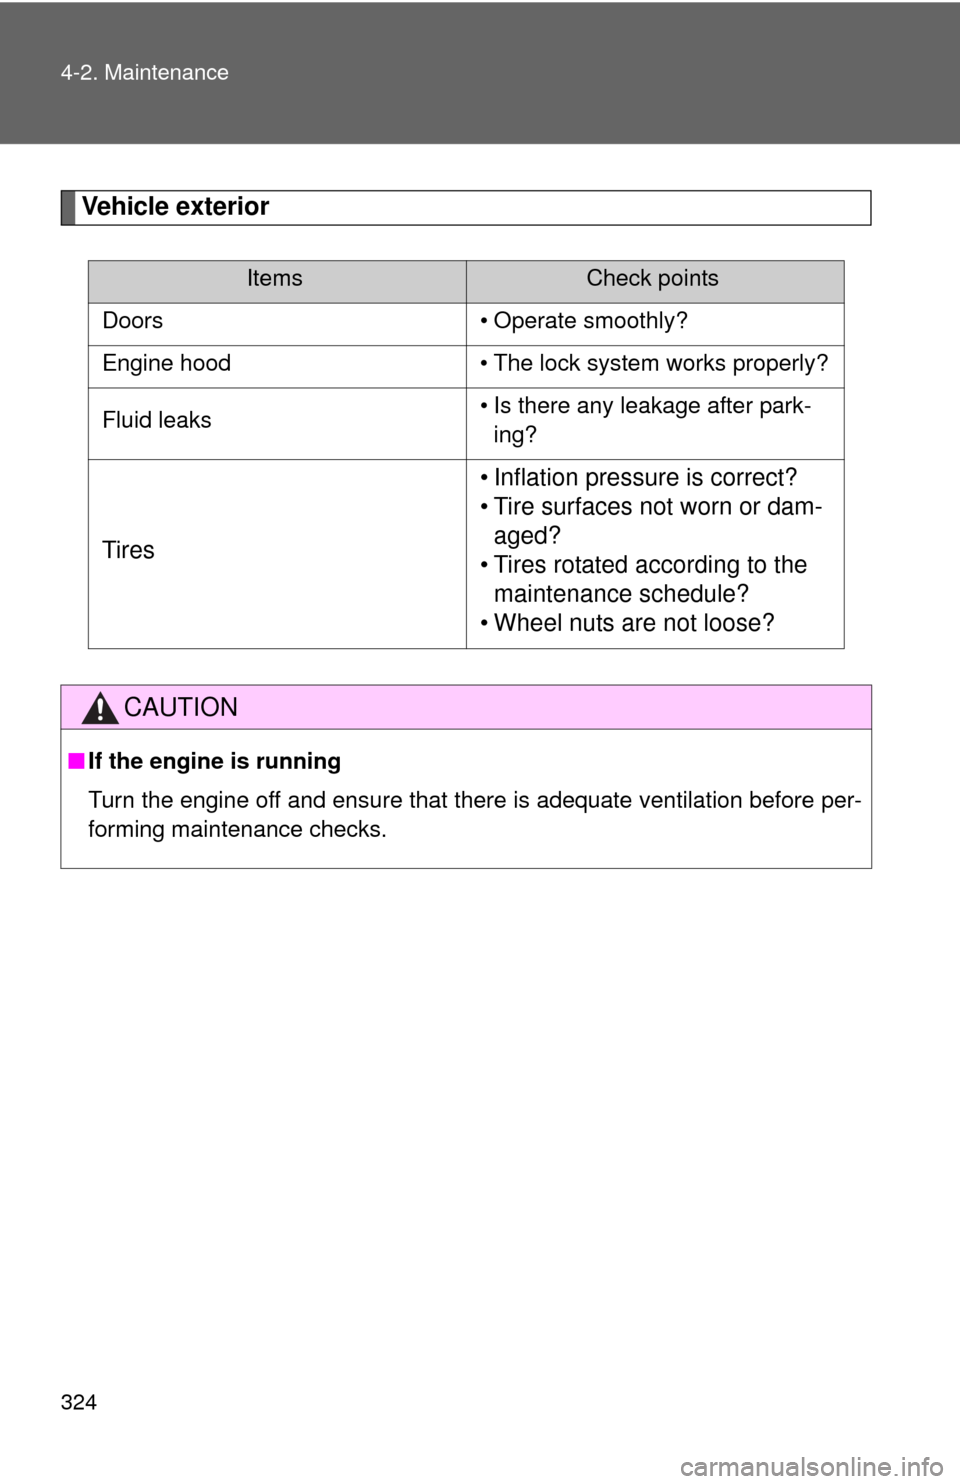
Vehicle exterior
ItemsCheck points
Doors • Operate smoothly?
Engine hood • The lock system works properly?
Fluid leaks• Is there any leakage after park-
ing?
Tires• Inflation pressure is correct?
• Tire surfaces not worn or dam-
aged?
• Tires rotated according to the
maintenance schedule?
• Wheel nuts are not loose?
CAUTION
■If the engine is running
Turn the engine off and ensure that there is adequate ventilation before per-
forming maintenance checks.
Page 327 of 500
327 4-3. Do-it-yourself maintenance
4
Maintenance and care
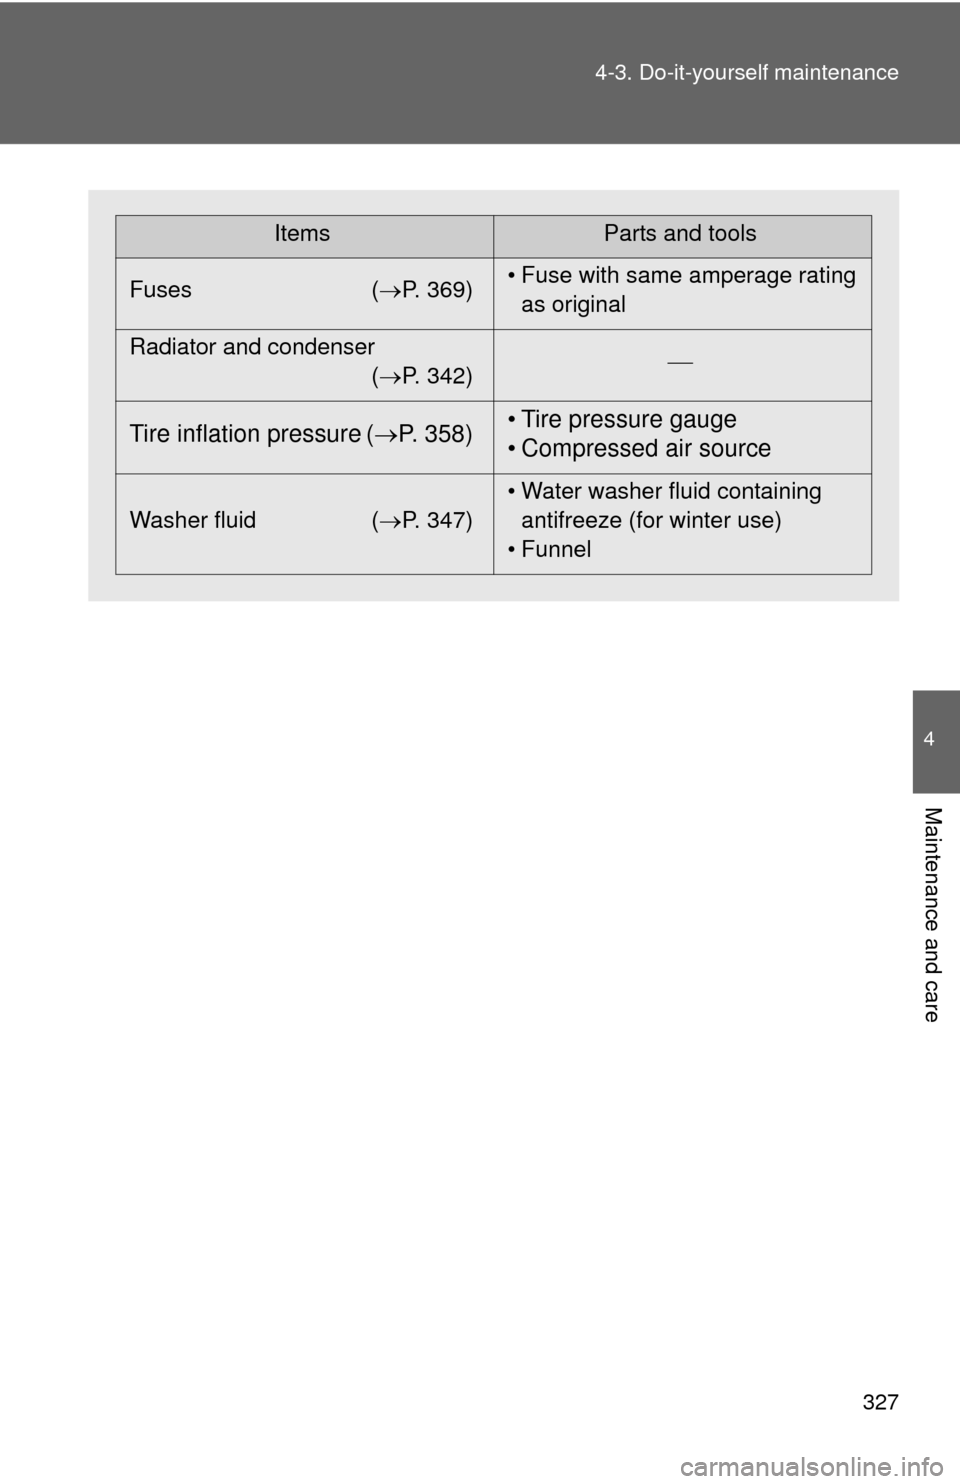
ItemsParts and tools
Fuses (P. 369)• Fuse with same amperage rating
as original
Radiator and condenser
(P. 342)
Tire inflation pressure (P. 358)• Tire pressure gauge
• Compressed air source
Washer fluid (P. 347)• Water washer fluid containing
antifreeze (for winter use)
• Funnel
Page 349 of 500
349
4-3. Do-it-yourself maintenance
4
Maintenance and care
Tires
Replace or rotate tires in accordance with maintenance sched-
ules and treadwear.
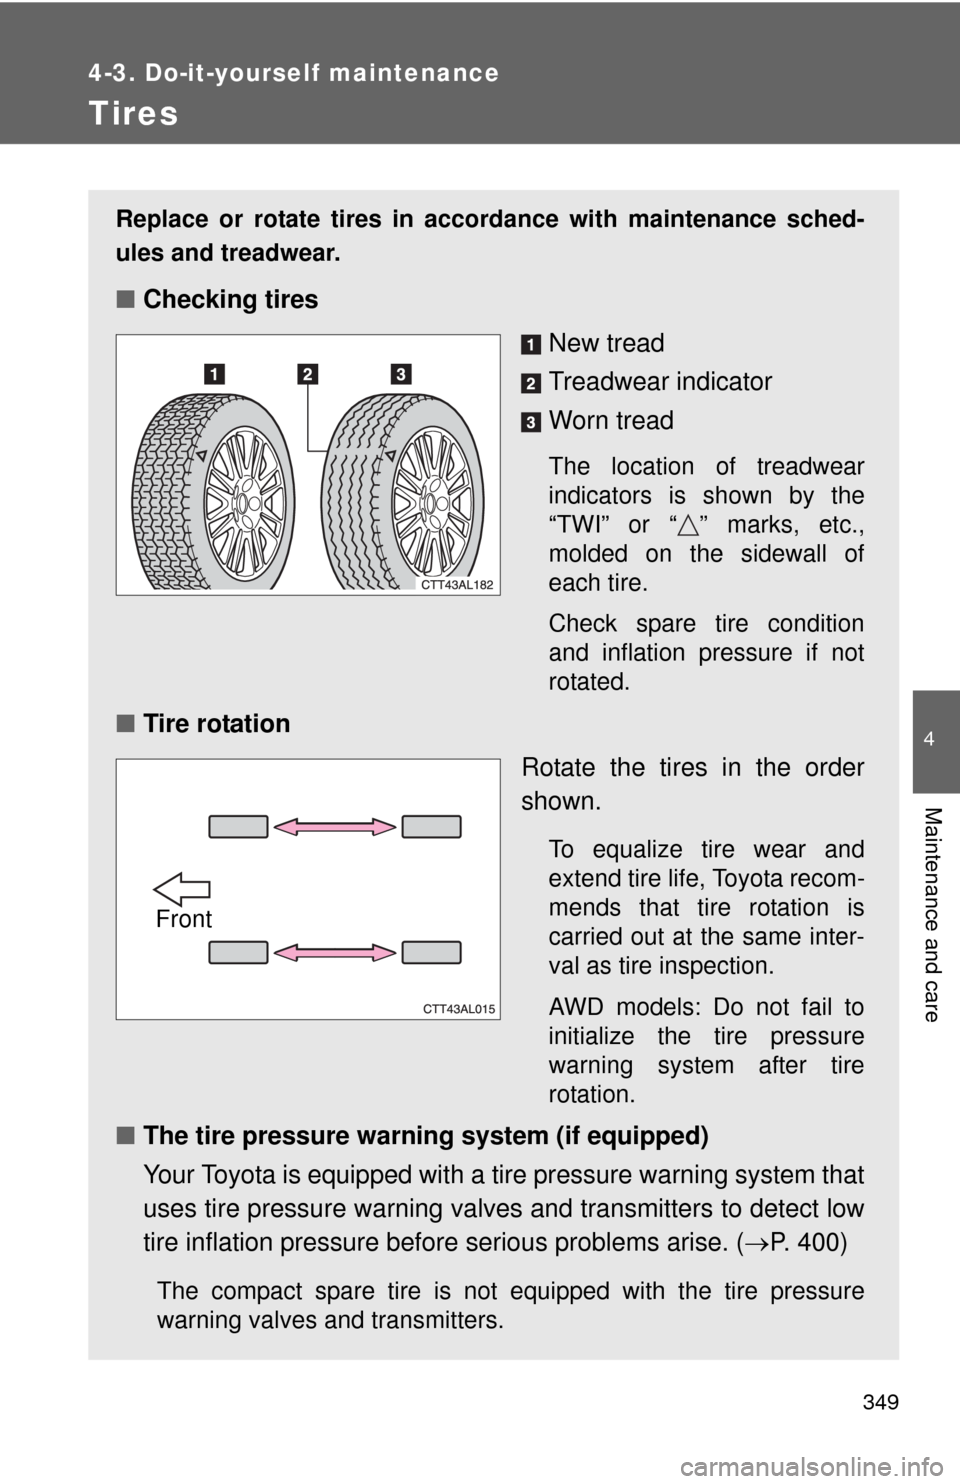
■Checking tires
New tread
Treadwear indicator
Worn tread
The location of treadwear
indicators is shown by the
“TWI” or “ ” marks, etc.,
molded on the sidewall of
each tire.
Check spare tire condition
and inflation pressure if not
rotated.
■Tire rotation
Rotate the tires in the order
shown.
To equalize tire wear and
extend tire life, Toyota recom-
mends that tire rotation is
carried out at the same inter-
val as tire inspection.
AWD models: Do not fail to
initialize the tire pressure
warning system after tire
rotation.
■The tire pressure warning system (if equipped)
Your Toyota is equipped with a tire pressure warning system that
uses tire pressure warning valves and transmitters to detect low
tire inflation pressure before serious problems arise. (P. 400)
The compact spare tire is not equipped with the tire pressure
warning valves and transmitters.
Front
Page 350 of 500

350 4-3. Do-it-yourself maintenance
Installing tire pressure warning valves and transmitters
When replacing tires or wheels, tire pressure warning valves and
transmitters must also be installed.
When new tire pressure warning valves and transmitters are
installed, new tire pressure warning valve and transmitter ID codes
must be registered in the tire pressure warning computer and the tire
pressure warning system must be initialized. Have tire pressure
warning valve and transmitter ID codes registered by your Toyota
dealer
. (P. 352)
Initializing the tire pressure warning system
■The tire pressure warning system must be initialized in the fol-
lowing circumstances:
●When rotating the tires on vehicles differing with front and rear tire
inflation pressure.
●When changing the tire size.
When the tire pressure warning system is initialized, the current tire
inflation pressure is set as the pressure benchmark.
Page 351 of 500
351 4-3. Do-it-yourself maintenance
4
Maintenance and care
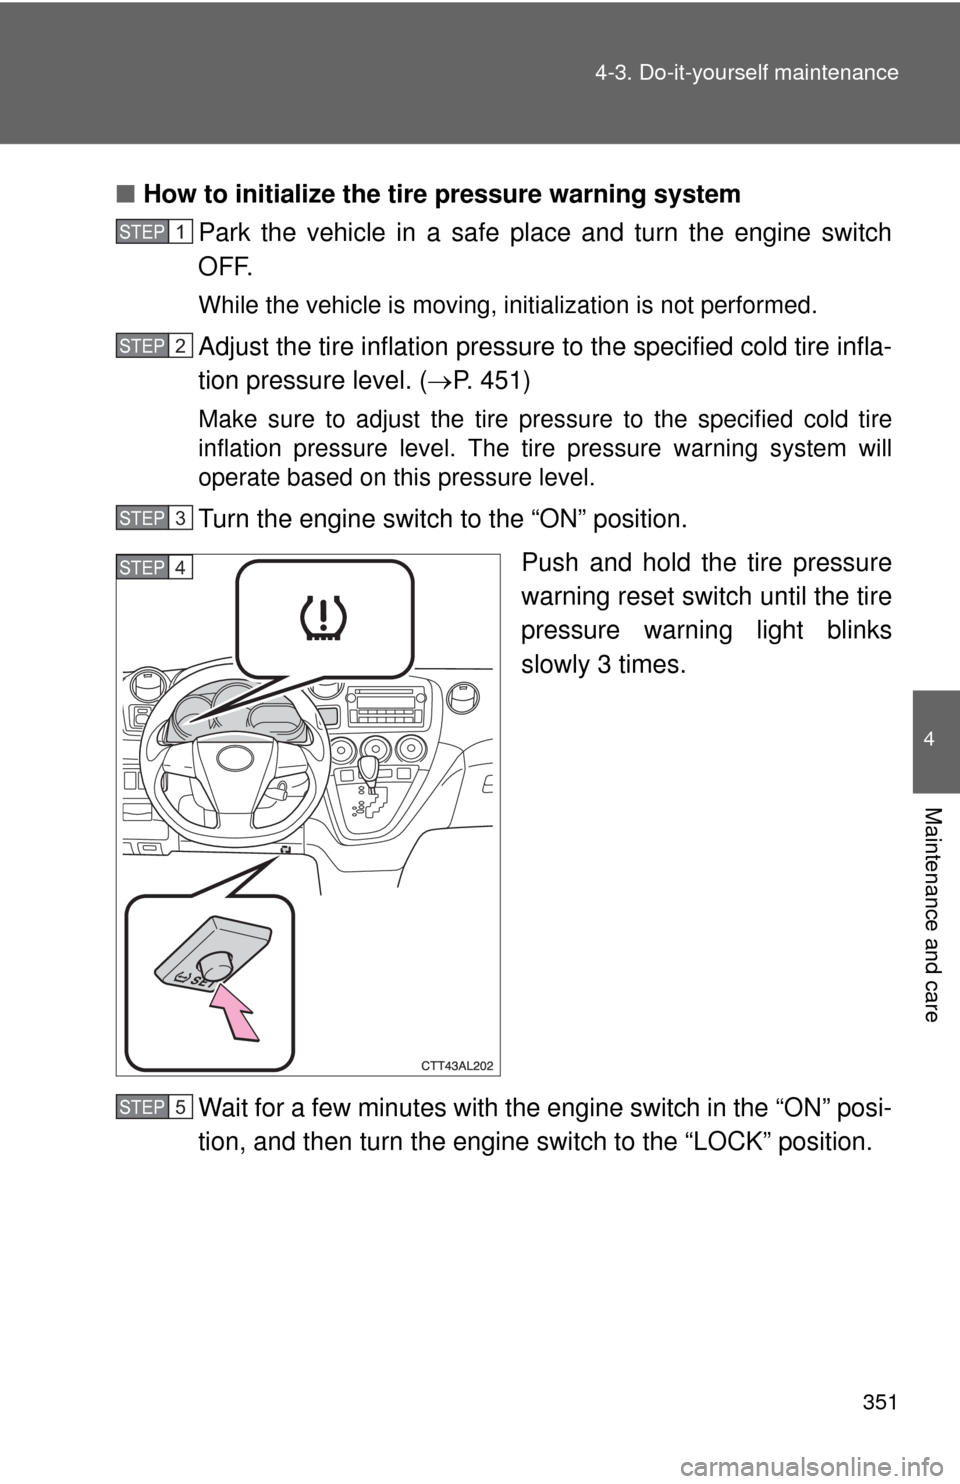
■How to initialize the tire pressure warning system
Park the vehicle in a safe place and turn the engine switch
OFF.
While the vehicle is moving, initialization is not performed.
Adjust the tire inflation pressure to the specified cold tire infla-
tion pressure level. (P. 451)
Make sure to adjust the tire pressure to the specified cold tire
inflation pressure level. The tire pressure warning system will
operate based on this pressure level.
Turn the engine switch to the “ON” position.
Push and hold the tire pressure
warning reset switch until the tire
pressure warning light blinks
slowly 3 times.
Wait for a few minutes with the engine switch in the “ON” posi-
tion, and then turn the engine switch to the “LOCK” position.
STEP1
STEP2
STEP3
STEP4
STEP5
Page 352 of 500

352 4-3. Do-it-yourself maintenance
Registering ID codes
The tire pressure warning valve and transmitter is equipped with a
unique ID code. When replacing a tire pressure warning valve and
transmitter, it is necessary to register the ID code of tire pressure
warning valve and transmitter. Have the ID code registered by your
Toyota dealer.
■When to replace your vehicle’s tires
Tires should be replaced if:
●You have tire damage such as cuts, splits, cracks deep enough to
expose the fabric, or bulges indicating internal damage
●A tire goes flat repeatedly or cannot be properly repaired due to the
size or location of a cut or other damage
If you are not sure, consult with your Toyota dealer.
■Replacing tires and wheels
If the ID code of the tire pressure warning valve and transmitter is not
registered, the tire pressure warning system will not work properly. After
driving for about 20 minutes, the tire pressure warning light comes on
after blinking for 1 minute to indicate a system malfunction.
■Tire life
Any tire over 6 years old must be checked by a qualified technician even
if they have seldom or never been used or damage is not obvious.
■If the tread wears down below 0.16 in. (4 mm) on snow tires
The effectiveness of snow tires is lost.
■If you push the tire pressure warning reset switch accidentally
If initialization is performed, adjust the tire inflation pressure to the speci-
fied level and initialize the tire pressure warning system again.
Page 353 of 500
353 4-3. Do-it-yourself maintenance
4
Maintenance and care
■When the initialization of the tire pressure warning system has
failed
Initialization can be completed in a few minutes. However, in the follow-
ing cases, the settings have not been recorded and the system will not
operate properly. If repeated attempts to record tire inflation pressure
settings are unsuccessful, have the vehicle inspected by your Toyota
dealer.
●When operating the tire pressure warning reset switch, the tire pres-
sure warning light does not blink 3 times.
●After carrying out the initialization procedure, the tire pressure warn-
ing light blinks for 1 minute then stays on after driving for about 20
minutes.
■Routine tire inflation pressure checks
The tire pressure warning system does not replace routine tire inflation
pressure checks. Make sure to check tire inflation pressure as part of
your routine of daily vehicle checks.
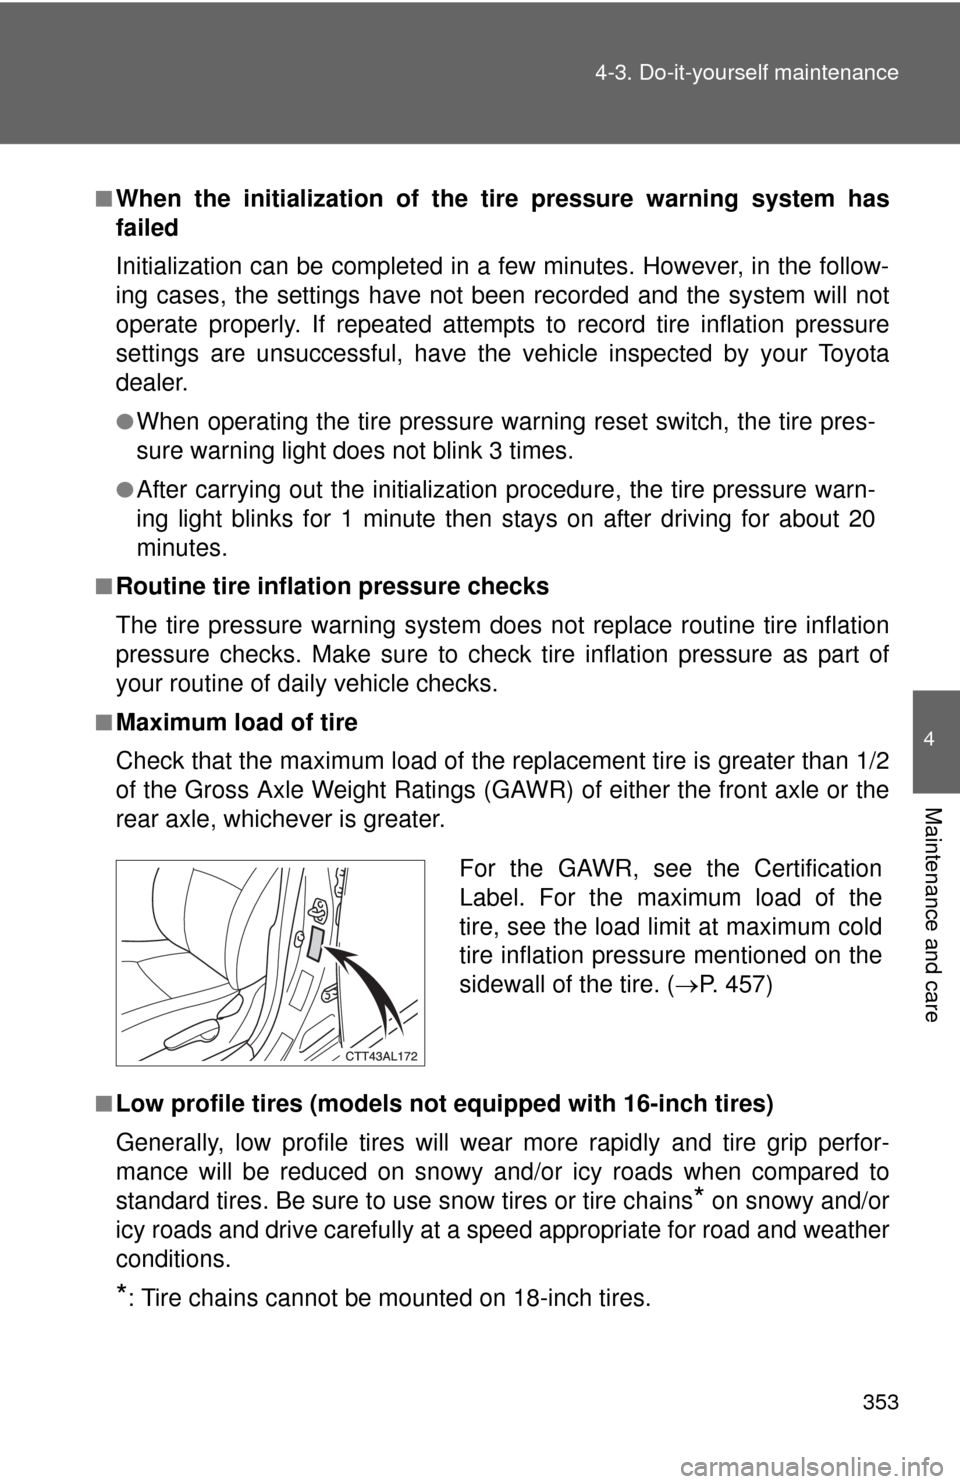
■Maximum load of tire
Check that the maximum load of the replacement tire is greater than 1/2
of the Gross Axle Weight Ratings (GAWR) of either the front axle or the
rear axle, whichever is greater.
■Low profile tires (models not equipped with 16-inch tires)
Generally, low profile tires will wear more rapidly and tire grip perfor-
mance will be reduced on snowy and/or icy roads when compared to
standard tires. Be sure to use snow tires or tire chains
* on snowy and/or
icy roads and drive carefully at a speed appropriate for road and weather
conditions.
*: Tire chains cannot be mounted on 18-inch tires.
For the GAWR, see the Certification
Label. For the maximum load of the
tire, see the load limit at maximum cold
tire inflation pressure mentioned on the
sidewall of the tire. (P. 457)