door lock TOYOTA MATRIX 2013 E140 / 2.G Quick Reference Guide
[x] Cancel search | Manufacturer: TOYOTA, Model Year: 2013, Model line: MATRIX, Model: TOYOTA MATRIX 2013 E140 / 2.GPages: 28, PDF Size: 4.22 MB
Page 3 of 28
OVERVIEW
FEATURES/OPERATIONS
SAFETY AND EMERGENCY FEATURES
1
2013
Corolla Matrix
INDEX
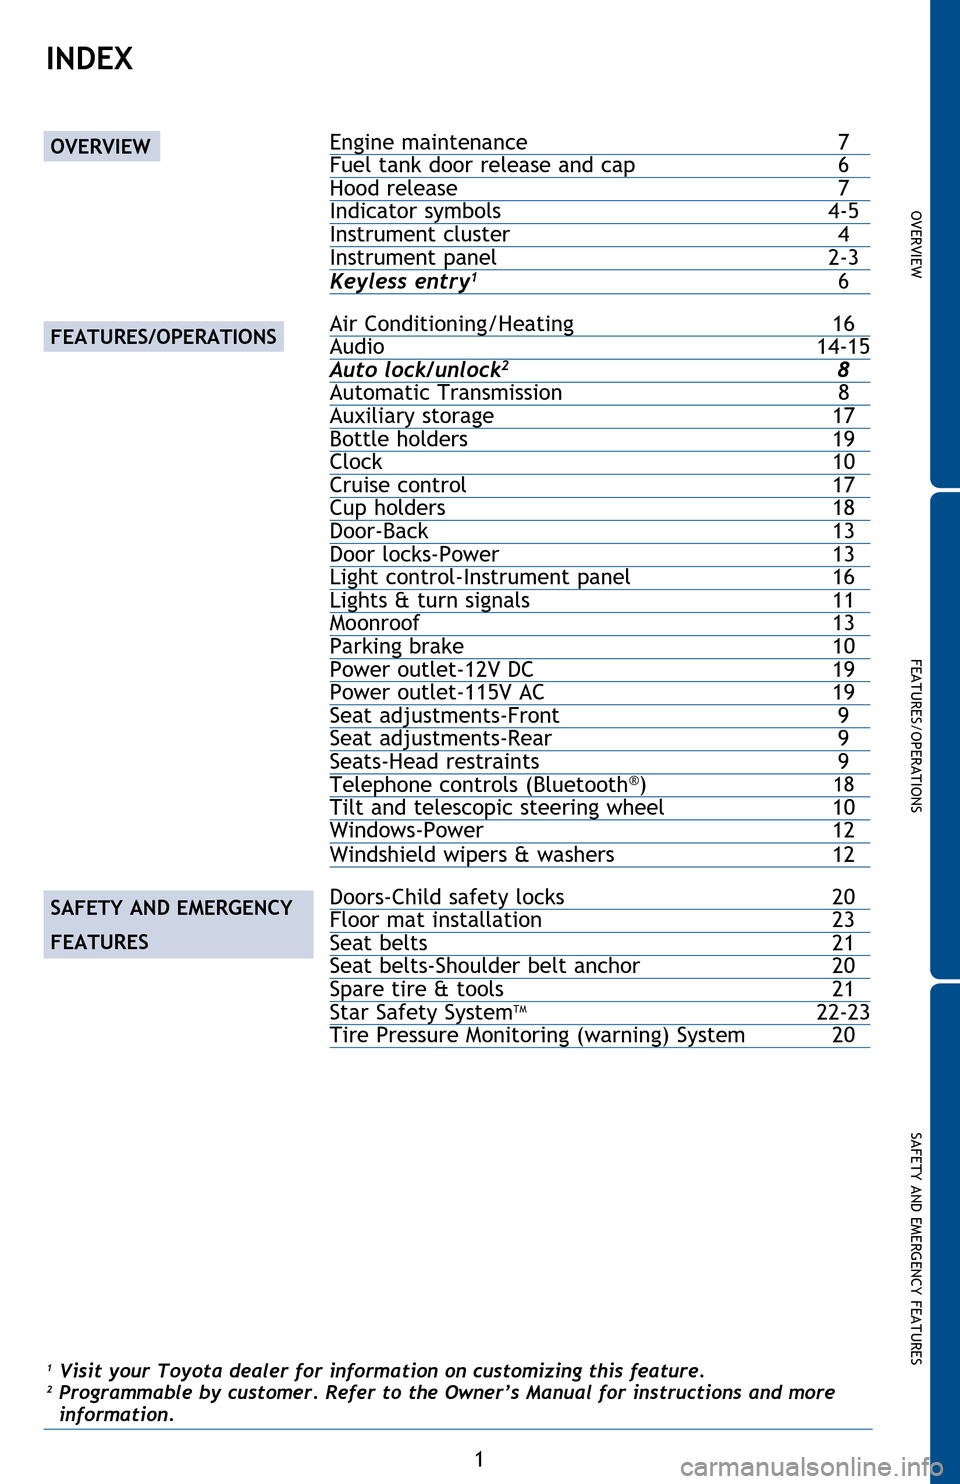
Engine maintenance 7Fuel tank door release and cap 6Hood release 7Indicator symbols 4-5Instrument cluster 4Instrument panel 2-3Keyless entry1 6 Air Conditioning/Heating 16Audio 14-15Auto lock/unlock2 8Automatic Transmission 8Auxiliary storage 17Bottle holders 19Clock 10Cruise control 17Cup holders 18Door-Back 13Door locks-Power 13Light control-Instrument panel 16Lights & turn signals 11Moonroof 13Parking brake 10Power outlet-12V DC 19Power outlet-115V AC 19Seat adjustments-Front 9Seat adjustments-Rear 9Seats-Head restraints 9Telephone controls (Bluetooth®) 18Tilt and telescopic steering wheel 10Windows-Power 12Windshield wipers & washers 12 Doors-Child safety locks 20Floor mat installation 23Seat belts 21Seat belts-Shoulder belt anchor 20Spare tire & tools 21Star Safety SystemTM 22-23Tire Pressure Monitoring (warning) System 20
1 Visit your Toyota dealer for information on customizing this feature.2 Programmable by customer. Refer to the Owner’s Manual for instructions and more information.
OVERVIEW
FEATURES/OPERATIONS
SAFETY AND EMERGENCY
FEATURES
126923_2013Matrix.indd 17/21/12 1:36 AM
Page 7 of 28
OVERVIEW
FEATURES/OPERATIONS
SAFETY AND EMERGENCY FEATURES
5
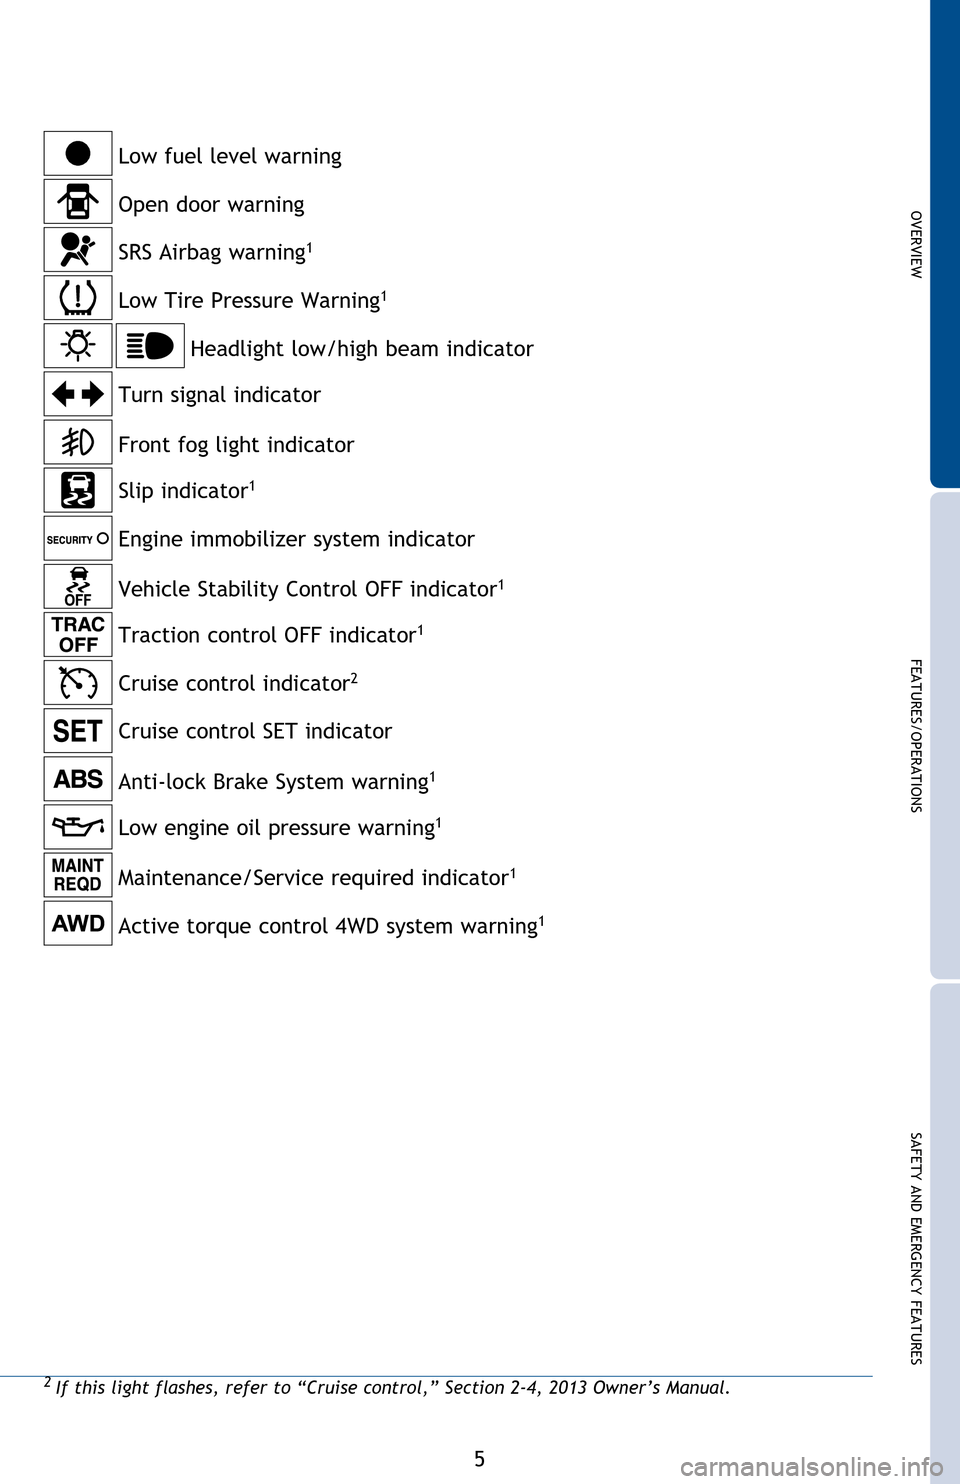
1 If indicator does not turn off within a few seconds of starting engine, there may be a
malfunction. Have vehicle inspected by your Toyota dealer.
Anti-lock Brake System warning1
Headlight low/high beam indicator
Turn signal indicator
Slip indicator
1
Cruise control indicator2
Low Tire Pressure Warning1
Open door warning
SRS Airbag warning1
Low fuel level warning
Front fog light indicator
For details, refer to “Indicators and warning lights,” Section 2-2, 2013 Owner’s
Manual .
Active torque control 4WD system warning1
Low engine oil pressure warning1
Maintenance/Service required indicator1
Engine immobilizer system indicator
Traction control OFF indicator
1
Vehicle Stability Control OFF indicator1
Cruise control SET indicator
2 If this light flashes, refer to “Cruise control,” Section 2-4, 2013 Owner’s Manual.
126923_2013Matrix.indd 57/21/12 1:36 AM
Page 8 of 28
6
OVERVIEW
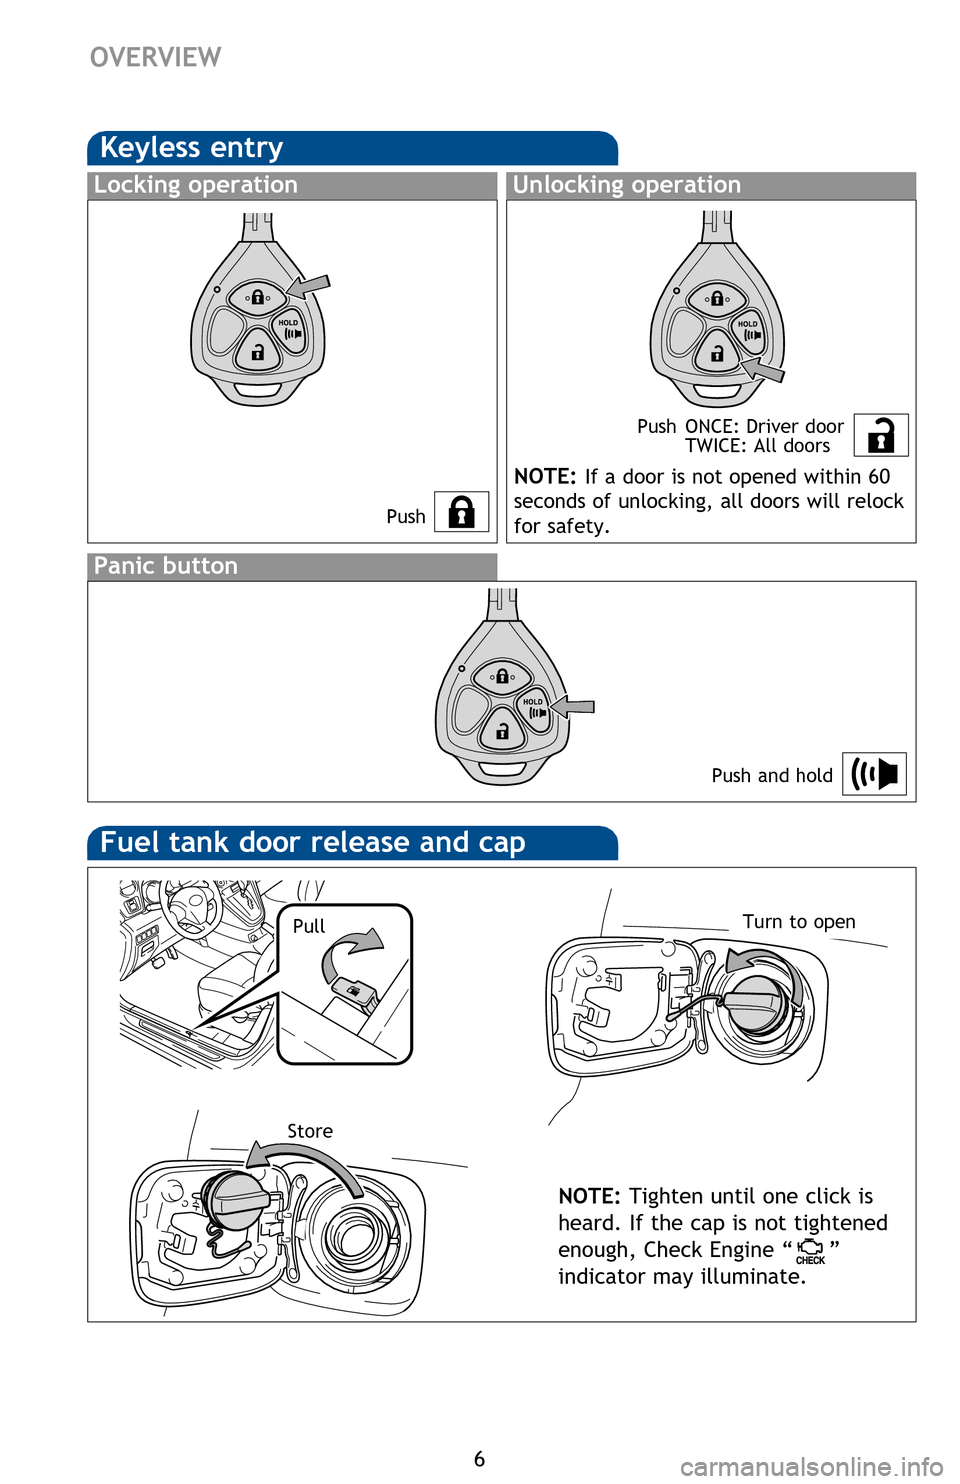
Keyless entry
PushPush ONCE: Driver door
TWICE: All doors
Locking operationUnlocking operation
Panic button
Push and hold
NOTE: If a door is not opened within 60
seconds of unlocking, all doors will relock
for safety.
Hood release
Fuel tank door release and cap
NOTE: Tighten until one click is
heard. If the cap is not tightened
enough, Check Engine “
”
indicator may illuminate.
PullTurn to open
Store
Engine coolant reservoir
Engine oil filler cap
Engine oil level dipstick
Windshield washer fluid tank
NOTE: Regularly scheduled maintenance, including oil changes, will help extend the life of your vehicle and maintain performance. Please refer
to the “Warranty & Maintenance Guide.”
Engine maintenance
4 cylinder (2AZ-FE) engine
126923_2013Matrix.indd 67/21/12 1:36 AM
Page 9 of 28
OVERVIEW
FEATURES/OPERATIONS
SAFETY AND EMERGENCY FEATURES
7
Unlocking operation
NOTE: If a door is not opened within 60
seconds of unlocking, all doors will relock
for safety.
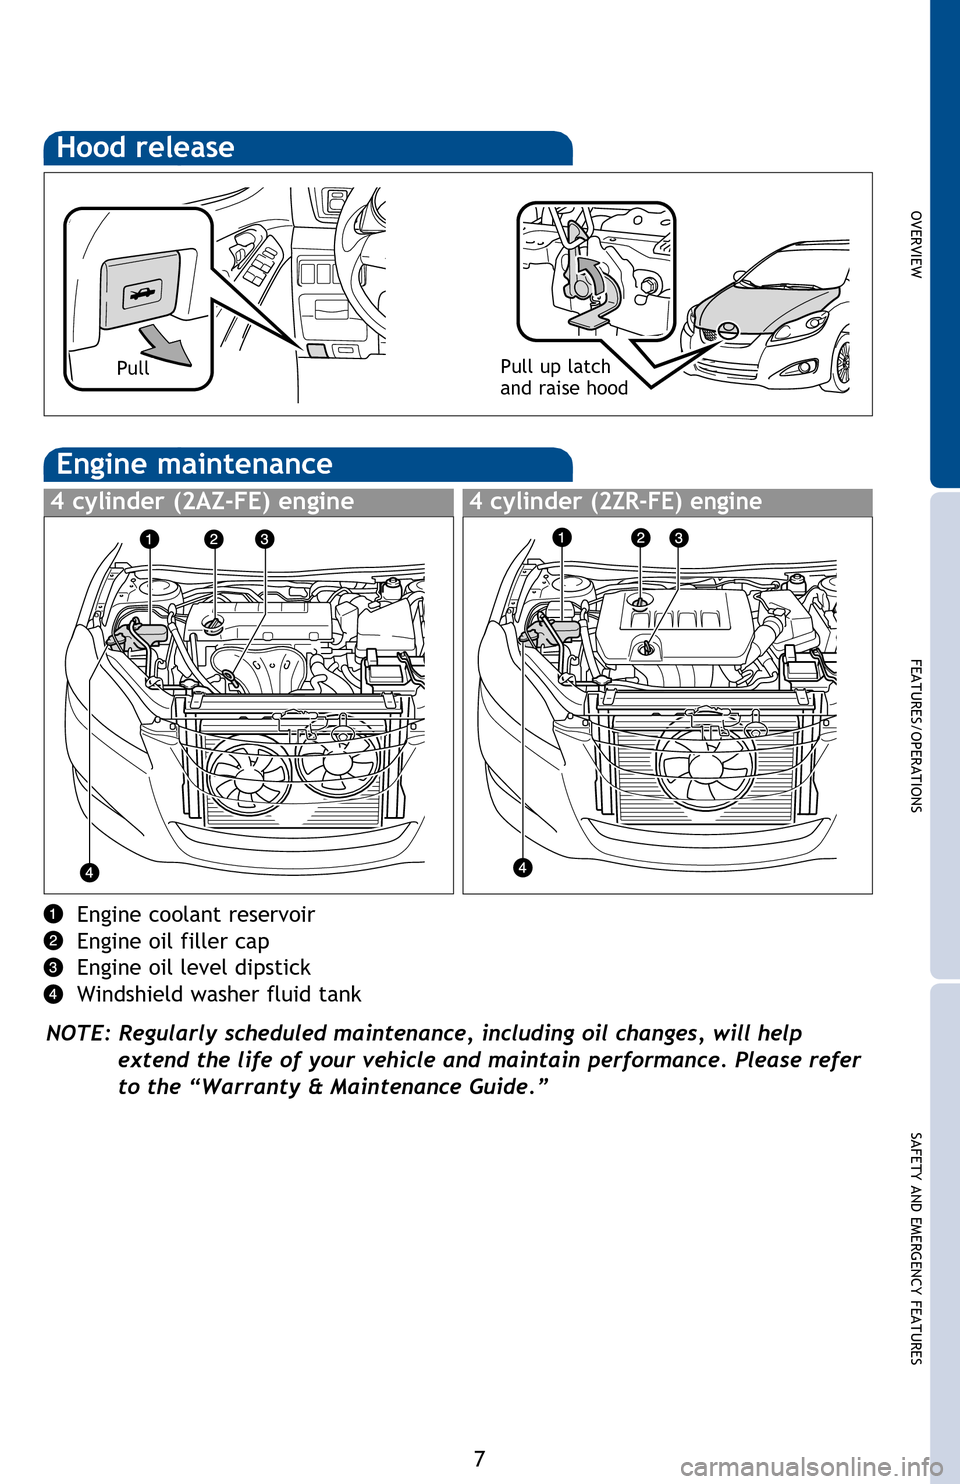
Hood release
Pull up latch
and raise hood
NOTE: Tighten until one click is
heard. If the cap is not tightened
enough, Check Engine “
”
indicator may illuminate.
Pull
Engine coolant reservoir
Engine oil filler cap
Engine oil level dipstick
Windshield washer fluid tank
NOTE: Regularly scheduled maintenance, including oil changes, will help extend the life of your vehicle and maintain performance. Please refer
to the “Warranty & Maintenance Guide.”
Engine maintenance
4 cylinder (2AZ-FE) engine4 cylinder (2ZR-FE) engine
126923_2013Matrix.indd 77/21/12 1:36 AM
Page 10 of 28
8
FEATURES/OPERATIONS
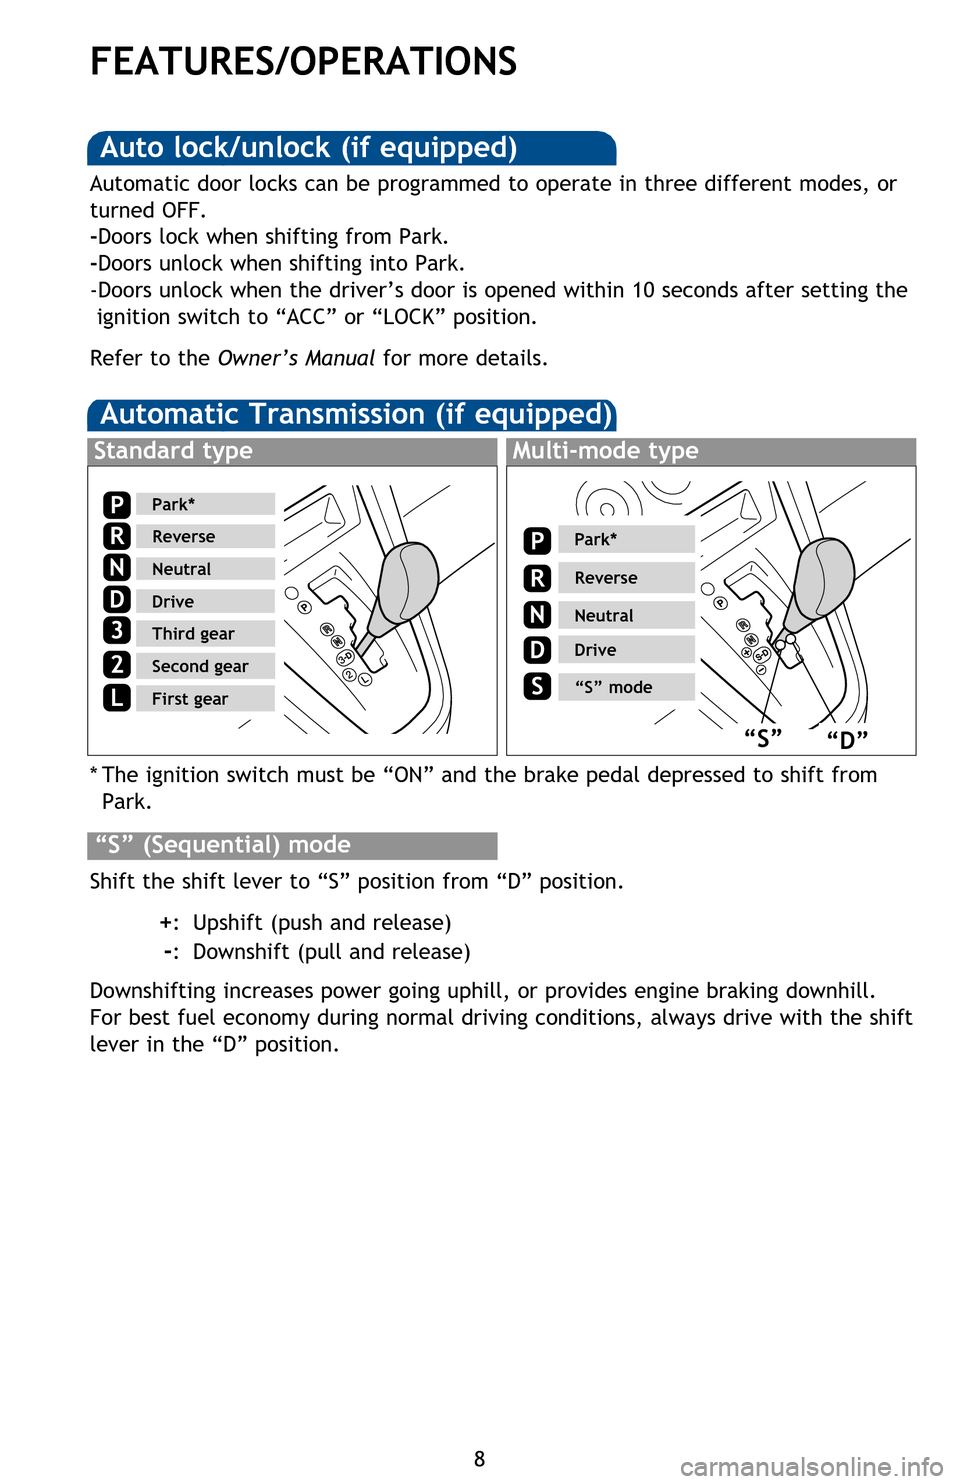
Automatic Transmission (if equipped)
* The ignition switch must be “ON” and the brake pedal depressed to shift from
Park.
Shift the shift lever to “S” position from “D” position.
+: Upshift (push and release)
-: Downshift (pull and release)
Downshifting increases power going uphill, or provides engine braking downhill.
For best fuel economy during normal driving conditions, always drive with the shift
lever in the “D” position.
“S” (Sequential) mode
3
2L
Standard typeMulti-mode type
Park*
Reverse
Neutral
Drive
“S” mode
Park*
Reverse
Neutral
Drive
Third gear
Second gear
First gear
3
2
L
“S”“D”
P
R
N
D
S
P
R
N
D
Automatic door locks can be programmed to operate in three different modes, or
turned OFF.
-Doors lock when shifting from Park.
-Doors unlock when shifting into Park.
-Doors unlock when the driver’s door is opened within 10 seconds after setting the ignition switch to “ACC” or “LOCK” position.
Refer to the Owner’s Manual for more details.
Seat adjustments-Rear
Seat adjustments-Front
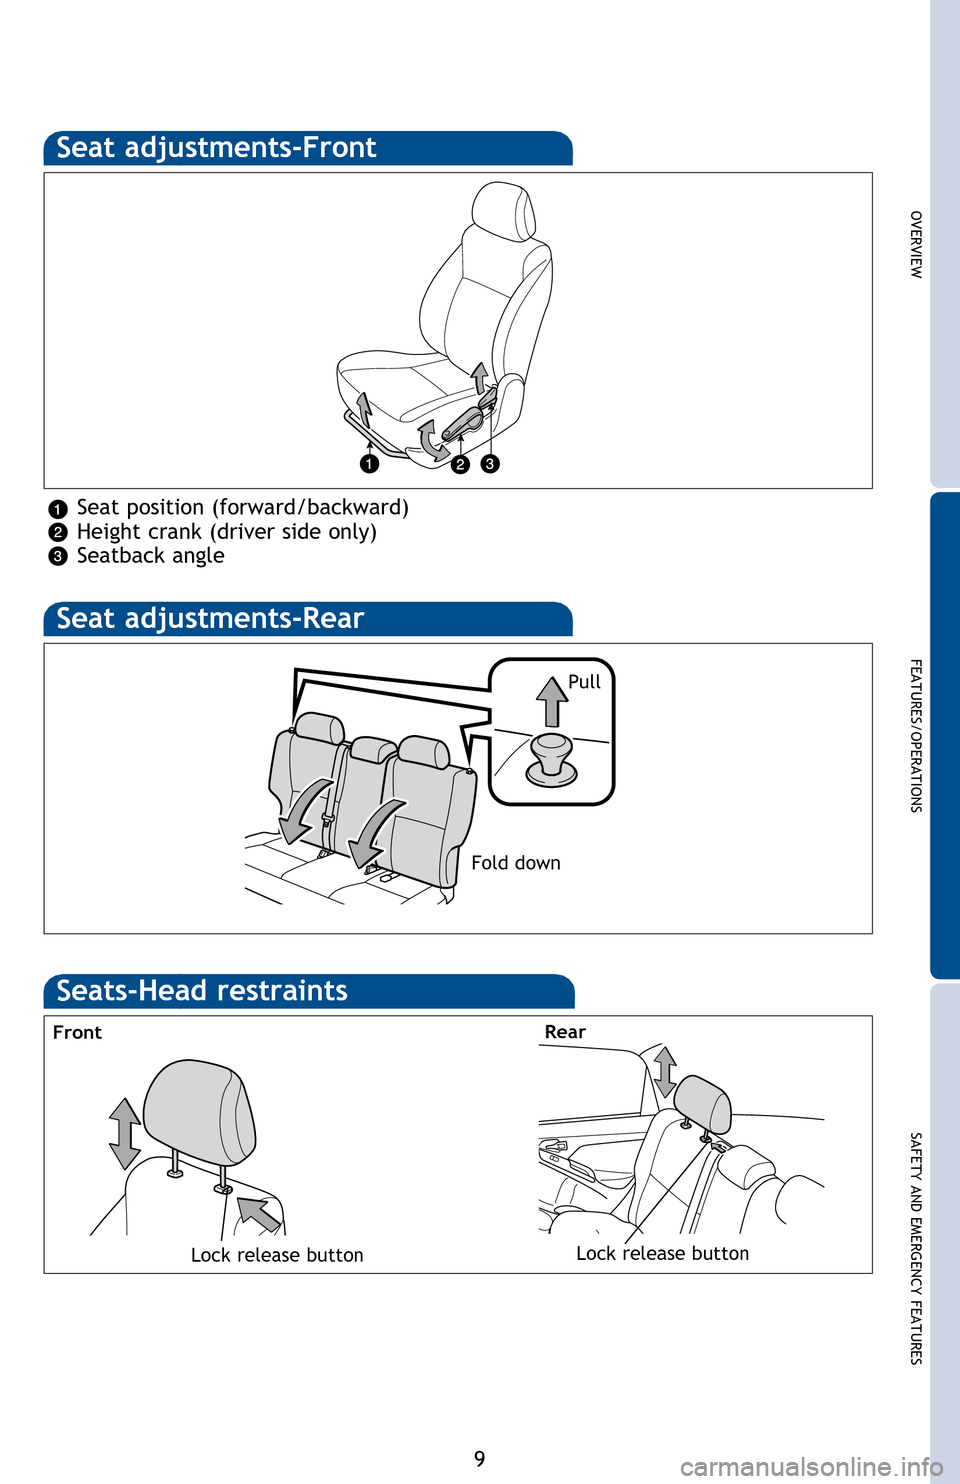
Seat position (forward/backward)
Height crank (driver side only)
Seatback angle
Seats-Head restraints
Front
Auto lock/unlock (if equipped)
126923_2013Matrix.indd 87/21/12 1:36 AM
Page 11 of 28
OVERVIEW
FEATURES/OPERATIONS
SAFETY AND EMERGENCY FEATURES
9
* The ignition switch must be “ON” and the brake pedal depressed to shift from
Park.
Shift the shift lever to “S” position from “D” position.
+: Upshift (push and release)
-: Downshift (pull and release)
Downshifting increases power going uphill, or provides engine braking downhill.
For best fuel economy during normal driving conditions, always drive with the shift
lever in the “D” position.
Automatic door locks can be programmed to operate in three different modes, or
turned OFF.
-Doors lock when shifting from Park.
-Doors unlock when shifting into Park.
-Doors unlock when the driver’s door is opened within 10 seconds after setting the ignition switch to “ACC” or “LOCK” position.
Refer to the Owner’s Manual for more details.
Seat adjustments-Rear
Seat adjustments-Front
Seat position (forward/backward)
Height crank (driver side only)
Seatback angle
Fold down Pull
Seats-Head restraints
Front
Rear
Lock release buttonLock release button
126923_2013Matrix.indd 97/21/12 1:36 AM
Page 14 of 28
12
FEATURES/OPERATIONS
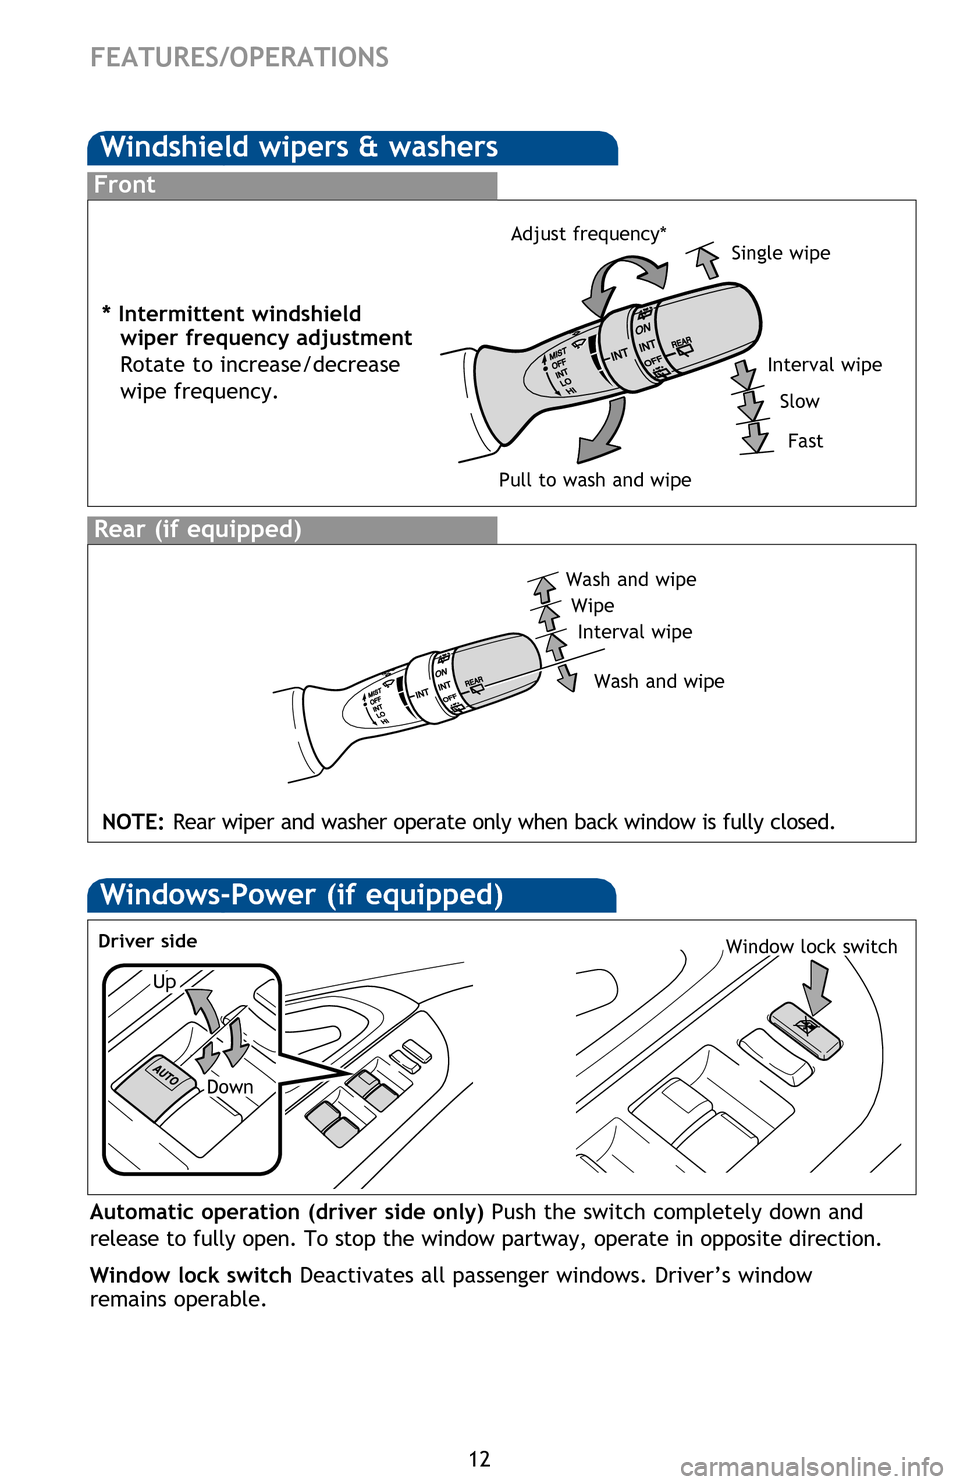
Windows-Power (if equipped)
Up
Down
Driver sideWindow lock switch
Automatic operation (driver side only) Push the switch completely down and
release to fully open. To stop the window partway, operate in opposite d\
irection.
Window lock switch Deactivates all passenger windows. Driver’s window
remains operable.
Door-Back
Windshield wipers & washers
Front
Rear (if equipped)
Interval wipe
Wash and wipe
Wipe
Wash and wipe
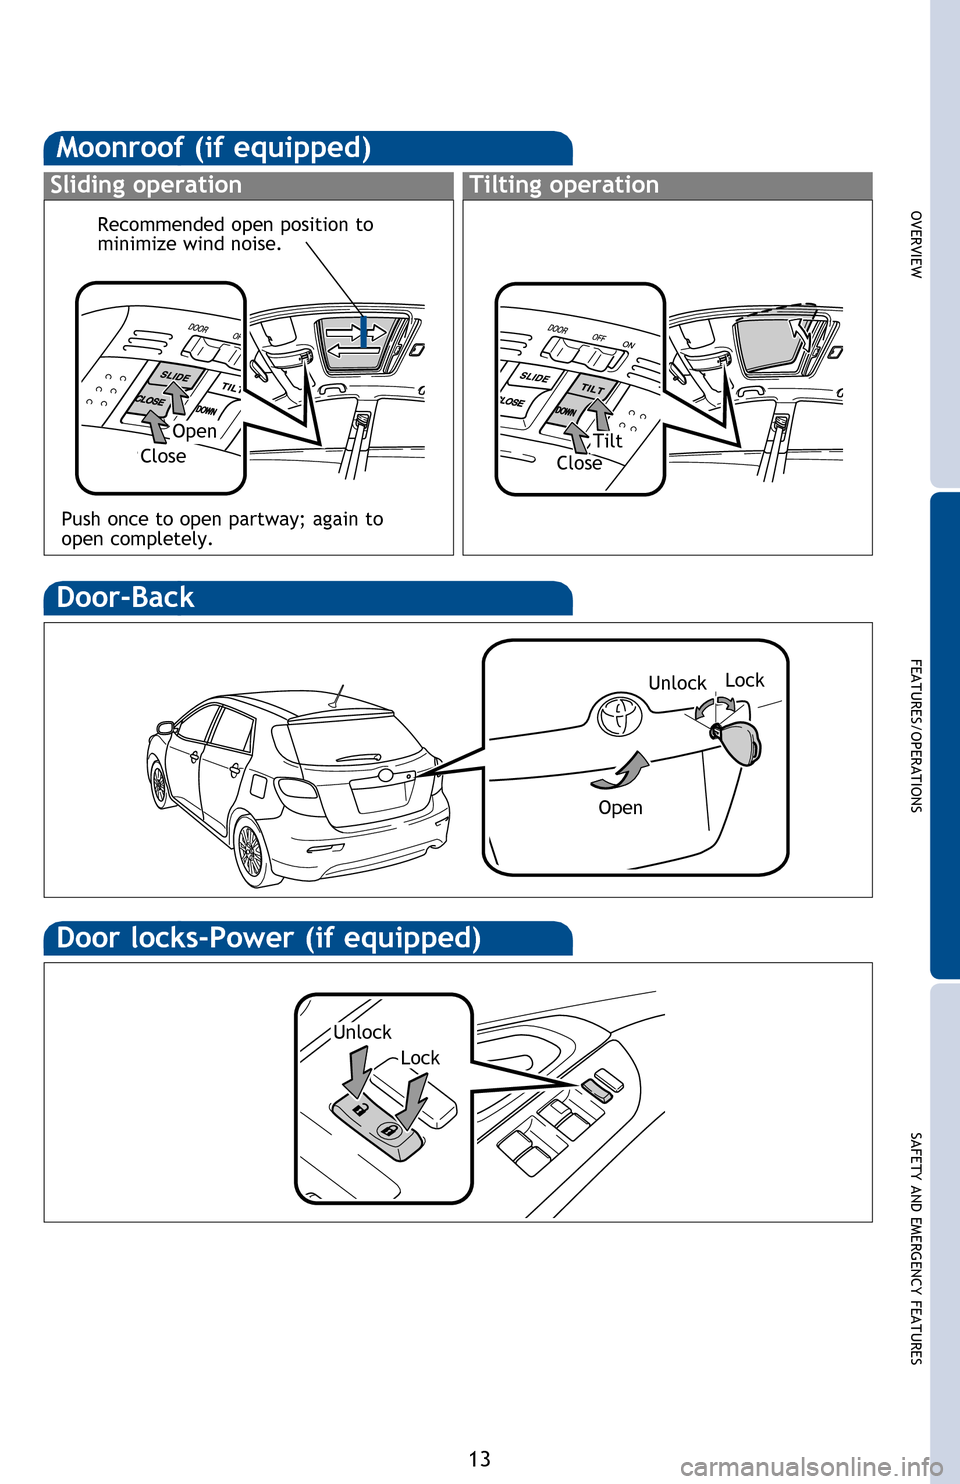
Moonroof (if equipped)
Sliding operation
Door locks-Power (if equipped)
Push once to open partway; again to
open completely.
NOTE: Rear wiper and washer operate only when back window is fully closed.
Interval wipe
Single wipe
SlowFast
Pull to wash and wipe Adjust frequency*
* Intermittent windshield
wiper frequency adjustment
Rotate
to increase/decrease
wipe
frequency.
126923_2013Matrix.indd 127/26/12 4:46 PM
Page 15 of 28
OVERVIEW
FEATURES/OPERATIONS
SAFETY AND EMERGENCY FEATURES
13
Window lock switch
Automatic operation (driver side only) Push the switch completely down and
release
to fully open. To stop the window partway, operate opposite direction.
Window
lock switch Deactivates all passenger windows. Driver’s window
remains
operable.
Door-Back
Lock
Unlock
Open
Moonroof (if equipped)
Sliding operationTilting operation
OpenTiltClose
Close
Recommended open position to
minimize
wind noise.
Door locks-Power (if equipped)
Lock
Unlock
Push once to open partway; again to
open
completely.
NOTE: Rear wiper and washer operate only when back window is fully closed.
Interval wipe
126923_2013Matrix.indd 137/21/12 1:37 AM
Page 22 of 28
20
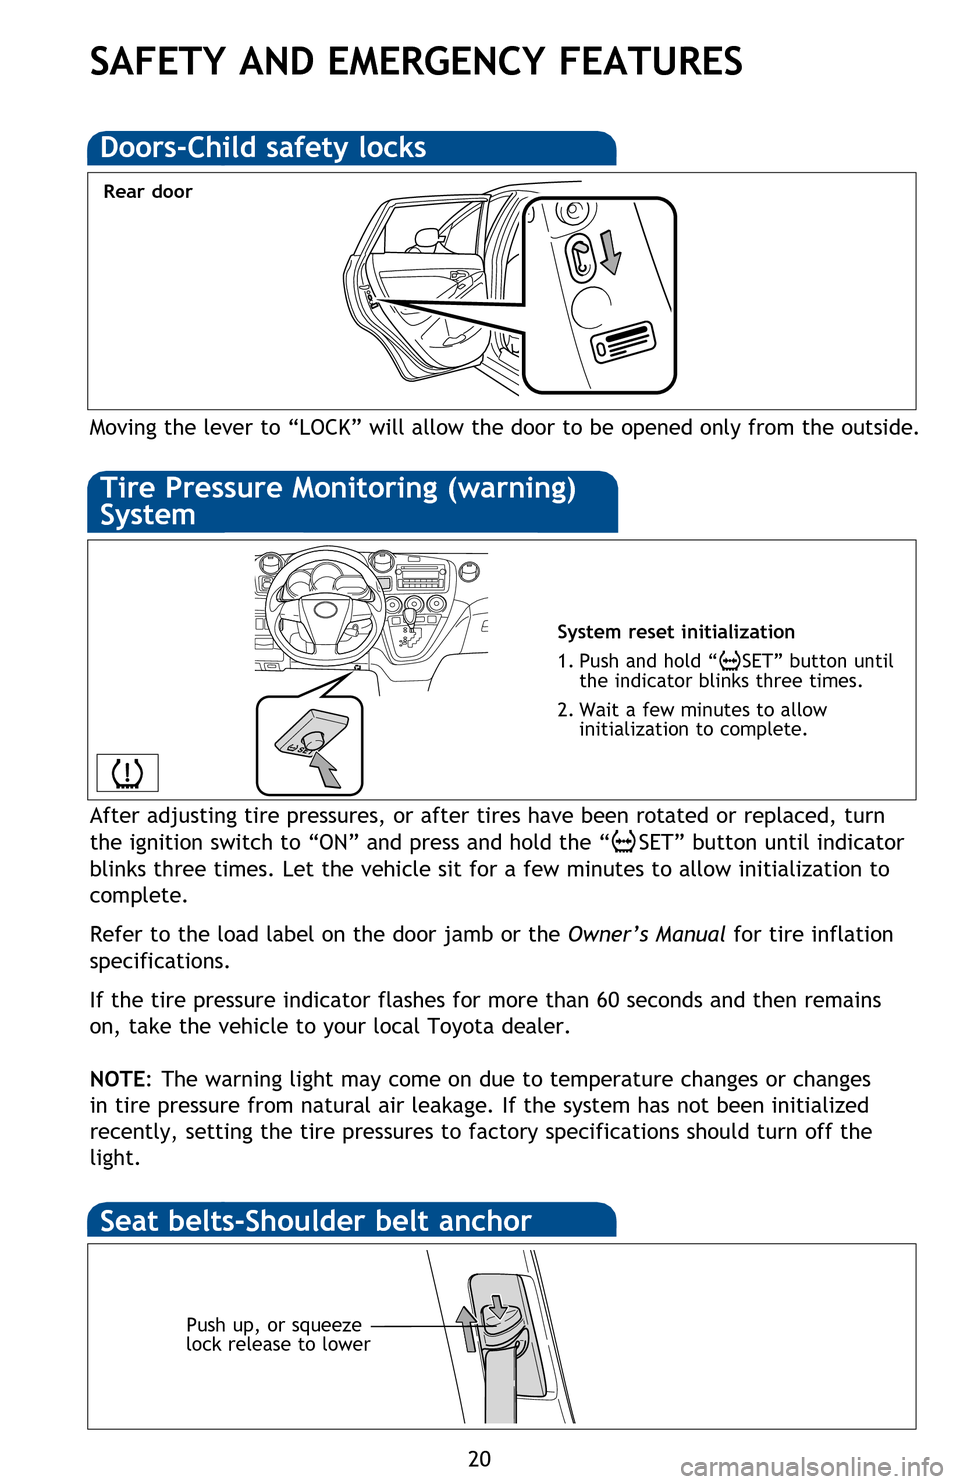
Moving the lever to “LOCK” will allow the door to be opened only from the outside.
Rear door
Doors-Child safety locks
System reset initialization
1. Push and hold “
SET” button until
the indicator blinks three times.
2.
Wait a few minutes to allow
initialization to complete.
Push up, or squeeze
lock release to lower
Seat belts-Shoulder belt anchor
SAFETY AND EMERGENCY FEATURES
If belt is fully extended, then retracted even slightly, it cannot be re-extended
beyond that point, unless fully retracted again. This feature is used to help hold
child restraint systems securely.
To find more information about seat belts, and how to install a child restraint
system, refer to the Owner’s Manual.
Seat belts
Spare tire & tools
Tool location
Removing the spare tire
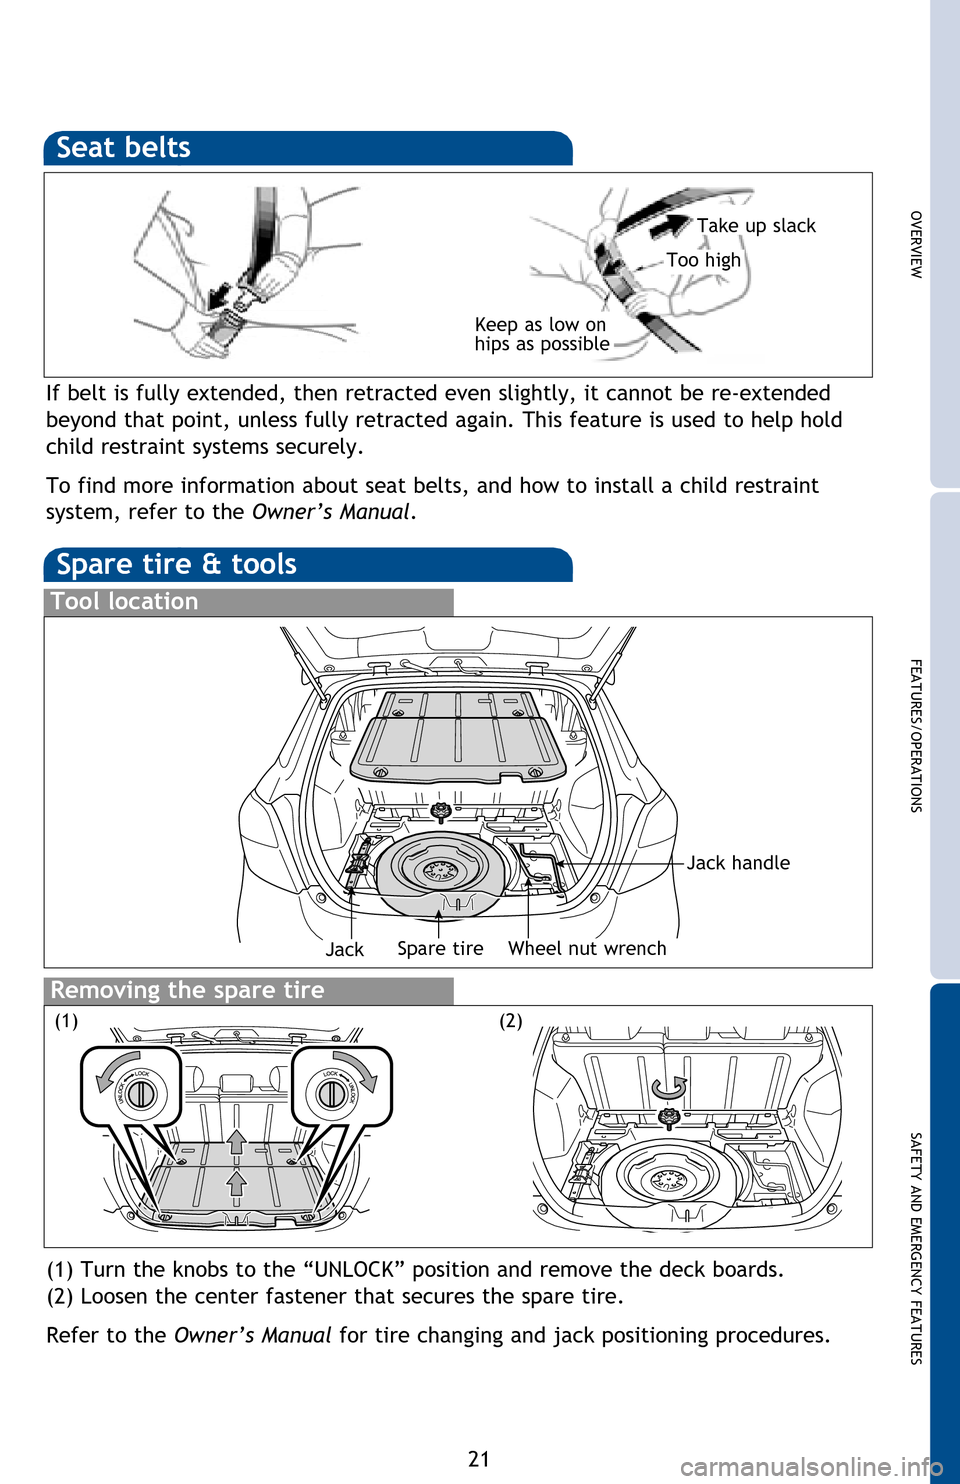
(1) Turn the knobs to the “UNLOCK” position and remove the deck boards.
(2) Loosen the center fastener that secures the spare tire.
Refer to the Owner’s Manual for tire changing and jack positioning procedures.
(1)
Tire Pressure Monitoring (warning)
System
After adjusting tire pressures, or after tires have been rotated or replaced, turn
the ignition switch to “ON” and press and hold the “
SET” button until indicator
blinks three times. Let the vehicle sit for a few minutes to allow initialization to
complete.
Refer to the load label on the door jamb or the Owner’s Manual for tire inflation
specifications.
If the tire pressure indicator flashes for more than 60 seconds and then remains
on, take the vehicle to your local Toyota dealer.
NOTE:
The warning light may come on due to temperature changes or changes
in tire pressure from natural air leakage. If the system has not been initialized
recently, setting the tire pressures to factory specifications should turn off the
light.
126923_2013Matrix.indd 207/21/12 1:37 AM
Page 23 of 28
OVERVIEW
FEATURES/OPERATIONS
SAFETY AND EMERGENCY FEATURES
21
Moving the lever to “LOCK” will allow the door to be opened only from the outside.
System reset initialization
1. Push and hold “
SET” button until
the indicator blinks three times.
2.
Wait a few minutes to allow
initialization to complete.
If belt is fully extended, then retracted even slightly, it cannot be re-extended
beyond that point, unless fully retracted again. This feature is used to help hold
child restraint systems securely.
To find more information about seat belts, and how to install a child restraint
system, refer to the Owner’s Manual.
Keep as low on
hips as possible
Take up slack
Too high
Seat belts
Spare tire & tools
Tool location
Removing the spare tire
(1) Turn the knobs to the “UNLOCK” position and remove the deck boards.
(2) Loosen the center fastener that secures the spare tire.
Refer to the Owner’s Manual for tire changing and jack positioning procedures.
Spare tireJack
(1)(2)
Wheel nut wrench
Jack handle
After adjusting tire pressures, or after tires have been rotated or replaced, turn
the ignition switch to “ON” and press and hold the “
SET” button until indicator
blinks three times. Let the vehicle sit for a few minutes to allow initialization to
complete.
Refer to the load label on the door jamb or the Owner’s Manual for tire inflation
specifications.
If the tire pressure indicator flashes for more than 60 seconds and then remains
on, take the vehicle to your local Toyota dealer.
NOTE:
The warning light may come on due to temperature changes or changes
in tire pressure from natural air leakage. If the system has not been initialized
recently, setting the tire pressures to factory specifications should turn off the
light.
126923_2013Matrix.indd 217/21/12 1:37 AM