ignition TOYOTA MATRIX 2013 E140 / 2.G Quick Reference Guide
[x] Cancel search | Manufacturer: TOYOTA, Model Year: 2013, Model line: MATRIX, Model: TOYOTA MATRIX 2013 E140 / 2.GPages: 28, PDF Size: 4.22 MB
Page 4 of 28
2
OVERVIEW
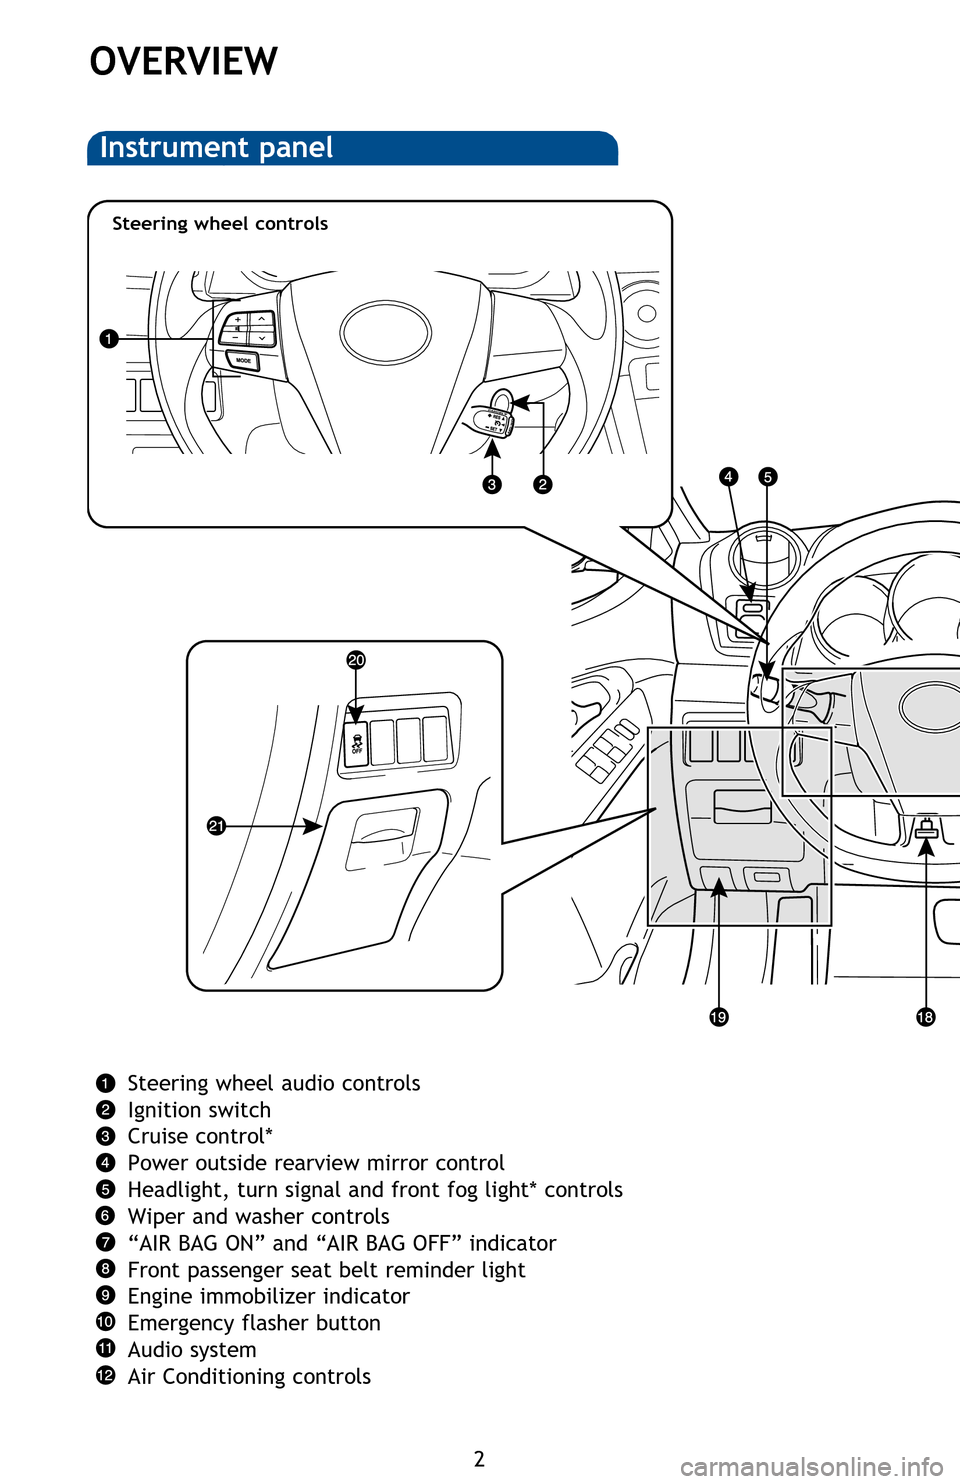
Instrument panel
Steering wheel audio controls
Ignition switch
Cruise control*
Power outside rearview mirror control
Headlight, turn signal and front fog light*
controls
Wiper and washer controls
“AIR BAG ON” and “AIR BAG OFF” indicator
Front passenger seat belt reminder light
Engine immobilizer indicator
Emergency flasher button
Audio system
Air Conditioning controls
Outside rearview mirrors*/Rear window defogger button
Power outlet (115V)*
AUX or AUX/USB port
Power outlet (12V) or cigarette lighter
Tire Pressure Monitoring (warning) System reset
Tilt and telescopic steering control
Hood lock release lever
VSC/TRAC OFF switch
Auxiliary storage
* If equipped
Steering wheel controls
126923_2013Matrix.indd 27/21/12 1:36 AM
Page 5 of 28
OVERVIEW
FEATURES/OPERATIONS
SAFETY AND EMERGENCY FEATURES
3
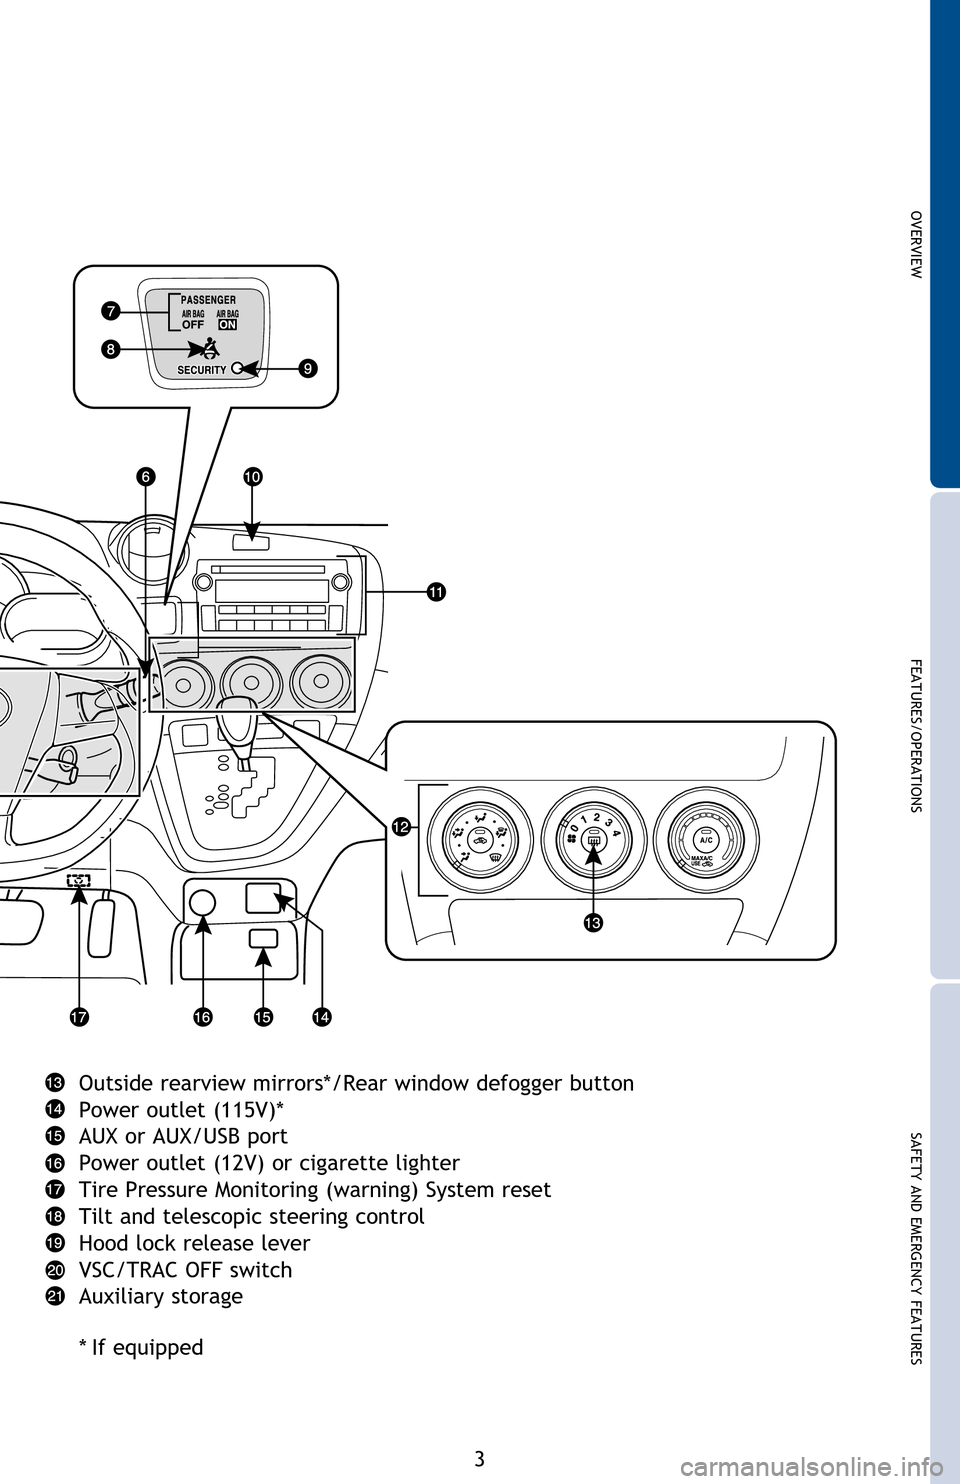
Steering wheel audio controls
Ignition switch
Cruise control*
Power outside rearview mirror control
Headlight, turn signal and front fog light*
controls
Wiper and washer controls
“AIR BAG ON” and “AIR BAG OFF” indicator
Front passenger seat belt reminder light
Engine immobilizer indicator
Emergency flasher button
Audio system
Air Conditioning controls
Outside rearview mirrors*/Rear window defogger button
Power outlet (115V)*
AUX or AUX/USB port
Power outlet (12V) or cigarette lighter
Tire Pressure Monitoring (warning) System reset
Tilt and telescopic steering control
Hood lock release lever
VSC/TRAC OFF switch
Auxiliary storage
*
If equipped
126923_2013Matrix.indd 37/21/12 1:36 AM
Page 10 of 28
8
FEATURES/OPERATIONS
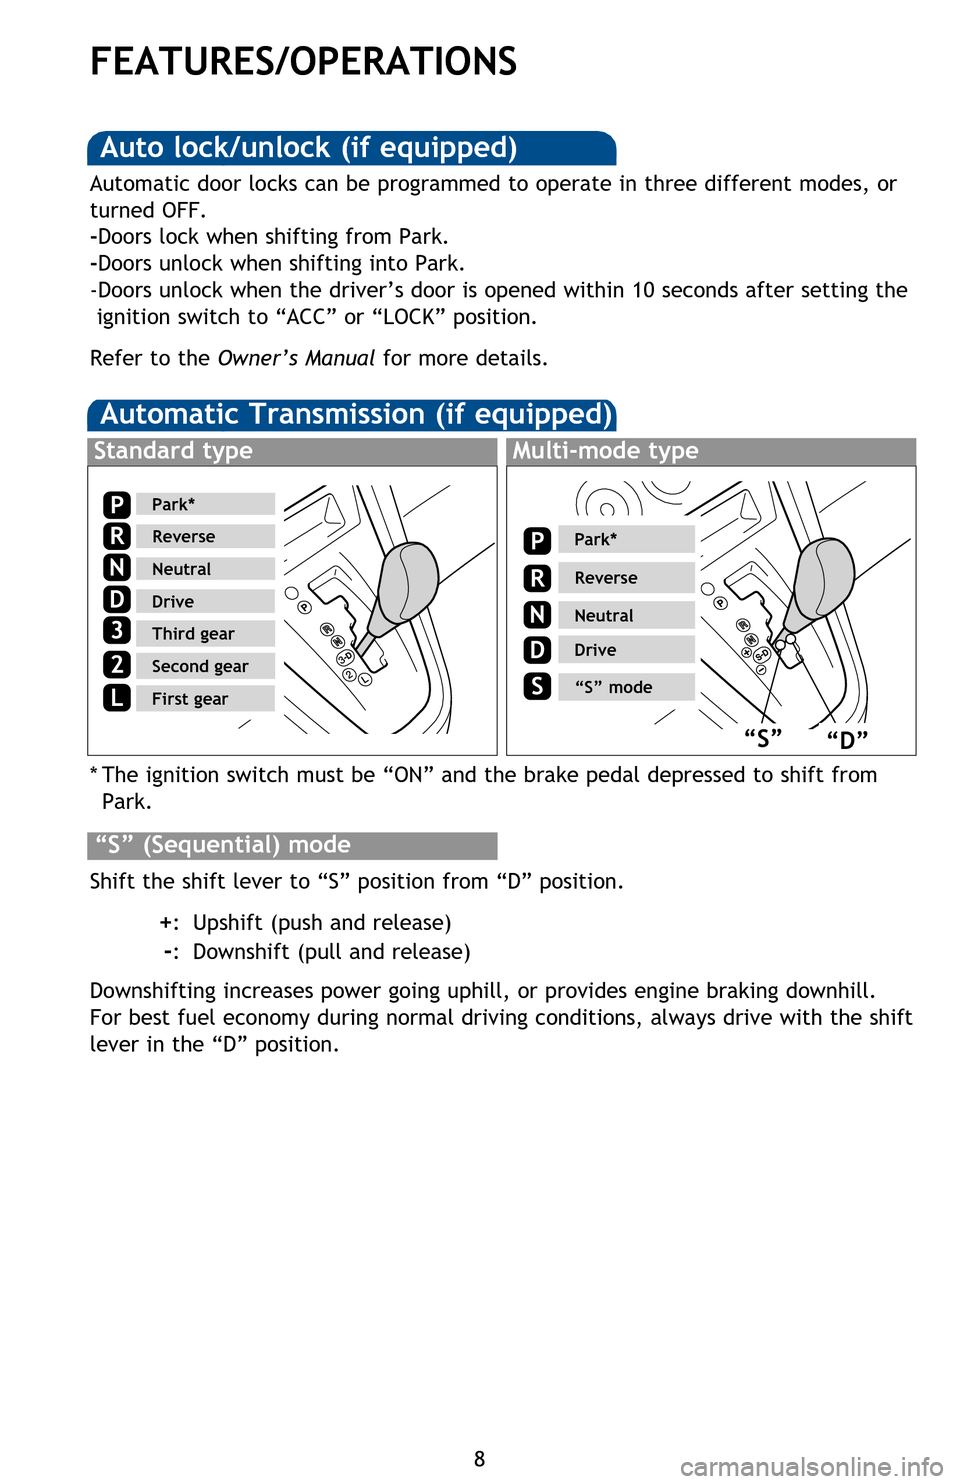
Automatic Transmission (if equipped)
* The ignition switch must be “ON” and the brake pedal depressed to shift from
Park.
Shift the shift lever to “S” position from “D” position.
+: Upshift (push and release)
-: Downshift (pull and release)
Downshifting increases power going uphill, or provides engine braking downhill.
For best fuel economy during normal driving conditions, always drive with the shift
lever in the “D” position.
“S” (Sequential) mode
3
2L
Standard typeMulti-mode type
Park*
Reverse
Neutral
Drive
“S” mode
Park*
Reverse
Neutral
Drive
Third gear
Second gear
First gear
3
2
L
“S”“D”
P
R
N
D
S
P
R
N
D
Automatic door locks can be programmed to operate in three different modes, or
turned OFF.
-Doors lock when shifting from Park.
-Doors unlock when shifting into Park.
-Doors unlock when the driver’s door is opened within 10 seconds after setting the ignition switch to “ACC” or “LOCK” position.
Refer to the Owner’s Manual for more details.
Seat adjustments-Rear
Seat adjustments-Front
Seat position (forward/backward)
Height crank (driver side only)
Seatback angle
Seats-Head restraints
Front
Auto lock/unlock (if equipped)
126923_2013Matrix.indd 87/21/12 1:36 AM
Page 11 of 28
OVERVIEW
FEATURES/OPERATIONS
SAFETY AND EMERGENCY FEATURES
9
* The ignition switch must be “ON” and the brake pedal depressed to shift from
Park.
Shift the shift lever to “S” position from “D” position.
+: Upshift (push and release)
-: Downshift (pull and release)
Downshifting increases power going uphill, or provides engine braking downhill.
For best fuel economy during normal driving conditions, always drive with the shift
lever in the “D” position.
Automatic door locks can be programmed to operate in three different modes, or
turned OFF.
-Doors lock when shifting from Park.
-Doors unlock when shifting into Park.
-Doors unlock when the driver’s door is opened within 10 seconds after setting the ignition switch to “ACC” or “LOCK” position.
Refer to the Owner’s Manual for more details.
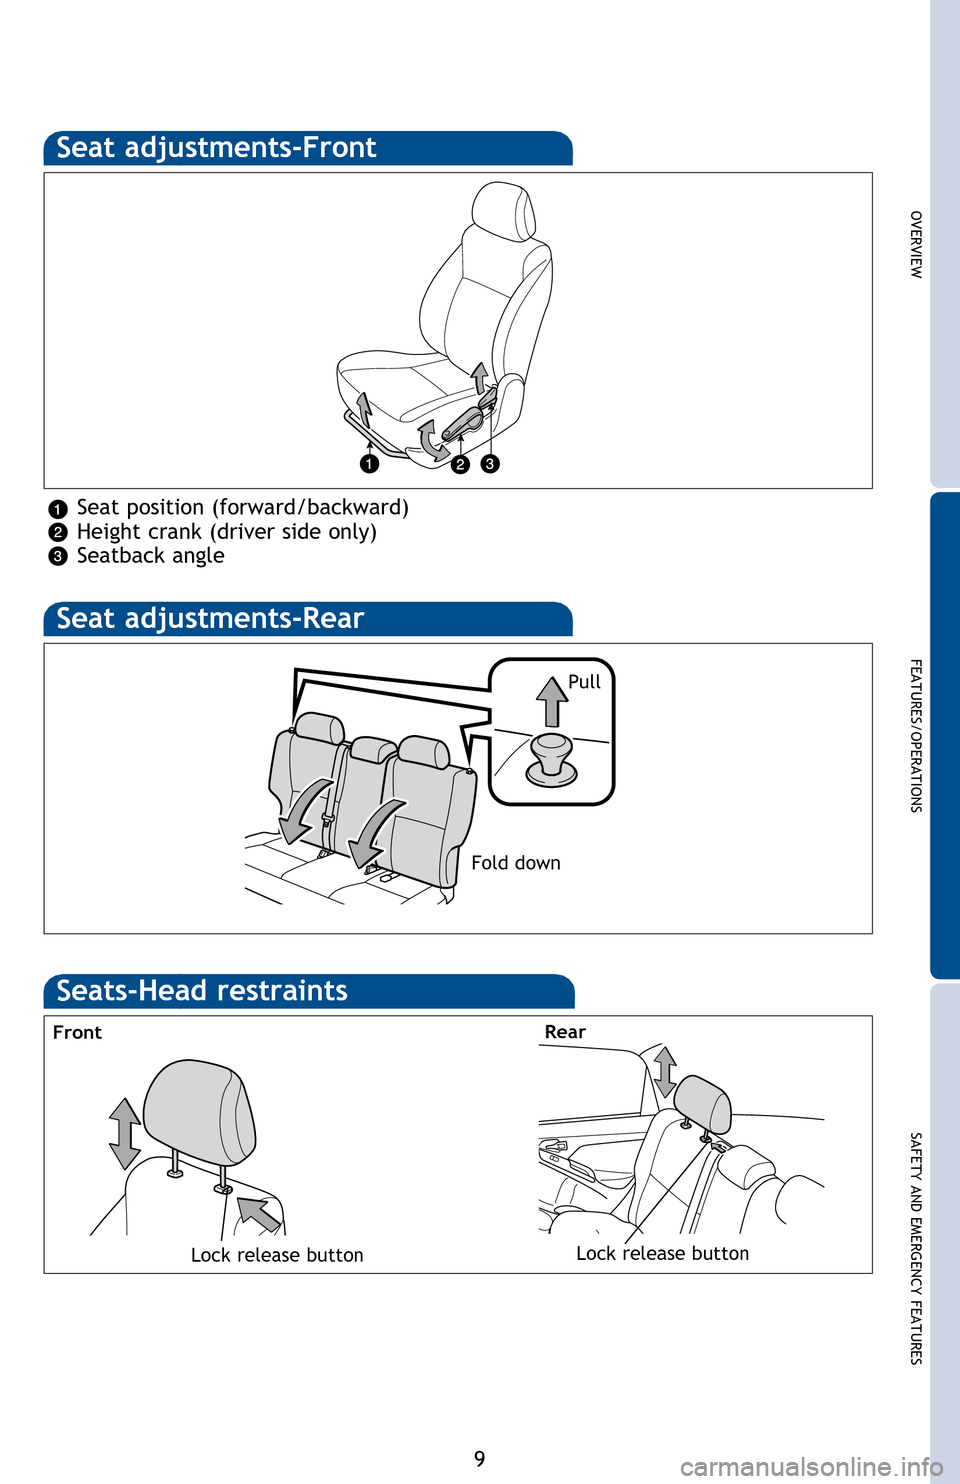
Seat adjustments-Rear
Seat adjustments-Front
Seat position (forward/backward)
Height crank (driver side only)
Seatback angle
Fold down Pull
Seats-Head restraints
Front
Rear
Lock release buttonLock release button
126923_2013Matrix.indd 97/21/12 1:36 AM
Page 20 of 28
18
FEATURES/OPERATIONS
Power outlet-12V DC (if equipped)
Power outlet-115V AC (if equipped)
Designed for 12V car accessories.
The ignition switch must be in the “ACC” or “ON” position.
The ignition switch must be in the “ON” position.
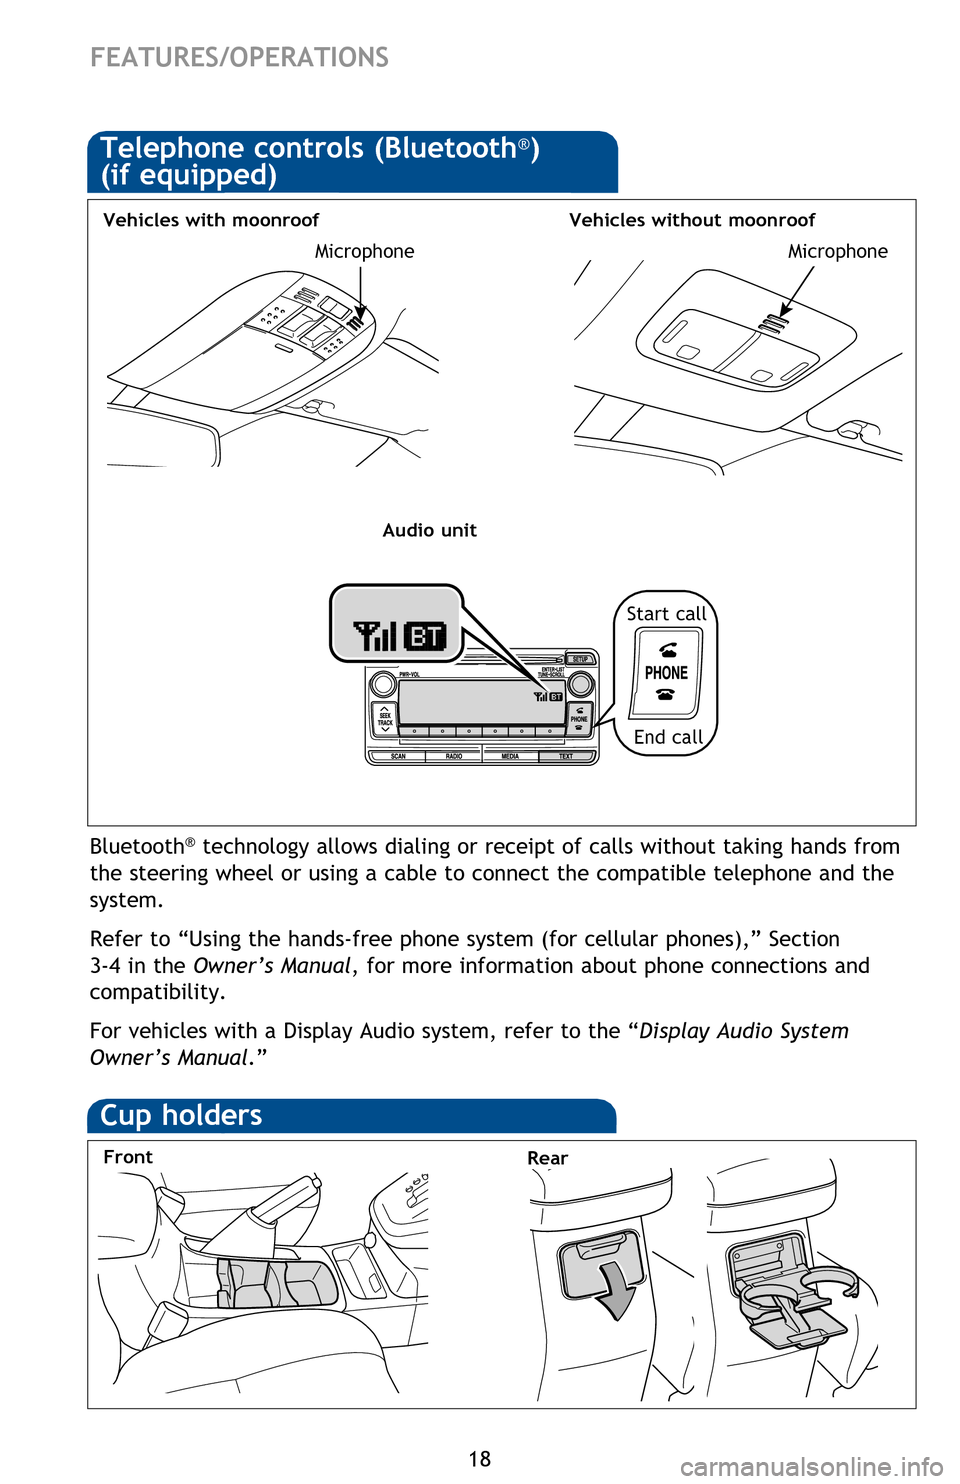
Bluetooth® technology allows dialing or receipt of calls without taking hands from
the steering wheel or using a cable to connect the compatible telephone and the
system.
Refer to “Using the hands-free phone system (for cellular phones),” Section
3-4 in the Owner’s Manual , for more information about phone connections and
compatibility.
For vehicles with a Display Audio system, refer to the “Display Audio System
Owner’s Manual. ”
Telephone controls (Bluetooth®)
(if equipped)
Vehicles without moonroofVehicles with moonroof
Cup holders
FrontRear
Bottle holders
Front
MicrophoneMicrophone
Audio unit
End call
Start call
126923_2013Matrix.indd 187/21/12 1:37 AM
Page 21 of 28
OVERVIEW
FEATURES/OPERATIONS
SAFETY AND EMERGENCY FEATURES
19
Power outlet-12V DC (if equipped)
Power outlet-115V AC (if equipped)
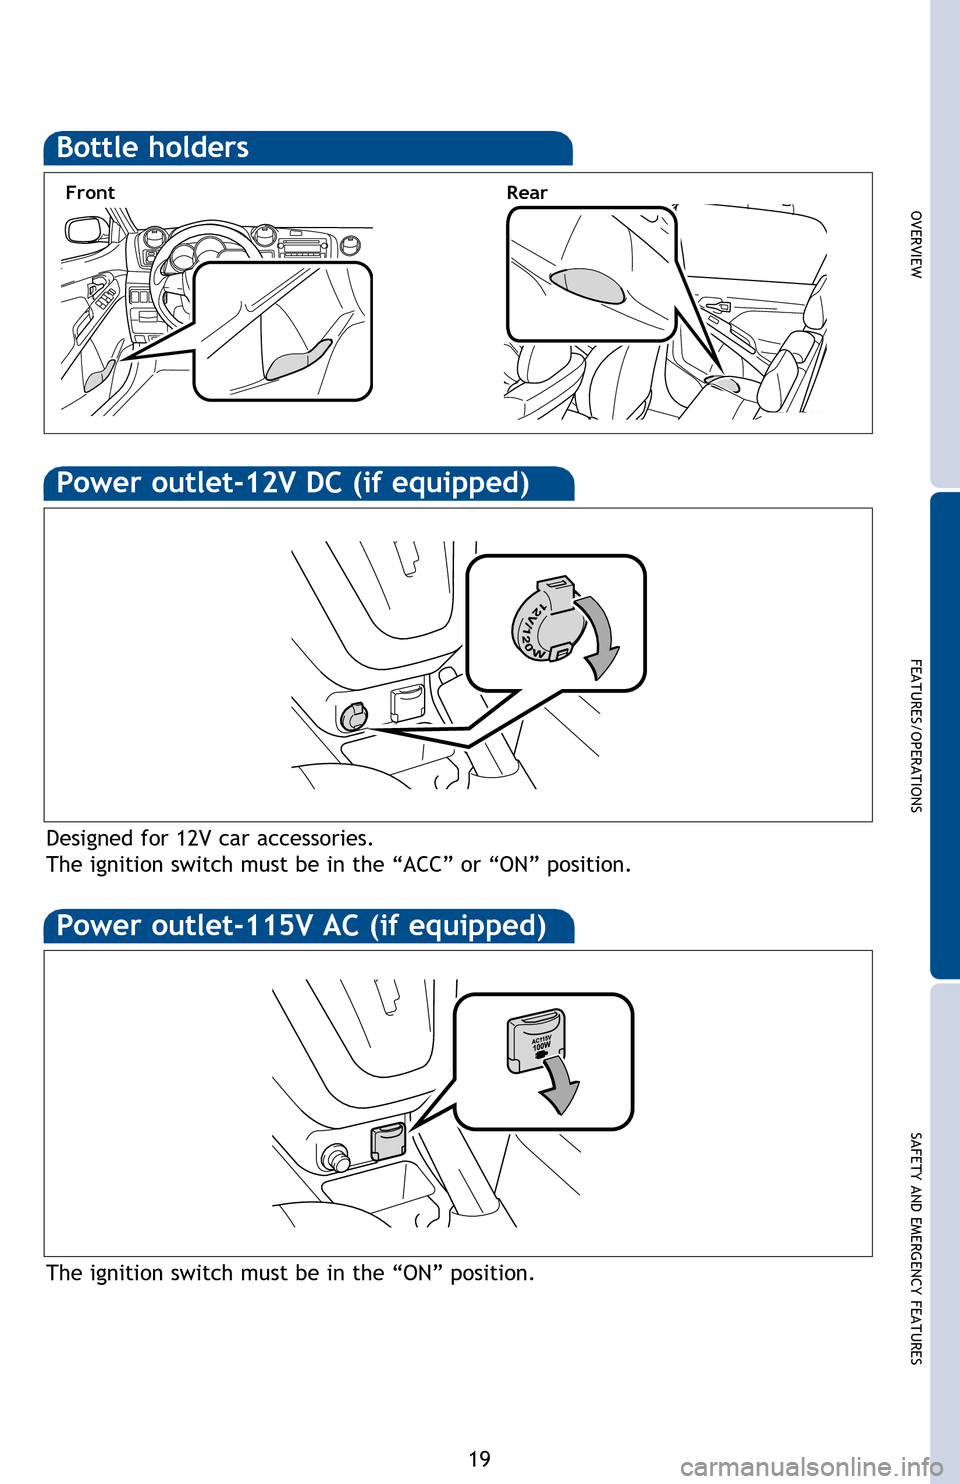
Designed for 12V car accessories.
The ignition switch must be in the “ACC” or “ON” position.
The ignition switch must be in the “ON” position.
Bluetooth® technology allows dialing or receipt of calls without taking hands from
the steering wheel or using a cable to connect the compatible telephone and the
system.
Refer to “Using the hands-free phone system (for cellular phones),” Section
3-4 in the Owner’s Manual , for more information about phone connections and
compatibility.
For vehicles with a Display Audio system, refer to the “Display Audio System
Owner’s Manual. ”
Vehicles without moonroof
Bottle holders
Front Rear
Microphone
126923_2013Matrix.indd 197/21/12 1:37 AM
Page 22 of 28
20
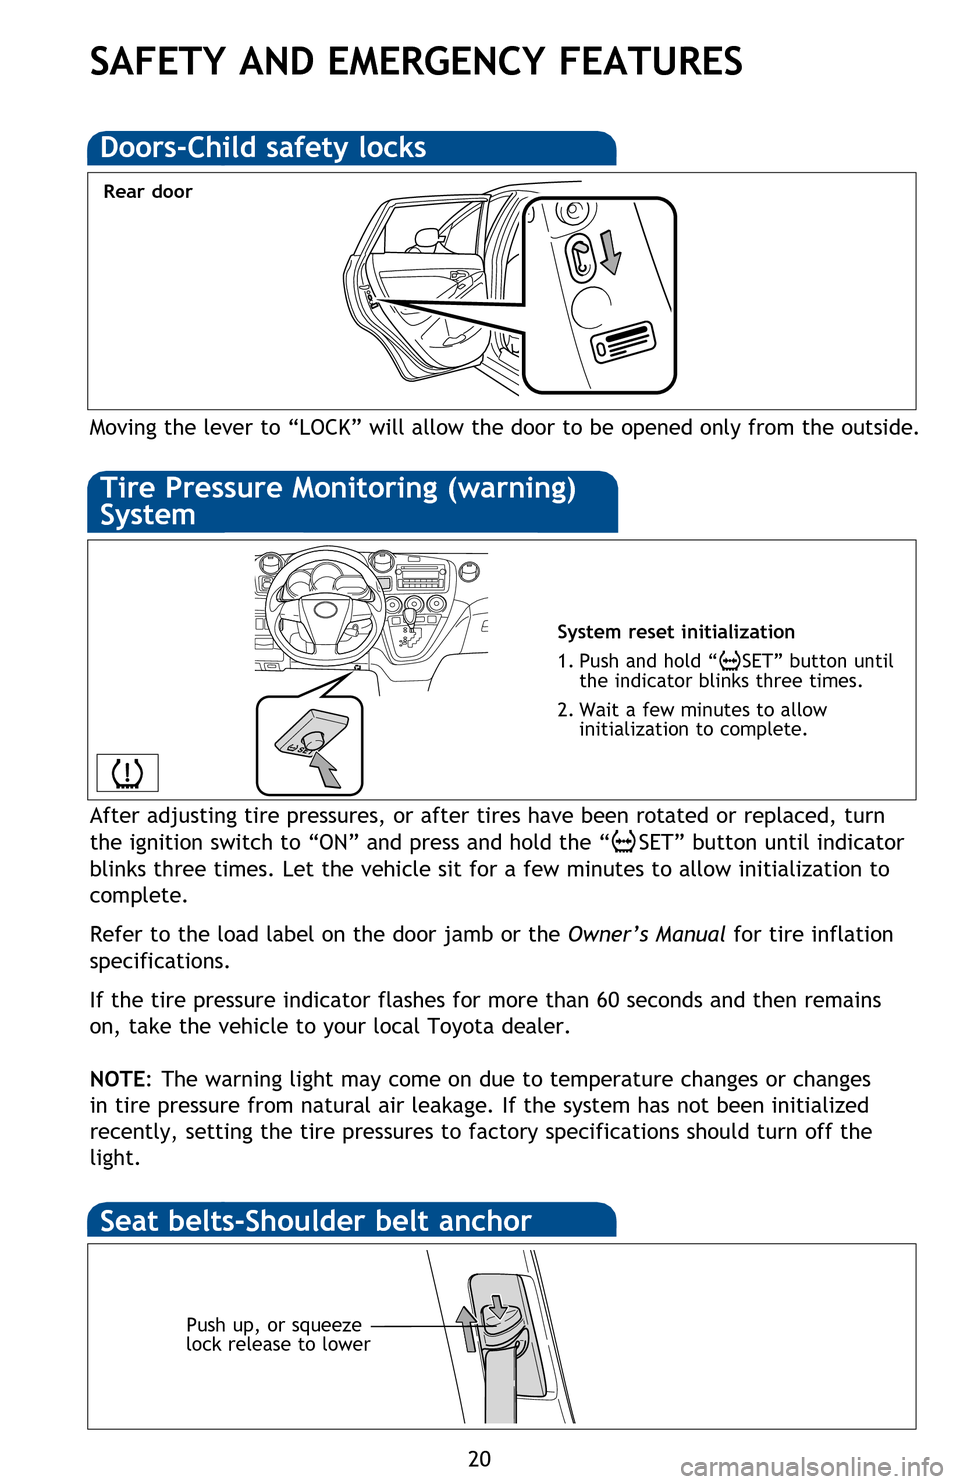
Moving the lever to “LOCK” will allow the door to be opened only from the outside.
Rear door
Doors-Child safety locks
System reset initialization
1. Push and hold “
SET” button until
the indicator blinks three times.
2.
Wait a few minutes to allow
initialization to complete.
Push up, or squeeze
lock release to lower
Seat belts-Shoulder belt anchor
SAFETY AND EMERGENCY FEATURES
If belt is fully extended, then retracted even slightly, it cannot be re-extended
beyond that point, unless fully retracted again. This feature is used to help hold
child restraint systems securely.
To find more information about seat belts, and how to install a child restraint
system, refer to the Owner’s Manual.
Seat belts
Spare tire & tools
Tool location
Removing the spare tire
(1) Turn the knobs to the “UNLOCK” position and remove the deck boards.
(2) Loosen the center fastener that secures the spare tire.
Refer to the Owner’s Manual for tire changing and jack positioning procedures.
(1)
Tire Pressure Monitoring (warning)
System
After adjusting tire pressures, or after tires have been rotated or replaced, turn
the ignition switch to “ON” and press and hold the “
SET” button until indicator
blinks three times. Let the vehicle sit for a few minutes to allow initialization to
complete.
Refer to the load label on the door jamb or the Owner’s Manual for tire inflation
specifications.
If the tire pressure indicator flashes for more than 60 seconds and then remains
on, take the vehicle to your local Toyota dealer.
NOTE:
The warning light may come on due to temperature changes or changes
in tire pressure from natural air leakage. If the system has not been initialized
recently, setting the tire pressures to factory specifications should turn off the
light.
126923_2013Matrix.indd 207/21/12 1:37 AM
Page 23 of 28
OVERVIEW
FEATURES/OPERATIONS
SAFETY AND EMERGENCY FEATURES
21
Moving the lever to “LOCK” will allow the door to be opened only from the outside.
System reset initialization
1. Push and hold “
SET” button until
the indicator blinks three times.
2.
Wait a few minutes to allow
initialization to complete.
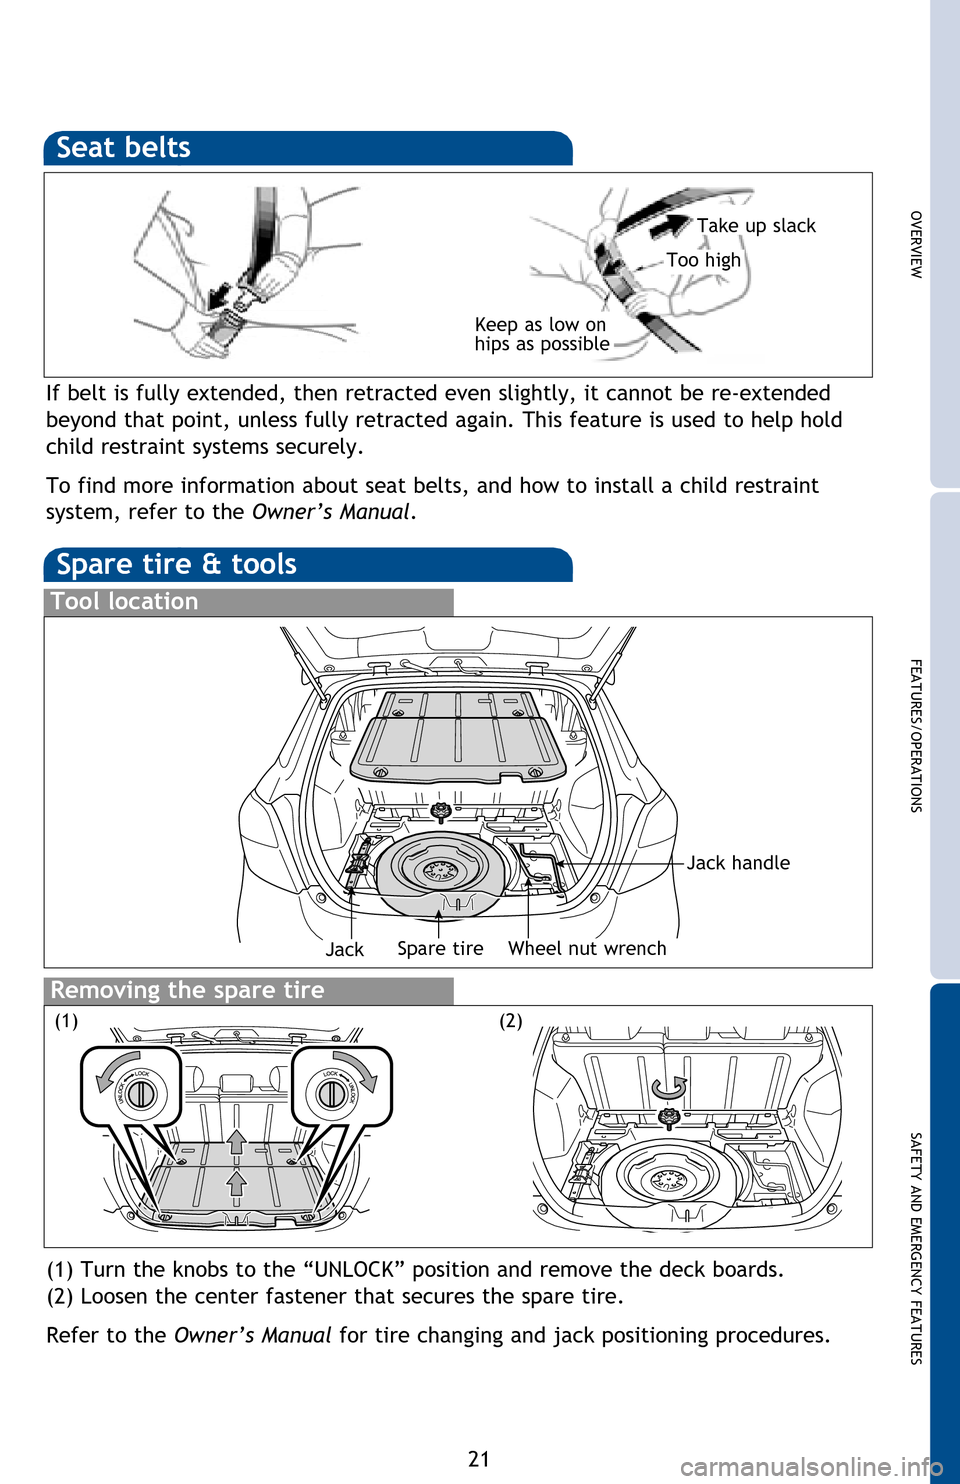
If belt is fully extended, then retracted even slightly, it cannot be re-extended
beyond that point, unless fully retracted again. This feature is used to help hold
child restraint systems securely.
To find more information about seat belts, and how to install a child restraint
system, refer to the Owner’s Manual.
Keep as low on
hips as possible
Take up slack
Too high
Seat belts
Spare tire & tools
Tool location
Removing the spare tire
(1) Turn the knobs to the “UNLOCK” position and remove the deck boards.
(2) Loosen the center fastener that secures the spare tire.
Refer to the Owner’s Manual for tire changing and jack positioning procedures.
Spare tireJack
(1)(2)
Wheel nut wrench
Jack handle
After adjusting tire pressures, or after tires have been rotated or replaced, turn
the ignition switch to “ON” and press and hold the “
SET” button until indicator
blinks three times. Let the vehicle sit for a few minutes to allow initialization to
complete.
Refer to the load label on the door jamb or the Owner’s Manual for tire inflation
specifications.
If the tire pressure indicator flashes for more than 60 seconds and then remains
on, take the vehicle to your local Toyota dealer.
NOTE:
The warning light may come on due to temperature changes or changes
in tire pressure from natural air leakage. If the system has not been initialized
recently, setting the tire pressures to factory specifications should turn off the
light.
126923_2013Matrix.indd 217/21/12 1:37 AM