fuse TOYOTA MIRAI 2016 1.G Owners Manual
[x] Cancel search | Manufacturer: TOYOTA, Model Year: 2016, Model line: MIRAI, Model: TOYOTA MIRAI 2016 1.GPages: 464, PDF Size: 8.05 MB
Page 4 of 464

TABLE OF CONTENTS4
MIRAI_OM_USA_OM62004U6-1. Using the air conditioning
system and defogger
Automatic air conditioning system............................. 258
Heated steering wheel/ seat heaters .................... 267
6-2. Using the interior lights Interior lights list ................ 269• Interior lights ................. 270
• Personal lights .............. 270
6-3. Using the storage features List of storage features...... 272• Glove box...................... 273
• Console box .................. 273
• Cup holders .................. 274
• Bottle holders ................ 276
• Auxiliary box ................. 276
Trunk features ................... 277
6-4. Other interior features Other interior features ....... 279• Sun visors ..................... 279
• Vanity mirrors................ 279
• Clock ............................. 280
• Armrest ......................... 281
• Coat hooks.................... 281
• Assist grips ................... 282
• Power outlet .................. 283
• Wireless charger ........... 284
Garage door opener .......... 292
Safety Connect.................. 299 7-1. Maintenance and care
Cleaning and protecting the vehicle exterior .......... 306
Cleaning and protecting the vehicle interior ........... 310
7-2. Maintenance Maintenance requirements ................... 313
General maintenance ........ 315
7-3. Do-it-yourself maintenance
Do-it-yourself service precautions ...................... 318
Hood .................................. 320
Positioning a floor jack....... 321
Motor compartment ........... 323
12-volt battery .................... 328
Tires................................... 332
Replacing the tire............... 339
Tire inflation pressure ........ 346
Wheels............................... 349
Air conditioning filter .......... 351
Electronic key battery ........ 353
Checking and replacing fuses ................................ 355
Light bulbs ......................... 358
6Interior features7Maintenance and care
Page 305 of 464
305
7Maintenance and care
MIRAI_OM_USA_OM62004U7-1. Maintenance and care
Cleaning and protecting the vehicle exterior .......... 306
Cleaning and protecting the vehicle interior ........... 310
7-2. Maintenance Maintenance requirements ................... 313
General maintenance........ 315
7-3. Do-it-yourself maintenance
Do-it-yourself service precautions ..................... 318
Hood ................................. 320
Positioning a floor jack ...... 321
Motor compartment ........... 323
12-volt battery ................... 328
Tires .................................. 332
Replacing the tire .............. 339
Tire inflation pressure ....... 346
Wheels .............................. 349
Air conditioning filter.......... 351
Electronic key battery........ 353
Checking and replacing fuses ............................... 355
Light bulbs......................... 358
Page 318 of 464
3187-3. Do-it-yourself maintenance
MIRAI_OM_USA_OM62004U
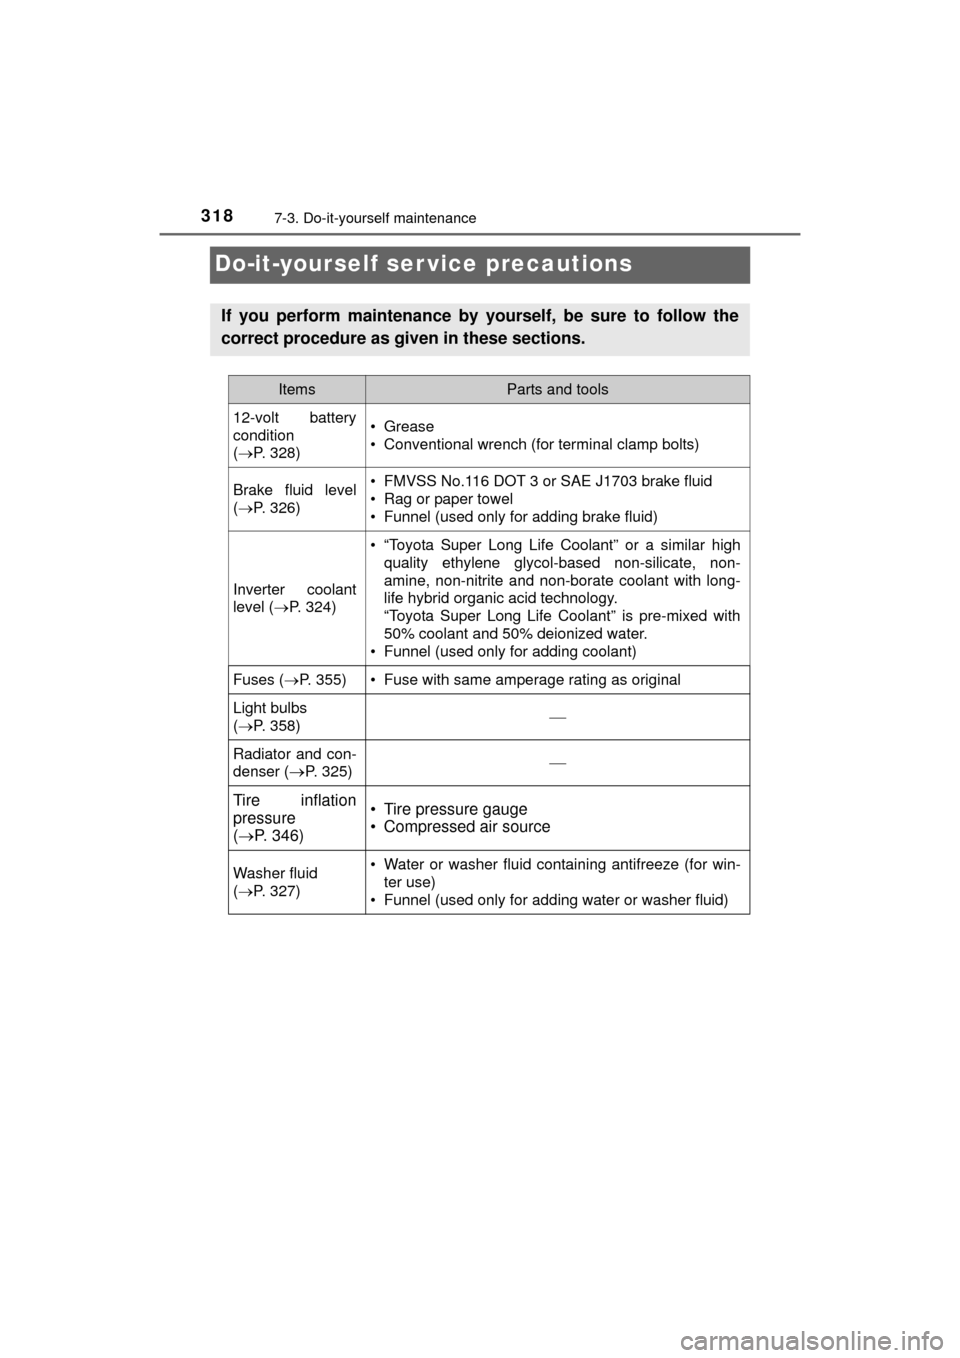
Do-it-yourself ser vice precautions
If you perform maintenance by yourself, be sure to follow the
correct procedure as given in these sections.
ItemsParts and tools
12-volt battery
condition
(P. 328)•Grease
• Conventional wrench (for terminal clamp bolts)
Brake fluid level
(P. 326)• FMVSS No.116 DOT 3 or SAE J1703 brake fluid
• Rag or paper towel
• Funnel (used only for adding brake fluid)
Inverter coolant
level ( P. 324)
• “Toyota Super Long Life Coolant” or a similar high
quality ethylene glycol-based non-silicate, non-
amine, non-nitrite and non-borate coolant with long-
life hybrid organic acid technology.
“Toyota Super Long Life Coolant” is pre-mixed with
50% coolant and 50% deionized water.
• Funnel (used only for adding coolant)
Fuses ( P. 355)• Fuse with same amperage rating as original
Light bulbs
(P. 358)
Radiator and con-
denser (
P. 325)
Tire inflation
pressure
( P. 346)• Tire pressure gauge
• Compressed air source
Washer fluid
(P. 327)• Water or washer fluid containing antifreeze (for win-
ter use)
• Funnel (used only for adding water or washer fluid)
Page 323 of 464
3237-3. Do-it-yourself maintenance
MIRAI_OM_USA_OM62004U
7
Maintenance and care
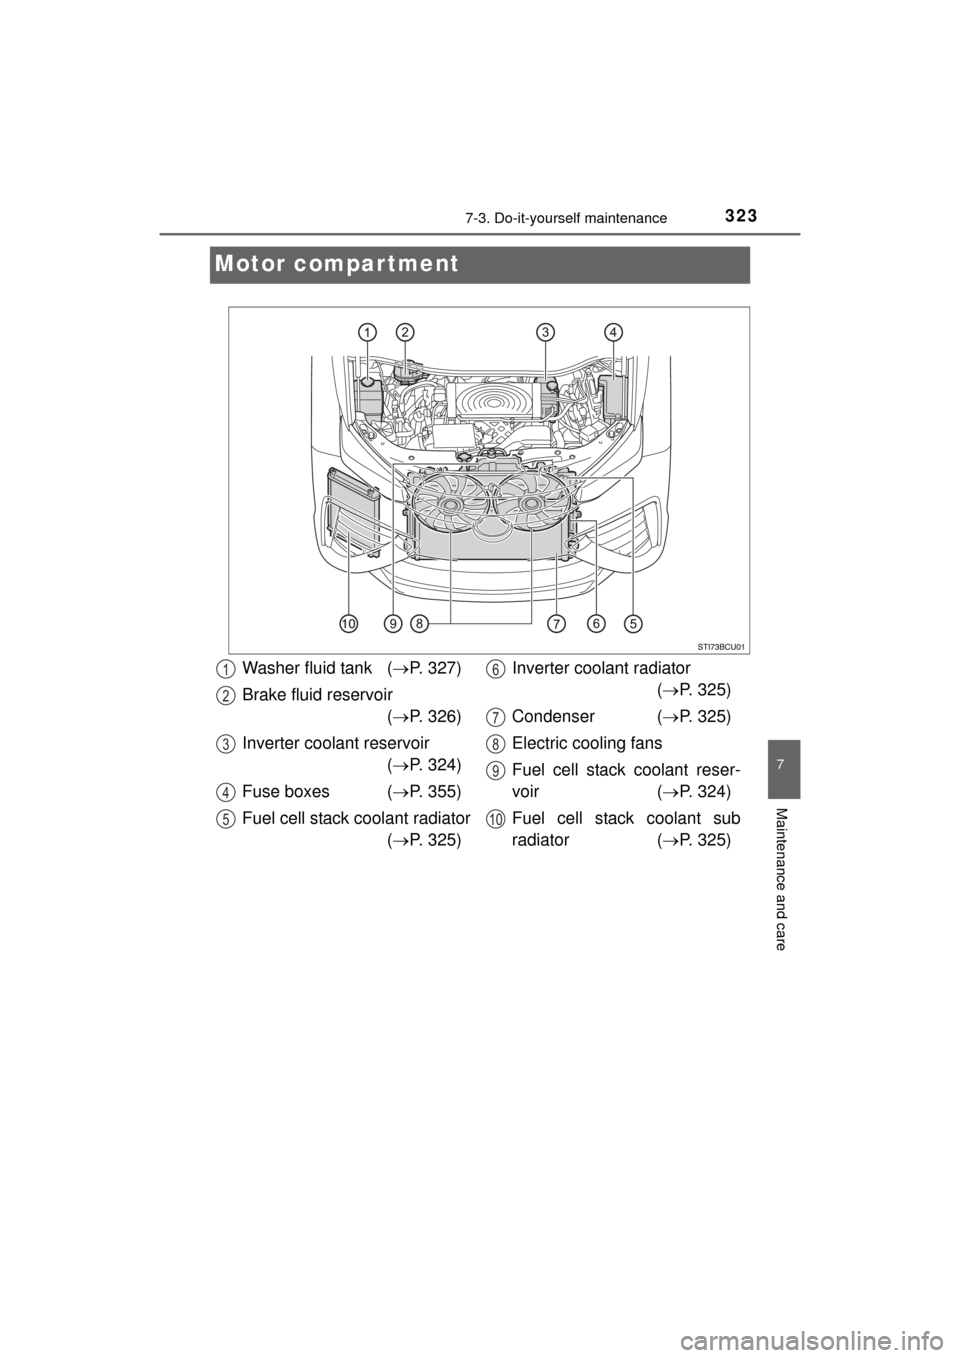
Motor compartment
Washer fluid tank (P. 327)
Brake fluid reservoir ( P. 326)
Inverter coolant reservoir ( P. 324)
Fuse boxes ( P. 355)
Fuel cell stack coolant radiator ( P. 325) Inverter coolant radiator
( P. 325)
Condenser ( P. 325)
Electric cooling fans
Fuel cell stack coolant reser-
voir ( P. 324)
Fuel cell stack coolant sub
radiator ( P. 325)1
2
3
4
5
6
7
8
9
10
Page 355 of 464
3557-3. Do-it-yourself maintenance
MIRAI_OM_USA_OM62004U
7
Maintenance and care
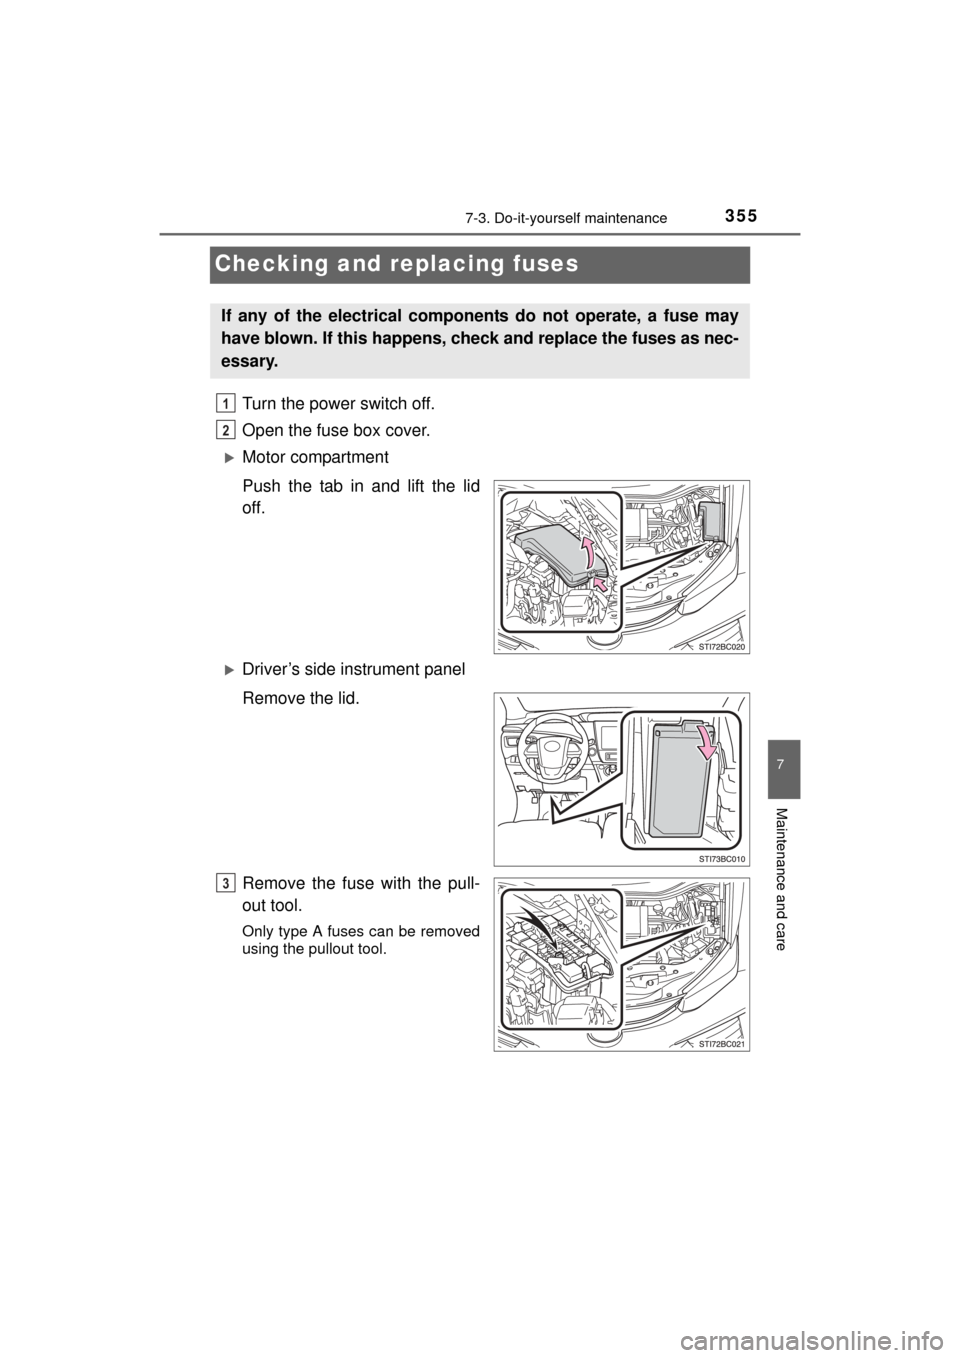
Checking and replacing fuses
Turn the power switch off.
Open the fuse box cover.
Motor compartment
Push the tab in and lift the lid
off.
Driver’s side instrument panel
Remove the lid.
Remove the fuse with the pull-
out tool.
Only type A fuses can be removed
using the pullout tool.
If any of the electrical components do not operate, a fuse may
have blown. If this happens, check and replace the fuses as nec-
essary.
1
2
3
Page 356 of 464
3567-3. Do-it-yourself maintenance
MIRAI_OM_USA_OM62004U
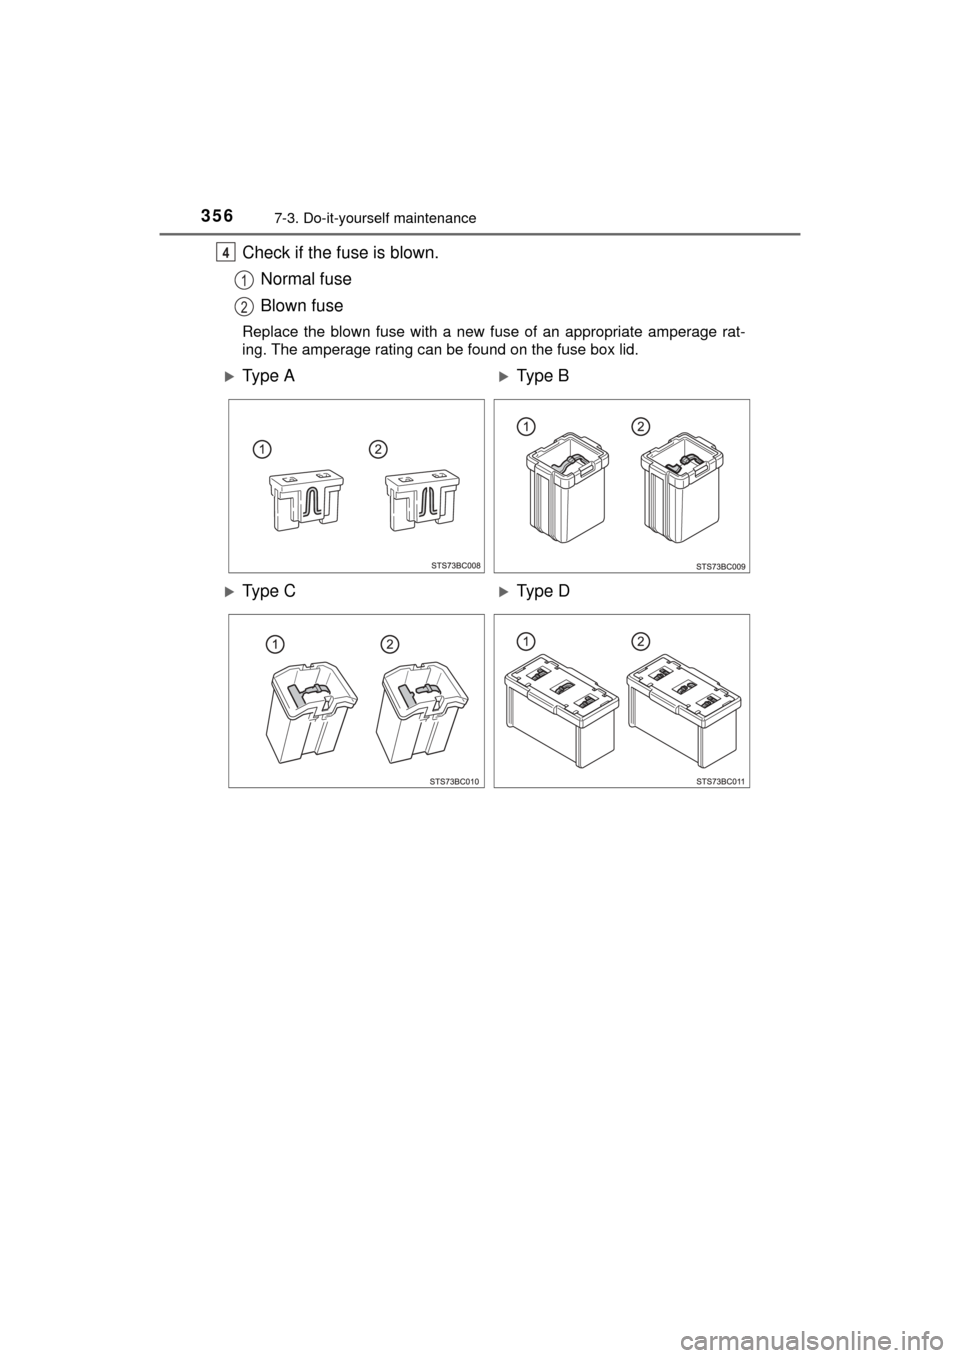
Check if the fuse is blown.Normal fuse
Blown fuse
Replace the blown fuse with a new fuse of an appropriate amperage rat-
ing. The amperage rating can be found on the fuse box lid.
4
1
2
Ty p e AType B
Ty p e CType D
Page 357 of 464
3577-3. Do-it-yourself maintenance
MIRAI_OM_USA_OM62004U
7
Maintenance and care
■After a fuse is replaced
●If the lights do not turn on even after the fuse has been replaced, a bulb may
need replacement. ( P. 358)
● If the replaced fuse blows again, have the vehicle inspected by your Toyota
dealer.
■ If there is an overload in a circuit
The fuses are designed to blow, protecting the wiring harness from damage.
WARNING
■To prevent system breakdowns and vehicle fire
Observe the following precautions.
Failure to do so may cause damage to the vehicle, and possibly a fire or
injury.
●Never use a fuse of a higher amperage rating than that indicated, or use\
any other object in place of a fuse.
● Always use a genuine Toyota fuse or equivalent.
Never replace a fuse with a wire, even as a temporary fix.
● Do not modify the fuses or fuse boxes.
NOTICE
■Before replacing fuses
Have the cause of electrical overload determined and repaired by your
Toyota dealer as soon as possible.
Page 396 of 464
3968-2. Steps to take in an emergency
MIRAI_OM_USA_OM62004U
If the fuel cell system will not start
One of the following may be the cause of the problem:
●The electronic key may not be functioning properly. ( P. 398)
● There may not be sufficient fuel in the vehicle’s tank.
Refuel the vehicle.
● The fuel door may be open. ( P. 201)
● There may be a malfunction in the immobilizer system.
( P. 72)
● There may be a malfunction in the shift control system.
* ( P. 378)
● The fuel cell system may be malf unctioning due to an electrical
problem such as electronic key ba ttery depletion or a blown fuse.
However, depending on the type of malfunction, an interim mea-
sure is available to start the fuel cell system. ( P. 177, 397)
● The electronic key may be in battery-saving mode. ( P. 133)
*: It may not be possible to shift the shift position from P to another position.
One of the following may be the cause of the problem:
● The 12-volt battery may be discharged. ( P. 401)
● The 12-volt battery terminal connections may be loose or corroded.
( P. 328)
Reasons for the fuel cell system not starting vary depending on
the situation. Check the follo wing and perform the appropriate
procedure:
The fuel cell system will not start even though the correct start-
ing procedure is being followed. ( P. 172)
The interior lights and headlights are dim, or the horn does not
sound or sounds at a low volume.
Page 401 of 464
4018-2. Steps to take in an emergency
MIRAI_OM_USA_OM62004U
8
When trouble arises
If the 12-volt batter y is discharged
If you have a set of jumper (or booster) cables and a second vehicle
with a 12-volt battery, you can jump start your vehicle by following the
steps below.
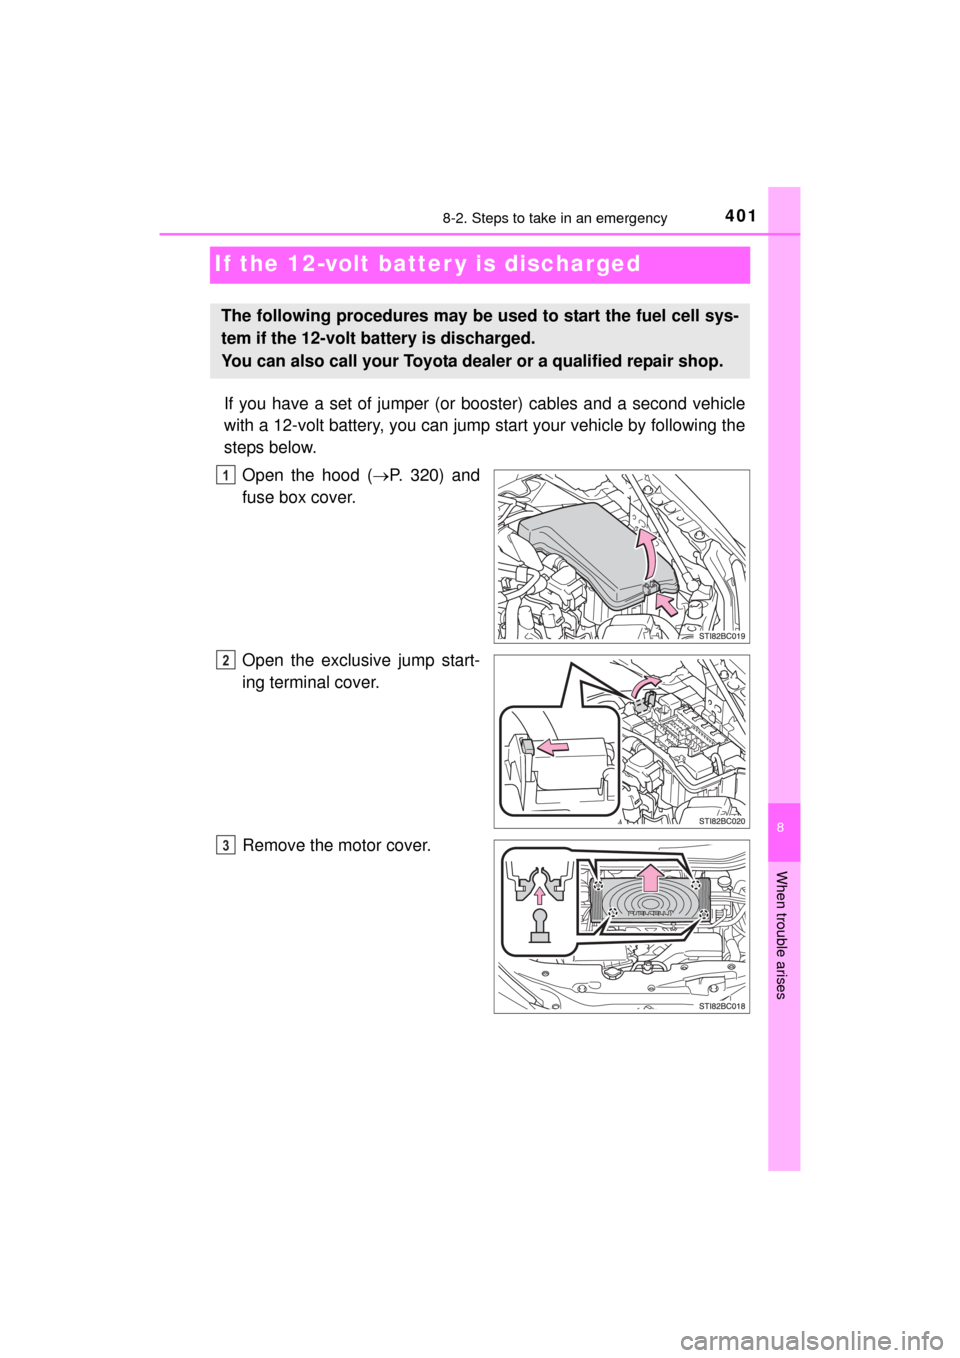
Open the hood ( P. 320) and
fuse box cover.
Open the exclusive jump start-
ing terminal cover.
Remove the motor cover.
The following procedures may be us ed to start the fuel cell sys-
tem if the 12-volt battery is discharged.
You can also call your Toyota de aler or a qualified repair shop.
1
2
3
Page 403 of 464
4038-2. Steps to take in an emergency
MIRAI_OM_USA_OM62004U
8
When trouble arises
Close the exclusive jump starting terminal cover, reinstall the motor
cover and the fuse box cover to its original position.
Once the fuel cell system starts, have the vehicle inspected at your
Toyota dealer as soon as possible.
■ Starting the fuel cell system when the 12-volt battery is discharged
The fuel cell system cannot be started by push-starting.
■ To prevent 12-volt battery discharge
●Turn off the headlights and the audio system while the fuel cell system is off.
● Turn off any unnecessary electrical components when the vehicle is running
at a low speed for an extended period, such as in heavy traffic.
■ Charging the 12-volt battery
The electricity stored in the 12-volt battery will discharge gradually even when
the vehicle is not in use, due to natural discharge and the draining effects of
certain electrical appliances. If the vehicle is left for a long time, the 12-volt
battery may discharge, and the fuel cell system may be unable to start. (The
12-volt battery recharges automatically while the fuel cell system is operat-
ing.)
■ When the 12-volt battery is removed or discharged
●In some cases, it may not be possible to unlock the doors using the smart
key system when the 12-volt battery is discharged. Use the wireless remote
control or the mechanical key to lock or unlock the doors.
● The fuel cell system may not start on the first attempt after the 12-volt bat-
tery has recharged but will start normally after the second attempt. This is
not a malfunction.
● The power switch mode is memorized by the vehicle. When the 12-volt bat-
tery is reconnected, the system will return to the mode it was in before the
12-volt battery was discharged. Before disconnecting the 12-volt battery,
turn the power switch off.
If you are unsure what mode the power switch was in before the 12-volt bat-
tery discharged, be especially careful when reconnecting the 12-volt battery.
● If the 12-volt battery is depleted with the shift position in P, it will not be pos-
sible to shift the shift position other than P. In this case, the vehicle cannot
be towed without lifting both front wheels because the front wheels are
locked by the parking lock. ( P. 363)
● When the 12-volt battery is reconnected, start the fuel cell system, depress
the brake pedal, and confirm that it is possible to shift into each shift posi-
tion.
● Make sure that the key is not inside the vehicle when recharging or replac-
ing the 12-volt battery. The key may be locked in the vehicle if the alarm is
activated. ( P. 75)
9