Trunk TOYOTA MIRAI 2017 1.G Owner's Guide
[x] Cancel search | Manufacturer: TOYOTA, Model Year: 2017, Model line: MIRAI, Model: TOYOTA MIRAI 2017 1.GPages: 464, PDF Size: 12.09 MB
Page 366 of 464
3668-2. Steps to take in an emergency
MIRAI_OM_USA_OM62023U
■While towing
If the fuel cell system is off, the power assist for the brakes and steering will
not function, making steering and braking more difficult.
■ Wheel nut wrench
Wheel nut wrench is installed in trunk. ( →P. 339, 382)
WARNING
Observe the following precautions.
Failure to do so may result in death or serious injury.
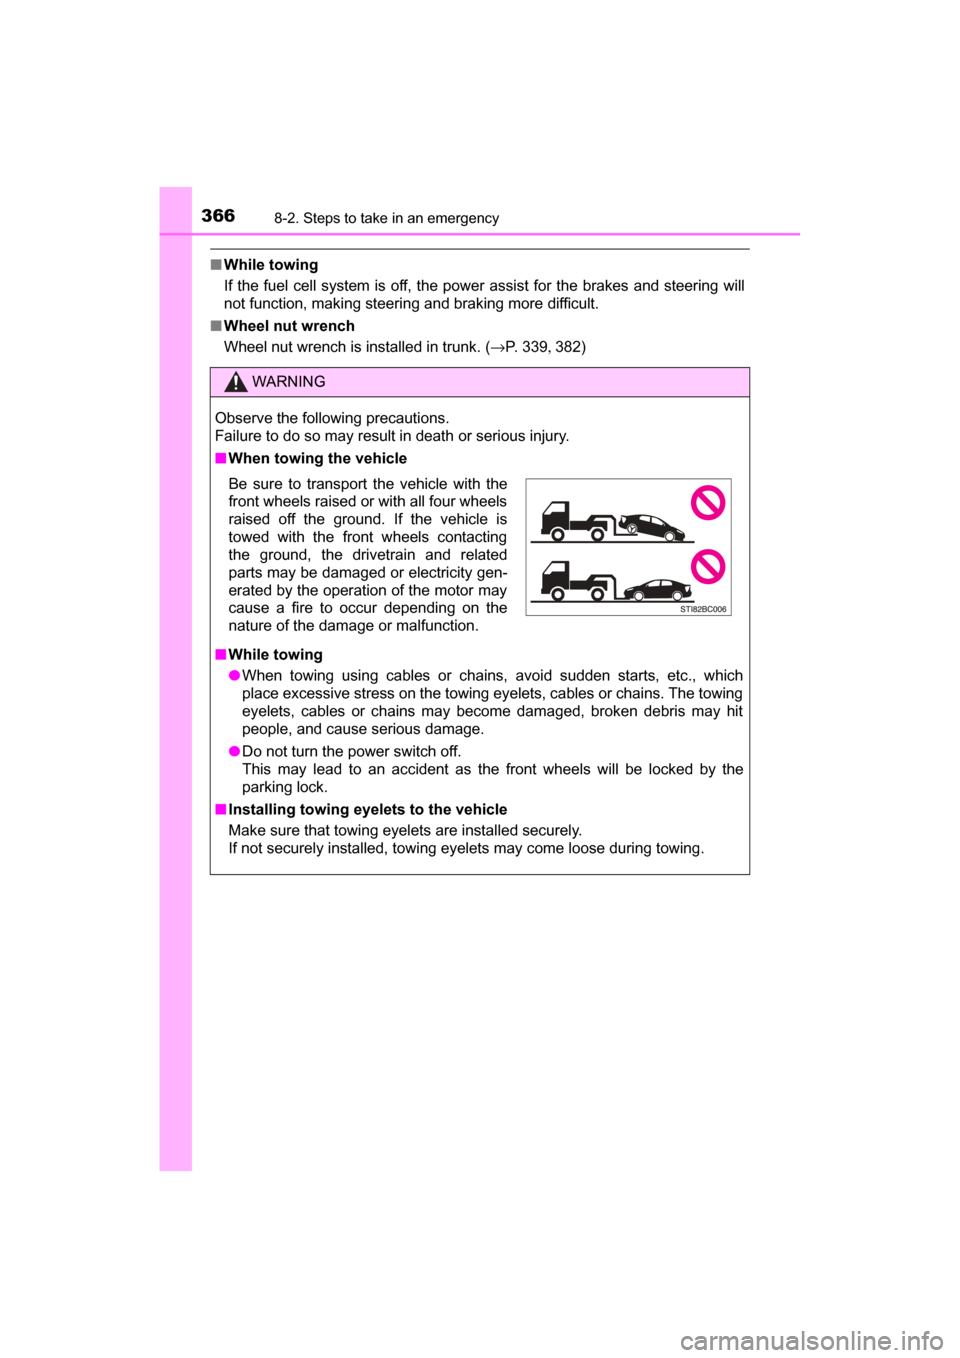
■ When towing the vehicle
■ While towing
● When towing using cables or chains, avoid sudden starts, etc., which
place excessive stress on the towing eyelets, cables or chains. The towing
eyelets, cables or chains may become damaged, broken debris may hit
people, and cause serious damage.
● Do not turn the power switch off.
This may lead to an accident as the front wheels will be locked by the
parking lock.
■ Installing towing eyelets to the vehicle
Make sure that towing eyelets are installed securely.
If not securely installed, towing eyelets may come loose during towing.
Be sure to transport the vehicle with the
front wheels raised or with all four wheels
raised off the ground. If the vehicle is
towed with the front wheels contacting
the ground, the drivetrain and related
parts may be damaged or electricity gen-
erated by the operation of the motor may
cause a fire to occur depending on the
nature of the damage or malfunction.
Page 371 of 464
3718-2. Steps to take in an emergency
MIRAI_OM_USA_OM62023U
8
When trouble arises
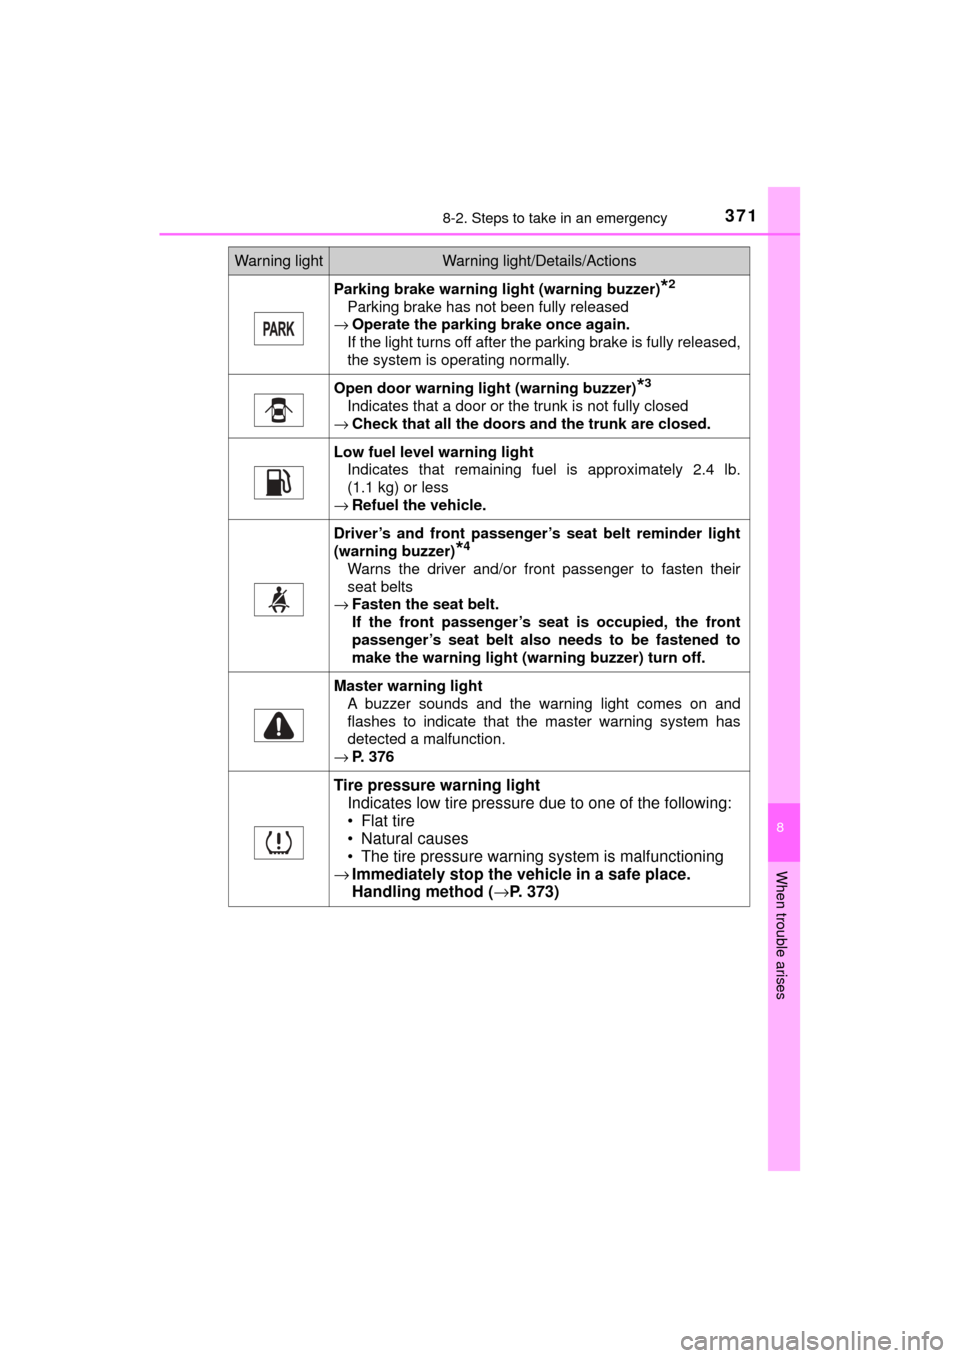
Parking brake warning light (warning buzzer)*2
Parking brake has not been fully released
→ Operate the parking brake once again.
If the light turns off after the parking brake is fully released,
the system is operating normally.
Open door warning light (warning buzzer)*3
Indicates that a door or the trunk is not fully closed
→ Check that all the doors and the trunk are closed.
Low fuel level warning light
Indicates that remaining fuel is approximately 2.4 lb.
(1.1 kg) or less
→ Refuel the vehicle.
Driver’s and front passenger’ s seat belt reminder light
(warning buzzer)
*4
Warns the driver and/or front passenger to fasten their
seat belts
→ Fasten the seat belt.
If the front passenger’s seat is occupied, the front
passenger’s seat belt also needs to be fastened to
make the warning light (warning buzzer) turn off.
Master warning light A buzzer sounds and the warning light comes on and
flashes to indicate that the master warning system has
detected a malfunction.
→ P. 376
Tire pressure warning light
Indicates low tire pressure due to one of the following:
• Flat tire
• Natural causes
• The tire pressure warning system is malfunctioning
→ Immediately stop the vehicle in a safe place.
Handling method ( →P. 373)
Warning lightWarning light/Details/Actions
Page 389 of 464
3898-2. Steps to take in an emergency
MIRAI_OM_USA_OM62023U
8
When trouble arises
With the compressor switch off, disconnect the hose from the valve
on the tire and then pull out the power plug from the power outlet
socket.
Some sealant may leak when the hose is removed.
Install the valve cap onto the valve of the emergency repaired tire.
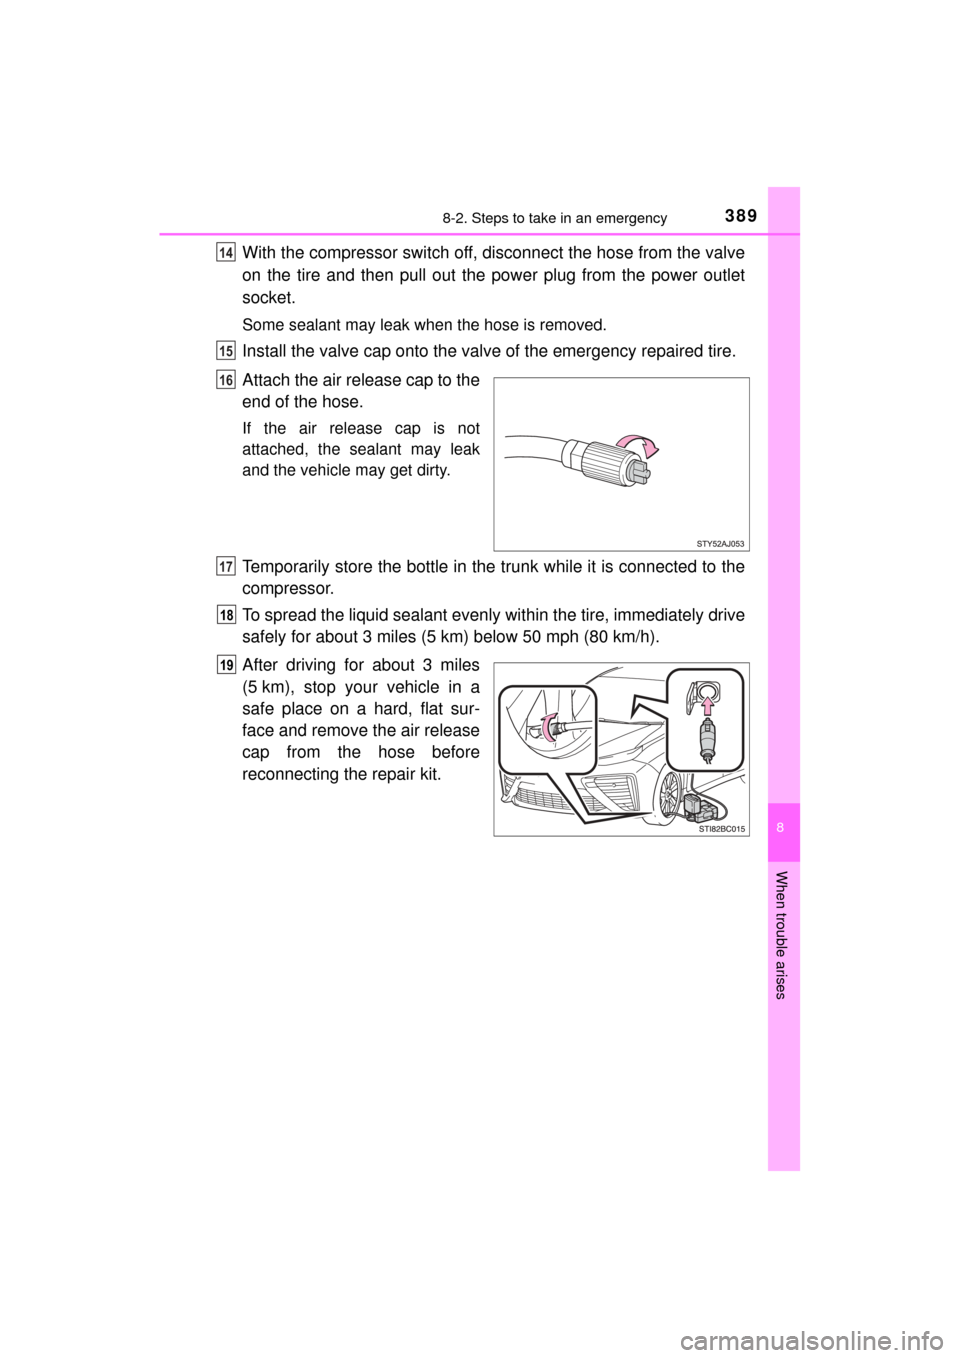
Attach the air release cap to the
end of the hose.
If the air release cap is not
attached, the sealant may leak
and the vehicle may get dirty.
Temporarily store the bottle in the trunk while it is connected to the
compressor.
To spread the liquid sealant evenly within the tire, immediately drive
safely for about 3 miles (5 km) below 50 mph (80 km/h).
After driving for about 3 miles
(5 km), stop your vehicle in a
safe place on a hard, flat sur-
face and remove the air release
cap from the hose before
reconnecting the repair kit.
14
15
16
17
18
19
Page 390 of 464
3908-2. Steps to take in an emergency
MIRAI_OM_USA_OM62023U
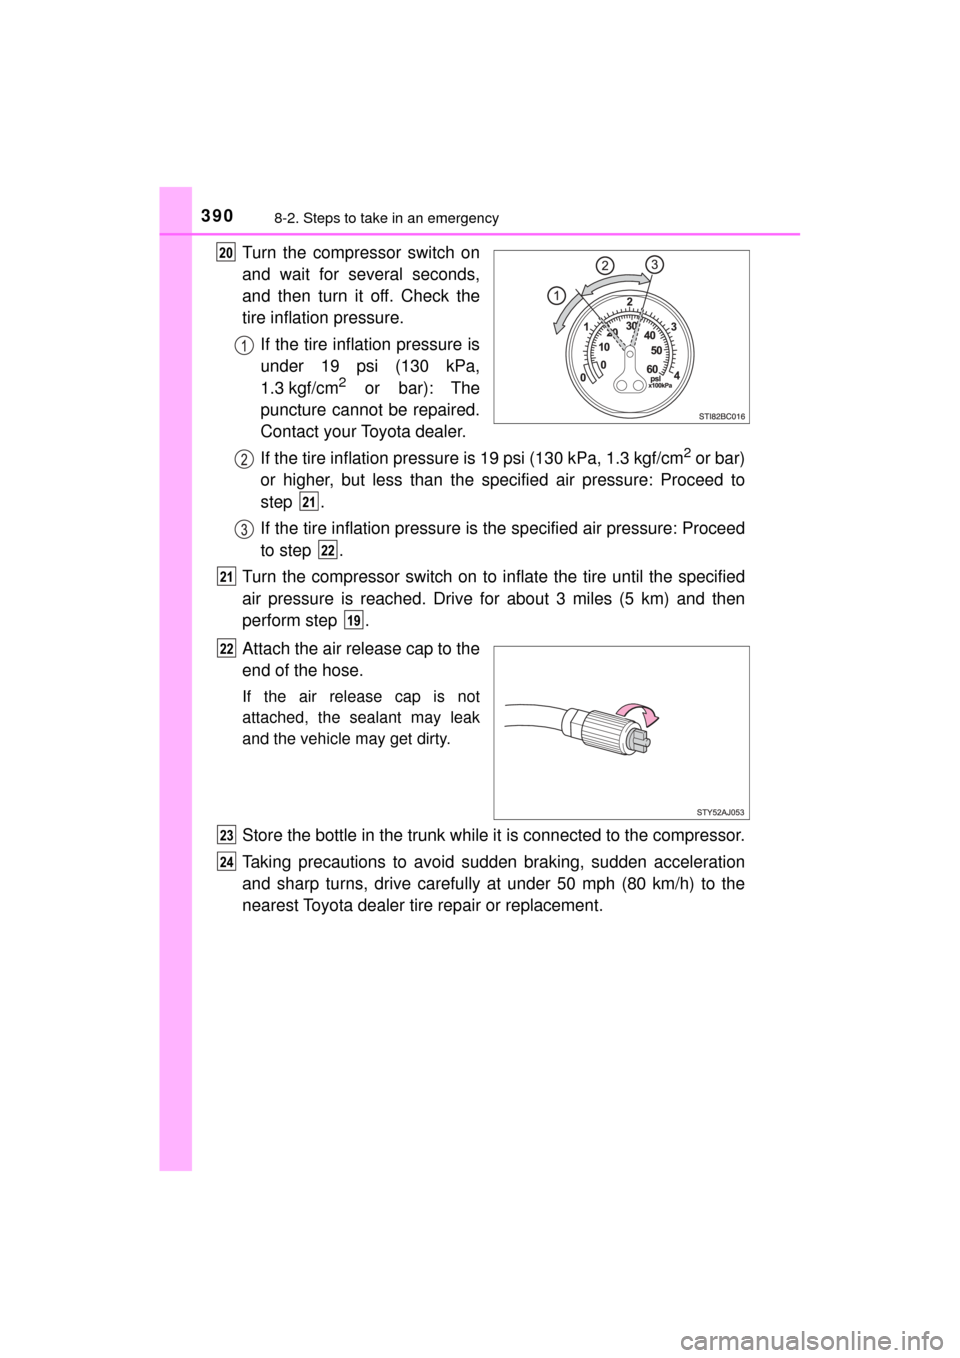
Turn the compressor switch on
and wait for several seconds,
and then turn it off. Check the
tire inflation pressure.If the tire inflation pressure is
under 19 psi (130 kPa,
1.3 kgf/cm
2 or bar): The
puncture cannot be repaired.
Contact your Toyota dealer.
If the tire inflation pressure is 19 psi (130 kPa, 1.3 kgf/cm
2 or bar)
or higher, but less than the specified air pressure: Proceed to
step .
If the tire inflation pressure is the specified air pressure: Proceed
to step .
Turn the compressor switch on to in flate the tire until the specified
air pressure is reached. Drive for about 3 miles (5 km) and then
perform step .
Attach the air release cap to the
end of the hose.
If the air release cap is not
attached, the sealant may leak
and the vehicle may get dirty.
Store the bottle in the trunk while it is connected to the compressor.
Taking precautions to avoid su dden braking, sudden acceleration
and sharp turns, drive carefully at under 50 mph (80 km/h) to the
nearest Toyota dealer tire repair or replacement.
20
21
22
21
19
22
23
24
Page 392 of 464
3928-2. Steps to take in an emergency
MIRAI_OM_USA_OM62023U■
If the tire is inflated to more
than the specified air pressure
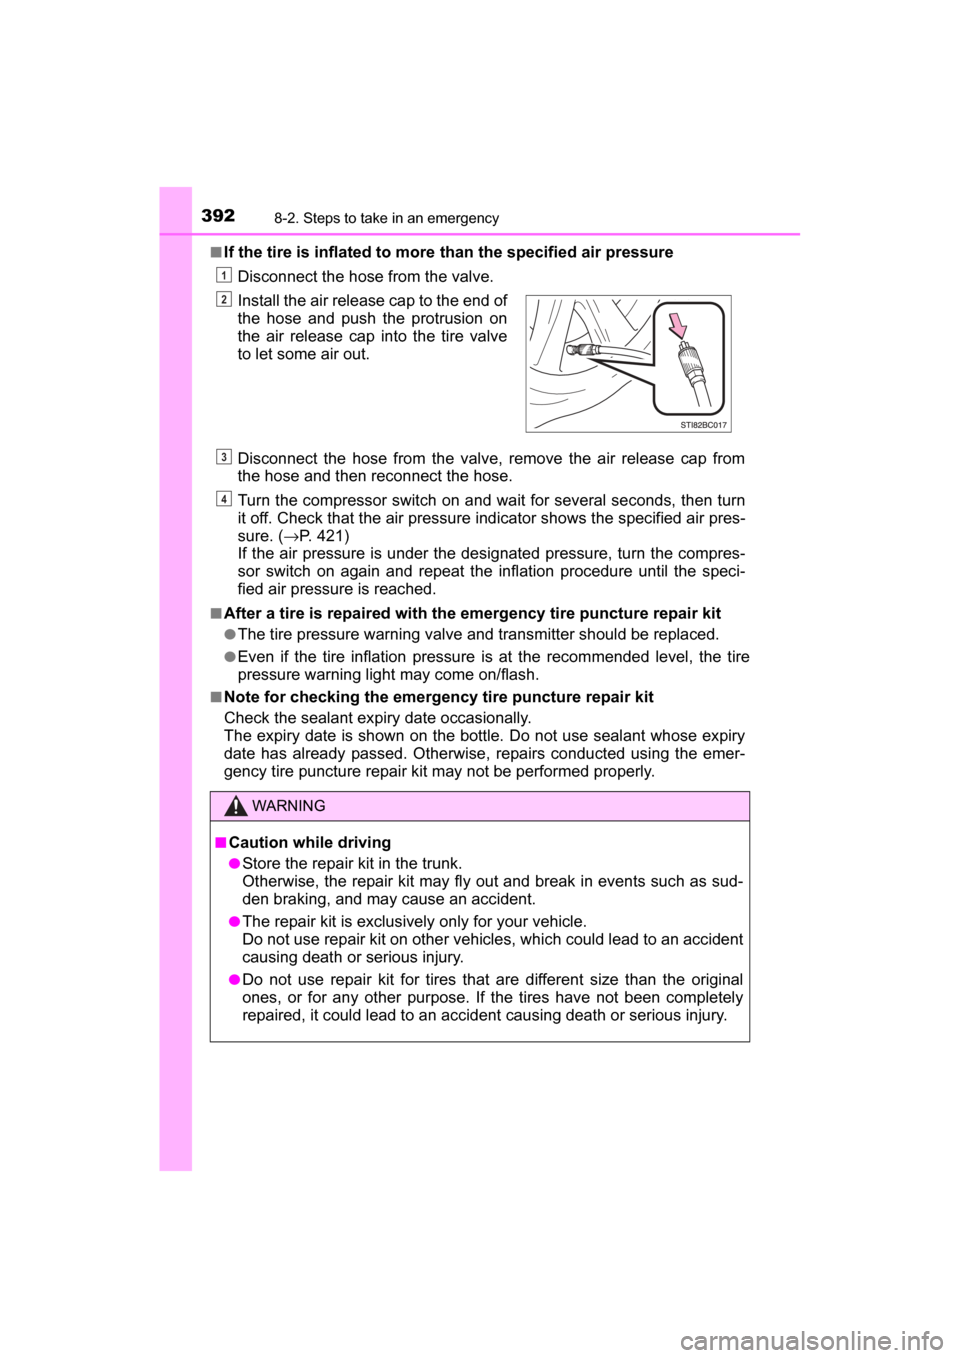
Disconnect the hose from the valve.
Disconnect the hose from the valve, remove the air release cap from
the hose and then reconnect the hose.
Turn the compressor switch on and wait for several se conds, then turn
it off. Check that the air pressure indicator shows the specified air pres-
sure. ( →P. 421)
If the air pressure is under the designated pressure, turn the compres-
sor switch on again and repeat the inflation procedure until the speci-
fied air pressure is reached.
■After a tire is repaired with the emergency tire puncture repair kit
●The tire pressure warning valve and transmitter should be replaced.
●Even if the tire inflation pressure is at the recommended level, the tire
pressure warning light may come on/flash.
■Note for checking the emergency tire puncture repair kit
Check the sealant expiry date occasionally.
The expiry date is shown on the bottle. Do not use sealant whose expiry
date has already passed. Otherwise, repairs conducted using the emer-
gency tire puncture repair kit may not be performed properly.Install the air release cap to the end of
the hose and push the protrusion on
the air release cap into the tire valve
to let some air out.
WARNING
■
Caution while driving
●Store the repair kit in the trunk.
Otherwise, the repair kit may fly out and break in events such as sud-
den braking, and may cause an accident.
●The repair kit is exclusively only for your vehicle.
Do not use repair kit on other vehicles, which could lead to an accident
causing death or serious injury.
●Do not use repair kit for tires that are different size than the original
ones, or for any other purpose. If the tires have not been completely
repaired, it could lead to an accide nt causing death or serious injury.
1
2
3
4
Page 421 of 464
4219-1. Specifications
MIRAI_OM_USA_OM62023U
9
Vehicle specifications
*: Light bulbs not listed in this table are LED bulbs.
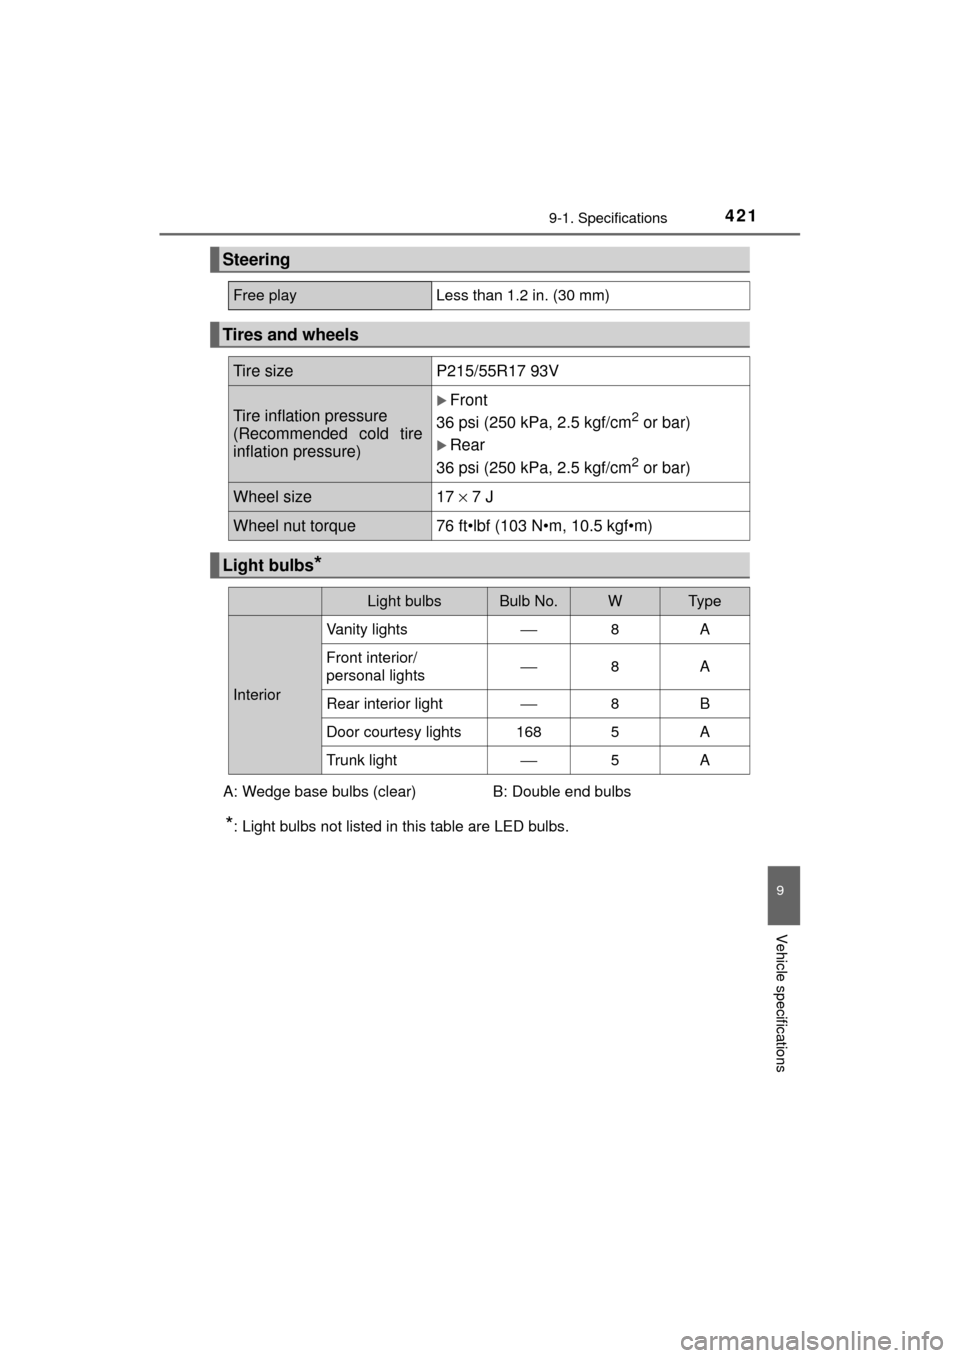
Steering
Free playLess than 1.2 in. (30 mm)
Tires and wheels
Tire sizeP215/55R17 93V
Tire inflation pressure
(Recommended cold tire
inflation pressure)
Front
36 psi (250 kPa, 2.5 kgf/cm
2 or bar)
Rear
36 psi (250 kPa, 2.5 kgf/cm2 or bar)
Wheel size 17 × 7 J
Wheel nut torque76 ft•lbf (103 N•m, 10.5 kgf•m)
Light bulbs*
Light bulbsBulb No.WTy p e
Interior Vanity lights
⎯8A
Front interior/
personal lights ⎯
8A
Rear interior light ⎯8B
Door courtesy lights 168 5 A
Trunk light ⎯5A
A: Wedge base bulbs (clear) B: Double end bulbs
Page 437 of 464
4379-2. Customization
MIRAI_OM_USA_OM62023U
9
Vehicle specifications
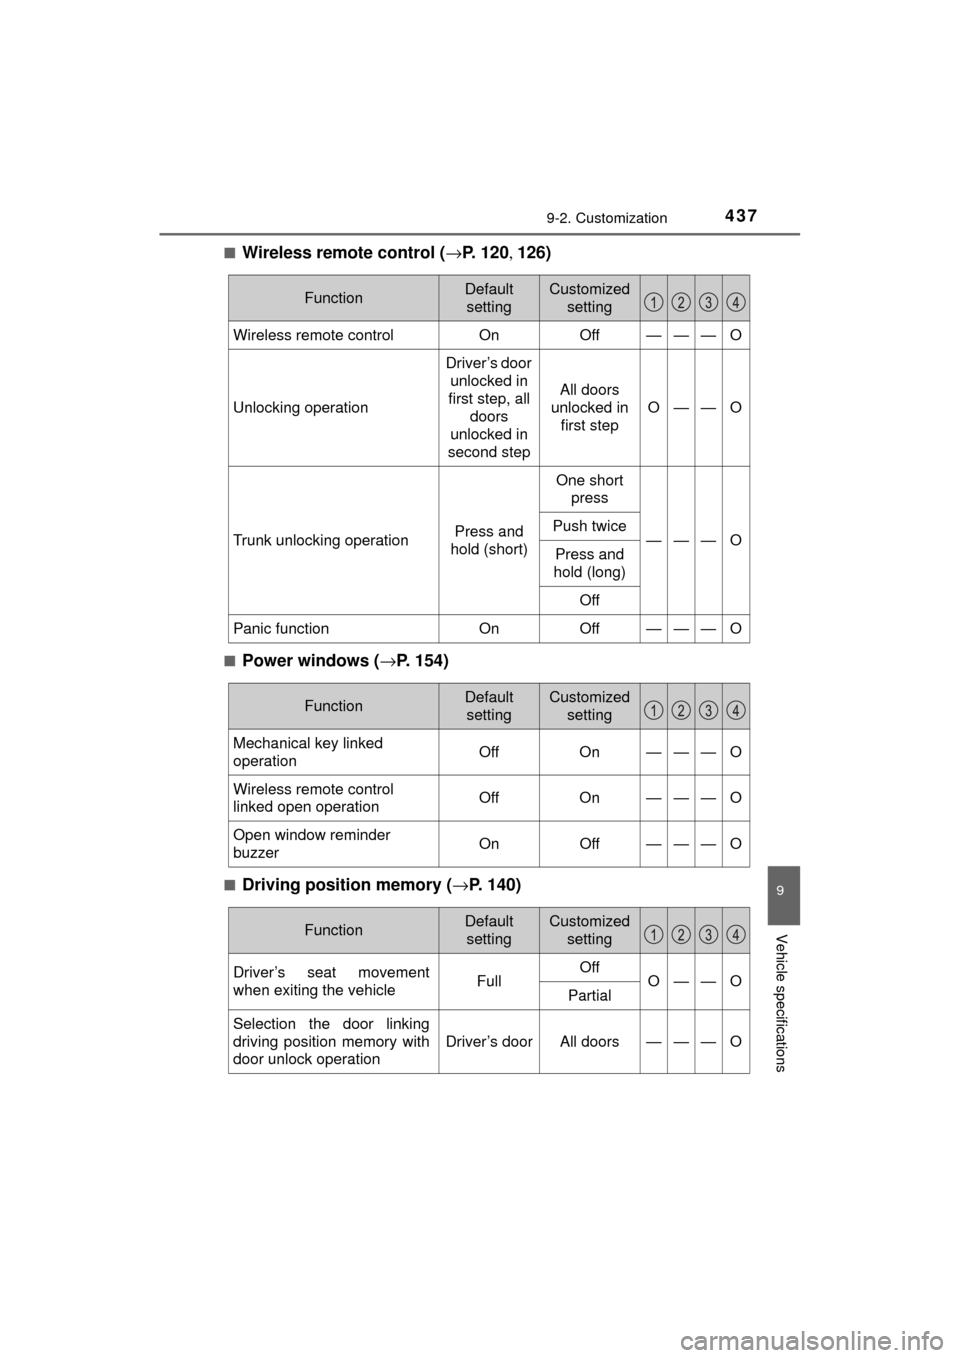
■Wireless remote control (→P. 1 2 0 , 126)
■Power windows ( →P. 154)
■Driving position memory ( →P. 140)
FunctionDefault
settingCustomized setting
Wireless remote controlOnOff———O
Unlocking operation
Driver’s door
unlocked in
first step, all doors
unlocked in
second step
All doors
unlocked in first step
O——O
Trunk unlocking operationPress and
hold (short)
One short press
———OPush twice
Press and
hold (long)
Off
Panic functionOnOff———O
FunctionDefault settingCustomized setting
Mechanical key linked
operationOffOn———O
Wireless remote control
linked open operationOffOn———O
Open window reminder
buzzerOnOff———O
FunctionDefault settingCustomized setting
Driver’s seat movement
when exiting the vehicleFullOffO——OPartial
Selection the door linking
driving position memory with
door unlock operation
Driver’s doorAll doors———O
Page 446 of 464
446What to do if... (Troubleshooting)
MIRAI_OM_USA_OM62023U
What to do if... (Troubleshooting)
●If you lose your mechanical keys, new genuine mechanical keys can be
made by your Toyota dealer. ( →P. 117)
●If you lose your electronic keys, the risk of vehicle theft increases signifi-
cantly. Contact your Toyota dealer immediately. ( →P. 119)
●Is the key battery weak or depleted? (→P. 353)
●Is the power switch in ON mode?
When locking the doors, turn the power switch off. ( →P. 174)
●Is the electronic key left inside the vehicle?
When locking the doors, make sure that you have the electronic key on
your person.
●The function may not operate properly due to the condition of the radio
wave. (→P. 134)
●Is the child-protector lock set?
The rear door cannot be opened from inside the vehicle when the lock is
set. Open the rear door from outside and then unlock the child-protector
lock. (→P. 123)
●The function to prevent the electronic key from being left inside the trunk
will operate and you can open the trunk as usual. Take the key out from the
trunk. ( →P. 128)
If you have a problem, check the following before contacting
your Toyota dealer.
The doors cannot be locked, unlocked, opened or closed
You lose your keys
The doors cannot be locked or unlocked
The rear door cannot be opened
The trunk lid is closed with the electronic key left inside
Page 450 of 464

450Alphabetical index
MIRAI_OM_USA_OM62023U
Back-up lightsReplacing light bulb .............. 358
Battery (12-volt battery) .......... 328 Battery checking ................... 328
If the 12-volt battery is discharged .......................... 401
Preparing and checking before winter....................... 253
Warning message ................. 376
Battery (traction battery)..... 78, 83 Air intake vent ......................... 85
Charging ................................. 81
Location ............................ 78, 83
Warning message ................. 376
Blind Spot Monitor (BSM) ....... 245 Blind Spot Monitor function ... 247
Rear Crossing Traffic Alert function ............................... 251
Bluetooth
®*
Audio system*
Hands-free system (for cellular phone)
*
Navigation system*
Bottle holders .......................... 276
Brake Fluid ...................................... 420
Parking brake........................ 186
Regenerative braking.............. 81
Warning light ......................... 369
Brake assist ............................. 232
Break-in tips ............................ 160
Brightness control Instrument panel light
control................................. 104
BSM (Blind Spot Monitor) ....... 245 Blind Spot Monitor function ... 247
Rear Cross Traffic Alert
function ............................... 250 Care .................................. 306, 310
Aluminum wheels ................. 307
Exterior ................................. 306
Interior .................................. 310
Seat belts.............................. 311
Cargo capacity......................... 169
CD player
*
Chains ...................................... 254
Child restraint system............... 56 Booster seats installation........ 64
Convertible seats installation ............................ 63
Front passenger occupant classification syst em ............ 49
Infant seats definition.............. 58
Infant seats installation ........... 62
Installing a CRS to the passenger seat..................... 59
Installing CRS with LATCH anchors ................................ 67
Installing CRS with seat belts...................................... 62
Installing CRS with top tether
strap ..................................... 69
Child safety ................................ 55 12-volt battery precautions................. 330, 404
Airbag precautions.................. 39
Child restraint system ............. 56
How your child should wear the seat belt.......................... 32
Power window lock switch .... 154
Power window precautions ... 156
Rear door child-protectors .... 123
Removed electronic key battery precautions............. 354
Seat belt extender precautions........................... 35
Seat belt precautions .............. 34
Seat heater precautions ....... 267
Trunk precautions ................. 129
BC
Page 456 of 464

456Alphabetical index
MIRAI_OM_USA_OM62023U
Lane Departure Alert (LDA) .... 216
LATCH anchors ......................... 67
LDA (Lane Departure Alert) .... 216
LeverAuxiliary catch lever .............. 320
Hood lock release lever ........ 320
Internal trunk release lever ... 128
Shift lever .............................. 179
Turn signal lever ................... 185
Wiper lever............................ 195
License plate lights ................. 187
Light switch ........................... 187
Replacing light bulbs............. 358
Light bulbs
Replacing .............................. 358
Lights Automatic High Beam
system ......... ....................... 190
Headlight switch.................... 187
Illuminated entry system ....... 271
Interior lights ......................... 270
Interior lights list .................... 269
Personal lights ...................... 270
Replacing light bulbs............. 358
Trunk light ............................. 128
Turn signal lever ................... 185
Vanity lights .......................... 279
Wattage ................................ 421
Load capacity........................... 169 Maintenance
Do-it-yourself maintenance... 318
General maintenance ........... 315
Maintenance data ................. 416
Maintenance
requirements ...................... 313
Master warning light ....... 371, 376
Meter ......................................... 102 Indicators .............................. 100
Instrument panel light control ................................ 104
Meters................................... 102
Multi-information display ....... 107
Warning lights ......................... 99
Warning message................. 376
Meter light control ................... 104
Mirrors Inside rear view mirror .......... 149
Outside rear view mirror defoggers ........................... 261
Outside rear view mirrors ..... 151
Vanity mirrors ....................... 279
MP3 disc
*
Multi-information display........ 107
Drive information .................. 108
Dynamic radar cruise control ................................ 203
Energy monitor ..................... 108
LDA (Lane Departure Alert) ....... 216
Switching the display ............ 104
Warning message................. 376
LM