TOYOTA PASEO 1996 Owners Manual
Manufacturer: TOYOTA, Model Year: 1996, Model line: PASEO, Model: TOYOTA PASEO 1996Pages: 165, PDF Size: 2.57 MB
Page 141 of 165
138To check the fluid level, simply look at
the see-through reservoir. The level
should be between the MAXº and
MINº lines on the reservoir. It is normal for the brake fluid level to go
down slightly as the brake pads wear. So be sure to keep the reservoir filled.
If the reservoir needs frequent refilling, it may indicate a serious mechanical prob- lem.
If the level is low, add SAE J1703 or
FMVSS No. 116 DOT 3 brake fluid to the
brake reservoir. Remove and replace the reservoir cover
by hand. Fill the brake fluid to the dotted
line.
This brings the fluid to the correct lev-
el when you put the cover back on. Use only newly opened brake fluid. Once
opened, brake fluid absorbs moisture
from the air, and excess moisture can cause a dangerous loss of braking.
CAUTION
Take care when filling the reservoir
because brake fluid can harm your
eyes and damage painted surfaces. If
fluid gets in your eyes, flush your
eyes with clean water.!
If you spill the fluid, be sure to wash
it off with water to prevent it from
damaging the parts or paint.
NOTICE
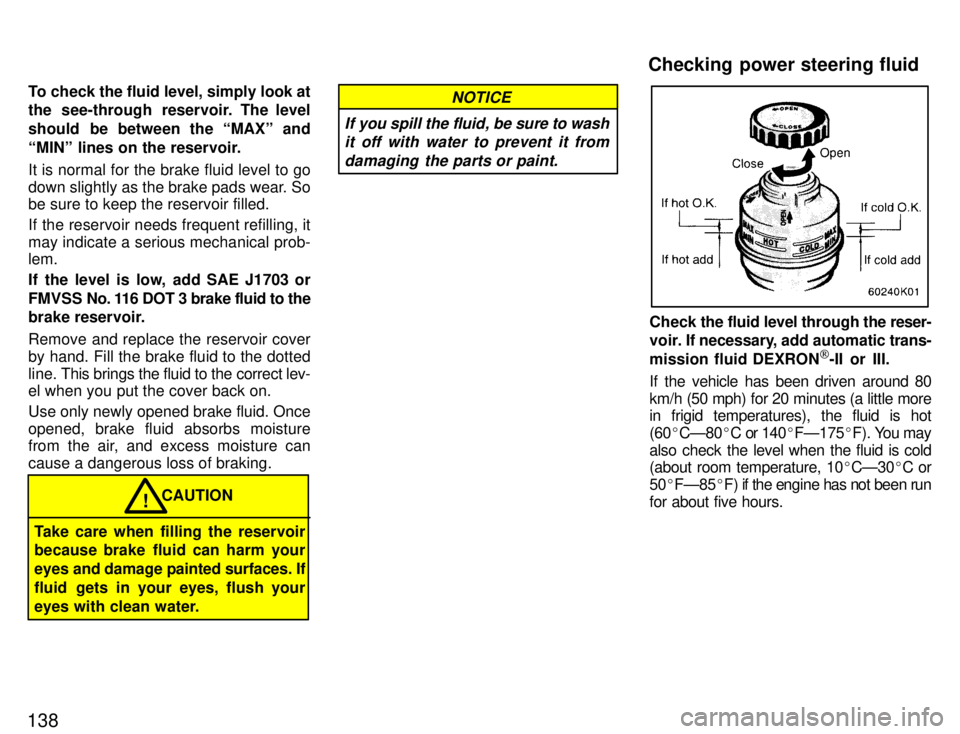
Check the fluid level through the reser-
voir. If necessary, add automatic trans-
mission fluid DEXRON [
-II or III.
If the vehicle has been driven around 80
km/h (50 mph) for 20 minutes (a little more
in frigid temperatures), the fluid is hot
(60 �CÐ80 �C or 140 �FÐ175 �F). You may
also check the level when the fluid is cold
(about room temperature, 10 �CÐ30 �C or
50 �FÐ85 �F) if the engine has not been run
for about five hours.
Checking power steering fluid
Page 142 of 165
139
Clean all dirt from outside of the reservoir
tank and look at the fluid level. If the fluid is cold, the level should be in the COLDº
range. Similarly, if it is hot, the fluid level
should be in the HOTº range. If the level
is at the low side of either range, add auto-
matic transmission fluid DEXRON
�
-II or
-III to bring the level within the range.
To remove the filler cap, turn it counter-
clockwise and lift up. To reinstall it, turn it clockwise. After replacing the filler cap,
visually check the steering box case, vane
pump and hose connections for leaks or damage.
CAUTION
The reservoir tank may be hot so be
careful not to burn yourself.!
Avoid overfilling, or the power steering could be damaged.
NOTICE
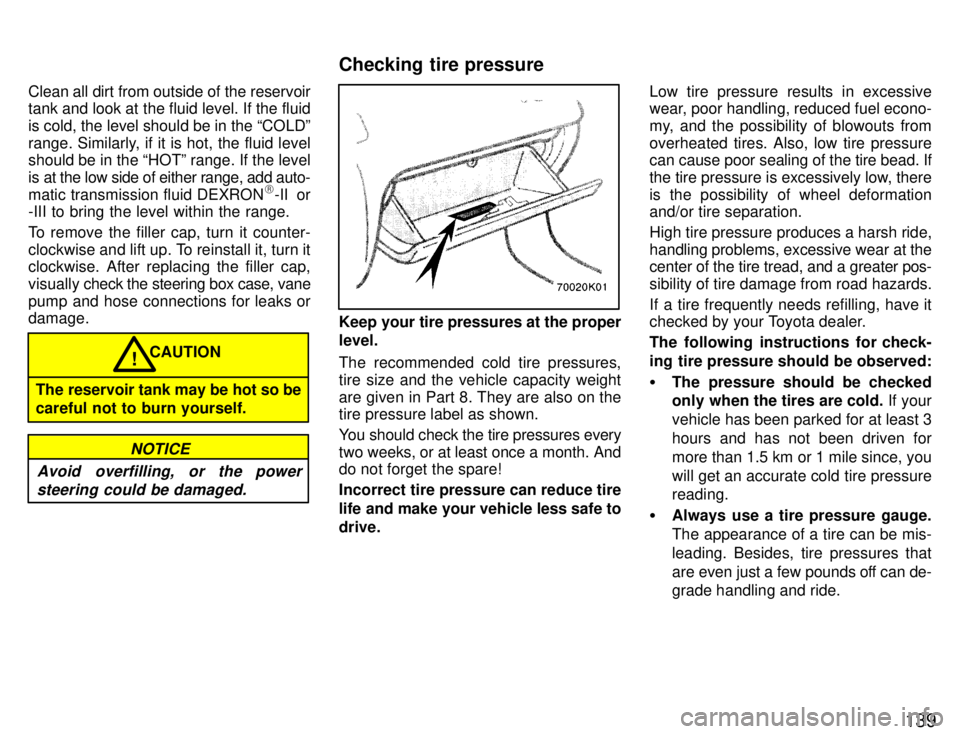
Keep your tire pressures at the proper level.
The recommended cold tire pressures,
tire size and the vehicle capacity weight
are given in Part 8. They are also on the tire pressure label as shown.
You should check the tire pressures every
two weeks, or at least once a month. And
do not forget the spare!
Incorrect tire pressure can reduce tire
life and make your vehicle less safe to drive. Low tire pressure results in excessive
wear, poor handling, reduced fuel econo-
my, and the possibility of blowouts fromoverheated tires. Also, low tire pressure
can cause poor sealing of the tire bead. If
the tire pressure is excessively low, there
is the possibility of wheel deformation and/or tire separation.
High tire pressure produces a harsh ride,
handling problems, excessive wear at the center of the tire tread, and a greater
pos-
sibility of tire damage from road hazards.
If a tire frequently needs refilling, have it
checked by your Toyota dealer.
The following instructions for check-
ing tire pressure should be observed: � The pressure should be checked
only when the tires are cold. If your
vehicle has been parked for at least 3 hours and has not been driven formore than 1.5 km or 1 mile since, you
will get an accurate cold tire pressure reading.
� Always use a tire pressure gauge.
The appearance of a tire can be mis-
leading. Besides, tire pressures that
are even just a few pounds off can de-
grade handling and ride.
Checking tire pressure
Page 143 of 165

140�
Take special care when adding air
to the compact spare tire. The small-
er tire size can gain pressure very
quickly. Add compressed air in small
quantities and check the pressure
often until it reaches the specifiedpressure.
� Do not bleed or reduce tire pres-sure after driving. It is normal for the
tire pressure to be higher after driving.
� Never exceed the vehicle capacityweight. The passenger and luggage
weight should be located so that the
vehicle is balanced.
� Be sure to reinstall the tire inflation
valve caps. Without the valve caps,
dirt or moisture could get into the valve
core and cause air leakage. If the capshave been lost, have new ones put onas soon as possible.
CHECKING YOUR TIRES Check the tire tread for the tread wear
indicators. If the indicators show, re-
place the tires.
The tires on your Toyota have built-in tread wear indicators to help you know
when the tires need replacement. When
the tread depth wears to 1.6 mm (0.06 in.)
or less, the indicators will appear. If you
can see the indicators in two or more adja-
cent grooves, the tire should be replaced.
The lower the tread, the higher the risk of skidding. The effectiveness of snow tires is lost
if the tread wears down below 4 mm (0.16 in.). Check the tires regularly for damage
such as cuts, splits and cracks. If any damage is found, consult with a tech-
nician and have the tire repaired or re-placed. Even if the damage does not appear seri-
ous, a qualified technician should ex-
amine the damage. Objects which havepenetrated the tire may have caused in- ternal damage.
Any tires which are over six years old
must be checked by a qualified techni-
cian even if damage is not obvious.
Tires deteriorate with age even if they
have never or seldom been used.
This
also applies to the spare tire and tires
stored for future use.REPLACING YOUR TIRES
When replacing a tire, use only the
same size and construction as origi-
nally installed and with the same or
greater load capacity.
Using any other size or type of tire may se-
riously affect handling, ride, speedome-
ter/odometer calibration, ground clear-
ance, and clearance between the body
and tires or snow chains.
Checking and replacing tires
Page 144 of 165
141
CAUTION
� Do not mix radial, bias belted, or
bias-ply tires on your vehicle. It can
cause dangerous handling charac-
teristics, resulting in loss of con- trol.
� Do not use tires or wheels other
than the manufacturer's recom-
mended size.!
Toyota recommends all four tires, or at
least both of the front or rear tires be
replaced at a time as a set.
See If you have a flat tireº in Part 4 for tire
change procedure.
When a tire is replaced, the wheel
should always be balanced.
An unbalanced wheel may affect vehicle
handling and tire life. Wheels can get out
of balance with regular use and should
therefore be balanced occasionally.
When replacing a tubeless tire, the air
valve should also be replaced with a
new one.
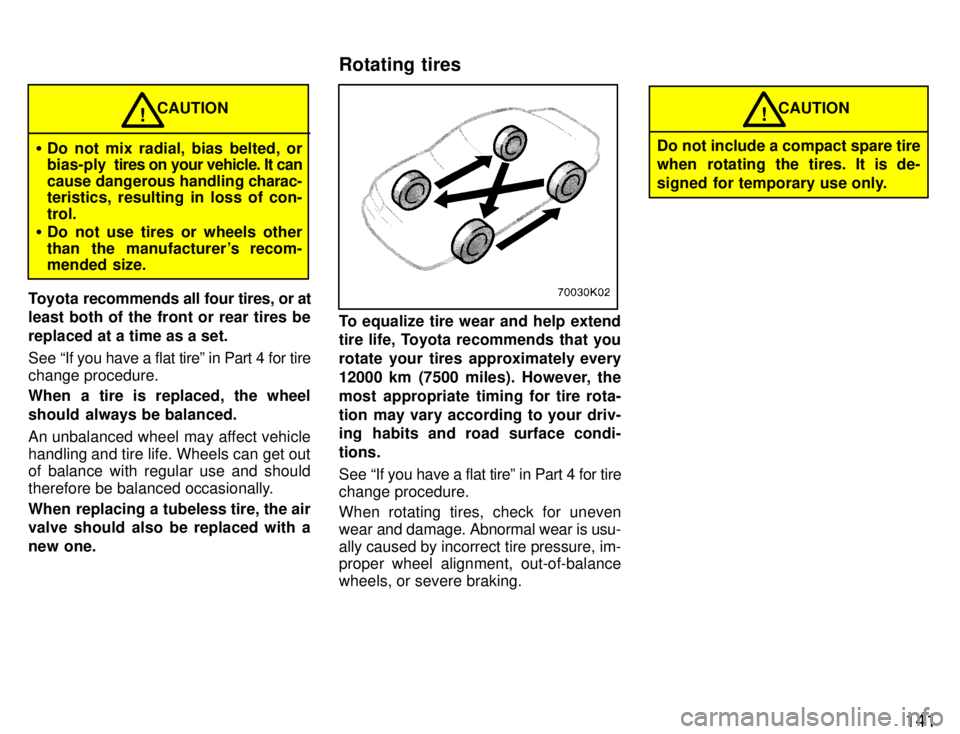
To equalize tire wear and help extend
tire life, Toyota recommends that you
rotate your tires approximately every
12000 km (7500 miles). However, the
most appropriate timing for tire rota-
tion may vary according to your driv-
ing habits and road surface condi- tions.
See If you have a flat tireº in Part 4 for tire
change procedure. When rotating tires, check for uneven
wear and damage. Abnormal wear is usu-
ally caused by incorrect tire pressure, im-
proper wheel alignment, out-of-balance
wheels, or severe braking.
CAUTION
Do not include a compact spare tire
when rotating the tires. It is de-
signed for temporary use only.!
Rotating tires
Page 145 of 165
142WHEN TO USE SNOW TIRES OR CHAINS
Snow tires or chains are recom-
mended when driving on snow or ice.
On wet or dry roads, conventional tires
provide better traction than snow tires. SNOW TIRE SELECTION
If you need snow tires, select the same
size, construction and load capacity
as the original tires on your Toyota.
Do not use tires other than those men-
tioned above. Do not install studded tires
without first checking local regulations for
possible restrictions.
SNOW TIRE INSTALLATION
Snow tires should be installed on all wheels. Installing snow tires on the front wheels
only can lead to an excessive difference
in road grip capability between the front
and rear tires which could cause loss of
vehicle control.
When storing removed tires, you should
store them in a cool dry place.
Mark the direction of rotation and be sure to install them in the same direction whenreplacing.
CAUTION
� Do not drive with the snow tires in- correctly inflated.
� Never drive over 120 km/h (75 mph)
with any type of snow tires.!
TIRE CHAIN SELECTION
Use tire chains of the correct size and type. Use SAE Class Sº type radial tire chains
except radial cable chains or V-bar type chains.
Regulations regarding the use of tire
chains vary according to location or
type of r oad, so always check them be-
fore installing chains.
CHAIN INSTALLATIONInstall the chains on the front tires as
tightly as possible. Do not use tire
chains on the rear tires. Retighten
chains after driving 0.5 '1.0 km
(1/4 '1/2 mile).
When installing chains on your tires, care- fully follow the instructions of the chain
manufacturer. If wheel covers are used, they will be
scratched by the chain band, so remove the covers before putting on the chains.
�
Do not exceed 50 km/h (30 mph) or
the chain manufacturer's recom-
mended speed limit, whichever is
lower.
� Drive carefully avoiding bumps,
holes, and sharp turns, which maycause the vehicle to bounce.
� Avoid sharp turns or locked-wheel
braking, as use of chains may ad- versely affect vehicle handling.
CAUTION!
Do not attempt to use a tire chain on
the compact spare tire, as it may
result in damage to the vehicle as well as the tire.
NOTICE
Installing snow tires and chains
Page 146 of 165

143
WHEN TO REPLACE YOUR WHEELS
If you have wheel damage such as
bending, cracks or heavy corrosion,
the wheel should be replaced.
If you fail to replace damaged wheels, the
tire may slip off the wheel or they may cause loss of handling control. WHEEL SELECTION
When replacing wheels, care should
be taken to ensure that the wheels are
replaced by ones with the same load
capacity, diameter, rim width, and off-set.
This m
ust be observed on compact spare
tires, too.
Correct replacement wheels are available
at your Toyota dealer.
A wheel of a different size or type may ad-
versely affect handling, wheel and bear-
ing life, brake cooling, speedometer/
odometer calibration, stopping ability,
headlight aim, bumper height, vehicle
ground clearance, and tire or snow chain clearance to the body and chassis. Replacement
with used wheels is not rec-
ommended as they may have been sub- jected to rough treatment or high mileageand could fail without warning. Also, bent
wheels which have been straightened
may have structural damage and there-
fore should not be used. Never use an in-
ner tube in a leaking wheel which is de-
signed for a tubeless tire. �
After driving your vehicle the first 1600
km (1000 miles), check that the wheel
nuts are tight.
� If you have repaired or changed your
tires, check that the wheel nuts are still
tight after driving 1600 km (1000miles).
� When using tire chains, be careful not
to damage the aluminum wheels.
� Use only the Toyota wheel nuts and
wrench designed for your aluminumwheels.
� When balancing your wheels, use only
Toyota balance weights or equivalent
and a plastic or rubber hammer.
� As with any wheel, periodically checkyour aluminum wheels for damage. If
damaged, replace immediately.
Replacing wheels
Aluminum wheel precautions
Page 147 of 165

144
Page 148 of 165
Part 7Checking battery conditionÐ ÐPrecautions
145
DO-IT-YOURSELF MAINTENANCEÐ
Chapter 7-3 Electrical components �
Checking battery condition
�Battery recharging precautions
�Checking and replacing fuses
�Adding washer fluid
�Replacing light bulbs
BATTERY PRECAUTIONS
The battery produces flammable
and explosive hydrogen gas. �
Do not cause a spark from the bat-
tery with tools.
� Do not smoke or light a match near
the battery.
The electrolyte contains poisonous
and corrosive sulfuric acid. � Avoid contact with eyes, skin or clothes.
� Never ingest electrolyte.
� Wear protective safety glasses
when working near the battery.
� Keep children away from the bat-
tery.
EMERGENCY MEASURES � If electrolyte gets in your eyes,
flush your eyes with clean water
for at least 15 minutes and get im-
mediate medical attention. If pos-
sible, continue to apply water with
a sponge or cloth while en route to
the medical office. CAUTION
!
�
If electrolyte gets on your skin,
thoroughly wash the contact area.
If you feel pain or burning, get med-
ical attention immediately.
� If electrolyte gets on your clothes,
there is a possibility of its soaking
through to your skin, so immedi- ately take off the exposed clothing
and follow the procedure above, if
necessary.
� If you happen to swallow electro-
lyte, drink a large quantity of water
or milk. Follow with milk of magne-
sia, beaten raw egg or vegetable
oil. Then go immediately for emer- gency help.
Page 149 of 165
146
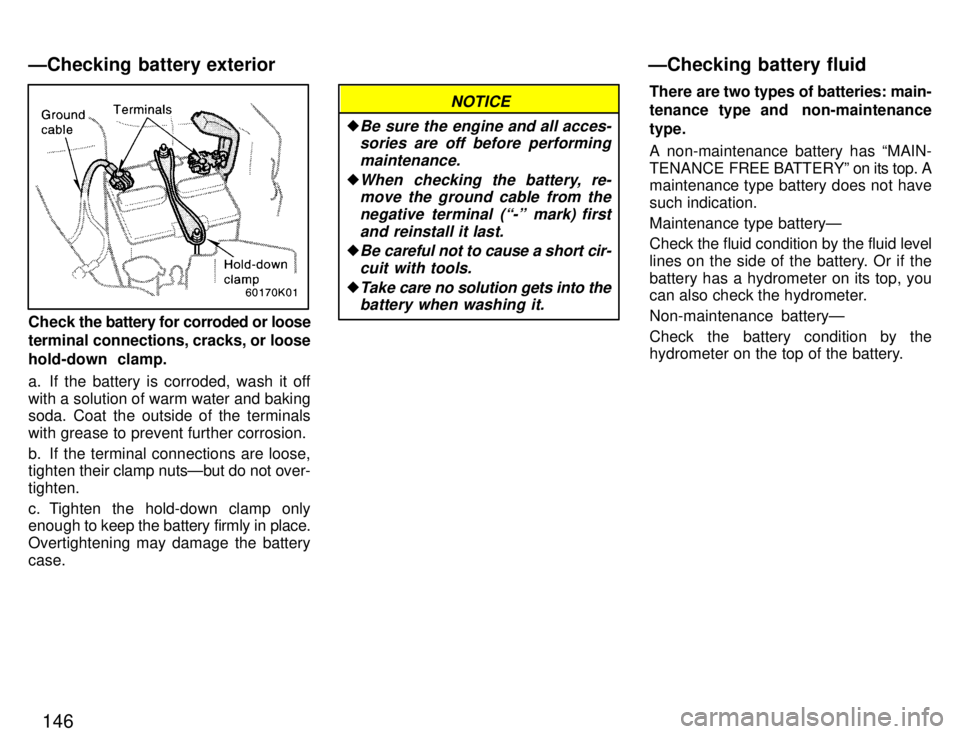
Check the battery for corroded or loose
terminal connections, cracks, or loose
hold-down clamp.
a. If the battery is corroded, wash it off with a solution of warm water and baking
soda. Coat the outside of the terminals with grease to prevent further corrosion.
b. If the terminal connections are loose, tighten their clamp nutsÐbut do not over-
tighten.
c. Tighten the hold-down clamp only
enough to keep the battery firmly in place.
Overtightening may damage the battery case.
NOTICE
�Be sure the engine and all acces-
sories are off before performing
maintenance.
�When checking the battery, re-move the ground cable from the
negative terminal (-º mark) first
and reinstall it last.
�Be careful not to cause a short cir-cuit with tools.
�Take care no solution gets into thebattery when washing it.
There are two types of batteries: main-
tenance type and non-maintenance type. A non-maintenance battery has MAIN-
TENANCE FREE BATTERYº on its top. A
maintenance type battery does not havesuch indication. Maintenance type batteryÐ Check the fluid condition by the fluid level
lines on the side of the battery. Or if the
battery has a hydrometer on its top, you
can also check the hydrometer. Non-maintenance batteryÐ
Check the battery condition by the
hydrometer on the top of the battery.
ÐChecking battery exterior
ÐChecking battery fluid
Page 150 of 165

147
CHECKING BY THE FLUID LEVEL
LINES (MAINTENANCE TYPE BAT-
TERY ONLY)
The fluid (electrolyte) level must be be-
tween the upper and lower lines.
When checking the fluid level, look at all six cells, not just one or two.
If the level is lower than the lower line, add
distilled water. (See ADDING DIS-
TILLED WATERº.)CHECKING BY THE HYDROMETER Check the battery condition by the
hydrometer color. Maintenance type batteryHydrometer color
ConditionType AType BCondition
GREENBLUEGood
DARKWHITECharging necessary. Have battery checked
by your Toyota dealer.
CLEAR or LIGHT YELLOWREDAdd distilled water*
*: See ADDING DISTILLED WATERº. Non-maintenance battery
Hydrometer color
ConditionType AType BCondition
GREENBLUEGood
DARKWHITECharging necessary. Have battery checked
by your Toyota dealer.
CLEAR or LIGHT YELLOWREDHave battery checked
by your Toyota dealer.
NOTICE
Do not refill the battery with water.