TOYOTA PRIUS 2005 2.G Navigation Manual
PRIUS 2005 2.G
TOYOTA
TOYOTA
https://www.carmanualsonline.info/img/14/6570/w960_6570-0.png
TOYOTA PRIUS 2005 2.G Navigation Manual
Page 100 of 139
90
POI category change
(Show POI Icons)
You can choose 6 icons displayed on the
“Show POI Icons” top screen, so that you
can easily set which icons to display on
the map screen.
1. Push the “MENU” button.
2. Touch the “Setup” switch. Then
touch
switch twice to display page 3 of
the “Setup” screen.
3. Touch the “Change” switch of
“Show POI Icons”.
4. Touch the category switch you wish to
change.
Page 101 of 139
91
5. Touch the switch corresponding to the
desired category. Then touch the
“OK”switch.
Delete previous point
You can delete your previous destination.
1. Push the
“MENU” button.
2. Touch the “Setup” switch. Then
touch
switch twice to display page 3 of
the “Setup” screen.
3. Touch the “Delete” switch of “Pre-
vious Point”.
Page 102 of 139
92
4. Touch the switch you want to delete.
For efficient previous point search, pre-
vious points can be sorted by the
“Date”
or “Name” switch.
5. To delete the point, touch the “Yes”
switch.
To cancel the deletion, touch the
“No”
switch.
Map color
1. Push the “MENU” button.
2. Touch the “Setup” switch. Then
touch
switch three times to display
page 4 of the “Setup” screen.
Page 103 of 139
93 3. Touch the desired color for day and/or
night map color and then touch the
“OK”switch to return the map screen.
Touch the
“Normal” switch to return to the
default map color.
Screen animation
When the “Screen Animation” feature is
turned on, some switches and screens be-
come animated. (e.g.: change map guid-
ance on the map screen)
To turn the “Screen Animation” mode on:
1. Push the
“MENU” button.
2. Touch the “Setup” switch. Then
touch
switch three times to display
page 4 of the “Setup” screen.
3. Touch the “On” switch of “Screen
Animation” and touch the
“OK” switch.
Page 106 of 139
 on the
screen. (See “Information items” on page
97.) W")
96
Maintenance information
This system informs you when to replace
certain parts or components and shows
dealer information (if registered) on the
screen. (See “Information items” on page
97.) When the navigation system begins
operating after either the information
item’s pre�set data arrives or the driving
distance reaches a pre�determined set-
ting, the “Information” screen will be dis-
played. This screen will appear every time
the system is turned on until you touch the
“Do not display this message
again”
switch.
To prevent this information screen from being
displayed again, touch the
“Do not dis-
play this message again”
switch.1. Push the
“INFO” button to display the
“Information Menu” screen.
5u004
2. Touch the “Maintenance” switch.
Touch the desired icon and input the con-
ditions.
Notice of “Date”: You can input the next
maintenance date.
Notice of “Distance”: You can input the driv-
ing distance until the next maintenance
check.
When you touch the
switch on the
“Maintenance” screen, the screen changes to
the “Personal Event” screen. Touch the keys
to input the desired name and then input con-
ditions.
After you input the date and/or distance,
touch the
“OK” switch. The screen then re-
turns to the “Maintenance” screen.
The following switches appear.
“Delete All”: To cancel all conditions which
have been inputted.
Page 108 of 139
98
(a) Register dealer
You can register the dealer name, staff,
location and phone number.
1. Touch the “Set Dealer” switch on
the “Maintenance” screen.
2. Enter the location of the dealer in the
same way as for destination input. (See
page 20.)After you input the dealer, the screen changes
and displays the map location of the dealer.
If it is OK, touch the
“Enter” switch.
The screen changes to “Edit Dealer” screen.
(See “(b) Edit dealer”.)
Page 109 of 139
99
(b) Edit dealer
You can edit the dealer name, staff, loca-
tion and phone number.
1. Touch the
“Set Dealer” switch on
the “Maintenance” screen. The “Edit
Dealer” screen appears.
2. To edit, touch the corresponding
switch.
�To edit “Dealer” or “Contact”
To input the name, touch the alphabet, nu-
meral and/or umlaut keys. You can input
up to 24 letters.
After inputting, touch the
“OK” switch at the
bottom right of the screen. The previous
screen will be displayed.
Page 110 of 139
100
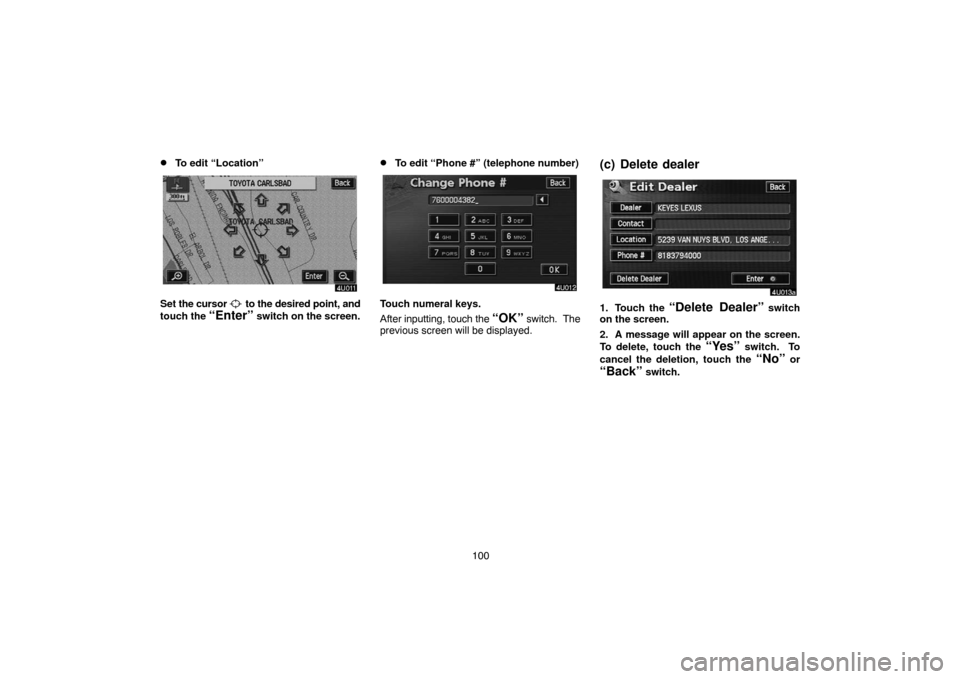
�To edit “Location”
Set the cursor to the desired point, and
touch the
“Enter” switch on the screen.
�To edit “Phone #” (telephone number)
Touch numeral keys.
After inputting, touch the
“OK” switch. The
previous screen will be displayed.
(c) Delete dealer
1. Touch the “Delete Dealer” switch
on the screen.
2. A message will appear on the screen.
To delete, touch the
“Yes” switch. To
cancel the deletion, touch the
“No” or
“Back” switch.
Page 111 of 139
101
(d) Set as destination
Touch the “Enter ” switch on the “Set
Dealer” screen. The screen changes and
displays the map location of the registered
dealer and the “Route Preference”. (See
“ — Entering Destination” on page 38.)
Calendar with memo
This system informs you of a memo entry.
At the specified date, the memo informa-
tion will be displayed when the navigation
system is in operation. The memo infor-
mation screen will appear every time the
system is turned on. To disable this
screen, touch the
“Do not display this
message again”
switch.1. Push the
“INFO” button to display the
“Information Menu” screen.
5u004
2. Touch the “Calendar” switch to dis-
play the “Calendar” screen.
Page 112 of 139
102
The current date is circled in yellow. If the cur-
rent date is not displayed on the screen, touch
the
“Today” switch to display the current
month calendar.
(a) Inputting a memo
1. Touch the day you want to add a memo.
2. To display the “Memo” screen, touch
the
“Add Memo” switch.
�Memo
Touch the “Memo” switch to enter text.

You can choose 6 icons displayed on the
“Show POI Icons” top screen, so that you
can easily set which icons to display on
the map screen.
1. Push the “ME")


 Register dealer
You can register the dealer name, staff,
location and phone number.
1. Touch the “Set Dealer” switch on
the “Maintenance” screen.
2. Enter the location of the dealer in")
 Edit dealer
You can edit the dealer name, staff, loca-
tion and phone number.
1. Touch the
“Set Dealer” switch on
the “Maintenance” screen. The “Edit
Dealer” screen appears.
2. To")
 Set as destination
Touch the “Enter ” switch on the “Set
Dealer” screen. The screen changes and
displays the map location of the registered
dealer and the “Route Preference”. (See")
 Inputting a memo
1. Touch the")