ECU TOYOTA PRIUS 2008 2.G Owner's Guide
[x] Cancel search | Manufacturer: TOYOTA, Model Year: 2008, Model line: PRIUS, Model: TOYOTA PRIUS 2008 2.GPages: 512, PDF Size: 7.23 MB
Page 342 of 512
342 3-7. Other interior features
PRIUS_U_(L/O_0802)Test the operation of the HomeLink
by pressing the newly
programmed button. Check to se e if the gate/device operates
correctly.
Repeat the steps above to program another device for each of
the remaining HomeLink
buttons.
■ Programming other devices
To program other devices such as home security systems, home
door locks or lighting, contact your authorized Toyota dealer for
assistance.
■ Reprogramming a button
The individual HomeLink
buttons cannot be erased but can be
reprogrammed. To reprogram a button, follow the “Basic program-
ming” instructions.
Operating the HomeLink
Press the appropriate HomeLink button. The HomeLink indicator
light on the HomeLink transceiver should turn on.
The HomeLink continues to send a signal for up to 20 seconds as long
as the button is pressed.
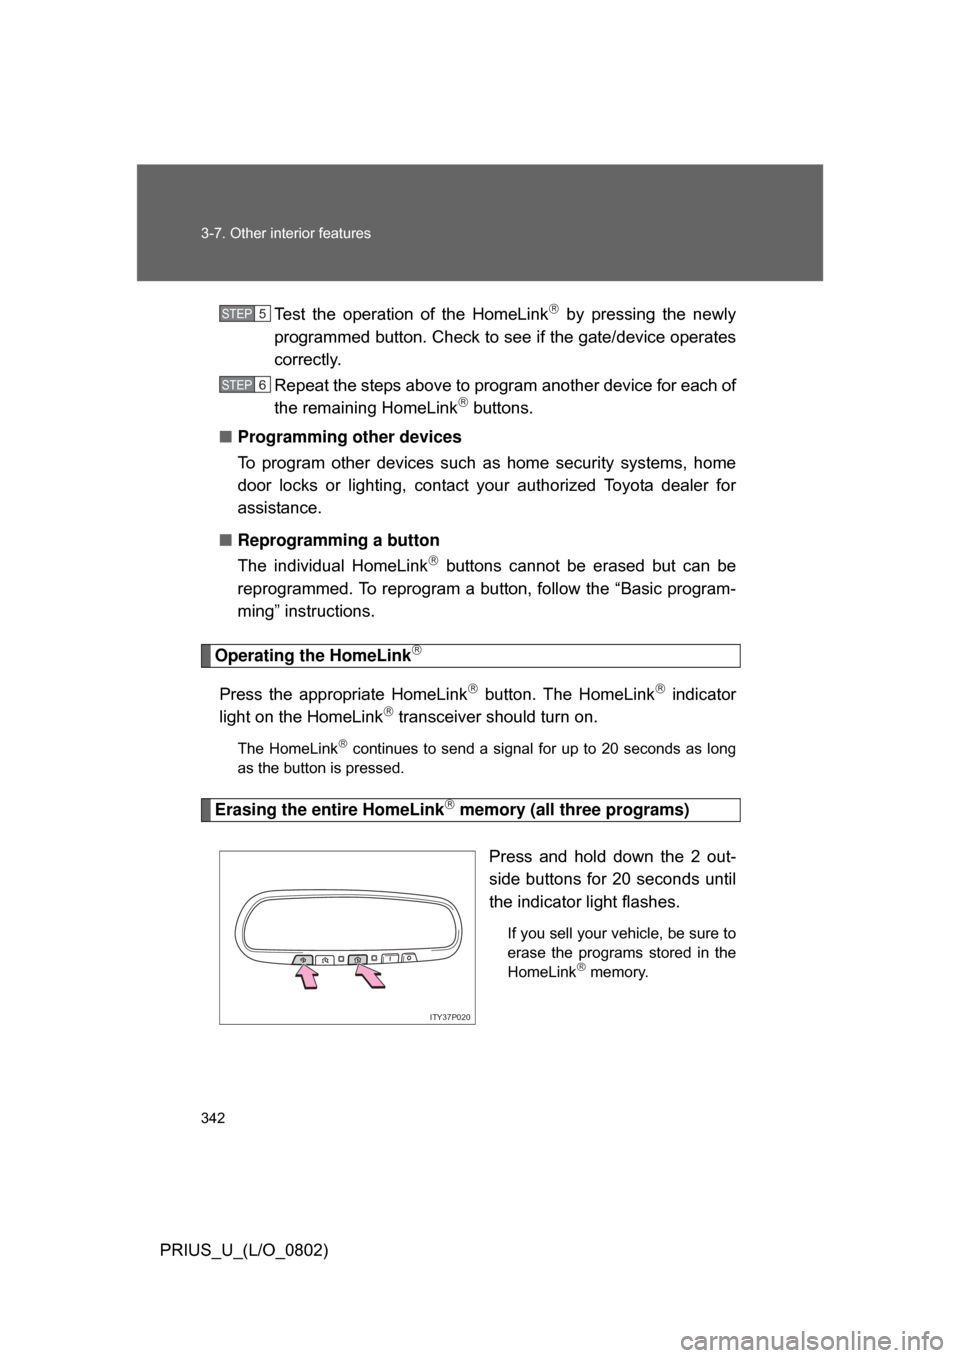
Erasing the entire HomeLink memory (all three programs)
Press and hold down the 2 out-
side buttons for 20 seconds until
the indicator light flashes.
If you sell your vehicle, be sure to
erase the programs stored in the
HomeLink
memory.
STEP5
STEP6
ITY37P020
Page 354 of 512

354 4-2. Maintenance
PRIUS_U_(L/O_0802)
Vehicle interior
ItemsCheck points
Accelerator pedal • Moves smoothly (without uneven pedal
effort or catching)?
Automatic transmission
“Park” mechanism • Can the vehicle be hold securely on an
incline with the shift lever in “P”?
Brake pedal • Moves smoothly?
• Does it have appropriate clearance and
correct amount of free play?
Brakes • Pulls to one side when applied?
• Loss of brake effectiveness?
• Spongy feeling brake pedal?
• Pedal almost touches floor?
Head restraints • Move smoothly and lock securely?
Indicators/buzzers • Function properly?
Lights • Do all the lights come on?
Parking brake • Moves smoothly?
• Can hold the vehicle securely on an
incline?
Seat belts • Does the seat belt system operate
smoothly?
• Are the belts undamaged?
Seats • Do the seat controls operate properly?
Steering wheel • Moves smoothly?
• Has correct free play?
• No strange noises?
Page 401 of 512
401
4-3. Do-it-yourself maintenance
4
Maintenance and care
PRIUS_U_(L/O_0802)
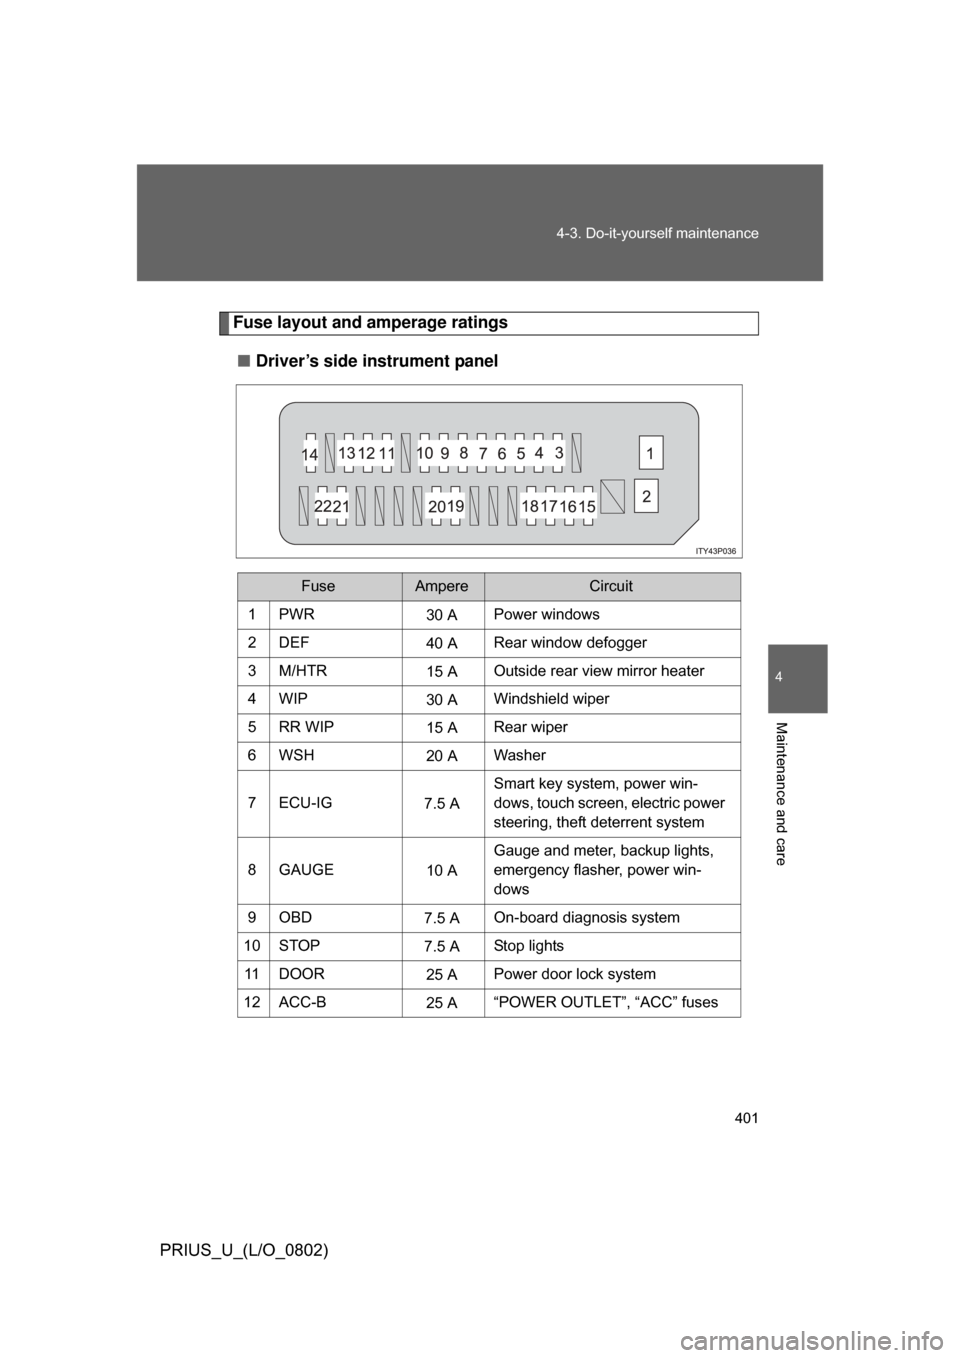
Fuse layout and amperage ratings
■ Driver’s side instrument panel
FuseAmpereCircuit
1PWR30 APower windows
2DEF 40 ARear window defogger
3M/HTR 15 AOutside rear view mirror heater
4WIP 30 AWindshield wiper
5RR WIP 15 ARear wiper
6WSH 20 AWasher
7 ECU-IG 7.5 ASmart key system, power win-
dows, touch screen, electric power
steering, theft deterrent system
8GAUGE 10 AGauge and meter, backup lights,
emergency flasher, power win-
dows
9OBD 7.5 AOn-board diagnosis system
10 STOP 7.5 AStop lights
11 D O O R 25 APower door lock system
12 ACC-B 25 A“POWER OUTLET”, “ACC” fuses
Page 402 of 512

402 4-3. Do-it-yourself maintenance
PRIUS_U_(L/O_0802)
13 ECU-B15 ATouch screen, power windows, air
conditioning system
14 AM1 7.5 AHybrid system
15 TAIL 10 ATail lights, license plates light,
parking lights
16 PANEL 7.5 ATouch screen, clock, audio sys-
tem, instrument panel lights
17 A/C (HTR) 10 AAir conditioning system
18 FR DOOR 20 APower windows
19 PWR OUTLET 15 APower outlet
20 ACC 7.5 AAudio system, touch screen, clock
21 PWR OUTLET
FR
15 A
Power outlet
22 IGN 7.5 AHybrid system, hybrid vehicle
immobilizer system, SRS airbags
FuseAmpereCircuit
Page 414 of 512

414 4-3. Do-it-yourself maintenance
PRIUS_U_(L/O_0802)
CAUTION
■Replacing light bulbs
● Turn off the headlights. Do not attempt to replace the bulb immediately
after turning off the headlights.
The bulbs become very hot and may cause burns.
● Do not touch the glass portion of the light bulb with bare hands. Hold the
bulb by the plastic or metal portion.
If the bulb is scratched or dropped it may blow out or crack.
● Fully install light bulbs and any parts used to secure them. Failing to do so
may result in heat damage, fire, or water entering the headlight unit. This
may damage the headlights or cause condensation to build up on the lens.
● Do not take apart or repair the low beam discharge headlight bulbs, con-
nectors, power supply circuits, or related components.
Doing so could result in electric shock and death or serious injury.
■ High-intensity discharge (HID) headlights
● Contact your Toyota dealer before replacing high-intensity discharge
headlights (including light bulbs).
● Do not touch the high-intensity discharge headlight’s high voltage socket
when the headlights are turned on. An extremely high voltage of 20000V
will be discharged and could result in serious injury or death by electric
shock.
■ To prevent damage or fire
Make sure bulbs are fully seated and locked.
Page 416 of 512
416
PRIUS_U_(L/O_0802)
5-1. Essential information
If your vehicle needs to be towed
Before towingThe following may indicate a problem with your transmission. Contact
your Toyota dealer before towing.
● The hybrid system is running, but the vehicle will not move.
● The vehicle makes an abnormal sound.
Emergency towing
If a tow truck is not available, in an emergency your vehicle may be
temporarily towed using a cable or chain secured to the emergency
towing eyelet. This should only attempted on hard, surfaced roads for
short distances below 18 mph (30km/h).
A driver must be in the vehicle to steer and operate the brakes. The
vehicle’s wheels, drive train, axles, steering and brakes must be in
good condition.
If towing is necessary, we recommend having your vehicle towed by
your Toyota dealer or a commerci al towing service, using a lift-type
truck or a flat bed truck.
Use a safety chain system for all to wing, and abide by all state/pro-
vincial and local laws.
If towing from the front, the vehicle ’s rear wheel and axles must be in
good condition. ( P. 420)
If they are damaged, use a towing dolly or flat bed truck.
Page 418 of 512
418 5-1. Essential information
PRIUS_U_(L/O_0802)
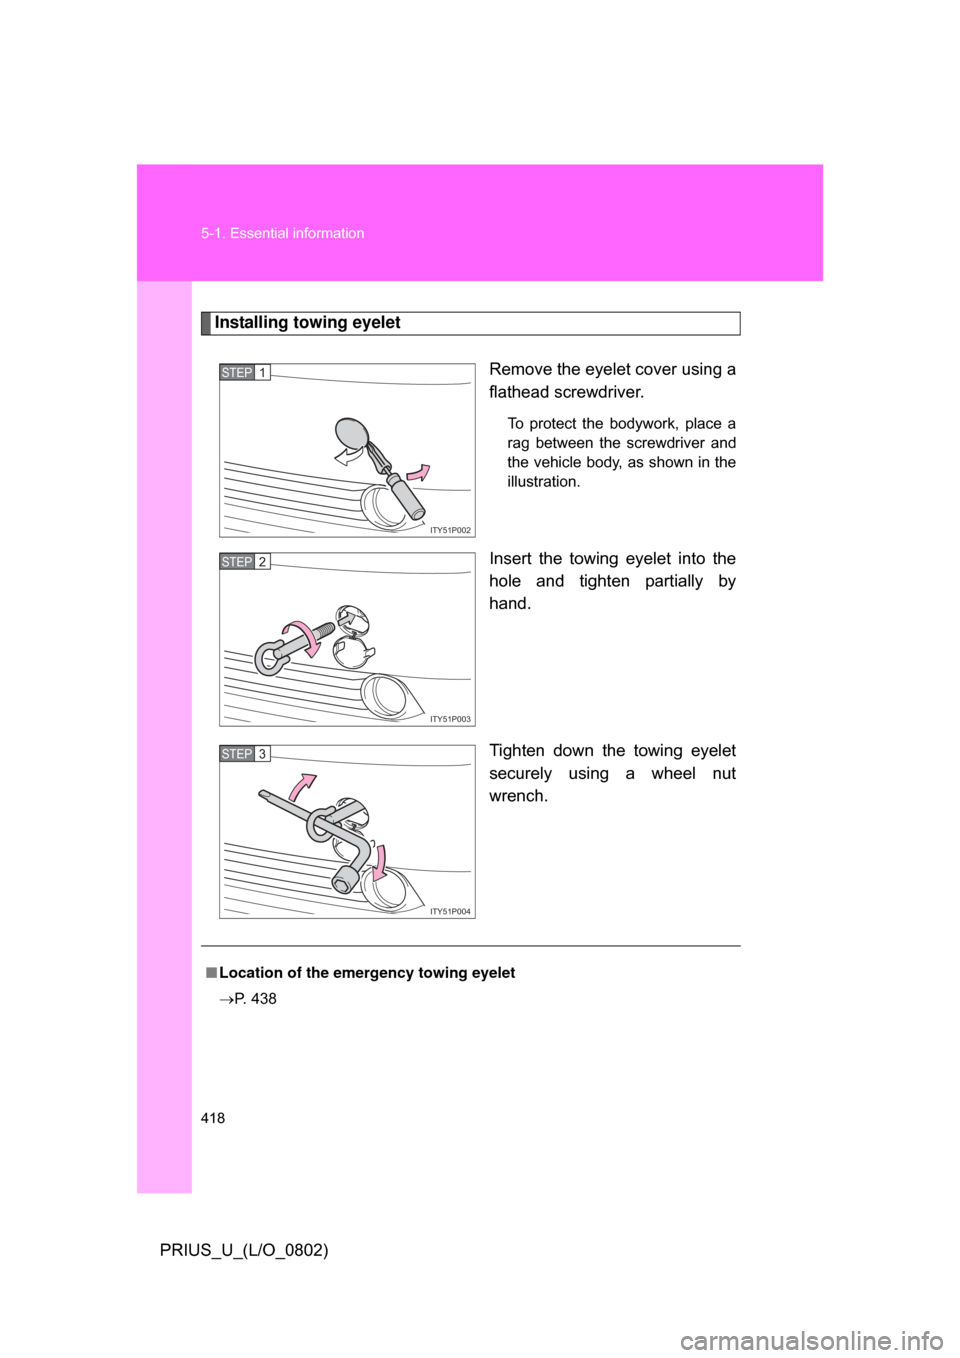
Installing towing eyeletRemove the eyelet cover using a
flathead screwdriver.
To protect the bodywork, place a
rag between the screwdriver and
the vehicle body, as shown in the
illustration.
Insert the towing eyelet into the
hole and tighten partially by
hand.
Tighten down the towing eyelet
securely using a wheel nut
wrench.
ITY51P002
STEP1
ITY51P003
STEP2
ITY51P004
STEP3
■Location of the emer gency towing eyelet
P. 438
Page 419 of 512
5
When trouble arises
419
5-1. Essential information
PRIUS_U_(L/O_0802)
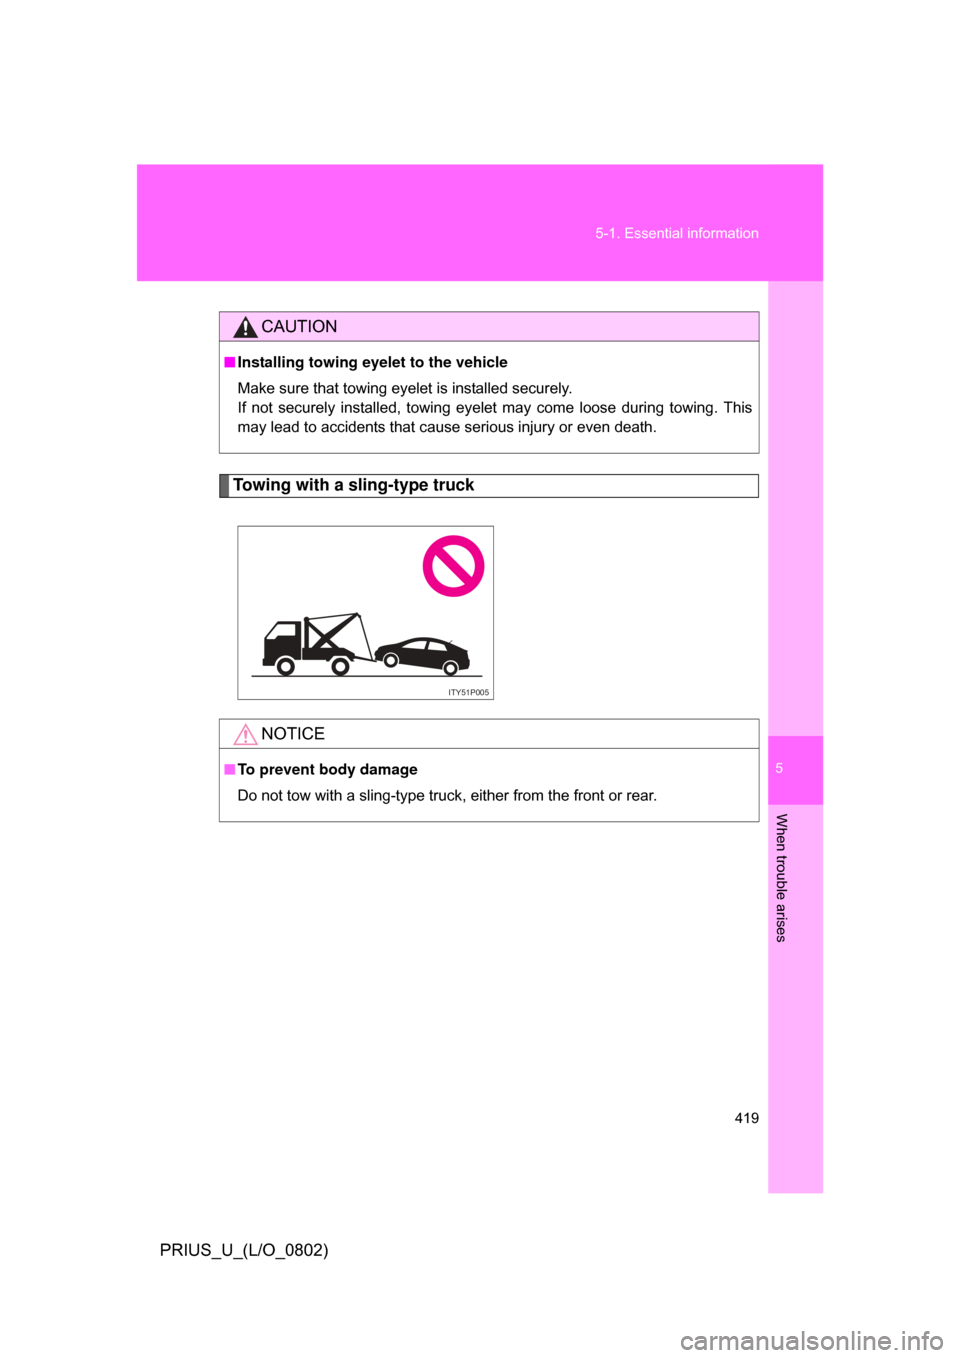
Towing with a sling-type truck
CAUTION
■
Installing towing eyelet to the vehicle
Make sure that towing eyelet is installed securely.
If not securely installed, towing eyelet may come loose during towing. This
may lead to accidents that cause serious injury or even death.
ITY51P005
NOTICE
■To prevent body damage
Do not tow with a sling-type truck, either from the front or rear.
Page 433 of 512

5
When trouble arises
433
5-2. Steps to take in an emergency
PRIUS_U_(L/O_0802)
■
If the malfunction indicator lamp comes on while driving
First check the following:
● Is your vehicle low on gas?
If it is, refuel the vehicle immediately.
● Is the fuel tank cap loose?
If it is, tighten it securely.
The light will go off after taking several driving trips.
If the light does not go off even after several trips, contact your Toyota dealer
as soon as possible.
■ Power steering warning light
When the voltage is low or drops, the power steering warning light may
come on.
■ SRS warning light
This warning light system monitors the following:
● The airbag sensor assembly
● Front airbag sensors
● The curtain shield airbag sensors
● The side and curtain shield airbag sensor assemblies
● The driver’s seat position sensor
● Driver’s seat belt buckle switch
● The front passenger occupant classification ECU
● The pressure sensor
● The belt tension sensor
● “AIR BAG ON” and “AIR BA G OFF” indicator lights
● Front passenger’s seat belt buckle switch
● The inflators
● The warning light
● The interconnecting wiring and power sources
Page 440 of 512
440 5-2. Steps to take in an emergency
PRIUS_U_(L/O_0802)
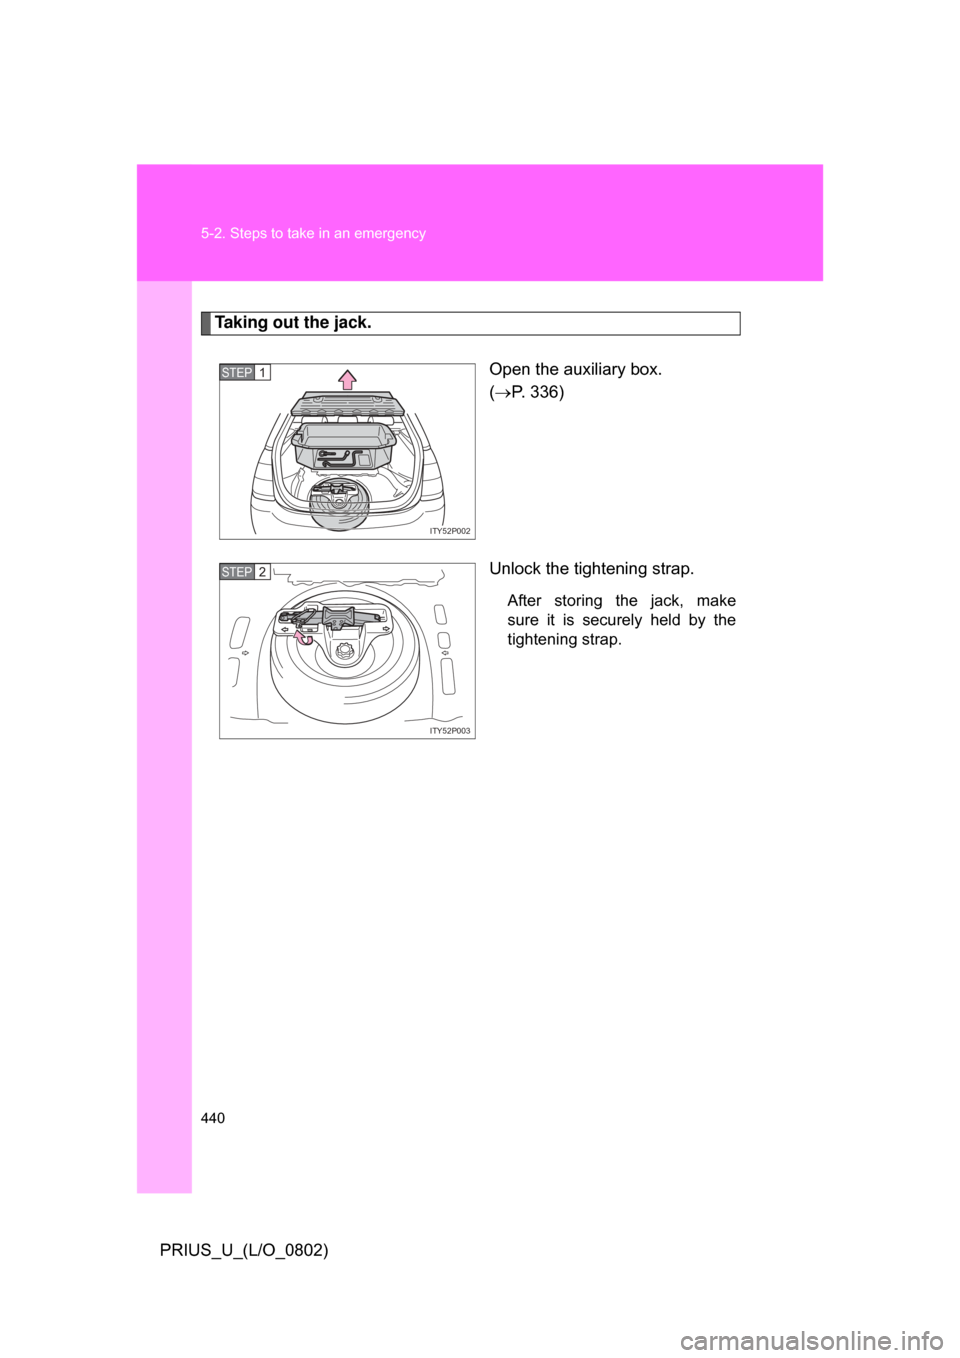
Taking out the jack.Open the auxiliary box.
( P. 336)
Unlock the tightening strap.
After storing the jack, make
sure it is securely held by the
tightening strap.
ITY52P002
STEP1
ITY52P003
STEP2