lock TOYOTA PRIUS 2016 4.G Manual Online
[x] Cancel search | Manufacturer: TOYOTA, Model Year: 2016, Model line: PRIUS, Model: TOYOTA PRIUS 2016 4.GPages: 800, PDF Size: 16.69 MB
Page 622 of 800
622
PRIUS_OM_OM47A29U_(U)
7-3. Do-it-yourself maintenance
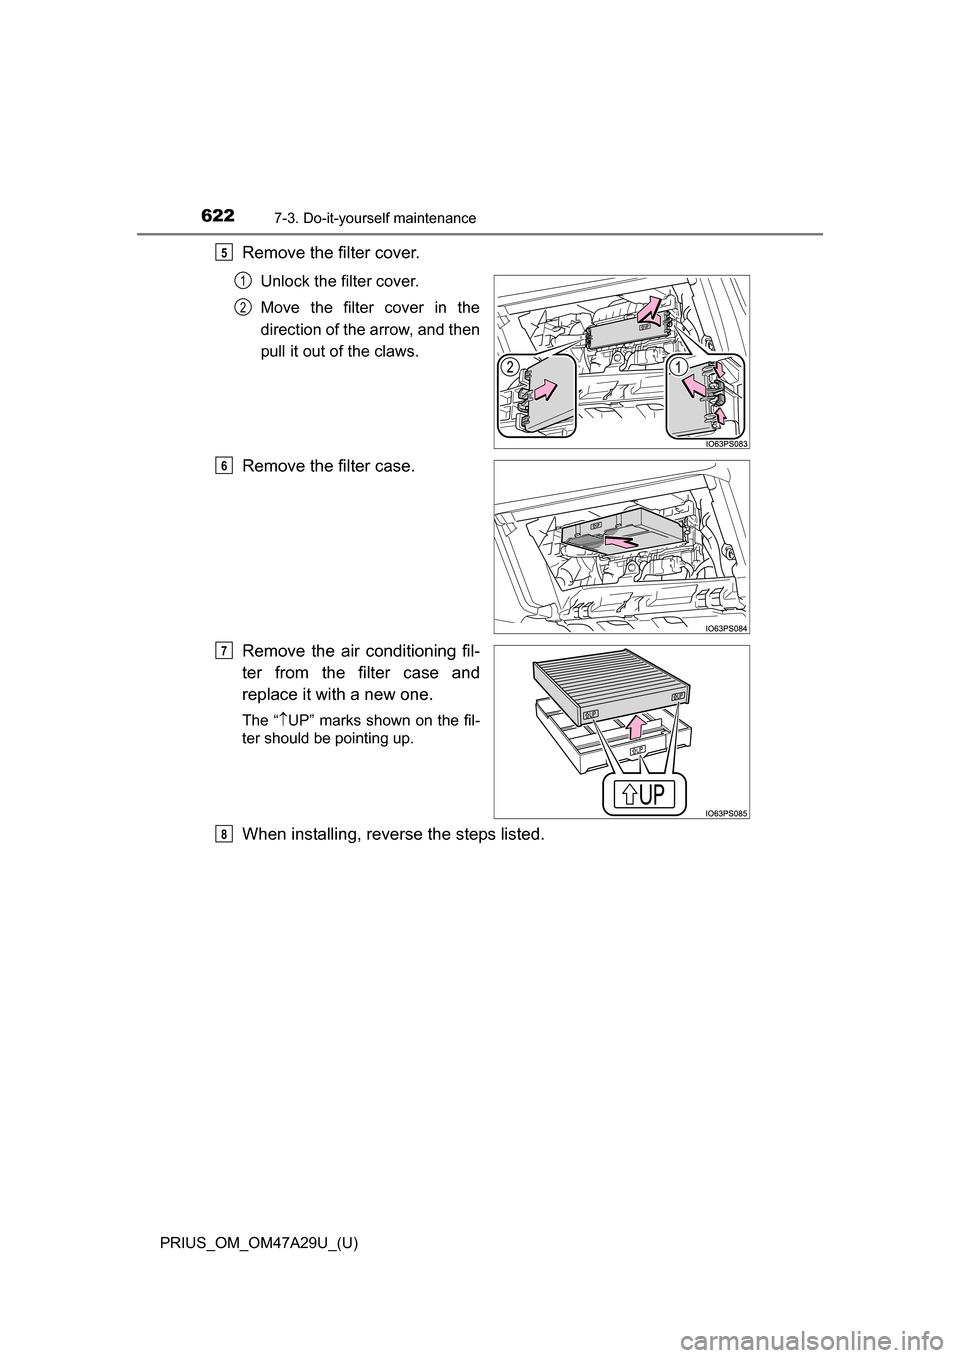
Remove the filter cover.
Unlock the filter cover.
Move the filter cover in the
direction of the arrow, and then
pull it out of the claws.
Remove the filter case.
Remove the air conditioning fil-
ter from the filter case and
replace it with a new one.
The “UP” marks shown on the fil-
ter should be pointing up.
When installing, reverse the steps listed.
5
1
2
6
7
8
Page 624 of 800
624
PRIUS_OM_OM47A29U_(U)
7-3. Do-it-yourself maintenance
Wiper rubber replacement
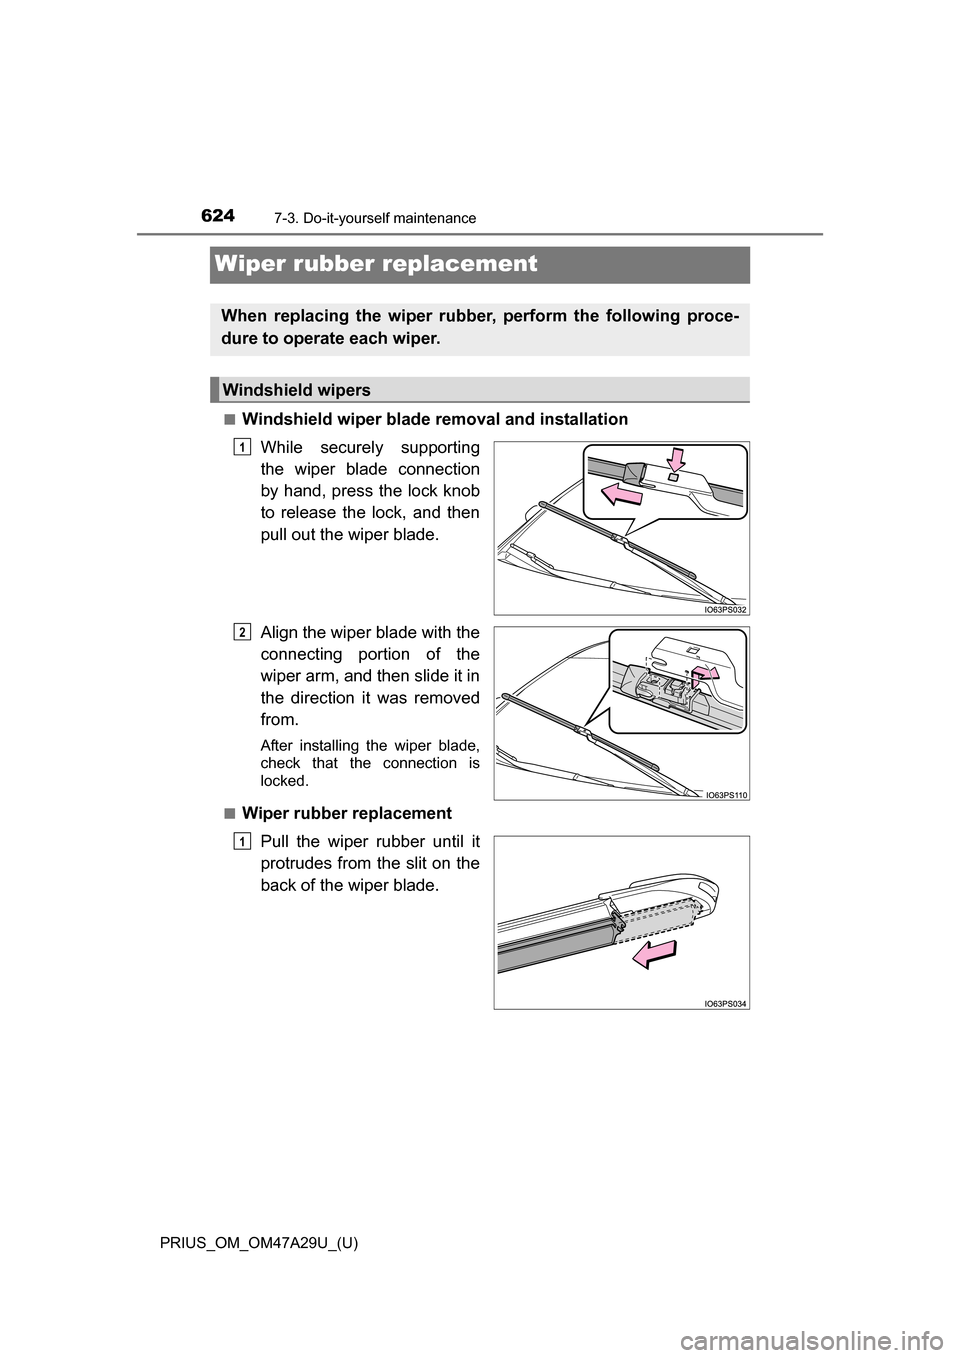
■Windshield wiper blade removal and installationWhile securely supporting
the wiper blade connection
by hand, press the lock knob
to release the lock, and then
pull out the wiper blade.
Align the wiper blade with the
connecting portion of the
wiper arm, and then slide it in
the direction it was removed
from.
After installing the wiper blade,
check that the connection is
locked.
■
Wiper rubber replacement Pull the wiper rubber until it
protrudes from the slit on the
back of the wiper blade.
When replacing the wiper rubber, perform the following proce-
dure to operate each wiper.
Windshield wipers
1
2
1
Page 627 of 800
PRIUS_OM_OM47A29U_(U)
6277-3. Do-it-yourself maintenance
7
Maintenance and care
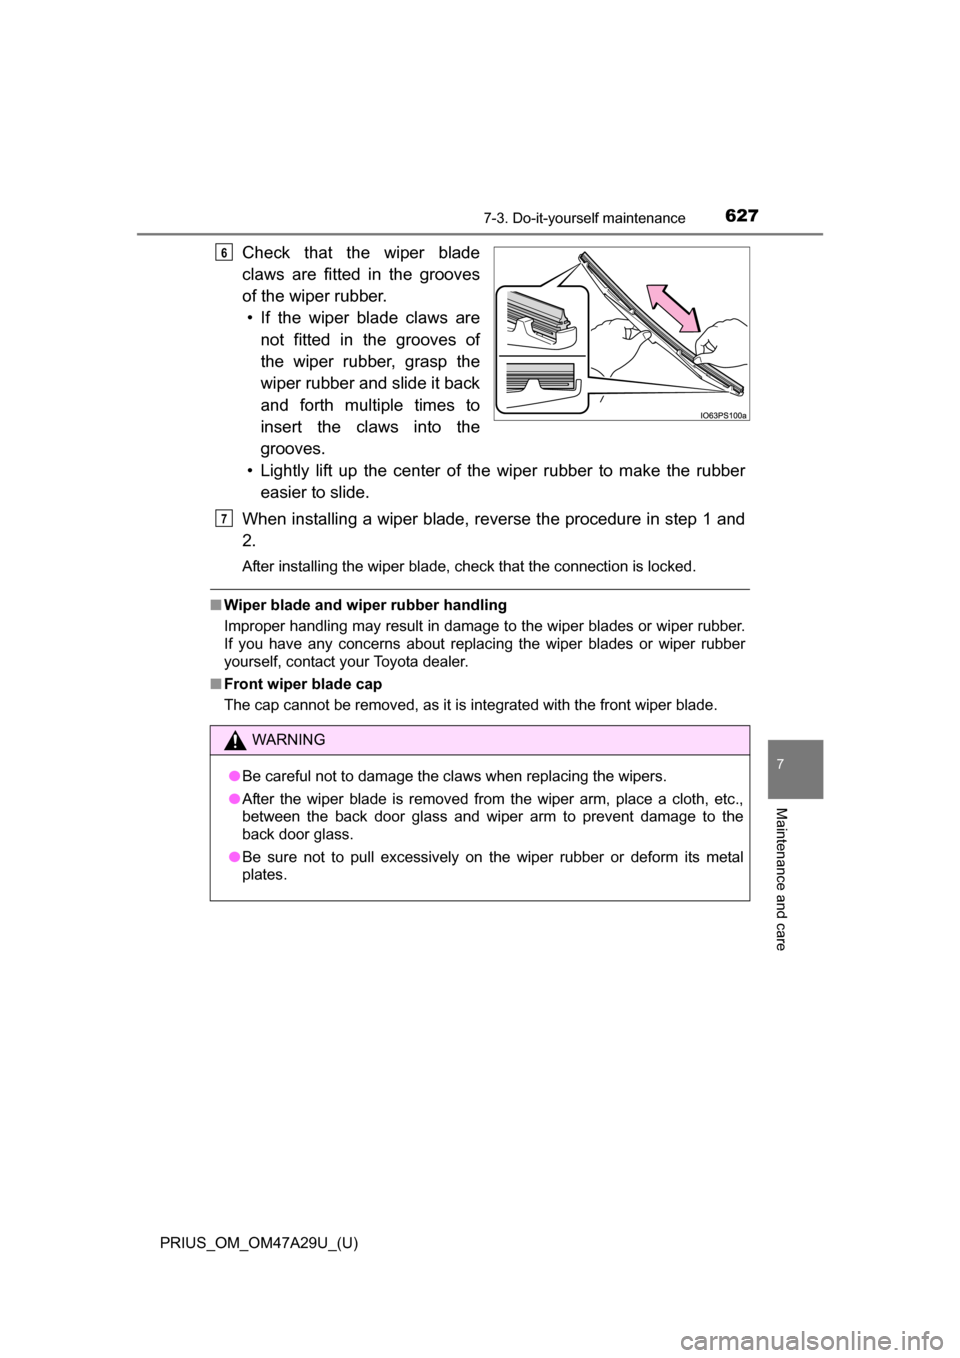
Check that the wiper blade
claws are fitted in the grooves
of the wiper rubber.• If the wiper blade claws are not fitted in the grooves of
the wiper rubber, grasp the
wiper rubber and slide it back
and forth multiple times to
insert the claws into the
grooves.
• Lightly lift up the center of the wiper rubber to make the rubber easier to slide.
When installing a wiper blade, reverse the procedure in step 1 and
2.
After installing the wiper blade, check that the connection is locked.
■ Wiper blade and wiper rubber handling
Improper handling may result in damage to the wiper blades or wiper rubber.
If you have any concerns about replacing the wiper blades or wiper rubber
yourself, contact your Toyota dealer.
■ Front wiper blade cap
The cap cannot be removed, as it is integrated with the front wiper blade.
6
WARNING
●Be careful not to damage the claws when replacing the wipers.
● After the wiper blade is removed from the wiper arm, place a cloth, etc.,
between the back door glass and wiper arm to prevent damage to the
back door glass.
● Be sure not to pull excessively on the wiper rubber or deform its metal
plates.
7
Page 628 of 800
628
PRIUS_OM_OM47A29U_(U)
7-3. Do-it-yourself maintenance
Electronic key batter y
●Flathead screwdriver
● Lithium battery CR2032
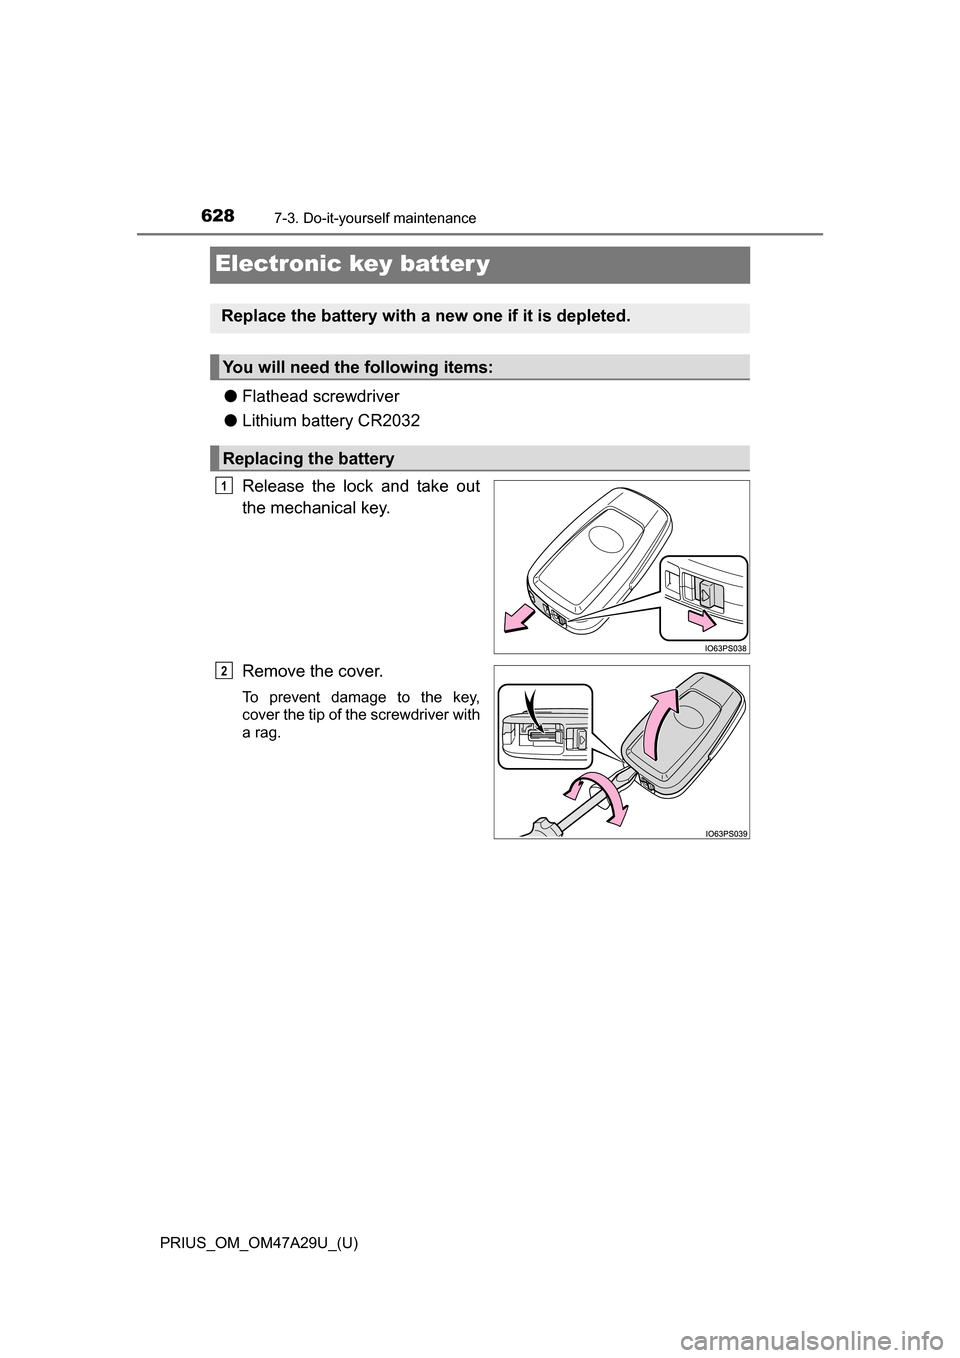
Release the lock and take out
the mechanical key.
Remove the cover.
To prevent damage to the key,
cover the tip of the screwdriver with
a rag.
Replace the battery with a new one if it is depleted.
You will need the following items:
Replacing the battery
1
2
Page 638 of 800
638
PRIUS_OM_OM47A29U_(U)
7-3. Do-it-yourself maintenance
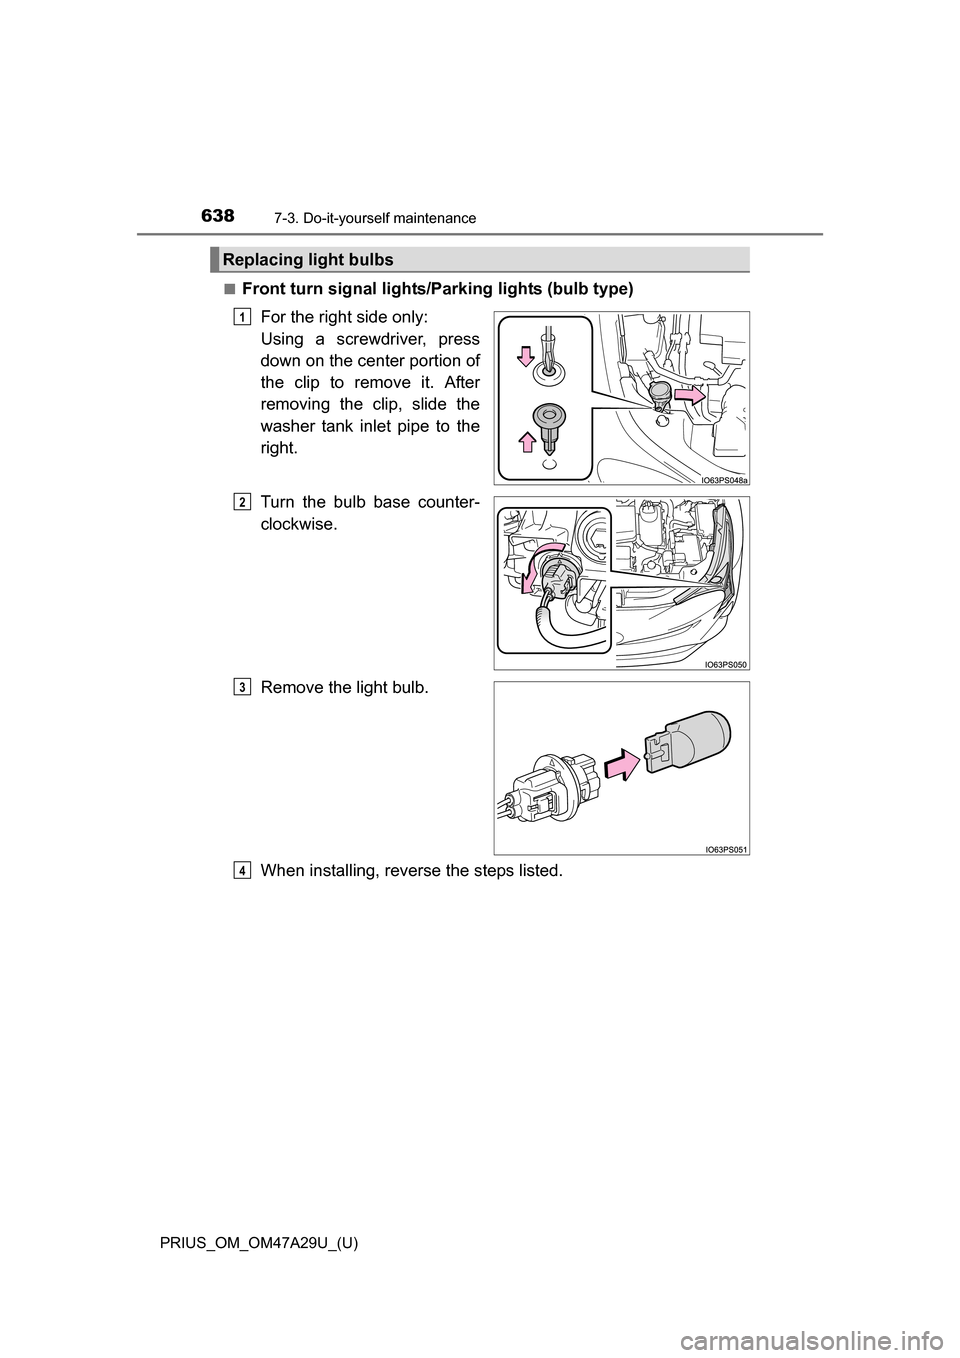
■Front turn signal lights/Parking lights (bulb type)For the right side only:
Using a screwdriver, press
down on the center portion of
the clip to remove it. After
removing the clip, slide the
washer tank inlet pipe to the
right.
Turn the bulb base counter-
clockwise.
Remove the light bulb.
When installing, reverse the steps listed.
Replacing light bulbs
1
2
3
4
Page 640 of 800
640
PRIUS_OM_OM47A29U_(U)
7-3. Do-it-yourself maintenance
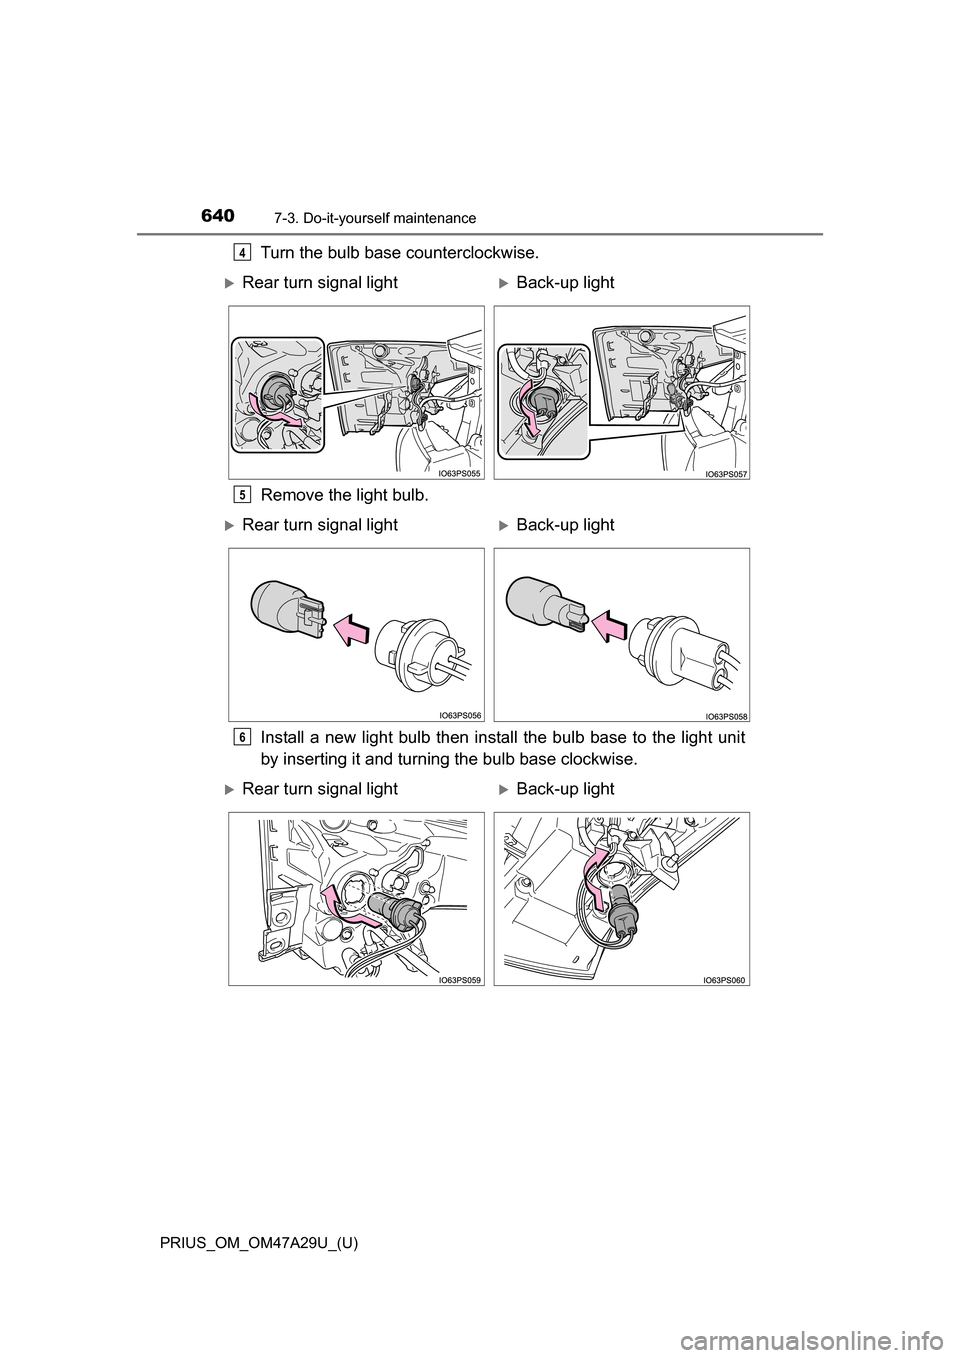
Turn the bulb base counterclockwise.
Remove the light bulb.
Install a new light bulb then install the bulb base to the light unit
by inserting it and turning the bulb base clockwise.4
Rear turn signal lightBack-up light
5
Rear turn signal lightBack-up light
6
Rear turn signal lightBack-up light
Page 643 of 800
PRIUS_OM_OM47A29U_(U)
6437-3. Do-it-yourself maintenance
7
Maintenance and care
WARNING
■Replacing light bulbs
●Be sure to stop the hybrid system and turn off the lights. Do not attempt to
replace the bulb immediately after turning off the lights.
The bulbs become very hot and may cause burns.
● Do not touch the glass portion of the light bulb with bare hands. When it is
unavoidable to hold the glass portion, use and hold with a clean dry cloth
to avoid getting moisture and oils on the bulb.
Also, if the bulb is scratched or dropped, it may blow out or crack.
● Fully install light bulbs and any parts used to secure them. Failure to do so
may result in heat damage, fire, or water entering the headlight unit. This
may damage the headlights or cause condensation to build up on the lens.
● Do not attempt to repair or disassemble light bulbs, connectors, electric
circuits or component parts.
Doing so may result in death or serious injury due to electric shock.
■ To prevent damage or fire
●Make sure bulbs are fully seated and locked.
● Check the wattage of the bulb before installing to prevent heat damage.
Page 648 of 800
648
PRIUS_OM_OM47A29U_(U)
8-2. Steps to take in an emergency
If your vehicle needs to be towed
In the following situations, it is not possible to be towed by another
vehicle using cables or chains, as the front wheels may be locked due
to the parking lock. Contact your Toyota dealer or commercial towing
service.
●There is a malfunction in the shift control system. ( P. 228, 671)
● There is a malfunction in the immobilizer system. ( P. 89)
● There is a malfunction in the smart key system. ( P. 708)
● The 12-volt battery is discharged. ( P. 711)
The following may indicate a problem with your hybrid transmission.
Contact your Toyota dealer or commercial towing service before tow-
ing.
● The hybrid system warning messa ge is displayed and the vehicle
does not move.
● The vehicle makes an abnormal sound.
If towing is necessary, we re commend having your vehicle
towed by your Toyota dealer or commercial towing service,
using a wheel-lift type truck or flatbed truck.
Use a safety chain system for all towing, and abide by all state/
provincial and local laws.
Situations when it is not possibl e to be towed by another vehicle
Situations when it is necessary to contact dealers before towing
Page 652 of 800
6528-2. Steps to take in an emergency
PRIUS_OM_OM47A29U_(U)
■While towing
If the hybrid system is off, the power assist for the brakes and steering will not
function, making steering and braking more difficult.
■ Wheel nut wrench
Wheel nut wrench is installed in luggage compartment. ( P. 674, 689)
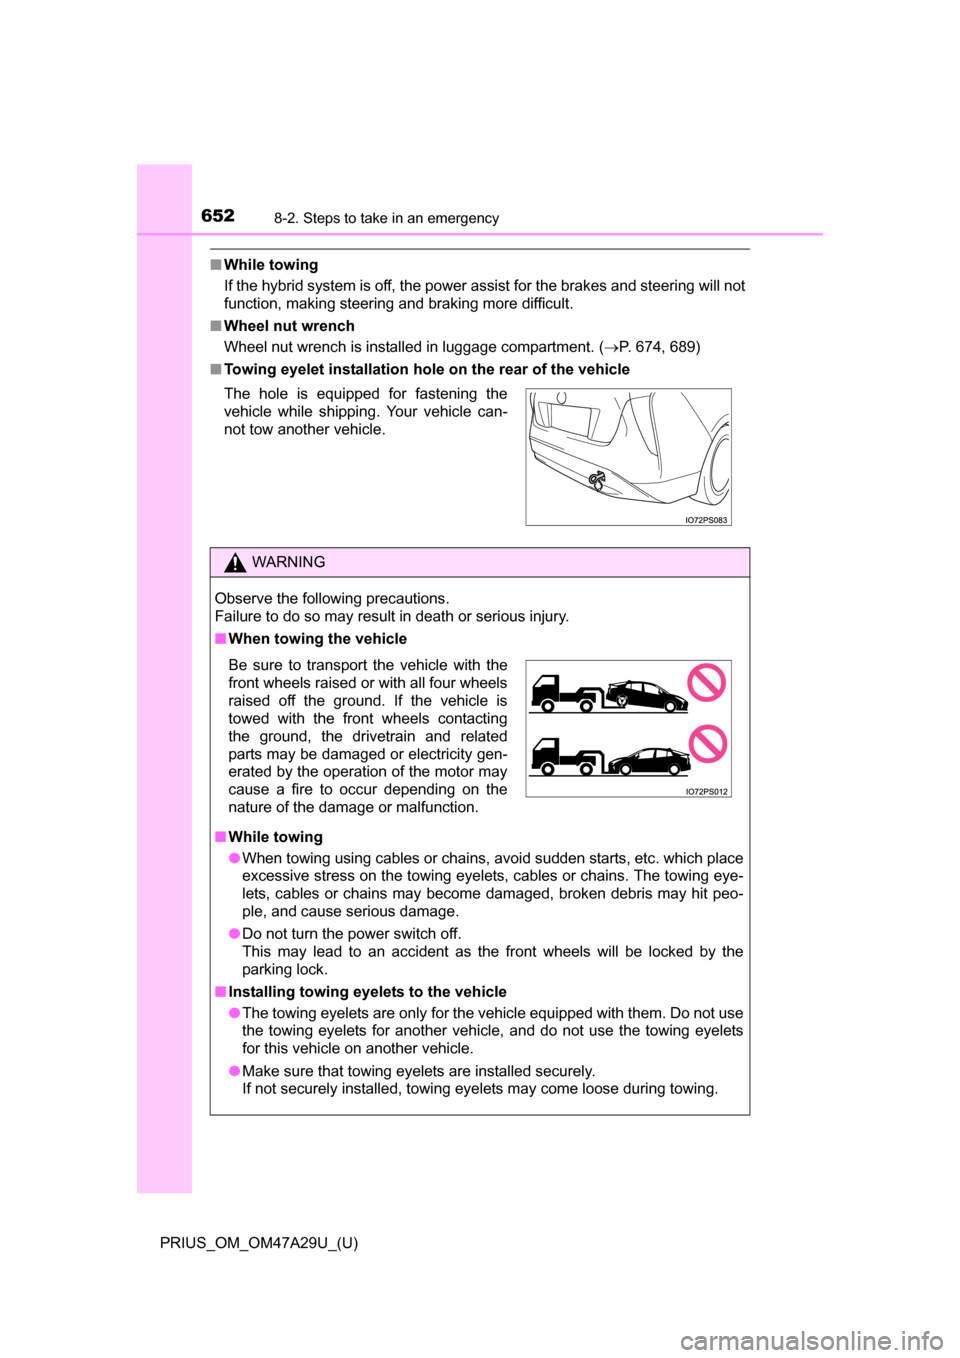
■ Towing eyelet installation hol e on the rear of the vehicle
The hole is equipped for fastening the
vehicle while shipping. Your vehicle can-
not tow another vehicle.
WARNING
Observe the following precautions.
Failure to do so may result in death or serious injury.
■ When towing the vehicle
■ While towing
●When towing using cables or chains, avoid sudden starts, etc. which place
excessive stress on the towing eyelets, cables or chains. The towing eye-
lets, cables or chains may become damaged, broken debris may hit peo-
ple, and cause serious damage.
● Do not turn the power switch off.
This may lead to an accident as the front wheels will be locked by the
parking lock.
■ Installing towing eyelets to the vehicle
●The towing eyelets are only for the vehicle equipped with them. Do not use
the towing eyelets for another vehicle, and do not use the towing eyelets
for this vehicle on another vehicle.
● Make sure that towing eyelets are installed securely.
If not securely installed, towing eyelets may come loose during towing.
Be sure to transport the vehicle with the
front wheels raised or with all four wheels
raised off the ground. If the vehicle is
towed with the front wheels contacting
the ground, the drivetrain and related
parts may be damaged or electricity gen-
erated by the operation of the motor may
cause a fire to occur depending on the
nature of the damage or malfunction.
Page 667 of 800
6678-2. Steps to take in an emergency
PRIUS_OM_OM47A29U_(U)
8
When trouble arises
■Warning messages
The warning messages explained below may differ from the actual messages
according to operation conditions and vehicle specifications.
■ System warning lights
The master warning light does not come on or flash in the following cases.
Instead, a separate system warning light will come on along with a message
shown on the multi-information display.
●“Antilock Brake System Malfunction Visit Your Dealer”:
The ABS warning light comes on. ( P. 656)
● “Braking Power Low Visit Your Dealer”:
The brake system warning light (yellow) will come on. ( P. 655)
● Indicates that a door is not fully closed while the vehicle is stopped.:
The Open door warning light comes on. ( P. 657)
■ If “Visit Your Dealer” is shown
The system or part shown on the multi-information display is malfunctioning.
Have the vehicle inspected by your Toyota dealer.
■ If a message about an operation is shown
●If a message about an operation of the accelerator pedal or brake pedal is
shown
A warning message about an operation of the brake pedal may be shown
while the driving assist systems such as PCS (Pre-Collision System) (if
equipped) or the dynamic radar cruise control with full-speed range (if
equipped) is operating. If a warning message is shown, be sure to deceler-
ate the vehicle or follow an instruction shown on the multi-information dis-
play.
● A warning message is shown when Drive-Start Control, Brake Override Sys-
tem or Intelligent Clearance Sonar (if equipped) operates ( P. 209, 210,
352). Follow the instructions on the multi-information display.
● If a message about an operation of the power switch is shown
An instruction for operation of the power switch is shown when the incorrect
procedure for starting the hybrid system is performed or the power switch is
operated incorrectly. Follow the instructions shown on the multi-information
display to operate the power switch again.
● If a message about a shift operation is shown
To prevent the shift position from bei ng selected incorrectly or the vehicle
from moving unexpectedly, the shift position may be changed automatically
( P. 236) or operating the shift lever may be required. In this case, change
the shift position following the instructions on the multi-information display.
● If a message or image about an open/close state of a part or replenishment
of a consumable is shown
Confirm the part indicated by the multi-information display or a warning light,
and then perform the coping method such as closing the open door or
replenishing a consumable.