clock TOYOTA PRIUS 2016 4.G Owners Manual
[x] Cancel search | Manufacturer: TOYOTA, Model Year: 2016, Model line: PRIUS, Model: TOYOTA PRIUS 2016 4.GPages: 800, PDF Size: 16.69 MB
Page 92 of 800
92
PRIUS_OM_OM47A29U_(U)
2. Instrument cluster
Combination meter
The units used on the display may differ depending on the target region.
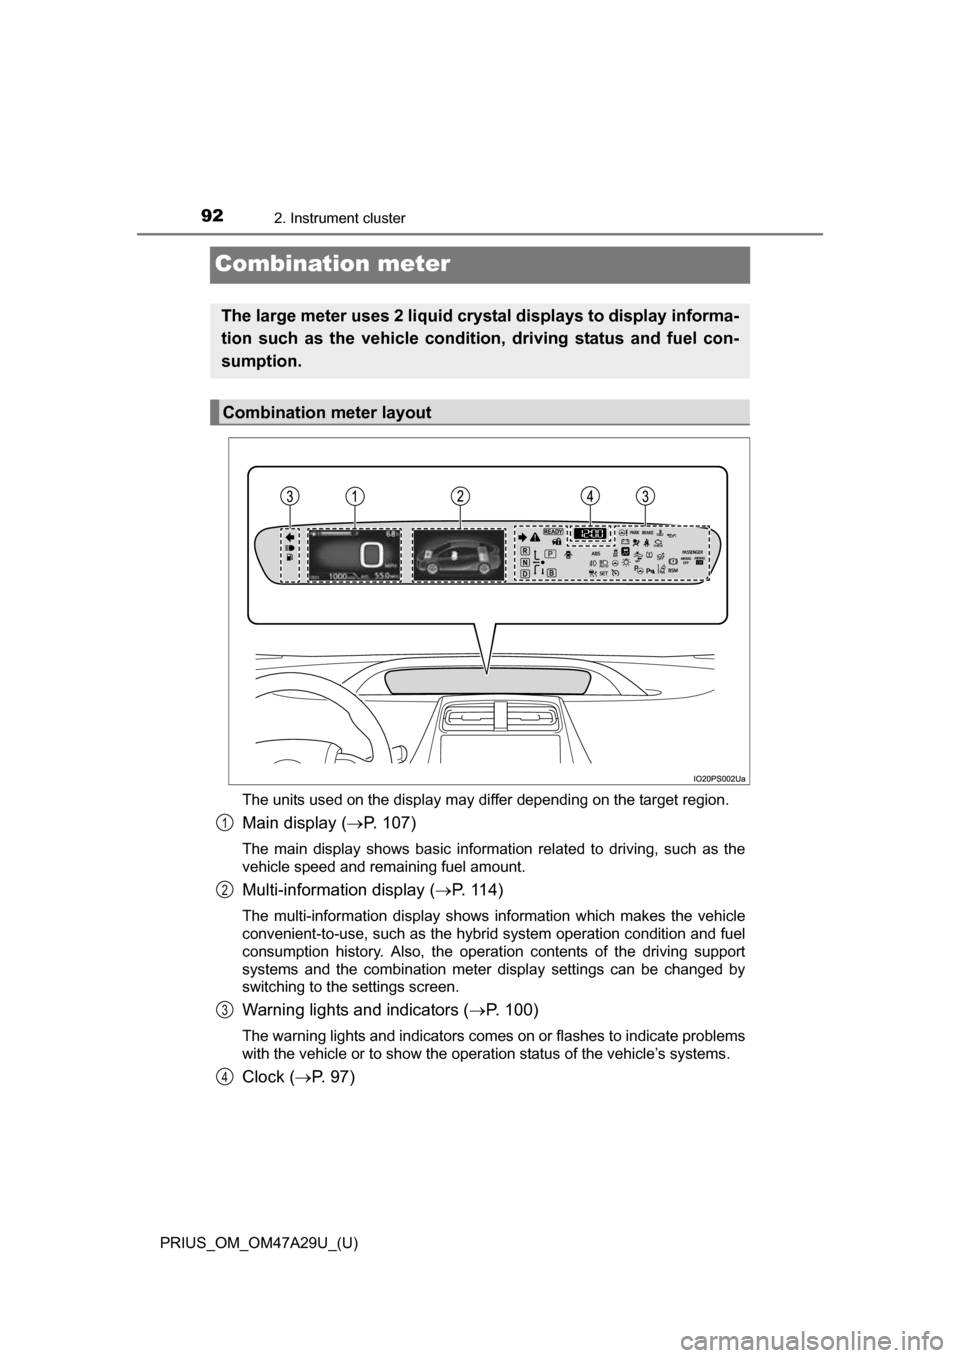
Main display (P. 107)
The main display shows basic information related to driving, such as the
vehicle speed and remaining fuel amount.
Multi-information display ( P. 114)
The multi-information display shows information which makes the vehicle
convenient-to-use, such as the hybrid system operation condition and fuel
consumption history. Also, the operat ion contents of the driving support
systems and the combination meter display settings can be changed by
switching to the settings screen.
Warning lights and indicators ( P. 100)
The warning lights and indicators comes on or flashes to indicate problems
with the vehicle or to show the operation status of the vehicle’s systems.
Clock ( P. 97)
The large meter uses 2 liquid cryst al displays to display informa-
tion such as the vehicle condition, driving status and fuel con-
sumption.
Combination meter layout
1
2
3
4
Page 97 of 800
PRIUS_OM_OM47A29U_(U)
972. Instrument cluster
2
Instrument cluster
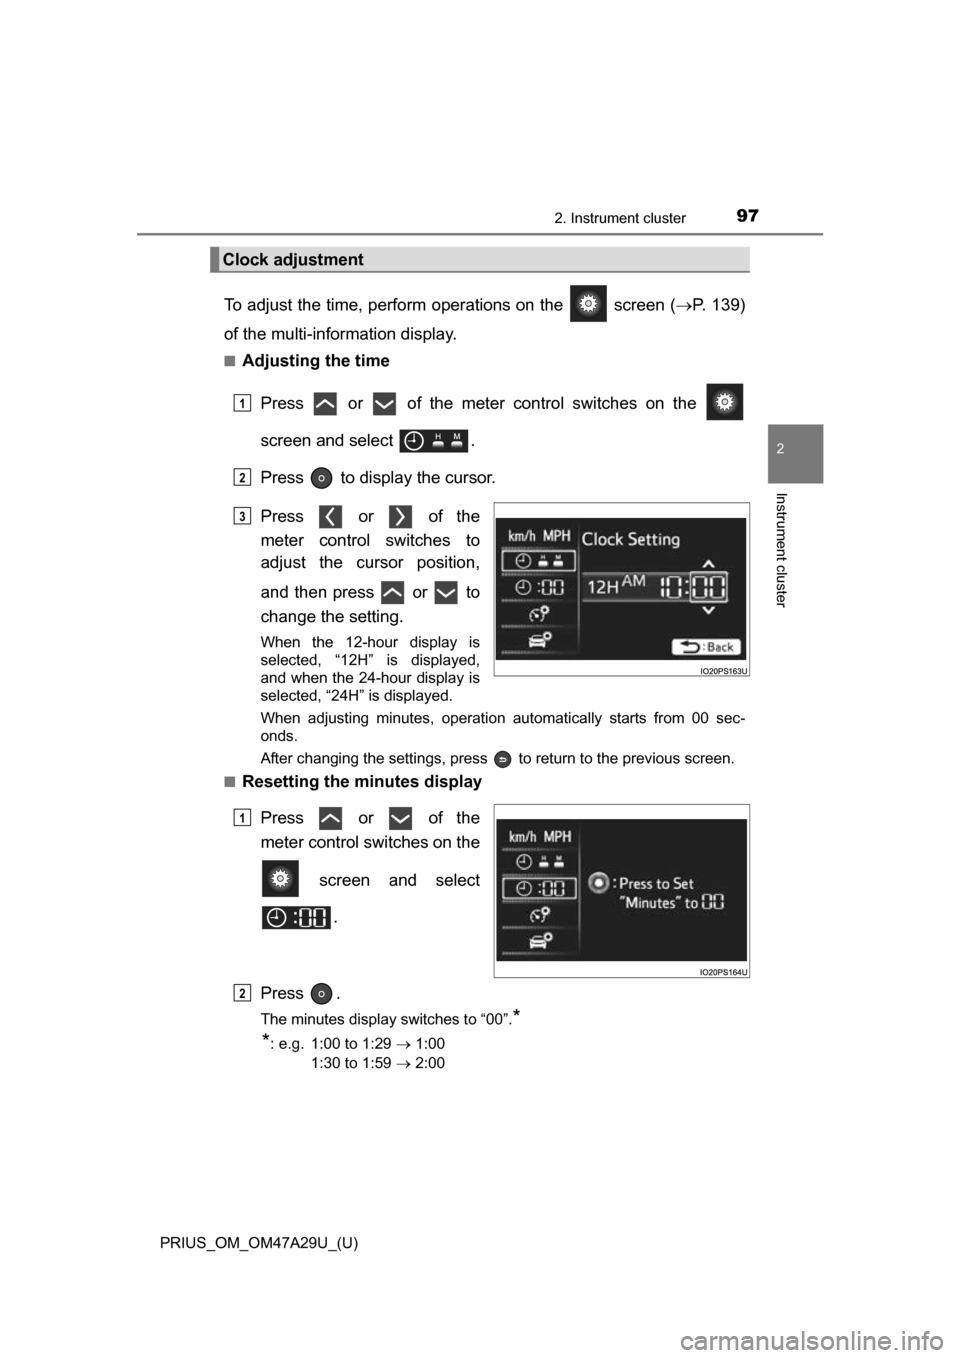
To adjust the time, perform operations on the screen (P. 139)
of the multi-info rmation display.
■Adjusting the time
Press or of the meter control switches on the
screen and select .
Press to display the cursor.
Press or of the
meter control switches to
adjust the cursor position,
and then press or to
change the setting.
When the 12-hour display is
selected, “12H” is displayed,
and when the 24-hour display is
selected, “24H” is displayed.
When adjusting minutes, operation automatically starts from 00 sec-
onds.
After changing the settings, press to return to the previous screen.
■
Resetting the minutes display
Press or of the
meter control switches on the
screen and select.
Press .
The minutes display switches to “00”.*
*
: e.g. 1:00 to 1:29 1:00
1:30 to 1:59 2:00
Clock adjustment
1
2
3
1
2
Page 98 of 800
98
PRIUS_OM_OM47A29U_(U)
2. Instrument cluster
■The meters and display illuminate when
The power switch is in ON mode.
■ Adjusting the instrument cluster brightness (P. 94)
● The brightness levels that can be selected differ depending on whether the
tail lights are on and surrounding brightness levels, as shown in the table
below.
*: 22 levels of the brightness are displayed on the setting screen. However,
the brightness setting will be the brightest when other than 1st level (the
darkest) is selected. If other than 1st or 22nd level is selected, when the
tail lights are turned on in a dark place, the instrument cluster brightness
setting will be the selected level.
● If the taillights are illuminated in a dark environment, the instrument cluster
light dims. However, when the brightness of the instrument cluster is set to
minimum or maximum (1st or 22nd level of the instrument cluster bright-
ness), even if the taillights are illuminated, the instrument cluster light will
not dim.
■ When disconnecting and reconnect ing 12-volt battery terminals
The settings of the calendar, clock, etc. will be reset.
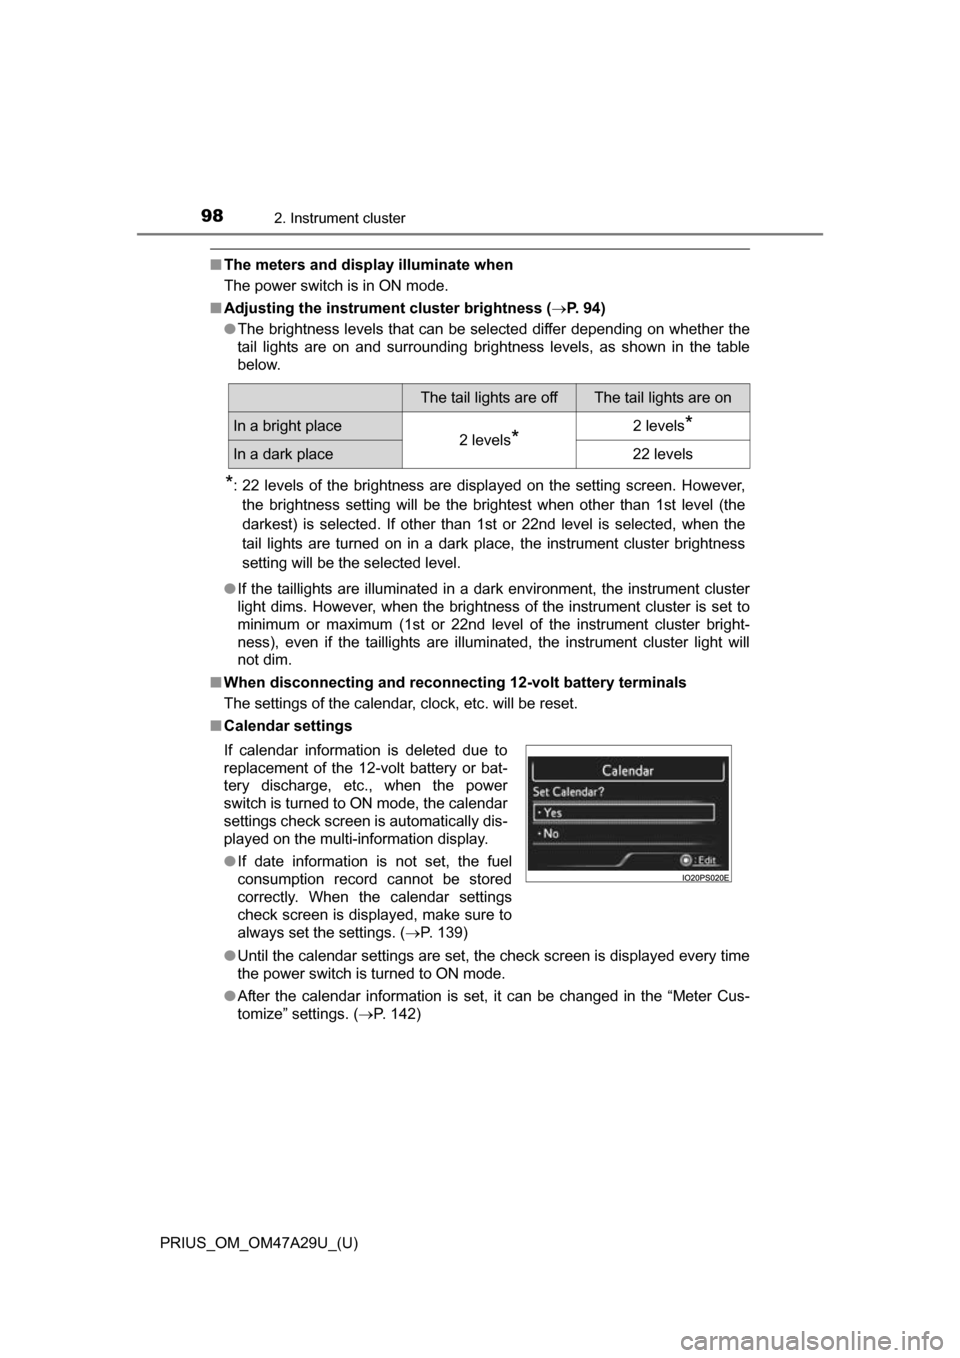
■ Calendar settings
●Until the calendar settings are set, the check screen is displayed every time
the power switch is turned to ON mode.
● After the calendar information is set, it can be changed in the “Meter Cus-
tomize” settings. ( P. 142)
The tail lights are offThe tail lights are on
In a bright place2 levels*2 levels*
In a dark place22 levels
If calendar information is deleted due to
replacement of the 12-volt battery or bat-
tery discharge, etc., when the power
switch is turned to ON mode, the calendar
settings check screen is automatically dis-
played on the multi-information display.
● If date information is not set, the fuel
consumption record cannot be stored
correctly. When the calendar settings
check screen is displayed, make sure to
always set the settings. ( P. 139)
Page 141 of 800
PRIUS_OM_OM47A29U_(U)
1412. Instrument cluster
2
Instrument cluster
*: If equipped
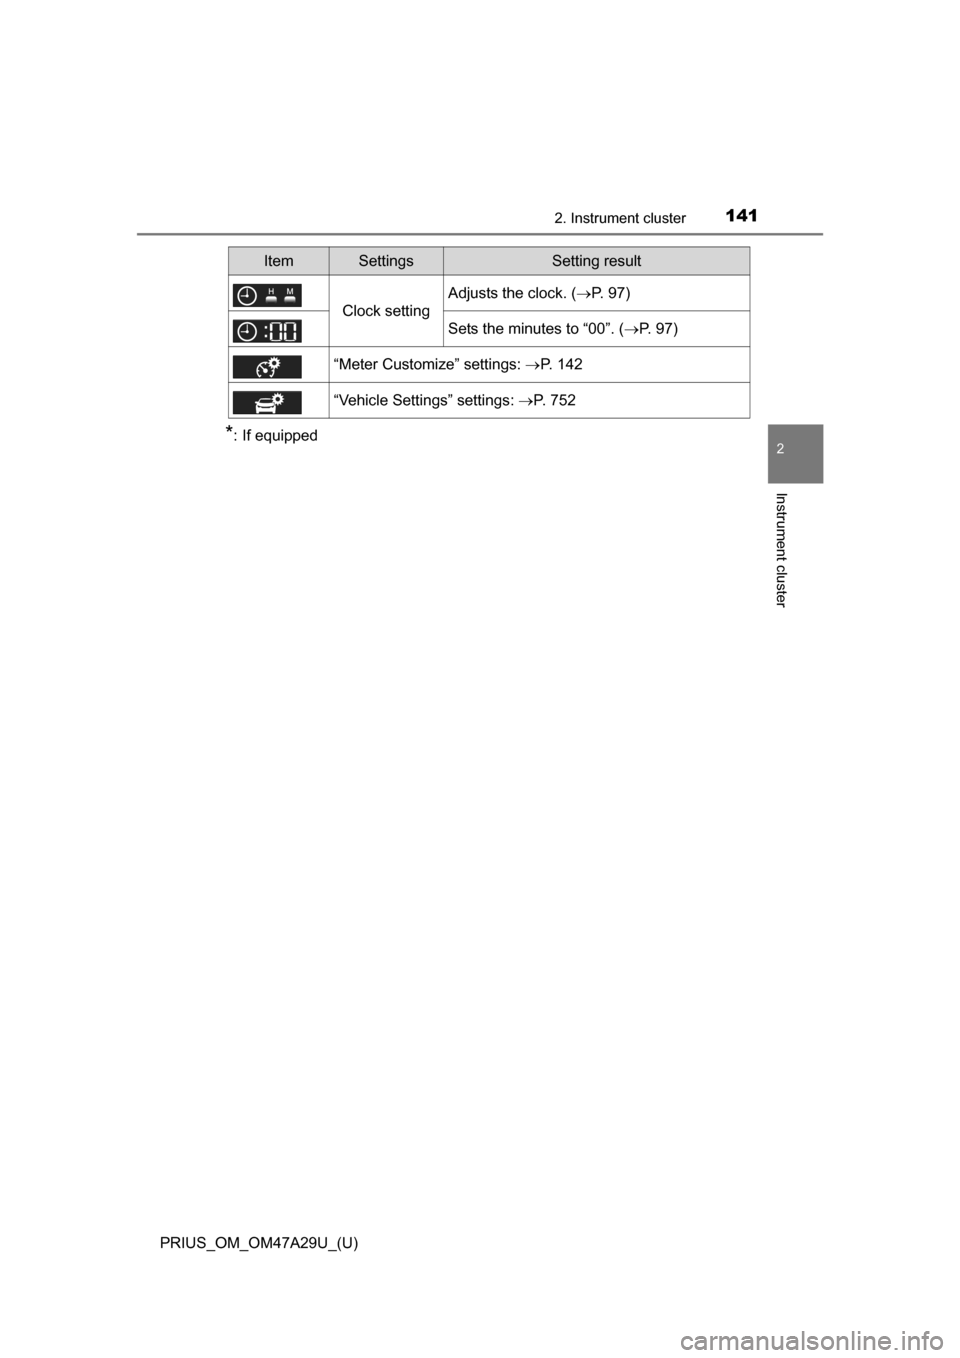
Clock setting
Adjusts the clock. (P. 97)
Sets the minutes to “00”. ( P. 97)
“Meter Customize” settings: P. 142
“Vehicle Settings” settings: P. 752
ItemSettingsSetting result
Page 229 of 800
PRIUS_OM_OM47A29U_(U)
2294-2. Driving procedures
4
Driving
■Meter display
When the power switch is turned off, each display will turn off as follows.
●The shift position indicator will turn off after approximately 2 seconds.
● The multi-information display, clock, etc. will turn off after approximately 30
seconds.
(Each display will also turn off immediately if a door is locked before 30 sec-
onds has elapsed.)
■ If the smart key system has been deactivated in a customized setting
P. 708
WARNING
■When starting the hybrid system
Always start the hybrid system while sitting in the driver’s seat. Do not
depress the accelerator pedal while starting the hybrid system under any
circumstances.
Doing so may cause an accident resulting in death or serious injury.
■ Stopping the hybrid syst em in an emergency
● If you want to stop the hybrid system in an emergency while driving the
vehicle, press and hold the power switch for more than 2 seconds, or
press it briefly 3 times or more in succession. ( P. 647)
However, do not touch the power switch while driving except in an emer-
gency. Turning the hybrid system off while driving will not cause loss of
steering or braking control, however, power assist to the steering will be
lost. This will make it more difficult to steer smoothly, so you should pull
over and stop the vehicle as soon as it is safe to do so.
● If the power switch is operated while the vehicle is running, a warning
message will be shown on the multi-information display and a buzzer
sounds.
● When restarting the hybrid system after an emergency shutdown while
driving, press the power switch. When restarting the hybrid system after
stopping the vehicle, change the shift position to P and then press the
power switch.
Page 593 of 800
PRIUS_OM_OM47A29U_(U)
5937-3. Do-it-yourself maintenance
7
Maintenance and care
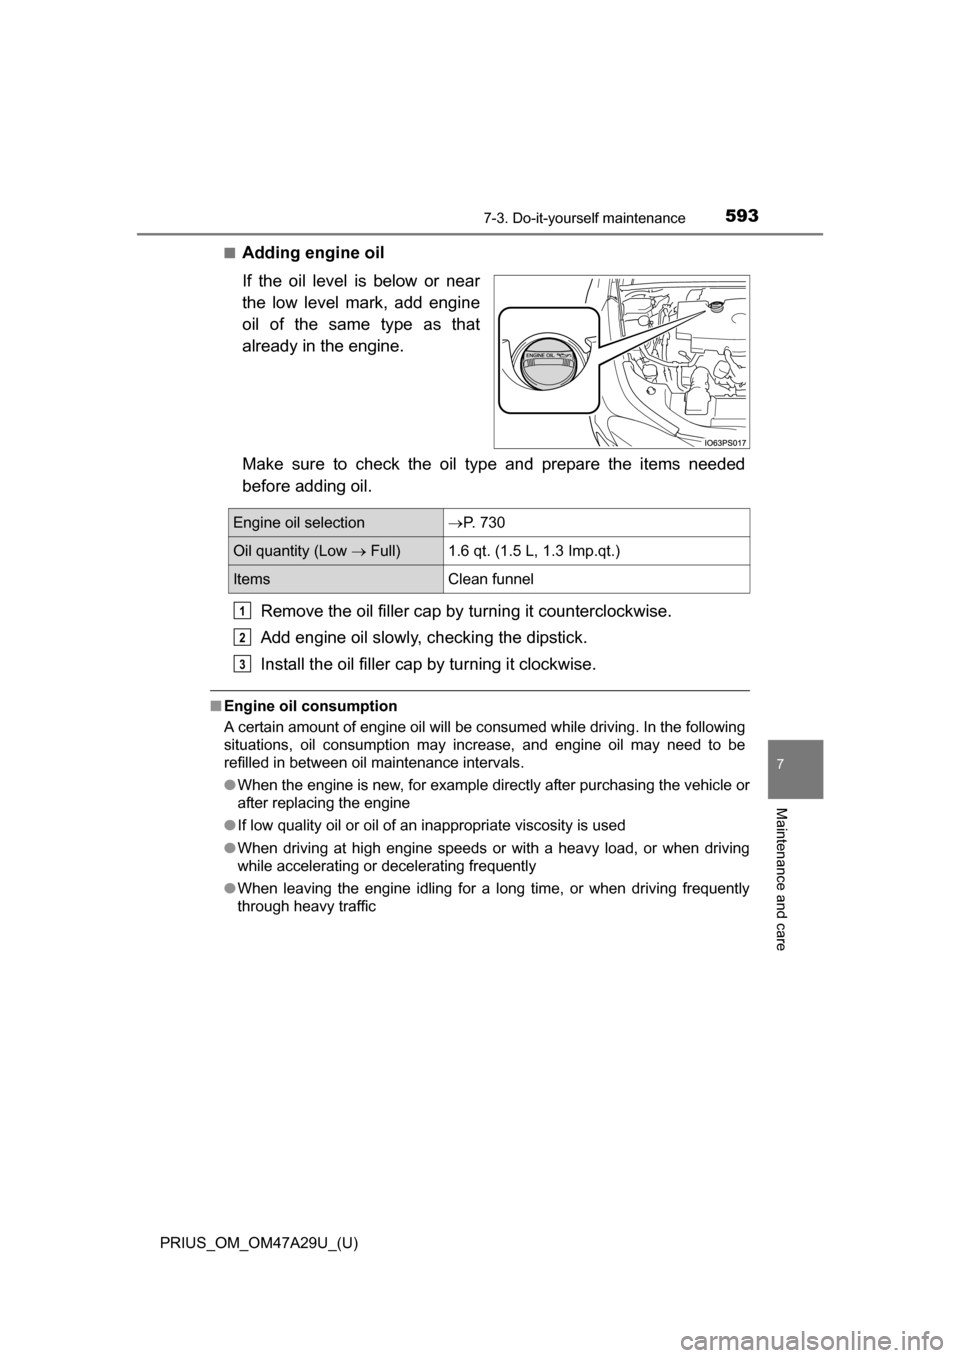
■Adding engine oil
If the oil level is below or near
the low level mark, add engine
oil of the same type as that
already in the engine.
Make sure to check the oil type and prepare the items needed
before adding oil.Remove the oil filler cap by turning it counterclockwise.
Add engine oil slowly, checking the dipstick.
Install the oil filler cap by turning it clockwise.
■ Engine oil consumption
A certain amount of engine oil will be consumed while driving. In the following
situations, oil consumption may increase, and engine oil may need to be
refilled in between oil maintenance intervals.
●When the engine is new, for example directly after purchasing the vehicle or
after replacing the engine
● If low quality oil or oil of an inappropriate viscosity is used
● When driving at high engine speeds or with a heavy load, or when driving
while accelerating or decelerating frequently
● When leaving the engine idling for a long time, or when driving frequently
through heavy traffic
Engine oil selectionP. 730
Oil quantity (Low Full)1.6 qt. (1.5 L, 1.3 Imp.qt.)
ItemsClean funnel
1
2
3
Page 638 of 800
638
PRIUS_OM_OM47A29U_(U)
7-3. Do-it-yourself maintenance
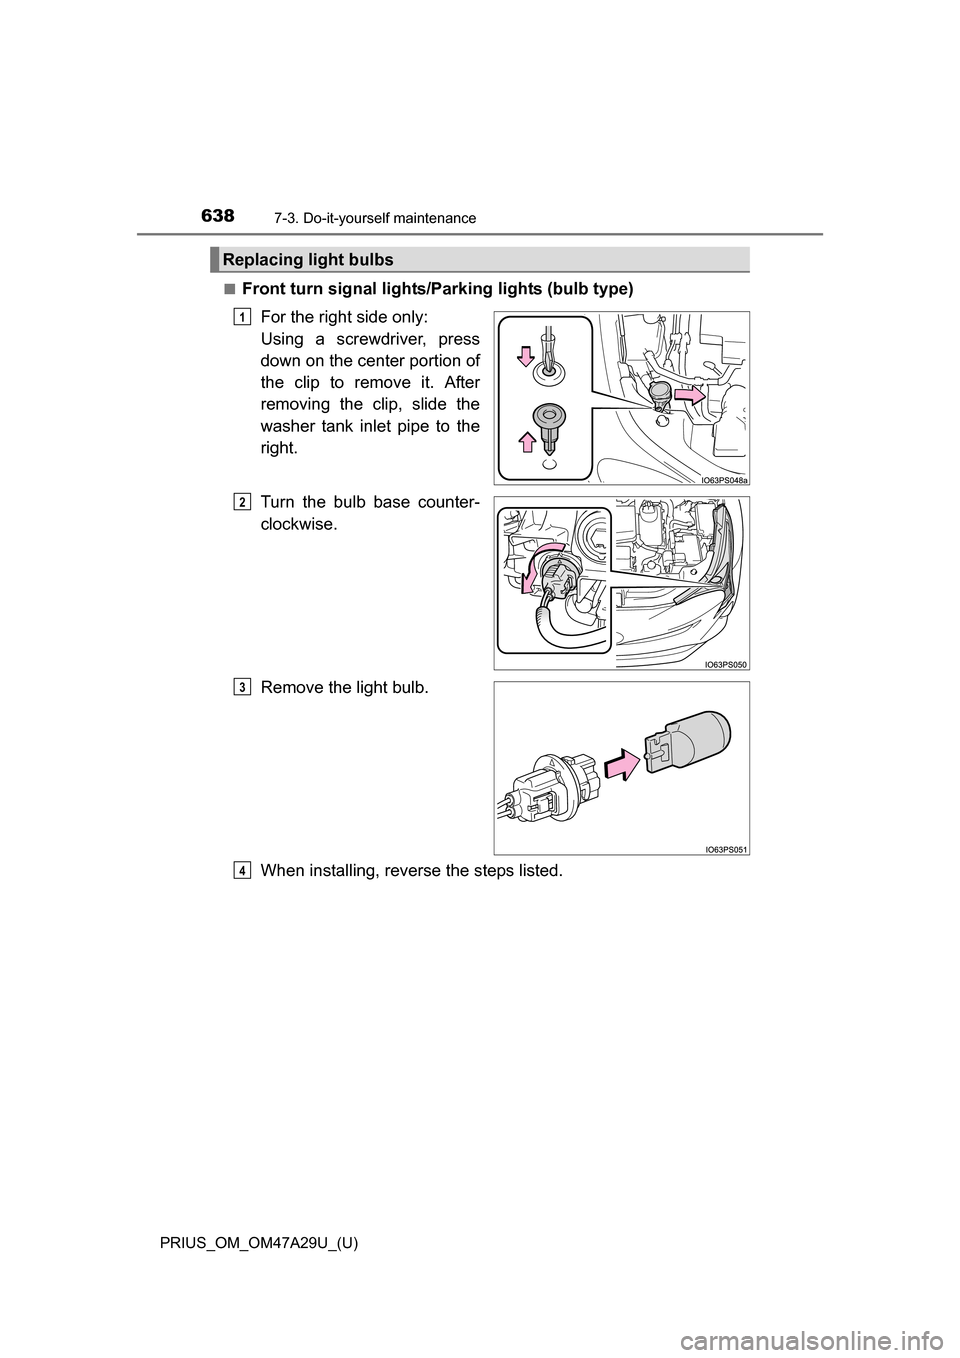
■Front turn signal lights/Parking lights (bulb type)For the right side only:
Using a screwdriver, press
down on the center portion of
the clip to remove it. After
removing the clip, slide the
washer tank inlet pipe to the
right.
Turn the bulb base counter-
clockwise.
Remove the light bulb.
When installing, reverse the steps listed.
Replacing light bulbs
1
2
3
4
Page 640 of 800
640
PRIUS_OM_OM47A29U_(U)
7-3. Do-it-yourself maintenance
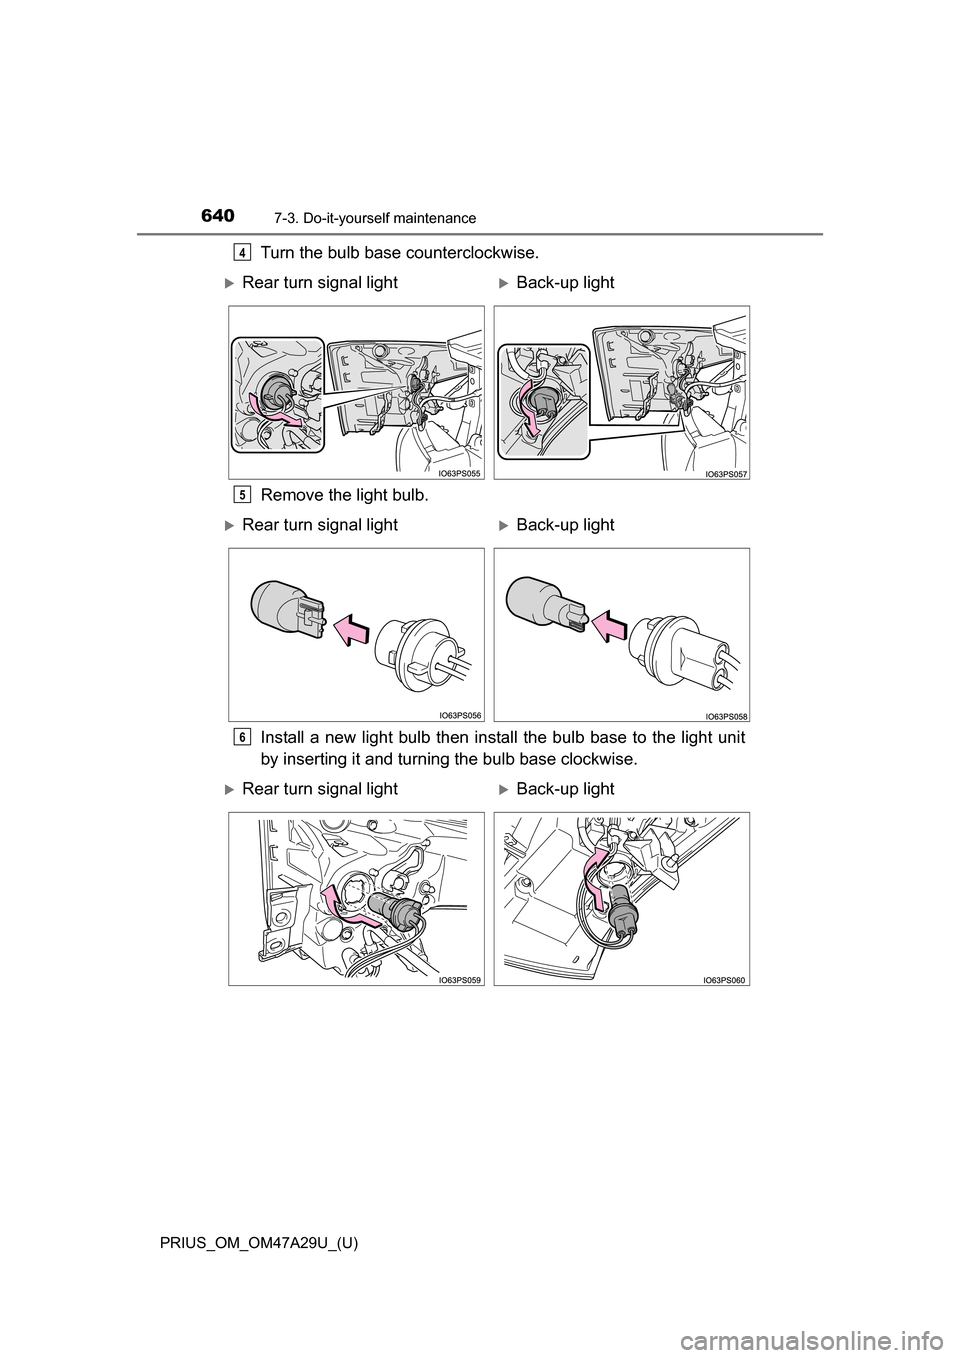
Turn the bulb base counterclockwise.
Remove the light bulb.
Install a new light bulb then install the bulb base to the light unit
by inserting it and turning the bulb base clockwise.4
Rear turn signal lightBack-up light
5
Rear turn signal lightBack-up light
6
Rear turn signal lightBack-up light
Page 693 of 800
6938-2. Steps to take in an emergency
PRIUS_OM_OM47A29U_(U)
8
When trouble arises
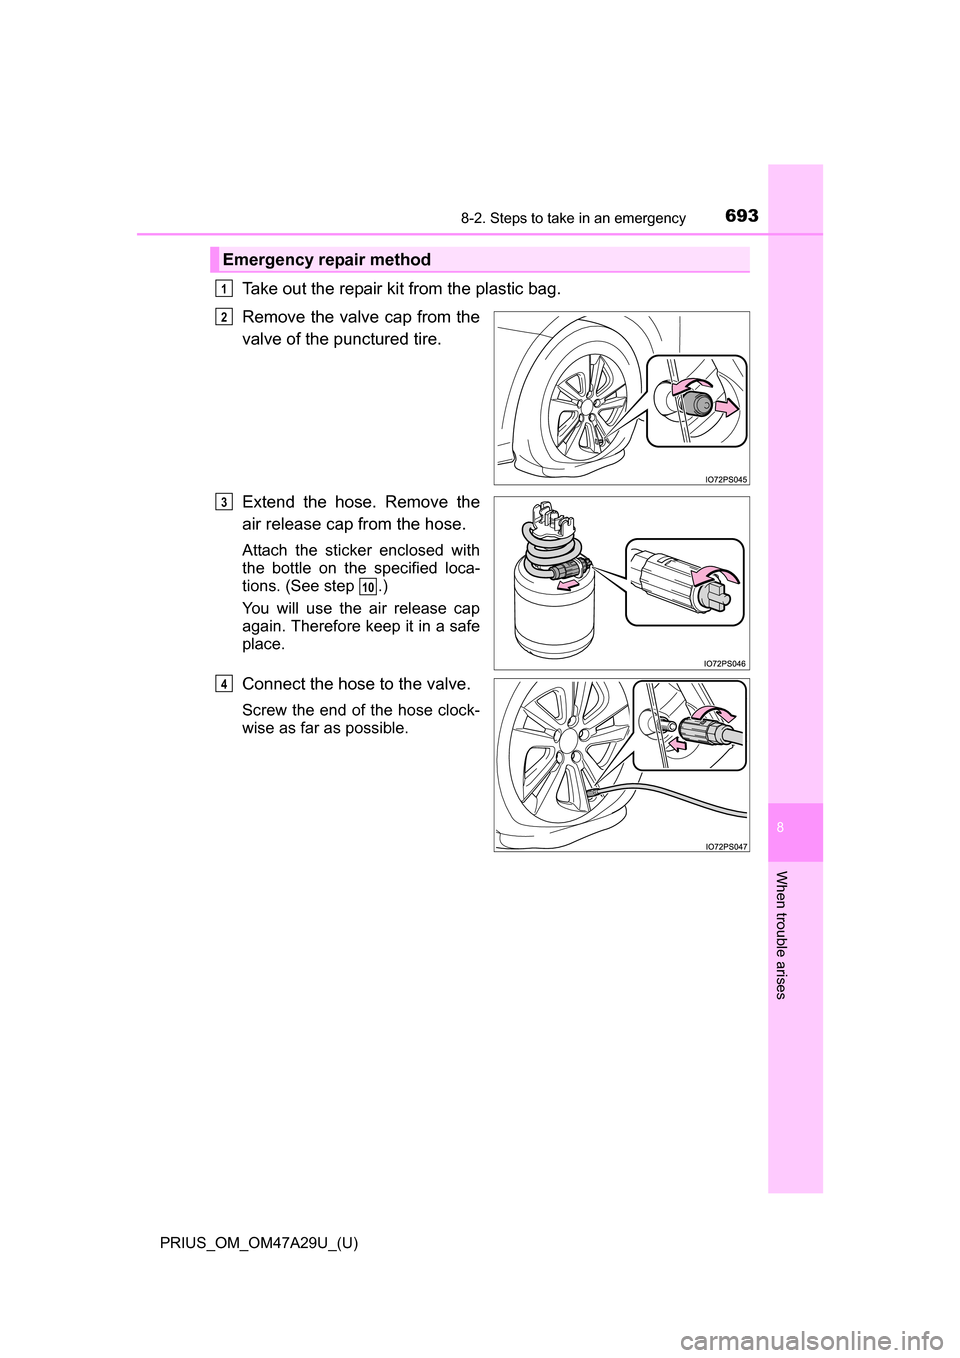
Take out the repair kit from the plastic bag.
Remove the valve cap from the
valve of the punctured tire.
Extend the hose. Remove the
air release cap from the hose.
Attach the sticker enclosed with
the bottle on the specified loca-
tions. (See step .)
You will use the air release cap
again. Therefore keep it in a safe
place.
Connect the hose to the valve.
Screw the end of the hose clock-
wise as far as possible.
Emergency repair method
1
2
3
10
4
Page 785 of 800
785Alphabetical index
PRIUS_OM_OM47A29U_(U)
Child-protectors....................... 168
CleaningAluminum wheels.................. 569
Camera sensor ..................... 271
Exterior ................................. 568
Interior................................... 574
Radar sensor ........................ 270
Seat belts .............................. 575
Water-repellent coating......... 569
Coat hooks ............................... 552
Combination meter .................... 92 Clock adjustment .................... 97
Main display .......................... 107
Multi-information display ....... 114
Warning lights and indicators ............................ 100
Condenser ................................ 597
Console box ............................. 529
Coolant Capacity ................................ 732
Checking ............................... 595
Preparing and checking before winter....................... 414
Cooling system ........................ 595 Hybrid system overheating ... 717
Consumption screen ............... 153
Cruise control Cruise control........................ 315
Dynamic radar cruise control with full-speed
range .................................. 300
Cup holders.............................. 530
Curtain shield airbags ............... 36
Customizable features ............ 752 Daytime running light
system.................................... 245
Deck board ............................... 533
Defogger Outside rear view mirrors ..... 517
Rear window ......................... 517
Windshield ............................ 517
Dimension ................................ 726
Dinghy towing.......................... 224
Display BSM (Blind Spot Monitor) ..... 322
Drive information .................. 116
Dynamic radar cruise control with full-speed range .......... 300
Energy monitor ............. 117, 153
Head-up display.................... 146
LDA (Lane Departure Alert with steering control) .......... 294
Multi-information display ....... 114
Parking assist system ....... ................. 336, 363
Pre-Collision warning............ 275
Trip information..................... 109
Warning messages ............... 665
Do-it-yourself maintenance .... 585
Door courtesy lights ............... 525 Location ................................ 525
Wattage ................................ 736D