height TOYOTA PRIUS 2018 (in English) User Guide
[x] Cancel search | Manufacturer: TOYOTA, Model Year: 2018, Model line: PRIUS, Model: TOYOTA PRIUS 2018Pages: 820, PDF Size: 15.63 MB
Page 634 of 820
634
PRIUS_OM_OM47B89U_(U)
7-3. Do-it-yourself maintenance
Air conditioning filter
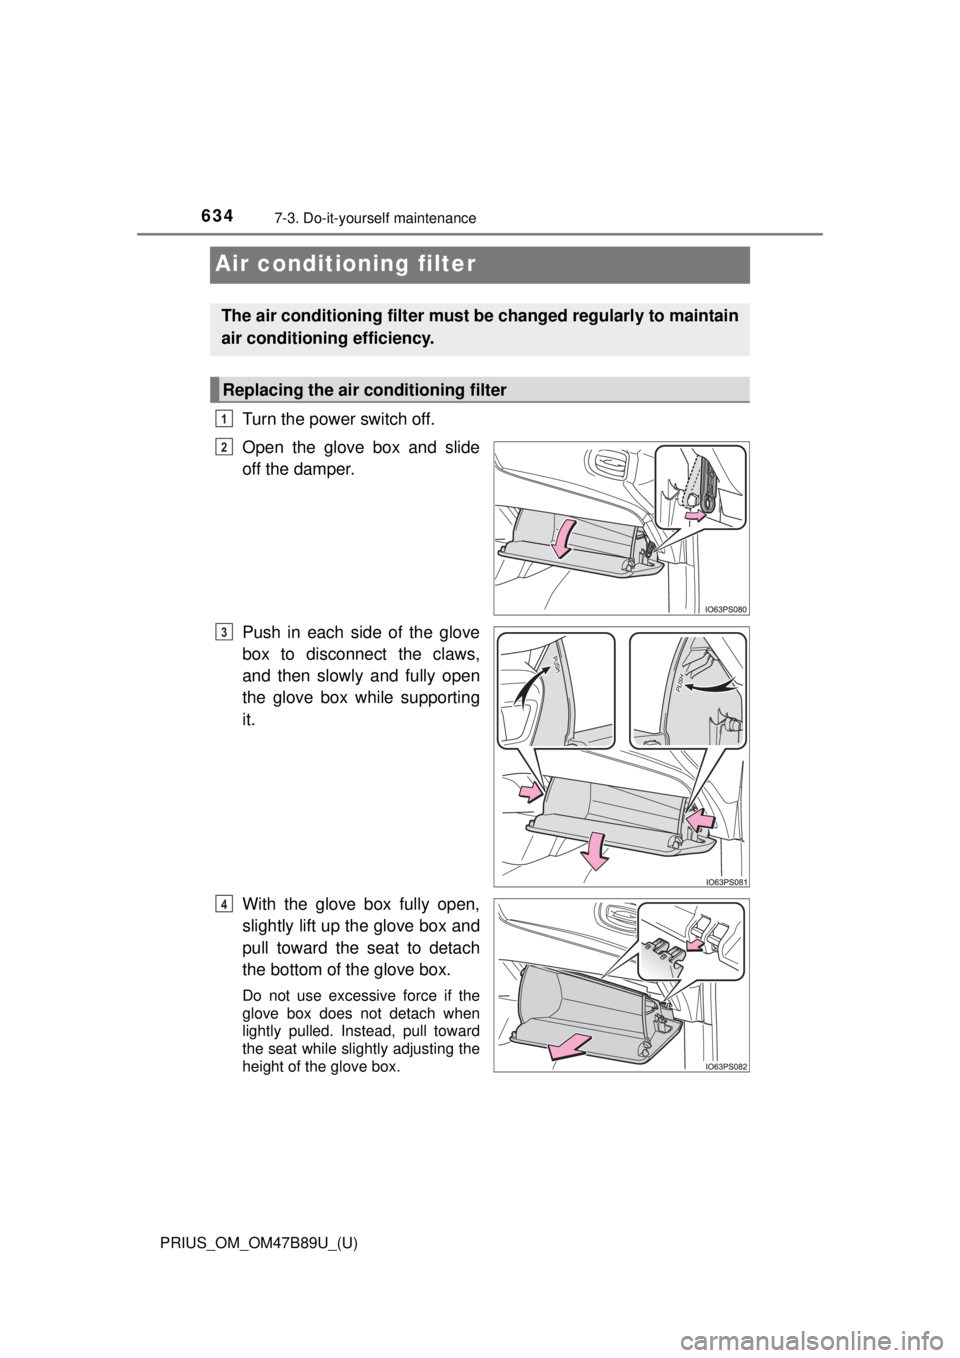
Turn the power switch off.
Open the glove box and slide
off the damper.
Push in each side of the glove
box to disconnect the claws,
and then slowly and fully open
the glove box while supporting
it.
With the glove box fully open,
slightly lift up the glove box and
pull toward the seat to detach
the bottom of the glove box.
Do not use excessive force if the
glove box does not detach when
lightly pulled. Instead, pull toward
the seat while slightly adjusting the
height of the glove box.
The air conditioning filt er must be changed regularly to maintain
air conditioning efficiency.
Replacing the air conditioning filter
1
2
3
4
Page 694 of 820
6948-2. Steps to take in an emergency
PRIUS_OM_OM47B89U_(U)
WARNING
■Using the tire jack
Observe the following precautions.
Improper use of the tire jack may cause the vehicle to suddenly fall off
the jack, leading to death or serious injury.
●Only use the tire jack that comes with this vehicle for replacing a flat
tire.
Do not use it on other vehicles, and do not use other tire jacks for
replacing tires on this vehicle.
●Do not raise the vehicle while someone is inside.
●Do not use the tire jack for any purpose other than replacing tires or
installing and removing tire chains.
●Do not put any part of your body under the vehicle while it is supported
by the jack.
●Do not start the hybrid system or drive the vehicle while the vehicle is
supported by the jack.
●When raising the vehicle, do not put an object on or under the jack.
●Do not raise the vehicle to a height greater than that required to
replace the tire.
●Use a jack stand if it is necessary to get under the vehicle.
●When lowering the vehicle, make su re that there is no-one near the
vehicle. If there are people nearby, warn them vocally before lowering.
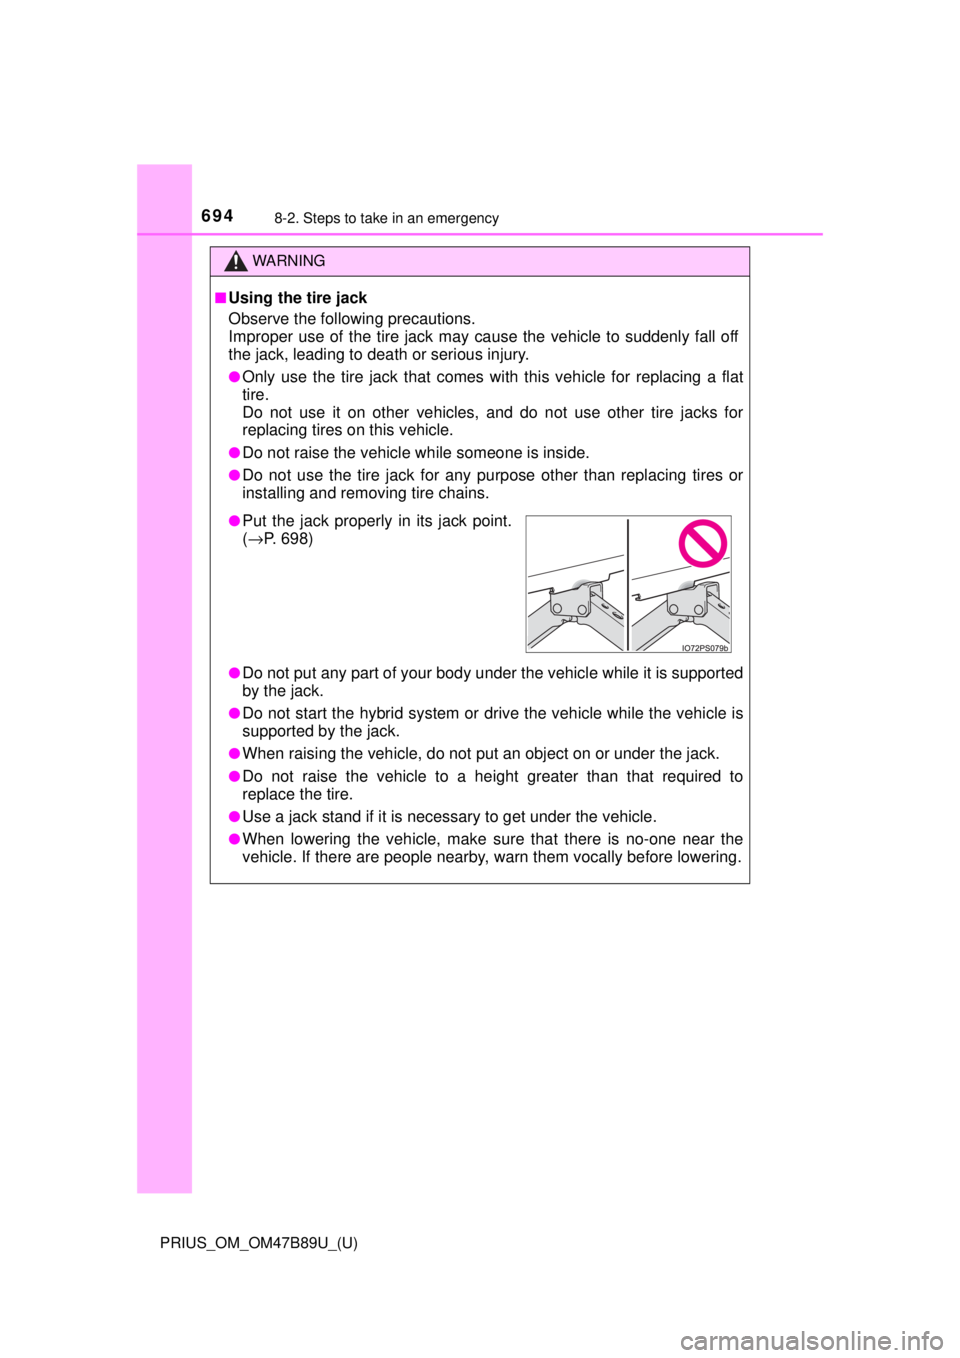
●Put the jack properly in its jack point.
(→ P. 698)
Page 702 of 820
7028-2. Steps to take in an emergency
PRIUS_OM_OM47B89U_(U)
■The compact spare tire (if equipped)
●The compact spare tire is identified by the label “TEMPORARY USE
ONLY” on the tire sidewall.
Use the compact spare tire temporarily, and only in an emergency.
●Make sure to check the tire inflation pressure of the compact spare tire.
(→ P. 752)
■When using the compact spare tire (if equipped)
As the compact spare tire is not equipped with a tire pressure warning
valve and transmitter, low inflation pressure of the spare tire will not be
indicated by the tire pressure warning system. Also, if you replace the
compact spare tire after the tire pressure warning light comes on, the light
remains on.
■When the compact spare tire is equipped (if equipped)
The vehicle height may become lower when driving with the compact
spare tire compared to when driving with standard tires.
■If you have a flat front tire on a road covered with snow or ice (vehi-
cles with compact spare tire)
Install the compact spare tire on one of the rear wheels of the vehicle.
Perform the following steps and fit tire chains to the front tires:
Replace a rear tire with the compact spare tire.
Replace the flat front tire with the tire removed from the rear of the vehi-
cle.
Fit tire chains to the front tires.
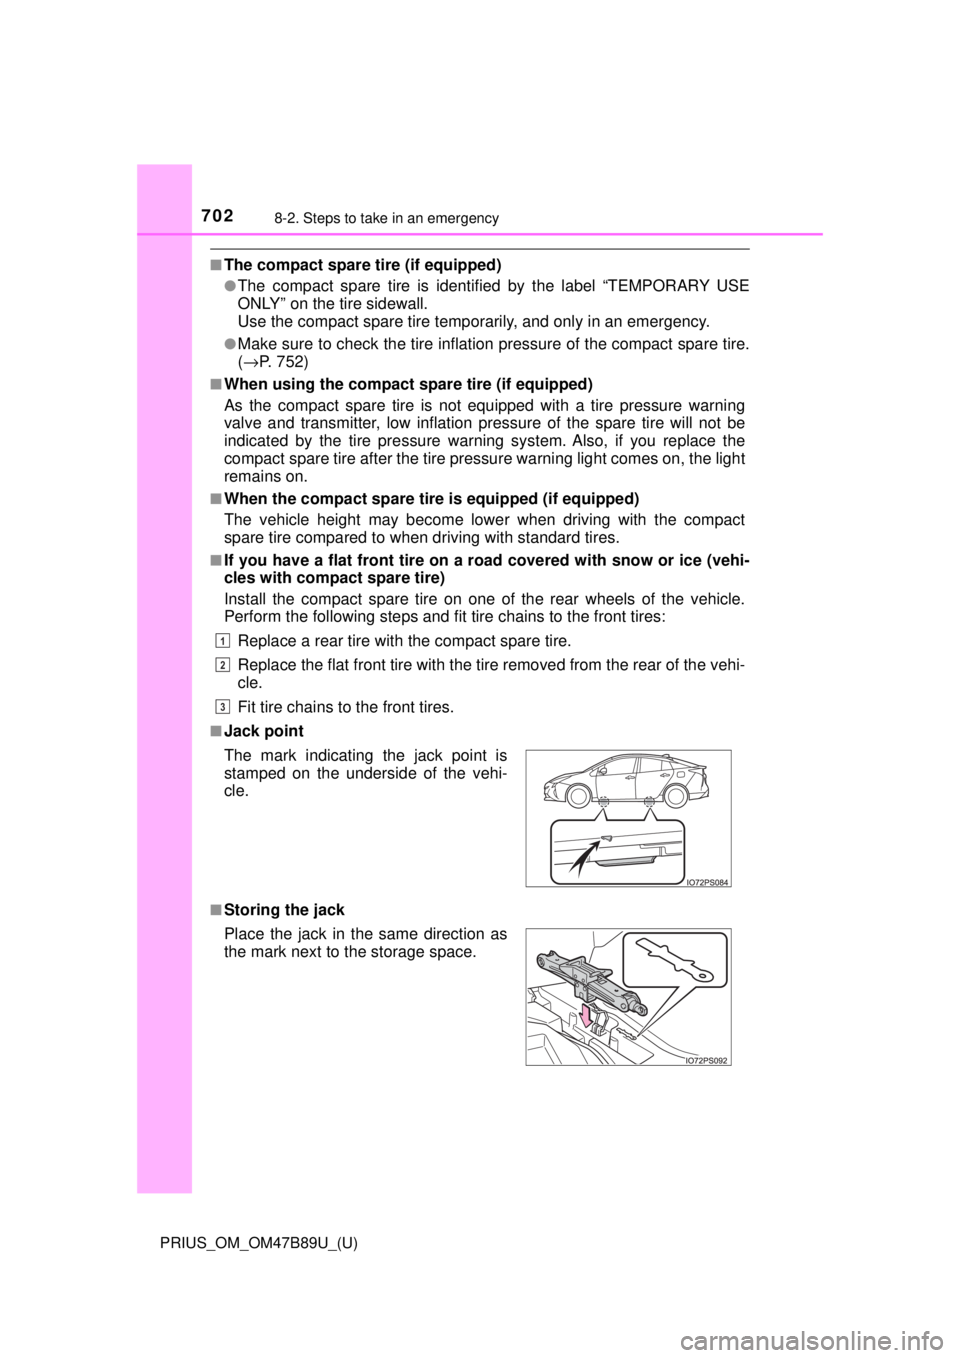
■Jack point
■Storing the jack The mark indicating the jack point is
stamped on the underside of the vehi-
cle.
Place the jack in the same direction as
the mark next to the storage space.
1
2
3
Page 704 of 820
7048-2. Steps to take in an emergency
PRIUS_OM_OM47B89U_(U)
NOTICE
■Be careful when driving over bumps with the compact spare tire
installed on the vehicle. (if equipped)
The vehicle height may become lower when driving with the compact
spare tire, compared to when driving with standard tires. Be careful
when driving over uneven road surfaces.
■Driving with tire chains and the compact spare tire (if equipped)
Do not fit tire chains to the compact spare tire.
Tire chains may damage the vehicle body and adversely affect driving
performance.
■When replacing the tires
When removing or fitting the wheels, tires or the tire pressure warning
valve and transmitter, contact your Toyota dealer as the tire pressure
warning valve and transmitter may be damaged if not handled correctly.
■Handling the decorative resin parts (for vehicles equipped with
17-inch tires)
→ P. 5 8 6
Page 744 of 820
744
PRIUS_OM_OM47B89U_(U)
9-1. Specifications
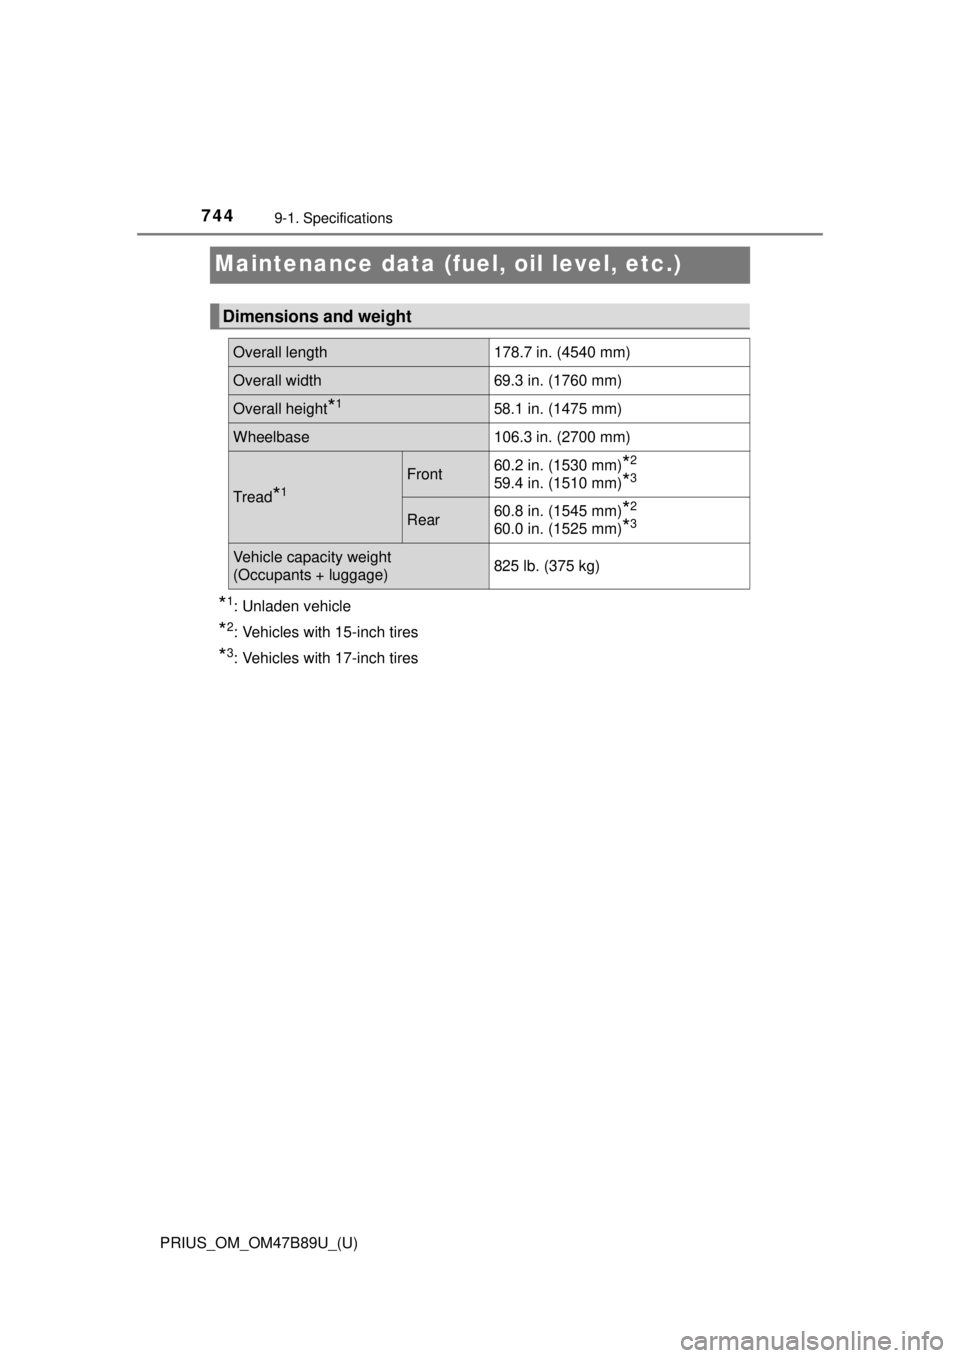
Maintenance data (fuel, oil level, etc.)
*1: Unladen vehicle
*2: Vehicles with 15-inch tires
*3: Vehicles with 17-inch tires
Dimensions and weight
Overall length178.7 in. (4540 mm)
Overall width69.3 in. (1760 mm)
Overall height*158.1 in. (1475 mm)
Wheelbase106.3 in. (2700 mm)
Tread*1
Front60.2 in. (1530 mm)*2
59.4 in. (1510 mm)*3
Rear60.8 in. (1545 mm)*2
60.0 in. (1525 mm)*3
Vehicle capacity weight
(Occupants + luggage)825 lb. (375 kg)
Page 760 of 820
760
PRIUS_OM_OM47B89U_(U)
9-1. Specifications
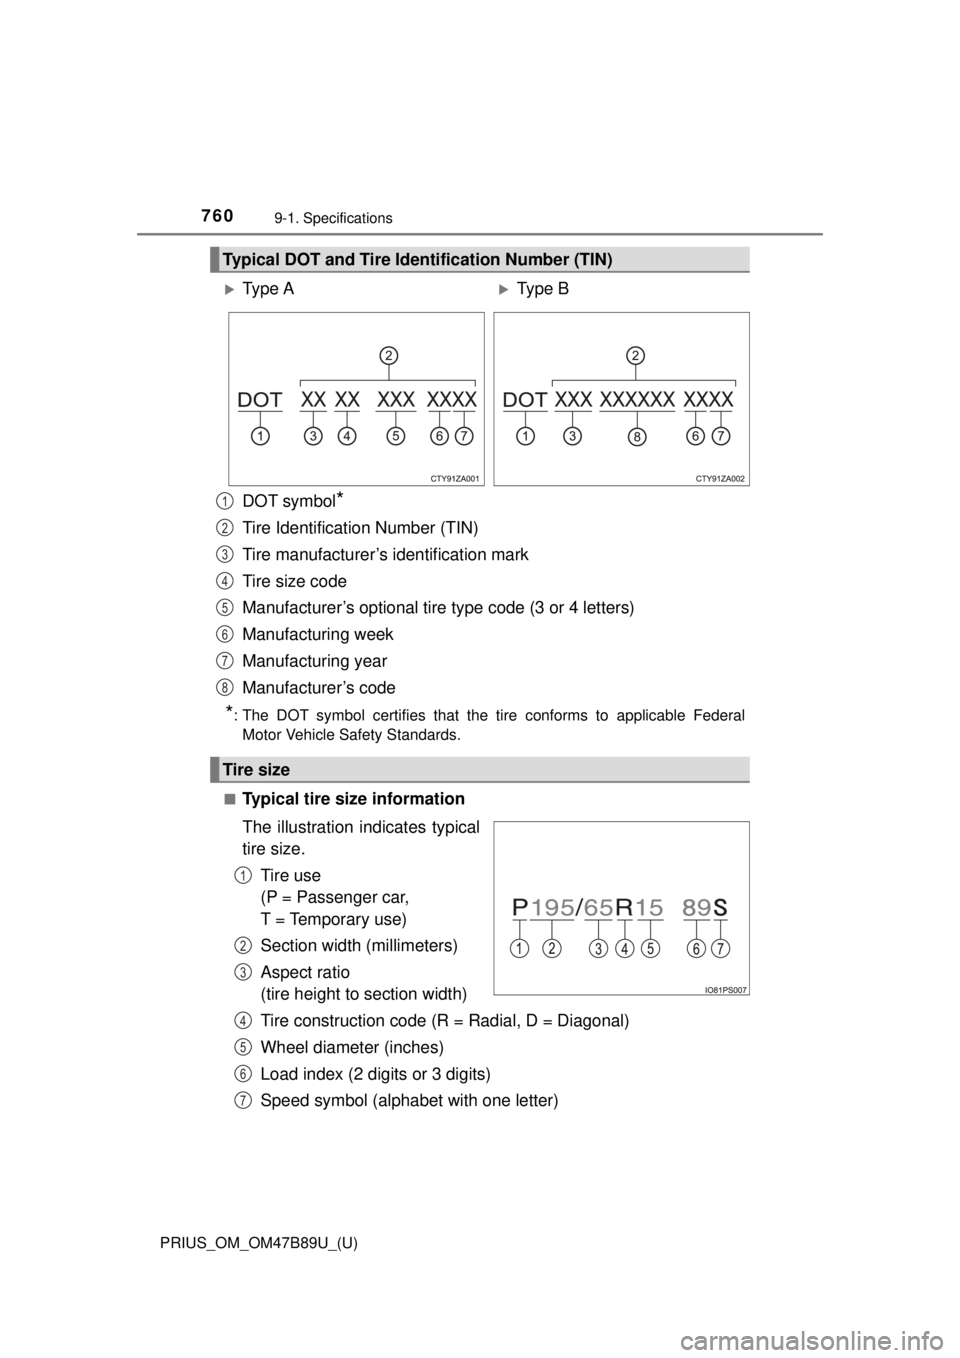
DOT symbol*
Tire Identification Number (TIN)
Tire manufacturer’s identification mark
Tire size code
Manufacturer’s optional tire type code (3 or 4 letters)
Manufacturing week
Manufacturing year
Manufacturer’s code
*: The DOT symbol certifies that the tire conforms to applicable Federal Motor Vehicle Safety Standards.
■
Typical tire size information
The illustration in dicates typical
tire size.
Tire use
(P = Passenger car,
T = Temporary use)
Section width (millimeters)
Aspect ratio
(tire height to section width)
Tire construction code (R = Radial, D = Diagonal)
Wheel diameter (inches)
Load index (2 digits or 3 digits)
Speed symbol (alphabet with one letter)
Typical DOT and Tire Identification Number (TIN)
Ty p e AType B
Tire size
1
2
3
4
5
6
7
8
1
2
3
4
5
6
7
Page 761 of 820
PRIUS_OM_OM47B89U_(U)
7619-1. Specifications
9
Vehicle specifications
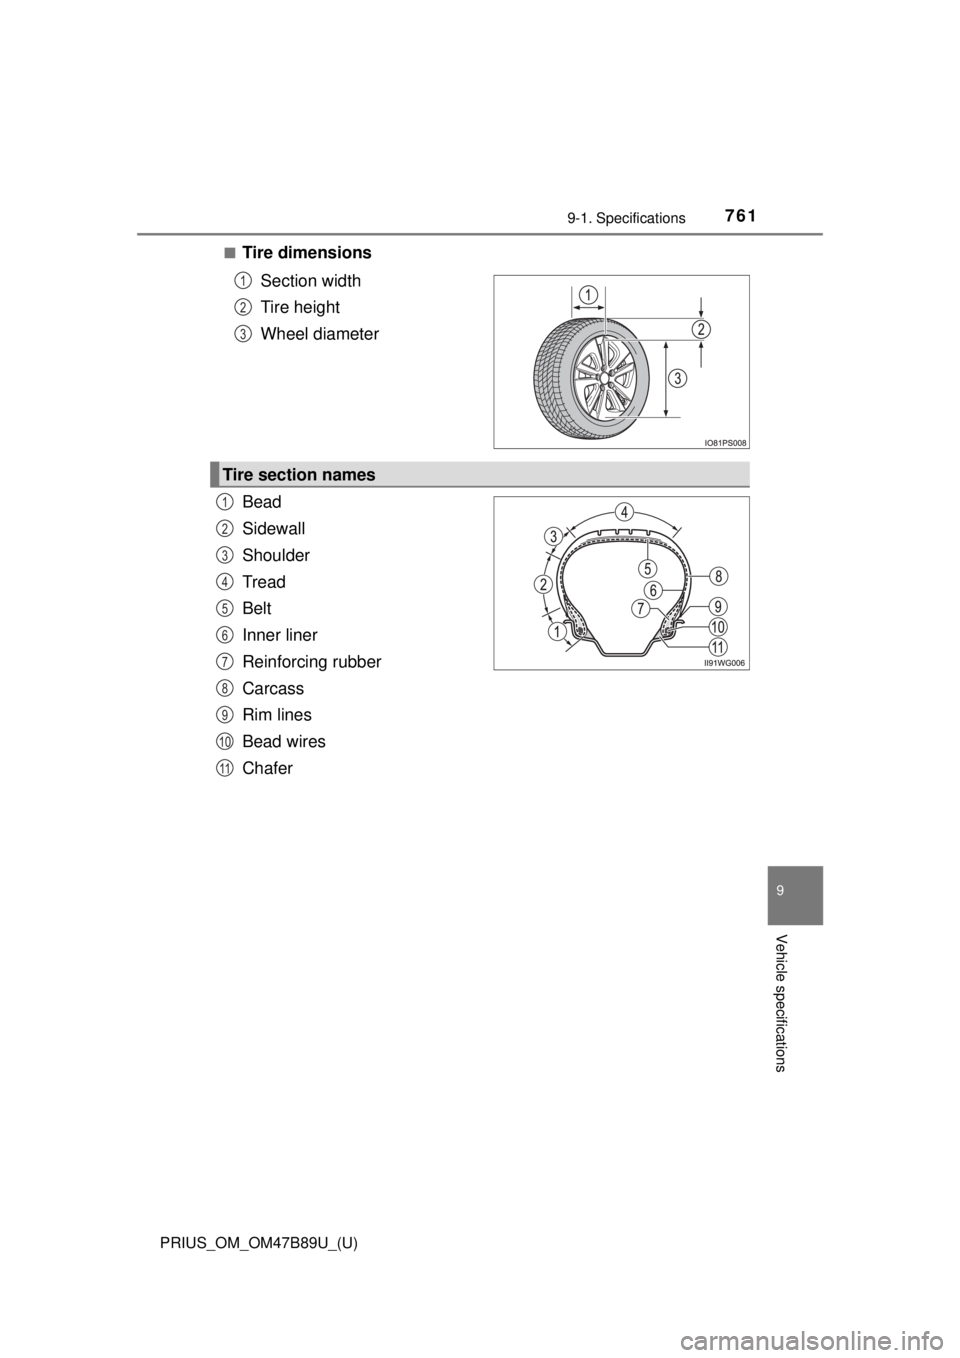
■Tire dimensionsSection width
Tire height
Wheel diameter
Bead
Sidewall
Shoulder
Tread
Belt
Inner liner
Reinforcing rubber
Carcass
Rim lines
Bead wires
Chafer
1
2
3
Tire section names
1
2
3
4
5
6
7
8
9
10
11