seats TOYOTA PRIUS 2018 (in English) Owner's Manual
[x] Cancel search | Manufacturer: TOYOTA, Model Year: 2018, Model line: PRIUS, Model: TOYOTA PRIUS 2018Pages: 820, PDF Size: 15.63 MB
Page 190 of 820
190
PRIUS_OM_OM47B89U_(U)
3-3. Adjusting the seats
Front seats
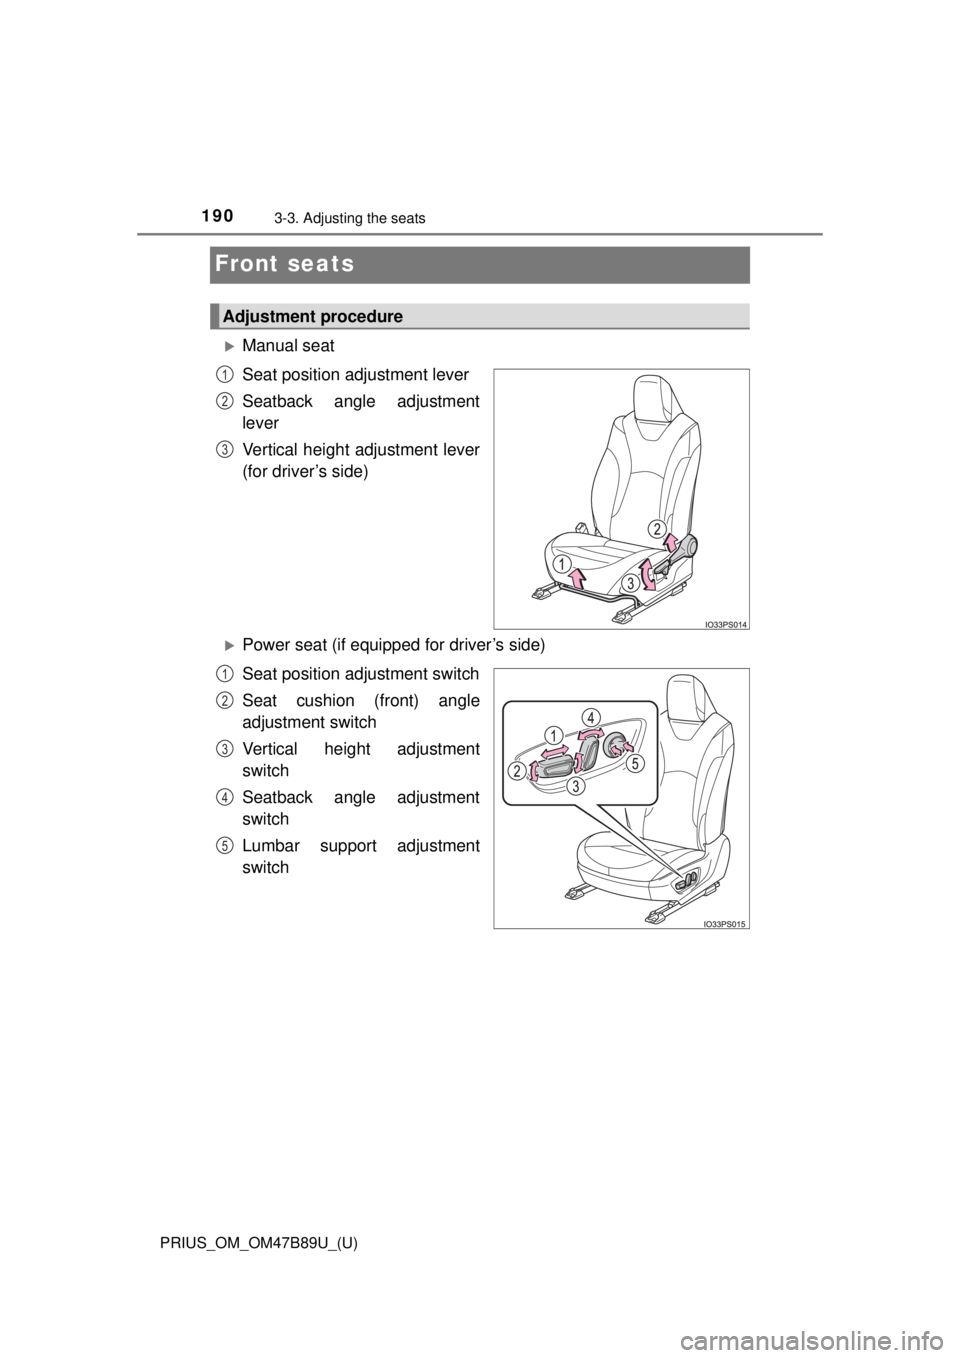
Manual seat
Seat position adjustment lever
Seatback angle adjustment
lever
Vertical height adjustment lever
(for driver’s side)
Power seat (if equipped for driver’s side)
Seat position adjustment switch
Seat cushion (front) angle
adjustment switch
Vertical height adjustment
switch
Seatback angle adjustment
switch
Lumbar support adjustment
switch
Adjustment procedure
1
2
3
1
2
3
4
5
Page 191 of 820
PRIUS_OM_OM47B89U_(U)
1913-3. Adjusting the seats
3
Operation of each component
■When adjusting the seat
Take care when adjusting the seat so that the head restraint does not touch
the ceiling.
WARNING
■When adjusting the seat position
● Take care when adjusting the seat position to ensure that other passen-
gers are not injured by the moving seat.
● Do not put your hands under the seat or near the moving parts to avoid
injury.
Fingers or hands may become jammed in the seat mechanism.
■ Seat adjustment
● To reduce the risk of sliding under the lap belt during a collision, do not
recline the seat more than necessary.
If the seat is too reclined, the lap belt may slide past the hips and apply
restraint forces directly to the abdomen, or your neck may contact the
shoulder belt, increasing the risk of death or serious injury in the event of
an accident.
Adjustments should not be made while driving as the seat may unexpect-
edly move and cause the driver to lose control of the vehicle.
● Manual seats: After adjusting the seat, make sure that the seat is locked in
position.
Page 192 of 820
192
PRIUS_OM_OM47B89U_(U)
3-3. Adjusting the seats
Rear seats
Park the vehicle in a safe place.
Apply the parking brake firmly and shift the shift position to P. (→P. 241)
Adjust the position of the front seat and the angle of the seatback.
(
→P. 190)
Depending on the position of the front seat, if the seatback is folded back-
ward, it may interfere with the operation of the rear seat.
Lift up and push down the head rest raints of the rear outboard
seats, and lower the head restra int of the rear center seat.
(
→P. 195)
Stow the armrest of the rear seat if it is pulled out. ( →P. 565)
This step is not necessary when operating the left side seat only.
The seatbacks can be folded down.
Before folding down the seatbacks
1
2
3
4
Page 193 of 820
PRIUS_OM_OM47B89U_(U)
1933-3. Adjusting the seats
3
Operation of each component
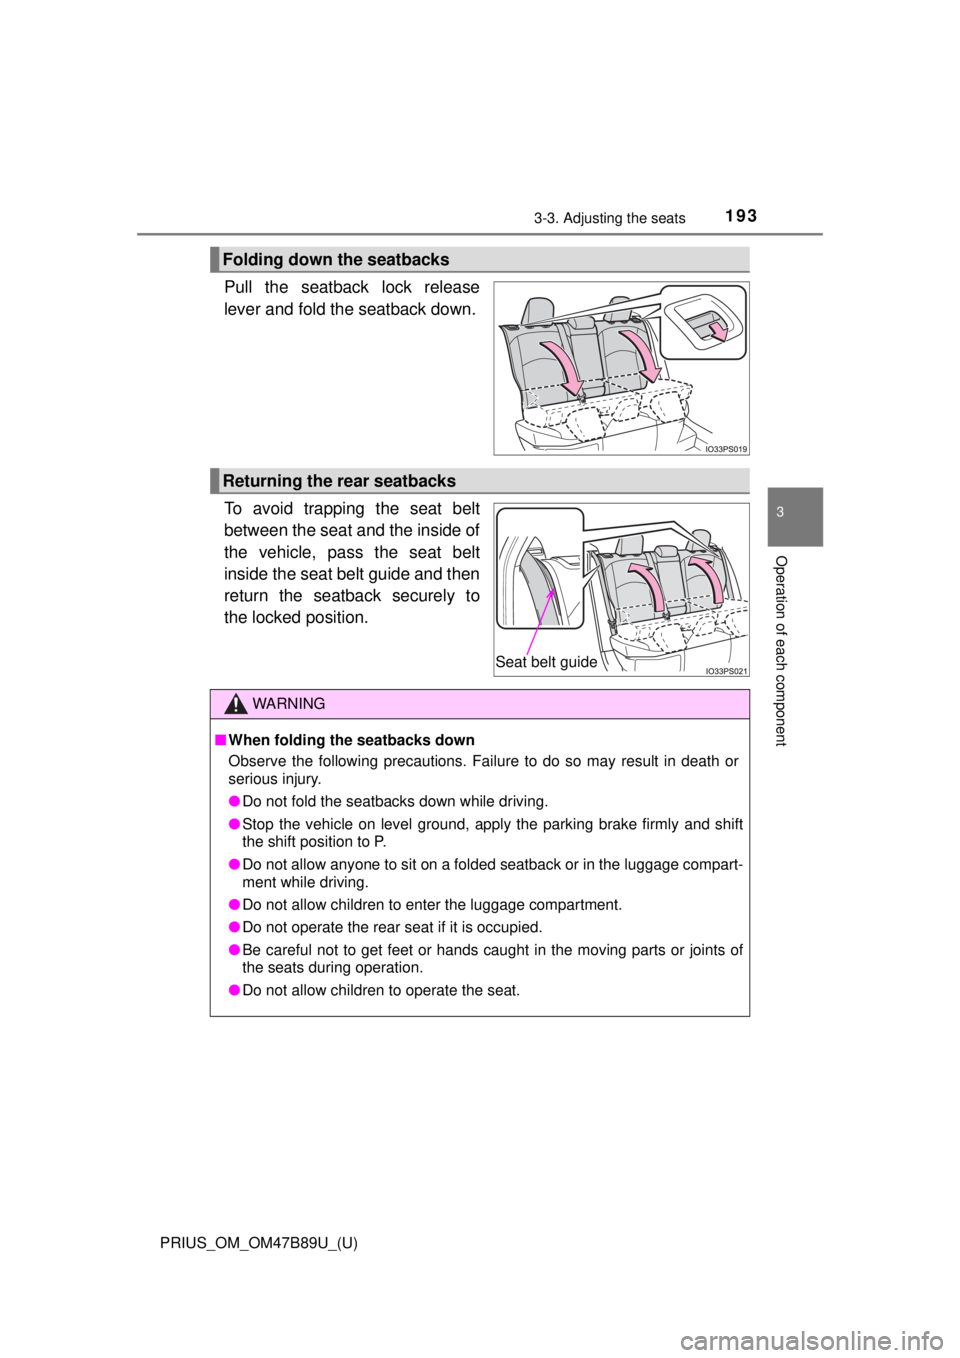
Pull the seatback lock release
lever and fold the seatback down.
To avoid trapping the seat belt
between the seat and the inside of
the vehicle, pass the seat belt
inside the seat belt guide and then
return the seatback securely to
the locked position.
Folding down the seatbacks
Returning the rear seatbacks
Seat belt guide
WARNING
■When folding the seatbacks down
Observe the following precautions. Failure to do so may result in death or
serious injury.
● Do not fold the seatbacks down while driving.
● Stop the vehicle on level ground, apply the parking brake firmly and shift
the shift position to P.
● Do not allow anyone to sit on a folded seatback or in the luggage compart-
ment while driving.
● Do not allow children to enter the luggage compartment.
● Do not operate the rear seat if it is occupied.
● Be careful not to get feet or hands caught in the moving parts or joints of
the seats during operation.
● Do not allow children to operate the seat.
Page 194 of 820
194
PRIUS_OM_OM47B89U_(U)
3-3. Adjusting the seats
WARNING
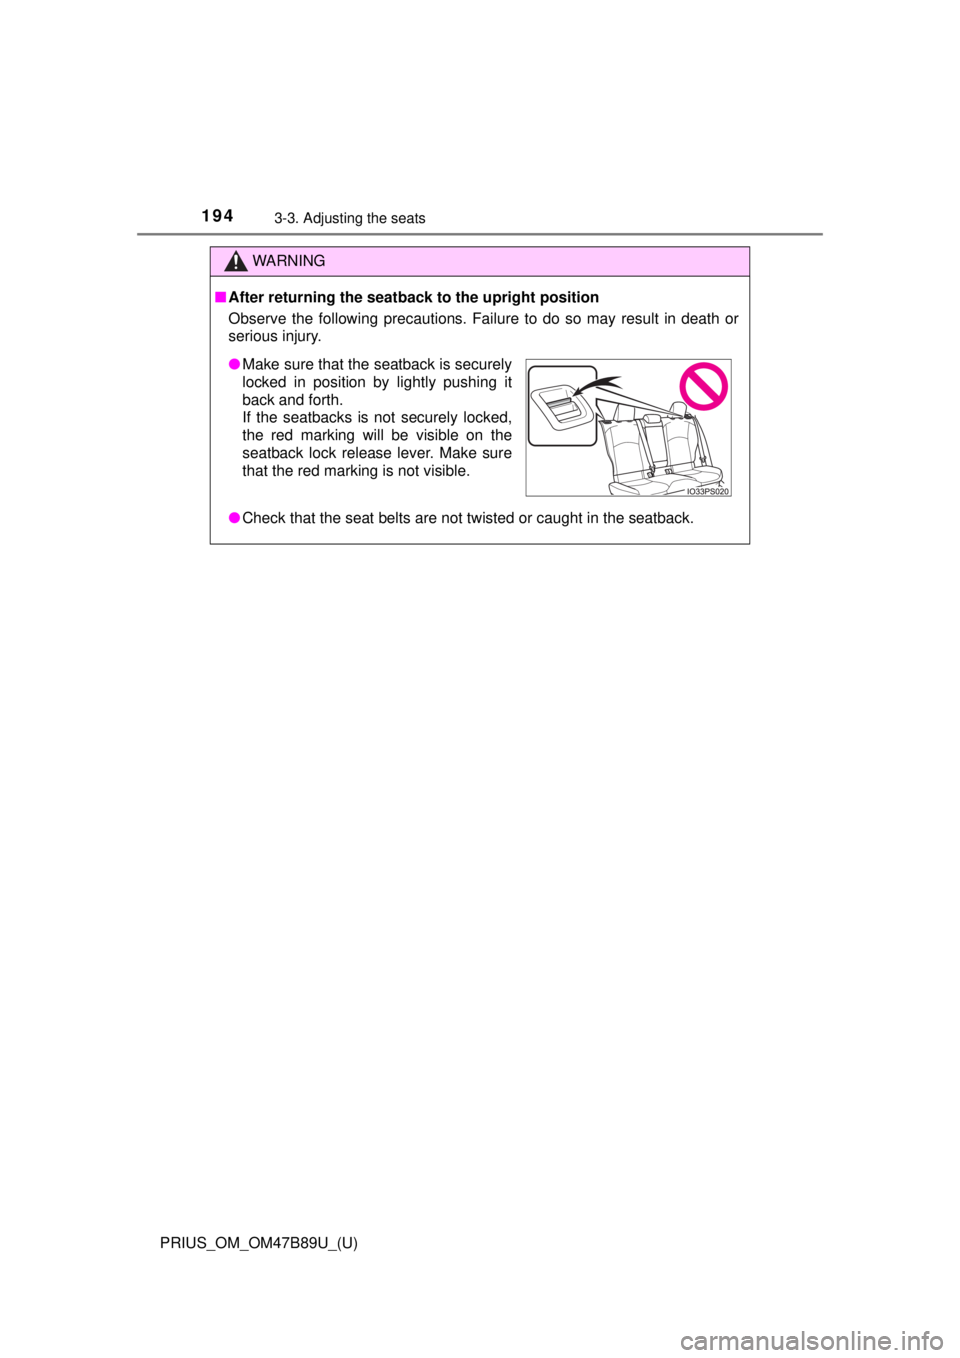
■After returning the seatback to the upright position
Observe the following precautions. Failure to do so may result in death or
serious injury.
● Check that the seat belts are not twisted or caught in the seatback.
●Make sure that the seatback is securely
locked in position by lightly pushing it
back and forth.
If the seatbacks is not securely locked,
the red marking will be visible on the
seatback lock release lever. Make sure
that the red marking is not visible.
Page 195 of 820
195
PRIUS_OM_OM47B89U_(U)
3-3. Adjusting the seats
3
Operation of each component
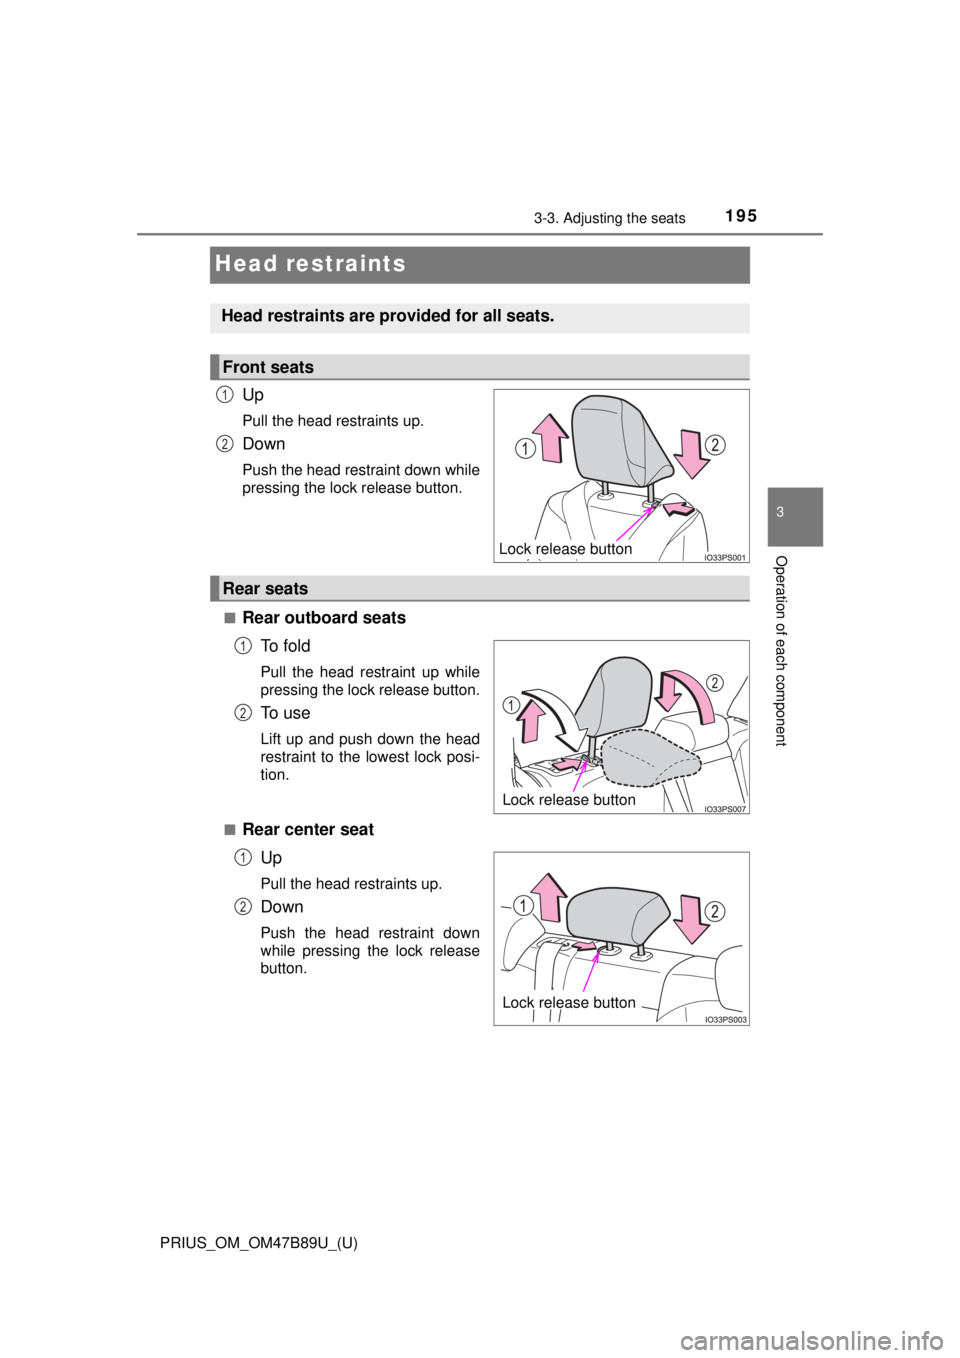
Head restraints
Up
Pull the head restraints up.
Down
Push the head restraint down while
pressing the lock release button.
■
Rear outboard seats To f o l d
Pull the head restraint up while
pressing the lock release button.
To u s e
Lift up and push down the head
restraint to the lowest lock posi-
tion.
■
Rear center seat Up
Pull the head restraints up.
Down
Push the head restraint down
while pressing the lock release
button.
Head restraints are provided for all seats.
Front seats
Lock release button
1
2
Rear seats
Lock release button
1
2
Lock release button
1
2
Page 196 of 820
196
PRIUS_OM_OM47B89U_(U)
3-3. Adjusting the seats
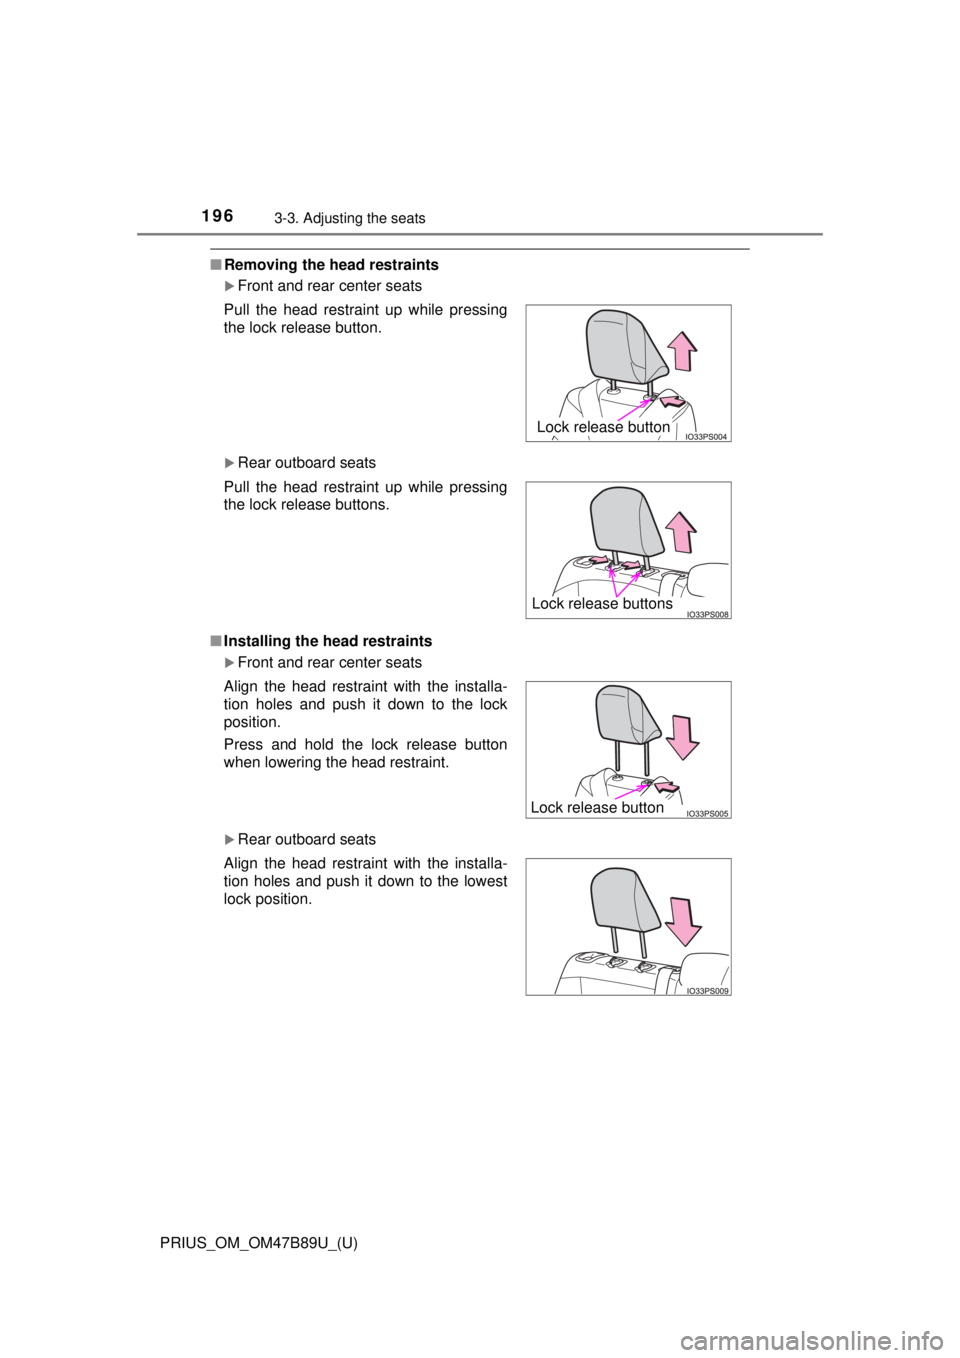
■Removing the head restraints
Front and rear center seats
Rear outboard seats
■ Installing the head restraints
Front and rear center seats
Rear outboard seats
Pull the head restraint up while pressing
the lock release button.
Pull the head restraint up while pressing
the lock release buttons.
Align the head restraint with the installa-
tion holes and push it down to the lock
position.
Press and hold the lock release button
when lowering the head restraint.
Align the head restraint with the installa-
tion holes and push it down to the lowest
lock position.
Lock release button
Lock release buttons
Lock release button
Page 197 of 820
PRIUS_OM_OM47B89U_(U)
1973-3. Adjusting the seats
3
Operation of each component
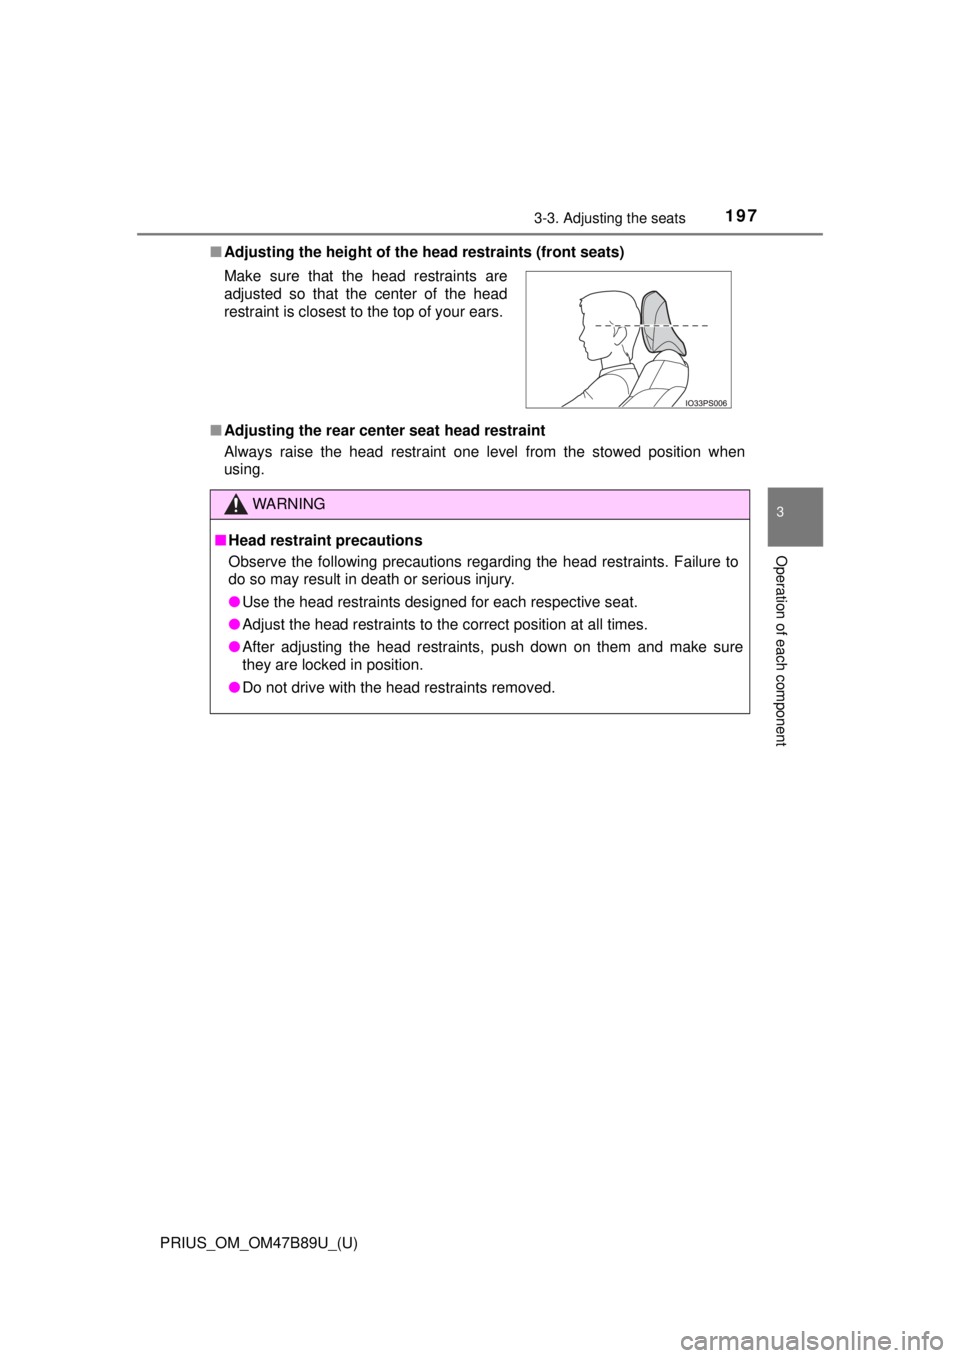
■Adjusting the height of the head restraints (front seats)
■ Adjusting the rear cente r seat head restraint
Always raise the head restraint one level from the stowed position when
using. Make sure that the head restraints are
adjusted so that the center of the head
restraint is closest to the top of your ears.
WARNING
■ Head restraint precautions
Observe the following precautions regarding the head restraints. Failure to
do so may result in death or serious injury.
● Use the head restraints designed for each respective seat.
● Adjust the head restraints to the correct position at all times.
● After adjusting the head restraints, push down on them and make sure
they are locked in position.
● Do not drive with the head restraints removed.
Page 227 of 820
PRIUS_OM_OM47B89U_(U)
2274-1. Before driving
4
Driving
WARNING
■Things that must not be carried in the luggage compartment
The following things may cause a fire if loaded in the luggage compart-
ment:
●Receptacles containing gasoline
●Aerosol cans
■Storage precautions
Observe the following precautions.
Failure to do so may prevent the pedals from being depressed properly,
may block the driver’s vision, or may result in items hitting the driver or
passengers, possibly causing an accident.
●Stow cargo and luggage in the luggage compartment whenever possi-
ble.
●Do not stack cargo and luggage in the luggage compartment higher
than the seatbacks.
●When you fold down the rear seats, long items should not be placed
directly behind the front seats.
●Never allow anyone to ride in the luggage compartment. It is not
designed for passengers. They should ride in their seats with their seat
belts properly fastened.
●Do not place cargo or luggage in or on the following locations.
• At the feet of the driver
• On the front passenger or rear seats (when stacking items)
• On the luggage cover (if equipped)
• On the instrument panel
• On the dashboard
●Secure all items in the occupant compartment.
■Capacity and distribution
●Do not exceed the maximum axle weight rating or the total vehicle
weight rating.
●Even if the total load of occupant’s weight and the cargo load is less
than the total load capacity, do not apply the load unevenly. Improper
loading may cause deterioration of steering or braking control which
may cause death or serious injury.
Page 518 of 820
5186-1. Using the air conditioning system and defogger
PRIUS_OM_OM47B89U_(U)■
S-FLOW mode
In S-FLOW mode, priority for the ai
rflow is given to the front seats,
reducing the airflow and air conditio ning effect on the rear seats.
When a passenger is not detecte d in the front passenger seat,
depending on the set temperature and ambient temperature, prior-
ity for the airflow will be gi ven to the driver’s seat only.
However, air will always be blown from the side outlet of the front pas-
senger seat.
The following S-FLOW modes are available:
Automatic S-FLOW mode
The system determines whether or not a rear passenger is in the
vehicle by the opening and closing of a rear door. When a rear
passenger is determined to be in the vehicle, S-FLOW mode will
be automatically disabled.
To enable S-FLOW mode again, press and enter manual
S-FLOW mode. (→P. 522)
The indicator will illuminate when S-FLOW mode is
enabled.
Manual S-FLOW mode
When is pressed, S-FLOW mode will be manually
enabled/disabled. ( →P. 522)
The indicator will illuminate when S-FLOW mode is enabled.
When the power switch is turned to ON mode, the system is oper-
ated in automatic S-FLOW mode.
■Other functions
● Switching between outside ai r and recirculated air modes
( → P. 519)
● Defogging the windshield ( →P. 520)
● Defogging the rear window and outside rear view mirrors
(→ P. 520)