fuel cap TOYOTA PRIUS C 2012 NHP10 / 1.G Owners Manual
[x] Cancel search | Manufacturer: TOYOTA, Model Year: 2012, Model line: PRIUS C, Model: TOYOTA PRIUS C 2012 NHP10 / 1.GPages: 552, PDF Size: 8.27 MB
Page 2 of 552

TABLE OF CONTENTSIndex
2
1-1. Hybrid systemHybrid system features ........ 24
Hybrid system precautions ... 29
Energy monitor/consumption screen ................................ 35
Hybrid vehicle driving tips .... 42
1-2. Key information Keys ..................................... 44
1-3. Opening, closing and
locking the doors
Smart key system................. 47
Wireless remote control ....... 61
Side doors ............................ 65
Back door ............................. 71
1-4. Adjustable components
(seats, mirrors,
steering wheel)
Front seats ........................... 76
Rear seats ............................ 77
Head restraints ..................... 81
Seat belts ............................. 84
Steering wheel ..................... 93
Anti-glare inside rear view mirror.......................... 94
Outside rear view mirrors ..... 96
1-5. Opening a nd closing the
windo ws and moon roof
Power windows .................... 98
Moon roof ........................... 101 1-6. Refueling
Opening the fuel tank cap... 105
1-7. Theft deterrent system Immobilizer system ............. 110
Theft prevention labels ....... 112
1-8. Safety information Correct driving posture ....... 113
SRS airbags ....................... 115
Front passenger occupant classification system ......... 129
Child restraint systems ....... 134
Installing child restraints ..... 138
2-1. Driving procedures Driving the vehicle .............. 148
Engine (ignition) switch....... 158
Power (ignition) switch........ 162
EV drive mode .................... 170
Hybrid transmission ............ 173
Turn signal lever ................. 176
Parking brake ..................... 177
Horn .................................... 178
2-2. Instrument cluster Gauges and meters ............ 179
Indicators and warning lights ................... 182
Multi-information display ..... 185
1Before driving
2When driving
Page 23 of 552
Before driving1
23
1-1. Hybrid systemHybrid system features ...... 24
Hybrid system precautions ...................... 29
Energy monitor/ consumption screen......... 35
Hybrid vehicle driving tips ................................... 42
1-2. Key information Keys ................................... 44
1-3. Opening, closing and locking the doors
Smart key system .............. 47
Wireless remote control ..... 61
Side doors .......................... 65
Back door ........................... 71
1-4. Adjustable components (seats, mirrors,
steering wheel)
Front seats ......................... 76
Rear seats.......................... 77
Head restraints................... 81
Seat belts ........................... 84
Steering wheel ................... 93
Anti-glare inside rear view mirror ....................... 94
Outside rear view mirrors ... 96 1-5. Opening and closing
the windows and
moon roof
Power windows .................. 98
Moon roof ......................... 101
1-6. Refueling Opening the fuel tank cap ......................... 105
1-7. Theft deterrent system Immobilizer system .......... 110
Theft prevention labels..... 112
1-8. Safety information Correct driving posture..... 113
SRS airbags ..................... 115
Front passenger occupant classification
system ........................... 129
Child restraint systems..... 134
Installing child restraints ........................ 138
Page 105 of 552
105
1
Before driving
1-6. Refueling
Opening the fuel tank cap
Perform the following steps to open the fuel tank cap:
■Before refueling the vehicle
●Vehicles without a smart key system
Turn the engine switch off and ensure that all the doors and
windows are closed.
● Vehicles with a smart key system
Turn the “POWER” switch off and ensure that all the doors
and windows are closed.
● Confirm the type of fuel. ( P. 107)
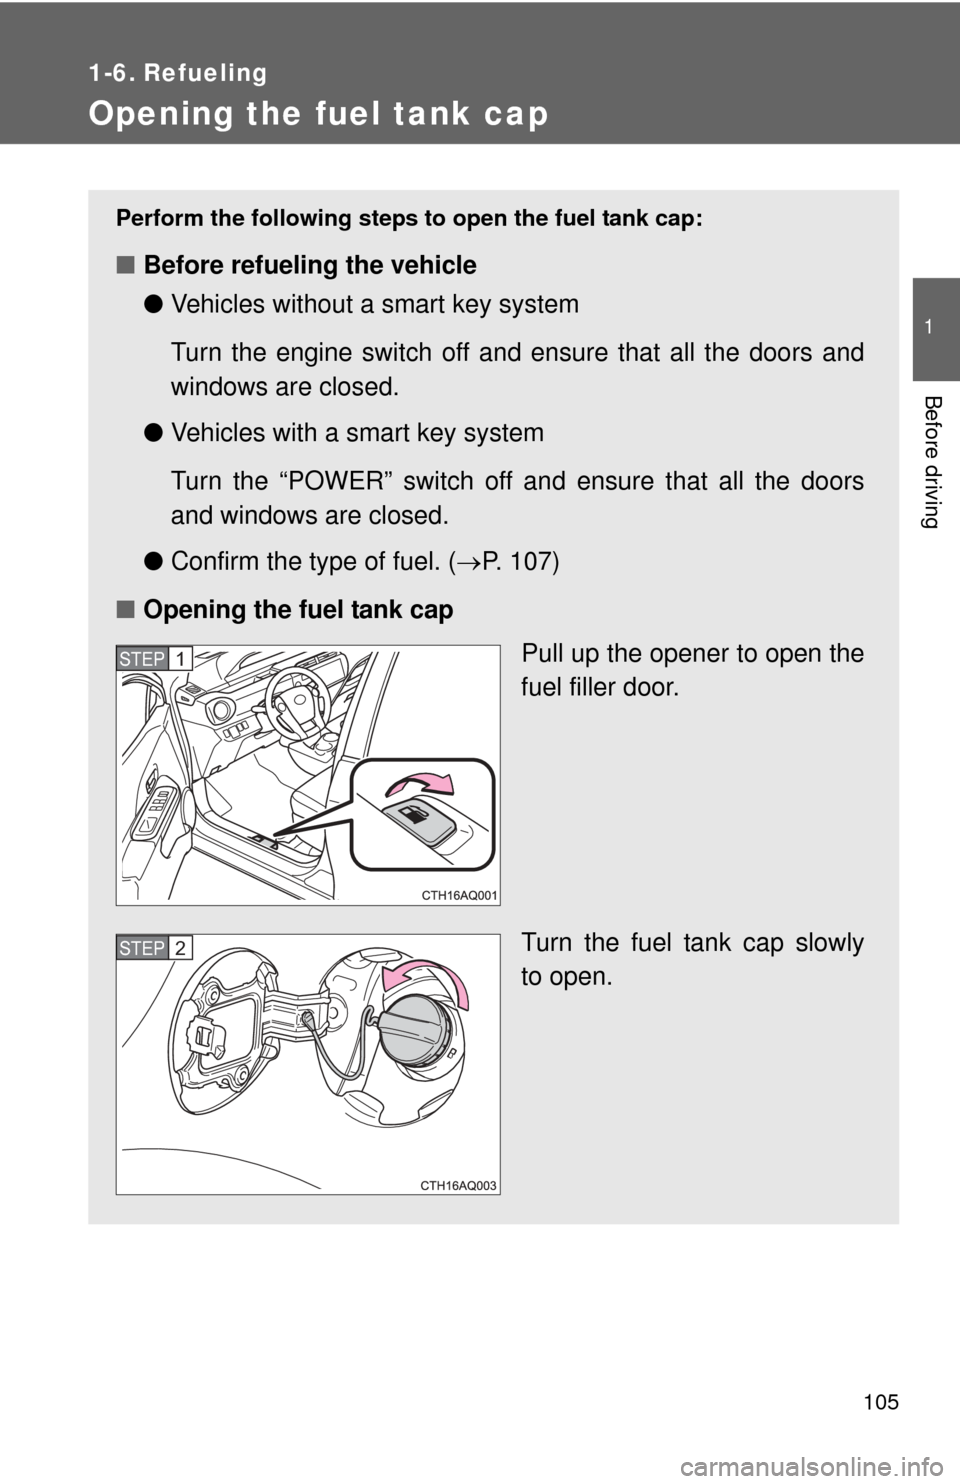
■ Opening the fuel tank cap
Pull up the opener to open the
fuel filler door.
Turn the fuel tank cap slowly
to open.
STEP1
STEP2
Page 106 of 552
106 1-6. Refueling
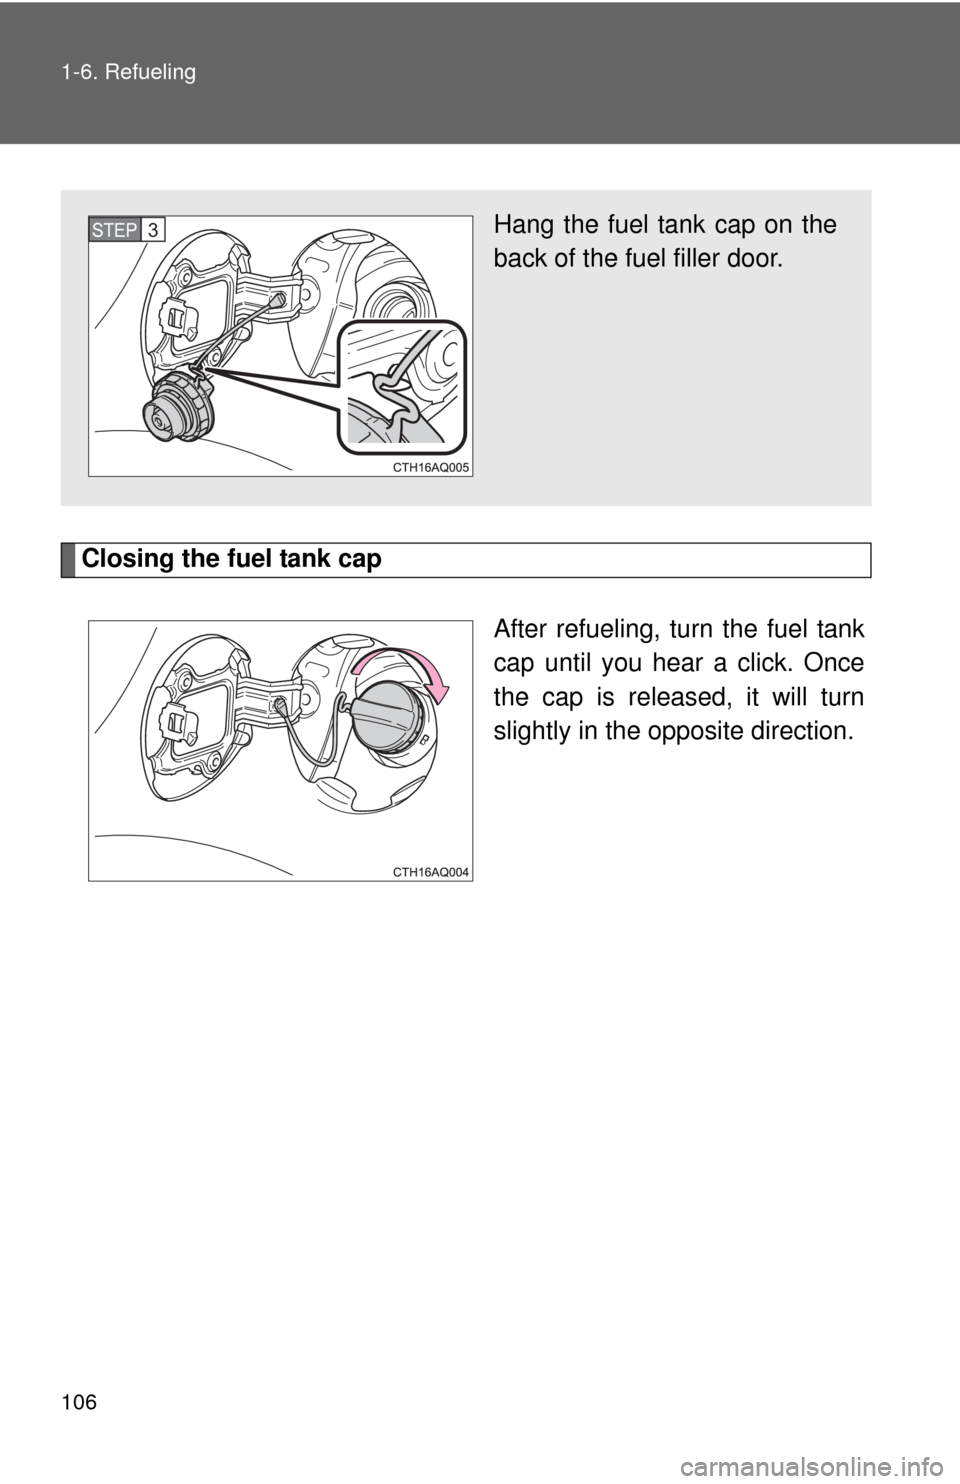
Closing the fuel tank capAfter refueling, turn the fuel tank
cap until you hear a click. Once
the cap is released, it will turn
slightly in the opposite direction.
Hang the fuel tank cap on the
back of the fuel filler door.STEP3
Page 108 of 552
108 1-6. Refueling
CAUTION
■When refueling the vehicle
Observe the following precautions while refueling the vehicle. Failure to do
so may result in death or serious injury.
●After exiting the vehicle and before opening the fuel door, touch an
unpainted metal surface to discharge any static electricity. It is important to
discharge static electricity before refueling because sparks resulting from
static electricity can cause fuel vapors to ignite while refueling.
● Always hold the grips on the fuel tank cap and turn it slowly to remove it.
A whooshing sound may be heard when the fuel tank cap is loosened.
Wait until the sound cannot be heard before fully removing the cap. In hot
weather, pressurized fuel may spray out the filler neck and cause injury.
● Do not allow anyone that has not discharged static electricity from their
body to come close to an open fuel tank.
● Do not inhale vaporized fuel.
Fuel contains substances that are harmful if inhaled.
● Do not smoke while refueling the vehicle.
Doing so may cause the fuel to ignite and cause a fire.
● Do not return to the vehicle or touch any person or object that is statically
charged.
This may cause static electricity to build up, resulting in a possible ignition
hazard.
■ When refueling
Observe the following precautions to prevent fuel overflowing from the fuel
tank:
●Securely insert the fuel nozzle into the fuel filler neck
● Stop filling the tank after the fuel nozzle automatically clicks off
● Do not top off the fuel tank
■ When replacing the fuel cap
Do not use anything but a genuine Toyota fuel tank cap designed for your
vehicle. Doing so may cause a fire or other incident which may result in
death or serious injury.
Page 224 of 552
224
2-5. Driving information
Cargo and luggage
Capacity and distributionCargo capacity depends on the total weight of the occupants.
(Cargo capacity) = (Total load capa city) — (Total weight of occupants)
Steps for Determining Correct Load Limit
(1)Locate the statement “The co mbined weight of occupants and
cargo should never exceed XXX kg or XXX lbs.” on your vehicle's
placard.
(2)Determine the combined weight of the driver and passengers that
will be riding in your vehicle.
(3)Subtract the combined weight of the driver and passengers from XXX kg or XXX lbs.
(4)The resulting figure equals the available amount of cargo and lug- gage load capacity.
For example, if the “XXX” amount equals 1400 lbs. and there will
be five 150 lb passengers in your vehicle, the amount of available
cargo and luggage load capacity is 650 lbs. (1400 - 750 (5 150) =
650 lbs.)
(5)Determine the combined weight of luggage and cargo being loaded on the vehicle. That weight may not safely exceed the avail-
able cargo and luggage load capacity calculated in Step 4.
Take notice of the following information about storage precau-
tions, cargo capacity and load:
● Stow cargo and luggage in the luggage compartment whenever
possible.
● Be sure all items are secured in place.
● To maintain vehicle balance while driving, position luggage
evenly within the luggage compartment.
● For better fuel economy, do no t carry unnecessary weight.
Page 242 of 552
242 3-1. Using the air conditioning system and defogger
■Operation of the air conditio ning system in Eco drive mode
In Eco drive mode, the air conditioning system is controlled as follows to pri-
oritize fuel efficiency:
● Heating/cooling capacity is restricted.
● Outside/recirculated air mode may automatically switch depending on
the temperature setting or the inside temperature.
● Fan speed restricted when automatic mode is selected
To improve air conditioning performance, perform the following operations:
● Adjust the fan speed or the temperature setting
● Turn off Eco drive mode
■ Customization
The air conditioning control of Eco drive mode can be changed to the same
setting as that used in normal drive mode.
(Customizable features P. 516)
■ Using automatic mode
Fan speed is adjusted automatically according to the temperature setting
and the ambient conditions.
Therefore, the fan may stop for a while until warm or cool air is ready to flow
immediately after is pressed.
■ Fogging up of the windows
●The windows will easily fog up when the humidity in the vehicle is high.
Turning on will dehumidify the air from the outlets and defog the
windshield effectively.
● If you turn off, the windows may fog up more easily.
● The windows may fog up if the recirculated air mode is used.
Page 355 of 552
355
4-2. Maintenance
4
Maintenance and care
Emission inspection and maintenance (I/M) programs
Some states have vehicle emission inspection programs which
include OBD (On Board Diagnostics) checks. The OBD system moni-
tors the operation of th e emission control system.
■If the malfunction indicator lamp comes on
The OBD system determines that a problem exists somewhere
in the emission control system. Your vehicle may not pass the I/
M test and may need to be repaired. Contact your Toyota dealer
to service the vehicle.
■ Your vehicle may not pass the I/M test in the following situa-
tions:
●When the 12-volt battery is disconnected or discharged
Readiness codes that are se t during ordinary driving are
erased.
Also, depending on your driving habits, the readiness codes
may not be completely set.
● When the fuel tank cap is loose
The malfunction indicator lamp comes on indicating a tempo-
rary malfunction and your vehi cle may not pass the I/M test.
■ When the malfunction indicator lamp still remains on after
several driving trips
The error code in the OBD system will not be cleared unless the
vehicle is driven 40 or more times.
■ If your vehicle does not pass the I/M test
Contact your Toyota dealer to prepare the vehicle for re-testing.
Page 390 of 552

390 4-3. Do-it-yourself maintenance
■Tire inflation pressure check interval
You should check tire inflation pressure every two weeks, or at least
once a month.
Do not forget to check the spare.
■Effects of incorrect tire inflation pressure
Driving with incorrect tire inflation pressure ma y result in the following:
●Reduced fuel efficiency
●Reduced driving comfort and tire life
●Reduced safety
●Damage to the drive train
If a tire needs frequent inflating, have it checked by your Toyota dealer.
■Instructions for checking tire inflation pressure
When checking tire inflation pressure, observe the following:
●Check only when the tires are cold.
If your vehicle has been parked for at least 3 hours or has not been
driven for more than 1 mile or 1.5 km, you will get an accurate cold
tire inflation pressure reading.
●Always use a tire pressure gauge.
The appearance of the tire can be mi sleading. In addition, tire infla-
tion pressure that is even just a few pounds off can affect ride quality
and handling.
●Do not reduce tire inflation pressure after driving. It is normal for tire
inflation pressure to be higher after driving.
●Never exceed the vehicle capacity weight.
Passengers and luggage weight should be placed so that the vehicle
is balanced.
Page 436 of 552

436 5-2. Steps to take in an emergency
■If the malfunction indicator lamp comes on while driving
The malfunction indicator lamp will come on if the fuel tank cap becomes
loose. If the fuel tank cap is loose, tighten it securely. The malfunction indica-
tor lamp will go off after several trips.
If the malfunction indicator lamp does not go off even after several trips, con-
tact your Toyota dealer as soon as possible.
■
When the tire pressure warning light comes on
Check the tire inflation pressure and adjust to the appropriate level.
Pushing the tire pressure warning reset switch will not turn off the tire
pressure warning light.
■The tire pressure warning light may come on due to natural causes
The tire pressure warning light may come on due to natural causes such
as natural air leaks and tire inflat ion pressure changes caused by tem-
perature. In this case, adjusting the tire inflation pressure will turn off the
warning light (after a few minutes).
■When a tire is replaced with a spare tire
The compact spare tire is not equipped with a tire pressure warning
valve and transmitter. If a tire goes flat, the tire pressure warning light will
not turn off even though the flat tire has been replaced with the spare
tire. Replace the spare tire with the re paired tire and adjust the tire infla-
tion pressure. The tire pressure wa rning light will go off after a few min-
utes.