parking brake TOYOTA PRIUS C 2014 NHP10 / 1.G User Guide
[x] Cancel search | Manufacturer: TOYOTA, Model Year: 2014, Model line: PRIUS C, Model: TOYOTA PRIUS C 2014 NHP10 / 1.GPages: 563, PDF Size: 8.89 MB
Page 159 of 563

158 2-1. Driving procedures
CAUTION
■When taking a nap in the vehicle
Always turn the hybrid system off. Otherwise, if you accidentally move the
shift lever or depress the accelerator pedal, this could cause an accident or
fire due to hybrid system overheating. Additionally, if the vehicle is parked in
a poorly ventilated area, exhaust gases may collect and enter the vehicle,
leading to death or a serious health hazard.
■ When braking
●When the brakes are wet, drive more cautiously.
Braking distance increases when the brakes are wet, and this may cause
one side of the vehicle to brake differently than the other side. Also, the
parking brake may not securely hold the vehicle.
● If the electronically controlled brake system does not operate, do not fol-
low other vehicles closely and avoid hills or sharp turns that require brak-
ing.
In this case, braking is still possible, but the brake pedal should be
depressed more firmly than usual. Also, the braking distance will increase.
Have your brakes fixed immediately.
● The brake system consists of 2 or more individual hydraulic systems; if
one of the systems fails, the other(s) will still operate. In this case, the
brake pedal should be depressed more firmly than usual and the braking
distance will increase. Have your brakes fixed immediately.
NOTICE
■When driving the vehicle
●Do not depress the accelerator and brake pedals at the same time during
driving, as this may restrain driving torque.
● Do not use the accelerator pedal or depress the accelerator and brake
pedals at the same time to hold the vehicle on a hill.
■ When parking the vehicle
Always shift the shift lever to P. Failure to do so may cause the vehicle to
move or the vehicle may accelerate suddenly if the accelerator pedal is acci-
dentally depressed.
Page 161 of 563
160
2-1. Driving procedures
Engine (ignition) switch (vehicles without a smart key system)
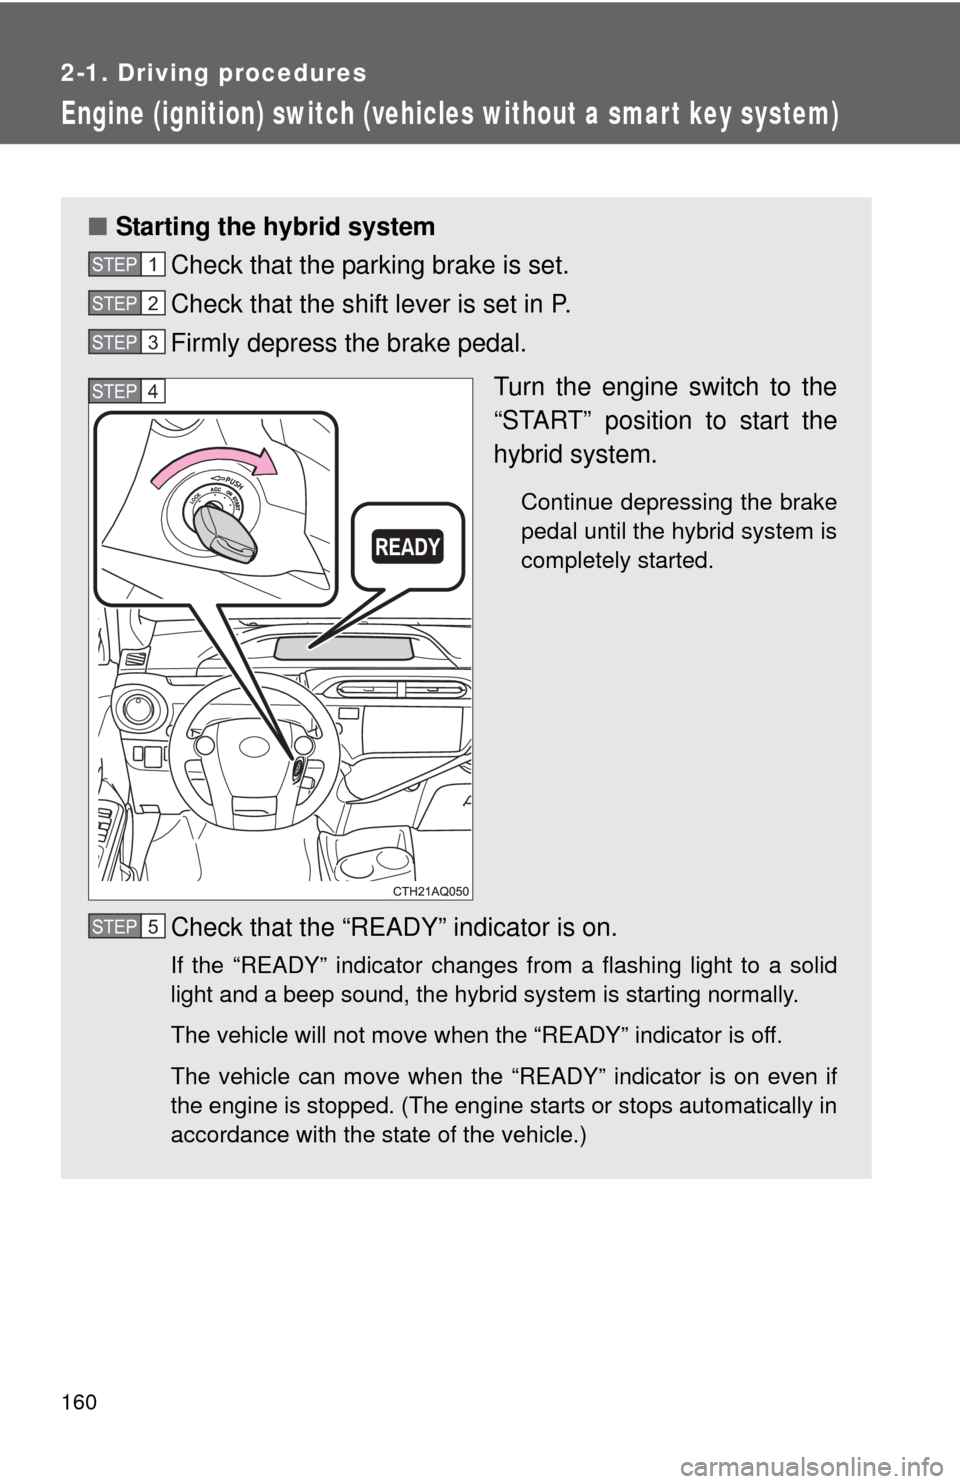
■Starting the hybrid system
Check that the parking brake is set.
Check that the shift lever is set in P.
Firmly depress the brake pedal.
Turn the engine switch to the
“START” position to start the
hybrid system.
Continue depressing the brake
pedal until the hybrid system is
completely started.
Check that the “READY” indicator is on.
If the “READY” indicator changes from a flashing light to a solid
light and a beep sound, the hybrid system is starting normally.
The vehicle will not move when the “READY” indicator is off.
The vehicle can move when the “READY” indicator is on even if
the engine is stopped. (The engine starts or stops automatically in
accordance with the state of the vehicle.)
STEP1
STEP2
STEP3
STEP4
STEP5
Page 165 of 563
164
2-1. Driving procedures
Power (ignition) switch (vehicles with a smart key system)
Performing the following operations when carrying the electronic
key on your person starts the hybr id system or changes “POWER”
switch modes.
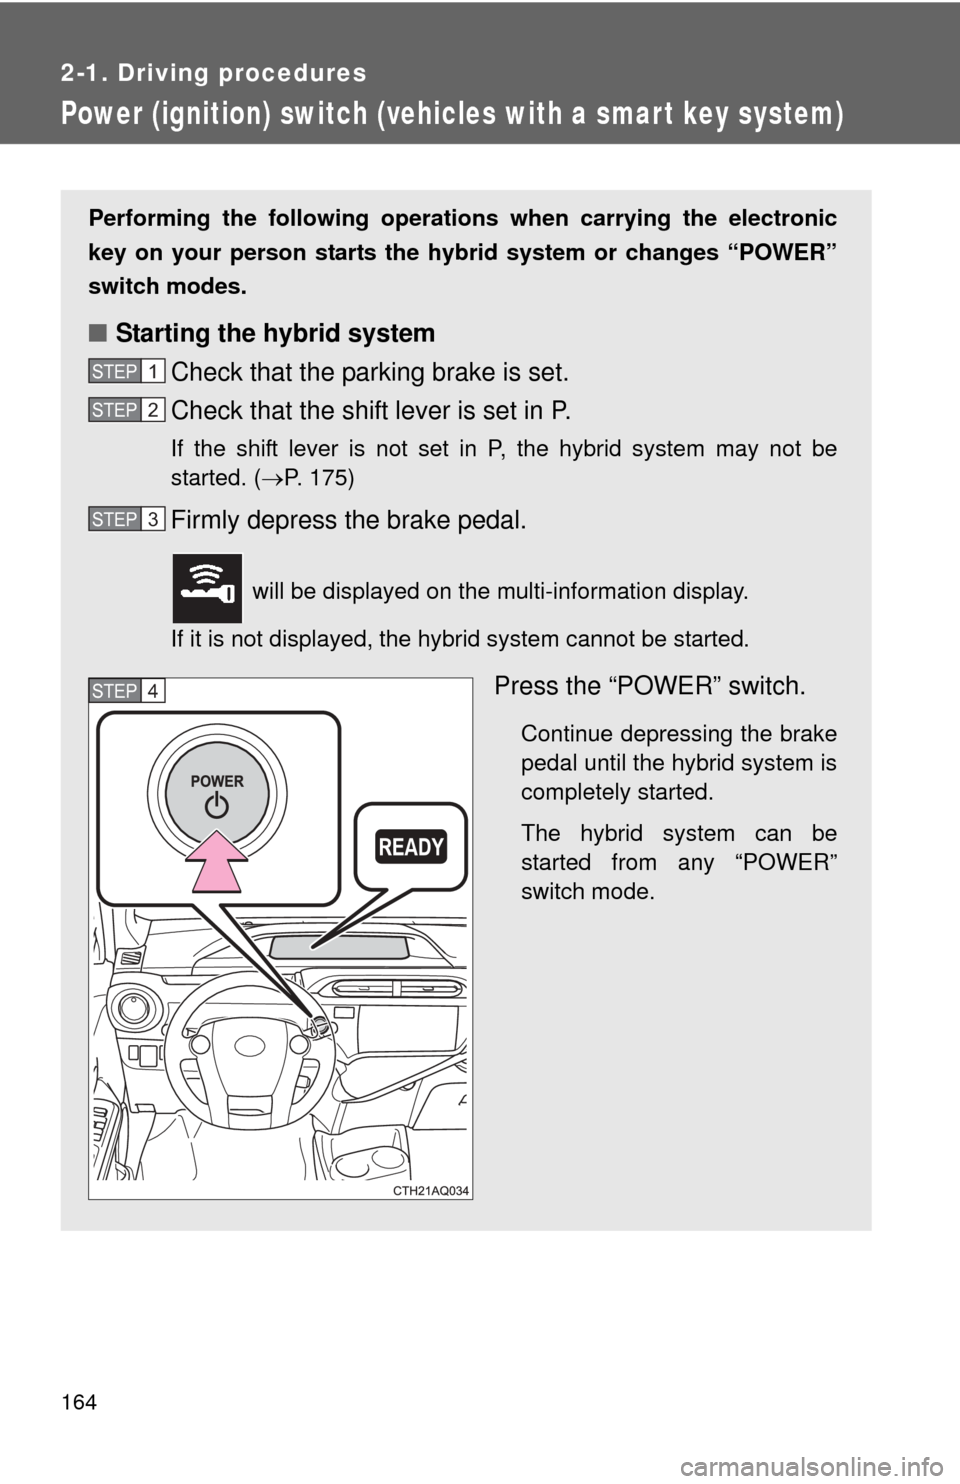
■ Starting the hybrid system
Check that the parking brake is set.
Check that the shift lever is set in P.
If the shift lever is not set in P, the hybrid system may not be
started. ( P. 175)
Firmly depress the brake pedal.
will be displayed on the multi-information display.
If it is not displayed, the hybrid system cannot be started.
Press the “POWER” switch.
Continue depressing the brake
pedal until the hybrid system is
completely started.
The hybrid system can be
started from any “POWER”
switch mode.
STEP1
STEP2
STEP3
STEP4
Page 166 of 563
165
2-1. Driving procedures
2
When driving
Check that the “READY” indicator is on.
If the “READY” indicator changes from a flashing light to a solid
light and a beep sound, the hybrid system is starting normally.
The vehicle will not move when
the “READY” indicator is off.
The vehicle can move when the “READY” indicator is on even if
the engine is stopped. (The engine starts or stops automatically in
accordance with the state of the vehicle.)
■ Stopping the hybrid system
Stop the vehicle completely.
Shift the shift lever to P.
Set the parking brake. ( P. 179)
Press the “POWER” switch.
Slowly release the brake pedal and check that on the
multi-information display is off.
STEP5
STEP1
STEP2
STEP3
STEP4
STEP5
Page 168 of 563

167
2-1. Driving procedures
2
When driving
When stopping the hybrid system with the shift lever in a
position other than P
If the hybrid system is stopped with the shift lever in a position other
than P, the “POWER” switch will not be turned off but instead be
turned to ACCESSORY mode. Perform the following procedure to
turn the switch off:
Check that the parking brake is set.
Shift the shift lever to P.
Check that is displayed on the multi-information dis-
play and then press the “POWER” switch once.
Check that on the multi- information display is off.
■Auto power off function
When the shift lever is in P, if the vehicle is left in ACCESSORY or ON mode
with the hybrid system not operating for more than 20 minutes (ACCES-
SORY mode) or one hour (ON mode), the “POWER” switch will automati-
cally turn off. However, this function cannot entirely prevent 12-volt battery
discharge. Do not leave the vehicle with the “POWER” switch in ACCES-
SORY or ON mode for long periods of time when the hybrid system is not
operating.
■ Sounds and vibrations specific to a hybrid vehicle
P. 2 8
■ Electronic key battery depletion
P. 5 8
■ When the ambient temperature is low, such as during winter driving
conditions
It may take time until the “READY” indicator comes on.
■ Conditions affecting operation
P. 5 5
STEP1
STEP2
STEP3
STEP4
Page 180 of 563
179
2-1. Driving procedures
2
When driving
Parking brake
■Parking brake engaged warning buzzer
A buzzer will sound if the vehicle is driven at a speed of approximately 3
mph (5 km/h) or more with the parking brake engaged. ( P. 450)
■ Usage in winter time
P. 231
NOTICE
■Before driving
Fully release the parking brake.
Driving the vehicle with the parking brake set will lead to brake components
overheating, which may affect braking performance and increase brake
wear.
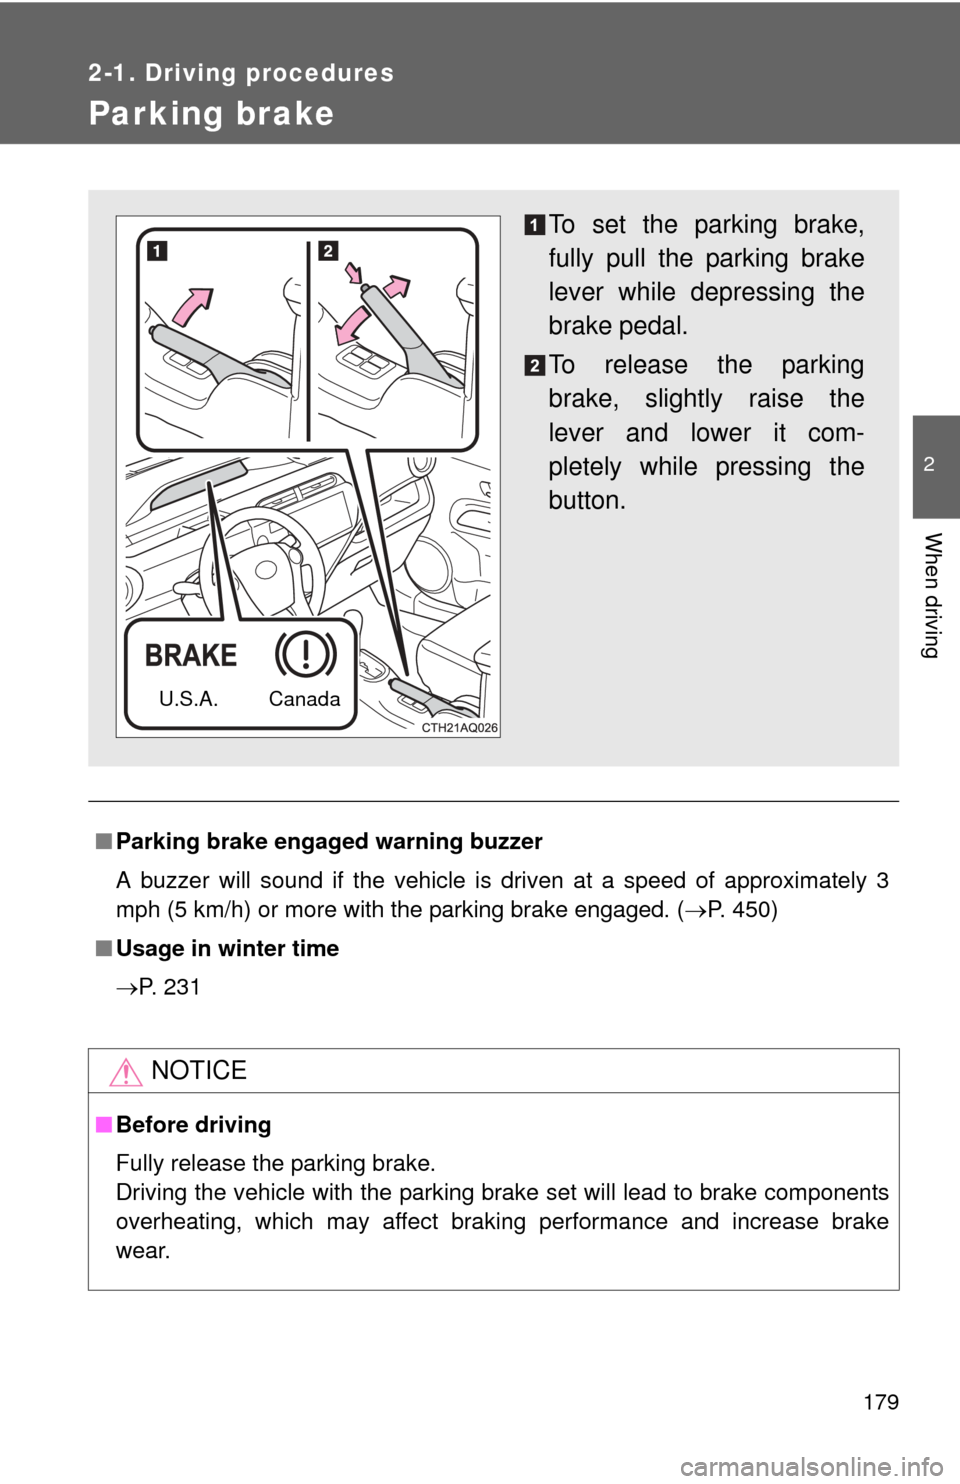
To set the parking brake,
fully pull the parking brake
lever while depressing the
brake pedal.
To release the parking
brake, slightly raise the
lever and lower it com-
pletely while pressing the
button.
U.S.A. Canada
Page 207 of 563

206 2-3. Operating the lights and wipers
■Daytime running light system
●To make your vehicle more visible to other drivers, the headlights turn on
automatically (at a reduced intensity) whenever the hybrid system is
started and the parking brake is released. Daytime running lights are not
designed for use at night.
For type A: Daytime running lights can be turned off by operating the
switch.
● Compared to turning on the headlights, the daytime running light system
offers greater durability and consumes less electricity, so it can help
improve fuel economy.
■ Light reminder buzzer
Vehicles without a smart key system
A buzzer sounds when the engine switch is turned to the “LOCK” or “ACC”
position and the driver's door is opened while the lights are turned on.
Vehicles with a smart key system
A buzzer sounds when the “POWER” switch is turned off or turned to
ACCESSORY mode and the driver's door is opened while the lights are
turned on.
■ Battery-saving function
In the following conditions, the remaining lights will go off automatically after
20 minutes in order to prevent the vehicle battery from being discharged:
●The headlights and/or tail lights are on.
● The engine switch is turned to the “ACC” or “LOCK” position (vehicles
without a smart key system) or the “P OWER” switch is turned to ACCES-
SORY mode or turned off (vehicles with a smart key system).
This function will be canceled in any of the following situations:
● When the engine switch is turned to the “ON” position (vehicles without a
smart key system) or the “POWER” switch is turned to ON mode (vehi-
cles with a smart key system).
● When the light switch is operated.
● When the door is opened or closed.
Page 224 of 563

223
2-4. Using other
driving systems
2
When driving
■Operating conditions of hill-start assist control
When the following four conditions are met, the hill-start assist control will
operate:
● The shift lever is in a position other than P or N (when starting off for-
ward/backward on an upward incline).
● The vehicle is stopped.
● The accelerator pedal is not depressed.
● The parking brake is not engaged.
■ Automatic system cancelation of hill-start assist control
The hill-start assist control will turn off in any of the following situations:
●The shift lever is moved to P or N.
● The accelerator pedal is depressed.
● The parking brake is engaged.
● Approximately 2 seconds elapse after the brake pedal is released.
Page 225 of 563
224 2-4. Using other driving systems
CAUTION
■The ABS does not operate effectively when
●The limits of tire gripping performance have been exceeded (such as
excessively worn tires on a snow covered road).
● The vehicle hydroplanes while driving at high speed on wet or slick roads.
■ Stopping distance when the ABS is operating may exceed that of nor-
mal conditions
The ABS is not designed to shorten the vehicle’s stopping distance. Always
maintain a safe distance from the vehicle in front of you, especially in the fol-
lowing situations:
● When driving on dirt, gravel or snow-covered roads
● When driving with tire chains
● When driving over bumps in the road
● When driving over roads with potholes or uneven surfaces
■ TRAC may not operate effectively when
Directional control and power may not be achievable while driving on slip-
pery road surfaces, even if the TRAC system is operating.
Drive the vehicle carefully in conditions where stability and power may be
lost.
■ Hill-start assist control
●Do not overly rely on hill-start assist control. Hill-start assist control may
not operate effectively on steep inclines and roads covered with ice.
● Unlike the parking brake, hill-start assist control is not intended to hold the
vehicle stationary for an extended period of time. Do not attempt to use
hill-start assist control to hold the vehicle on an incline, as doing so may
lead to an accident.
Page 233 of 563
![TOYOTA PRIUS C 2014 NHP10 / 1.G User Guide 232 2-5. Driving information
Selecting tire chainsUse the correct tire chain size when mounting the tire chains. Chain
size is regulated for each tire size.
Side chain
(0.12 in. [3.0 mm] in diameter](/img/14/6627/w960_6627-232.png "TOYOTA PRIUS C 2014 NHP10 / 1.G User Guide 232 2-5. Driving information
Selecting tire chainsUse the correct tire chain size when mounting the tire chains. Chain
size is regulated for each tire size.
Side chain
(0.12 in. [3.0 mm] in diameter")
232 2-5. Driving information
Selecting tire chainsUse the correct tire chain size when mounting the tire chains. Chain
size is regulated for each tire size.
Side chain
(0.12 in. [3.0 mm] in diameter)
Cross chain
(0.16 in. [4.0 mm] in diameter)
Regulations on the use of tire chains
Regulations regarding the use of ti re chains vary depending on loca-
tion and type of road. Always chec k local regulations before installing
chains.
■ When driving the vehicle
Accelerate the vehicle slowly, keep a safe distance between you
and the vehicle ahead, and drive at a reduced speed suitable to
road conditions.
■ When parking the vehicle
Park the vehicle and move the shift lever to P without setting the
parking brake. The parking brak e may freeze up, preventing it
from being released. If necessary , block the wheels to prevent
inadvertent sliding or creeping.