lock TOYOTA PRIUS PLUG-IN 2013 Manual Online
[x] Cancel search | Manufacturer: TOYOTA, Model Year: 2013, Model line: PRIUS PLUG-IN, Model: TOYOTA PRIUS PLUG-IN 2013Pages: 704, PDF Size: 19.59 MB
Page 354 of 704
328
2-4. Using other driving systems
PRIUS PHV_OM_OM47787U_(U)
Driving assist systems
To h e l p e n h a n c e d r i v i n g s a f e t y and performance, the following sys-
tems operate automatically in response to various driving situations.
Be aware, however, that these systems are supplementary and
should not be relied upon too heavily when operating the vehicle.
■ABS (Anti-lock Brake System)
Helps to prevent wheel lock when the brakes are applied suddenly, or if
the brakes are applied while driving on a slippery road surface
■Brake assist
Generates an increased level of braking force after the brake pedal is
depressed when the system detects a panic stop situation
■VSC (Vehicle Stability Control)
Helps the driver to control skidding when swerving suddenly or turning
on slippery road surfaces
■TRAC (Traction Control)
Helps to maintain drive power and prevent the drive wheels from spin-
ning when starting the vehicle or accelerating on slippery roads
■EPS (Electric Power Steering)
Employs an electric motor to reduce the amount of effort needed to turn
the steering wheel
■Enhanced VSC (Enhanced Vehicle Stability Control)
Provides cooperative control of the ABS, TRAC, VSC and EPS.
Helps to maintain directional stability when swerving on slippery road
surfaces by controlling steering performance.
Page 364 of 704

338
2-4. Using other driving systems
PRIUS PHV_OM_OM47787U_(U)
■Conditions that may trigger the system even if there is no possibility of
a collision
●When there is an object by the roadside at the entrance to a curve
●When passing an oncoming vehicle on a curve
●When driving over a narrow iron bridge
●When there is a metal object on the road surface
●When driving on an uneven road surface (nose up, nose down)
●When passing an oncoming vehicle on a left-turn
●When your vehicle rapidly closes on the vehicle in front
●When a grade separation/interchange, sign, billboard, or other structure
appears to be directly in the vehicle’s line of travel
●When the steep angle of the road causes a metal object located beneath
the road surface to be seen ahead of the vehicle
●When an extreme change in vehicle height occurs
●When the axis of the radar is out of adjustment
●When passing through certain toll gates
●When passing through an overpass
When the system is activated in the situations described above, there is also
a possibility that the seat belts will retract quickly and the brakes will be
applied with a force greater than normal. When the seat belt is locked in the
retracted position, stop the vehicle in a safe place, release the seat belt and
refasten it.
Page 372 of 704
346
2-5. Driving information
PRIUS PHV_OM_OM47787U_(U)
CAUTION
■Things that must not be carried in the luggage compartment
The following things may cause a fire if loaded in the luggage compart-
ment:
●Receptacles containing gasoline
●Aerosol cans
■Storage precautions
Observe the following precautions.
Failure to do so may result in death or serious injury.
●Stow carg o and luggage in the luggage compar tment whenever possi-
ble.
●Do not stack cargo and luggage in the luggage compartment higher
than the seatbacks.
Such items may be thrown about and possibly injure people in the
vehicle in the event of sudden braking or in an accident.
●Do not place cargo or luggage in or on the following locations as the
item may get under the brake or accelerator pedal and prevent the
pedals from being depressed properly, block the driver’s vision, or hit
the driver or passengers, causing an accident:
•At the feet of the driver
•On the front passenger or rear seats (when stacking items)
•On the luggage cover
•On the instrument panel
•On the dashboard
Page 376 of 704
350
2-5. Driving information
PRIUS PHV_OM_OM47787U_(U)
■Before driving the vehicle
Perform the following according to the driving conditions:
●Do not try to forcibly open a window or move a wiper that is
frozen. Pour warm water over the frozen area to melt the ice.
Wipe away the water immediately to prevent it from freezing.
●To e n s u r e p r o p e r o p e r a t i o n o f t he climate control system fan,
remove any snow that has accumulated on the air inlet vents
in front of the windshield.
●Check for and remove any excess ice or snow that may have
accumulated on the exterior lights, vehicle’s roof, chassis,
around the tires or on the brakes.
●Remove snow or mud from the bottom of your shoes before
getting in the vehicle.
■When driving the vehicle
Accelerate the vehicle slowly, keep a safe distance between you
and the vehicle ahead, and drive at a reduced speed suitable to
road conditions.
■When parking the vehicle
Park the vehicle and shift the shift position to P and block the
wheel under the vehicle without setting the parking brake. The
parking brake may freeze up, preventing it from being released.
If necessary, block the wheels to prevent inadvertent sliding or
creeping.
Page 393 of 704
368
3-1. Using the air conditioning system and defogger
PRIUS PHV_OM_OM47787U_(U)
CAUTION
■To p r e v e n t t h e w i n d s h i e l d f r o m f o g g i n g u p
Do not use during cool air operation in extremely humid weather.
The difference between the temperature of the outside air and that of the
windshield can cause the outer surface of the windshield to fog up, blocking
your vision.
NOTICE
■To p r e v e n t 1 2 - v o l t b a t t e r y d i s c h a r g e
Do not leave the air conditioning system on longer than necessary when the
hybrid system is not operating.
Page 398 of 704
373
3-1. Using the air conditioning system and defogger
PRIUS PHV_OM_OM47787U_(U)
3
Interior features
■Security feature
Any unlocked doors will be automatically locked when the system is operat-
ing. The buzzer will beep and the emergency flashers flash when the doors
have been locked or the system has been turned off.
(The doors locked: Once; The system turned off: Twice)
■Conditions affecting operation
→P. 1 1 9
■When using the Remote Air Conditioning System
A charging message will be displayed on the multi-information display. Dif-
ferent messages will be displayed depending on when the Remote Air Con-
ditioning System was started (after charging or during charging).
(→P. 5 6 2 )
■While the Remote Air Conditioning System is operating
●Depending on the operating condition of the Remote Air Conditioning
System, the electric fan may spin and an operating noise may be heard.
However, this does not indicate a malfunction.
●The Remote Air Conditioning System may stop operating temporarily if
other features that use electricity (for example, the seat heater, lights,
windshield wipers) are in operation or if the charge level of the 12-volt
battery becomes low.
■Electronic key battery depletion
→P. 1 2 3
■When the electronic key battery is fully depleted
→P. 1 2 3
■Customization
Setting (e.g. Operation using the on the wireless remote control) can
be changed.
(Customizable features →P. 6 4 5 )
Page 409 of 704
384
3-3. Using the interior lights
PRIUS PHV_OM_OM47787U_(U)
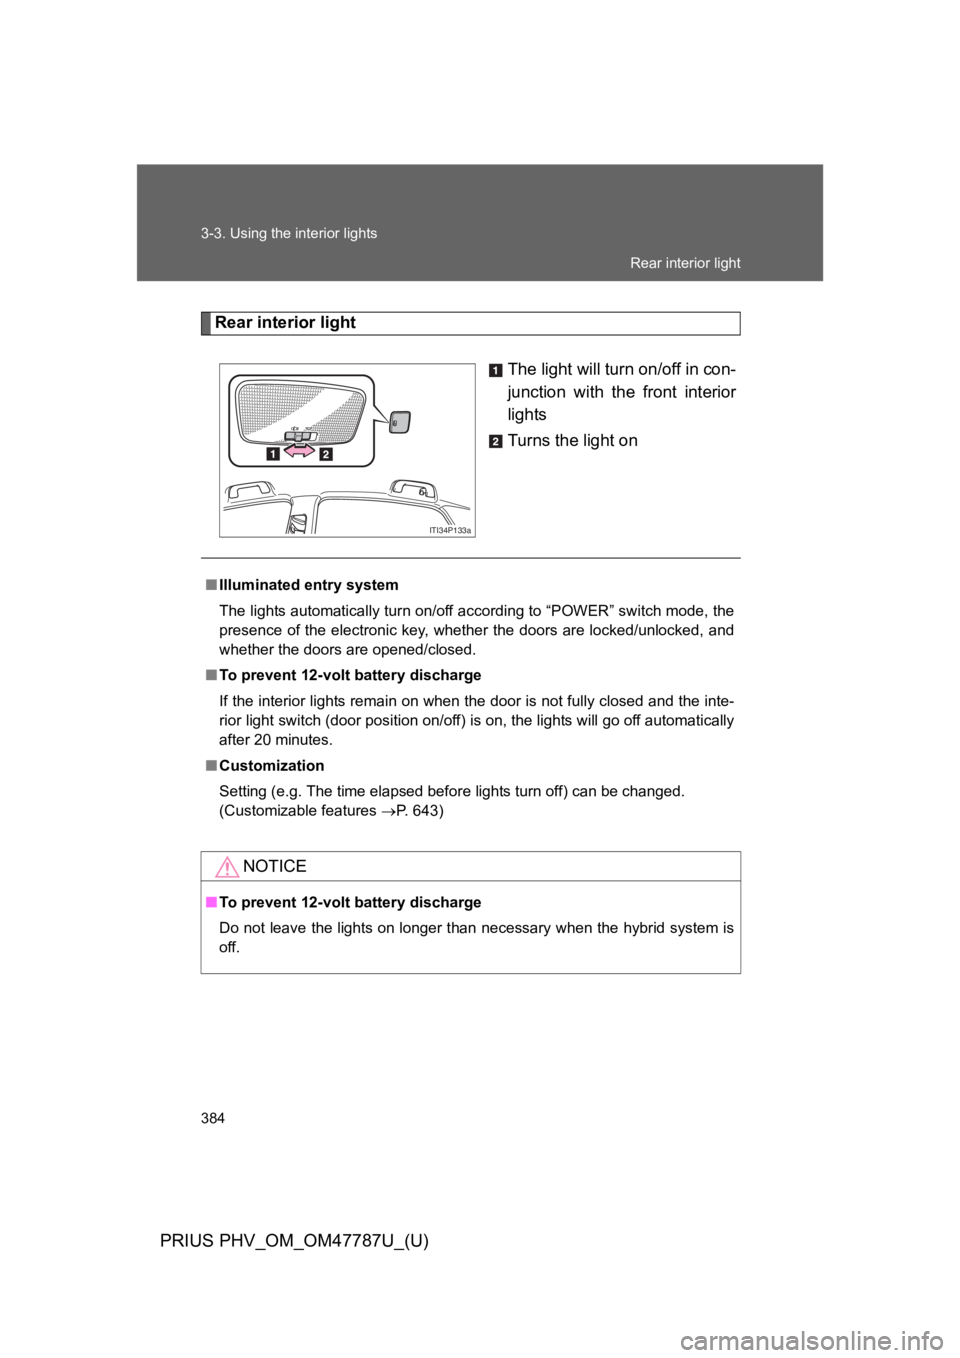
Rear interior light
The light will turn on/off in con-
junction with the front interior
lights
Turns the light on
ITI34P133a
■Illuminated entry system
The lights automatically turn on/off according to “POWER” switch mode, the
presence of the electronic key, whether the doors are locked/unlocked, and
whether the doors are opened/closed.
■To p r e v e n t 1 2 - v o l t b a t t e r y d i s c h a r g e
If the interior lights remain on when the door is not fully closed and the inte-
rior light switch (door position on/off) is on, the lights will go off automatically
after 20 minutes.
■Customization
Setting (e.g. The time elapsed before lights turn off) can be changed.
(Customizable features →P. 6 4 3 )
NOTICE
■To p r e v e n t 1 2 - v o l t b a t t e r y d i s c h a r g e
Do not leave the lights on longer than necessary when the hybrid system is
off.
Rear interior light
Page 412 of 704
387
3-4. Using the storage features
PRIUS PHV_OM_OM47787U_(U)
3
Interior features
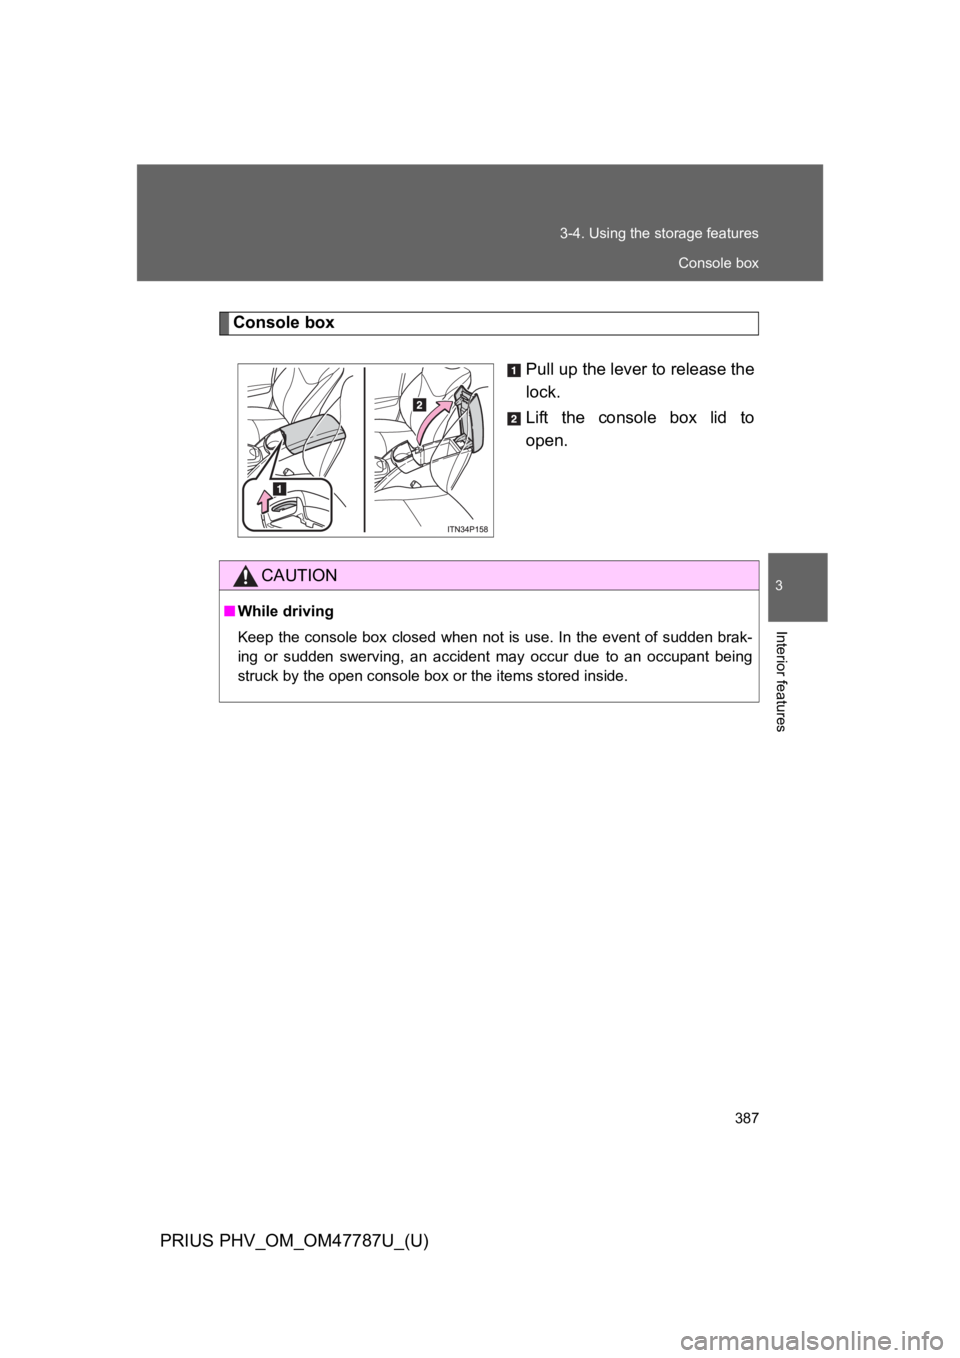
Console box
Pull up the lever to release the
lock.
Lift the console box lid to
open.
CAUTION
■While driving
Keep the console box closed when not is use. In the event of sudden brak-
ing or sudden swerving, an accident may occur due to an occupant being
struck by the open console box or the items stored inside.
Console box
Page 432 of 704
407
3-5. Other interior features
PRIUS PHV_OM_OM47787U_(U)
3
Interior features
Garage door opener∗
The garage door opener (HomeLink® Universal Transceiver) is manufac-
tured under license from HomeLink®.
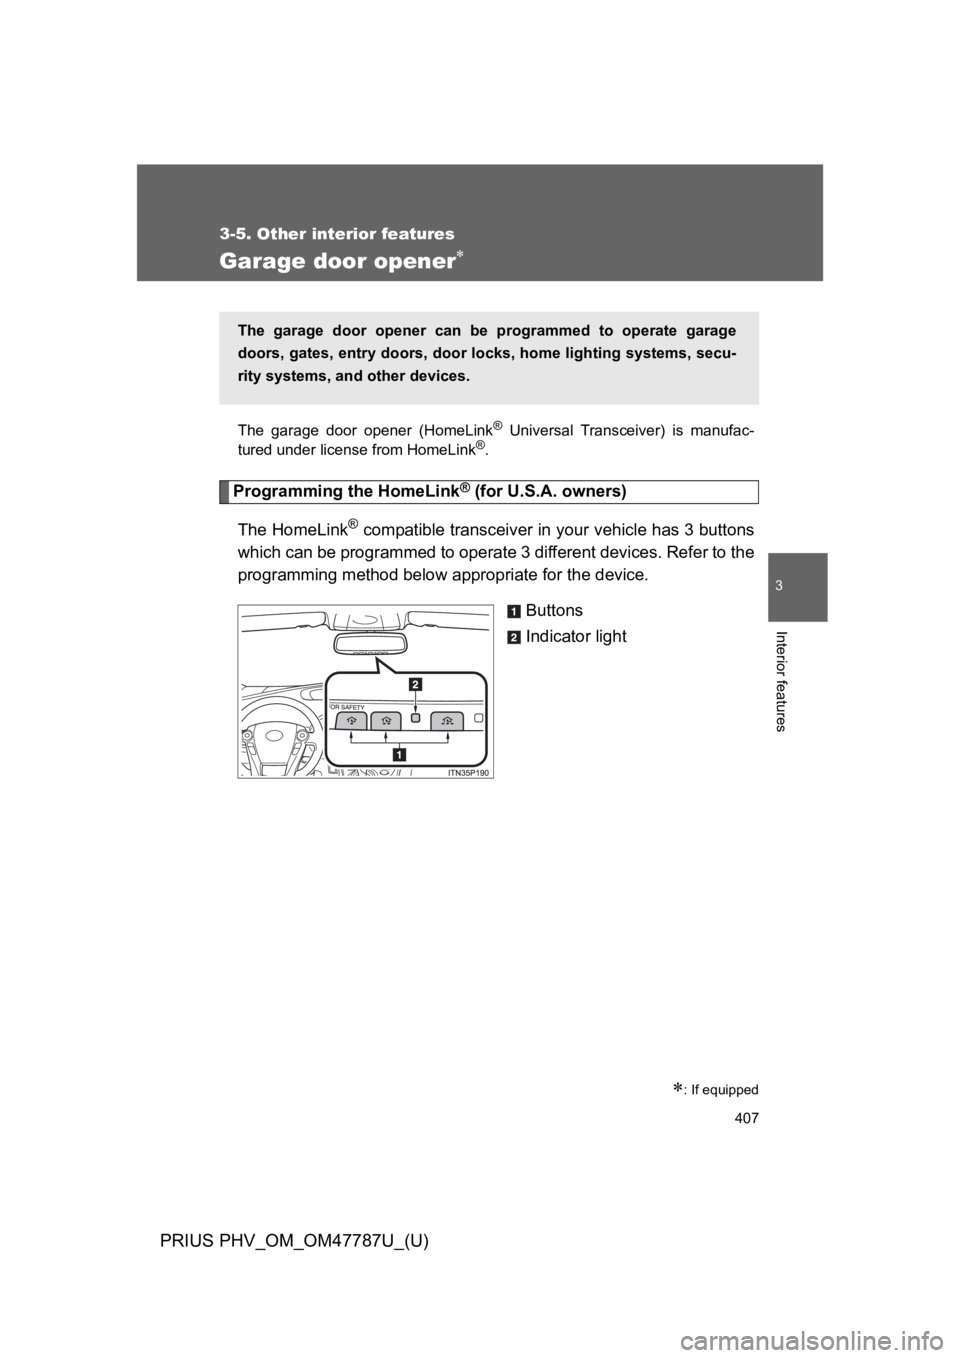
Programming the HomeLink® (for U.S.A. owners)
The HomeLink® compatible transceiver in your vehicle has 3 buttons
which can be programmed to operate 3 different devices. Refer to the
programming method below appropriate for the device.
Buttons
Indicator light
∗: If equipped
The garage door opener can be programmed to operate garage
doors, gates, entry doors, door locks, home lighting systems, secu-
rity systems, and other devices.
Page 436 of 704
411
3-5. Other interior features
PRIUS PHV_OM_OM47787U_(U)
3
Interior features
■Programming an entry gate (for U.S.A. owners)/Programming
a devices in the Canadian market
Place the remote control transmitter 1 to 3 in. (25 to 75 mm)
away from the HomeLink® buttons.
Keep the HomeLink® indicator light in view while programming.
Press and hold the selected HomeLink® button.
Repeatedly press and release (cycle) the remote control
transmitter for 2 seconds each until step 4 is completed.
When the HomeLink® indicator light starts to flash rapidly,
release the buttons.
Te s t t h e H o m e L i n k® operation by pressing the newly pro-
grammed button. Check to see if the gate/device operates
correctly.
Repeat the steps above to program another device for any of
the remaining HomeLink® buttons.
■Programming other devices
To p r o g r a m o t h e r d e v i c e s s u c h as home security systems, home
door locks and lighting, contact your Toyota dealer for assistance.
■Reprogramming a button
The individual HomeLink® buttons cannot be erased but can be
reprogrammed. To reprogram a button, follow the “Reprogramming
a HomeLink® button” instructions.
STEP 1
STEP 2
STEP 3
STEP 4
STEP 5
STEP 6