fuse box TOYOTA PRIUS PLUG-IN HYBRID 2013 1.G Owners Manual
[x] Cancel search | Manufacturer: TOYOTA, Model Year: 2013, Model line: PRIUS PLUG-IN HYBRID, Model: TOYOTA PRIUS PLUG-IN HYBRID 2013 1.GPages: 684, PDF Size: 12.83 MB
Page 459 of 684
459
4-3. Do-it-yourself maintenance
PRIUS PHV_OM_OM47787U_(U)
4
Maintenance and care
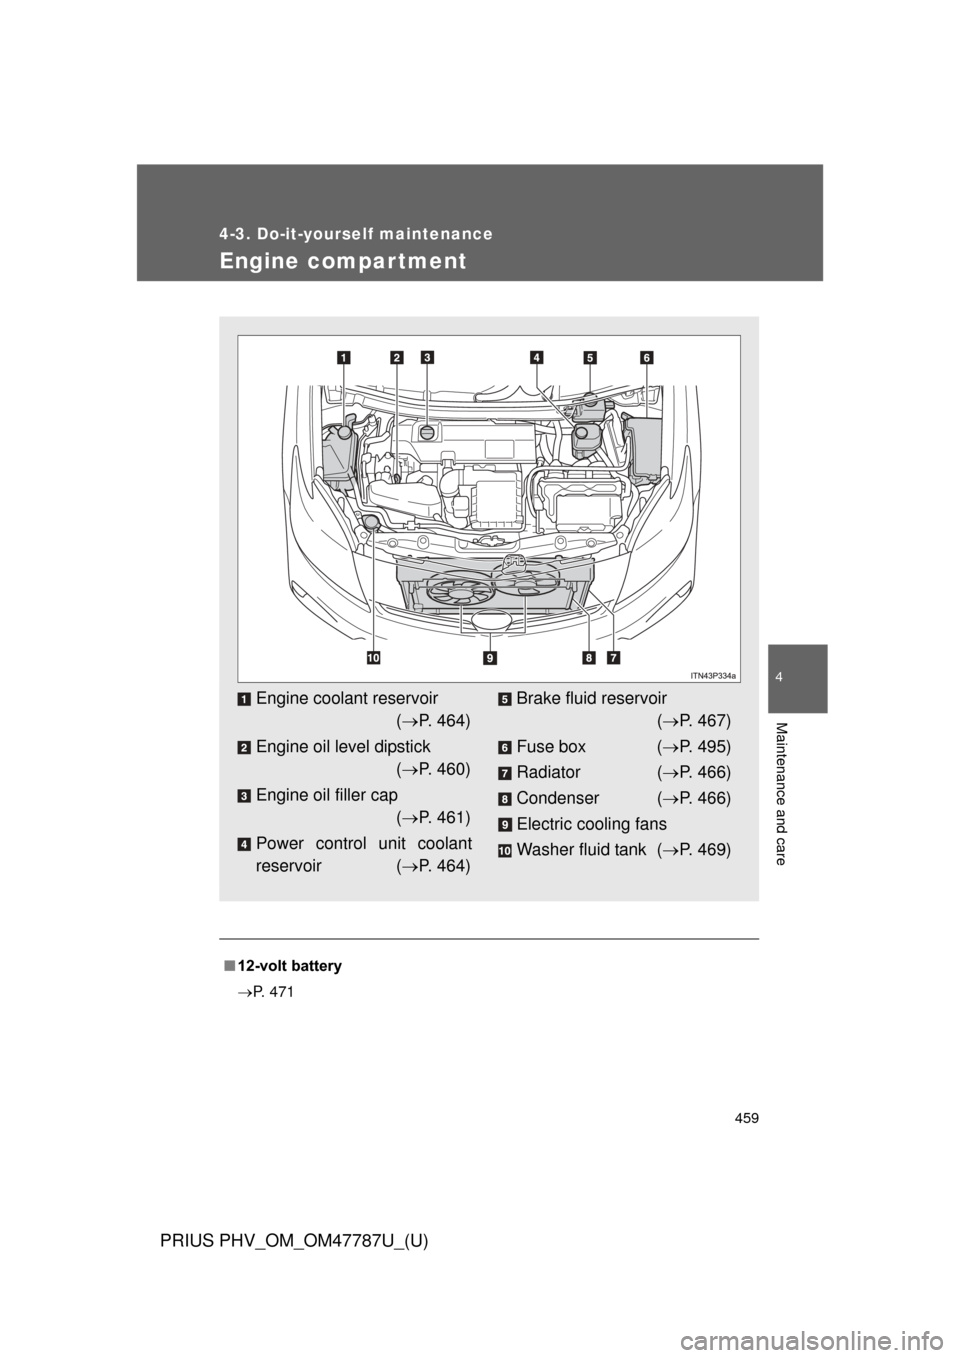
Engine compar tment
■12-volt battery
P. 471
Engine coolant reservoir
( P. 464)
Engine oil level dipstick ( P. 460)
Engine oil filler cap ( P. 461)
Power control unit coolant
reservoir ( P. 464)Brake fluid reservoir
( P. 467)
Fuse box ( P. 495)
Radiator ( P. 466)
Condenser ( P. 466)
Electric cooling fans
Washer fluid tank ( P. 469)
Page 495 of 684
495
4-3. Do-it-yourself maintenance
PRIUS PHV_OM_OM47787U_(U)
4
Maintenance and care
Checking and replacing fuses
If any of the electrical components do not operate, a fuse may have
blown. If this happens, check and replace the fuses as necessary.
Turn the “POWER” switch off.
Vehicles with Solar Ventilation Sy stem: Turn the Solar Ventilation
System off and make sure not to operate the Remote Air Condi-
tioning System.
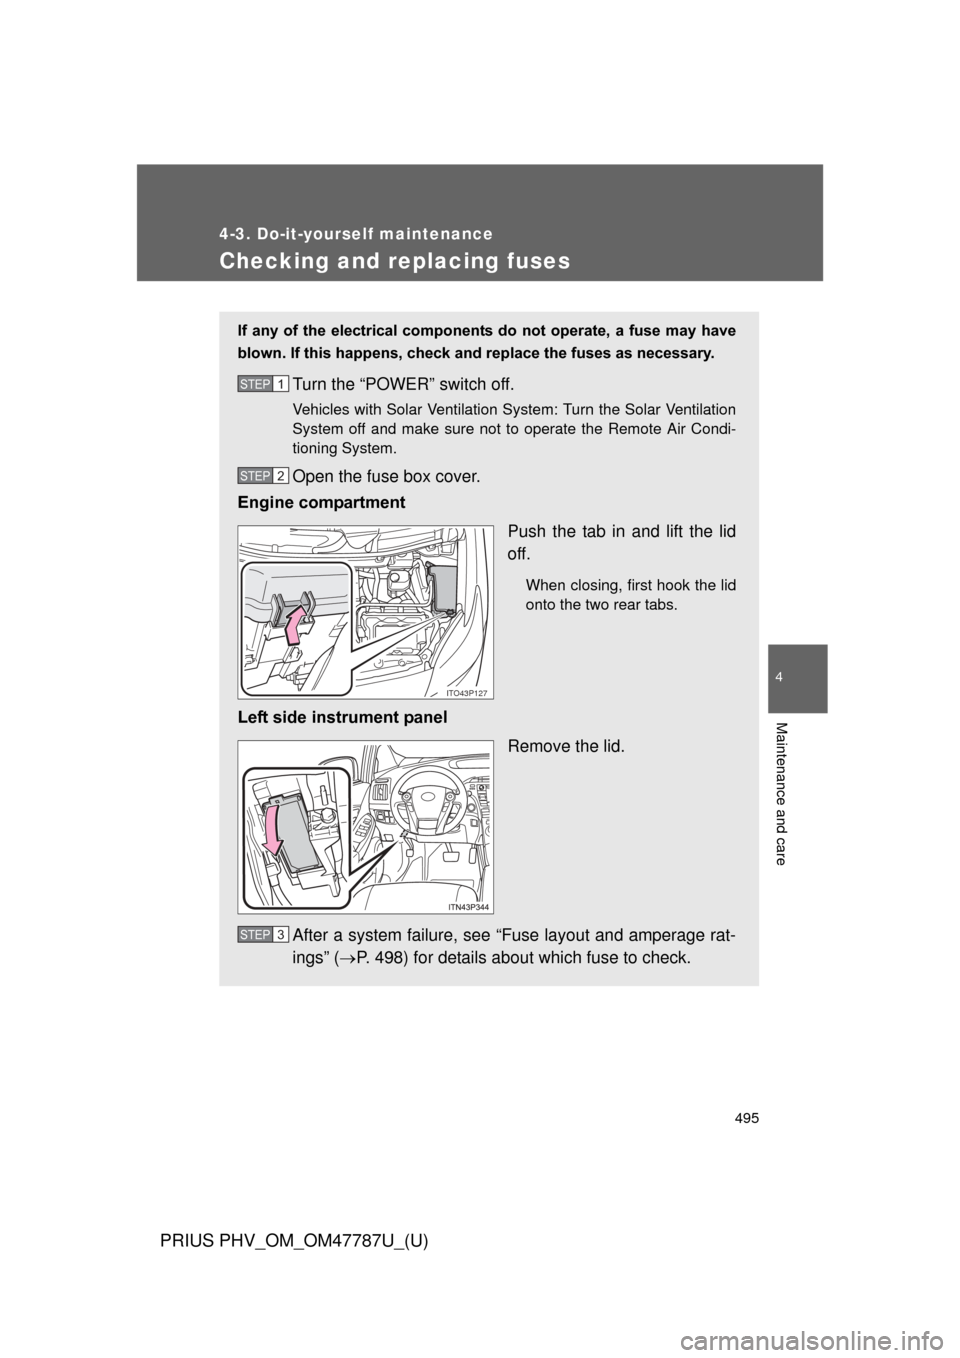
Open the fuse box cover.
Engine compartment
Push the tab in and lift the lid
off.
When closing, first hook the lid
onto the two rear tabs.
Left side instrument panelRemove the lid.
After a system failure, see “Fuse layout and amperage rat-
ings” ( P. 498) for details about which fuse to check.
STEP 1
STEP 2
ITO43P127
STEP 3
Page 496 of 684
496 4-3. Do-it-yourself maintenance
PRIUS PHV_OM_OM47787U_(U)
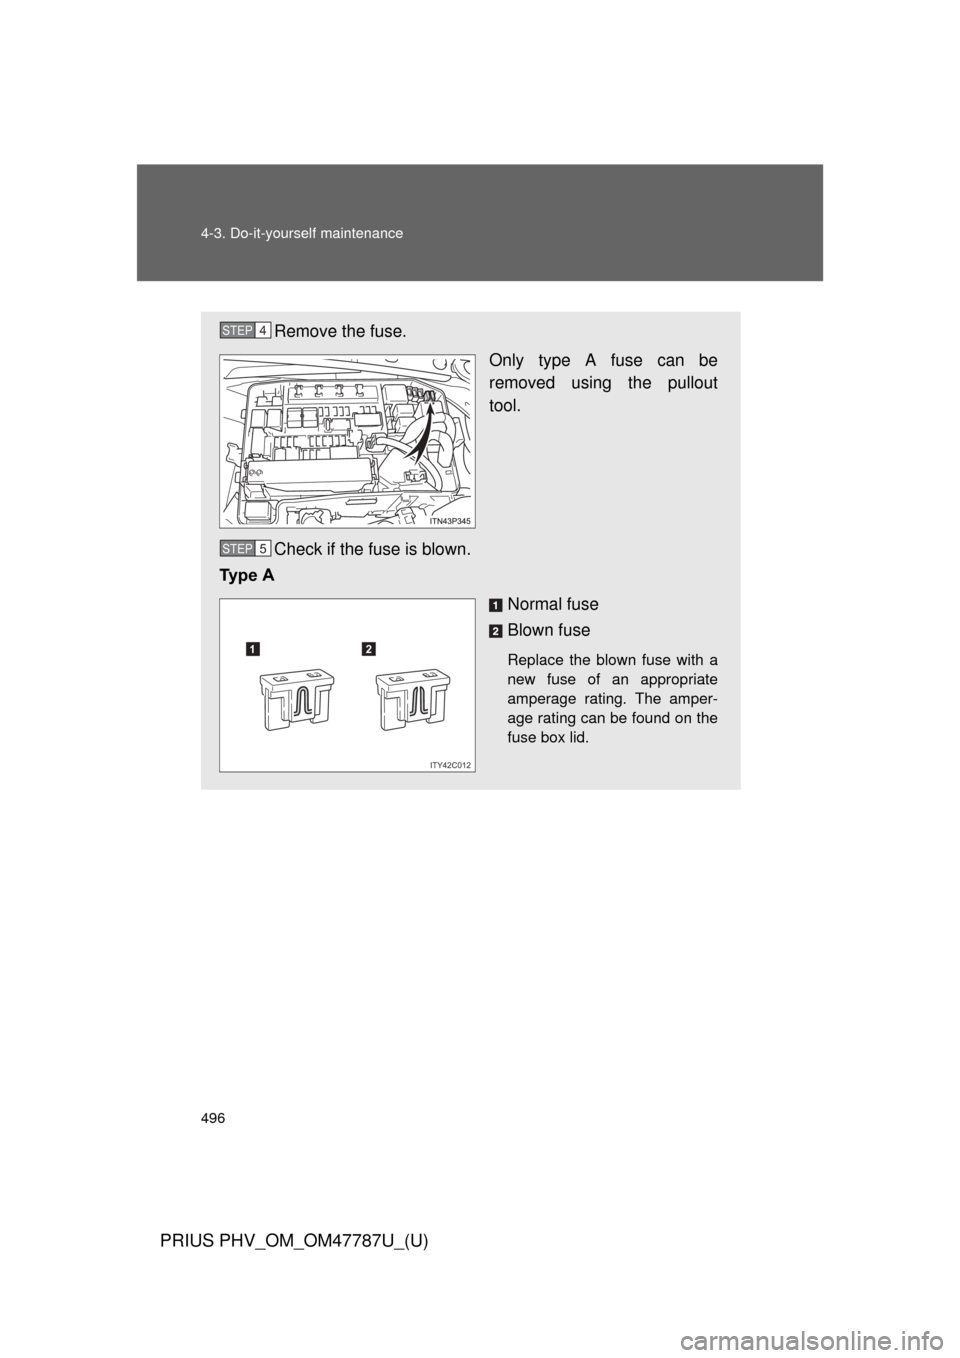
Remove the fuse.Only type A fuse can be
removed using the pullout
tool.
Check if the fuse is blown.
Ty p e A
Normal fuse
Blown fuse
Replace the blown fuse with a
new fuse of an appropriate
amperage rating. The amper-
age rating can be found on the
fuse box lid.
STEP 4
STEP 5
12
ITY42C012
Page 497 of 684
497
4-3. Do-it-yourself maintenance
PRIUS PHV_OM_OM47787U_(U)
4
Maintenance and care
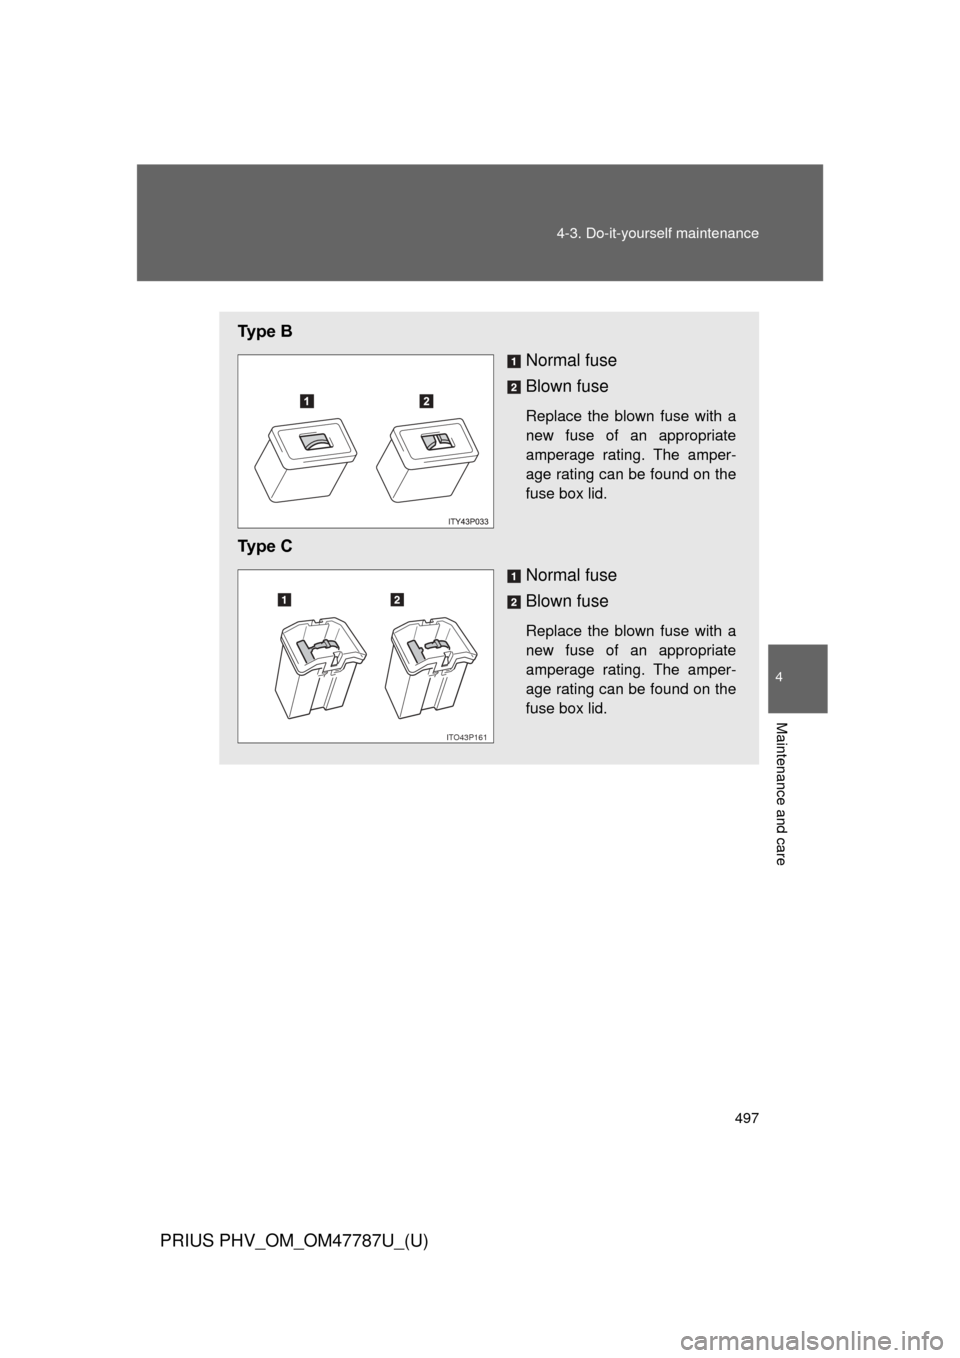
Ty p e B
Normal fuse
Blown fuse
Replace the blown fuse with a
new fuse of an appropriate
amperage rating. The amper-
age rating can be found on the
fuse box lid.
Ty p e CNormal fuse
Blown fuse
Replace the blown fuse with a
new fuse of an appropriate
amperage rating. The amper-
age rating can be found on the
fuse box lid.
ITO43P161
Page 504 of 684

504 4-3. Do-it-yourself maintenance
PRIUS PHV_OM_OM47787U_(U)
FUSEAmpereCircuit
25 RR WIP 20A Rear window wiper and washer
26 WIP 30A Windshield wipers
27 MET 7.5A Gauges and meters
28 IGN 10ABrake system, driver support sys-
tem, multiport fuel injection sys-
tem/sequential multiport fuel
injection system, SRS airbag sys-
tem, front passenger occupant
classification system (ECU and
sensors), power management sys-
tem, smart key system, front pas-
senger’s seat belt reminder light
29 PANEL 10AAir conditioning system, personal
light, transmission, P position
switch, navigation system, Remote
Air Conditioning System, headlight
cleaner, front passenger’s seat
belt reminder light, headlight level-
ing system, glove box light, clock,
audio system, MPH or km/h switch
30 TAIL 10AHeadlight leveling system, park-
ing lights, tail lights, license plate
lights, front fog lights, side marker
lights
Page 505 of 684
505
4-3. Do-it-yourself maintenance
PRIUS PHV_OM_OM47787U_(U)
4
Maintenance and care
■
After a fuse is replaced
● If the lights do not turn on even after the fuse has been replaced, a bulb
may need replacement. ( P. 507)
● If the replaced fuse blows again, have the vehicle inspected by your
Toyota dealer.
■ If there is an overload in a circuit
The fuses are designed to blow, protecting the wiring harness from damage.
■ When replacing light bulbs
Toyota recommends that you use genuine Toyota products designed for this
vehicle. Because certain bulbs are connected to circuits designed to prevent
overload, non-genuine parts or parts not designed for this vehicle may be
unusable.
CAUTION
■To prevent system breakdowns and vehicle fire
Observe the following precautions.
Failure to do so may cause damage to the vehicle, and possibly a fire or
injury.
● Never use a fuse of a higher amperage rating than that indicated, or use
any other object in place of a fuse.
● Always use a genuine Toyota fuse or equivalent.
Never replace a fuse with a wire, even as a temporary fix.
● Do not modify the fuses or fuse boxes.
■ Fuse box near the power control unit
Never check or replace the fuses as there are high voltage parts and wiring
near the fuse box.
Doing so may cause electric shock, resulting in death or serious injury.
Page 596 of 684
596 5-2. Steps to take in an emergency
PRIUS PHV_OM_OM47787U_(U)
Start the engine of the second vehicle. Increase the engine
speed slightly and maintain at that level for approximately
5 minutes to charge the battery of your vehicle.
Maintain the engine speed of the second vehicle and start
the hybrid system of your ve hicle by turning the “POWER”
switch to ON mode.
Make sure the “READY” indicator comes on. If the indicator
light does not come on, contact your Toyota dealer.
Once the hybrid system has started, remove the jumper
cables in the exact reverse or der from which they were con-
nected.
Close the exclusive jump starting terminal cover, and rein-
stall the fuse box cover to its original position.
When installing, first hook the fuse box cover onto the two rear
tabs.
Once the hybrid system starts , have the vehicle inspected at
your Toyota dealer as soon as possible.
STEP 4
STEP 5
STEP 6
STEP7
STEP8