button TOYOTA PRIUS PLUG-IN HYBRID 2016 User Guide
[x] Cancel search | Manufacturer: TOYOTA, Model Year: 2016, Model line: PRIUS PLUG-IN HYBRID, Model: TOYOTA PRIUS PLUG-IN HYBRID 2016Pages: 744, PDF Size: 84.41 MB
Page 271 of 744
2714-2. Opening, closing and locking the doors
PRIUS PHV_OM_OM47A89E_(EE)
4
Operation of each component
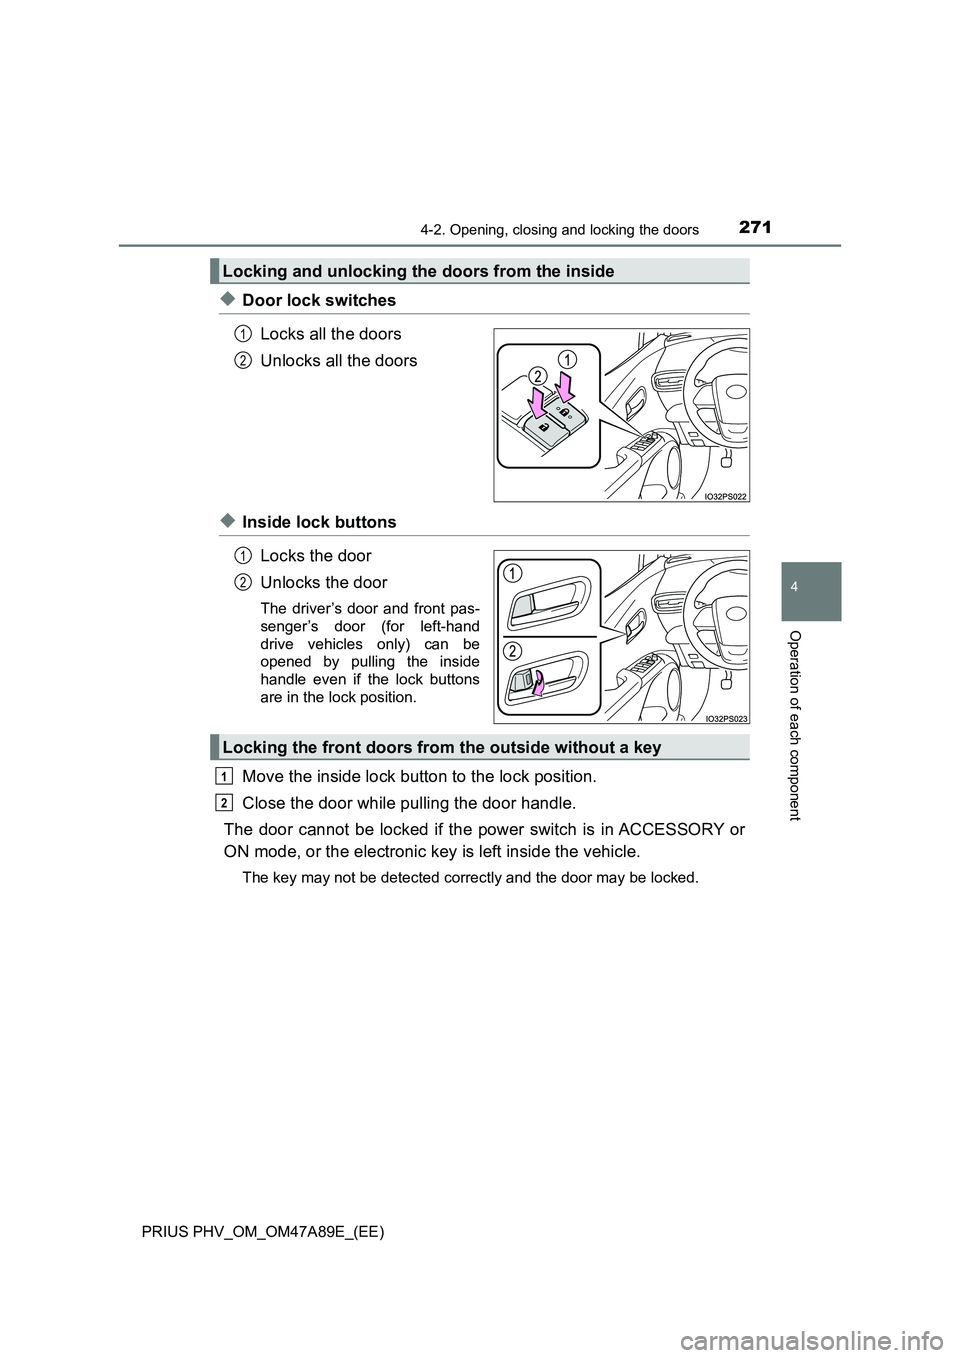
◆Door lock switches
Locks all the doors
Unlocks all the doors
◆Inside lock buttons
Locks the door
Unlocks the door
The driver’s door and front pas-
senger’s door (for left-hand
drive vehicles only) can be
opened by pulling the inside
handle even if the lock buttons
are in the lock position.
Move the inside lock button to the lock position.
Close the door while pulling the door handle.
The door cannot be locked if the power switch is in ACCESSORY or
ON mode, or the electronic key is left inside the vehicle.
The key may not be detected correctly and the door may be locked.
Locking and unlocking the doors from the inside
1
2
1
2
Locking the front doors from the outside without a key
1
2
Page 273 of 744
2734-2. Opening, closing and locking the doors
PRIUS PHV_OM_OM47A89E_(EE)
4
Operation of each component
WARNING
■To prevent an accident
Observe the following precautions while driving the vehicle.
Failure to do so may result in a door opening and an occupant throwing out
of the vehicle, resulting in death or serious injury.
● Ensure that all doors are properly closed.
● Do not pull the inside handle of the doors while driving.
Be especially careful for the driver’s door and front passenger’s door (for
left-hand drive vehicles only), as the door may be opened even if the
inside lock buttons are in locked position.
● Set the rear door child-protector locks when children are seated in the rear
seats.
■ When opening or closing a door
Check the surroundings of the vehicle such as whether the vehicle is on an
incline, whether there is enough space for a door to open and whether a
strong wind is blowing. When opening or closing the door, hold the door
handle tightly to prepare for any unpredictable movement.
■ When using the wireless remote control and operating the power win-
dows
Operate the power window after checking to make sure that there is no pos-
sibility of any passenger having any of their body parts caught in the side
window. Also, do not allow children to operate the wireless remote control. It
is possible for children and other passengers to get caught in the power
window.
Page 281 of 744
2814-2. Opening, closing and locking the doors
PRIUS PHV_OM_OM47A89E_(EE)
4
Operation of each component
■When “Smart Entry & Start System Malfunction See Owner’s Manual” is
displayed on the multi-information display
The system may be malfunctioning. Have the vehicle inspected by any autho-
rized Toyota dealer or repairer, or another duly qualified and equipped profes-
sional immediately.
■ Battery-saving function
The battery-saving function will be activated in order to prevent the electronic
key battery and the 12-volt battery from being discharged while the vehicle is
not in operation for a long time.
● In the following situations, the smart entry & start system may take some
time to unlock the doors.
• The electronic key has been left in an area of approximately 2 m (6 ft.) of
the outside of the vehicle for 10 minutes or longer.
• The smart entry & start system has not been used for 5 days or longer.
● If the smart entry & start system has not been used for 14 days or longer,
the doors cannot be unlocked at any doors except the driver’s door. In this
case, take hold of the driver’s door handle, or use the wireless remote con-
trol or the mechanical key, to unlock the doors.
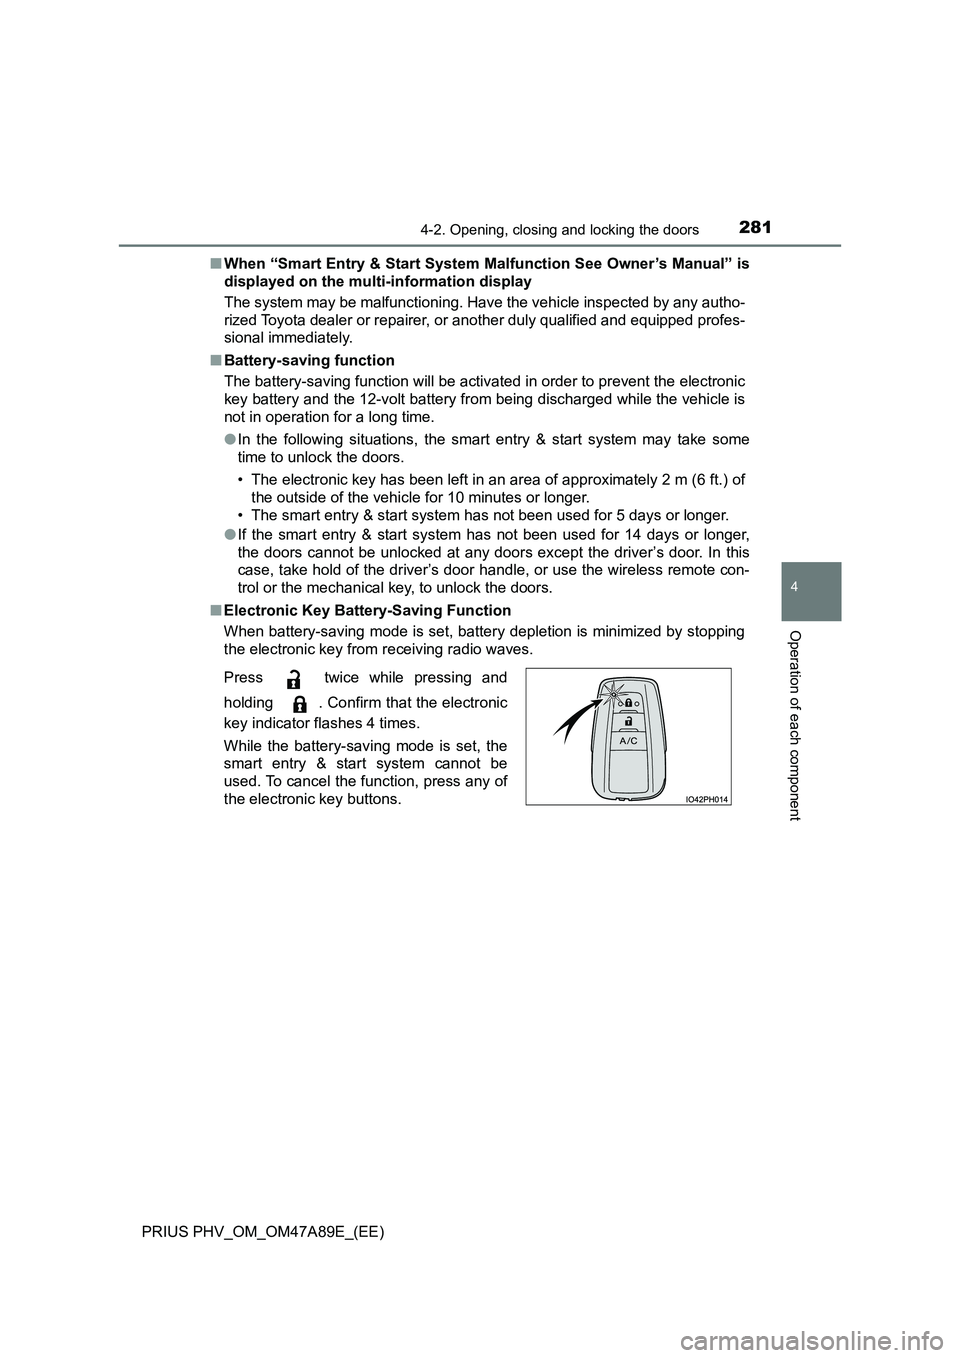
■ Electronic Key Battery-Saving Function
When battery-saving mode is set, battery depletion is minimized by stopping
the electronic key from receiving radio waves.
Press twice while pressing and
holding . Confirm that the electronic
key indicator flashes 4 times.
While the battery-saving mode is set, the
smart entry & start system cannot be
used. To cancel the function, press any of
the electronic key buttons.
Page 299 of 744
2994-3. Adjusting the seats
PRIUS PHV_OM_OM47A89E_(EE)
4
Operation of each component
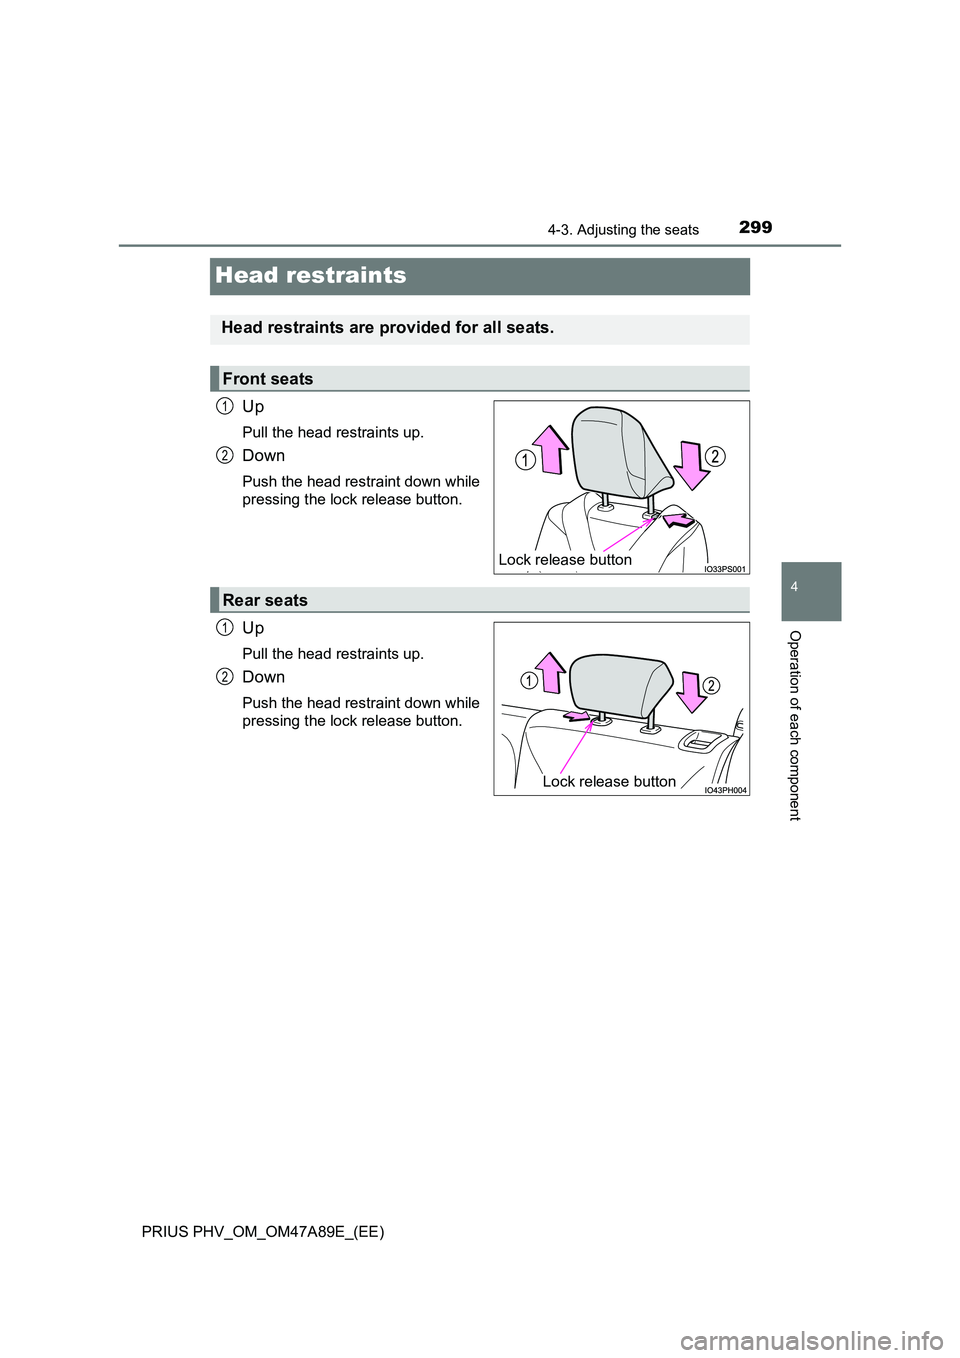
Head restraints
Up
Pull the head restraints up.
Down
Push the head restraint down while
pressing the lock release button.
Up
Pull the head restraints up.
Down
Push the head restraint down while
pressing the lock release button.
Head restraints are provided for all seats.
Front seats
Lock release button
1
2
Rear seats
Lock release button
1
2
Page 300 of 744
3004-3. Adjusting the seats
PRIUS PHV_OM_OM47A89E_(EE)
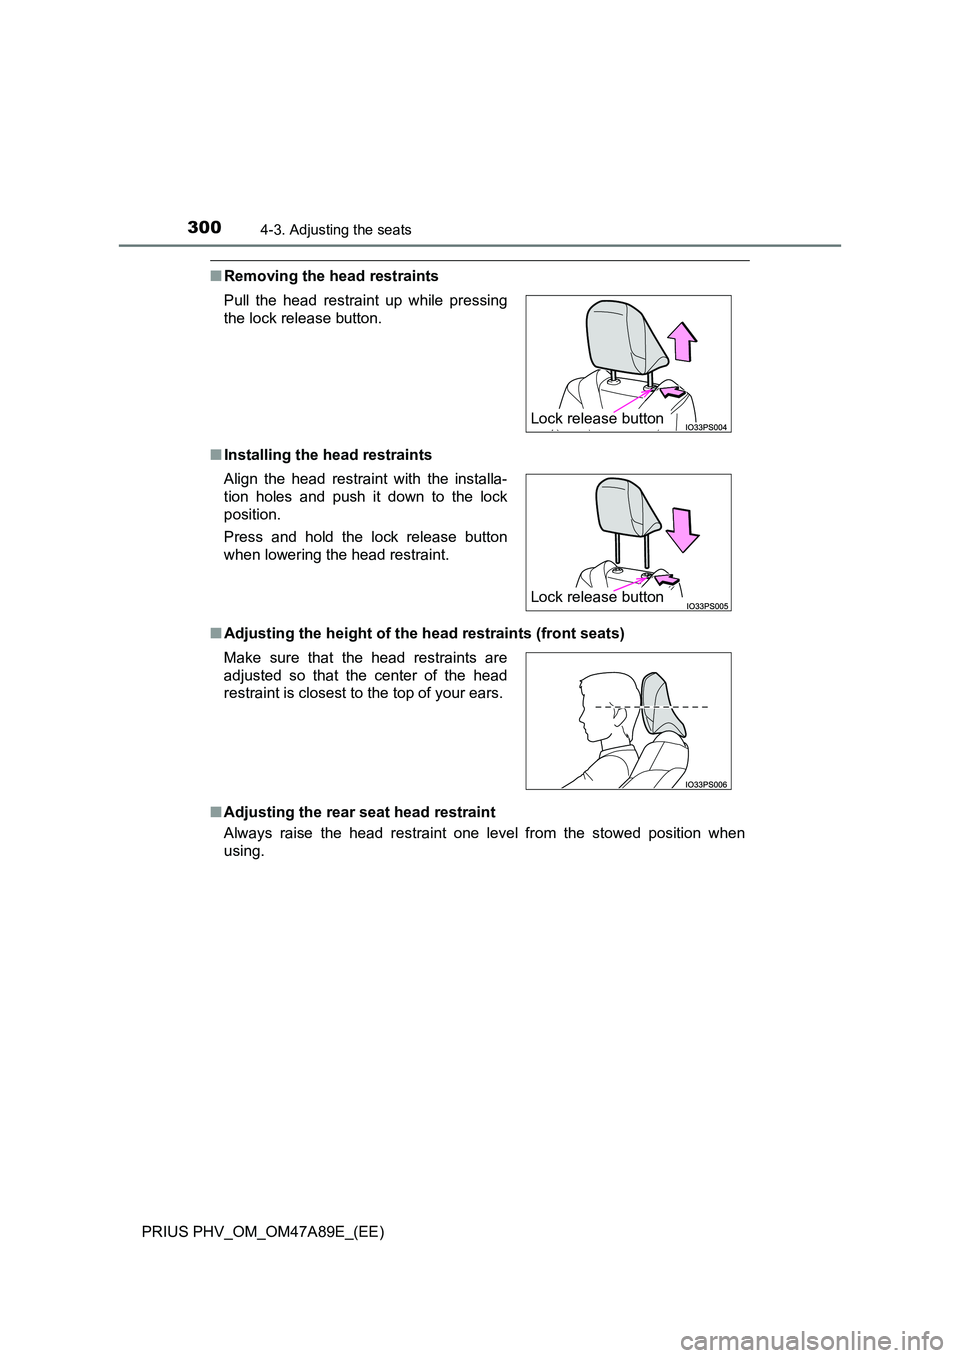
■Removing the head restraints
■ Installing the head restraints
■ Adjusting the height of the head restraints (front seats)
■ Adjusting the rear seat head restraint
Always raise the head restraint one level from the stowed position when
using.
Pull the head restraint up while pressing
the lock release button.
Align the head restraint with the installa-
tion holes and push it down to the lock
position.
Press and hold the lock release button
when lowering the head restraint.
Make sure that the head restraints are
adjusted so that the center of the head
restraint is closest to the top of your ears.
Lock release button
Lock release button
Page 304 of 744
3044-4. Adjusting the steering wheel and mirrors
PRIUS PHV_OM_OM47A89E_(EE)
Inside rear view mirror
Responding to the level of brightness of the headlights of vehicles
behind, the reflected light is automatically reduced.
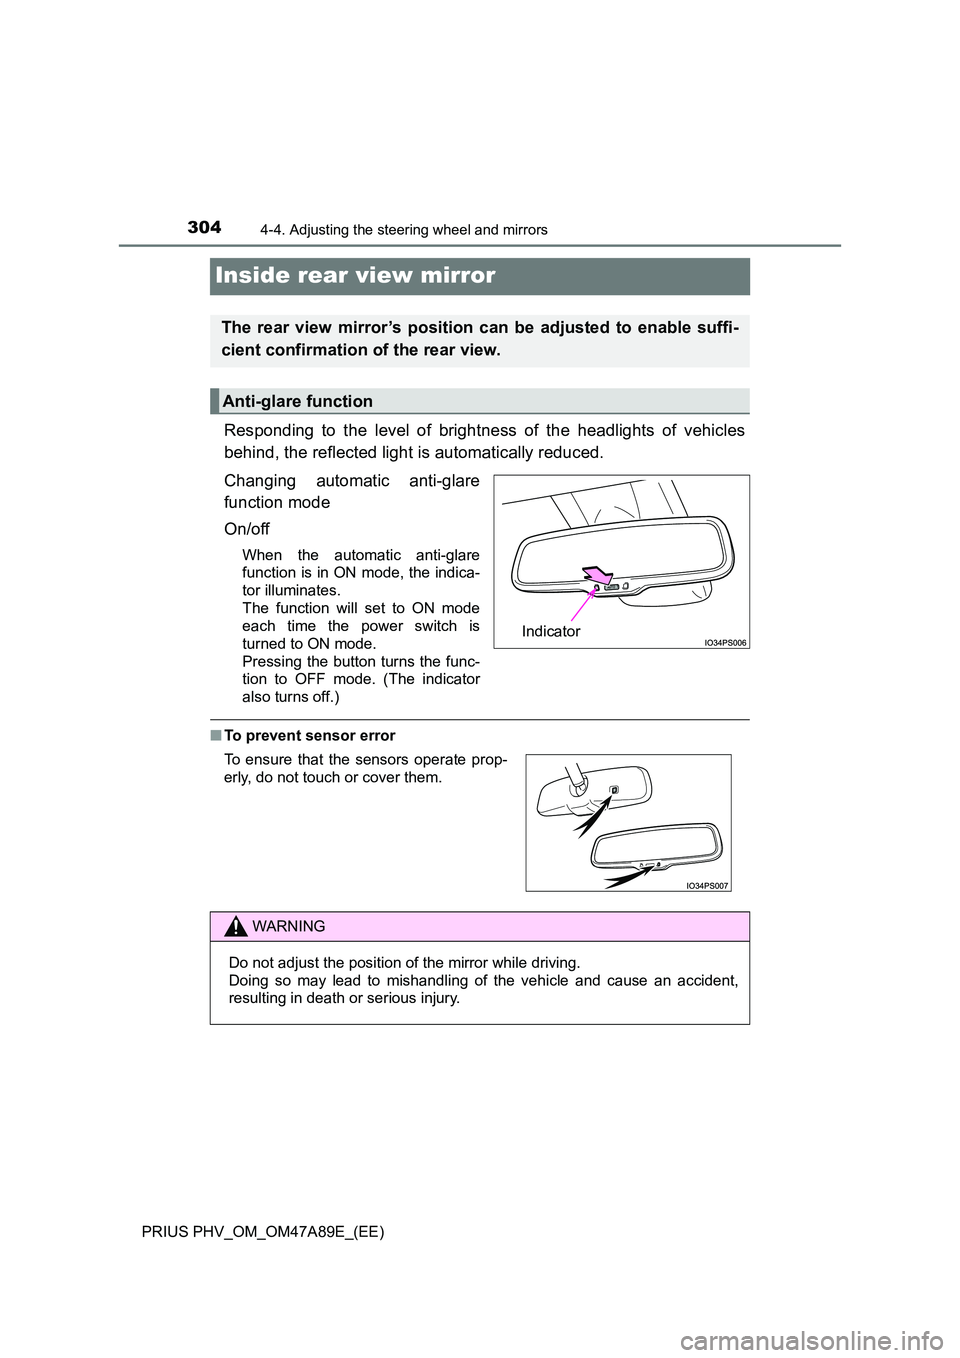
Changing automatic anti-glare
function mode
On/off
When the automatic anti-glare
function is in ON mode, the indica-
tor illuminates.
The function will set to ON mode
each time the power switch is
turned to ON mode.
Pressing the button turns the func-
tion to OFF mode. (The indicator
also turns off.)
■ To prevent sensor error
The rear view mirror’s position can be adjusted to enable suffi-
cient confirmation of the rear view.
Anti-glare function
Indicator
To ensure that the sensors operate prop-
erly, do not touch or cover them.
WARNING
Do not adjust the position of the mirror while driving.
Doing so may lead to mishandling of the vehicle and cause an accident,
resulting in death or serious injury.
Page 399 of 744
3995-5. Using the driving support systems
PRIUS PHV_OM_OM47A89E_(EE)
5
Driving
WARNING
■To avoid inadvertent dynamic radar cruise control with full-speed
range activation
Switch the dynamic radar cruise control with full-speed range off using the
“ON-OFF” button when not in use.
■ Situations unsuitable for dynamic radar cruise control with full-speed
range
Do not use dynamic radar cruise control with full-speed range in any of the
following situations.
Doing so may result in inappropriate speed control and could cause an acci-
dent resulting in death or serious injury.
● Roads where there are pedestrians, cyclers, etc.
● In heavy traffic
● On roads with sharp bends
● On winding roads
● On slippery roads, such as those covered with rain, ice or snow
● On steep downhills, or where there are sudden changes between sharp up
and down gradients
Vehicle speed may exceed the set speed when driving down a steep hill.
● At entrances to freeways and highways
● When weather conditions are bad enough that they may prevent the sen-
sors from detecting correctly (fog, snow, sandstorm, heavy rain, etc.)
● When there is rain, snow, etc. on the front surface of the radar sensor or
camera sensor
● In traffic conditions that require frequent repeated acceleration and decel-
eration
● When your vehicle is during emergency towing
● When an approach warning buzzer is heard often
Page 401 of 744
4015-5. Using the driving support systems
PRIUS PHV_OM_OM47A89E_(EE)
5
Driving
Example of constant speed cruising
When there are no vehicles ahead
The vehicle travels at the speed set by the driver. The desired vehicle-to-
vehicle distance can also be set by operating the vehicle-to-vehicle dis-
tance button.
Example of deceleration cruising and follow-up cruising
When a preceding vehicle driving slower than the set speed
appears
When a vehicle is detected running ahead of you, the system automatically
decelerates your vehicle. When a greater reduction in vehicle speed is
necessary, the system applies the brakes (the stop lights will come on at
this time). The system will respond to changes in the speed of the vehicle
ahead in order to maintain the vehicle-to-vehicle distance set by the driver.
Approach warning warns you when the system cannot decelerate suffi-
ciently to prevent your vehicle from closing in on the vehicle ahead.
When the vehicle ahead of you stops, your vehicle will also stop (vehicle is
stopped by system control). After the vehicle ahead starts off, pushing the
cruise control lever up or depressing the accelerator pedal will resume fol-
low-up cruising.
Example of acceleration
When there are no longer any preceding vehicles driving slower
than the set speed
The system accelerates until the set speed is reached. The system then
returns to constant speed cruising.
1
2
3
Page 402 of 744
4025-5. Using the driving support systems
PRIUS PHV_OM_OM47A89E_(EE)
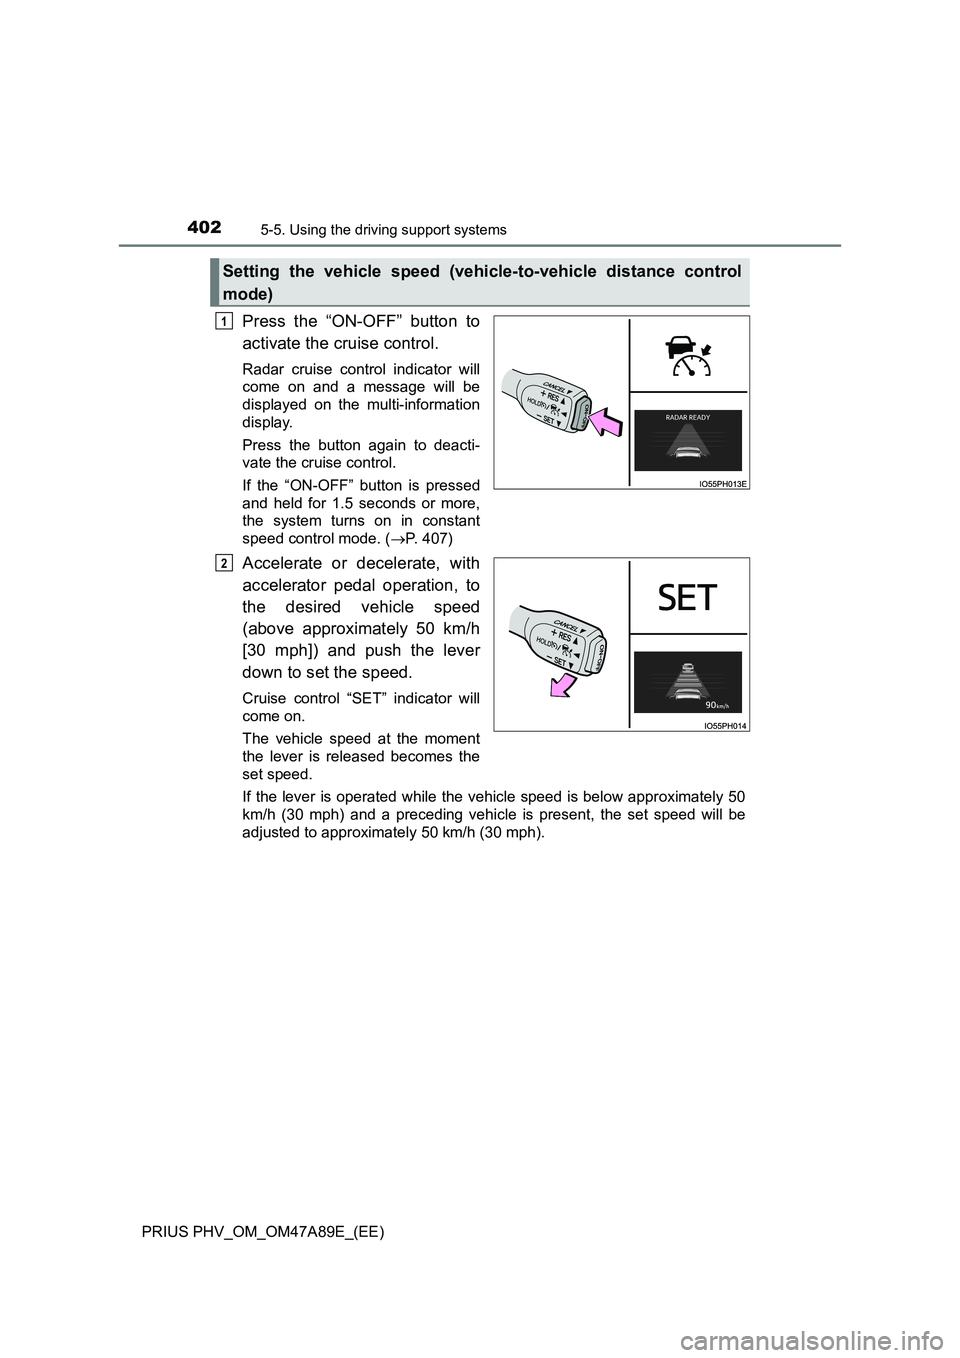
Press the “ON-OFF” button to
activate the cruise control.
Radar cruise control indicator will
come on and a message will be
displayed on the multi-information
display.
Press the button again to deacti-
vate the cruise control.
If the “ON-OFF” button is pressed
and held for 1.5 seconds or more,
the system turns on in constant
speed control mode. (P. 407)
Accelerate or decelerate, with
accelerator pedal operation, to
the desired vehicle speed
(above approximately 50 km/h
[30 mph]) and push the lever
down to set the speed.
Cruise control “SET” indicator will
come on.
The vehicle speed at the moment
the lever is released becomes the
set speed.
If the lever is operated while the vehicle speed is below approximately 50
km/h (30 mph) and a preceding vehicle is present, the set speed will be
adjusted to approximately 50 km/h (30 mph).
Setting the vehicle speed (vehicle-to-vehicle distance control
mode)
1
2
Page 404 of 744
4045-5. Using the driving support systems
PRIUS PHV_OM_OM47A89E_(EE)
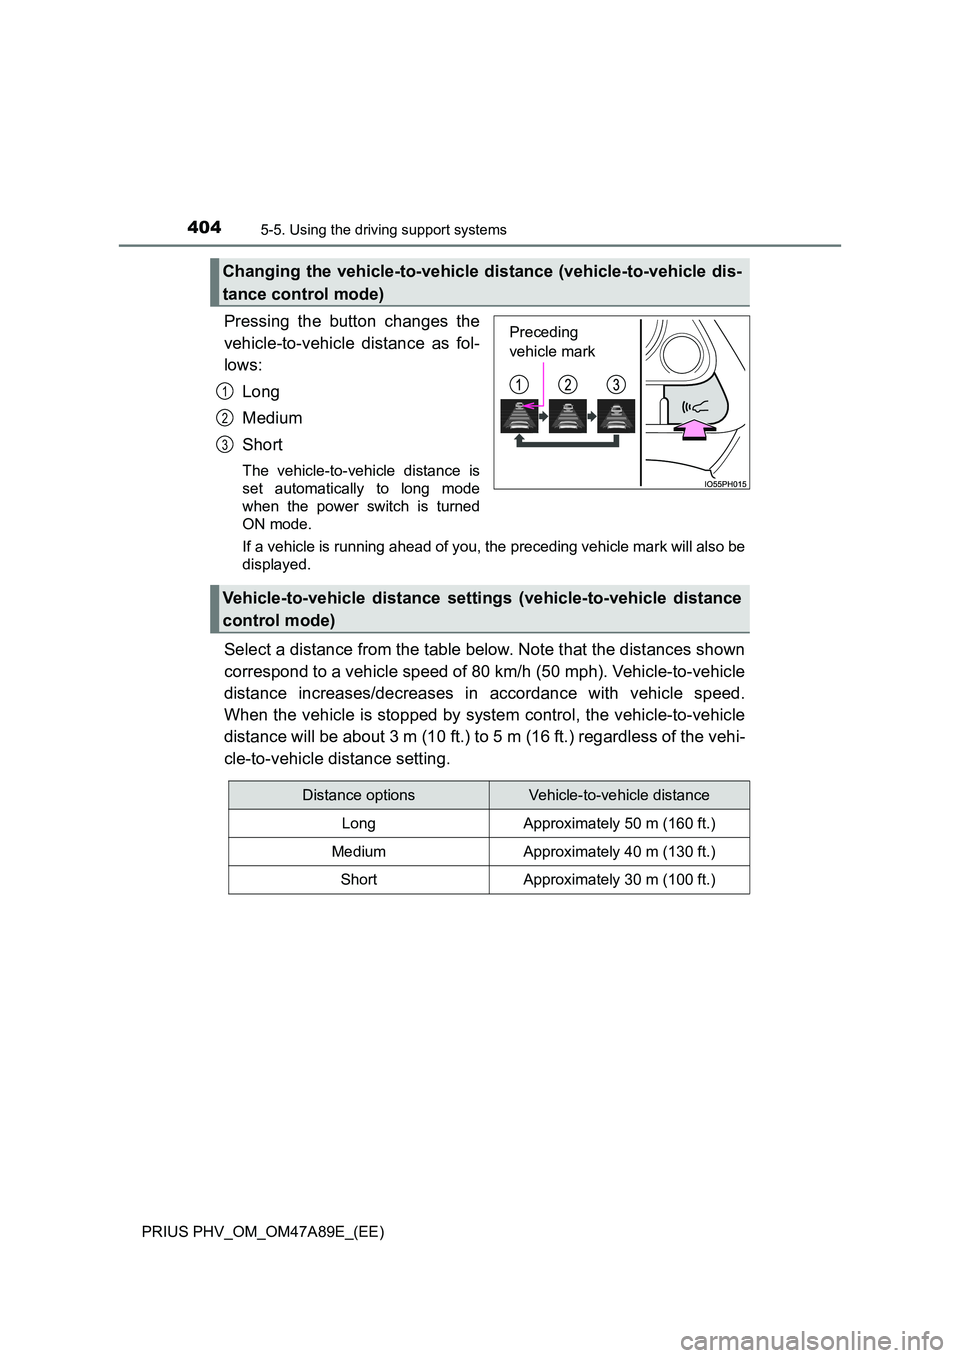
Pressing the button changes the
vehicle-to-vehicle distance as fol-
lows:
Long
Medium
Short
The vehicle-to-vehicle distance is
set automatically to long mode
when the power switch is turned
ON mode.
If a vehicle is running ahead of you, the preceding vehicle mark will also be
displayed.
Select a distance from the table below. Note that the distances shown
correspond to a vehicle speed of 80 km/h (50 mph). Vehicle-to-vehicle
distance increases/decreases in accordance with vehicle speed.
When the vehicle is stopped by system control, the vehicle-to-vehicle
distance will be about 3 m (10 ft.) to 5 m (16 ft.) regardless of the vehi-
cle-to-vehicle distance setting.
Changing the vehicle-to-vehicle distance (vehicle-to-vehicle dis-
tance control mode)
Preceding
vehicle mark
1
2
3
Vehicle-to-vehicle distance settings (vehicle-to-vehicle distance
control mode)
Distance optionsVehicle-to-vehicle distance
LongApproximately 50 m (160 ft.)
MediumApproximately 40 m (130 ft.)
ShortApproximately 30 m (100 ft.)