buttons TOYOTA PRIUS PRIME 2022 Owners Manual
[x] Cancel search | Manufacturer: TOYOTA, Model Year: 2022, Model line: PRIUS PRIME, Model: TOYOTA PRIUS PRIME 2022Pages: 808, PDF Size: 14.72 MB
Page 22 of 808
22Pictorial index
PRIUS PRIME_OM_OM47E74U_(U)
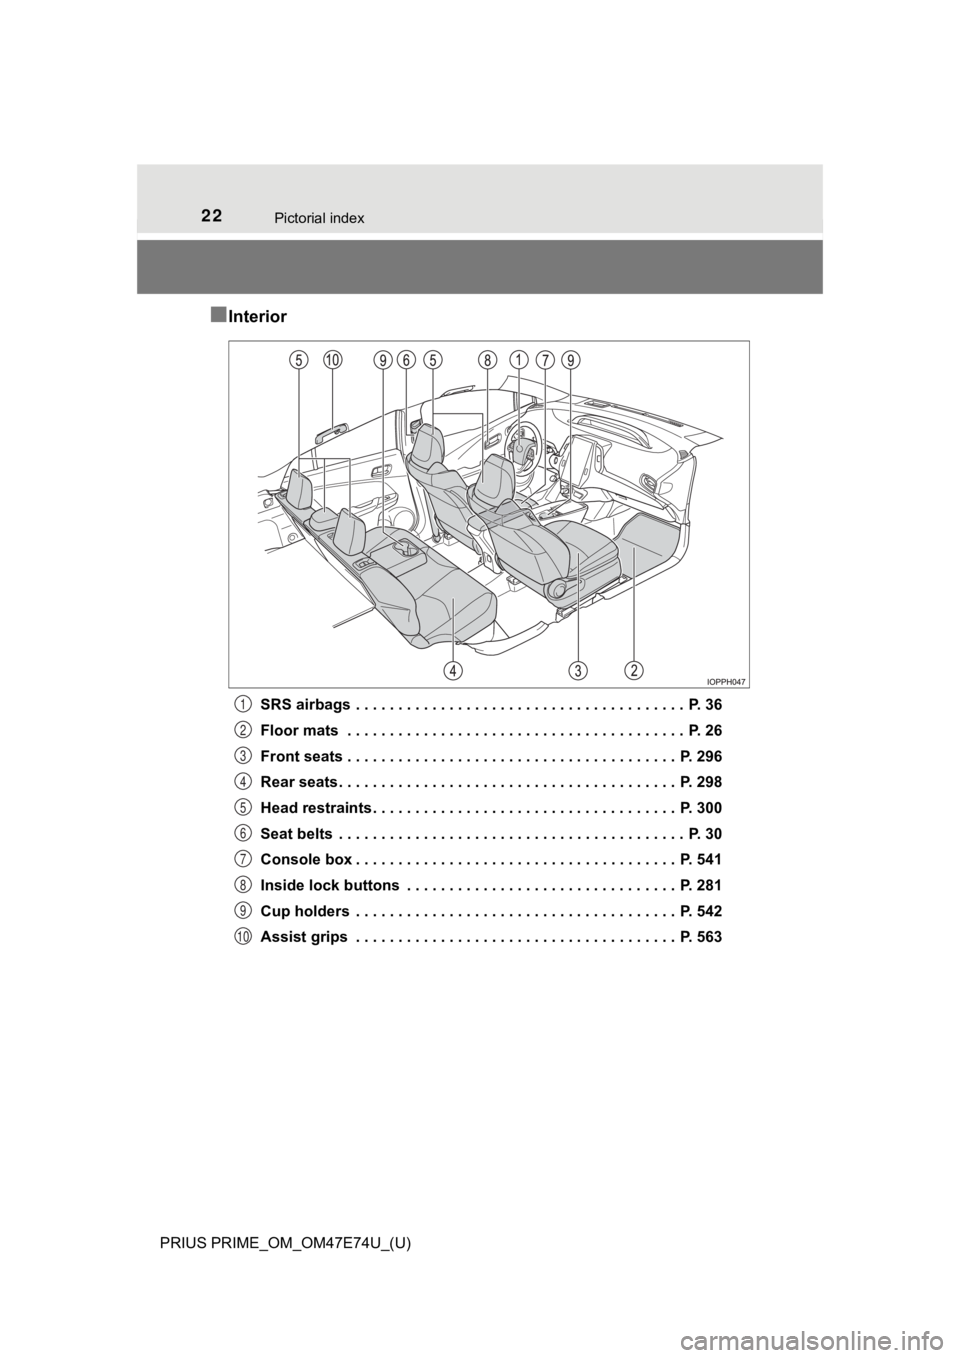
■Interior
SRS airbags . . . . . . . . . . . . . . . . . . . . . . . . . . . . . . . . . . . . . . . P. 36
Floor mats . . . . . . . . . . . . . . . . . . . . . . . . . . . . . . . . . . . . . . . . P. 26
Front seats . . . . . . . . . . . . . . . . . . . . . . . . . . . . . . . . . . . . . . . P. 296
Rear seats . . . . . . . . . . . . . . . . . . . . . . . . . . . . . . . . . . . . . . . . P. 298
Head restraints . . . . . . . . . . . . . . . . . . . . . . . . . . . . . . . . . . . . P. 300
Seat belts . . . . . . . . . . . . . . . . . . . . . . . . . . . . . . . . . . . . . . . . . P. 30
Console box . . . . . . . . . . . . . . . . . . . . . . . . . . . . . . . . . . . . . . P. 541
Inside lock buttons . . . . . . . . . . . . . . . . . . . . . . . . . . . . . . . . P. 281
Cup holders . . . . . . . . . . . . . . . . . . . . . . . . . . . . . . . . . . . . . . P. 542
Assist grips . . . . . . . . . . . . . . . . . . . . . . . . . . . . . . . . . . . . . . P. 5631
2
3
4
5
6
7
8
9
10
Page 70 of 808
701-2. Child safety
PRIUS PRIME_OM_OM47E74U_(U)■
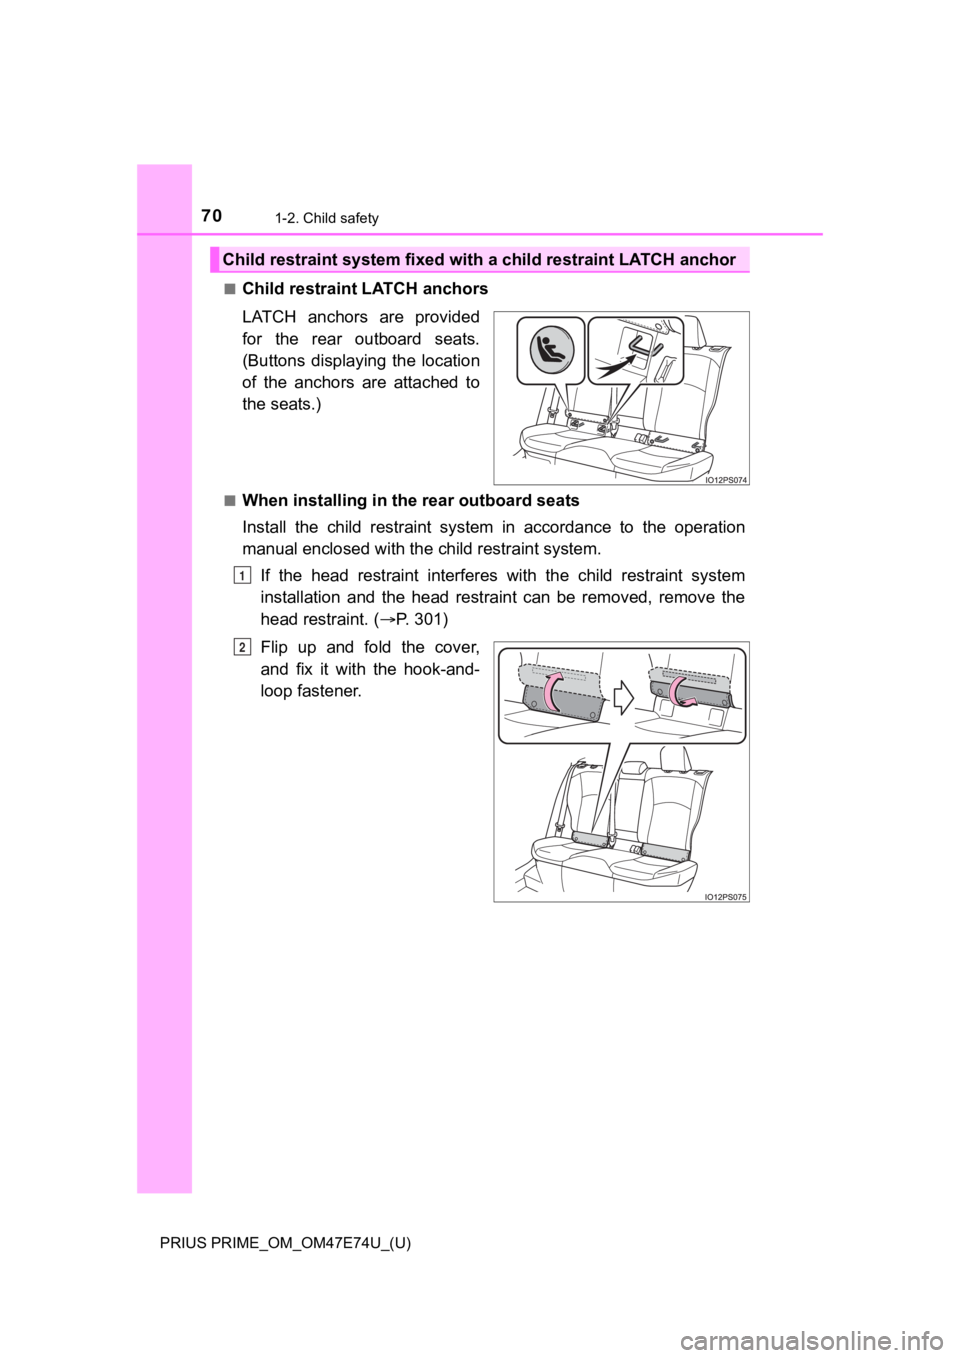
Child restraint LATCH anchors
LATCH anchors are provided
for the rear outboard seats.
(Buttons displaying the location
of the anchors are attached to
the seats.)
■When installing in the rear outboard seats
Install the child restraint system in accordance to the operati
on
manual enclosed with the child restraint system.
If the head restraint interferes with the child restraint syste m
installation and the head restraint can be removed, remove the
head restraint. ( P. 301)
Flip up and fold the cover,
and fix it with the hook-and-
loop fastener.
Child restraint system fixed with a child restraint LATCH ancho r
1
2
Page 174 of 808
174
PRIUS PRIME_OM_OM47E74U_(U)
2-2. Charging
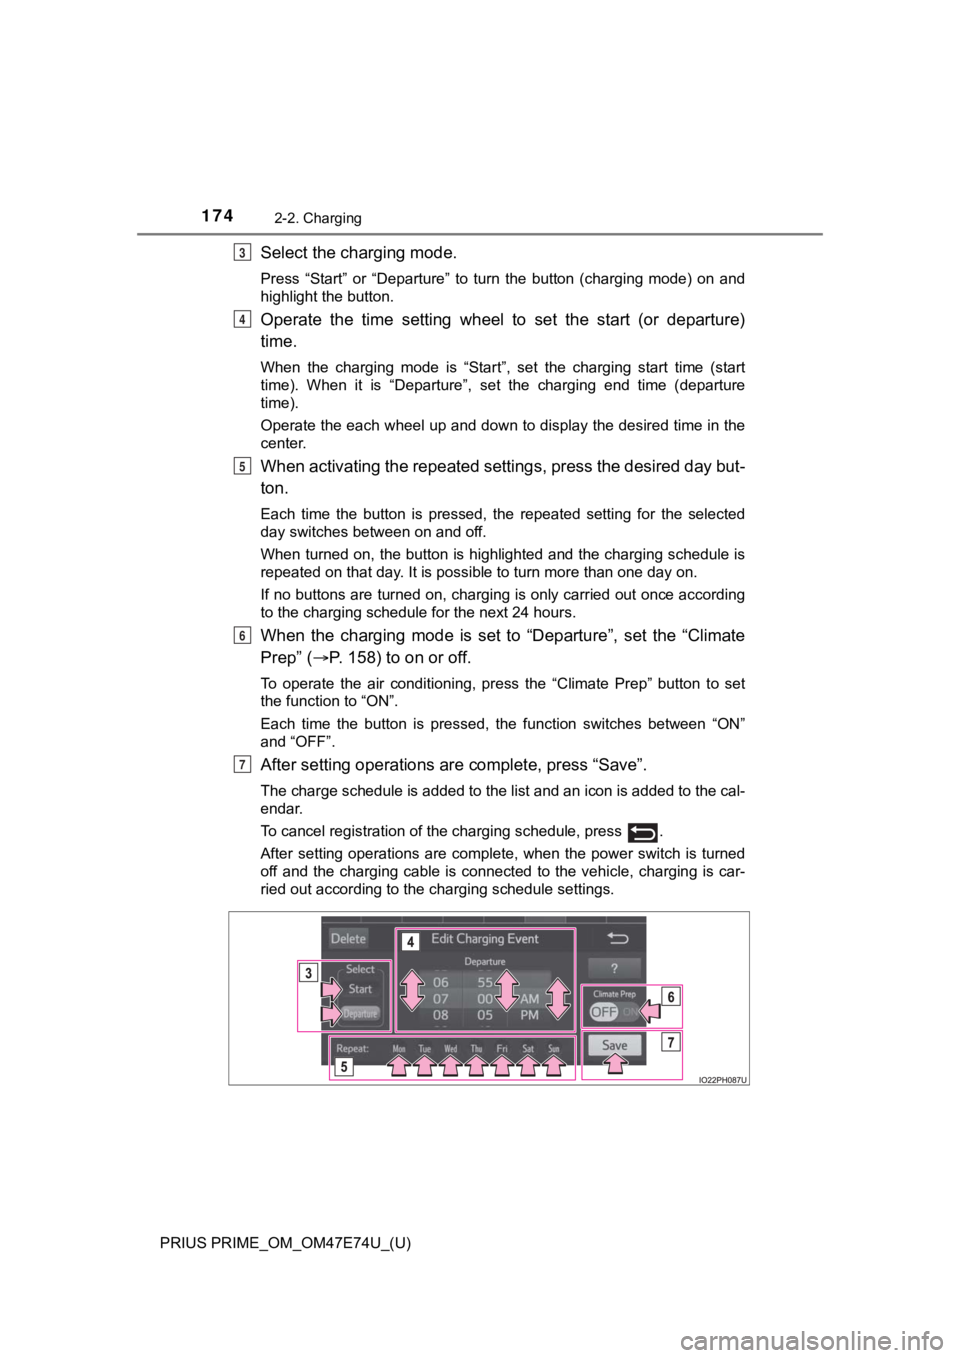
Select the charging mode.
Press “Start” or “Departure” to turn the button (charging mode) on and
highlight the button.
Operate the time setting wheel to set the start (or departure)
time.
When the charging mode is “Start”, set the charging start time (start
time). When it is “Departure”, set the charging end time (depar ture
time).
Operate the each wheel up and down to display the desired time in the
center.
When activating the repeated settings, press the desired day bu t-
ton.
Each time the button is pressed, the repeated setting for the selected
day switches between on and off.
When turned on, the button is highlighted and the charging sche dule is
repeated on that day. It is possible to turn more than one day on.
If no buttons are turned on, charging is only carried out once according
to the charging schedule for the next 24 hours.
When the charging mode is set to “Departure”, set the “Climate
Prep” ( P. 158) to on or off.
To operate the air conditioning, press the “Climate Prep” butto n to set
the function to “ON”.
Each time the button is pressed, the function switches between “ON”
and “OFF”.
After setting operations are complete, press “Save”.
The charge schedule is added to the list and an icon is added to the cal-
endar.
To cancel registration of the charging schedule, press .
After setting operations are complete, when the power switch is turned
off and the charging cable is connected to the vehicle, charging is car-
ried out according to the charging schedule settings.
3
4
5
6
7
Page 275 of 808
PRIUS PRIME_OM_OM47E74U_(U)
2754-1. Key information
4
Operation of each component
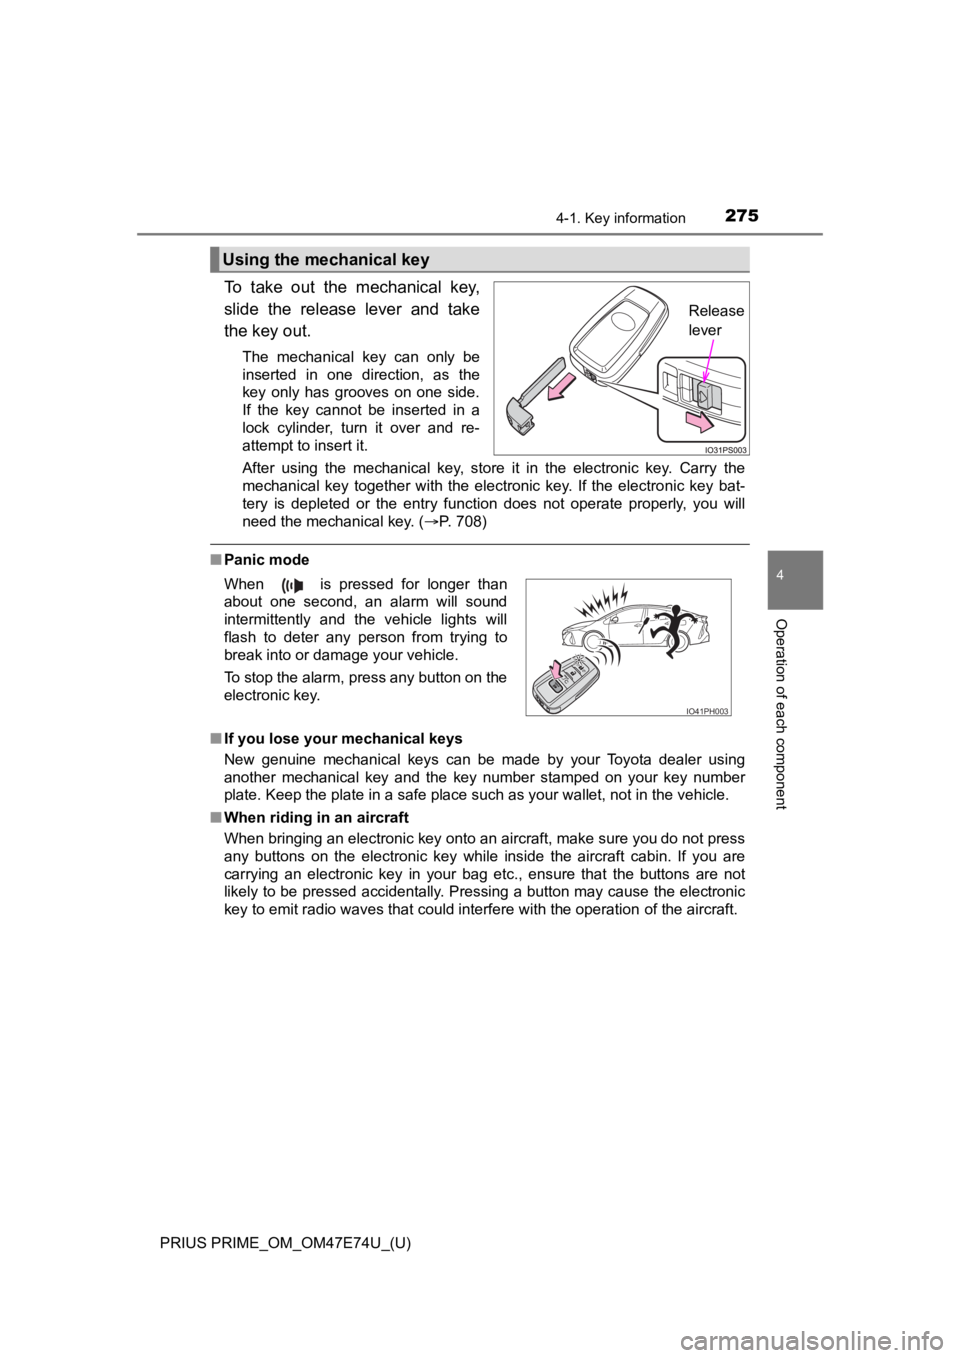
To take out the mechanical key,
slide the release lever and take
the key out.
The mechanical key can only be
inserted in one direction, as the
key only has grooves on one side.
If the key cannot be inserted in a
lock cylinder, turn it over and re-
attempt to insert it.
After using the mechanical key, store it in the electronic key. Carry the
mechanical key together with the electronic key. If the electronic key bat-
tery is depleted or the entry function does not operate properl y, you will
need the mechanical key. ( P. 708)
■Panic mode
■ If you lose your mechanical keys
New genuine mechanical keys can be made by your Toyota dealer using
another mechanical key and the key number stamped on your key n umber
plate. Keep the plate in a safe place such as your wallet, not in the vehicle.
■ When riding in an aircraft
When bringing an electronic key onto an aircraft, make sure you do not press
any buttons on the electronic key while inside the aircraft cabin. If you are
carrying an electronic key in your bag etc., ensure that the buttons are not
likely to be pressed accidentally. Pressing a button may cause the electronic
key to emit radio waves that could interfere with the operation of the aircraft.
Using the mechanical key
Release
lever
When is pressed for longer than
about one second, an alarm will sound
intermittently and the vehicle lights will
flash to deter any person from trying to
break into or damage your vehicle.
To stop the alarm, press any button on the
electronic key.
IO41PH003
Page 281 of 808
PRIUS PRIME_OM_OM47E74U_(U)
2814-2. Opening, closing and locking the doors
4
Operation of each component
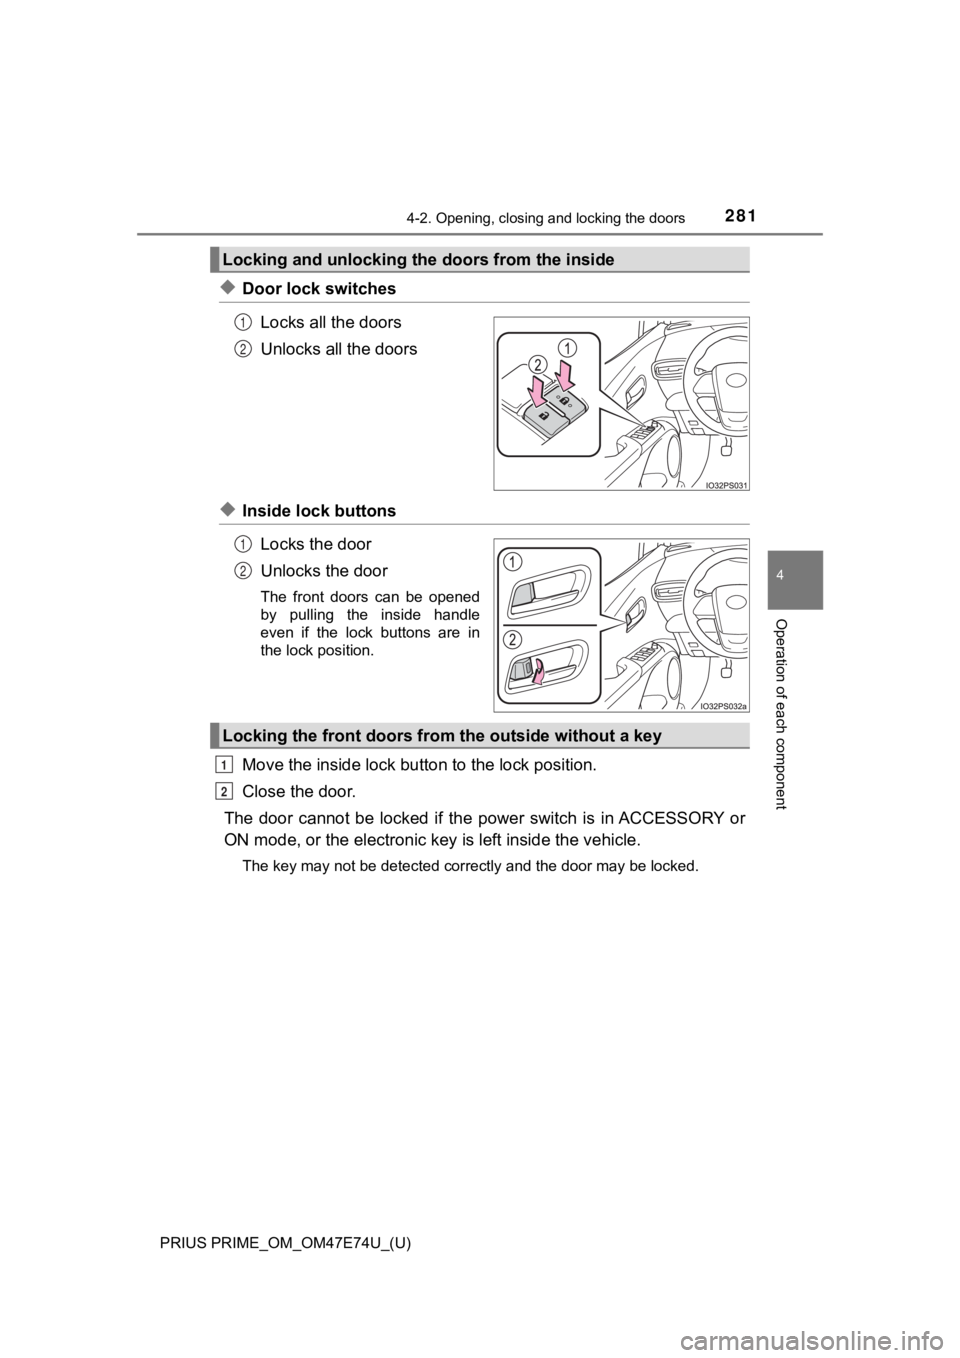
◆Door lock switchesLocks all the doors
Unlocks all the doors
◆Inside lock buttonsLocks the door
Unlocks the door
The front doors can be opened
by pulling the inside handle
even if the lock buttons are in
the lock position.
Move the inside lock bu tton to the lock position.
Close the door.
The door cannot be locked if the p ower switch is in ACCESSORY or
ON mode, or the electronic key is left inside the vehicle.
The key may not be detected correctly and the door may be locke d.
Locking and unlocking the doors from the inside
1
2
1
2
Locking the front doors from the outside without a key
1
2
Page 283 of 808
PRIUS PRIME_OM_OM47E74U_(U)
2834-2. Opening, closing and locking the doors
4
Operation of each component
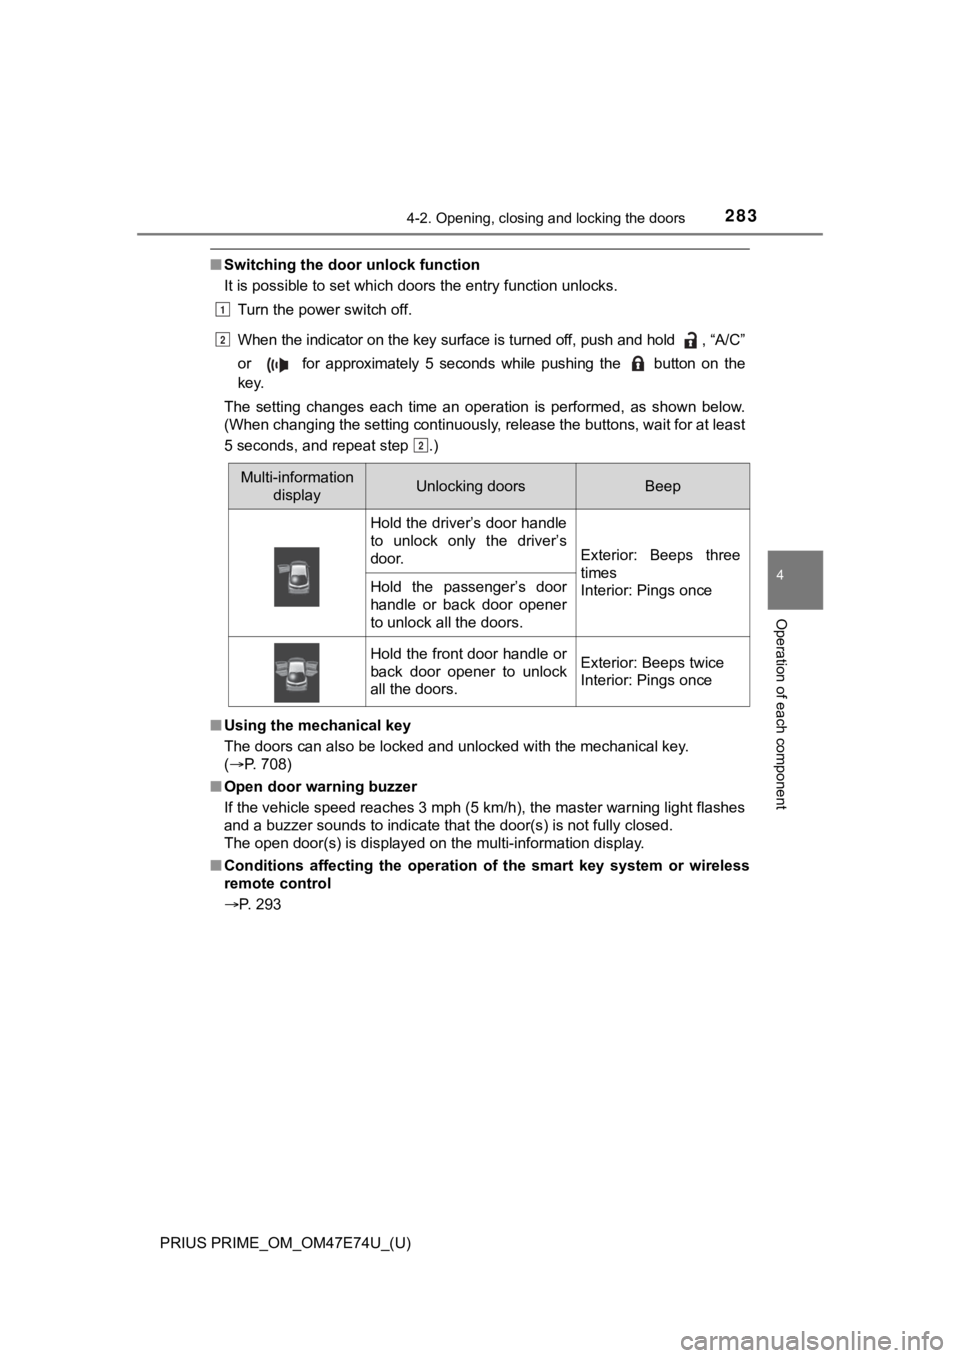
■Switching the door unlock function
It is possible to set which doors the entry function unlocks.
Turn the power switch off.
When the indicator on the key surface is turned off, push and h old , “A/C”
or for approximately 5 seconds while pushing the button on th e
key.
The setting changes each time an operation is performed, as sho wn below.
(When changing the setting continuously, release the buttons, w ait for at least
5 seconds, and repeat step .)
■ Using the mechanical key
The doors can also be locked and unlocked with the mechanical k ey.
( P. 708)
■ Open door warning buzzer
If the vehicle speed reaches 3 mph (5 km/h), the master warning light flashes
and a buzzer sounds to indicate that the door(s) is not fully c losed.
The open door(s) is displayed on the multi-information display.
■ Conditions affecting the operation of the smart key system or w ireless
remote control
P. 293
Multi-information
displayUnlocking doorsBeep
Hold the driver’s door handle
to unlock only the driver’s
door.
Exterior: Beeps three
times
Interior: Pings once
Hold the passenger’s door
handle or back door opener
to unlock all the doors.
Hold the front door handle or
back door opener to unlock
all the doors.Exterior: Beeps twice
Interior: Pings once
1
2
2
Page 284 of 808
284
PRIUS PRIME_OM_OM47E74U_(U)
4-2. Opening, closing and locking the doors
■Rear seat reminder function
●In order to remind you not to forget luggage, etc. in the rear seat, when the
power switch is turned off after any of the following condition s are met, a
buzzer will sound and a message will be displayed on the multi- information
display for approximately 6 seconds.
• The hybrid system is started within 10 minutes after opening and closing
a rear door.
• A rear door has been opened and closed after the hybrid system was
started.
However, if a rear door is opened and then closed within approximately 2
seconds, the rear seat reminder function may not operate.
● The rear seat reminder function determines that luggage, etc. has been
placed in a rear seat based on opening and closing of a rear door. There-
fore, depending on the situation, the rear seat reminder function may not
operate and you may still forget luggage, etc. in the rear seat, or it may
operate unnecessarily.
● The rear seat reminder function can be enabled/disabled. ( P. 749)
■ Customization
Settings (e.g. unlocking function using a key) can be changed.
(Customizable features: P. 749)
WARNING
■To prevent an accident
Observe the following precautions while driving the vehicle.
Failure to do so may result in a door opening and an occupant could be
thrown out of the vehicle, resulting in death or serious injury.
● Ensure that all doors are properly closed and locked.
● Do not pull the inside handle of the doors while driving.
Be especially careful for the front doors, as the doors may be opened even
if the inside lock buttons are in locked position.
● Set the rear door child-protector locks when children are seated in the rear
seats.
■ When opening or closing a door
Check the surroundings of the vehicle such as whether the vehicle is on an
incline, whether there is enough space for a door to open and w hether a
strong wind is blowing. When opening or closing the door, hold the door
handle tightly to prepare for any unpredictable movement.
■ When using the wireless remote control and operating the power win-
dows
Operate the power window after checking to make sure that there is no pos-
sibility of any passenger having any of their body parts caught in the side
window. Also, do not allow children to operate the wireless rem ote control. It
is possible for children and other passengers to get caught in the power
window.
Page 292 of 808
292
PRIUS PRIME_OM_OM47E74U_(U)
4-2. Opening, closing and locking the doors
■When “Smart Key System malfuncti on See owner’s manual” is dis-
played on the multi-information display
The system may be malfunctioning. Have the vehicle inspected by your
Toyota dealer immediately.
■ Battery-saving function
The battery-saving function will be activated in order to preve nt the electronic
key battery and the 12-volt battery from being discharged while the vehicle is
not in operation for a long time.
● In the following situations, the smart key system may take some time to
unlock the doors.
• The electronic key has been left in an area of approximately 6 ft. (2 m) of
the outside of the vehicle for 10 minutes or longer.
• The smart key system has not been used for 5 days or longer.
● If the smart key system has not been used for 14 days or longer , the doors
cannot be unlocked at any doors except the driver’s door. In th is case, take
hold of the driver’s door handle, or use the wireless remote co ntrol or the
mechanical key, to unlock the doors.
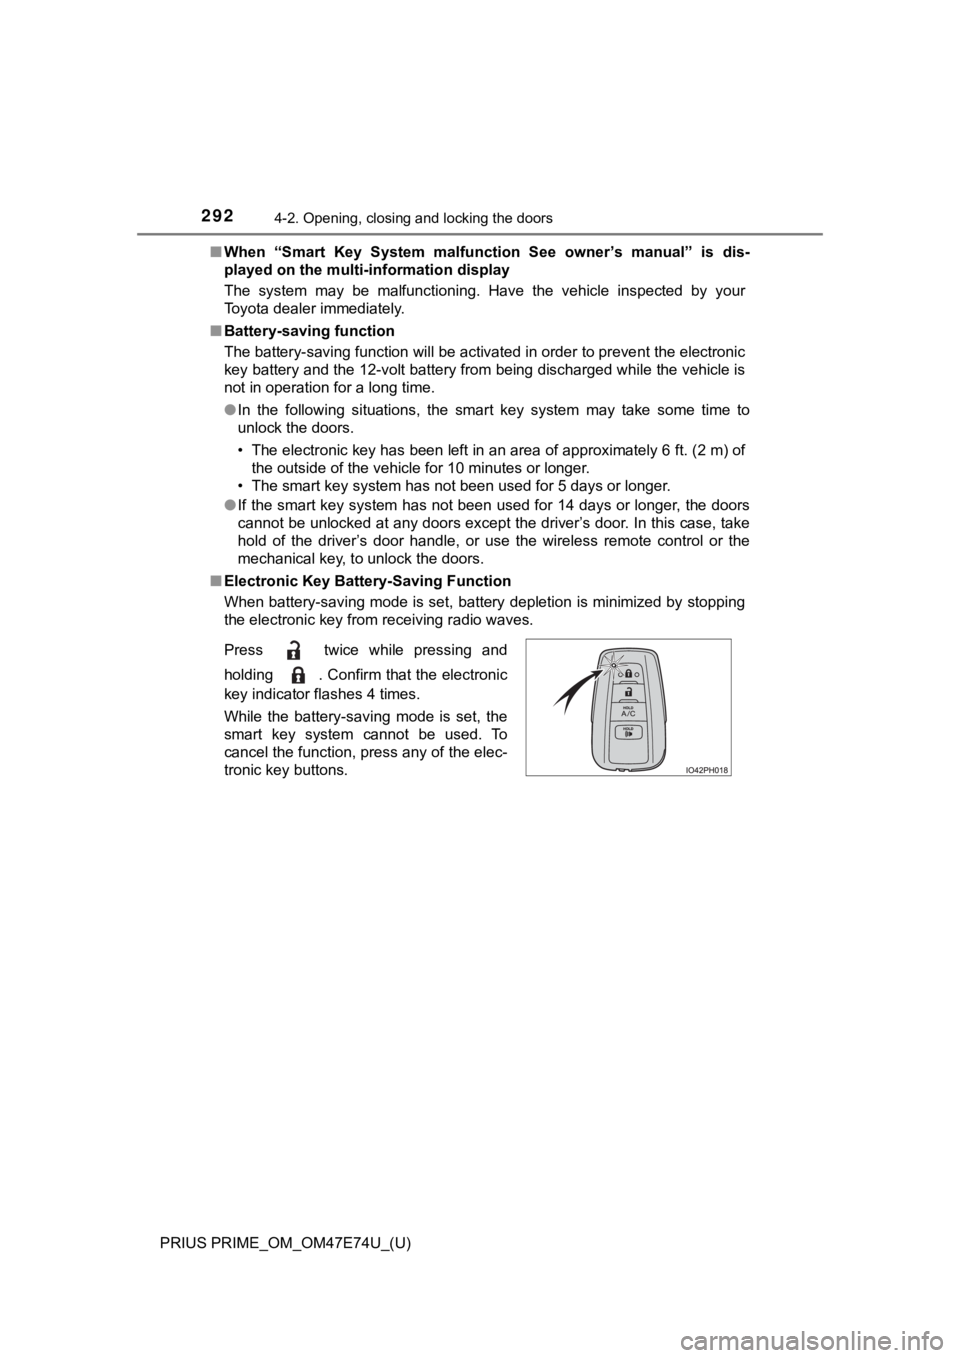
■ Electronic Key Battery-Saving Function
When battery-saving mode is set, battery depletion is minimized by stopping
the electronic key from receiving radio waves.
Press twice while pressing and
holding . Confirm that the electronic
key indicator flashes 4 times.
While the battery-saving mode is set, the
smart key system cannot be used. To
cancel the function, press any of the elec-
tronic key buttons.
Page 301 of 808
PRIUS PRIME_OM_OM47E74U_(U)
3014-3. Adjusting the seats
4
Operation of each component
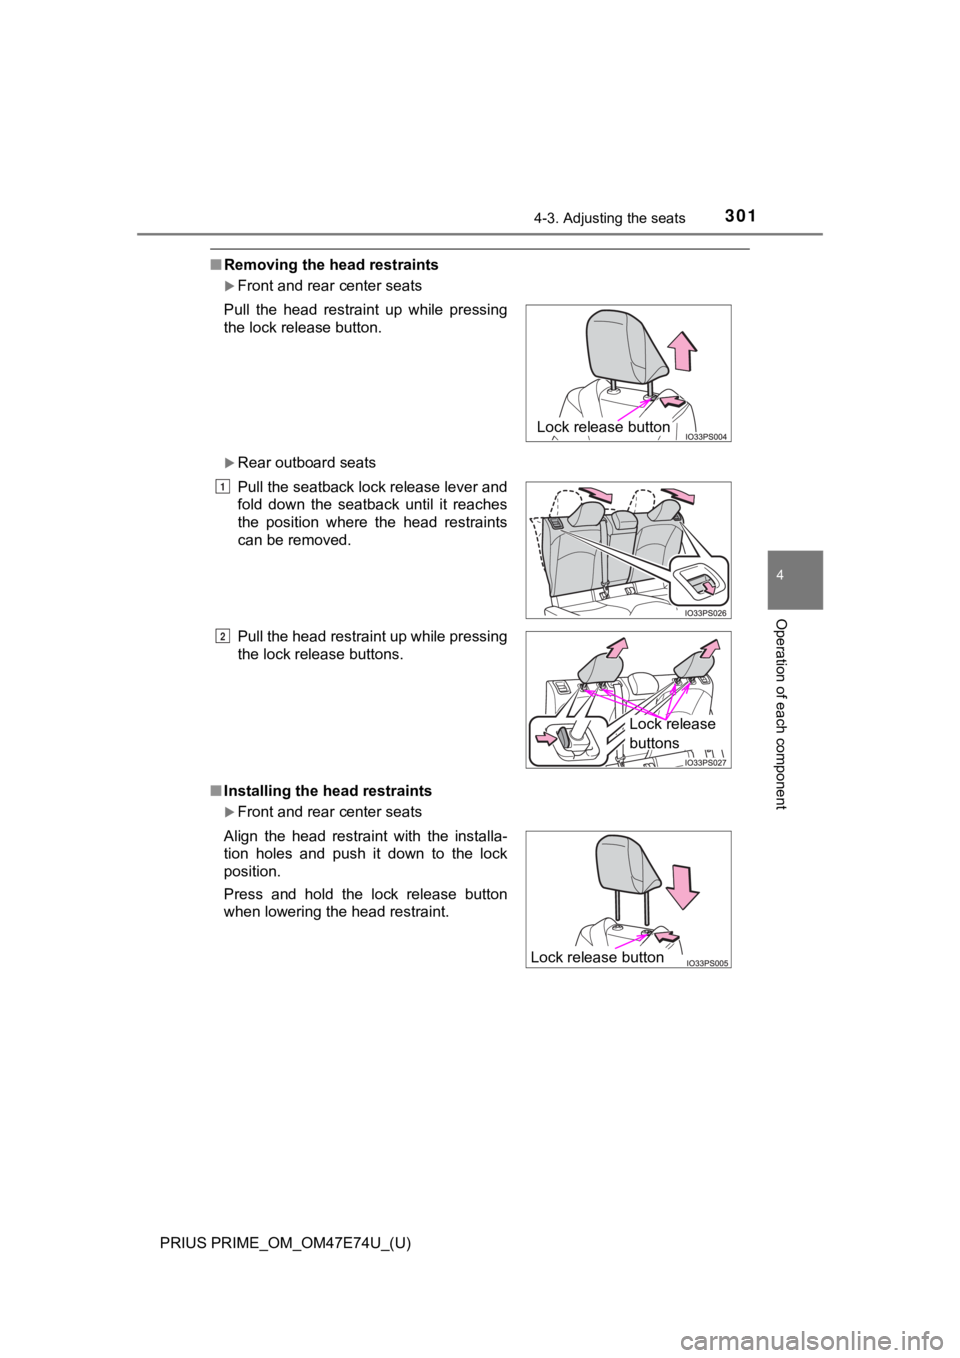
■Removing the head restraints
Front and rear center seats
Rear outboard seats
■ Installing the head restraints
Front and rear center seats
Pull the head restraint up while pressing
the lock release button.
Pull the seatback lock release lever and
fold down the seatback until it reaches
the position where the head restraints
can be removed.
Pull the head restraint up while pressing
the lock release buttons.
Align the head restraint with the installa-
tion holes and push it down to the lock
position.
Press and hold the lock release button
when lowering the head restraint.
Lock release button
1
2
Lock release
buttons
Lock release button
Page 564 of 808
564
PRIUS PRIME_OM_OM47E74U_(U)
6-4. Using the other interior features
Garage door opener
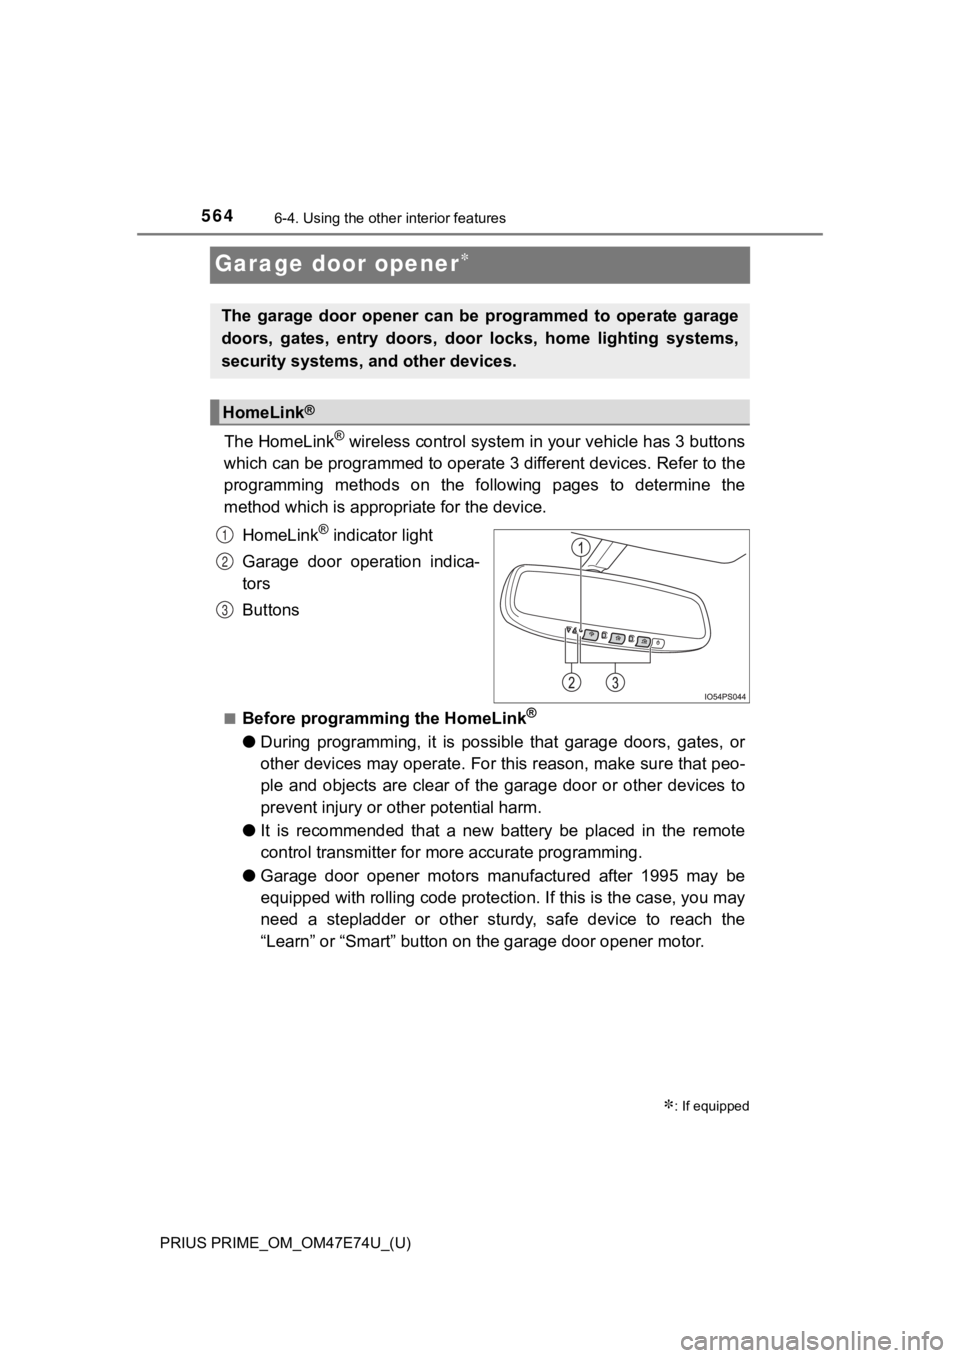
The HomeLink® wireless control system in your vehicle has 3 buttons
which can be programmed to operate 3 different devices. Refer to the
programming methods on the following pages to determine the
method which is approp riate for the device.
HomeLink
® indicator light
Garage door operation indica-
tors
Buttons
■Before programming the HomeLink®
● During programming, it is possible that garage doors, gates, or
other devices may operate. For this reason, make sure that peo-
ple and objects are clear of the garage door or other devices t o
prevent injury or other potential harm.
● It is recommended that a new battery be placed in the remote
control transmitter for mo re accurate programming.
● Garage door opener motors manufactured after 1995 may be
equipped with rolling code pro tection. If this is the case, you may
need a stepladder or other sturdy, safe device to reach the
“Learn” or “Smart” button on the garage door opener motor.
: If equipped
The garage door opener can be programmed to operate garage
doors, gates, entry doors, door locks, home lighting systems,
security systems, and other devices.
HomeLink®
1
2
3