fuse box TOYOTA PRIUS PRIME 2023 Owners Manual
[x] Cancel search | Manufacturer: TOYOTA, Model Year: 2023, Model line: PRIUS PRIME, Model: TOYOTA PRIUS PRIME 2023Pages: 680, PDF Size: 14.97 MB
Page 457 of 680
4576-4. Using the other interior features
6
Interior features
The USB Type-C charging ports
are used to supply 3 A of elec-
tricity at 5 V to external devices.
The USB Type-C charging ports
are for charging only. They are
not designed for data transfer or
other purposes.
Depending on the external
device, it may not charge prop-
erly. Refer to the manual
included with the device before
using a USB Type-C charging
port.
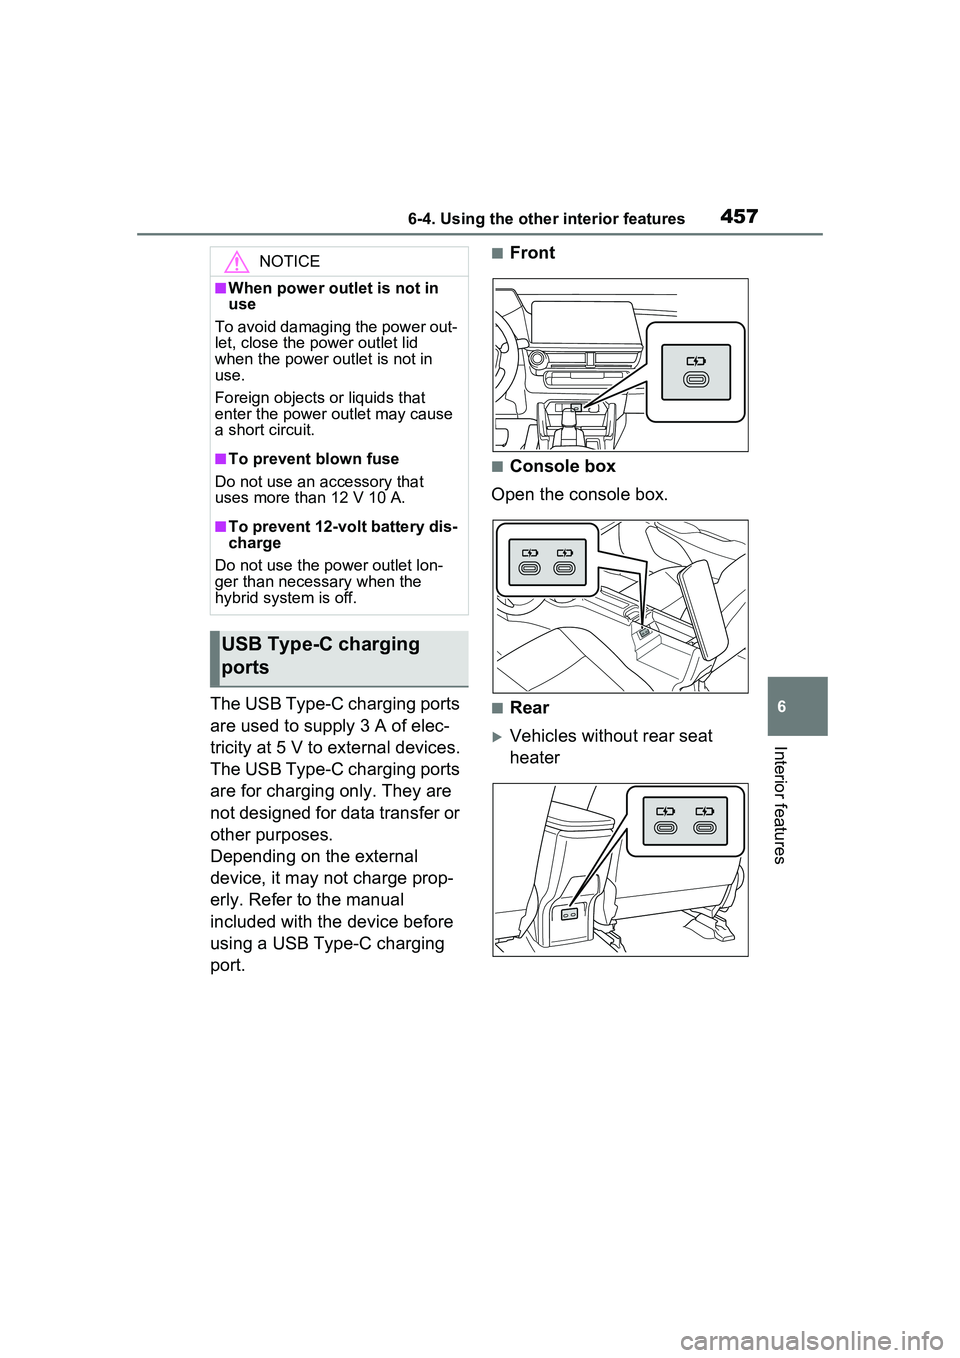
■Front
■Console box
Open the console box.
■Rear
Vehicles without rear seat
heater
NOTICE
■When power outlet is not in
use
To avoid damaging the power out-
let, close the power outlet lid
when the power outlet is not in
use.
Foreign objects or liquids that
enter the power outlet may cause
a short circuit.
■To prevent blown fuse
Do not use an accessory that
uses more than 12 V 10 A.
■To prevent 12-volt battery dis-
charge
Do not use the power outlet lon-
ger than necessary when the
hybrid system is off.
USB Type-C charging
ports
Page 504 of 680
5047-3. Do-it-yourself maintenance
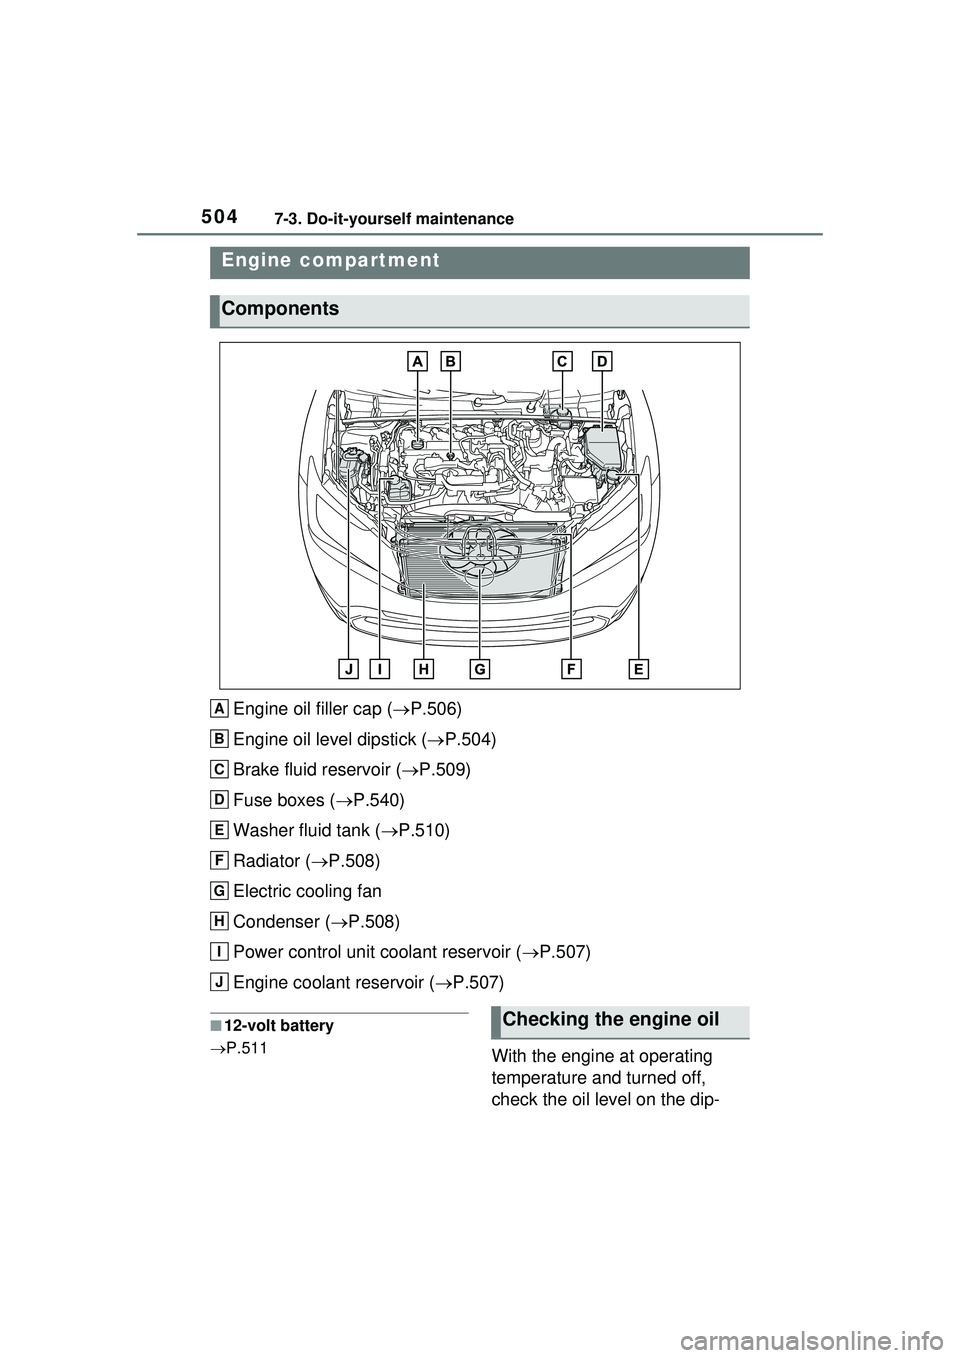
Engine oil filler cap (P.506)
Engine oil level dipstick ( P.504)
Brake fluid reservoir ( P.509)
Fuse boxes ( P.540)
Washer fluid tank ( P.510)
Radiator ( P.508)
Electric cooling fan
Condenser ( P.508)
Power control unit coolant reservoir ( P.507)
Engine coolant reservoir ( P.507)
■12-volt battery
P.511
With the engine at operating
temperature and turned off,
check the oil level on the dip-
Engine compartment
Components
A
B
C
D
E
F
G
H
I
J
Checking the engine oil
Page 540 of 680
5407-3. Do-it-yourself maintenance
1Turn the power switch off.
Confirm that the charging connec-
tor is not connected.
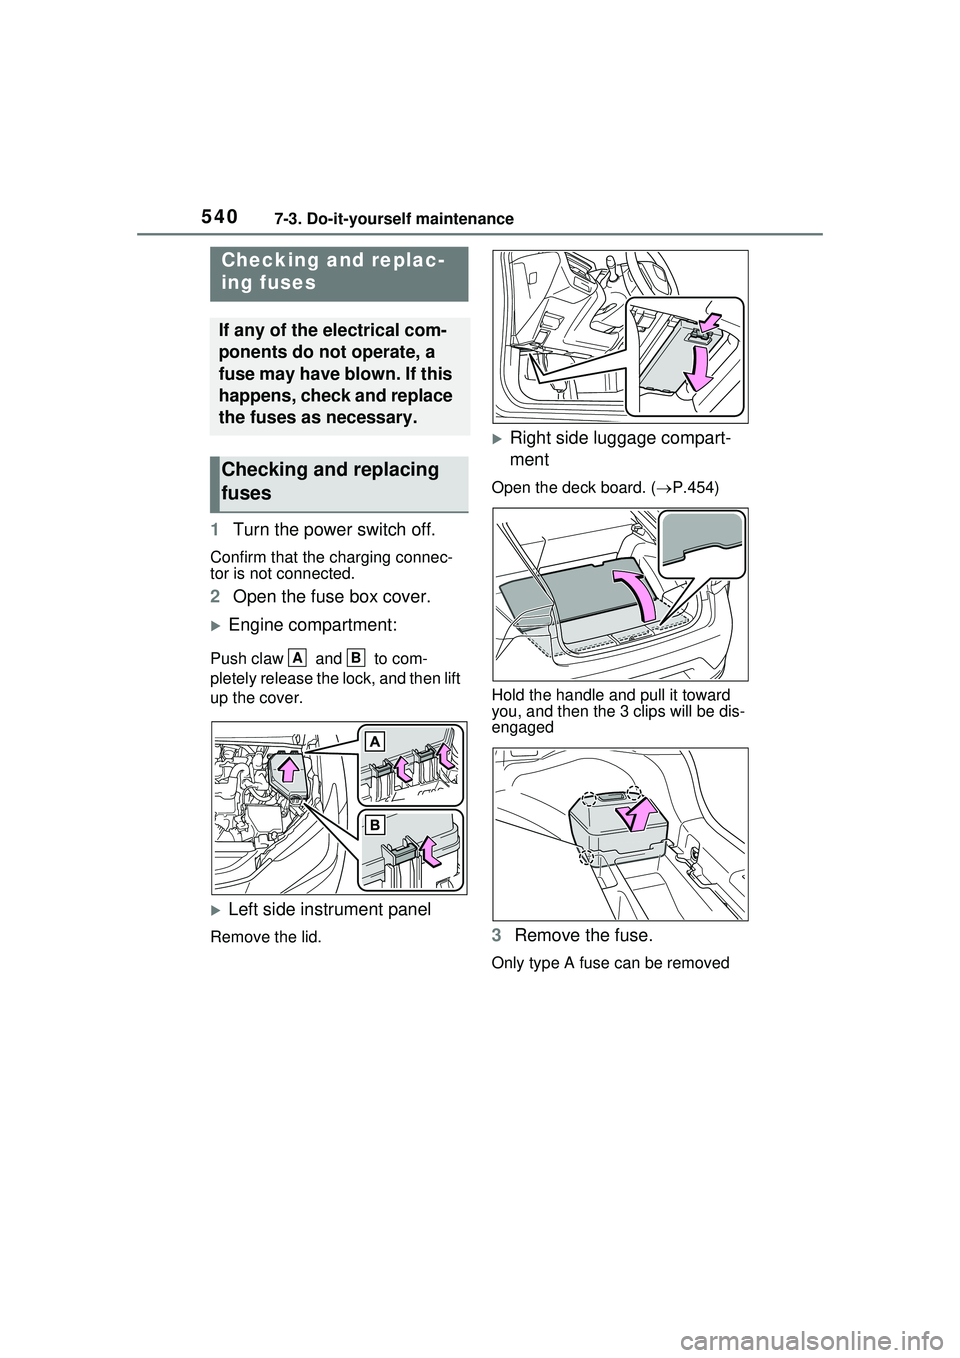
2Open the fuse box cover.
Engine compartment:
Push claw and to com-
pletely release the lock, and then lift
up the cover.
Left side instrument panel
Remove the lid.
Right side luggage compart-
ment
Open the deck board. ( P.454)
Hold the handle and pull it toward
you, and then the 3 clips will be dis-
engaged
3 Remove the fuse.
Only type A fuse can be removed
Checking and replac-
ing fuses
If any of the electrical com-
ponents do not operate, a
fuse may have blown. If this
happens, check and replace
the fuses as necessary.
Checking and replacing
fuses
AB
Page 541 of 680
5417-3. Do-it-yourself maintenance
7
Maintenance and care
using the pullout tool.
4Check if the fuse is blown.
Replace the blown fuse with a new
fuse of an appropriate amperage
rating. The amperage rating can be
found on the fuse box lid.
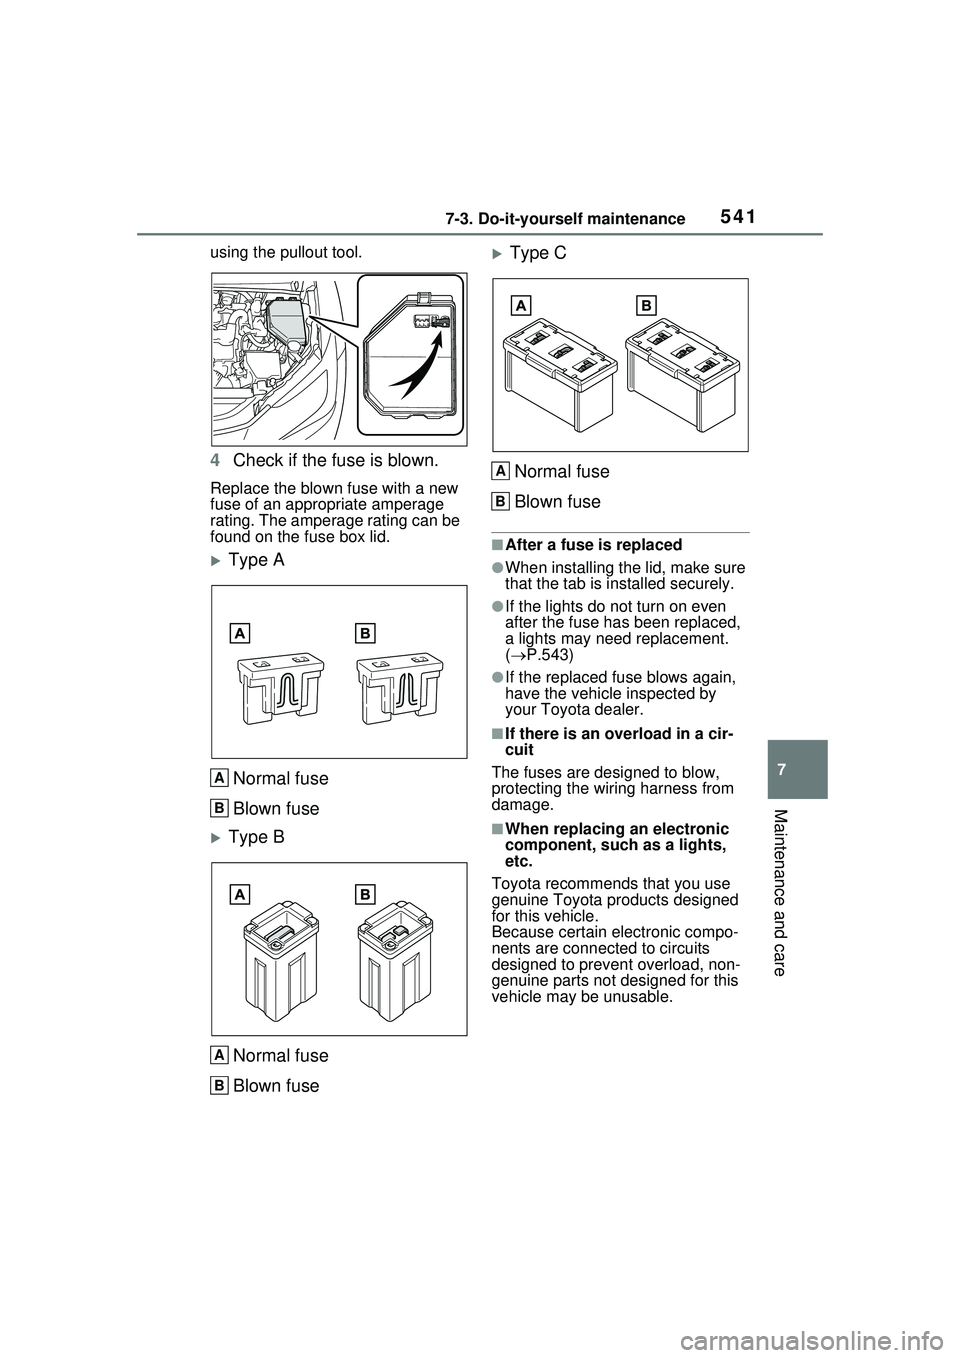
Type A
Normal fuse
Blown fuse
Type BNormal fuse
Blown fuse
Type CNormal fuse
Blown fuse
■After a fuse is replaced
●When installing the lid, make sure
that the tab is in stalled securely.
●If the lights do not turn on even
after the fuse has been replaced,
a lights may need replacement.
( P.543)
●If the replaced fuse blows again,
have the vehicle inspected by
your Toyota dealer.
■If there is an overload in a cir-
cuit
The fuses are designed to blow,
protecting the wiring harness from
damage.
■When replacing an electronic
component, such as a lights,
etc.
Toyota recommends that you use
genuine Toyota products designed
for this vehicle.
Because certain electronic compo-
nents are connected to circuits
designed to prevent overload, non-
genuine parts not designed for this
vehicle may be unusable.
A
B
A
B
A
B
Page 542 of 680
5427-3. Do-it-yourself maintenance
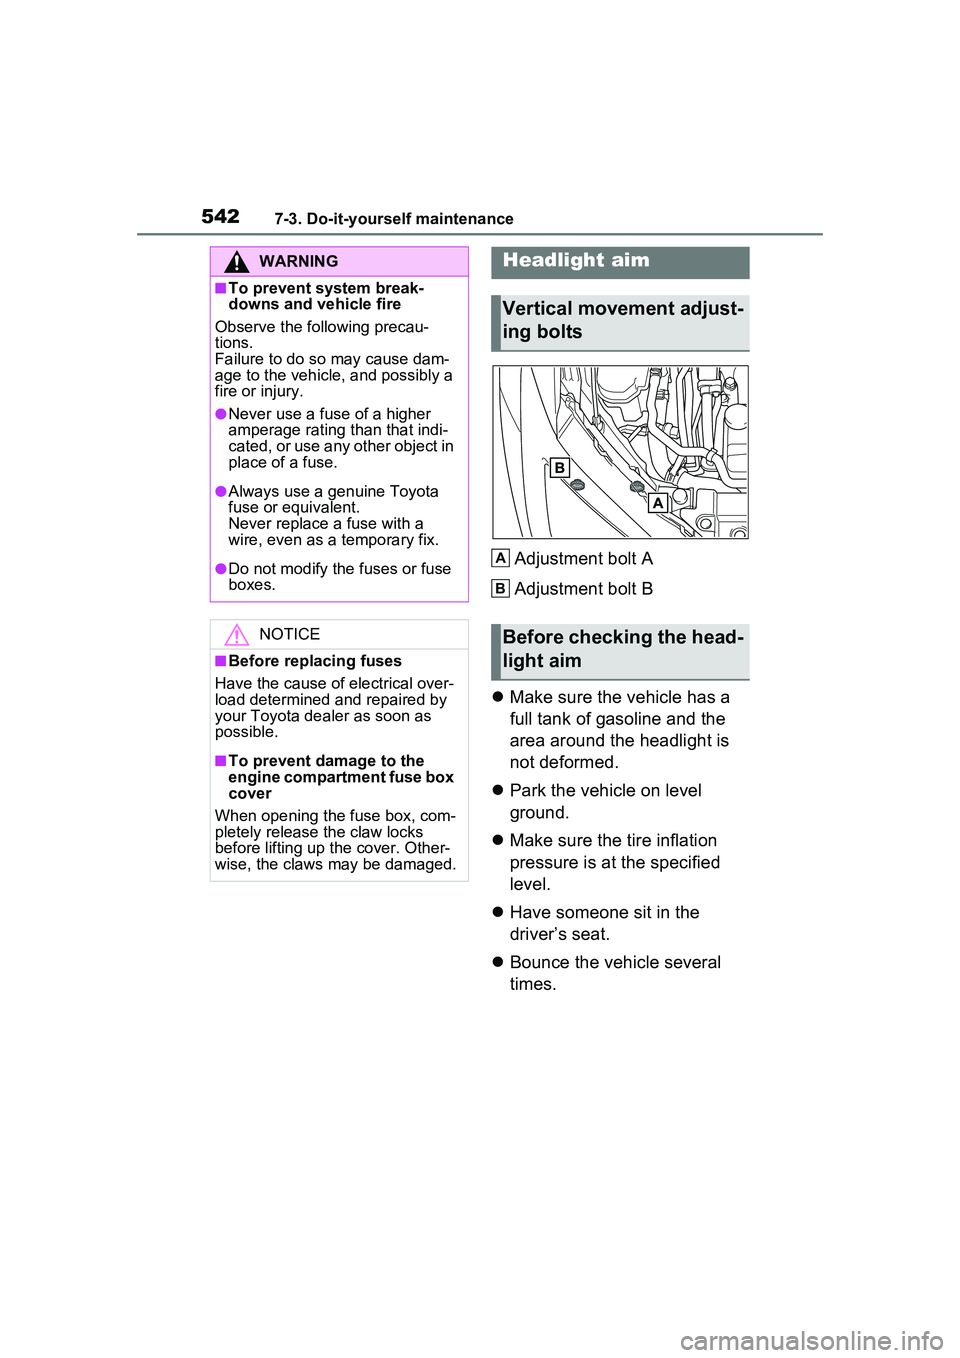
Adjustment bolt A
Adjustment bolt B
Make sure the vehicle has a
full tank of gasoline and the
area around the headlight is
not deformed.
Park the vehicle on level
ground.
Make sure the tire inflation
pressure is at the specified
level.
Have someone sit in the
driver’s seat.
Bounce the vehicle several
times.
WARNING
■To prevent system break-
downs and vehicle fire
Observe the following precau-
tions.
Failure to do so may cause dam-
age to the vehicle, and possibly a
fire or injury.
●Never use a fuse of a higher
amperage rating than that indi-
cated, or use any other object in
place of a fuse.
●Always use a genuine Toyota
fuse or equivalent.
Never replace a fuse with a
wire, even as a temporary fix.
●Do not modify the fuses or fuse
boxes.
NOTICE
■Before replacing fuses
Have the cause of electrical over-
load determined and repaired by
your Toyota dealer as soon as
possible.
■To prevent damage to the
engine compartment fuse box
cover
When opening the fuse box, com-
pletely release the claw locks
before lifting up the cover. Other-
wise, the claws may be damaged.
Headlight aim
Vertical movement adjust-
ing bolts
Before checking the head-
light aim
A
B
Page 589 of 680
5898-2. Steps to take in an emergency
8
When trouble arises
If you have a set of jumper (or
booster) cables and a second
vehicle with a 12-volt battery,
you can jump start your vehicle
by following the steps below.
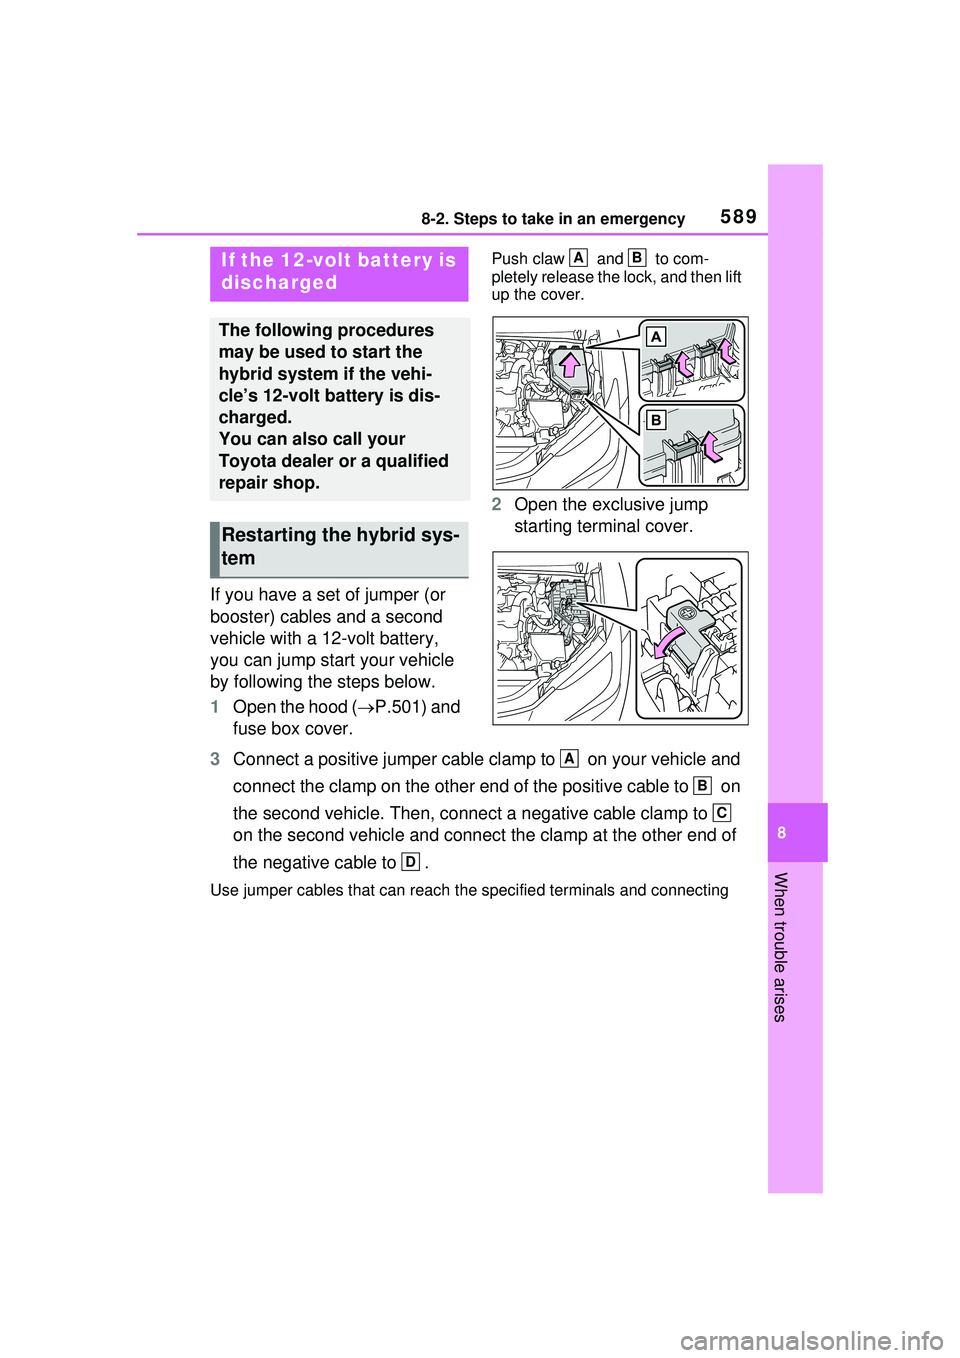
1Open the hood ( P.501) and
fuse box cover.
Push claw and to com-
pletely release the lock, and then lift
up the cover.
2 Open the exclusive jump
starting terminal cover.
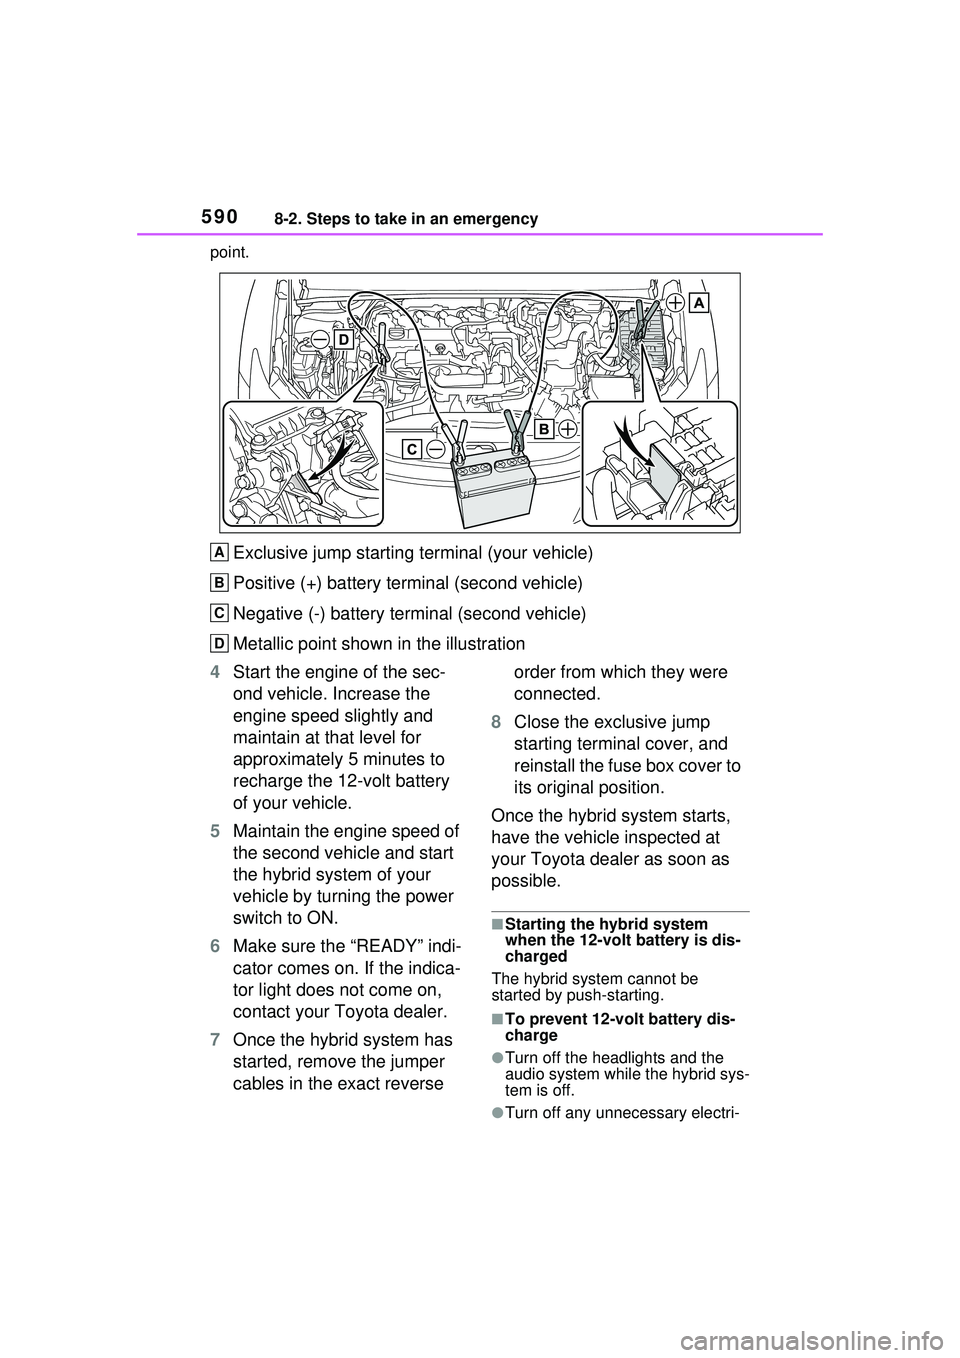
3 Connect a positive jumper cable clamp to on your vehicle and
connect the clamp on the other end of the positive cable to on
the second vehicle. Then, connect a negative cable clamp to
on the second vehicle and connect the clamp at the other end of
the negative cable to .
Use jumper cables that can reach t he specified terminals and connecting
If the 12-volt battery is
discharged
The following procedures
may be used to start the
hybrid system if the vehi-
cle’s 12-volt battery is dis-
charged.
You can also call your
Toyota dealer or a qualified
repair shop.
Restarting the hybrid sys-
tem
AB
A
B
C
D
Page 590 of 680
5908-2. Steps to take in an emergency
point.
Exclusive jump starting terminal (your vehicle)
Positive (+) battery terminal (second vehicle)
Negative (-) battery terminal (second vehicle)
Metallic point shown in the illustration
4 Start the engine of the sec-
ond vehicle. Increase the
engine speed slightly and
maintain at that level for
approximately 5 minutes to
recharge the 12-volt battery
of your vehicle.
5 Maintain the engine speed of
the second vehicle and start
the hybrid system of your
vehicle by turning the power
switch to ON.
6 Make sure the “READY” indi-
cator comes on. If the indica-
tor light does not come on,
contact your Toyota dealer.
7 Once the hybrid system has
started, remove the jumper
cables in the exact reverse order from which they were
connected.
8 Close the exclusive jump
starting terminal cover, and
reinstall the fuse box cover to
its original position.
Once the hybrid system starts,
have the vehicle inspected at
your Toyota dealer as soon as
possible.
■Starting the hybrid system
when the 12-volt battery is dis-
charged
The hybrid system cannot be
started by push-starting.
■To prevent 12-volt battery dis-
charge
●Turn off the headlights and the
audio system while the hybrid sys-
tem is off.
●Turn off any unnecessary electri-
A
B
C
D
Page 655 of 680
Alphabetical Index655
Fuel .......................................... 279Capacity ............................... 601
Fuel gauge ........................... 155
Information ........................... 607
Refueling .............................. 279
Type ............................. 601, 607
Warning light ........................ 562
Fuel filler door ..... ................... 280
Opener switch ...................... 280
Refueling .............................. 279
Fuel gauge .............................. 155
Fuses ....................................... 540
G
Garage door opener ............... 477
Gauges .................................... 155
Glove box ................................ 451
H
Headlights ............................... 269 AHB (Automatic High Beam) 272
Headlight aim ....................... 542
Replacing exterior lights ....... 543
Switch................................... 269
Headlights aim ........................ 542
Head restraints ....................... 212
Heated steering wheel ........... 443
Heaters Automatic air conditioning sys-tem ..................................... 434
Heated steering wheel ......... 443
Hybrid battery (traction battery) ........................................... 108
Outside rear view mirrors ..... 436
Seat heaters ......................... 443
High mounted stoplight Replacing exterior lights ....... 543
High voltage components ....... 83
Hill-start assist control .......... 424
Hood ........................................ 501
Hooks Cargo hooks .........................454
Retaining hooks (floor mat) ....28
Horn .........................................215
HV mode ....................................73
Hybrid battery (traction battery) .................................................83Charging ...............................116
Location ..................................83
Specification .........................602
Hybrid battery (traction battery) charge mode ...........................75
Hybrid system ...........................72 ACC ......................................254
Acoustic Vehicle Alerting System.............................................81
Brake Override System ........240
Drive-Start Control (DSC) .....245
Emergency shut off system ....87
Energy monitor/consumption screen.................................173
High voltage components .......83
How to start the hybrid system ...........................................251
Hybrid System Indicator .......155
If the hybrid system will not start ...........................................584
If your vehicle has to be stopped in an emergency .................547
Ignition switch (power switch) ...........................................251
Overheating ..........................594
Plug-in Hybrid Electric Vehicle driving tips ............................88
Plug-in hybrid system precau- tions ......................................83
Power (ignition) switch .........251
Regenerative braking .............78
Starting the hybrid system ....251
Hybrid System Indicator ........155
I
I/M test .....................................498