remove seats TOYOTA PRIUS PRIME 2023 Owners Manual
[x] Cancel search | Manufacturer: TOYOTA, Model Year: 2023, Model line: PRIUS PRIME, Model: TOYOTA PRIUS PRIME 2023Pages: 680, PDF Size: 14.97 MB
Page 45 of 680
451-1. For safe use
1
For safety and security
WARNING
●Make sure the “PASSENGER
AIR BAG OFF” indicator light is
not illuminated when using the
seat belt extender for the front
passenger seat. If the “PAS-
SENGER AIR BAG OFF” indi-
cator light is illuminated,
disconnect the extender tongue
from the seat belt buckle, and
reconnect the seat belt. Recon-
nect the seat belt extender after
making sure the “PASSENGER
AIR BAG ON” indicator light is
illuminated. If you use the seat
belt extender while the “PAS-
SENGER AIR BAG OFF” indi-
cator light is illuminated, the
SRS airbags for the front pas-
senger will not activate, which
could cause death or serious
injury in the event of a collision.
●Do not apply a heavy load to the
front passenger seat or equip-
ment (e.g. se atback pocket).
●Do not put weight on the front
passenger seat by putting your
hands or feet on the front pas-
senger seat seatback from the
rear passenger seat.
●Do not let a rear passenger lift
the front passenger seat with
their feet or press on the seat-
back with their legs.
●Do not put objects under the
front passenger seat.
●Do not recline the front passen-
ger seatback so far that it
touches a rear seat. This may
cause the “PASSENGER AIR
BAG OFF” indicator light to be
illuminated, which indicates that
the SRS airbags for the front
passenger will not activate in
the event of a severe accident.
If the seatback touches the rear
seat, return th e seatback to a
position where it does not touch
the rear seat. Keep the front
passenger seatback as upright
as possible when the vehicle is
moving. Reclining the seatback
excessively may lessen the
effectiveness of the seat belt
system.
●If an adult sits in the front pas-
senger seat, the “PASSENGER
AIR BAG ON” indicator light is
illuminated. If the “PASSEN-
GER AIR BAG OFF” indicator is
illuminated, ask the passenger
to sit up straight, well back in
the seat, feet on the floor, and
with the seat belt worn correctly.
If the “PASSENGER AIR BAG
OFF” indicator still remains illu-
minated, either ask the passen-
ger to move to the rear seat, or
if that is not possible, move the
front passenger seat fully rear-
ward.
●When it is unavoidable to install
a forward-facing child restraint
system on the front passenger
seat, install the child restraint
system on the front passenger
seat in the proper order.
( P.53)
●Do not modify or remove the
front seats.
Page 54 of 680
541-2. Child safety
■When installing a child
restraint system to a front
passenger seat
For the safety of a child, install
child restraint system to a rear
seats. When installing child
restraint system to a front pas-
senger seat is unavoidable,
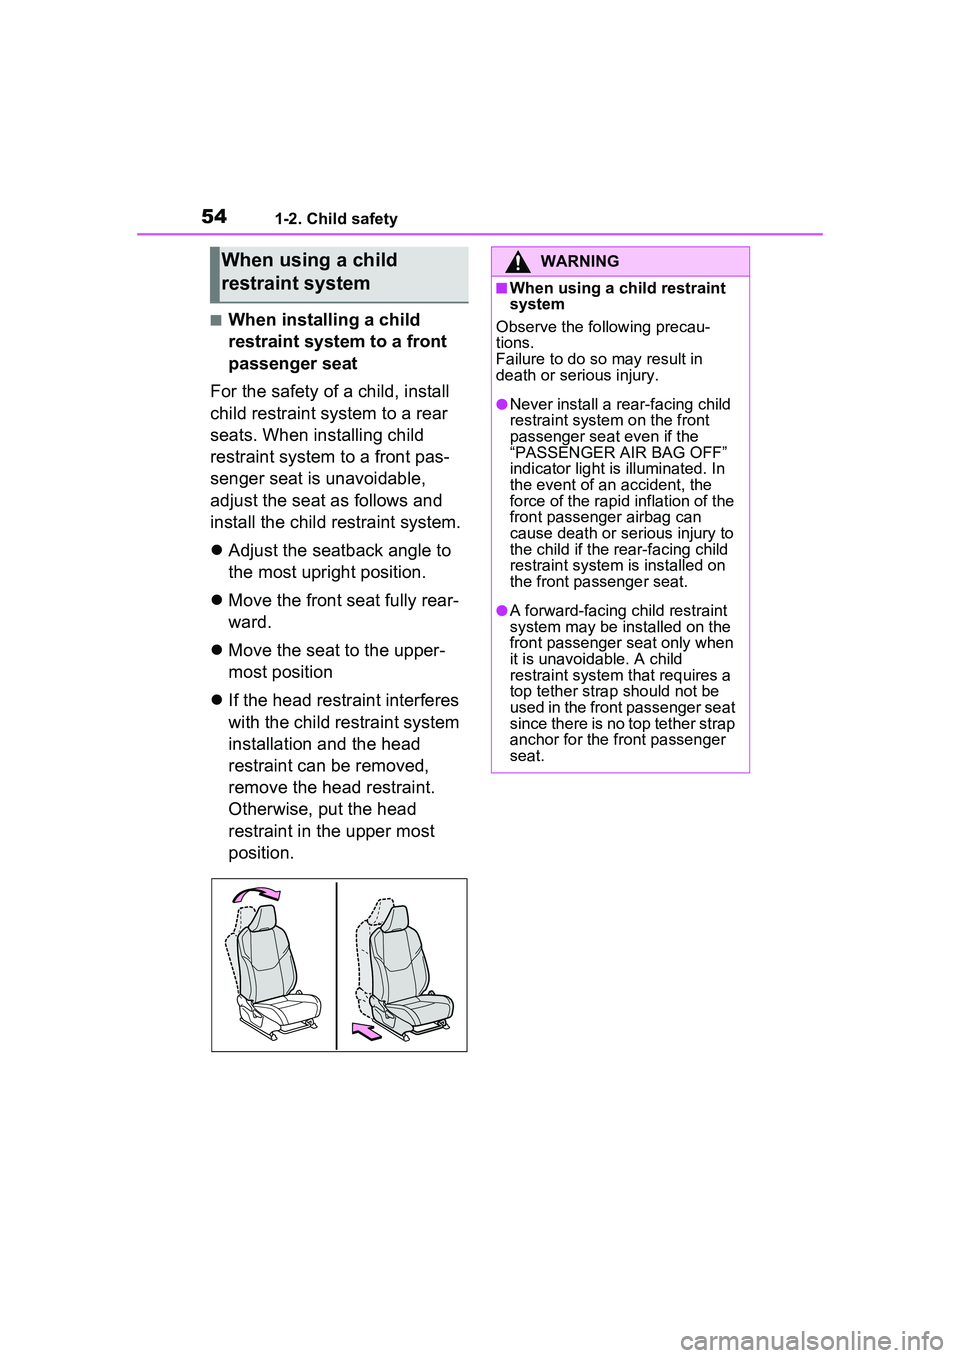
adjust the seat as follows and
install the child restraint system.
Adjust the seatback angle to
the most upright position.
Move the front seat fully rear-
ward.
Move the seat to the upper-
most position
If the head restraint interferes
with the child restraint system
installation and the head
restraint can be removed,
remove the head restraint.
Otherwise, put the head
restraint in the upper most
position.
When using a child
restraint systemWARNING
■When using a child restraint
system
Observe the following precau-
tions.
Failure to do so may result in
death or serious injury.
●Never install a re ar-facing child
restraint system on the front
passenger seat even if the
“PASSENGER AIR BAG OFF”
indicator light is illuminated. In
the event of an accident, the
force of the rapid inflation of the
front passenger airbag can
cause death or serious injury to
the child if the rear-facing child
restraint system is installed on
the front passenger seat.
●A forward-facing child restraint
system may be installed on the
front passenger seat only when
it is unavoidable. A child
restraint system that requires a
top tether strap should not be
used in the front passenger seat
since there is no top tether strap
anchor for the front passenger
seat.
Page 60 of 680
601-2. Child safety
■Child restraint LATCH
anchors
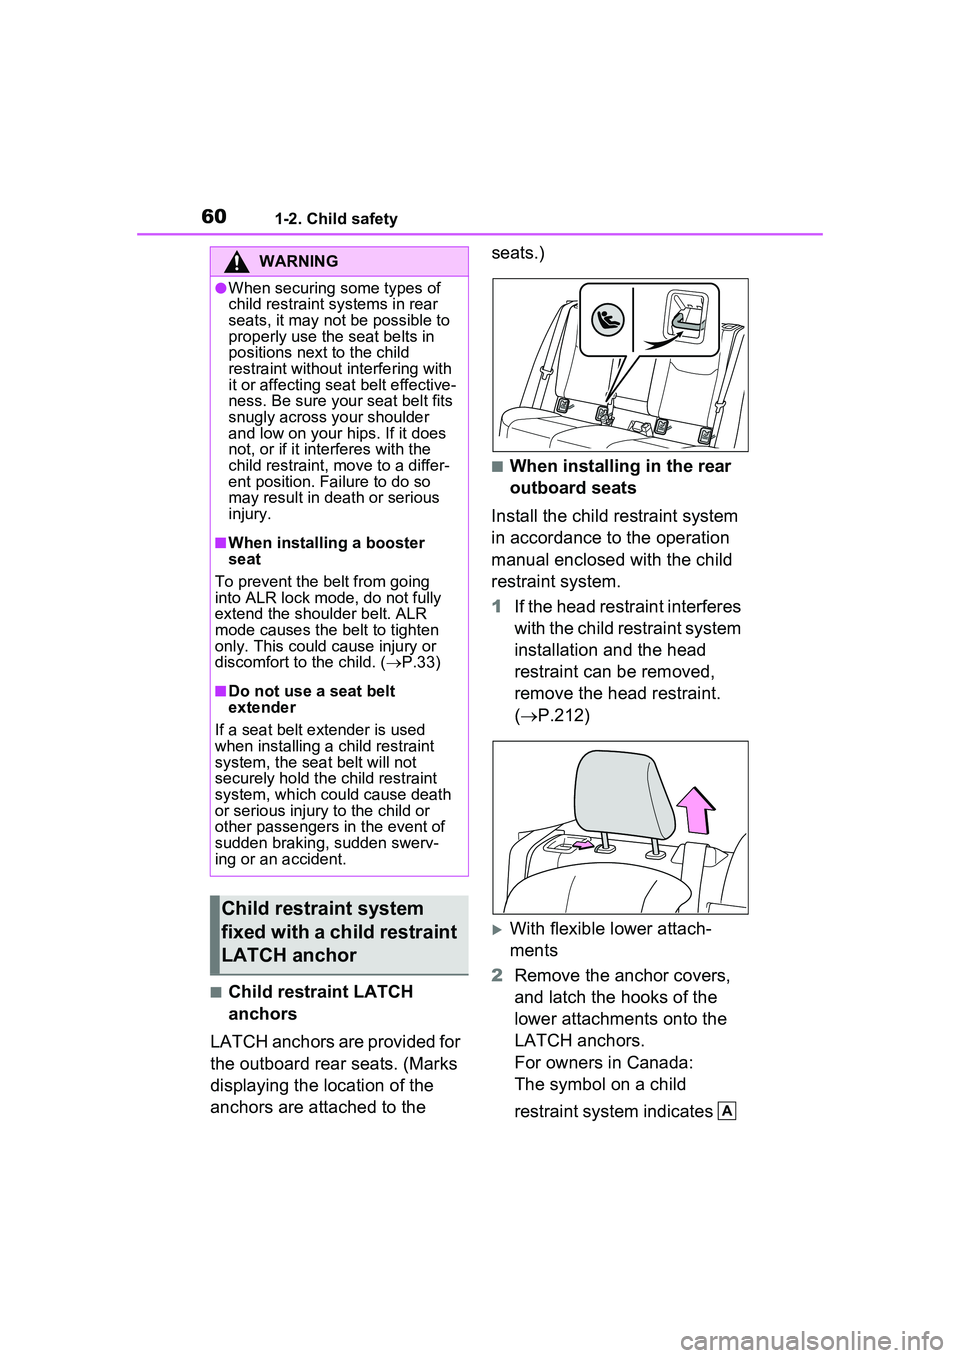
LATCH anchors are provided for
the outboard rear seats. (Marks
displaying the location of the
anchors are attached to the seats.)
■When installing in the rear
outboard seats
Install the child restraint system
in accordance to the operation
manual enclosed with the child
restraint system.
1 If the head restraint interferes
with the child restraint system
installation and the head
restraint can be removed,
remove the head restraint.
( P.212)
With flexible lower attach-
ments
2 Remove the anchor covers,
and latch the hooks of the
lower attachments onto the
LATCH anchors.
For owners in Canada:
The symbol on a child
restraint system indicates
WARNING
●When securing some types of
child restraint systems in rear
seats, it may not be possible to
properly use the seat belts in
positions next to the child
restraint without interfering with
it or affecting se at belt effective-
ness. Be sure your seat belt fits
snugly across your shoulder
and low on your hips. If it does
not, or if it interferes with the
child restraint, mo ve to a differ-
ent position. Failure to do so
may result in death or serious
injury.
■When installing a booster
seat
To prevent the belt from going
into ALR lock mode, do not fully
extend the shoulder belt. ALR
mode causes the belt to tighten
only. This could cause injury or
discomfort to the child. ( P.33)
■Do not use a seat belt
extender
If a seat belt extender is used
when installing a child restraint
system, the seat belt will not
securely hold th e child restraint
system, which could cause death
or serious injury to the child or
other passengers in the event of
sudden braking, sudden swerv-
ing or an accident.
Child restraint system
fixed with a child restraint
LATCH anchor
A
Page 61 of 680
611-2. Child safety
1
For safety and security
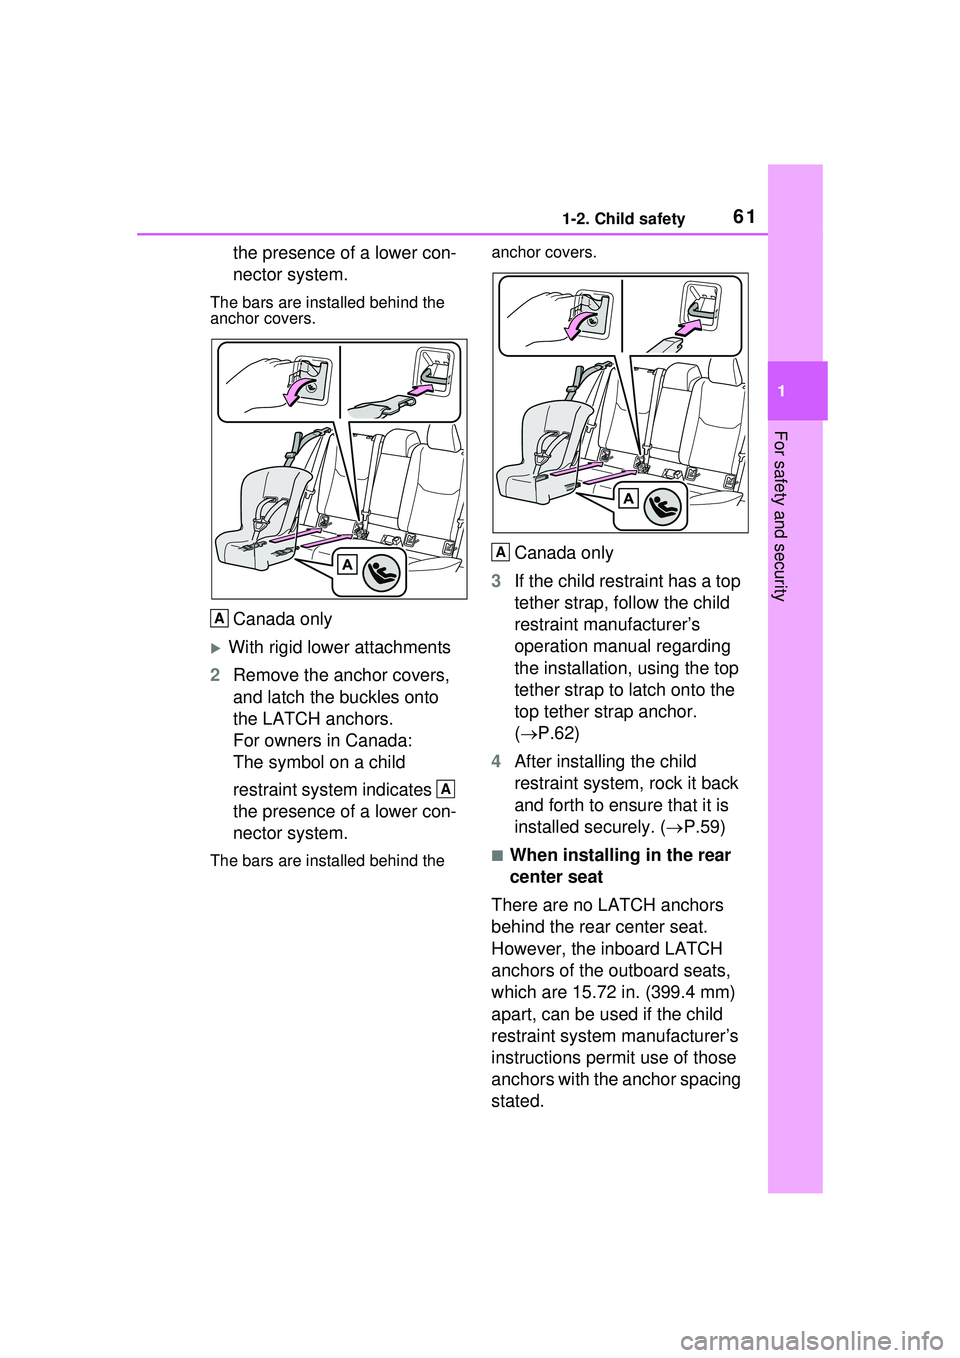
the presence of a lower con-
nector system.
The bars are installed behind the
anchor covers.
Canada only
With rigid lower attachments
2 Remove the anchor covers,
and latch the buckles onto
the LATCH anchors.
For owners in Canada:
The symbol on a child
restraint system indicates
the presence of a lower con-
nector system.
The bars are installed behind the anchor covers.
Canada only
3 If the child restraint has a top
tether strap, follow the child
restraint manufacturer’s
operation manual regarding
the installation, using the top
tether strap to latch onto the
top tether strap anchor.
( P.62)
4 After installing the child
restraint system, rock it back
and forth to ensure that it is
installed securely. ( P.59)
■When installing in the rear
center seat
There are no LATCH anchors
behind the rear center seat.
However, the inboard LATCH
anchors of the outboard seats,
which are 15.72 in. (399.4 mm)
apart, can be used if the child
restraint system manufacturer’s
instructions permit use of those
anchors with the anchor spacing
stated.
A
A
A
Page 63 of 680
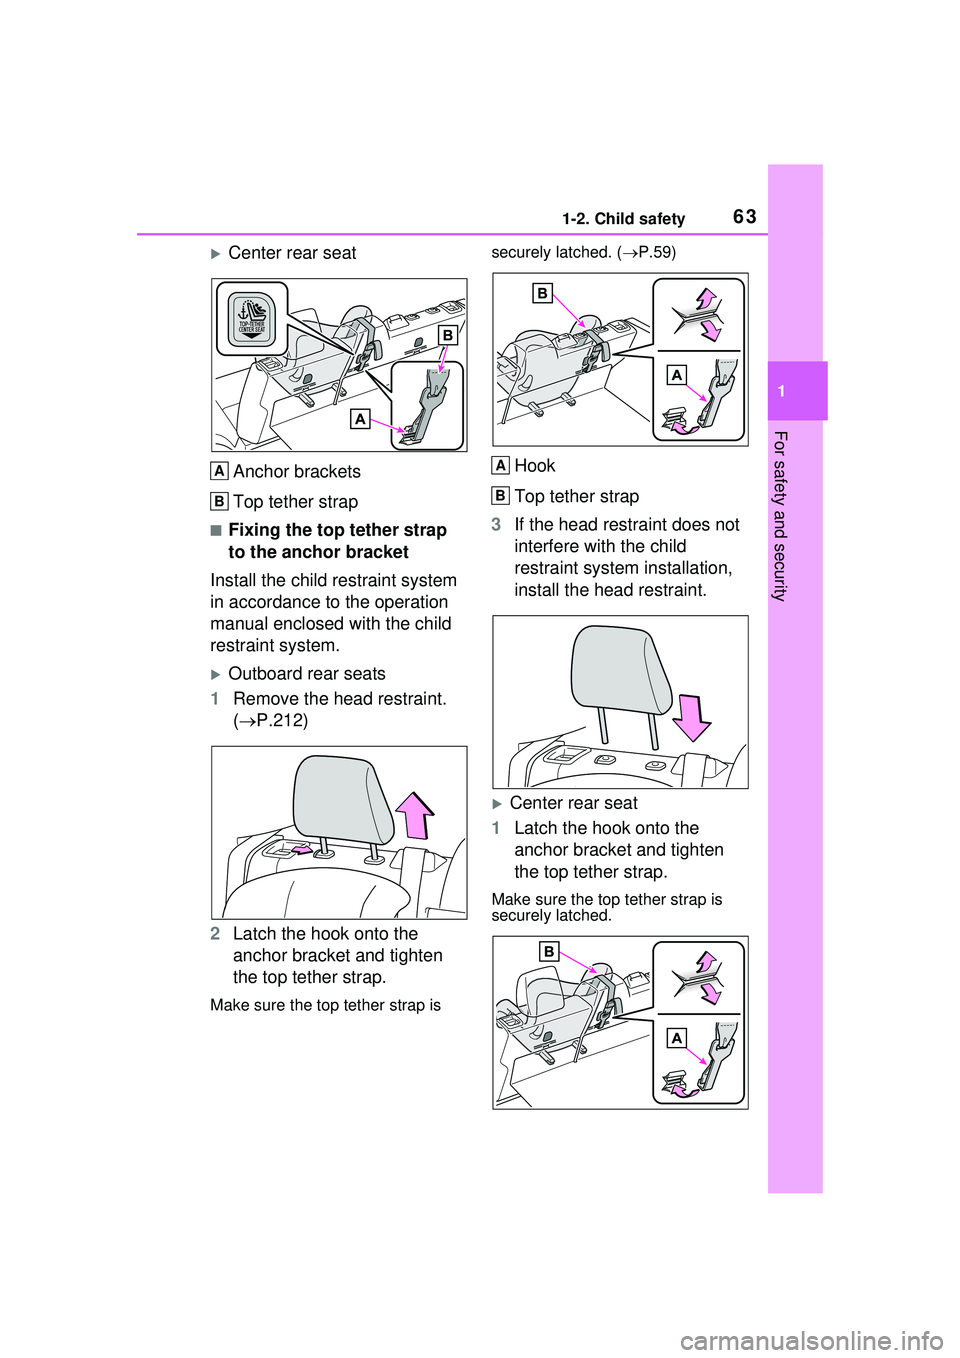
631-2. Child safety
1
For safety and security
Center rear seatAnchor brackets
Top tether strap
■Fixing the top tether strap
to the anchor bracket
Install the child restraint system
in accordance to the operation
manual enclosed with the child
restraint system.
Outboard rear seats
1 Remove the head restraint.
( P.212)
2 Latch the hook onto the
anchor bracket and tighten
the top tether strap.
Make sure the top tether strap is securely latched. (
P.59)
Hook
Top tether strap
3 If the head restraint does not
interfere with the child
restraint system installation,
install the head restraint.
Center rear seat
1 Latch the hook onto the
anchor bracket and tighten
the top tether strap.
Make sure the top tether strap is
securely latched.
A
B
A
B
Page 212 of 680
2124-3. Adjusting the seats
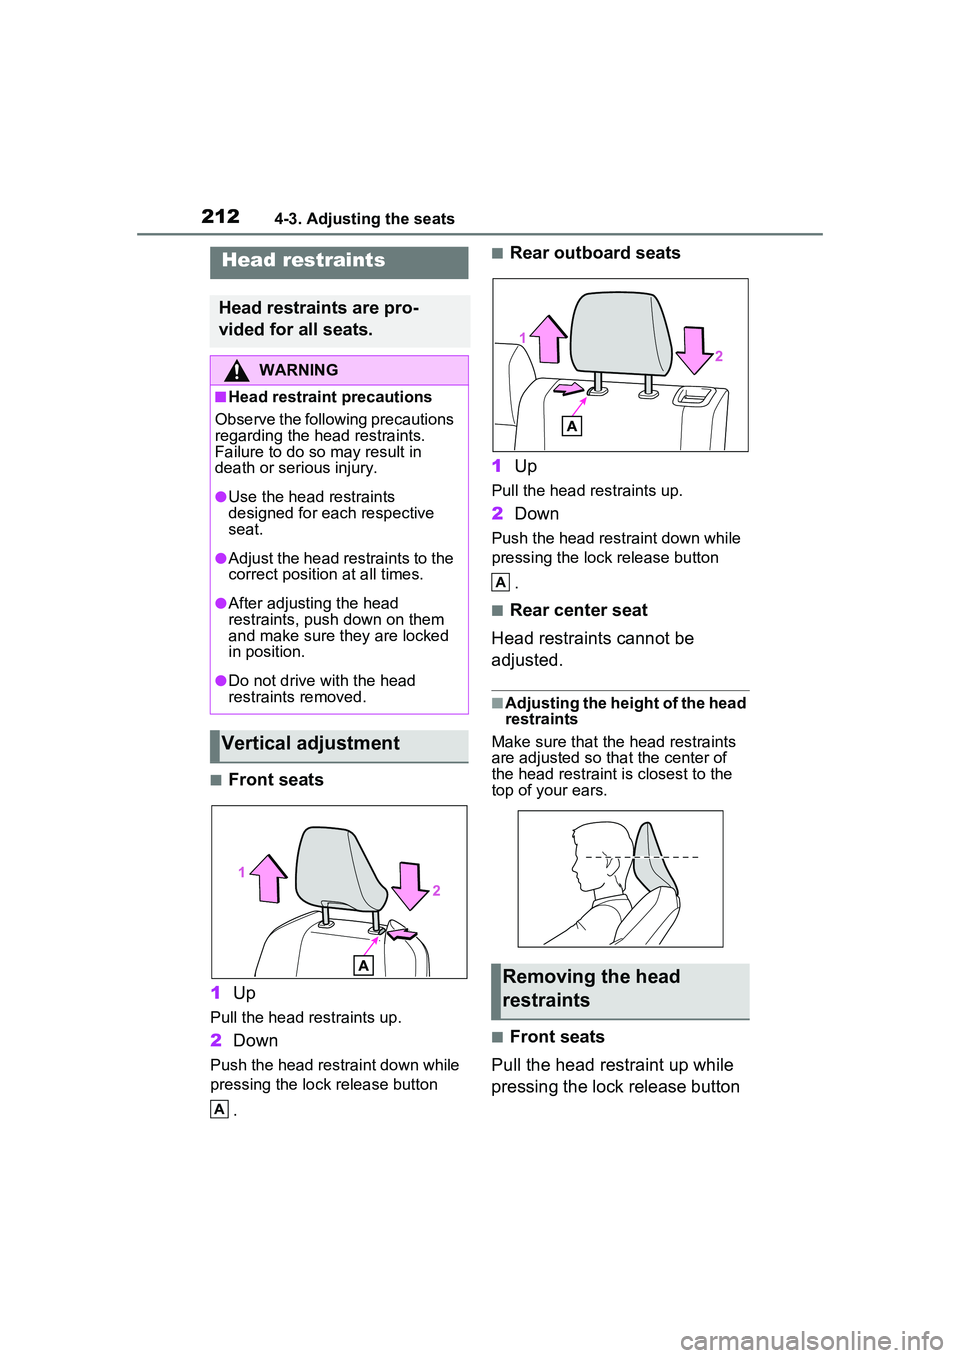
■Front seats
1 Up
Pull the head restraints up.
2Down
Push the head restraint down while
pressing the lock release button
.
■Rear outboard seats
1 Up
Pull the head restraints up.
2Down
Push the head restraint down while
pressing the lock release button
.
■Rear center seat
Head restraints cannot be
adjusted.
■Adjusting the height of the head
restraints
Make sure that the head restraints
are adjusted so that the center of
the head restraint is closest to the
top of your ears.
■Front seats
Pull the head restraint up while
pressing the lock release button
Head restraints
Head restraints are pro-
vided for all seats.
WARNING
■Head restraint precautions
Observe the following precautions
regarding the head restraints.
Failure to do so may result in
death or serious injury.
●Use the head restraints
designed for each respective
seat.
●Adjust the head restraints to the
correct position at all times.
●After adjusting the head
restraints, push down on them
and make sure they are locked
in position.
●Do not drive with the head
restraints removed.
Vertical adjustment
A
Removing the head
restraints
A
Page 213 of 680
2134-3. Adjusting the seats
4
Before driving
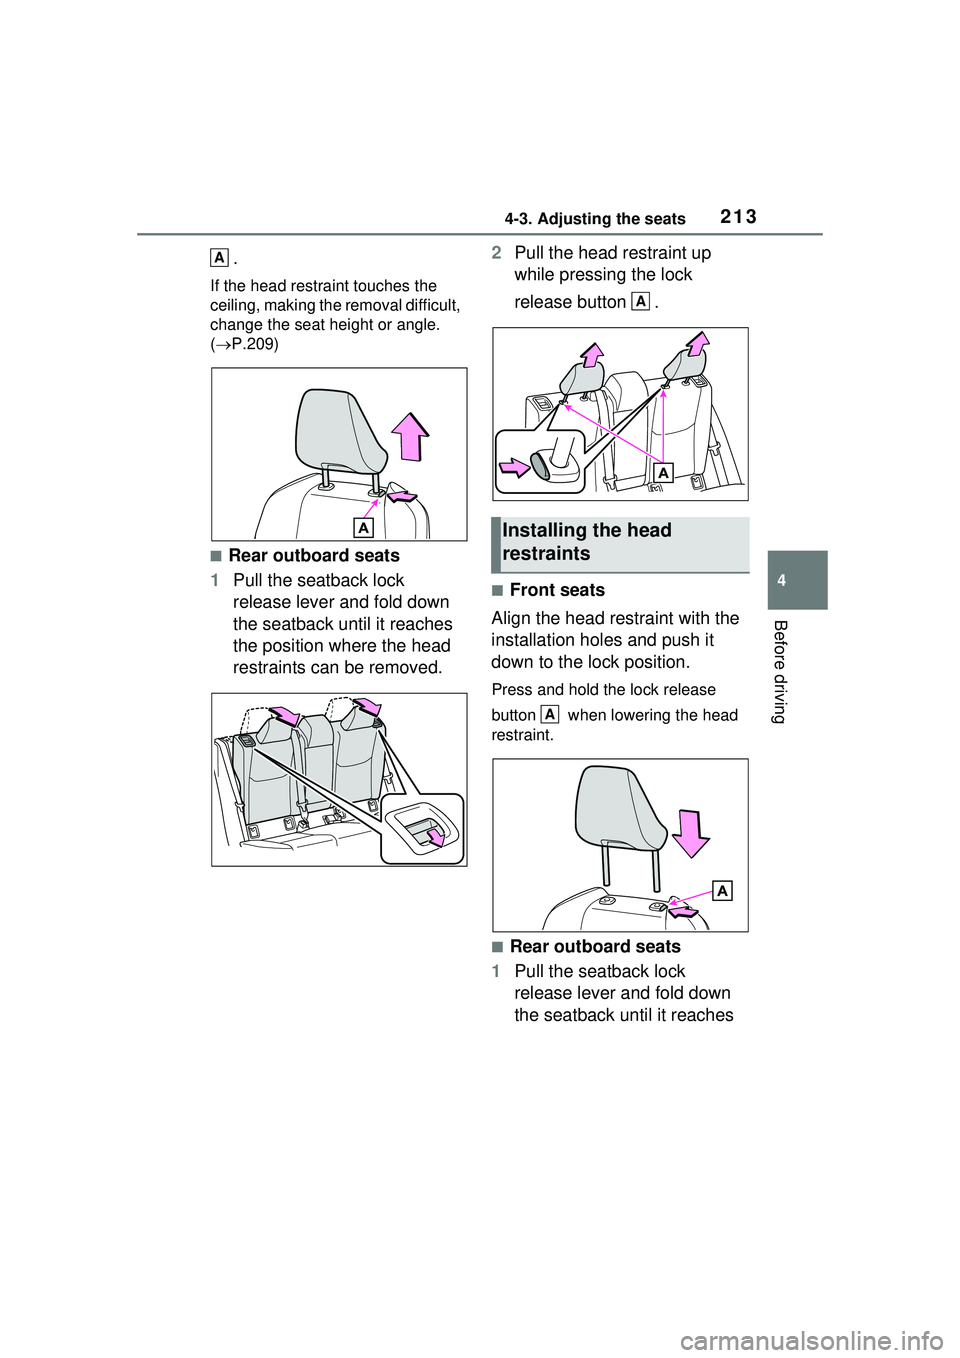
.
If the head restraint touches the
ceiling, making the removal difficult,
change the seat height or angle.
( P.209)
■Rear outboard seats
1 Pull the seatback lock
release lever and fold down
the seatback until it reaches
the position where the head
restraints can be removed. 2
Pull the head restraint up
while pressing the lock
release button .
■Front seats
Align the head restraint with the
installation holes and push it
down to the lock position.
Press and hold the lock release
button when lowering the head
restraint.
■Rear outboard seats
1 Pull the seatback lock
release lever and fold down
the seatback until it reaches
A
Installing the head
restraints
A
A
Page 491 of 680
4917-1. Maintenance and care
7
Maintenance and care
damage to the UV protective coat-
ing, observe the following:
●If the windows are dirty, gently
wipe them with a cloth soaked in
water or lukewarm water as soon
as possible.
●If the windows are very dirty, do
not open and close them repeat-
edly.
WARNING
■Water in the vehicle
●Do not splash or spill liquid in
the vehicle, such as on the floor,
on the rear seats or in the lug-
gage compartment.
Doing so may cause the hybrid
battery, electrical components,
etc. to malfunction or catch fire.
●Do not get any of the SRS com-
ponents or wiring in the vehicle
interior wet.
( P.36)
An electrical malfunction may
cause the airbags to deploy or
not function properly, resulting
in death or serious injury.
●Do not let the wireless charger
( P.458) get wet. Failure to do
so may cause the charger to
become hot and cause burns or
could cause electric shock
resulting in death or serious
injury.
■Cleaning the interior (espe-
cially instrument panel)
Do not use polish wax or polish
cleaner. The instrument panel
may reflect off the windshield,
obstructing the driver’s view and
leading to an accident, resulting in
death or serious injury.
NOTICE
■Cleaning detergents
●Do not use the following types
of detergent, as they may dis-
color the vehicle interior or
cause streaks or damage to
painted surfaces:
• Non-seat portions: Organic sub- stances such as benzene or
gasoline, alkaline or acidic solu-
tions, dye, and bleach
• Seats: Alkaline or acidic solu- tions, such as thinner, benzene,
and alcohol
●Do not use polish wax or polish
cleaner. The instrument panel’s
or other interior part’s painted
surface may be damaged.
■Preventing damage to leather
surfaces
Observe the following precautions
to avoid damage to and deteriora-
tion of leather surfaces:
●Remove any dust or dirt from
leather surfaces immediately.
●Do not expose the vehicle to
direct sunlight for extended peri-
ods of time. Park the vehicle in
the shade, especially during
summer.
●Do not place items made of
vinyl, plastic, or containing wax
on the upholstery, as they may
stick to the leather surface if the
vehicle interior heats up signifi-
cantly.
■Water on the floor
Do not wash the vehicle floor with
water.
Vehicle systems such as the
audio system may be damaged if
water comes into contact with
electrical components such as the
audio system above or under the
floor of the vehicle. Water may
also cause the body to rust.