change wheel TOYOTA PRIUS V 2012 Accessories, Audio & Navigation (in English)
[x] Cancel search | Manufacturer: TOYOTA, Model Year: 2012, Model line: PRIUS V, Model: TOYOTA PRIUS V 2012Pages: 409, PDF Size: 6.88 MB
Page 141 of 409
141
1. PHONE OPERATION
4
PHONE
PRIUS v (US) NAVI 47675U
11.05.17 14:27
4. CALL ON THE Bluetooth® PHONE
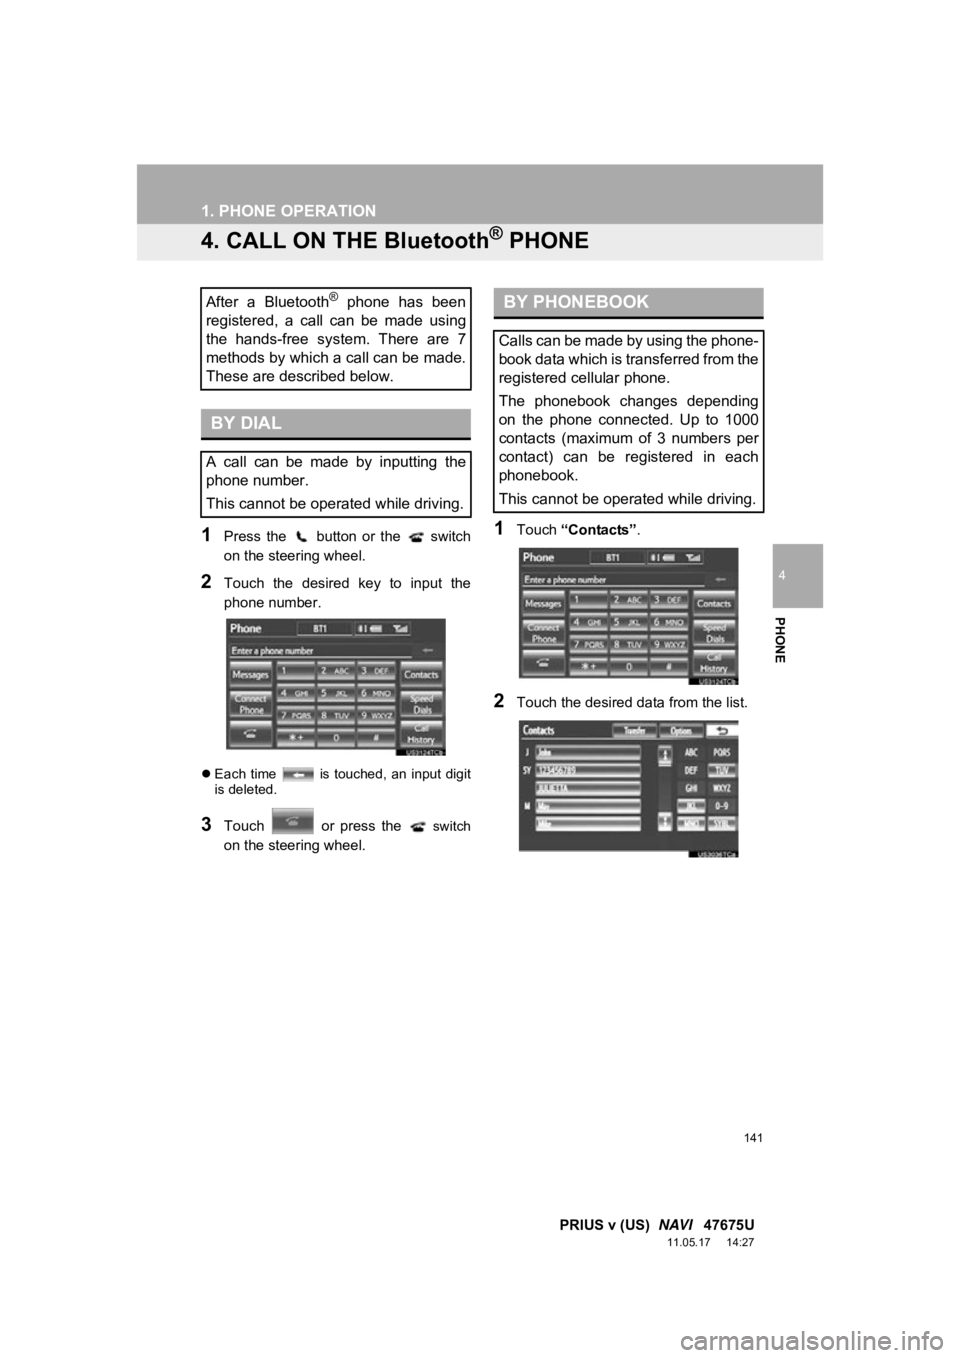
1Press the button or the switch
on the steering wheel.
2Touch the desired key to input the
phone number.
Each time is touched, an input digit
is deleted.
3Touch or press the switch
on the steering wheel.
1Touch “Contacts” .
2Touch the desired data from the list.
After a Bluetooth® phone has been
registered, a call can be made using
the hands-free system. There are 7
methods by which a call can be made.
These are described below.
BY DIAL
A call can be made by inputting the
phone number.
This cannot be operated while driving.
BY PHONEBOOK
Calls can be made by using the phone-
book data which is transferred from the
registered cellular phone.
The phonebook changes depending
on the phone connected. Up to 1000
contacts (maximum of 3 numbers per
contact) can be registered in each
phonebook.
This cannot be operated while driving.
Page 144 of 409
144
1. PHONE OPERATION
PRIUS v (US) NAVI 47675U
11.05.17 14:27
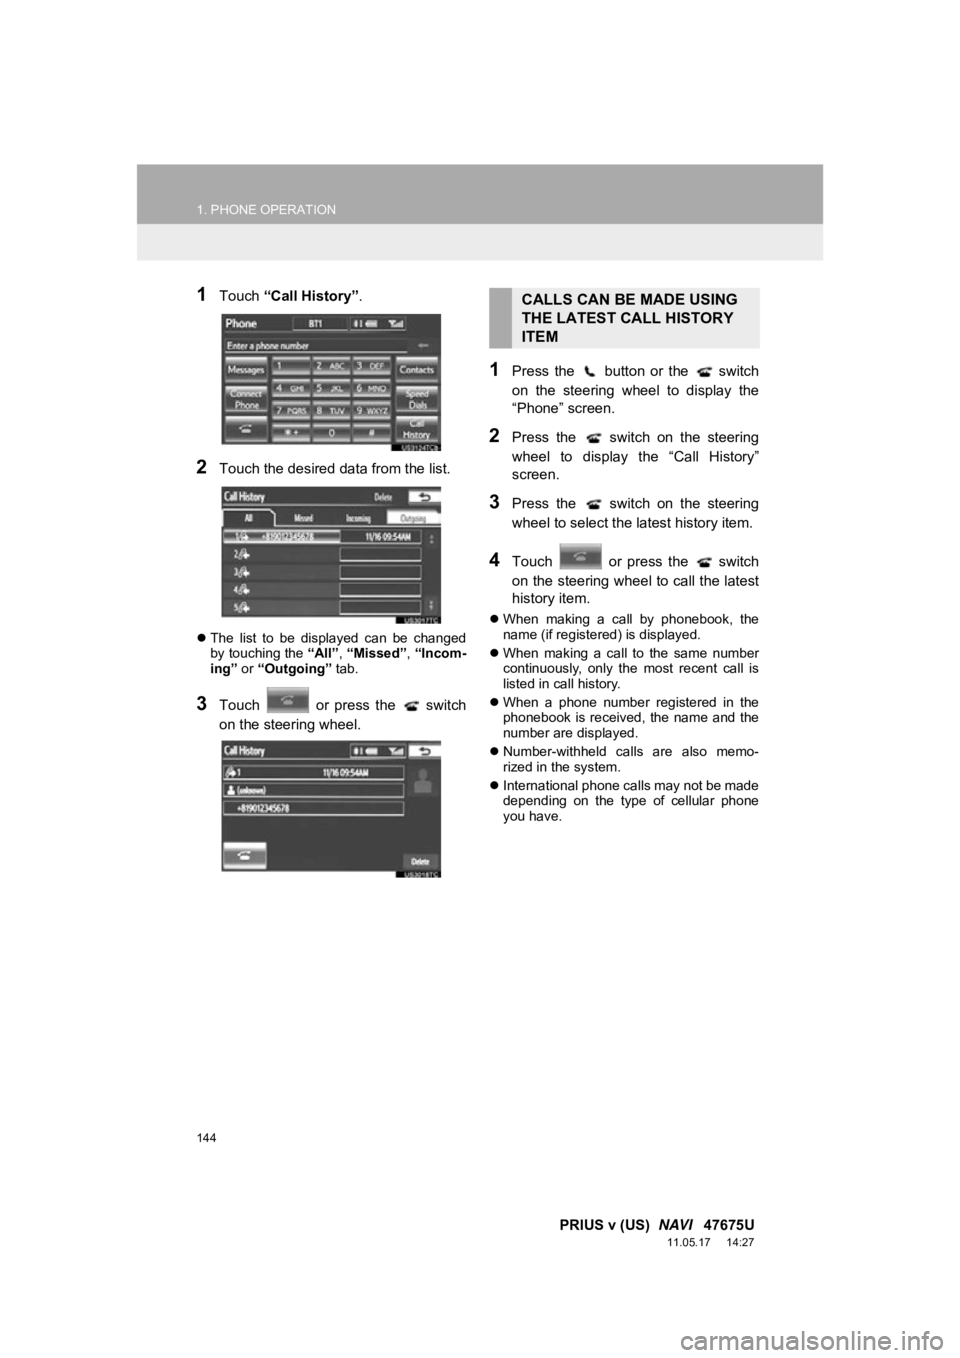
1Touch “Call History” .
2Touch the desired data from the list.
The list to be displayed can be changed
by touching the “All”, “Missed” , “Incom-
ing” or “Outgoing” tab.
3Touch or press the switch
on the steering wheel.
1Press the button or the switch
on the steering wheel to display the
“Phone” screen.
2Press the switch on the steering
wheel to display the “Call History”
screen.
3Press the switch on the steering
wheel to select the latest history item.
4Touch or press the switch
on the steering wheel to call the latest
history item.
When making a call by phonebook, the
name (if registered) is displayed.
When making a call to the same number
continuously, only the most recent call is
listed in call history.
When a phone number registered in the
phonebook is received, the name and the
number are displayed.
Number-withheld calls are also memo-
rized in the system.
International phone calls may not be made
depending on the type of cellular phone
you have.
CALLS CAN BE MADE USING
THE LATEST CALL HISTORY
ITEM
Page 149 of 409
149
1. PHONE OPERATION
4
PHONE
PRIUS v (US) NAVI 47675U
11.05.17 14:27
6. TALK ON THE Bluetooth® PHONE
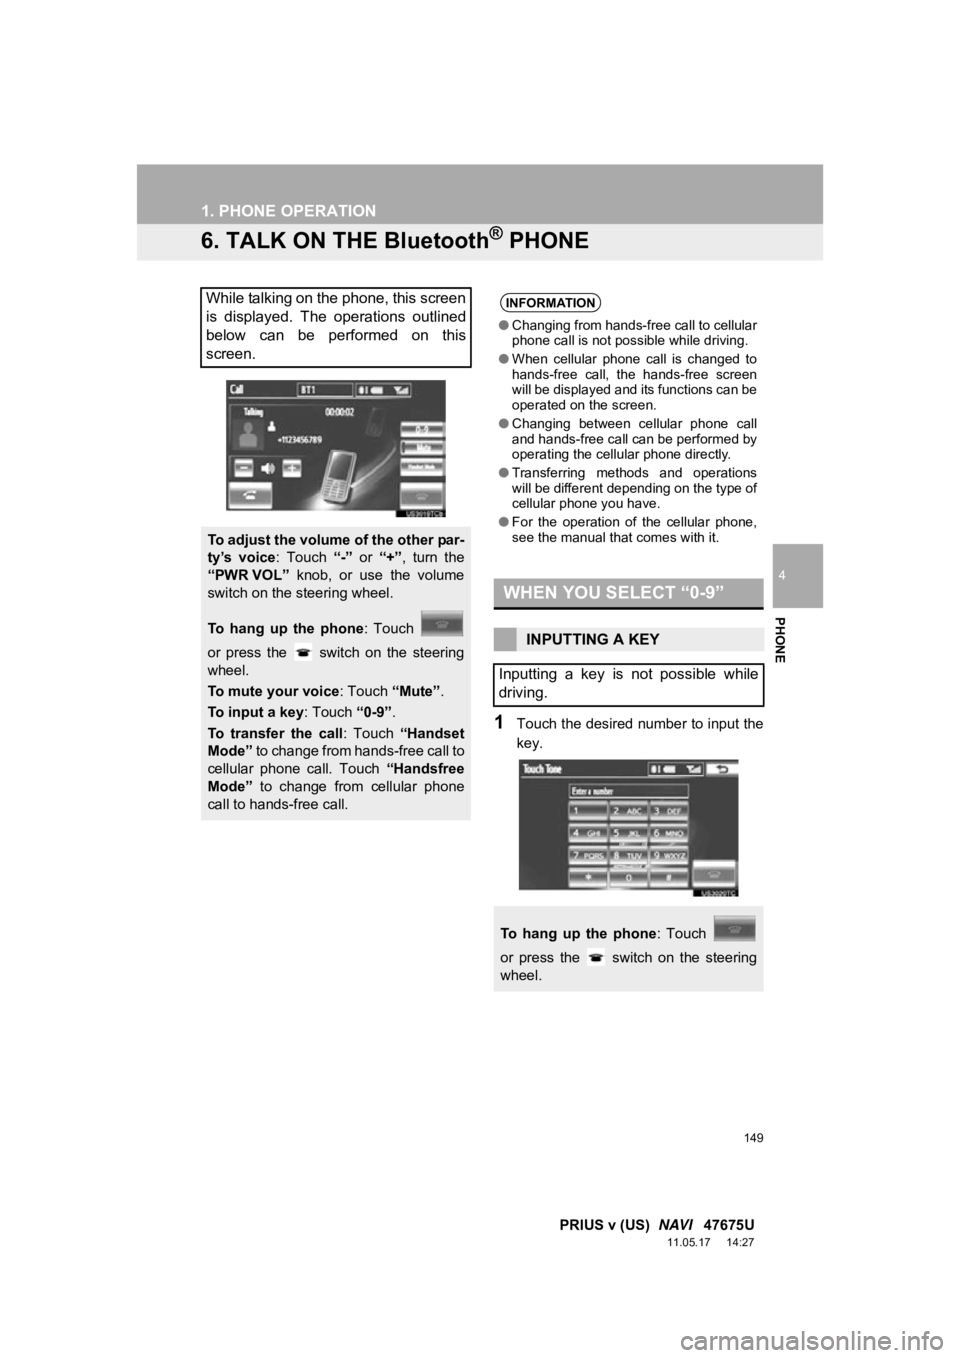
1Touch the desired number to input the
key.
While talking on the phone, this screen
is displayed. The operations outlined
below can be performed on this
screen.
To adjust the volume of the other par-
ty’s voice : Touch “-” or “+”, turn the
“PWR VOL” knob, or use the volume
switch on the steering wheel.
To hang up the phone : Touch
or press the switch on the steering
wheel.
To mute your voice : Touch “Mute”.
To input a key : Touch “0-9”.
To transfer the call : Touch “Handset
Mode” to change from hands-free call to
cellular phone call. Touch “Handsfree
Mode” to change from cellular phone
call to hands-free call.
INFORMATION
● Changing from hands-free call to cellular
phone call is not possible while driving.
● When cellular phone call is changed to
hands-free call, the hands-free screen
will be displayed and its functions can be
operated on the screen.
● Changing between cellular phone call
and hands-free call can be performed by
operating the cellular phone directly.
● Transferring methods and operations
will be different depending on the type of
cellular phone you have.
● For the operation of the cellular phone,
see the manual that comes with it.
WHEN YOU SELECT “0-9”
INPUTTING A KEY
Inputting a key is not possible while
driving.
To hang up the phone : Touch
or press the switch on the steering
wheel.
Page 170 of 409
170
2. SETUP
PRIUS v (US) NAVI 47675U
11.05.17 14:27
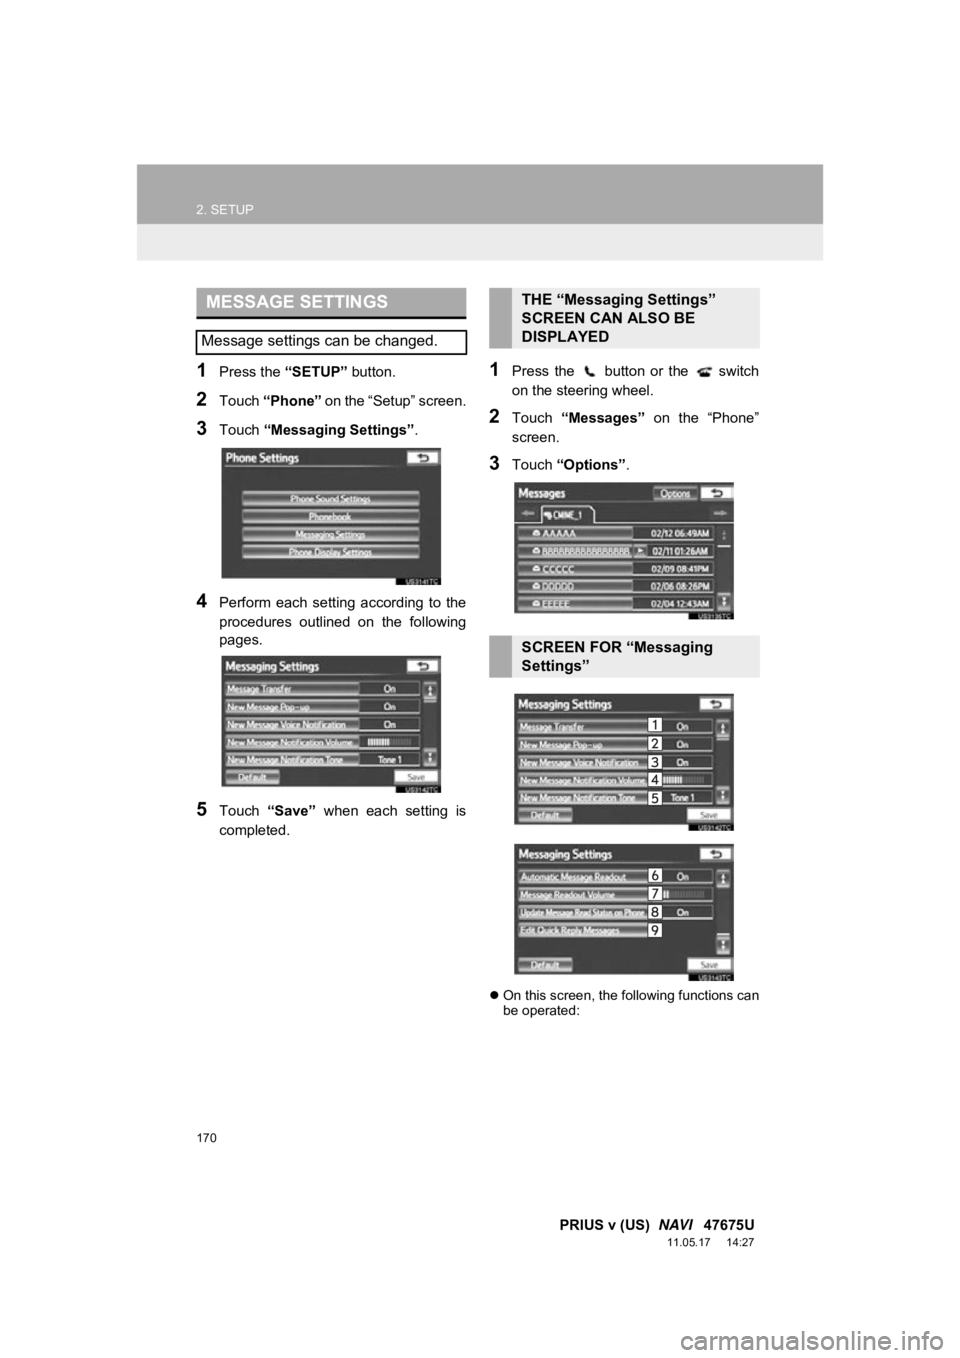
1Press the “SETUP” button.
2Touch “Phone” on the “Setup” screen.
3Touch “Messaging Settings” .
4Perform each setting according to the
procedures outlined on the following
pages.
5Touch “Save” when each setting is
completed.
1Press the button or the switch
on the steering wheel.
2Touch “Messages” on the “Phone”
screen.
3Touch “Options” .
On this screen, the following functions can
be operated:
MESSAGE SETTINGS
Message settings can be changed.
THE “Messaging Settings”
SCREEN CAN ALSO BE
DISPLAYED
SCREEN FOR “Messaging
Settings”
Page 250 of 409
250
1. AUDIO/VIDEO SYSTEM OPERATION
PRIUS v (US) NAVI 47675U
11.05.17 14:27
11. AUDIO/VIDEO REMOTE CONTROLS (STEERING SWITCHES)
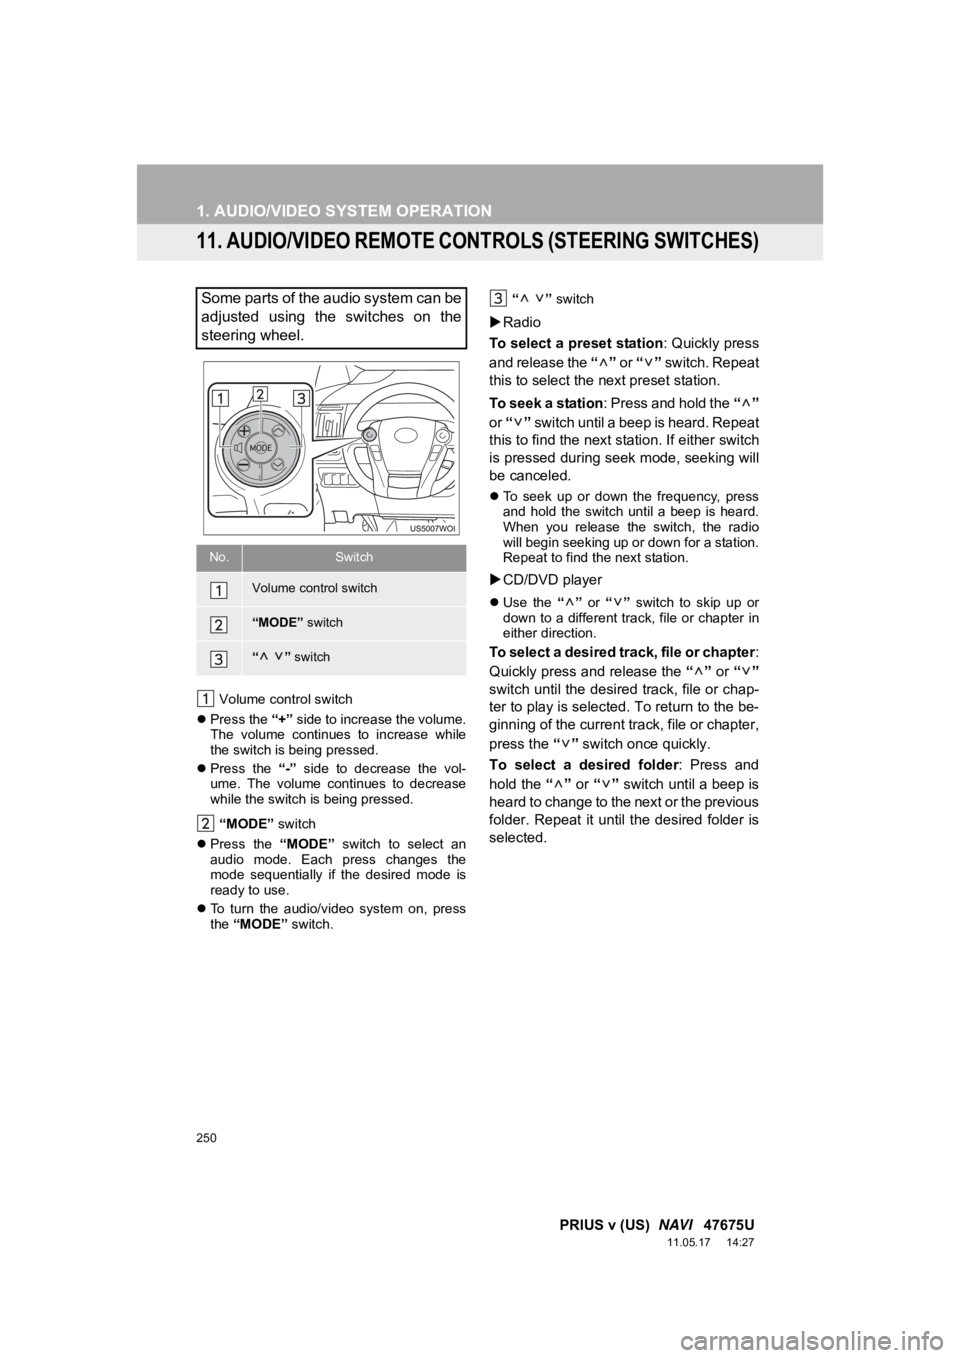
Volume control switch
Press the “+” side to increase the volume.
The volume continues to increase while
the switch is being pressed.
Press the “-” side to decrease the vol-
ume. The volume continues to decrease
while the switch is being pressed.
“MODE” switch
Press the “MODE” switch to select an
audio mode. Each press changes the
mode sequentially if the desired mode is
ready to use.
To turn the audio/video system on, press
the “MODE” switch. “ ”
switch
Radio
To select a preset station : Quickly press
and release the “” or “” switch. Repeat
this to select the next preset station.
To seek a station: Press and hold the “”
or “” switch until a beep is heard. Repeat
this to find the next station. If either switch
is pressed during seek mode, seeking will
be canceled.
To seek up or down the frequency, press
and hold the switch until a beep is heard.
When you release the switch, the radio
will begin seeking up or down for a station.
Repeat to find the next station.
CD/DVD player
Use the “” or “” switch to skip up or
down to a different track, file or chapter in
either direction.
To select a desired track, file or chapter :
Quickly press and release the “” or “”
switch until the desired track, file or chap-
ter to play is selected. To return to the be-
ginning of the current track, file or chapter,
press the “” switch once quickly.
To select a desired folder : Press and
hold the “” or “” switch until a beep is
heard to change to the next or the previous
folder. Repeat it until the desired folder is
selected.
Some parts of the audio system can be
adjusted using the switches on the
steering wheel.
No.Switch
Volume control switch
“MODE” switch
“” switch
Page 322 of 409
322
2. ADVANCED PARKING GUIDANCE SYSTEM
PRIUS v (US) NAVI 47675U
11.05.17 14:28
2. MANEUVERING WHEN PARKING
1To activate the advanced parking guid-
ance system, shift the shift position to
“R” when the “POWER” switch is in ON
mode and the back door is completely
closed.
If you move the shift position out of “R”,
the screen returns to the previous screen.
Operating another function of the naviga-
tion system will display another screen.
Even if the shift position is in “R”, if you
press any of the mode buttons around the
display, such as “MAP/VOICE” or “INFO/
APPS” , the screen will switch to that
mode.
MANEUVERING WHEN
PARKING
Instructions given are only examples.
When and how much to turn the steer-
ing wheel will vary according to traffic
conditions, road surface conditions,
vehicle condition, etc. when parking.
It is necessary to be fully aware of this
before using the advanced parking
guidance system.
Also, when parking, be sure to check
that the parking space will accommo-
date your vehicle before maneuvering
into it.
CAUTION
● Depending on the circumstances of the
vehicle (number of passengers, amount
of luggage, etc.), the position of the
guide lines displayed on the screen may
change. Be sure to check visually
behind and all around the vehicle before
proceeding.
TO ACTIVATE THE ADVANCED
PARKING GUIDANCE SYSTEM
Page 334 of 409
334
2. ADVANCED PARKING GUIDANCE SYSTEM
PRIUS v (US) NAVI 47675U
11.05.17 14:28
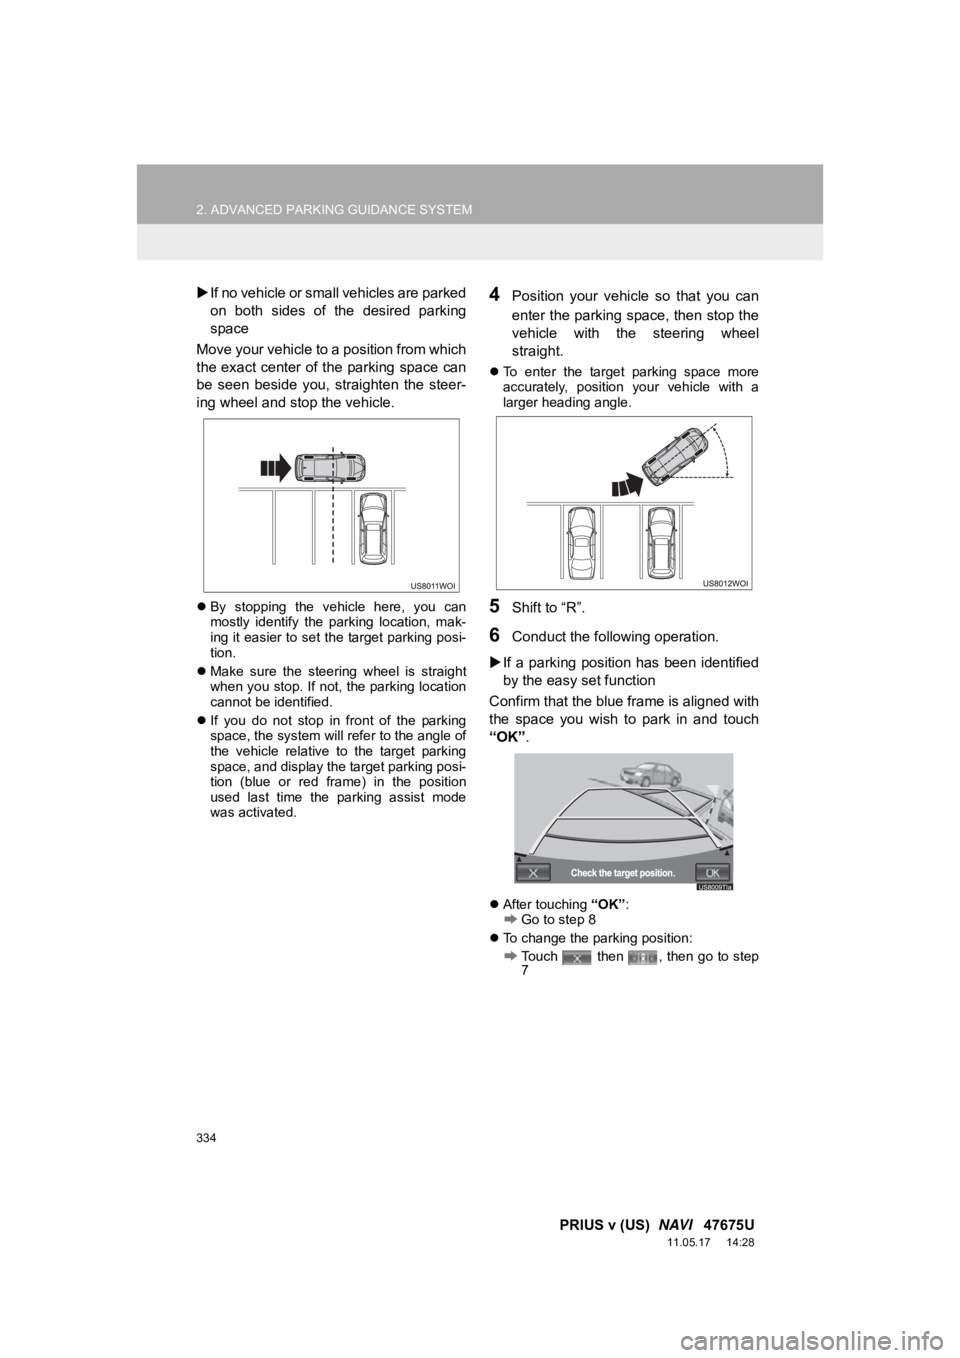
If no vehicle or small vehicles are parked
on both sides of the desired parking
space
Move your vehicle to a position from which
the exact center of the parking space can
be seen beside you, straighten the steer-
ing wheel and stop the vehicle.
By stopping the vehicle here, you can
mostly identify the parking location, mak-
ing it easier to set the target parking posi-
tion.
Make sure the steering wheel is straight
when you stop. If not, the parking location
cannot be identified.
If you do not stop in front of the parking
space, the system will refer to the angle of
the vehicle relative to the target parking
space, and display the target parking posi-
tion (blue or red frame) in the position
used last time the parking assist mode
was activated.
4Position your vehicl e so that you can
enter the parking space, then stop the
vehicle with the steering wheel
straight.
To enter the target parking space more
accurately, position your vehicle with a
larger heading angle.
5Shift to “R”.
6Conduct the following operation.
If a parking position has been identified
by the easy set function
Confirm that the blue frame is aligned with
the space you wish to park in and touch
“OK” .
After touching “OK”:Go to step 8
To change the parking position:
Touch then , then go to step
7
Page 335 of 409
335
2. ADVANCED PARKING GUIDANCE SYSTEM
9
PRIUS v (US) NAVI 47675U
11.05.17 14:28
PERIPHERAL MONITORING SYSTEM
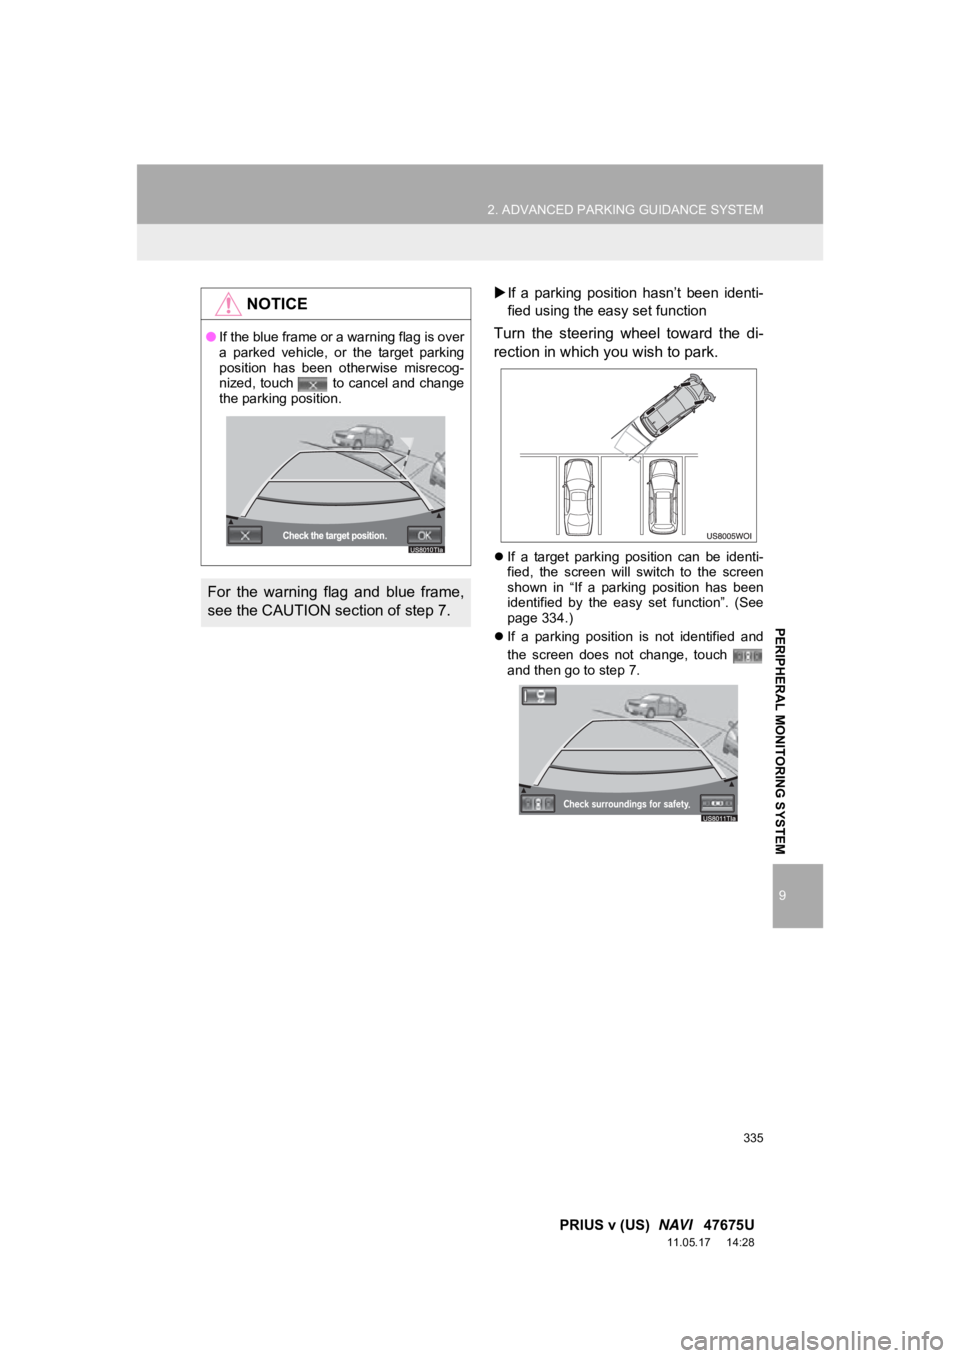
If a parking position hasn’t been identi-
fied using the easy set function
Turn the steering wheel toward the di-
rection in which you wish to park.
If a target parking position can be identi-
fied, the screen will switch to the screen
shown in “If a parking position has been
identified by the easy set function”. (See
page 334.)
If a parking position is not identified and
the screen does not change, touch
and then go to step 7.
NOTICE
●If the blue frame or a warning flag is over
a parked vehicle, or the target parking
position has been otherwise misrecog-
nized, touch to cancel and change
the parking position.
For the warning flag and blue frame,
see the CAUTION section of step 7.
Page 365 of 409
365
2. ADVANCED PARKING GUIDANCE SYSTEM
9
PRIUS v (US) NAVI 47675U
11.05.17 14:28
PERIPHERAL MONITORING SYSTEM
CAUTION
●Do not use the system in the following
conditions:
• Outside of parking areas
• In unprepared parking area such as
gravel or sand
• In parking areas that are crooked or have level variations
• On slippery or icy roads, or in snow
• If the asphalt is melted due to harsh sunlight
• If there are obstacles in the target parking position (inside the blue
frame), or obstacles between the vehi-
cle and the parking space
• If there are a large number of vehicles or pedestrians passing
• In areas unsuitable for parking (overly small parking space, cliff etc.)
• If the image is hard to see due to dirt, direct sunlight, shadow or snow on the
camera lens
• If you are using tire chains or emer- gency tire(s)
● Do not use the system when the back
door is not completely closed.
CAUTION
● Do not use tires other than those
installed by the manufacturer, as the
system may not function correctly. Fur-
thermore, if you change the tires, there
may be errors in the positions of the
lines and frames displayed on the
screen. If you wish to change your tires,
see your Toyota dealer.
● In the following conditions, assisted
parking in the set parking position may
not be possible:
• The tires are extremely worn, or the
tire inflation pressure is low
• You are carrying an extremely heavy load
• There is a load in one side of the vehi- cle only, causing the vehicle to lean
• Tires have received a strong impact, such as bumping against a curb,
resulting in improper wheel alignment
If there is a large difference between the
set parking space and the vehicle posi-
tion in any situations other than those
above, consult with your Toyota dealer.
● Use your own eyes to confirm the vehi-
cle’s surroundings, as the displayed
image may become faint or dark, and
moving images will be distorted, or not
entirely visible when the outside temper-
ature is low. When backing up, be sure
to check behind and all around the vehi-
cle visually and with mirror before pro-
ceeding.