window TOYOTA PRIUS V 2012 Accessories, Audio & Navigation (in English)
[x] Cancel search | Manufacturer: TOYOTA, Model Year: 2012, Model line: PRIUS V, Model: TOYOTA PRIUS V 2012Pages: 228, PDF Size: 3.73 MB
Page 203 of 228
203
1. SETUP OPERATION
8
SETUP
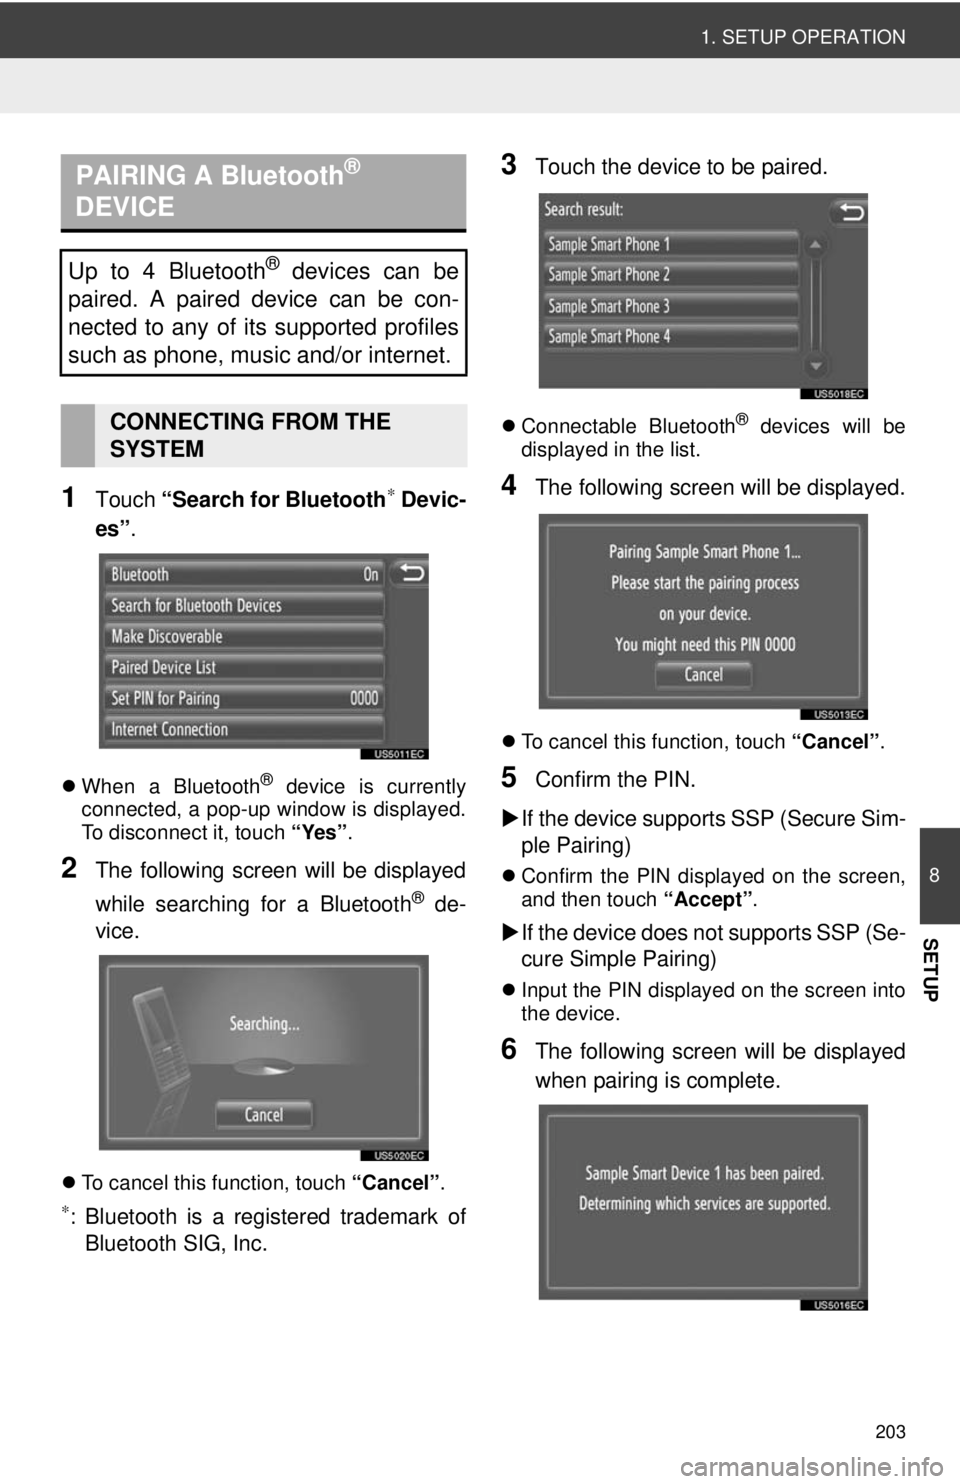
1Touch “Search for Bluetooth∗ Devic-
es” .
When a Bluetooth® device is currently
connected, a pop-up window is displayed.
To disconnect it, touch “Yes”.
2The following screen will be displayed
while searching for a Bluetooth
® de-
vice.
To cancel this function, touch “Cancel”.
∗: Bluetooth is a registered trademark of
Bluetooth SIG, Inc.
3Touch the device to be paired.
Connectable Bluetooth® devices will be
displayed in the list.
4The following screen will be displayed.
To cancel this function, touch “Cancel”.
5Confirm the PIN.
If the device supports SSP (Secure Sim-
ple Pairing)
Confirm the PIN displayed on the screen,
and then touch “Accept”.
If the device does not supports SSP (Se-
cure Simple Pairing)
Input the PIN displayed on the screen into
the device.
6The following screen will be displayed
when pairing is complete.
PAIRING A Bluetooth®
DEVICE
Up to 4 Bluetooth® devices can be
paired. A paired device can be con-
nected to any of its supported profiles
such as phone, music and/or internet.
CONNECTING FROM THE
SYSTEM
Page 204 of 228
204
1. SETUP OPERATION
7The system waits for connection re-
quests coming from the paired device.
All requested profiles are connected
automatically.
Internet profile is not connected automati-
cally. For details on connecting internet
profile, see “LOGIN PROCESS INTER-
NET PROFILE” on page 205.
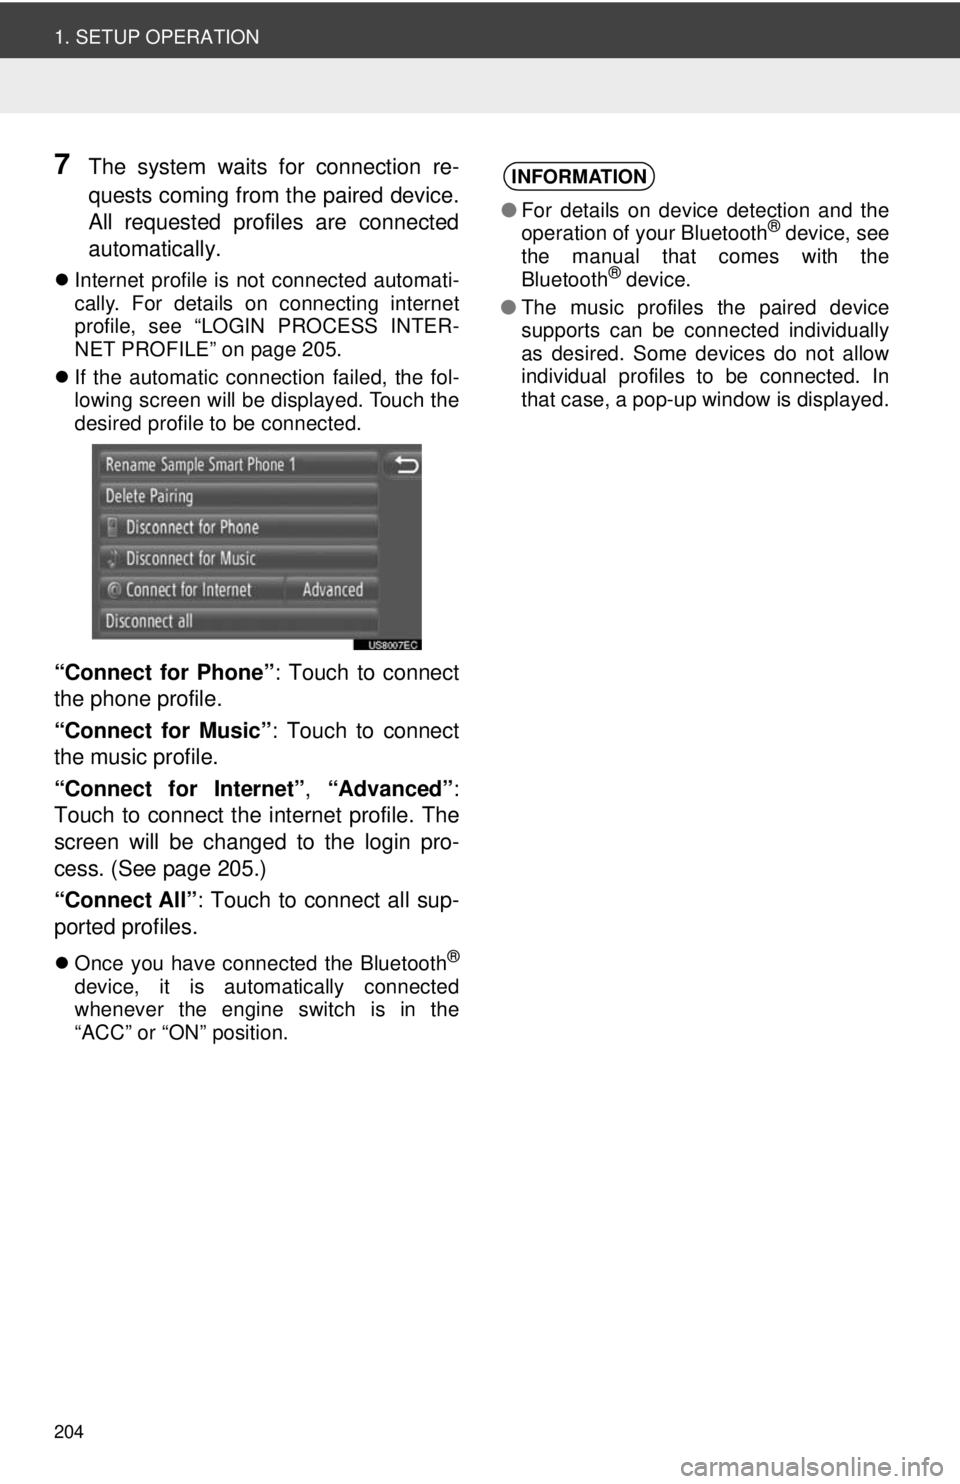
If the automatic connection failed, the fol-
lowing screen will be displayed. Touch the
desired profile to be connected.
“Connect for Phone” : Touch to connect
the phone profile.
“Connect for Music” : Touch to connect
the music profile.
“Connect for Internet” , “Advanced” :
Touch to connect the internet profile. The
screen will be changed to the login pro-
cess. (See page 205.)
“Connect All” : Touch to connect all sup-
ported profiles.
Once you have connected the Bluetooth®
device, it is automatically connected
whenever the engine switch is in the
“ACC” or “ON” position.
INFORMATION
●For details on device detection and the
operation of your Bluetooth® device, see
the manual that comes with the
Bluetooth
® device.
● The music profiles the paired device
supports can be connected individually
as desired. Some devices do not allow
individual profiles to be connected. In
that case, a pop-up window is displayed.
Page 205 of 228
205
1. SETUP OPERATION
8
SETUP
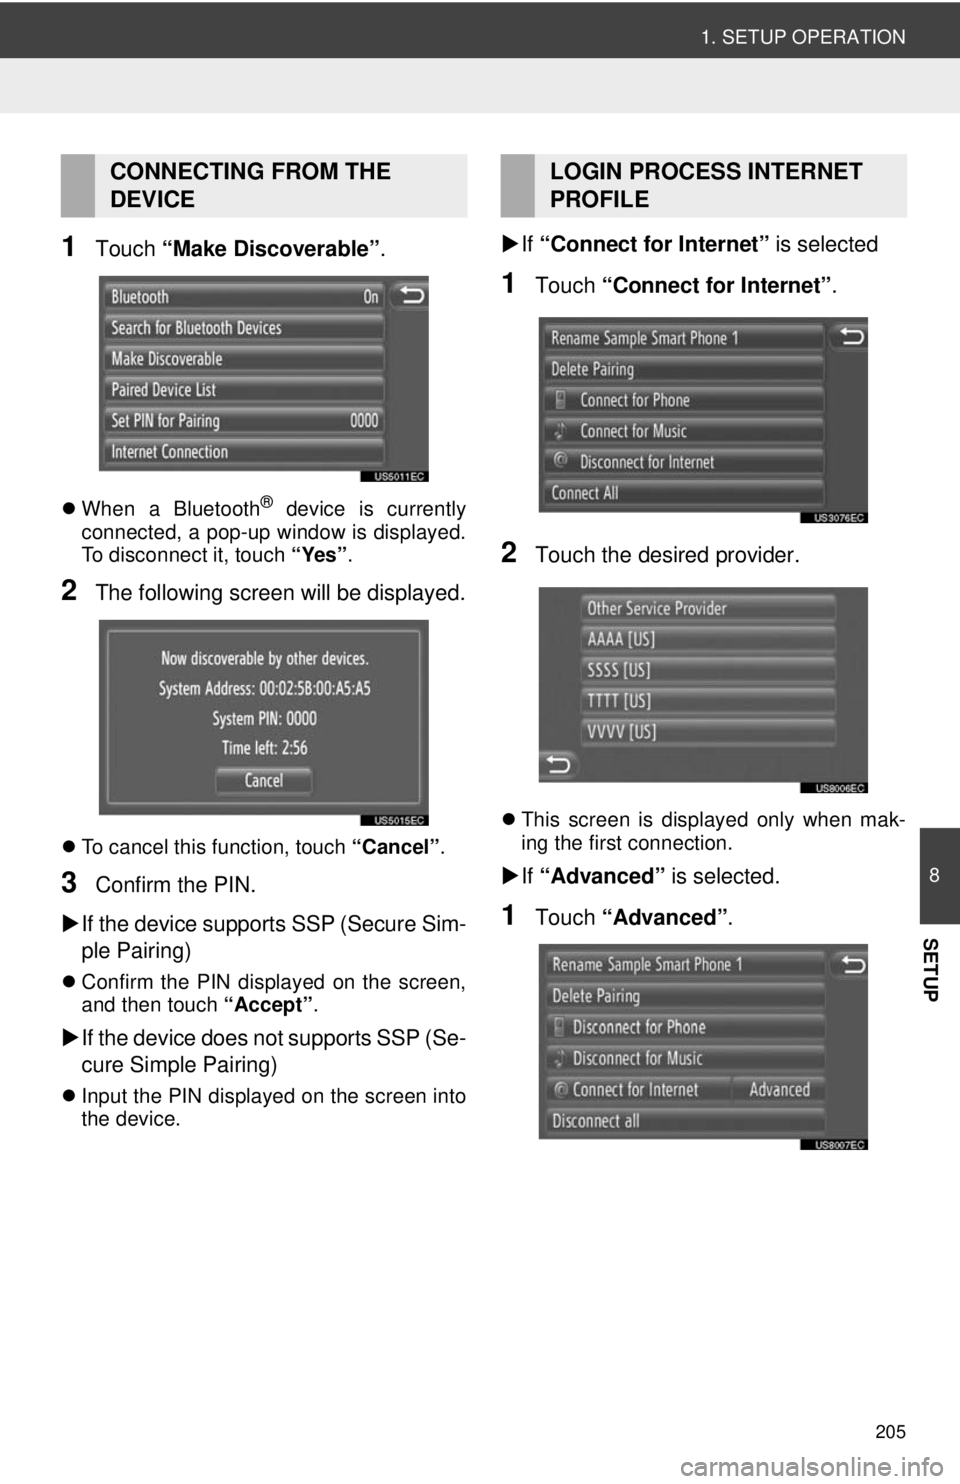
1Touch “Make Discoverable” .
When a Bluetooth® device is currently
connected, a pop-up window is displayed.
To disconnect it, touch “Yes”.
2The following screen will be displayed.
To cancel this function, touch “Cancel”.
3Confirm the PIN.
If the device supports SSP (Secure Sim-
ple Pairing)
Confirm the PIN displayed on the screen,
and then touch “Accept” .
If the device does not supports SSP (Se-
cure Simple Pairing)
Input the PIN displayed on the screen into
the device.
If “Connect for Internet” is selected
1Touch “Connect for Internet” .
2Touch the desired provider.
This screen is displayed only when mak-
ing the first connection.
If “Advanced” is selected.
1Touch “Advanced” .
CONNECTING FROM THE
DEVICELOGIN PROCESS INTERNET
PROFILE
Page 208 of 228
208
1. SETUP OPERATION
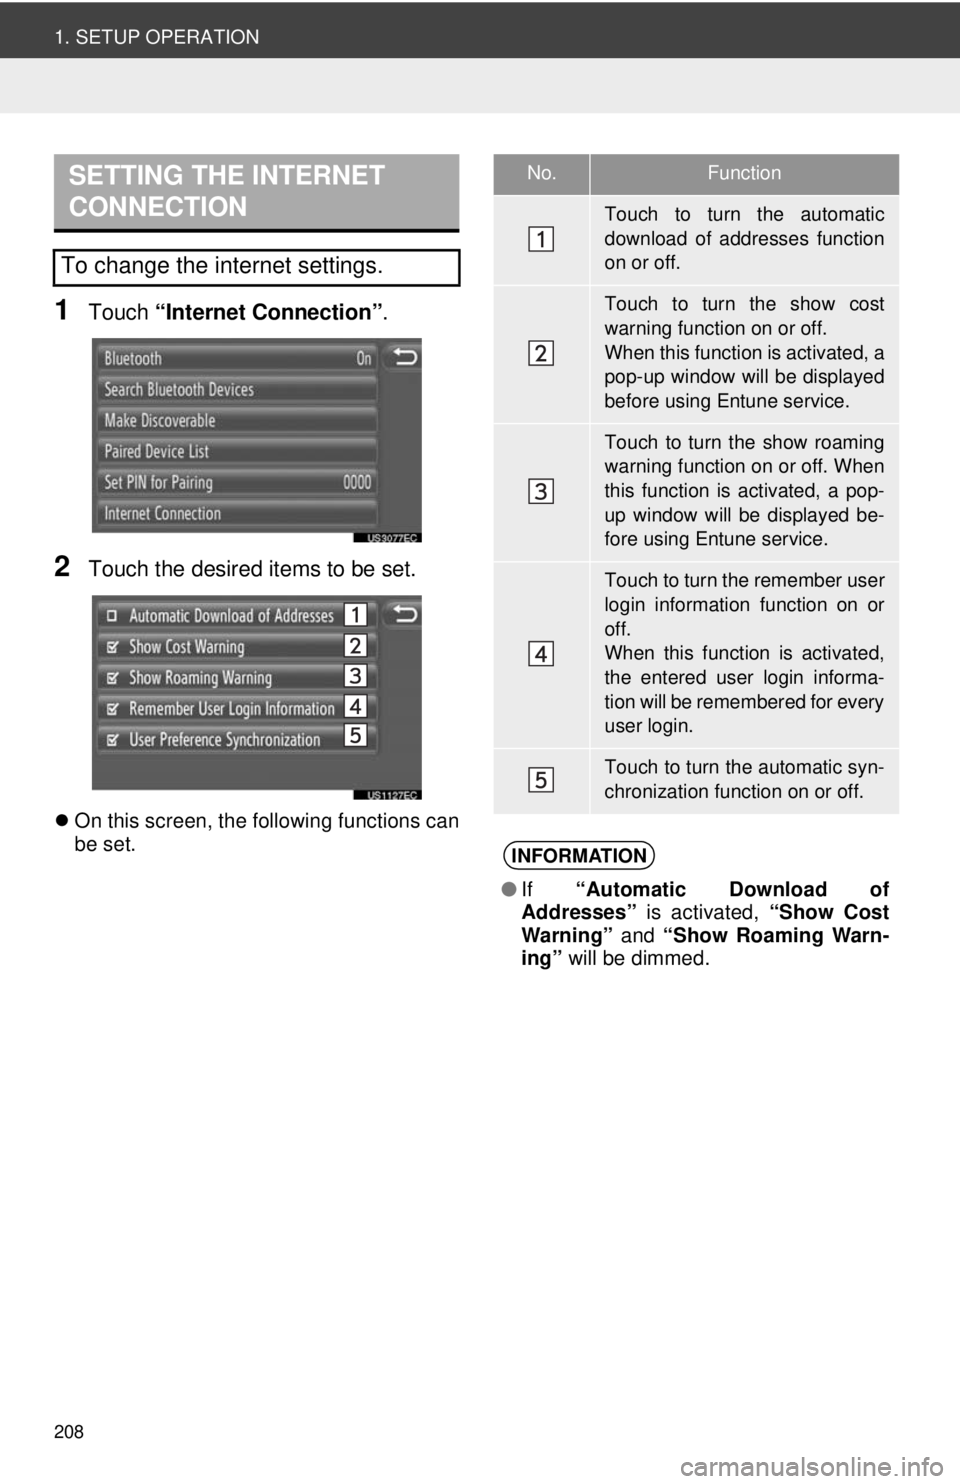
1Touch “Internet Connection” .
2Touch the desired items to be set.
On this screen, the following functions can
be set.
SETTING THE INTERNET
CONNECTION
To change the internet settings.
No.Function
Touch to turn the automatic
download of addresses function
on or off.
Touch to turn the show cost
warning function on or off.
When this function is activated, a
pop-up window will be displayed
before using Entune service.
Touch to turn the show roaming
warning function on or off. When
this function is activated, a pop-
up window will be displayed be-
fore using Entune service.
Touch to turn the remember user
login information function on or
off.
When this function is activated,
the entered user login informa-
tion will be remembered for every
user login.
Touch to turn the automatic syn-
chronization function on or off.
INFORMATION
●If “Automatic Download of
Addresses” is activated, “Show Cost
Warning” and “Show Roaming Warn-
ing” will be dimmed.
Page 215 of 228
215
1. REAR VIEW MONITOR SYSTEM
9
REAR VIEW MONITOR SYSTEM
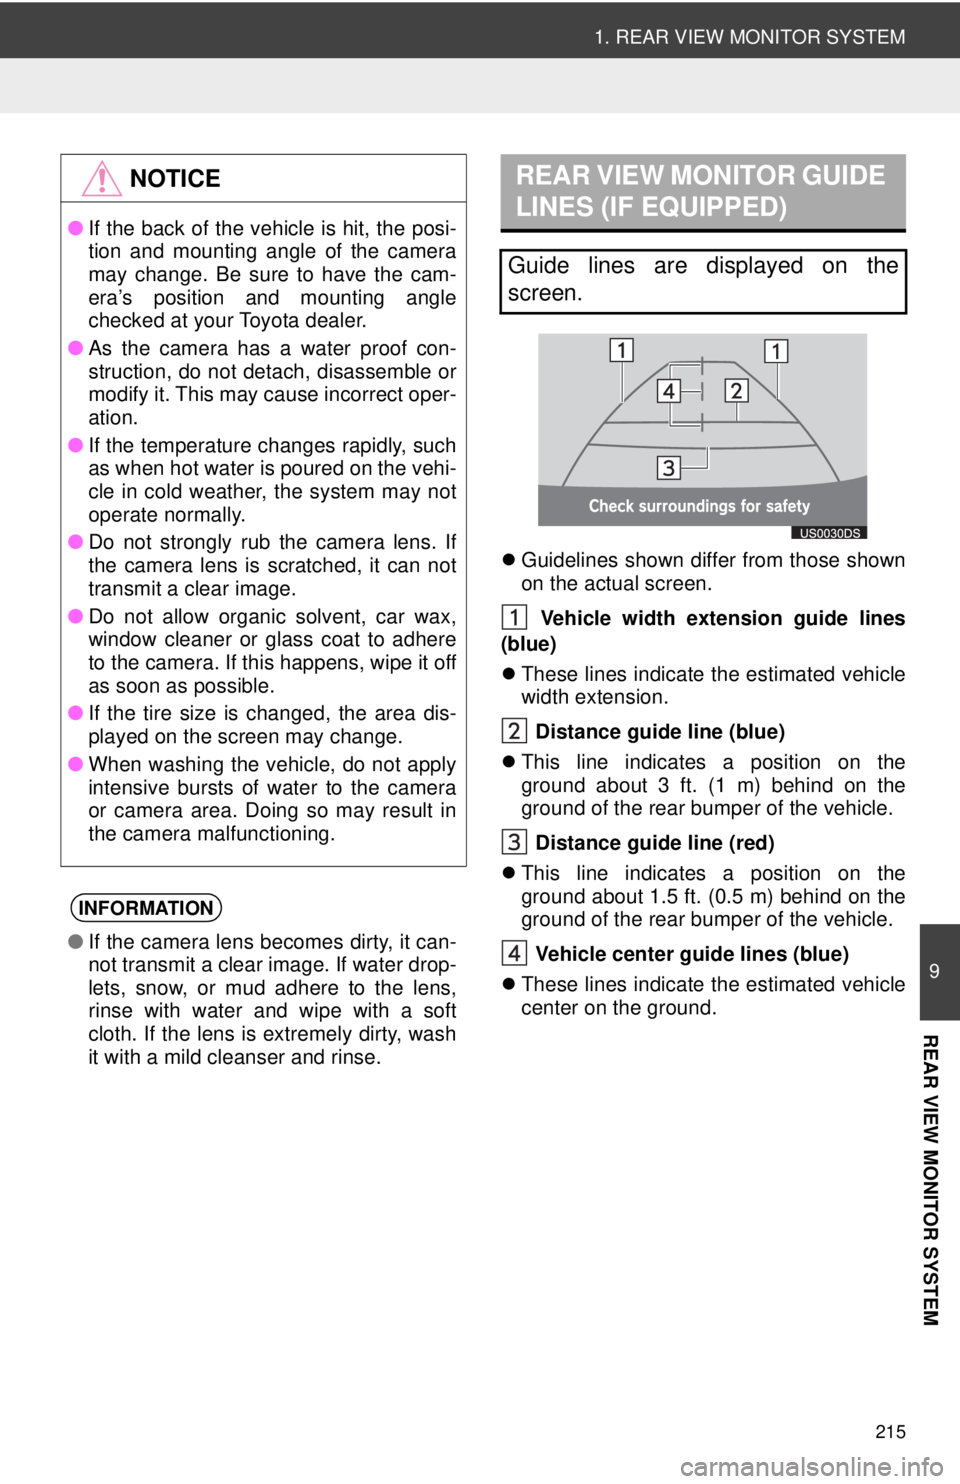
Guidelines shown differ from those shown
on the actual screen.
Vehicle width exten sion guide lines
(blue)
These lines indicate the estimated vehicle
width extension.
Distance guide line (blue)
This line indicates a position on the
ground about 3 ft. (1 m) behind on the
ground of the rear bumper of the vehicle.
Distance guide line (red)
This line indicates a position on the
ground about 1.5 ft. (0.5 m) behind on the
ground of the rear bumper of the vehicle.
Vehicle center gu ide lines (blue)
These lines indicate the estimated vehicle
center on the ground.
NOTICE
● If the back of the vehicle is hit, the posi-
tion and mounting angle of the camera
may change. Be sure to have the cam-
era’s position and mounting angle
checked at your Toyota dealer.
● As the camera has a water proof con-
struction, do not detach, disassemble or
modify it. This may cause incorrect oper-
ation.
● If the temperature changes rapidly, such
as when hot water is poured on the vehi-
cle in cold weather, the system may not
operate normally.
● Do not strongly rub the camera lens. If
the camera lens is scratched, it can not
transmit a clear image.
● Do not allow organic solvent, car wax,
window cleaner or glass coat to adhere
to the camera. If this happens, wipe it off
as soon as possible.
● If the tire size is changed, the area dis-
played on the screen may change.
● When washing the vehicle, do not apply
intensive bursts of water to the camera
or camera area. Doing so may result in
the camera malfunctioning.
INFORMATION
●If the camera lens becomes dirty, it can-
not transmit a clear image. If water drop-
lets, snow, or mud adhere to the lens,
rinse with water and wipe with a soft
cloth. If the lens is extremely dirty, wash
it with a mild cleanser and rinse.
REAR VIEW MONITOR GUIDE
LINES (IF EQUIPPED)
Guide lines are displayed on the
screen.