engine TOYOTA PRIUS V 2012 Accessories, Audio & Navigation (in English)
[x] Cancel search | Manufacturer: TOYOTA, Model Year: 2012, Model line: PRIUS V, Model: TOYOTA PRIUS V 2012Pages: 131, PDF Size: 5.2 MB
Page 11 of 131
11
1. CONTROLS AND FEATURES
1
QUICK GUIDE
3. TOUCH SCREEN OPERATION
To prevent damage to the screen, lightly
touch the screen buttons with your finger.
When a screen button is touched, a beep
sounds. (To set a beep sound, see page
93.)
Do not use objects other than your finger
to touch the screen.
This system is operated mainly by the
screen buttons.
NOTICE
●To prevent the 12-volt battery from being
discharged, do not leave the system on
longer than necessary when the engine
is not running.
INFORMATION
●If the system does not respond to a
touch on a screen button, move your fin-
ger away from the screen and then
touch it again.
● Dimmed screen buttons cannot be oper-
ated.
● Wipe off fingerprints using a glass clean-
ing cloth. Do not use chemical cleaners
to clean the touch screen.
● The displayed image may become
darker and moving images may be
slightly distorted when the display is
cold.
● Under extremely cold conditions, the
screen may not be displayed and the
data input by a user may be deleted.
Also, the screen buttons may be harder
than usual to depress.
● When you look at the screen through
polarized material such as polarized
sunglasses, the screen may be dark and
hard to see. If so, look at the screen
from different angles, adjust the screen
settings (See “DISPLAY SETTINGS” on
page 96.), or take off your sunglasses.
Page 16 of 131
16
1. AUDIO SYSTEM OPERATION
2. SOME BASICS
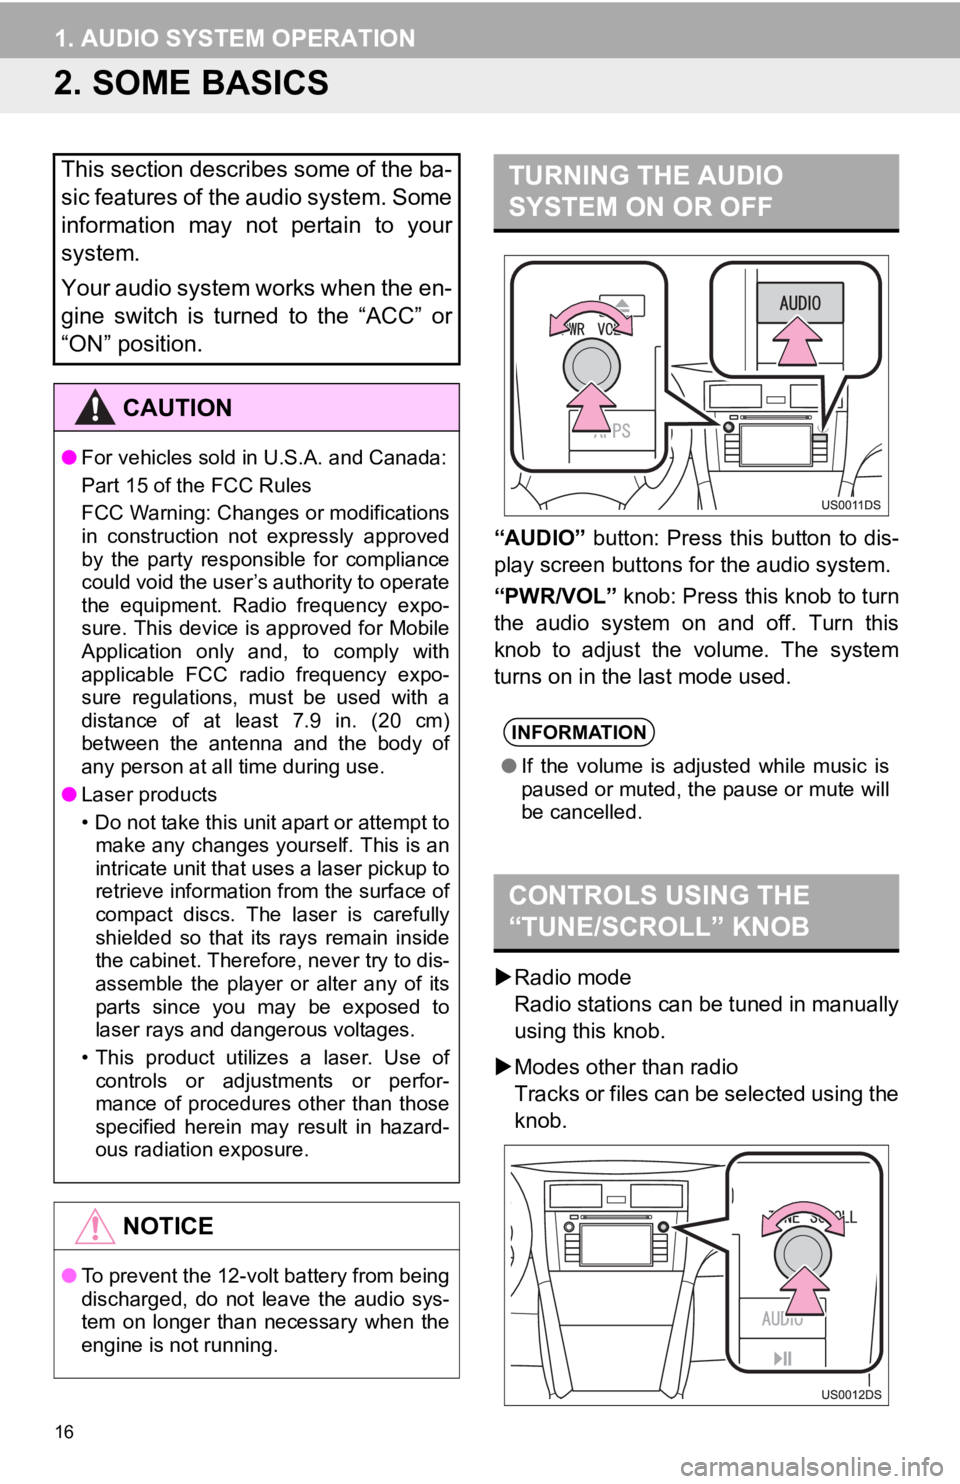
“AUDIO” button: Press this button to dis-
play screen buttons for the audio system.
“PWR/VOL” knob: Press this knob to turn
the audio system on and off. Turn this
knob to adjust the volume. The system
turns on in the last mode used.
Radio mode
Radio stations can be tuned in manually
using this knob.
Modes other than radio
Tracks or files can be selected using the
knob.
This section describes some of the ba-
sic features of the audio system. Some
information may not pertain to your
system.
Your audio system works when the en-
gine switch is turned to the “ACC” or
“ON” position.
CAUTION
● For vehicles sold in U.S.A. and Canada:
Part 15 of the FCC Rules
FCC Warning: Changes or modifications
in construction not expressly approved
by the party responsible for compliance
could void the user’s authority to operate
the equipment. Radio frequency expo-
sure. This device is approved for Mobile
Application only and, to comply with
applicable FCC radio frequency expo-
sure regulations, must be used with a
distance of at least 7.9 in. (20 cm)
between the antenna and the body of
any person at all time during use.
● Laser products
• Do not take this unit apart or attempt to
make any changes yourself. This is an
intricate unit that uses a laser pickup to
retrieve information from the surface of
compact discs. The laser is carefully
shielded so that its rays remain inside
the cabinet. Therefore, never try to dis-
assemble the player or alter any of its
parts since you may be exposed to
laser rays and dangerous voltages.
• This product utilizes a laser. Use of controls or adjustments or perfor-
mance of procedures other than those
specified herein may result in hazard-
ous radiation exposure.
NOTICE
● To prevent the 12-volt battery from being
discharged, do not leave the audio sys-
tem on longer than necessary when the
engine is not running.
TURNING THE AUDIO
SYSTEM ON OR OFF
INFORMATION
●If the volume is adjusted while music is
paused or muted, the pause or mute will
be cancelled.
CONTROLS USING THE
“TUNE/SCROLL” KNOB
Page 85 of 131
4
85
1
2
3
4
5
6
1. QUICK REFERENCE .................... 86
2. FUEL CONSUMPTION.................. 87
FUEL CONSUMPTION (VEHICLES WITH HYBRID
SYSTEM) ............................................ 87
FUEL CONSUMPTION (VEHICLES WITH GASOLINE
ENGINE) ............................................. 87
3. TIRE PRESSURE WARNING SYSTEM .......... ....................... ..... 89
SHOWING THE TIRE PRESSURE
SCREEN ............................................. 89
1VEHICLE INFORMATION
VEHICLE INFORMATION
Page 87 of 131
87
1. VEHICLE INFORMATION
4
VEHICLE INFORMATION
2. FUEL CONSUMPTION
Energy monitor
Trip consumption
History
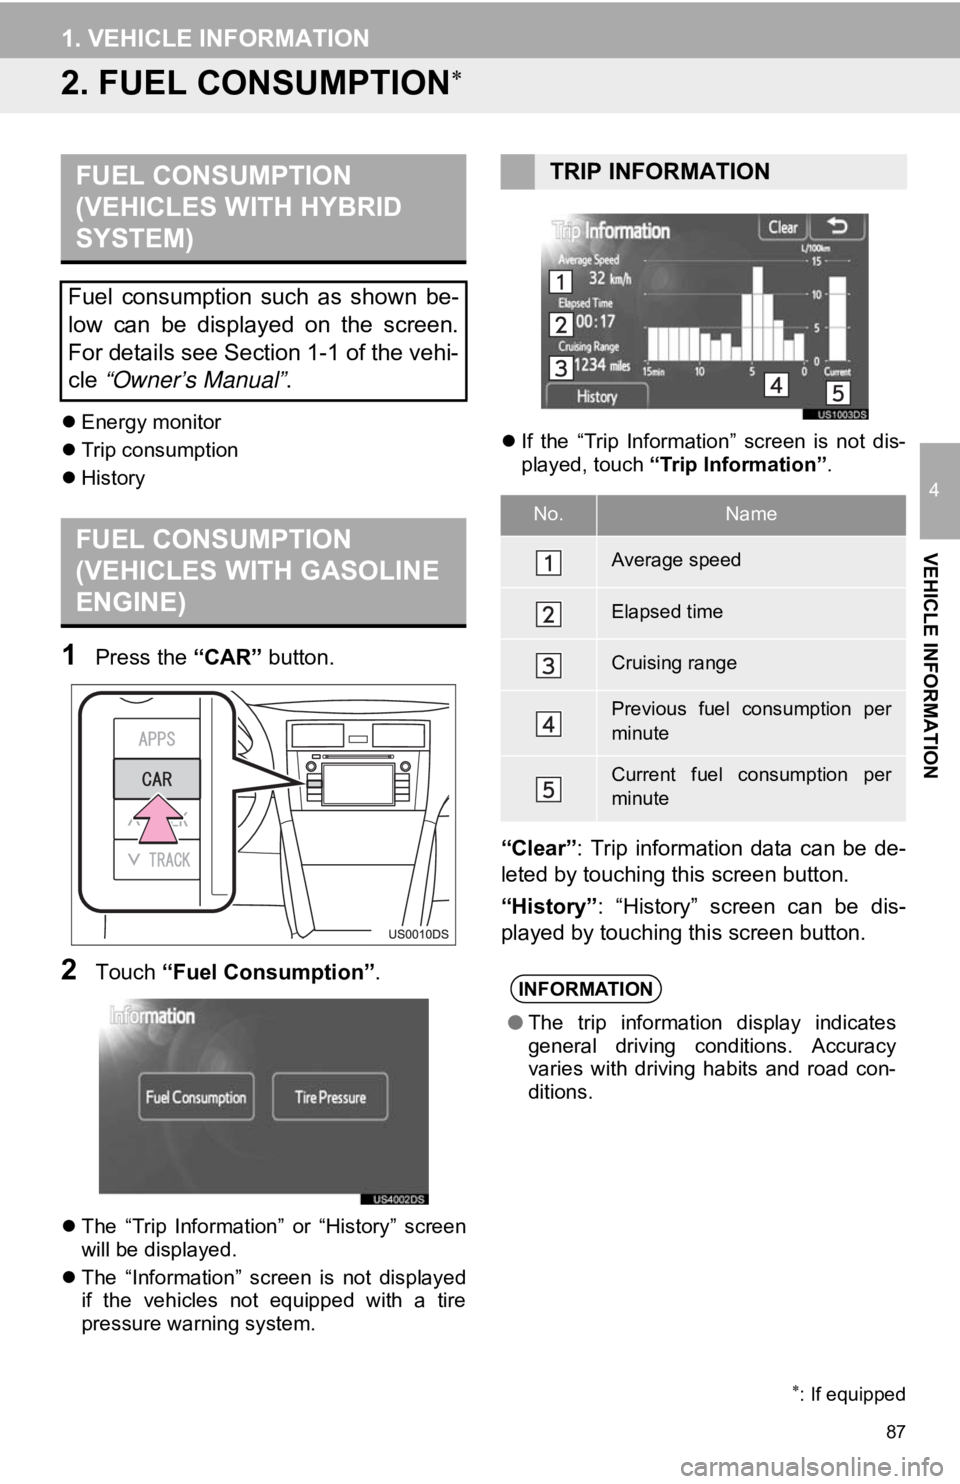
1Press the “CAR” button.
2Touch “Fuel Consumption” .
The “Trip Information” or “History” screen
will be displayed.
The “Information” screen is not displayed
if the vehicles not equipped with a tire
pressure warning system.
If the “Trip Information” screen is not dis-
played, touch “Trip Information” .
“Clear”: Trip information data can be de-
leted by touching this screen button.
“History” : “History” screen can be dis-
played by touching this screen button.
: If equipped
FUEL CONSUMPTION
(VEHICLES WITH HYBRID
SYSTEM)
Fuel consumption such as shown be-
low can be displayed on the screen.
For details see Section 1-1 of the vehi-
cle “Owner’s Manual” .
FUEL CONSUMPTION
(VEHICLES WITH GASOLINE
ENGINE)
TRIP INFORMATION
No.Name
Average speed
Elapsed time
Cruising range
Previous fuel consumption per
minute
Current fuel consumption per
minute
INFORMATION
●The trip information display indicates
general driving conditions. Accuracy
varies with driving habits and road con-
ditions.
Page 96 of 131
96
1. SETUP OPERATION
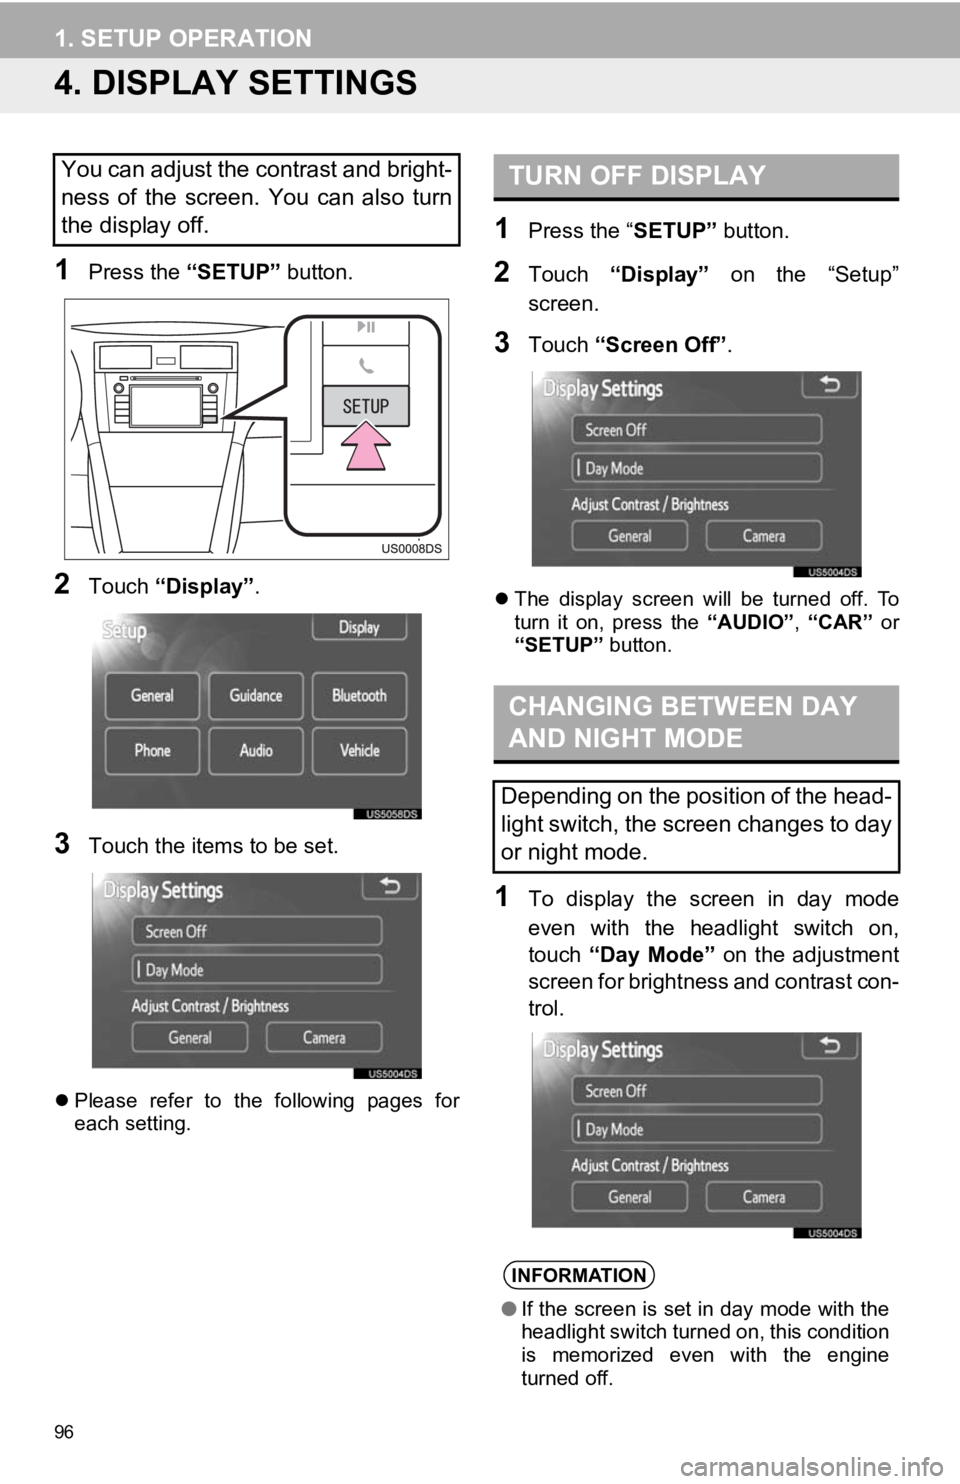
4. DISPLAY SETTINGS
1Press the “SETUP” button.
2Touch “Display” .
3Touch the items to be set.
Please refer to the following pages for
each setting.
1Press the “ SETUP” button.
2Touch “Display” on the “Setup”
screen.
3Touch “Screen Off” .
The display screen will be turned off. To
turn it on, press the “AUDIO”, “CAR” or
“SETUP” button.
1To display the screen in day mode
even with the headlight switch on,
touch “Day Mode” on the adjustment
screen for brightness and contrast con-
trol.
You can adjust the contrast and bright-
ness of the screen. You can also turn
the display off.TURN OFF DISPLAY
CHANGING BETWEEN DAY
AND NIGHT MODE
Depending on the position of the head-
light switch, the screen changes to day
or night mode.
INFORMATION
● If the screen is set in day mode with the
headlight switch turned on, this condition
is memorized even with the engine
turned off.
Page 109 of 131
109
1. SETUP OPERATION
5
SETUP
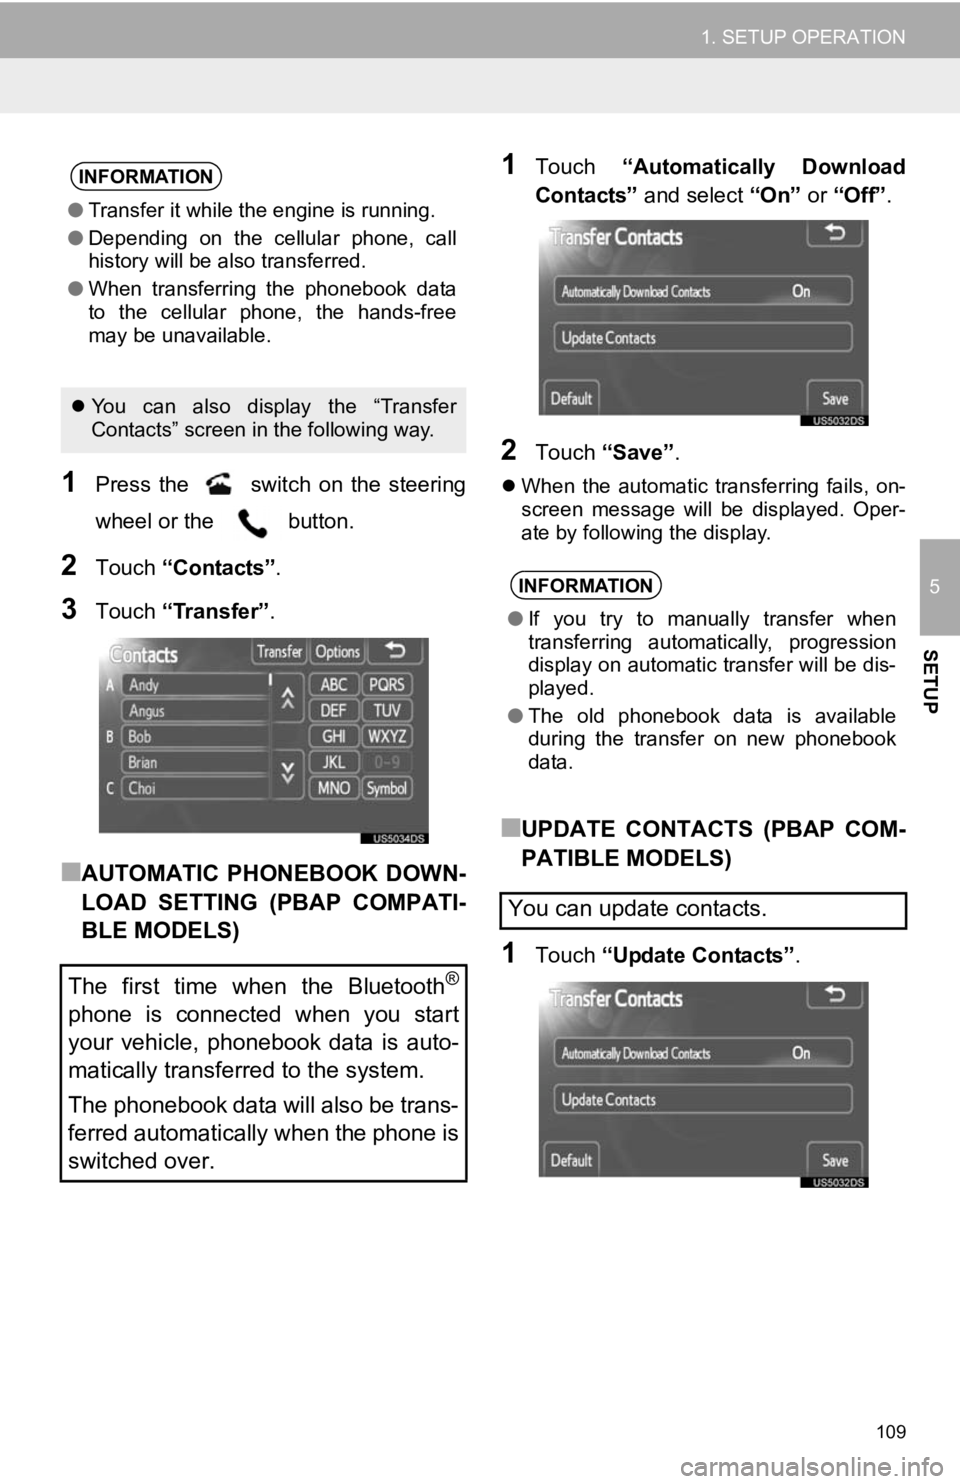
1Press the switch on the steering
wheel or the button.
2Touch “Contacts” .
3Touch “Transfer” .
■AUTOMATIC PHONEBOOK DOWN-
LOAD SETTING (PBAP COMPATI-
BLE MODELS)
1Touch “Automatically Download
Contacts” and select “On” or “Off” .
2Touch “Save” .
When the automatic transferring fails, on-
screen message will be displayed. Oper-
ate by following the display.
■UPDATE CONTACTS (PBAP COM-
PATIBLE MODELS)
1Touch “Update Contacts” .
INFORMATION
●Transfer it while the engine is running.
● Depending on the cellular phone, call
history will be also transferred.
● When transferring the phonebook data
to the cellular phone, the hands-free
may be unavailable.
You can also display the “Transfer
Contacts” screen in the following way.
The first time when the Bluetooth®
phone is connected when you start
your vehicle, phonebook data is auto-
matically transferred to the system.
The phonebook data will also be trans-
ferred automatically when the phone is
switched over.
INFORMATION
● If you try to manually transfer when
transferring automatically, progression
display on automatic transfer will be dis-
played.
● The old phonebook data is available
during the transfer on new phonebook
data.
You can update contacts.
Page 120 of 131
120
1. REAR VIEW MONITOR SYSTEM
1. REAR VIEW MONITOR SYSTEM OPERATION
1To display the rear view image on the
screen, the shift lever is in the “R” posi-
tion when the engine switch is in the
“ON” position.
If you move the shift lever out of the “R”
position, the screen returns to the previ-
ous screen.
The rear view monitor system assists
the driver by displaying an image of the
view behind the vehicle while backing
up.
The image is displayed in reverse on
the screen. This allows the image to
appear in the same manner as that of
the rear view mirror.CAUTION
●Never depend on the rear view monitor
system entirely when backing up.
Always make sure your intended path is
clear.
Use caution, just as you would when
backing up any vehicle.
● Never back up while looking only at the
screen. The image on the screen is dif-
ferent from actual conditions. Depicted
distances between objects and flat sur-
faces will differ from the actual dis-
tances. If you back up while looking only
at the screen, you may hit a vehicle, a
person or an object. When backing up,
be sure to check behind and all around
the vehicle visually and with mirrors
before proceeding.
● Do not use the system when the back
door, trunk or tailgate is not completely
closed.
● Use your own eyes to confirm the vehi-
cle’s surroundings, as the displayed
image may become faint or dark, and
moving images will be distorted, or not
entirely visible when the outside temper-
ature is low. When backing up, be sure
to check behind and all around the vehi-
cle visually and with mirror before pro-
ceeding.
● Do not use the system in the following
cases:
• On icy or slick road surfaces, or in
snow.
• When using tire chains or emergency tires.
• On an uneven road, such as a slope.
With rear view monitor guide lines (If
equipped)
● Always check the vehicle surrounding
area, because the guide lines are ancil-
lary lines.
● The guide lines are ancillary lines and
do not change even if the steering wheel
is turned.