change wheel TOYOTA PROACE CITY 2022 Owner's Manual
[x] Cancel search | Manufacturer: TOYOTA, Model Year: 2022, Model line: PROACE CITY, Model: TOYOTA PROACE CITY 2022Pages: 320, PDF Size: 75.81 MB
Page 187 of 320
187
Driving
6
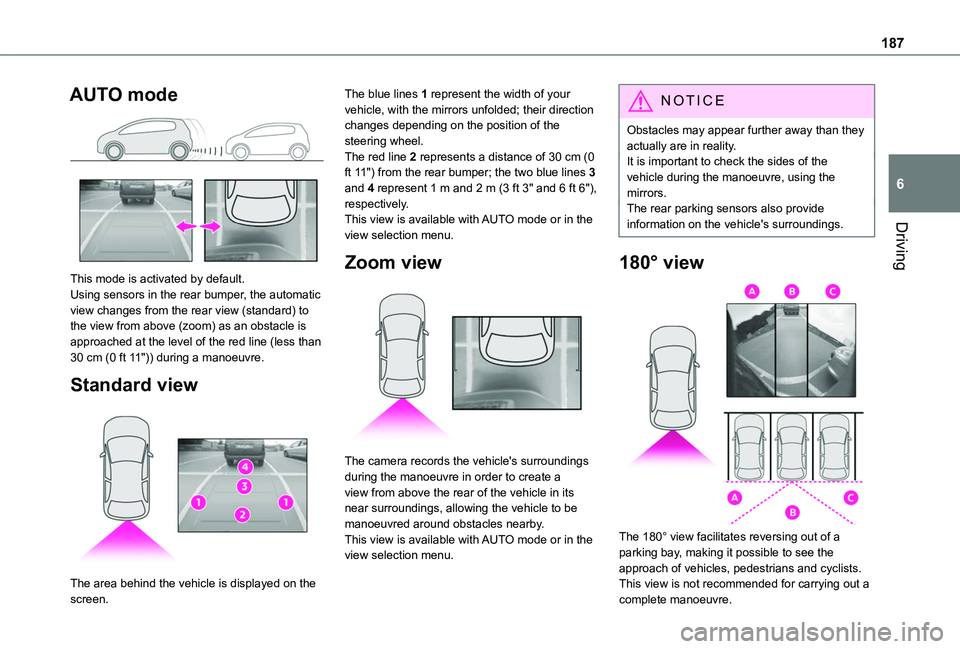
AUTO mode
This mode is activated by default.Using sensors in the rear bumper, the automatic view changes from the rear view (standard) to the view from above (zoom) as an obstacle is approached at the level of the red line (less than 30 cm (0 ft 11")) during a manoeuvre.
Standard view
The area behind the vehicle is displayed on the
screen.
The blue lines 1 represent the width of your vehicle, with the mirrors unfolded; their direction changes depending on the position of the steering wheel.The red line 2 represents a distance of 30 cm (0 ft 11") from the rear bumper; the two blue lines 3 and 4 represent 1 m and 2 m (3 ft 3" and 6 ft 6"), respectively.This view is available with AUTO mode or in the view selection menu.
Zoom view
The camera records the vehicle's surroundings during the manoeuvre in order to create a view from above the rear of the vehicle in its near surroundings, allowing the vehicle to be manoeuvred around obstacles nearby.This view is available with AUTO mode or in the view selection menu.
NOTIC E
Obstacles may appear further away than they actually are in reality.It is important to check the sides of the vehicle during the manoeuvre, using the mirrors.The rear parking sensors also provide information on the vehicle's surroundings.
180° view
The 180° view facilitates reversing out of a parking bay, making it possible to see the approach of vehicles, pedestrians and cyclists.This view is not recommended for carrying out a
complete manoeuvre.
Page 223 of 320
223
In the event of a breakdown
8
Running out of fuel
(Diesel)
With Diesel engines, the fuel system must be primed if you run out of fuel.Before starting to prime the system, it is essential to put at least 5 litres of Diesel into the fuel tank.
NOTIC E
For more information on Refuelling and on Misfuel prevention (Diesel), refer to the corresponding section.
NOTIC E
For more information on the Engine compartment, in particular the location of these components under the bonnet, refer to the corresponding section.
With Euro 6.2/6.3 engines
► Switch on the ignition (without starting the engine).► Wait around 1 minute and switch off the ignition.► Operate the starter motor to start the engine.If the engine does not start at the first attempt,
do not keep trying, but restart the procedure.
Tool kit
► For easier access, move the seat(s) forward.
Accessing the tools
Vehicle with electric motor
With temporary puncture repair kitThe tools are located in the passenger footwell.With spare wheelThe tools are located under the right-hand front seat.To access the tools:– With non-adjustable front seat, lift the seat cushion by placing your hand between the cushion and the backrest.– With adjustable front seat, move the seat forward as far as possible.The jack is located in the passenger footwell.
Vehicle with Petrol or Diesel engine
With temporary puncture repair kitThe kit is located under the right-hand front seat.With spare wheel
The jack is located under the right-hand front seat.The tools are located under the left-hand front seat.
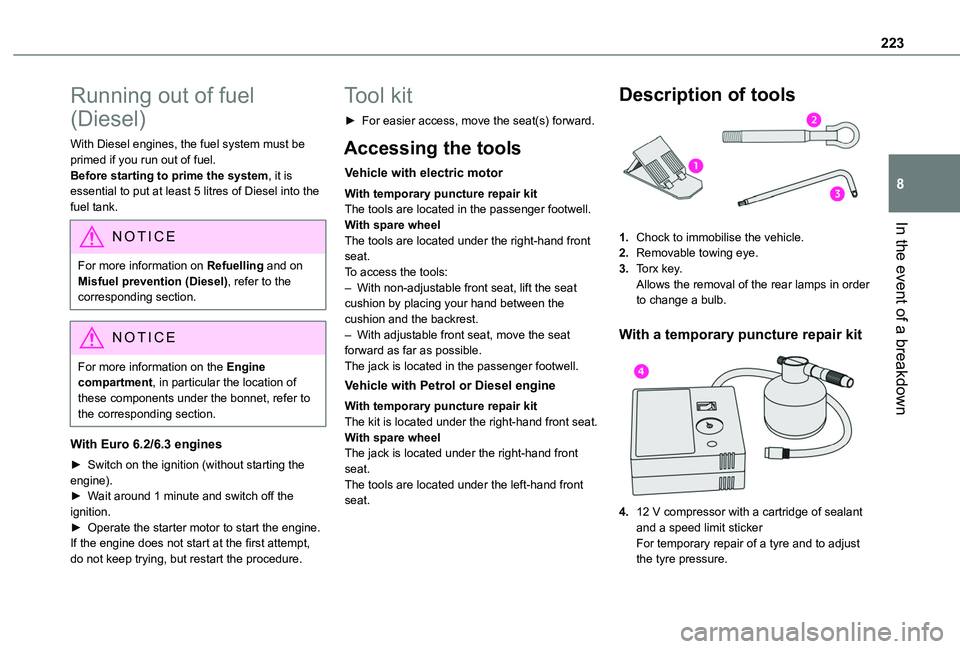
Description of tools
1.Chock to immobilise the vehicle.
2.Removable towing eye.
3.Torx key.Allows the removal of the rear lamps in order to change a bulb.
With a temporary puncture repair kit
4.12 V compressor with a cartridge of sealant and a speed limit stickerFor temporary repair of a tyre and to adjust
the tyre pressure.
Page 224 of 320
224
WARNI NG
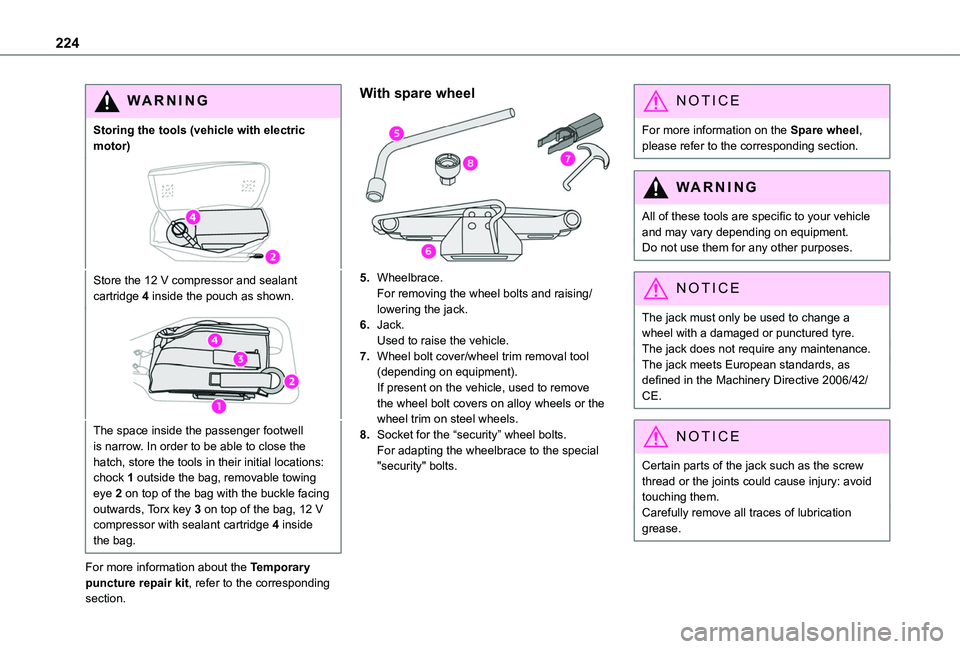
Storing the tools (vehicle with electric motor)
Store the 12 V compressor and sealant cartridge 4 inside the pouch as shown.
The space inside the passenger footwell is narrow. In order to be able to close the hatch, store the tools in their initial locations: chock 1 outside the bag, removable towing eye 2 on top of the bag with the buckle facing outwards, Torx key 3 on top of the bag, 12 V compressor with sealant cartridge 4 inside the bag.
For more information about the Temporary puncture repair kit, refer to the corresponding section.
With spare wheel
5.Wheelbrace.For removing the wheel bolts and raising/lowering the jack.
6.Jack.Used to raise the vehicle.
7.Wheel bolt cover/wheel trim removal tool (depending on equipment).If present on the vehicle, used to remove the wheel bolt covers on alloy wheels or the wheel trim on steel wheels.
8.Socket for the “security” wheel bolts.For adapting the wheelbrace to the special "security" bolts.
NOTIC E
For more information on the Spare wheel, please refer to the corresponding section.
WARNI NG
All of these tools are specific to your vehicle and may vary depending on equipment.Do not use them for any other purposes.
NOTIC E
The jack must only be used to change a wheel with a damaged or punctured tyre.The jack does not require any maintenance.The jack meets European standards, as defined in the Machinery Directive 2006/42/CE.
NOTIC E
Certain parts of the jack such as the screw thread or the joints could cause injury: avoid touching them.Carefully remove all traces of lubrication grease.
Page 227 of 320
227
In the event of a breakdown
8
Spare wheel
NOTIC E
For more information on the Tool kit, refer to the corresponding section.
► Park the vehicle, taking care to avoid obstructing traffic, and apply the parking brake.► Follow the safety instructions (hazard warning lamps, warning triangle, wearing high visibility vest, etc.) according to the legislation in force in the country where you are driving.► Switch off the ignition.
Access to the spare wheel
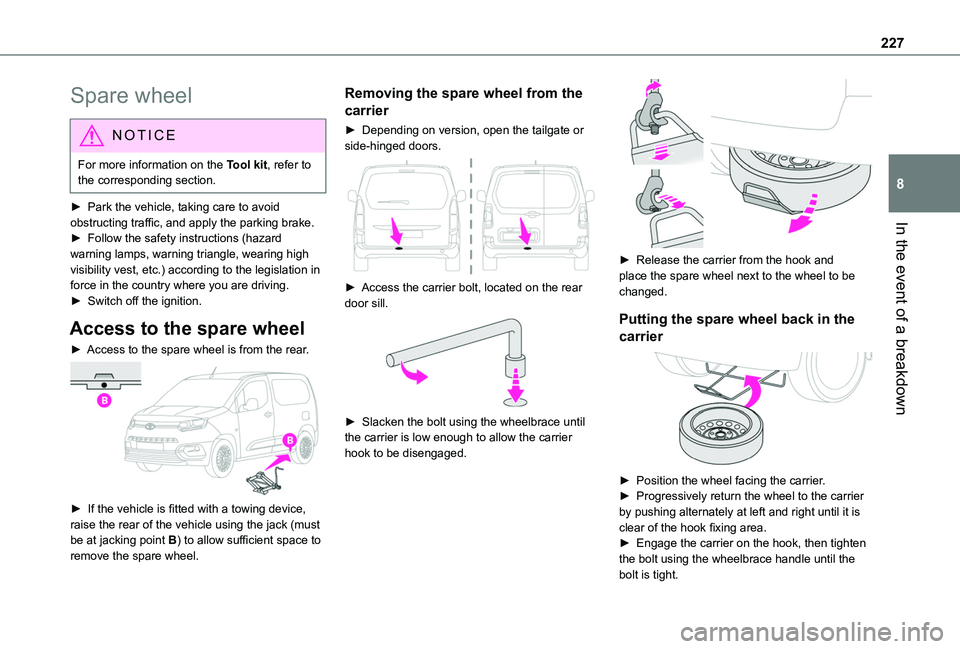
► Access to the spare wheel is from the rear.
► If the vehicle is fitted with a towing device, raise the rear of the vehicle using the jack (must be at jacking point B) to allow sufficient space to
remove the spare wheel.
Removing the spare wheel from the
carrier
► Depending on version, open the tailgate or side-hinged doors.
► Access the carrier bolt, located on the rear door sill.
► Slacken the bolt using the wheelbrace until the carrier is low enough to allow the carrier hook to be disengaged.
► Release the carrier from the hook and place the spare wheel next to the wheel to be changed.
Putting the spare wheel back in the
carrier
► Position the wheel facing the carrier.► Progressively return the wheel to the carrier by pushing alternately at left and right until it is clear of the hook fixing area.► Engage the carrier on the hook, then tighten the bolt using the wheelbrace handle until the bolt is tight.
Page 228 of 320
228
Removing a wheel
WARNI NG
Parking the vehicleImmobilise the vehicle where it does not obstruct traffic: the ground must be level, stable and non-slippery.With a manual gearbox, engage first gear to lock the wheels, apply the parking brake, unless it is programmed to be in automatic mode, and switch off the ignition.With an automatic gearbox, select mode P to lock the wheels, apply the parking brake, unless it is programmed to be in automatic mode, and switch off the ignition.Check for the fixed illumination of the parking brake warning lamps in the instrument panel.The occupants must get out of the vehicle and wait where they are safe.If necessary, place a chock under the wheel diagonally opposite the wheel to be changed.Never go underneath a vehicle raised using a
jack; use an axle stand.
NOTIC E
Wheel with wheel trimWhen removing the wheel, first remove the wheel trim by pulling at the valve aperture using the wheelbrace.When refitting the wheel, refit the wheel trim, starting by placing its aperture in line with the valve and then pushing it into place all round its edge with the palm of your hand.
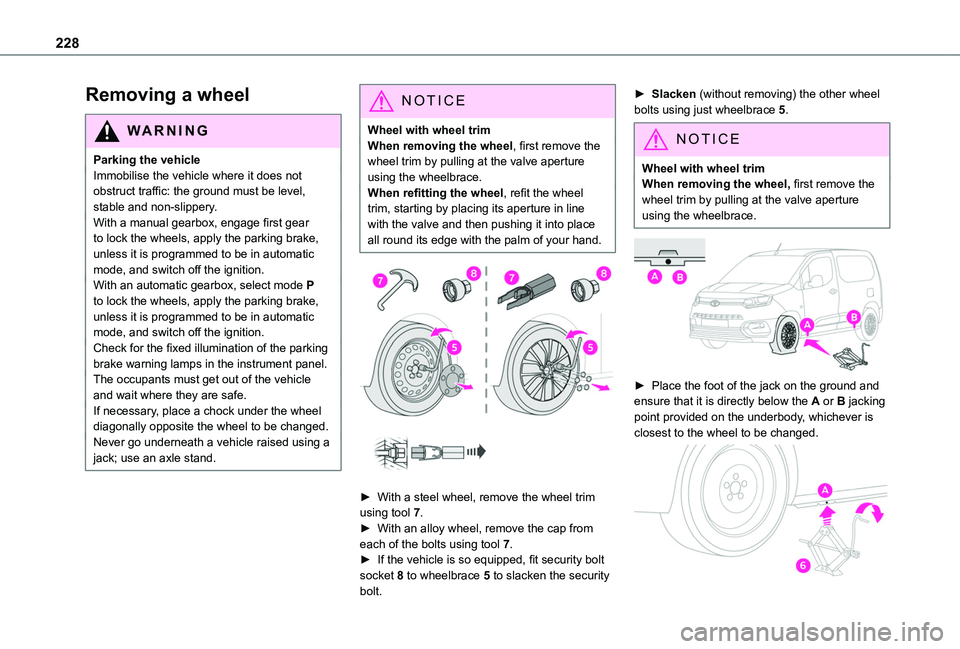
► With a steel wheel, remove the wheel trim using tool 7.► With an alloy wheel, remove the cap from each of the bolts using tool 7.
► If the vehicle is so equipped, fit security bolt socket 8 to wheelbrace 5 to slacken the security bolt.
► Slacken (without removing) the other wheel bolts using just wheelbrace 5.
NOTIC E
Wheel with wheel trimWhen removing the wheel, first remove the wheel trim by pulling at the valve aperture using the wheelbrace.
► Place the foot of the jack on the ground and ensure that it is directly below the A or B jacking point provided on the underbody, whichever is closest to the wheel to be changed.
Page 254 of 320
254
Identification markings
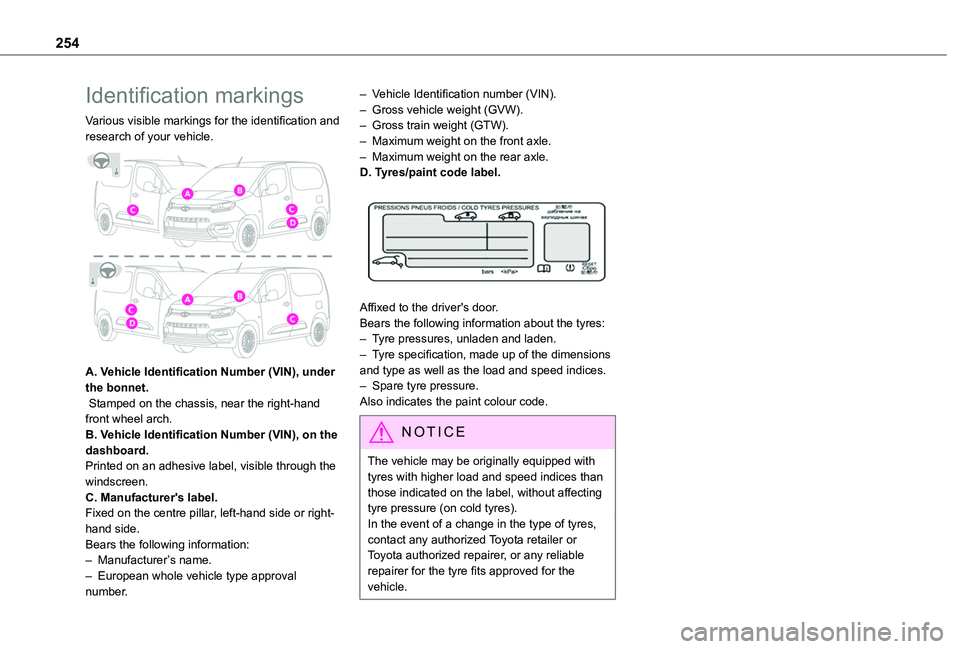
Various visible markings for the identification and research of your vehicle.
A. Vehicle Identification Number (VIN), under the bonnet. Stamped on the chassis, near the right-hand front wheel arch.B. Vehicle Identification Number (VIN), on the dashboard.Printed on an adhesive label, visible through the windscreen.C. Manufacturer's label.Fixed on the centre pillar, left-hand side or right-hand side.Bears the following information:
– Manufacturer’s name.– European whole vehicle type approval number.
– Vehicle Identification number (VIN).– Gross vehicle weight (GVW).– Gross train weight (GTW).– Maximum weight on the front axle.– Maximum weight on the rear axle.D. Tyres/paint code label.
Affixed to the driver's door.Bears the following information about the tyres:– Tyre pressures, unladen and laden.– Tyre specification, made up of the dimensions and type as well as the load and speed indices.– Spare tyre pressure.Also indicates the paint colour code.
NOTIC E
The vehicle may be originally equipped with tyres with higher load and speed indices than those indicated on the label, without affecting tyre pressure (on cold tyres).In the event of a change in the type of tyres, contact any authorized Toyota retailer or Toyota authorized repairer, or any reliable repairer for the tyre fits approved for the vehicle.
Page 256 of 320
256
Steering mounted controls
Steering mounted controls -
Type 1
Radio:Select the previous/next preset radio station.Select the previous/next item in a menu or a list.Media:Select the previous/next track.Select the previous/next item in a menu or a list.Radio:Short press: display the list of radio stations.Long press: update the list.Media:Short press: display the list of folders.Long press: display the available sorting options.Short press: change audio source (radio;
USB; AUX if equipment connected; CD; streaming).Long press: display the call log.
Short press during an incoming call: accept the call.Short press during a call in progress: end the call.Confirm a selection.
Increase volume.
Decrease volume.
Mute/restore sound by simultaneously pressing the increase and decrease volume buttons.
Steering mounted controls -
Type 2
Voice commands:This control is located on the steering wheel or at the end of the lighting control stalk (depending on equipment).Short press, smartphone voice commands via the system.Increase volume.
Decrease volume.Mute by pressing the volume increase
and decrease buttons simultaneously (depending on equipment).Restore the sound by pressing one of the two volume buttons.Change the multimedia source.
Short press: display the calls log.Short press during an incoming call: accept the call.
Long press during an incoming call: reject the call.Short press during a call in progress: end the call.Radio (rotate): previous/next preset station.Media (rotate): previous/next track, move in a list.Short press: confirm a selection; if nothing selected, access to presets.Radio: display the list of stations.Media: display the list of tracks.
Menus
Radio
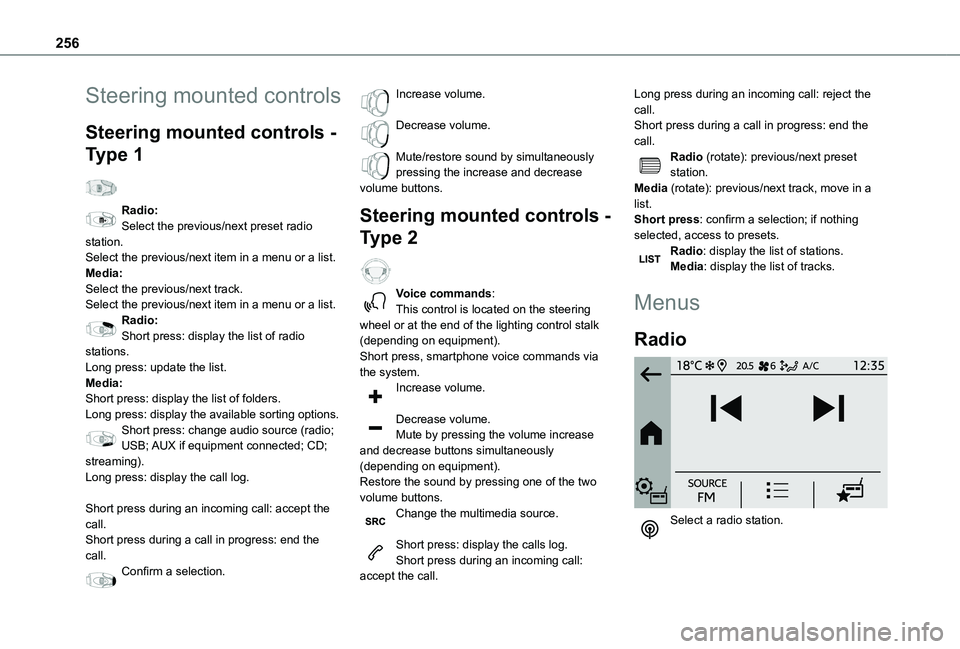
Select a radio station.
Page 266 of 320
266
– Media player connected via the auxiliary socket (depending on equipment).
NOTIC E
In the "Settings" menu, it is possible to create a profile for an individual or for a group of people with shared interests, and configure a wide range of settings (radio presets, audio settings, ambiences, etc.). Settings are applied automatically.
NOTIC E
In very hot conditions, the volume may be limited to protect the system. It may enter standby mode (with the screen and sound off) for 5 minutes or more.The system will resume normal operation when the temperature in the passenger compartment has dropped.
Steering mounted controls
Steering mounted controls -
Type 1
Radio:Select the previous/next preset radio station.Select the previous/next item in a menu or a list.Media:Select the previous/next track.Select the previous/next item in a menu or a list.Radio:Short press: display the list of radio stations.Long press: update the list.Media:Short press: display the list of folders.Long press: display the available sorting options.Change audio source (radio; USB; AUX if
equipment connected; CD; streaming).Confirm a selection.
Increase volume.
Decrease volume.
Mute/restore sound by simultaneously pressing the increase and decrease volume buttons.
Steering mounted controls -
Type 2
Voice commands:This control is located on the steering wheel or at the end of the lighting control lever (depending on equipment).Short press, smartphone voice commands via the system.Increase volume.
Decrease volume.Mute by pressing the volume increase and decrease buttons simultaneously (depending on equipment).Restore the sound by pressing one of the two volume buttons.Media (short press): change the multimedia source.Telephone (short press): start telephone call.
Call in progress (short press): access telephone menu.Telephone (long press): reject an incoming call, end call; when no call is in progress, access telephone menu.Radio (rotate): automatic search for the previous/next station.Media (rotate): previous/next track, move in a list.
Page 280 of 320
280
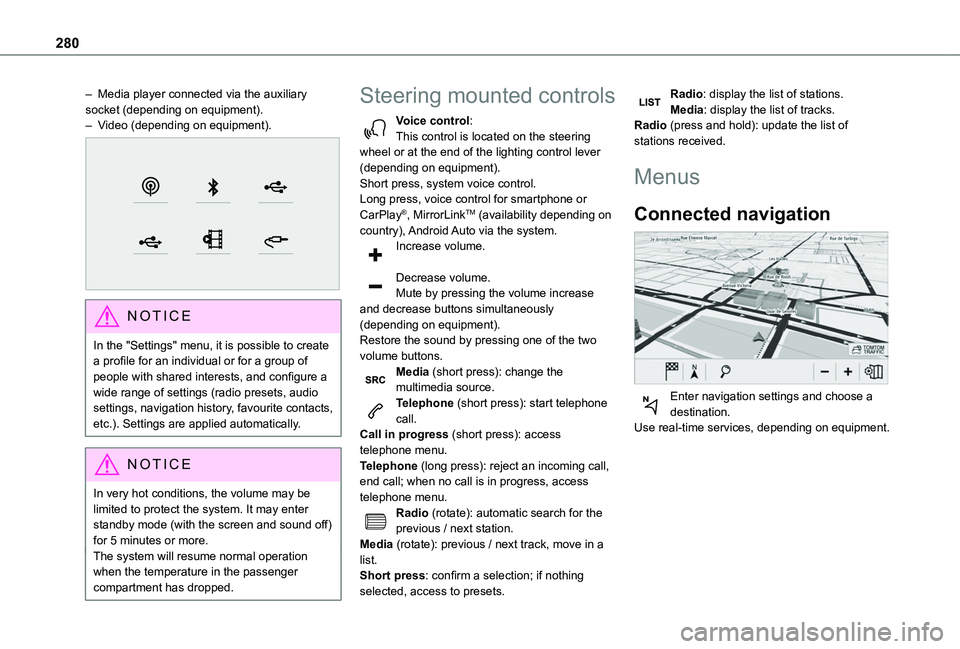
– Media player connected via the auxiliary socket (depending on equipment).– Video (depending on equipment).
NOTIC E
In the "Settings" menu, it is possible to create a profile for an individual or for a group of people with shared interests, and configure a wide range of settings (radio presets, audio settings, navigation history, favourite contacts, etc.). Settings are applied automatically.
NOTIC E
In very hot conditions, the volume may be limited to protect the system. It may enter standby mode (with the screen and sound off) for 5 minutes or more.
The system will resume normal operation when the temperature in the passenger compartment has dropped.
Steering mounted controls
Voice control:This control is located on the steering wheel or at the end of the lighting control lever (depending on equipment).Short press, system voice control.Long press, voice control for smartphone or CarPlay®, MirrorLinkTM (availability depending on country), Android Auto via the system.Increase volume.
Decrease volume.Mute by pressing the volume increase and decrease buttons simultaneously (depending on equipment).Restore the sound by pressing one of the two volume buttons.Media (short press): change the multimedia source.Telephone (short press): start telephone call.Call in progress (short press): access
telephone menu.Telephone (long press): reject an incoming call, end call; when no call is in progress, access telephone menu.Radio (rotate): automatic search for the previous / next station.Media (rotate): previous / next track, move in a list.Short press: confirm a selection; if nothing selected, access to presets.
Radio: display the list of stations.Media: display the list of tracks.Radio (press and hold): update the list of stations received.
Menus
Connected navigation
Enter navigation settings and choose a destination.Use real-time services, depending on equipment.
Page 310 of 320
310
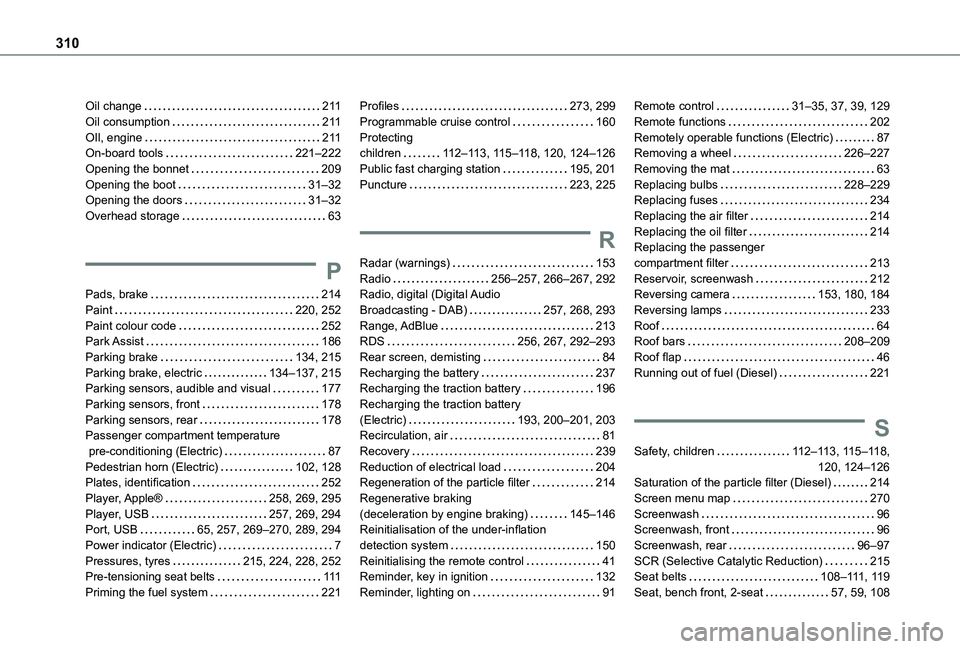
Oil change 2 11Oil consumption 2 11OIl, engine 2 11On-board tools 221–222Opening the bonnet 209Opening the boot 31–32Opening the doors 31–32Overhead storage 63
P
Pads, brake 214Paint 220, 252Paint colour code 252Park Assist 186Parking brake 134, 215Parking brake, electric 134–137, 215Parking sensors, audible and visual 177Parking sensors, front 178Parking sensors, rear 178Passenger compartment temperature
pre-conditioning (Electric) 87Pedestrian horn (Electric) 102, 128Plates, identification 252Player, Apple® 258, 269, 295Player, USB 257, 269, 294Port, USB 65, 257, 269–270, 289, 294Power indicator (Electric) 7Pressures, tyres 215, 224, 228, 252Pre-tensioning seat belts 111Priming the fuel system 221
Profiles 273, 299Programmable cruise control 160Protecting children 11 2–11 3, 11 5–11 8, 120, 124–126Public fast charging station 195, 201Puncture 223, 225
R
Radar (warnings) 153Radio 256–257, 266–267, 292Radio, digital (Digital Audio Broadcasting - DAB) 257, 268, 293Range, AdBlue 213RDS 256, 267, 292–293Rear screen, demisting 84Recharging the battery 237Recharging the traction battery 196Recharging the traction battery (Electric) 193, 200–201, 203Recirculation, air 81
Recovery 239Reduction of electrical load 204Regeneration of the particle filter 214Regenerative braking (deceleration by engine braking) 145–146Reinitialisation of the under-inflation detection system 150Reinitialising the remote control 41Reminder, key in ignition 132Reminder, lighting on 91
Remote control 31–35, 37, 39, 129Remote functions 202Remotely operable functions (Electric) 87Removing a wheel 226–227Removing the mat 63Replacing bulbs 228–229Replacing fuses 234Replacing the air filter 214Replacing the oil filter 214Replacing the passenger compartment filter 213Reservoir, screenwash 212Reversing camera 153, 180, 184Reversing lamps 233Roof 64Roof bars 208–209Roof flap 46Running out of fuel (Diesel) 221
S
Safety, children 11 2–11 3, 11 5–11 8, 120, 124–126Saturation of the particle filter (Diesel) 214Screen menu map 270Screenwash 96Screenwash, front 96Screenwash, rear 96–97SCR (Selective Catalytic Reduction) 215Seat belts 108–111, 11 9Seat, bench front, 2-seat 57, 59, 108