key TOYOTA PROACE CITY EV 2022 Service Manual
[x] Cancel search | Manufacturer: TOYOTA, Model Year: 2022, Model line: PROACE CITY EV, Model: TOYOTA PROACE CITY EV 2022Pages: 320, PDF Size: 75.81 MB
Page 221 of 320
221
Practical information
7
With drive selector and
electric parking brake /
Release procedure
► With the vehicle stationary and the engine running, depress the brake pedal and select mode N.Within 5 seconds:► Depress and hold the brake pedal, then observe this order: switch off the ignition (if start with START/STOP, press and hold the button for 2 seconds) and move the push selector forwards or backwards.► Release the brake pedal, then switch on the ignition again.► Place your foot on the brake and press the electric parking brake control to release it.► Release the brake pedal, then switch off the ignition.
NOTIC E
Keyless Entry and StartingYou must not depress the brake pedal while switching the ignition on again, then switching it off. If you do, the engine will start, requiring you to restart the procedure.
WARNI NG
A message is displayed on the instrument panel to confirm the unlocking of the wheels for 15 minutes.When the vehicle is free-wheeling, the audio system cannot be updated (message displayed on the instrument panel).
Reverting to normal operation
► While depressing the brake pedal, restart the engine, then set the gear selector to P.
Advice on care and
maintenance
General recommendations
Observe the following recommendations to avoid damaging the vehicle.
Exterior
WARNI NG
Never use a high-pressure jet wash in the engine compartment - risk of damaging the electrical components!Do not wash the vehicle in bright sunshine or extremely cold conditions.
NOTIC E
When washing the vehicle at an automatic roller-brush car wash, be sure to lock the doors and, depending on version, remove the electronic key.When using a pressure washer, hold the lance at least 30 cm from the vehicle (particularly when cleaning areas containing chipped paint, sensors or seals).Promptly clean up any stains containing chemicals liable to damage the vehicle's paint (including tree resin, bird droppings, insect secretions, pollen and tar).If justified by the environment, clean the vehicle frequently to remove salty deposits (in coastal areas), soot (in industrial areas) and mud/salts (in wet or cold areas). These substances can be highly corrosive.Contact any authorized Toyota retailer or Toyota authorized repairer, or any reliable repairer for advice on removing stubborn stains requiring special products (such as tar
or insect removers).Preferably, have paint touch-ups performed by any authorized Toyota retailer or Toyota authorized repairer, or any reliable repairer.
Page 223 of 320
223
In the event of a breakdown
8
Running out of fuel
(Diesel)
With Diesel engines, the fuel system must be primed if you run out of fuel.Before starting to prime the system, it is essential to put at least 5 litres of Diesel into the fuel tank.
NOTIC E
For more information on Refuelling and on Misfuel prevention (Diesel), refer to the corresponding section.
NOTIC E
For more information on the Engine compartment, in particular the location of these components under the bonnet, refer to the corresponding section.
With Euro 6.2/6.3 engines
► Switch on the ignition (without starting the engine).► Wait around 1 minute and switch off the ignition.► Operate the starter motor to start the engine.If the engine does not start at the first attempt,
do not keep trying, but restart the procedure.
Tool kit
► For easier access, move the seat(s) forward.
Accessing the tools
Vehicle with electric motor
With temporary puncture repair kitThe tools are located in the passenger footwell.With spare wheelThe tools are located under the right-hand front seat.To access the tools:– With non-adjustable front seat, lift the seat cushion by placing your hand between the cushion and the backrest.– With adjustable front seat, move the seat forward as far as possible.The jack is located in the passenger footwell.
Vehicle with Petrol or Diesel engine
With temporary puncture repair kitThe kit is located under the right-hand front seat.With spare wheel
The jack is located under the right-hand front seat.The tools are located under the left-hand front seat.
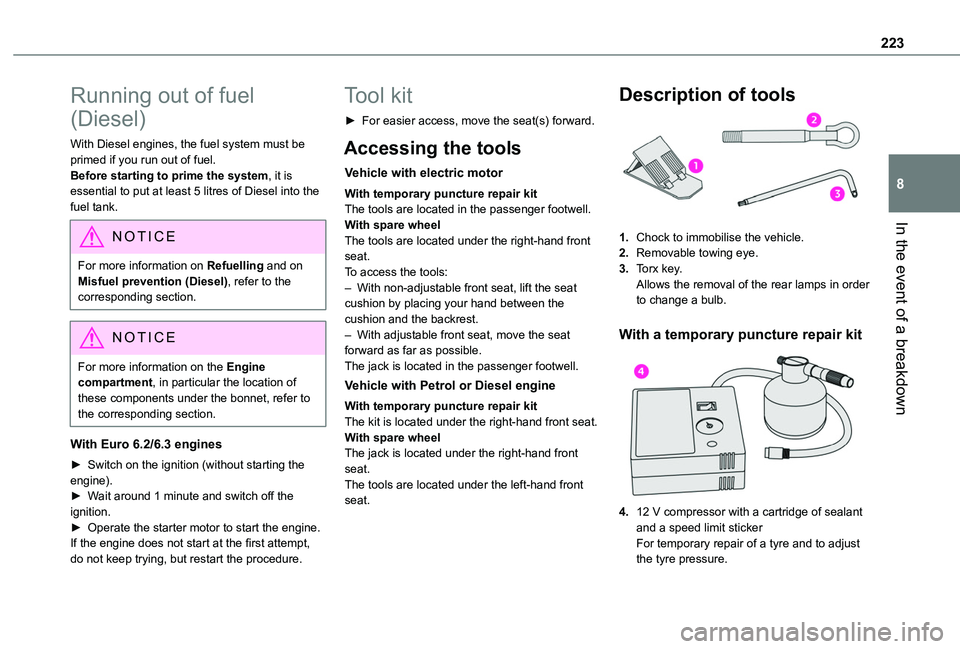
Description of tools
1.Chock to immobilise the vehicle.
2.Removable towing eye.
3.Torx key.Allows the removal of the rear lamps in order to change a bulb.
With a temporary puncture repair kit
4.12 V compressor with a cartridge of sealant and a speed limit stickerFor temporary repair of a tyre and to adjust
the tyre pressure.
Page 224 of 320
224
WARNI NG
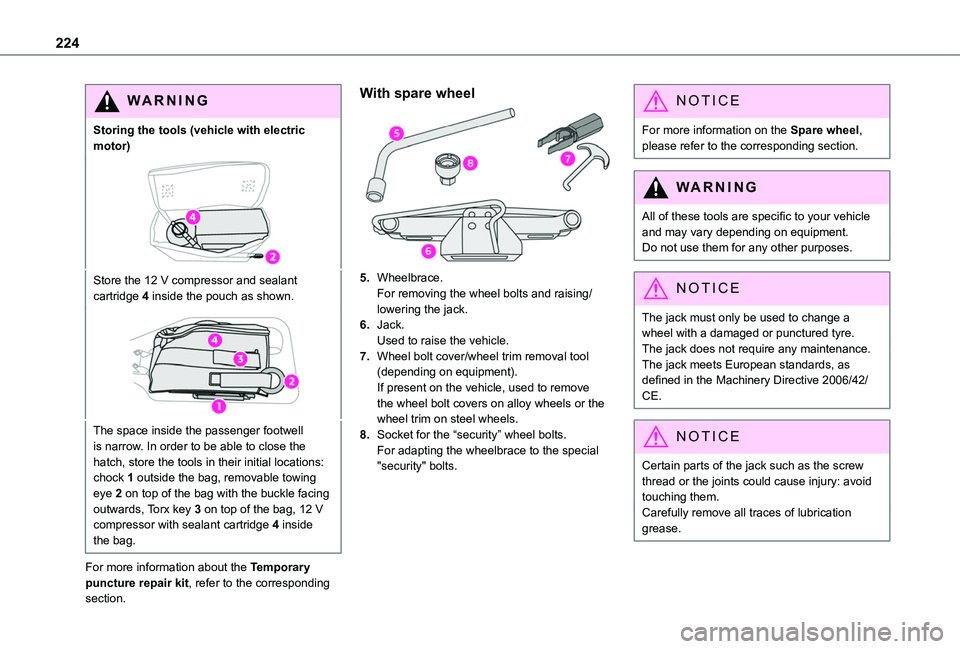
Storing the tools (vehicle with electric motor)
Store the 12 V compressor and sealant cartridge 4 inside the pouch as shown.
The space inside the passenger footwell is narrow. In order to be able to close the hatch, store the tools in their initial locations: chock 1 outside the bag, removable towing eye 2 on top of the bag with the buckle facing outwards, Torx key 3 on top of the bag, 12 V compressor with sealant cartridge 4 inside the bag.
For more information about the Temporary puncture repair kit, refer to the corresponding section.
With spare wheel
5.Wheelbrace.For removing the wheel bolts and raising/lowering the jack.
6.Jack.Used to raise the vehicle.
7.Wheel bolt cover/wheel trim removal tool (depending on equipment).If present on the vehicle, used to remove the wheel bolt covers on alloy wheels or the wheel trim on steel wheels.
8.Socket for the “security” wheel bolts.For adapting the wheelbrace to the special "security" bolts.
NOTIC E
For more information on the Spare wheel, please refer to the corresponding section.
WARNI NG
All of these tools are specific to your vehicle and may vary depending on equipment.Do not use them for any other purposes.
NOTIC E
The jack must only be used to change a wheel with a damaged or punctured tyre.The jack does not require any maintenance.The jack meets European standards, as defined in the Machinery Directive 2006/42/CE.
NOTIC E
Certain parts of the jack such as the screw thread or the joints could cause injury: avoid touching them.Carefully remove all traces of lubrication grease.
Page 235 of 320
235
In the event of a breakdown
8
Rear lamps
For more information on Changing a bulb and, in particular, the types of bulb, refer to the corresponding section.
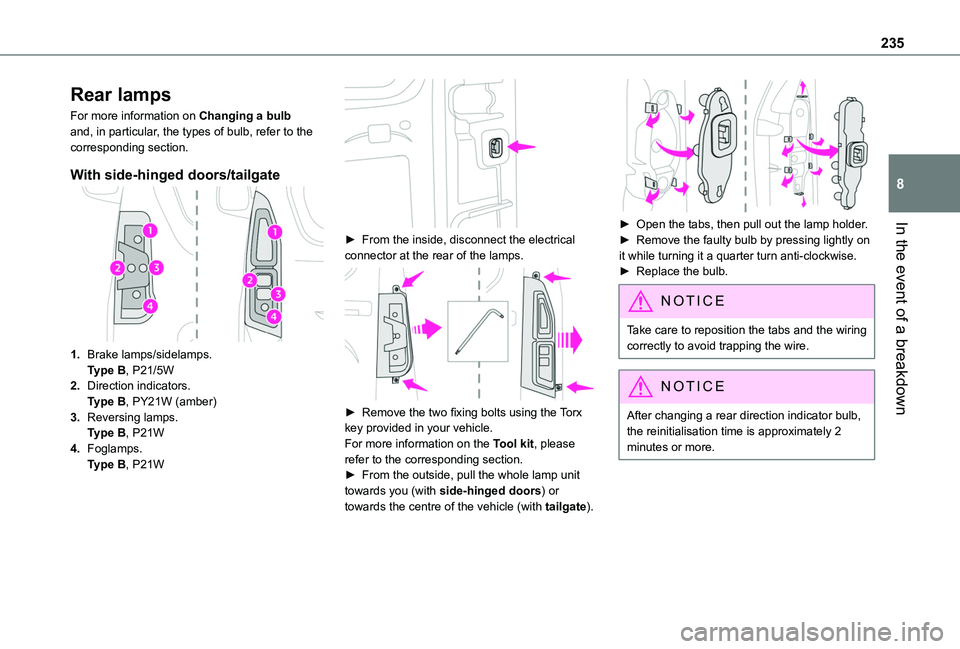
With side-hinged doors/tailgate
1.Brake lamps/sidelamps.Type B, P21/5W
2.Direction indicators.Type B, PY21W (amber)
3.Reversing lamps.Type B, P21W
4.Foglamps.Type B, P21W
► From the inside, disconnect the electrical connector at the rear of the lamps.
► Remove the two fixing bolts using the Torx key provided in your vehicle.For more information on the Tool kit, please refer to the corresponding section.► From the outside, pull the whole lamp unit towards you (with side-hinged doors) or towards the centre of the vehicle (with tailgate).
► Open the tabs, then pull out the lamp holder.► Remove the faulty bulb by pressing lightly on it while turning it a quarter turn anti-clockwise.► Replace the bulb.
NOTIC E
Take care to reposition the tabs and the wiring correctly to avoid trapping the wire.
NOTIC E
After changing a rear direction indicator bulb, the reinitialisation time is approximately 2
minutes or more.
Page 240 of 320
240
Disconnecting/reconnecting
the battery
In order to maintain an adequate state of charge for starting the engine, we recommend disconnecting the battery if the vehicle is to be unused for an extended period.Before disconnecting the battery:► Close all openings (doors, boot, windows, roof).► Switch off all electricity-consuming devices (audio system, wipers, lamps, etc.).► Switch off the ignition and wait for 4 minutes.After accessing the battery, it is only necessary to disconnect the (+) terminal.
Quick-release terminal clamp
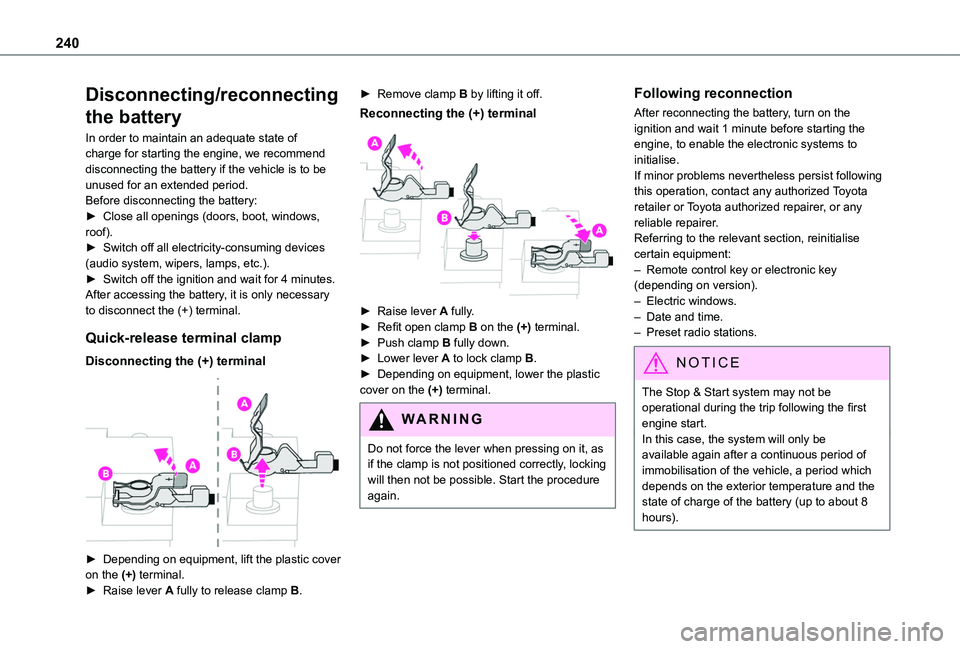
Disconnecting the (+) terminal
► Depending on equipment, lift the plastic cover on the (+) terminal.► Raise lever A fully to release clamp B.
► Remove clamp B by lifting it off.
Reconnecting the (+) terminal
► Raise lever A fully.► Refit open clamp B on the (+) terminal.► Push clamp B fully down.► Lower lever A to lock clamp B.► Depending on equipment, lower the plastic cover on the (+) terminal.
WARNI NG
Do not force the lever when pressing on it, as if the clamp is not positioned correctly, locking will then not be possible. Start the procedure again.
Following reconnection
After reconnecting the battery, turn on the ignition and wait 1 minute before starting the engine, to enable the electronic systems to initialise.If minor problems nevertheless persist following this operation, contact any authorized Toyota retailer or Toyota authorized repairer, or any reliable repairer.Referring to the relevant section, reinitialise certain equipment:– Remote control key or electronic key (depending on version).– Electric windows.– Date and time.– Preset radio stations.
NOTIC E
The Stop & Start system may not be operational during the trip following the first engine start.In this case, the system will only be
available again after a continuous period of immobilisation of the vehicle, a period which depends on the exterior temperature and the state of charge of the battery (up to about 8 hours).
Page 242 of 320
242
NOTIC E
In case of battery or electric parking brake failure, it is essential to call a professional using flatbed recovery vehicles (excluding manual gearbox).
Accessing the eye
NOTIC E
For more information on the Tool kit, refer to the corresponding section.
WARNI NG
With a manual gearbox, move the gear lever into neutral.With an automatic gearbox, place the gear selector into position N.Failure to adhere to this instruction may lead to damage to braking system components and the lack of braking assistance on restarting the engine.
Towing your vehicle
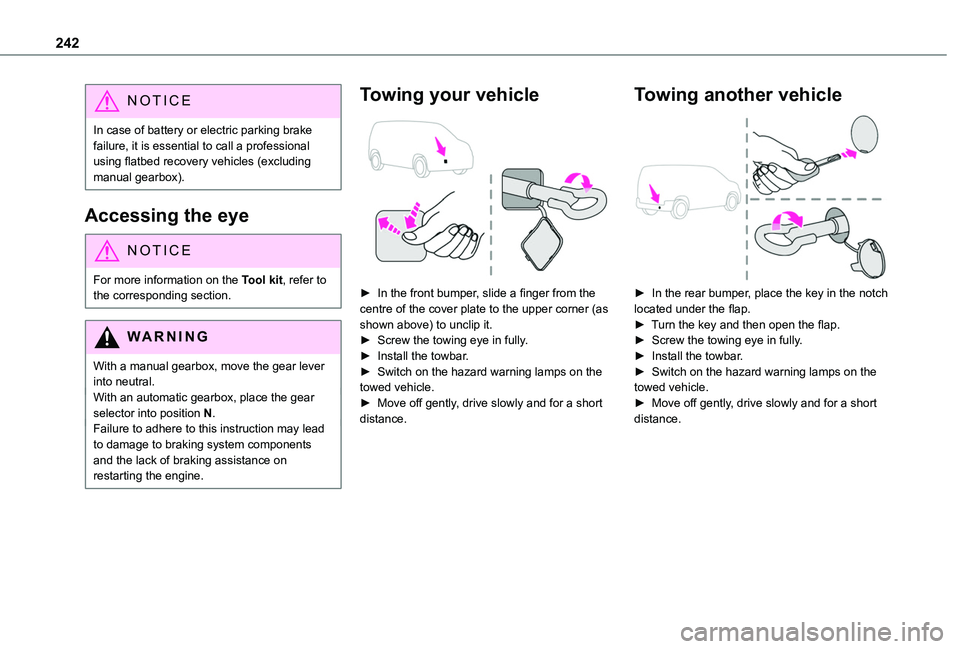
► In the front bumper, slide a finger from the centre of the cover plate to the upper corner (as shown above) to unclip it.► Screw the towing eye in fully.► Install the towbar.► Switch on the hazard warning lamps on the towed vehicle.► Move off gently, drive slowly and for a short distance.
Towing another vehicle
► In the rear bumper, place the key in the notch located under the flap.► Turn the key and then open the flap.► Screw the towing eye in fully.► Install the towbar.► Switch on the hazard warning lamps on the towed vehicle.► Move off gently, drive slowly and for a short distance.
Page 258 of 320
258
Radio
Choose the band
Press the "Radio" menu.
Press the "SOURCE" button.Choose the band: FM, AM or DAB, depending on equipment.
Selecting a station
Press one of the buttons for an automatic search for radio stations.OrPress on the displayed frequency.
Enter the FM and AM waveband values using the virtual keypad.OrPress this button to display the list of stations received and available on the waveband.
WARNI NG
Radio reception may be affected by the use of electrical equipment not approved by the Brand, such as a USB charger connected to the 12 V socket.The exterior environment (hills, buildings, tunnels, basement car parks, etc.) may block reception, including in RDS mode. This behaviour is normal in propagation of radio
waves and does not indicate any failure of the audio system.
Presetting a station
Select a radio station or frequency.Press the "Presets" button.
Make a long press on an empty line to preset the station. An audible signal confirms the presetting of the station.It is possible to preset up to 16 stations.
NOTIC E
To replace a preset station by the currently playing station, make a long press on the preset station.
Activating/Deactivating RDS
RDS, if activated, allows you to continue listening to the same station by automatically retuning to alternative frequencies.
NOTIC E
In certain conditions, tracking may not be assured throughout the entire country as
radio stations do not cover 100% of the territory. This explains the loss of reception of the station during a journey.
Press the "Radio Settings" button.
Activate/Deactivate "RDS options".
Playing TA messages
The TA (Traffic Announcement) function gives priority to TA alert messages.To operate, this function needs good reception of a radio station that transmits this type of message. While traffic information is being broadcast, the current media is automatically interrupted so that the TA message can be heard. Normal play of the media previously playing is resumed at the end of the message.Press the "Radio Settings" button.
Activate/Deactivate "Traffic announcement (TA)".
Audio settings
Press the "Radio Settings" button.
In the list, select "Audio Settings".Activate/deactivate and configure the available options (sound balance, ambiances, etc.).
NOTIC E
The sound balance/distribution is audio processing that allows the quality of the sound to be adapted according to where the passengers are sitting in the vehicle.
Page 262 of 320
262
Deleting a telephone
Press the "Bluetooth" button.
Press "Manage connections".In the displayed window select "Delete".The list of paired devices is displayed.Press on the name of the telephone to delete.
Receiving a call
An incoming call is announced by a ring and a superimposed display in the screen.To accept the call:Make a short press on the steering mounted TEL button.To reject the call:Make a long press
on the steering mounted TEL button.
OrPress "End call" on the touch screen.
Making a call
WARNI NG
Using the telephone is not recommended while driving.Parking the vehicle.Make the call using the steering mounted controls.
Calling a new number
Press "Telephone".
Press the "Keypad" button.
Enter the phone number using the digital keypad.Press "OK" to start the call.
Calling a contact
Press the "Telephone" menu.
Or make a long press
on the steering mounted TEL button.
Press "Contacts".Select the desired contact from the list offered.
Calling a recently used number
Press "Telephone".
Press "Calls".OrMake a long press
on the steering mounted TEL button.
Select the desired contact from the list offered.
NOTIC E
A call in progress remains active in the vehicle for 10 minutes after switching off the ignition. After that, the system switches off and the call automatically redirects to the telephone.
NOTIC E
It is always possible to make a call directly from the telephone; as a safety measure, first park the vehicle.
Settings
Adjusting the brightness
Press "Settings".
Select "Display".Press the buttons to adjust the brightness of the screen and/or of the instrument panel (depending on version).
Modifying system settings
Press "Settings".
Press "System".Press "Privacy" to access the privacy settings.
Page 269 of 320
269
TOYOTA Connect Radio
11
Press the frequency.
Enter the FM and AM waveband values using the virtual keypad.Press "OK" to confirm.
WARNI NG
Radio reception may be affected by the use of
electrical equipment not approved by the Brand, such as a USB charger connected to the 12 V socket.The exterior environment (hills, buildings, tunnels, basement car parks, etc.) may block reception, including in RDS mode. This phenomenon is perfectly normal in the context of radio wave transmission, and in no way indicative of an audio system malfunction.
Changing the waveband
Press Radio Media to display the main page. Press the "OPTIONS" button to access the secondary page.Press "Band" to change waveband.
Press in the shaded area to confirm.
Presetting a station
Select a radio station or frequency.Make a short press on the star outline. If the star is solid, the radio station is already preset.OrSelect a radio station or frequency.Press "Preset".Make a long press on one of the buttons to preset the station.
Activating/Deactivating RDS
RDS, if activated, allows you to continue listening to the same station by automatically retuning to alternative frequencies.Press Radio Media to display the main page.Press the "OPTIONS" button to access the secondary page.Activate/deactivate "RDS".
Press in the shaded area to confirm.
NOTIC E
RDS station tracking may not be available nationwide, as many radio stations do not cover 100 % of the country. This explains the loss of reception of the station during a journey.
Displaying text information
The "Radio Text" function displays information transmitted by the radio station relating to the station or the currently playing song.Press Radio Media to display the main page.Press the "OPTIONS" button to access the secondary page.Activate/deactivate "News".
Press in the shaded area to confirm.
Playing TA messages
The TA (Traffic Announcement) function gives priority to TA alert messages. To operate, this function needs good reception of a radio station that transmits this type of message. While traffic information is being broadcast, the current media is automatically interrupted so that the TA message can be heard. Normal play of the previously playing media resumes at the end of
the message.Press Radio Media to display the main page.Press the "OPTIONS" button to access the secondary page.Activate/deactivate "TA".
Press in the shaded area to confirm.
Page 275 of 320
275
TOYOTA Connect Radio
11
on the steering mounted PHONE button to reject the call.OrPress "End call".
Making a call
WARNI NG
Using the telephone is not recommended while driving.Parking the vehicle.Make the call using the steering mounted controls.
Calling a new number
Press Telephone to display the main page. Enter the phone number using the digital keypad.Press "Call" to start the call.
Calling a contact
Press Telephone to display the main page. Or press and hold
the steering mounted PHONE button.
Press "Contacts".
Select the desired contact from the displayed list.Press "Call".
Calling a recently used
number
Press Telephone to display the main page.OrPress and hold
the steering mounted button.
Press "Recent calls".Select the desired contact from the displayed list.
NOTIC E
It is always possible to make a call directly from the telephone; as a safety measure, first park the vehicle.
Setting the ringtone
Press Telephone to display the main page. Press the "OPTIONS" button to access the secondary page.Press "Ring volume" to display the volume bar.Press the arrows or move the slider to set the ring volume.
Settings
Configuring profiles
Press Settings to display the main page.
Press "Profiles".
Select "Profile 1", "Profile 2", "Profile 3” or "Common profile".Press this button to enter a name for the profile using the virtual keypad.Press "OK" to save.
Press the back arrow to confirm.
Press this button to activate the profile.
Press the back arrow again to confirm.
Press this button to reset the selected profile.
Adjusting the brightness
Press Settings to display the main page.
Press Brightness.
Move the slider to adjust the brightness of the screen and/or the instrument panel (depending on version).Press in the shaded area to confirm.