ECU TOYOTA PROACE CITY VERSO 2019 User Guide
[x] Cancel search | Manufacturer: TOYOTA, Model Year: 2019, Model line: PROACE CITY VERSO, Model: TOYOTA PROACE CITY VERSO 2019Pages: 272, PDF Size: 58.6 MB
Page 84 of 272

84
All work on the airbag systems must only be performed by a TOYOTA dealer or a qualified workshop.Even if all of the precautions mentioned are observed, a risk of injury or of minor burns to the head, chest or arms cannot be ruled out when an airbag is deployed. The airbag inflates almost instantly (within a few milliseconds) then deflates within the same time discharging the hot gas via openings provided for this purpose.
WARNI NG
Front airbagsDo not drive holding the steering wheel by its spokes or resting your hands on the centre part of the wheel.Passengers must not place their feet on the dashboard.Do not smoke as deployment of the airbags can cause burns or the risk of injury from a
cigarette or pipe.Never remove or pierce the steering wheel or hit it violently.Do not fix or attach anything to the steering wheel or dashboard, as this could cause injuries when the airbags are deployed.
WARNI NG
Lateral airbagsUse only approved covers on the seats, compatible with the deployment of the lateral airbags. For information on the range of seat covers suitable for your vehicle, contact a TOYOTA dealer.Do not fix or attach anything to the seat backrests (clothes, etc.), as this could cause injuries to the thorax or arm when the lateral airbag is deployed.Do not sit with the upper part of the body any nearer to the door than necessary.The vehicle's front door panels include side impact sensors.A damaged door or any unauthorised or incorrectly executed work (modification or repair) on the front doors or their interior trim could compromise the operation of these sensors - risk of malfunction of the lateral airbags!Such work must only be done by a TOYOTA
dealer or a qualified workshop.
WARNI NG
Curtain airbagsDo not fix or attach anything to the roof, as this could cause head injuries when the curtain airbag is deployed.Do not remove the grab handles installed on the roof, as they play a part in securing the curtain airbags.
Child seats
NOTIC E
The regulations on carrying children are specific to each country. Refer to the legislation in force in your country.
For maximum safety, please observe the following recommendations:– In accordance with European regulations, all children under the age of 12 or less than 150 cm (4 ft 11”) tall must travel in approved child seats suited to their weight, on seats fitted with a seat belt or ISOFIX mountings.– Statistically, the safest seats in your vehicle for carrying children are the rear seats.– Children weighing less than 9 kg (20 lb) must travel in the "rear facing" position, whether in the front or rear of the vehicle.
Page 85 of 272

85
Safety
5
NOTIC E
It is recommended that children travel on the rear seats of the vehicle:– ‘rear facing’ up to the age of 3,– ‘forward facing’ over the age of 3.
WARNI NG
Make sure that the seat belt is correctly positioned and tightened.For child seats with a support leg, ensure that the support leg is in firm and steady contact with the floor.
WARNI NG
Remove and stow the head restraint before installing a child seat with backrest on a passenger seat. Refit the head restraint once the child seat has been removed.
Advice
WARNI NG
An incorrectly installed child seat compromises the child's safety in the event of an accident.Ensure that there is no seat belt or seat belt buckle under the child seat, as this could destabilise it.
Remember to fasten the seat belts or the harness of child seats, keeping the slack relative to the child's body to a minimum, even for short journeys.When installing a child seat using the seat belt, ensure that the seat belt is tightened correctly on the child seat and that it secures the child seat firmly on the seat of the vehicle. If the passenger seat is adjustable, move it forwards if necessary.Remove the head restraint before installing a child seat with a backrest on a passenger seat.Ensure that the head restraint is stored or attached securely to prevent it from being thrown around the vehicle in the event of sharp braking. Refit the head restraint once the child seat has been removed.
WARNI NG
Installing a booster seatThe chest part of the seat belt must be positioned on the child's shoulder without touching the neck.Ensure that the lap part of the seat belt passes correctly over the child's thighs.Use a booster seat with backrest, equipped with a belt guide at shoulder level.
WARNI NG
Additional protectionsTo prevent accidental opening of the doors and rear windows, use the "Child lock".Take care not to open the rear windows by more than one third.To protect young children from the rays of the sun, fit side blinds on the rear windows.As a safety precaution, do not leave:– a child alone and unattended in a vehicle,– a child or an animal in a vehicle which is exposed to the sun, with the windows closed,– the keys within reach of children inside the vehicle.
Page 88 of 272

L1Installed in the \"rearward facing\" position.
Grou")
88
Recommended child
seats
Range of recommended child seats secured using a three-point seat belt.
Group 0+: from birth to 13 kg (28 lb)
L1Installed in the "rearward facing" position.
Groups 2 and 3: from 15 to 36 kg (from 34 to 79 lb)
L5Can be fitted to the vehicle's ISOFIX mountings.The child is restrained by the seat belt.Only suitable for installation on the side rear seats.The head restraint on the vehicle seat must be removed.
Groups 2 and 3: from 15 to 36 kg (from 34 to 79 lb)
L6The child is restrained by the seat belt.Only suitable for installation on the front passenger seat or on the rear side seats.
Page 89 of 272

89
Safety
5
Locations for child seats secured using the seat belt
In accordance with European regulations, the table indicates the options\
for installing child seats secured using a seat belt and universally ap\
proved (c) according to the weight of the child and the seating position in the veh\
icle.
Child weight and age guide
SeatUnder 13 kg (28 lb)(groups 0 (d) and 0+)
Up to about 1 year old
From 9 to 18 kg (from 20 to 39 lb)(group 1)From about 1 to 3
years old
15-25 kg (34-56 lb)(group 2)From about 3 to 6
years old
22-36 kg (49-79 lb)(group 3)From about 6 to 10
years old
Row 1 (a)Fixed passenger seatX
Passenger seat with forwards and backwards adjustment
With passenger airbag deactivated "OFF"
U (f)
With passenger airbag activated "ON"
XUF (f)
Row 2 (b) (e)U
Row 3 (b) (e)U (g) (h)
Key
(a) Refer to the current legislation in the country in which you are drivin\
g before placing a child in this seat position.(b) To install a rearward-facing or forward-facing child seat on a rear seat,\
adjust the rear seat to the fully back position with the backrest strai\
ghtened.(c) Universal child seat: child seat suitable for installation in all vehic\
les using the seat belt.(d) Group 0: from birth to 10 kg (22 lb). Carrycots and "car" infant carriers must not be installed on the f\
ront passenger seat(s) or the seats in row 3.
(e) To install a rearward-facing or forward-facing child seat on a rear seat,\
move the seats in front of it forward, then straighten their backrests \
to allow sufficient room for the child seat and the child's legs.(f) With the fixed passenger seat (which cannot be placed in the folded position), adjust the backrest angle to 0°.
Page 90 of 272
 On the L1 version, fold down the backrests in row 2.(h) In")
90
For more information on the Front seats and, in particular, the folded position for the backrest, refer to the corresponding secti\
on.(g) On the L1 version, fold down the backrests in row 2.(h) Installing child seats with a support leg is prohibited in the third ro\
w.U Seat position suitable for installing a child seat secured using the se\
at belt and universally approved for rearward-facing and/or forward-faci\
ng use.UF Seat position suitable for installing a child seat secured using a seat\
belt and universally approved for forward-facing use.X Seat position not suitable for installing a child seat for the stated w\
eight class.
"ISOFIX" mountings
Row 2
* On some versions, the central seat is not equipped with ISOFIX mountings.
The vehicle has been approved in accordance with the latest ISOFIX regulation.If fitted on the vehicle, the regulation ISOFIX mountings are identified by labels.The mountings comprise three rings for each seat:– Two front rings A, located between the vehicle seat backrest and cushion, indicated by an "ISOFIX" marking,– If fitted to your vehicle, a rear ring B, located behind the vehicle's seat, called Top Tether, for securing the upper strap, indicated by a "Top Tether" marking.The Top Tether secures the upper strap of child seats that have them. In case of frontal impact,
this device limits the tilting of the child seat forward.This ISOFIX mounting system provides fast, reliable and safe fitting of the child seat in the vehicle.The ISOFIX child seats are fitted with two latches which are secured on the two front rings A.Some child seats also have an upper strap which is attached to rear ring B.To secure the child seat to the Top Tether:– remove and stow the head restraint before installing a child seat on this seat (refit it once the child seat has been removed),– pass the strap of the child seat over the top of the seat backrest, centring it between the
openings for the head restraint rods,– attach the hook of the upper strap to rear ring B,– tighten the upper strap.
Page 91 of 272

91
Safety
5
WARNI NG
Incorrect installation of a child seat in a vehicle compromises the protection of the child in the event of an accident.Strictly follow the fitting instructions provided in the installation guide supplied with the child seat.
Recommended ISOFIX
child seats
NOTIC E
Also consult the user guide from the child seat’s manufacturer to find out how to install and remove the seat.
Group 0+: from birth to 13 kg (28 lb)(size category: E)
Installed "rearward facing" using an ISOFIX base which is attached to rings A.The base has a support leg, height-adjustable, which rests on the vehicle's floor.This child seat can also be secured with a seat belt. In this case, only the shell is used and attached to the vehicle seat using the three-point seat belt.
Group 1: from 9 to 18 kg (from 20 to 39 lb)(size category: B1)
Suitable for forward-facing installation only.Attached to rings A and ring B, referred to as TOP TETHER, using an upper strap.Three seat body angles: sitting, reclining, lying down.This child seat can also be used in seat positions not equipped with ISOFIX mountings. In this case, it must be secured to the vehicle's seat by the three-point seat belt. Adjust the front seat of the vehicle so that the child's feet do not touch the backrest.
Page 93 of 272

93
Safety
5
IL Seat suitable for an ISOFIX Semi-Universal child seat, which may be eit\
her:– rearward-facing, fitted with an upper strap or a support leg.– forward-facing, fitted with a support leg.– a carrycot fitted with an upper strap or a support leg.For more information on ISOFIX child seats and in particular on securing the upper strap, refer to the correspondi\
ng section.
i-Size child seats
i-Size child seats have two latches that engage on the two rings A.These i-Size child seats also have:– either an upper strap that is attached to ring B.– or a support leg that rests on the vehicle floor, compatible with the approved i-Size seat position.Their role is to prevent the child seat from tipping forward in the even\
t of a collision.For more information on the ISOFIX mountings, refer to the corresponding section.
Locations for i-Size child seats
In accordance with the new European regulations, this table indicates the options for installing i-Size child seats on seats in the vehicle fitted with i-Size approved ISOFIX mountings.
Seat positioni-Size child restraint system
Row 1 (a)Passenger seatNot i-Size
Row 2 (b) (c) (d)i-U
Row 3 (b)Not i-Size
Key
(a) Refer to the current legislation in the country in which you are drivin\
g before placing a child in this seat position.(b) To install a rearward-facing or forward-facing child seat on a rear seat,\
adjust the rear seat to the fully back position with the backrest strai\
ghtened.(c) Adjust the front seat to its maximum height.(d) On some versions, the central seat is not equipped with ISOFIX mounting\
s.i-U Suitable for forward-facing and rearward-facing "Universal" i-Size rest\
raint systems.i-UF Only suitable for forward-facing "Universal" i-Size restraint systems.
Page 107 of 272

107
Driving
6
selector in position P to allow the engine to be started.If position N is selected inadvertently while driving, allow the engine to return to idle, then select position D to accelerate.
WARNI NG
When the engine is running at idle with the brakes released, if position R, D or M is
selected, the vehicle moves even without the accelerator being pressed.Never leave children unsupervised inside the vehicle.As a safety measure, never leave the vehicle without taking your key or remote control with you, even for a short time.When carrying out maintenance with the engine running, apply the parking brake and select position P.
WARNI NG
With an automatic gearbox, never try to start the engine by pushing the vehicle.
Automatic operation
► Select position D for automatic
changing of the gears.The gearbox then operates in auto-adaptive mode, without any intervention on the part of the
driver. It continuously selects the most suitable gear according to the driving style, the road profile and the load in the vehicle.For maximum acceleration without touching the selector, press the accelerator fully down (kick-down). The gearbox changes down automatically or holds the gear selected until the maximum engine speed is reached.When braking, the gearbox changes down automatically to provide effective engine braking.If the accelerator pedal is sharply released, the gearbox will not shift to a higher gear for safety reasons.
WARNI NG
Never select position N while the vehicle is moving.Never select positions P or R unless the vehicle is completely stationary.
Temporary manual control
of gear changes
You can temporarily assume control of gear changing using the "+" et "-” steering-mounted controls. The gear change request will be executed if the engine speed permits. This function allows you to anticipate certain situations, such as overtaking another vehicle or approaching a bend in the road.
After a few seconds with no inputs via the control paddles, the gearbox reverts to automatic operation.
Creeping (moving without
using the accelerator)
This function facilitates manoeuvring of the vehicle at low speed (when parking, in traffic jams, etc.).When the engine is at idle, with the parking brake released and gear position D, M or R selected, the vehicle begins to creep forward as soon as you take your foot off the brake pedal (even without pressing the accelerator).
WARNI NG
As a safety precaution, never leave the vehicle with the engine running and the doors closed.
Manual operation
► With the selector in position D, press button M to enable 6-speed sequential gear changing.The indicator lamp for the button comes on.► Operate the "+" or "-" steering mounted controls. M appears and the engaged gears are shown in succession on the instrument panel.
Page 116 of 272
11 6
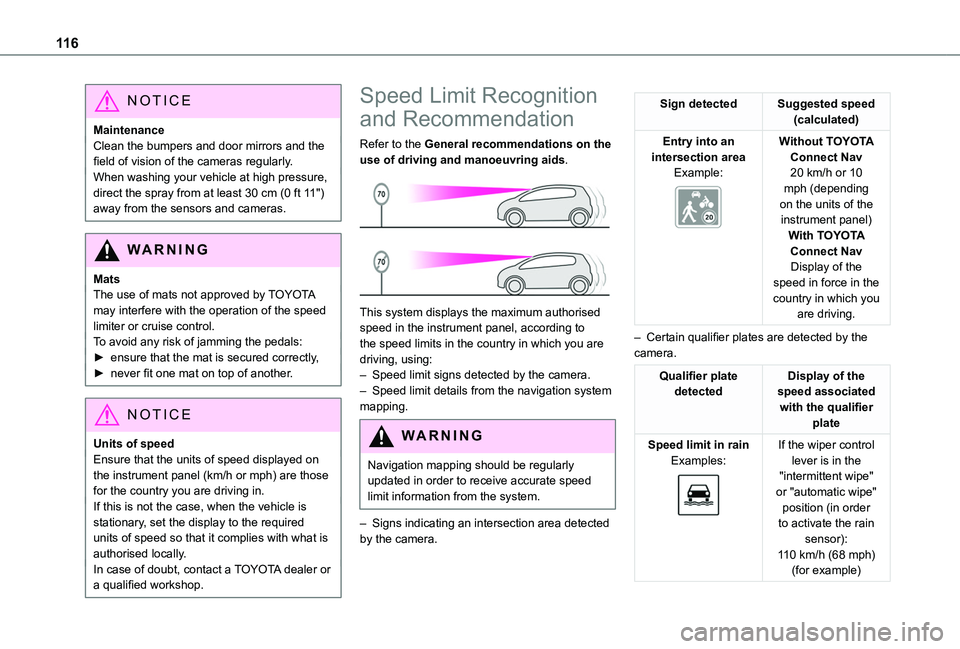
NOTIC E
MaintenanceClean the bumpers and door mirrors and the field of vision of the cameras regularly.When washing your vehicle at high pressure, direct the spray from at least 30 cm (0 ft 11") away from the sensors and cameras.
WARNI NG
MatsThe use of mats not approved by TOYOTA may interfere with the operation of the speed limiter or cruise control.To avoid any risk of jamming the pedals:► ensure that the mat is secured correctly,► never fit one mat on top of another.
NOTIC E
Units of speed
Ensure that the units of speed displayed on the instrument panel (km/h or mph) are those for the country you are driving in.If this is not the case, when the vehicle is stationary, set the display to the required units of speed so that it complies with what is authorised locally.In case of doubt, contact a TOYOTA dealer or a qualified workshop.
Speed Limit Recognition
and Recommendation
Refer to the General recommendations on the use of driving and manoeuvring aids.
This system displays the maximum authorised speed in the instrument panel, according to the speed limits in the country in which you are driving, using:– Speed limit signs detected by the camera.– Speed limit details from the navigation system mapping.
WARNI NG
Navigation mapping should be regularly updated in order to receive accurate speed limit information from the system.
– Signs indicating an intersection area detected by the camera.
Sign detectedSuggested speed (calculated)
Entry into an intersection areaExample:
Without TOYOTA Connect Nav20 km/h or 10 mph (depending on the units of the instrument panel)With TOYOTA
Connect NavDisplay of the speed in force in the country in which you are driving.
– Certain qualifier plates are detected by the camera.
Qualifier plate detectedDisplay of the speed associated with the qualifier plate
Speed limit in rainExamples:
If the wiper control lever is in the "intermittent wipe" or "automatic wipe" position (in order to activate the rain sensor):
110 km/h (68 mph) (for example)
Page 151 of 272

151
Practical information
7
Towing device with quickly
detachable towball
No tools are required to install or remove this genuine towing device.
NOTIC E
Trailers with LED lamps are not compatible with the wiring harness of this device.
Fitting
► On the towball, move the lever from position 1 to position 2.
► Before fitting the towball, check that the contact points (shown by the arrows) are clean. Use a soft, clean cloth.► Insert the end of the towball into the carrier, located underneath the rear bumper, as far as it can go.► Secure the towball correctly by moving the lever to position 3 ("locked" position).► If necessary, pivot the socket downwards, paying attention to the exhaust pipe.► Connect the trailer plug to the 13-pin socket provided next to the carrier.► Secure the trailer by connecting its safety cable to the eye on the carrier.
Removing
► On the towball, move the lever from position 3 to position 2.► Remove the towball by pulling it towards you.► Once the towball has been removed, move the lever from position 2 to position 1.
WARNI NG
If the towball is not locked, the trailer can detach. This may cause an accident.Always lock the towball as described in the instructions.Observe the legislation in force in the country in which you are driving.Remove the towball when not in use.
Before starting the vehicle, check that the trailer lamps operate correctly.Before setting off, check the adjustment of the headlamp beam height.
WARNI NG
Connect the trailer plug with the engine off.If you connect the trailer plug within a few minutes of switching off the engine, do not
touch the exhaust pipe. Risk of burns!
WARNI NG
Carrier systems (box or bicycle carrier)Always comply with the maximum load authorised on the towing device: if exceeded, the device may detach from the vehicle, potentially causing a serious accident.
NOTIC E
For more information about the Engine technical data and towed loads and in particular, the maximum load on the towing device, refer to the corresponding section.
WARNI NG
Remove the quickly detachable towball when not towing a trailer.