check engine TOYOTA PROACE VERSO 2020 Owner's Guide
[x] Cancel search | Manufacturer: TOYOTA, Model Year: 2020, Model line: PROACE VERSO, Model: TOYOTA PROACE VERSO 2020Pages: 418, PDF Size: 39.32 MB
Page 276 of 418
276
Checks
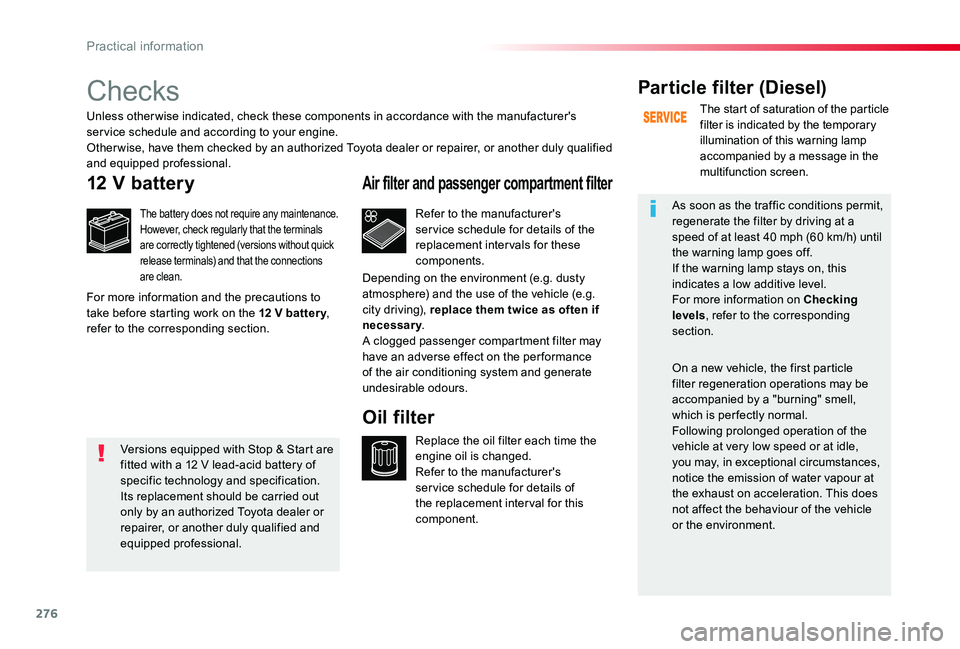
12 V battery
The battery does not require any maintenance.However, check regularly that the terminals are correctly tightened (versions without quick release terminals) and that the connections are clean.
Refer to the manufacturer's ser vice schedule for details of the replacement inter vals for these components.
Air filter and passenger compartment filter
Replace the oil filter each time the engine oil is changed.Refer to the manufacturer's ser vice schedule for details of the replacement inter val for this component.
Oil filter
Particle filter (Diesel)
The start of saturation of the particle filter is indicated by the temporary illumination of this warning lamp accompanied by a message in the multifunction screen.
As soon as the traffic conditions permit, regenerate the filter by driving at a speed of at least 40 mph (60 km/h) until
the warning lamp goes off.If the warning lamp stays on, this indicates a low additive level.For more information on Checking levels, refer to the corresponding section.
On a new vehicle, the first particle filter regeneration operations may be accompanied by a "burning" smell, which is per fectly normal.Following prolonged operation of the vehicle at very low speed or at idle, you may, in exceptional circumstances, notice the emission of water vapour at the exhaust on acceleration. This does not affect the behaviour of the vehicle or the environment.
Unless other wise indicated, check these components in accordance with the manufacturer's service schedule and according to your engine.Other wise, have them checked by an authorized Toyota dealer or repairer, or another duly qualified and equipped professional.
For more information and the precautions to take before starting work on the 12 V batter y, refer to the corresponding section.
Depending on the environment (e.g. dusty atmosphere) and the use of the vehicle (e.g. city driving), replace them twice as often if necessary.A clogged passenger compartment filter may have an adverse effect on the per formance of the air conditioning system and generate undesirable odours.
Versions equipped with Stop & Start are fitted with a 12 V lead-acid battery of specific technology and specification.Its replacement should be carried out only by an authorized Toyota dealer or repairer, or another duly qualified and equipped professional.
Practical information
Page 281 of 418
281
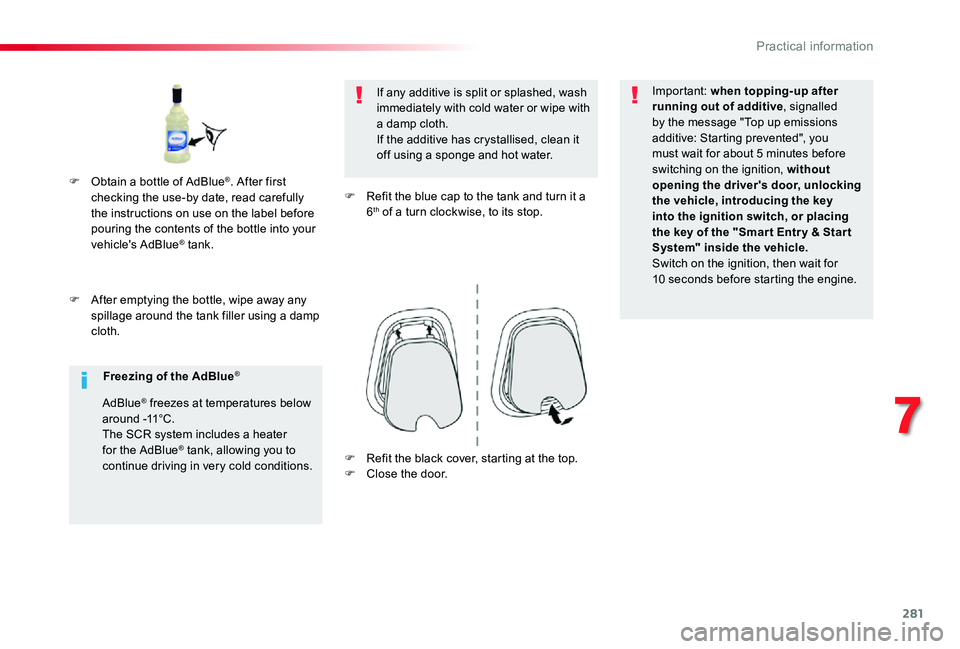
F After emptying the bottle, wipe away any spillage around the tank filler using a damp cloth.
If any additive is split or splashed, wash immediately with cold water or wipe with a damp cloth.If the additive has crystallised, clean it off using a sponge and hot water.
F Refit the blue cap to the tank and turn it a 6th of a turn clockwise, to its stop.
Important: when topping-up after running out of additive, signalled by the message "Top up emissions additive: Starting prevented", you must wait for about 5 minutes before switching on the ignition, without opening the driver's door, unlocking the vehicle, introducing the key into the ignition switch, or placing the key of the "Smar t Entr y & Star t System" inside the vehicle.Switch on the ignition, then wait for 10 seconds before starting the engine.
F Obtain a bottle of AdBlue®. After first checking the use-by date, read carefully the instructions on use on the label before pouring the contents of the bottle into your
vehicle's AdBlue® tank.
Freezing of the AdBlue®
AdBlue® freezes at temperatures below around -11°C.The SCR system includes a heater for the AdBlue® tank, allowing you to continue driving in very cold conditions.F Refit the black cover, starting at the top.F Close the door.
7
Practical information
Page 287 of 418
287
Repair procedure
1. Sealing
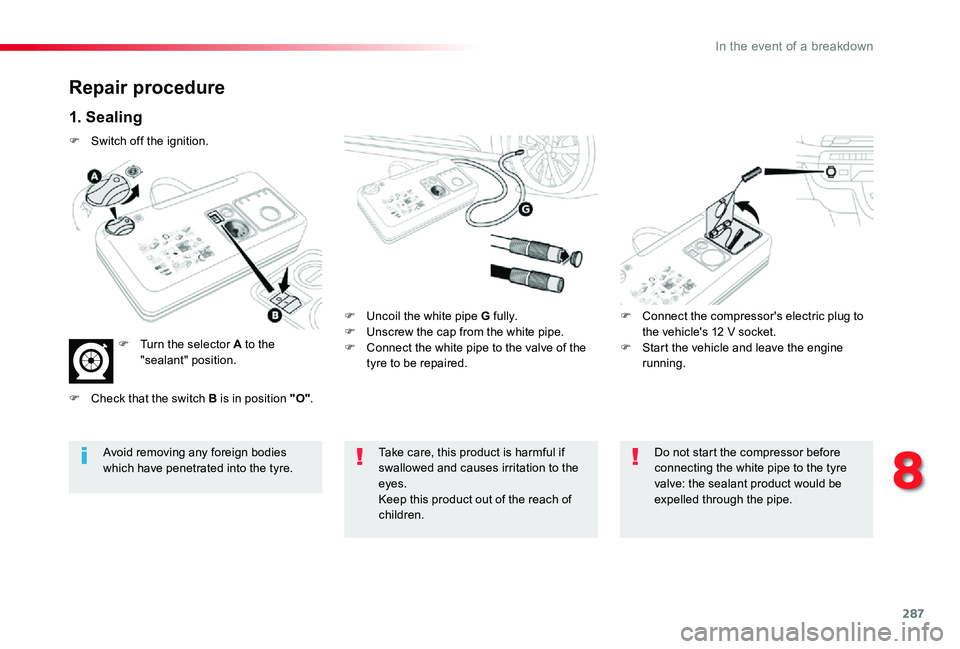
F Uncoil the white pipe G fully.F Unscrew the cap from the white pipe.F Connect the white pipe to the valve of the tyre to be repaired.
F Connect the compressor's electric plug to the vehicle's 12 V socket.F Start the vehicle and leave the engine running.
Take care, this product is harmful if swallowed and causes irritation to the eyes.Keep this product out of the reach of children.
Avoid removing any foreign bodies which have penetrated into the tyre.
Do not start the compressor before connecting the white pipe to the tyre valve: the sealant product would be expelled through the pipe.
F Switch off the ignition.
F Turn the selector A to the "sealant" position.
F Check that the switch B is in position "O".
8
In the event of a breakdown
Page 290 of 418
290
Checking /adjusting tyre
pressures
You can also use the compressor without injecting any product, to check and if necessary adjust your tyre pressures.
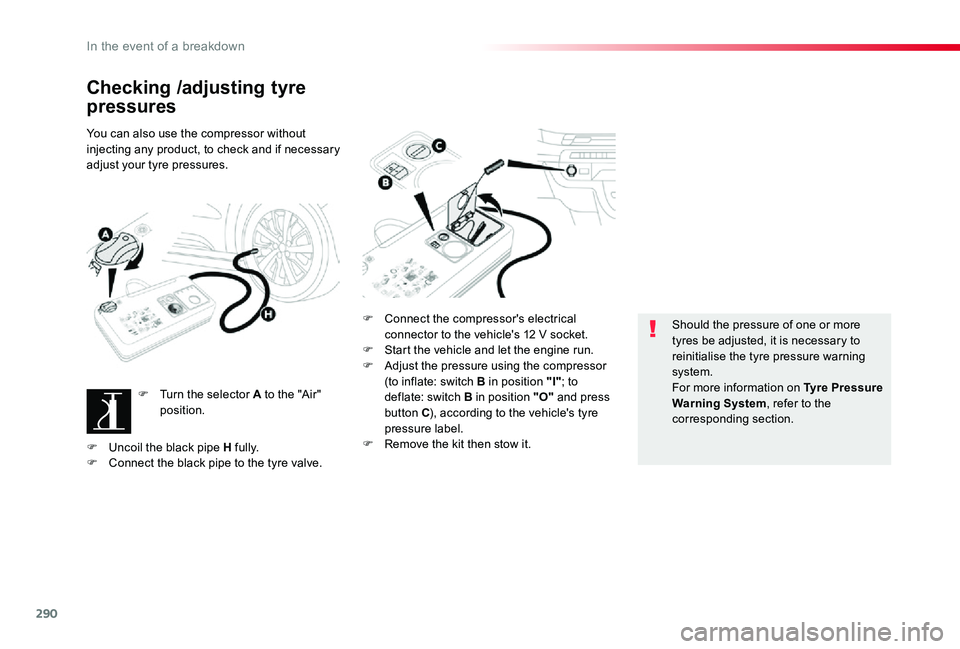
F Turn the selector A to the "Air" position.
F Connect the compressor's electrical connector to the vehicle's 12 V socket.F Start the vehicle and let the engine run.F Adjust the pressure using the compressor (to inflate: switch B in position "I"; to deflate: switch B in position "O" and press button C), according to the vehicle's tyre pressure label.F Remove the kit then stow it.
Should the pressure of one or more tyres be adjusted, it is necessary to reinitialise the tyre pressure warning system.For more information on Tyre Pressure Warning System, refer to the corresponding section.
F Uncoil the black pipe H fully.F Connect the black pipe to the tyre valve.
In the event of a breakdown
Page 317 of 418
317
Starting using another
battery
Never try to start the engine by connecting a battery charger.Never use a 24 V or higher battery b o o s t e r.First check that the slave battery has a nominal voltage of 12 V and a capacity at least equal to that of the discharged battery.The two vehicles must not be in contact with each other.Switch off the electrical consumers on both vehicles (audio system, wipers, lighting, ...).Ensure that the jump lead cables do
not pass close to moving parts of the engine (cooling fan, belts, ...).Do not disconnect the (+) terminal when the engine is running.
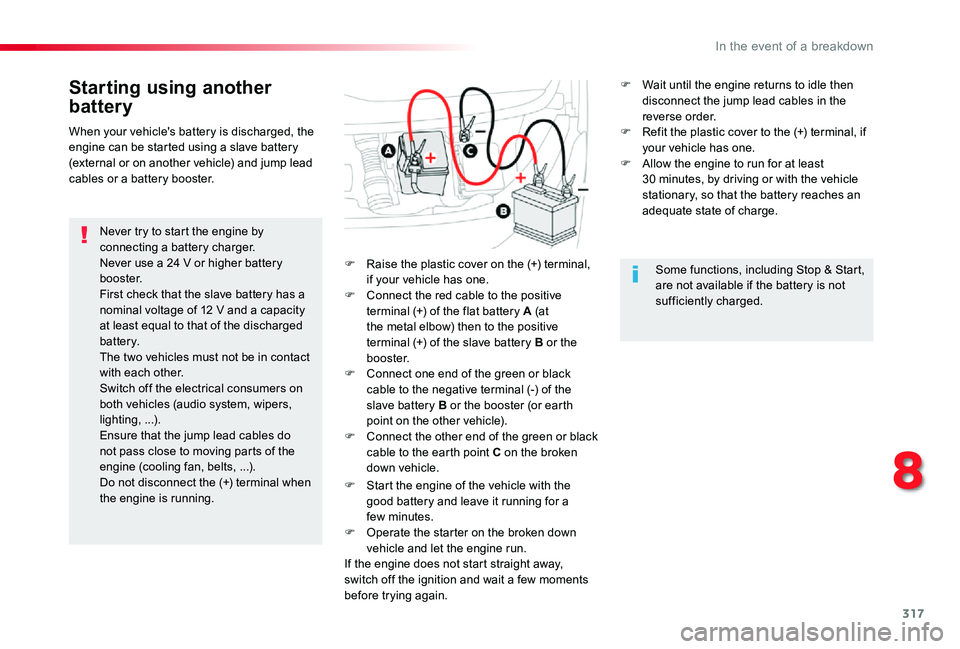
F Raise the plastic cover on the (+) terminal, if your vehicle has one.F Connect the red cable to the positive terminal (+) of the flat battery A (at the metal elbow) then to the positive terminal (+) of the slave battery B or the b o o s t e r.F Connect one end of the green or black cable to the negative terminal (-) of the slave battery B or the booster (or earth point on the other vehicle).F Connect the other end of the green or black cable to the earth point C on the broken down vehicle.
F Start the engine of the vehicle with the good battery and leave it running for a few minutes.F Operate the starter on the broken down
vehicle and let the engine run.If the engine does not start straight away, switch off the ignition and wait a few moments before trying again.
When your vehicle's battery is discharged, the engine can be started using a slave battery (external or on another vehicle) and jump lead cables or a battery booster.
Some functions, including Stop & Start, are not available if the battery is not sufficiently charged.
F Wait until the engine returns to idle then disconnect the jump lead cables in the reverse order.F Refit the plastic cover to the (+) terminal, if your vehicle has one.F Allow the engine to run for at least 30 minutes, by driving or with the vehicle stationary, so that the battery reaches an adequate state of charge.
8
In the event of a breakdown
Page 366 of 418
366
Settings
QUESTIONRESPONSESOLUTION
When changing the setting of treble and bass, the equalizer setting is deselected.When changing the equalizer setting, the treble and bass settings are reset.
The selection of an equalizer setting imposes the settings for treble and bass and vice versa.Modify the treble and bass or equalizer settings to obtain the desired musical ambience.
When changing the balance setting, distribution is deselected.When changing the distribution setting, the balance setting is deselected.
The selection of a distribution setting imposes the balance settings and vice versa.Modify the balance setting or the distribution setting to obtain the desired sound quality.
There is a difference in sound quality between the different audio sources.To allow for optimal listening quality, the audio settings can be tailored to different sound sources, which can generate audible differences when changing source.
Check that the audio settings are adapted to the sources listened to. It is recommended that the audio settings (Bass:, Treble:, Balance) be adjusted to the middle position, select the "None" musical ambience and set the loudness correction to the "Active" position in CD mode or to the "Inactive" position in radio mode.
When the engine is off, the system switches off after several minutes of use.When the engine is switched off, the system's operating time depends on the state of charge of the battery.The switch-off is normal: the system automatically goes into energy economy mode and switches off to maintain an adequate charge in the battery.
Start then vehicle’s engine to increase the charge of the battery.
The date and time cannot be set.Setting of the date and time is only available if the synchronisation with the satellites is deactivated.
Settings menu / Options / Time-Date setting. Select the "Time" tab and deactivate the "GPS synchronisation" (UTC).
Toyota Pro Touch with navigation system
Page 386 of 418
386
Settings
QUESTIONRESPONSESOLUTION
When changing the setting of treble and bass, the equalizer setting is deselected.When changing the equalizer setting, the treble and bass settings are reset.
The selection of an equalizer setting imposes the settings for treble and bass and vice versa.Modify the treble and bass or equalizer settings to obtain the desired musical ambience.
When changing the balance setting, distribution is deselected.When changing the distribution setting, the balance setting is deselected.
The selection of a distribution setting imposes the balance settings and vice versa.Modify the balance setting or the distribution setting to obtain the desired sound quality.
There is a difference in sound quality between the different audio sources.To allow for optimal listening quality, the audio settings can be tailored to different sound sources, which can generate audible differences when changing source.
Check that the audio settings are adapted to the sources listened to. Adjust the audio functions to the middle position.
When the engine is off, the system switches off after several minutes of use.When the engine is switched off, the system's operating time depends on the state of charge of the battery.The switch-off is normal: the system automatically goes into energy economy mode and switches off to maintain an adequate charge in the battery.
Start the engine to increase the charge of the battery.
Toyota Pro Touch
Page 406 of 418
406
The table below gives answers to the most frequently asked questions on your audio system.
QUESTIONANSWERSOLUTION
With the engine off, the audio system switches off after a few minutes of use.
When the engine is switched off, the audio system operating time depends on the state of charge of the battery.The switch-off is normal: the audio equipment switches to economy mode and switches off to prevent discharging of the vehicle's battery.
Start the vehicle's engine to increase the battery charge.
The message "the audio system is overheated" appears on the display.
In order to protect the installation if the surrounding temperature is too high, the audio system switches to an automatic thermal protection mode leading to a reduction in volume or CD play stopping.
Switch the audio system off for a few minutes to allow the system to cool.
Frequently asked questions
QUESTIONANSWERSOLUTION
There is a difference in sound quality between the different audio sources (radio, CD...).
For optimum sound quality, the audio settings (Volume, Bass, Treble, Ambience and Loudness) can be adapted to the different sound sources, which may result in audible differences when changing source (radio, CD...).
Check that the audio settings (Volume, Bass, Treble, Ambience and Loudness) are adapted to the sources listened to. It is advisable to set the audio functions (Bass, Treble, Front-Rear Balance and Left-Right Balance) to the middle position, select the musical ambience "None" and set the loudness correction to the "Active" position in CD mode or to the "Inactive" position in radio mode.
Radio
Audio and Telematics
Page 410 of 418
410
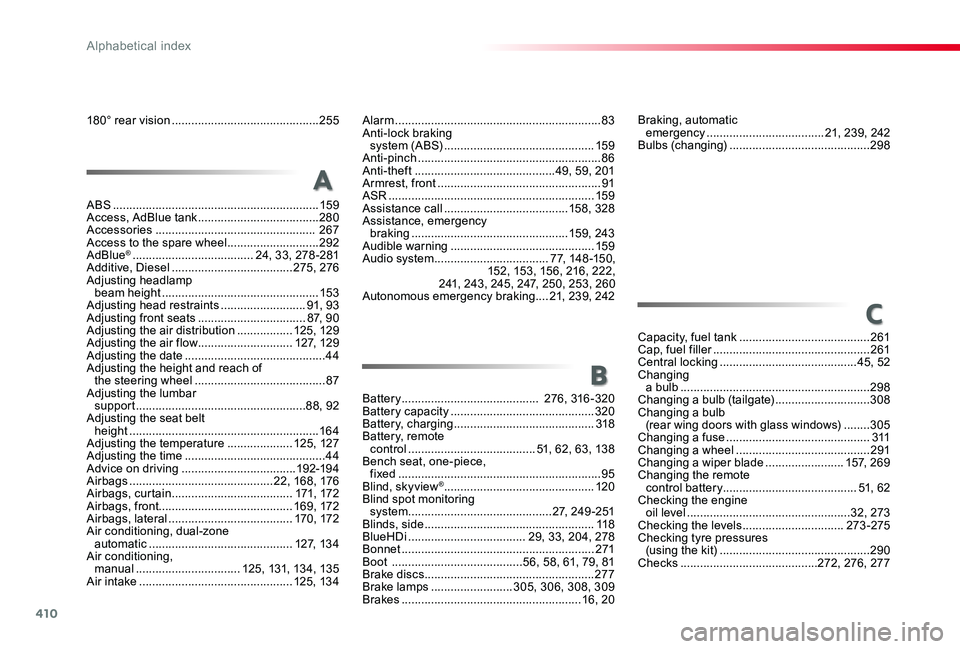
ABS ...............................................................159Access, AdBlue tank .....................................280Accessories ................................................. 267Access to the spare wheel ............................292AdBlue® .....................................24, 33, 278-281Additive, Diesel .....................................275, 276Adjusting headlamp beam height ................................................15 3Adjusting head restraints ..........................91, 93Adjusting front seats .................................87, 90Adjusting the air distribution .................125, 129Adjusting the air flow .............................127, 129Adjusting the date ...........................................44Adjusting the height and reach of the steering wheel ........................................87Adjusting the lumbar support ....................................................88, 92Adjusting the seat belt height ..........................................................16 4Adjusting the temperature ....................125, 127Adjusting the time ...........................................44Advice on driving ...................................192-19 4Airbags ............................................22, 168, 176Airbags, curtain .....................................171, 172Airbags, front.........................................169, 172Airbags, lateral ......................................170, 172Air conditioning, dual-zone automatic ............................................127, 134Air conditioning, manual ................................125, 131, 13 4, 13 5Air intake ...............................................125, 134
Alarm ...............................................................83Anti-lock braking system (ABS) ..............................................159Anti-pinch ........................................................86Anti-theft ...........................................49, 59, 201Armrest, front ..................................................91ASR ...............................................................159Assistance call ......................................15 8, 328Assistance, emergency braking ................................................159, 243Audible warning ............................................159Audio system ...................................77, 148-15 0, 152, 15 3, 15 6, 216, 222, 2 41, 243, 245, 247, 250, 253, 260Autonomous emergency braking ....21, 239, 242
A
C
B
Braking, automatic emergency ....................................21, 239, 242Bulbs (changing) ...........................................298
Capacity, fuel tank ........................................261Cap, fuel filler ................................................261Central locking ..........................................45, 52Changing a bulb ..........................................................298Changing a bulb (tailgate) .............................308Changing a bulb (rear wing doors with glass windows) ........305Changing a fuse ............................................311Changing a wheel .........................................291Changing a wiper blade ........................157, 269Changing the remote control battery.........................................51, 62Checking the engine oil level ..................................................32, 273Checking the levels ...............................273-275Checking tyre pressures (using the kit) ..............................................290Checks ..........................................272, 276, 277
Battery .......................................... 276, 316-320Battery capacity ............................................320Battery, charging ...........................................318Battery, remote control .......................................51, 62, 63, 13 8Bench seat, one-piece, fixed ..............................................................95Blind, skyview® ..............................................120Blind spot monitoring system ............................................2 7, 249-2 51Blinds, side ....................................................11 8BlueHDi ....................................29, 33, 204, 278Bonnet ...........................................................271Boot ........................................56, 58, 61, 79, 81Brake discs ....................................................277Brake lamps .........................305, 306, 308, 309Brakes .......................................................16, 20
180° rear vision .............................................255
Alphabetical index
Page 413 of 418
413
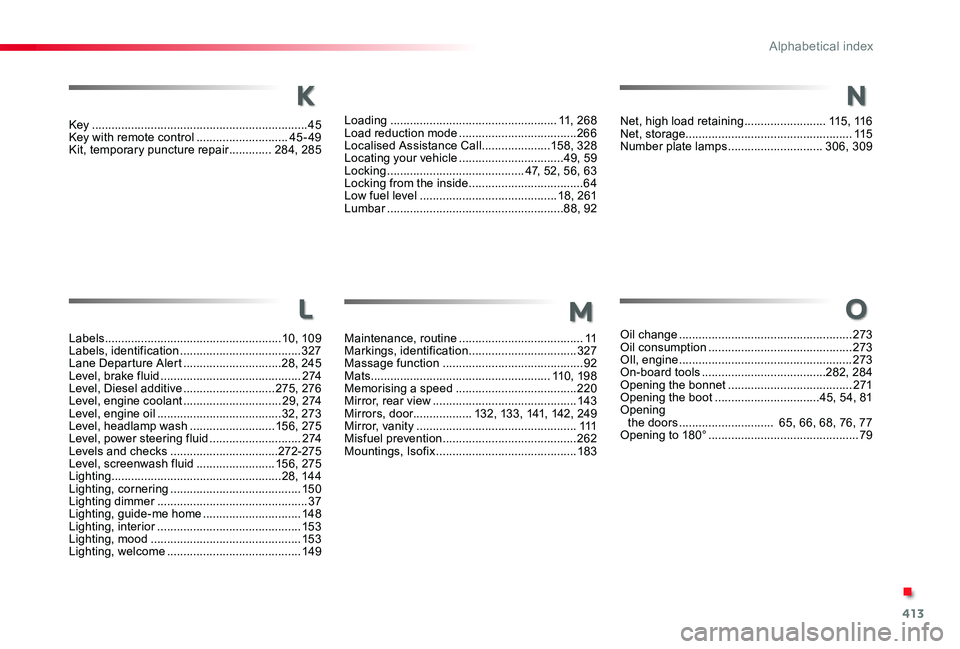
Key ..................................................................45Key with remote control ............................45-49Kit, temporary puncture repair .............284, 285
Labels ......................................................10, 109Labels, identification .....................................327Lane Departure Alert ..............................28, 245Level, brake fluid ...........................................2 74Level, Diesel additive ............................275, 276Level, engine coolant ..............................29, 2 74Level, engine oil ......................................32, 273Level, headlamp wash ..........................15 6, 275Level, power steering fluid ............................2 74Levels and checks .................................272-275Level, screenwash fluid ........................15 6, 275Lighting ....................................................28, 14 4Lighting, cornering ........................................15 0Lighting dimmer ..............................................37Lighting, guide-me home ..............................148Lighting, interior ............................................15 3Lighting, mood ..............................................15 3Lighting, welcome .........................................149
Loading ...................................................11, 268Load reduction mode ....................................266Localised Assistance Call .....................15 8, 328Locating your vehicle ................................49, 59Locking ..........................................47, 52, 56, 63Locking from the inside ...................................64Low fuel level ..........................................18, 261Lumbar ......................................................88, 92
K
L
Maintenance, routine ......................................11Markings, identification .................................327Massage function ...........................................92Mats .......................................................11 0, 198Memorising a speed .....................................220Mirror, rear view ............................................143Mirrors, door..................132, 13 3, 141, 142, 249Mirror, vanity .................................................111Misfuel prevention .........................................262Mountings, Isofix ...........................................183
M
Net, high load retaining .........................115, 11 6Net, storage...................................................115Number plate lamps .............................306, 309
Oil change .....................................................273Oil consumption ............................................273OIl, engine .....................................................273On-board tools ......................................282, 284Opening the bonnet ......................................271Opening the boot ................................45, 54, 81Opening the doors ............................. 65, 66, 68, 76, 77Opening to 180° ..............................................79
N
O
.
Alphabetical index