wheel TOYOTA PROACE VERSO 2022 User Guide
[x] Cancel search | Manufacturer: TOYOTA, Model Year: 2022, Model line: PROACE VERSO, Model: TOYOTA PROACE VERSO 2022Pages: 360, PDF Size: 70.79 MB
Page 48 of 360
48
– Bicycles are loaded on to or unloaded from the bicycle carrier.– Something is deposited or lifted behind the vehicle.– An animal approaches the bumper,– The vehicle is washed.– The vehicle is being serviced.– A wheel is changed. To avoid any sudden operation, keep the key
away from the detection zone (also from the boot’s interior sides) or deactivate the function in the vehicle configuration menu.
W ARNI NG
Ensure that no person or object might prevent the correct opening or closing of the doors.Be aware of children when operating the doors.
Side-hinged rear doors
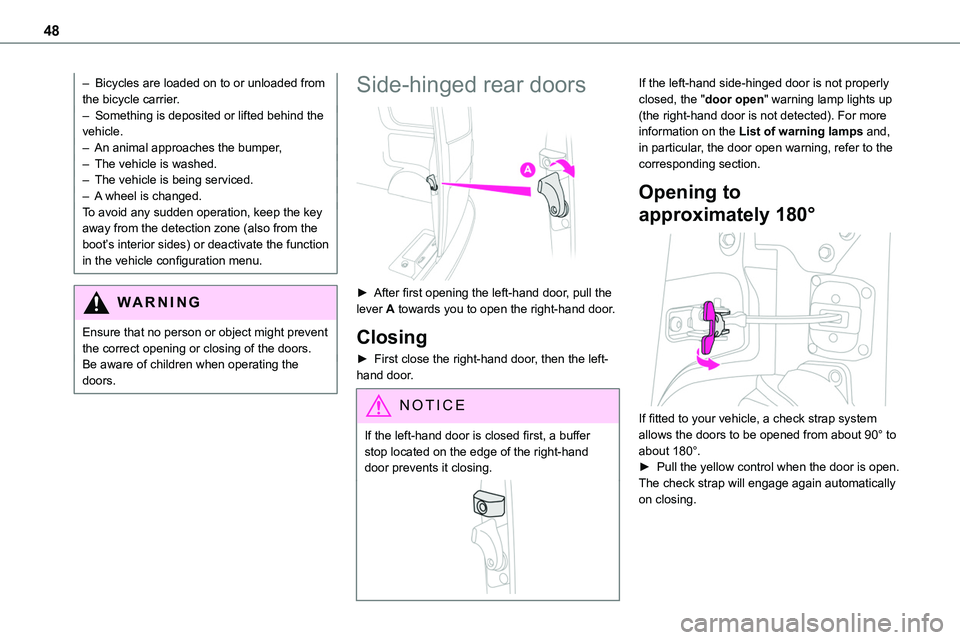
► After first opening the left-hand door, pull the lever A towards you to open the right-hand door.
Closing
► First close the right-hand door, then the left-hand door.
NOTIC E
If the left-hand door is closed first, a buffer stop located on the edge of the right-hand door prevents it closing.
If the left-hand side-hinged door is not properly closed, the "door open" warning lamp lights up (the right-hand door is not detected). For more information on the List of warning lamps and, in particular, the door open warning, refer to the corresponding section.
Opening to
approximately 180°
If fitted to your vehicle, a check strap system allows the doors to be opened from about 90° to about 180°.► Pull the yellow control when the door is open.The check strap will engage again automatically on closing.
Page 51 of 360
51
Access
2
The monitoring system is deactivated: the indicator lamp in the button goes off and the direction indicators flash for about 2 seconds.
NOTIC E
When the vehicle automatically locks itself again (as happens if a door or the boot is not opened within 30 seconds of unlocking), the monitoring system is also reactivated automatically.
Triggering of the alarm
This is indicated by sounding of the siren and flashing of the direction indicators for 30 seconds.The monitoring functions remain active until the alarm has been triggered ten times in succession.When the vehicle is unlocked, rapid flashing of the indicator lamp in the button indicates that the alarm was triggered during your absence. When the ignition is switched on, this flashing stops immediately.
Locking the vehicle
with exterior perimeter
monitoring only
Deactivate the interior volumetric monitoring to avoid the unwanted triggering of the alarm, in certain cases such as:– Slightly open window.– Washing the vehicle.
– Changing a wheel.– Towing the vehicle.– Transport on a ship or ferry.
Deactivating interior volumetric
monitoring
► Switch off the ignition and within 10 seconds press the alarm button until the indicator lamp is on fixed.► Exit the vehicle.► Immediately lock the vehicle using the remote control or the "Smart Entry & Start" system.Only exterior perimeter monitoring is activated; the red indicator lamp in the button flashes every second.To take effect, this deactivation must be performed whenever the ignition is switched off.
Reactivating interior volumetric
monitoring
► Deactivate exterior perimeter monitoring by unlocking the vehicle using the remote control or the "Smart Entry & Start" system.The indicator lamp in the button goes off.► Reactivate the full alarm system by locking the vehicle using the remote control or the "Smart Entry & Start" system.
The red indicator lamp in the button once again flashes every second.
Locking the vehicle without
activating the alarm
► Lock or deadlock the vehicle using the key (integral to the remote control) in the driver's door lock.
Failure of the remote control
To deactivate the monitoring functions:► unlock the vehicle using the key (integral to the remote control) in the driver's door lock,► open the door; the alarm is triggered,► switch on the ignition; the alarm stops; the indicator lamp in the button goes off.
Malfunction
When the ignition is switched on, the fixed lighting of the red indicator lamp in the button indicates a system malfunction.
Page 53 of 360
53
Ease of use and comfort
3
Correct driving position
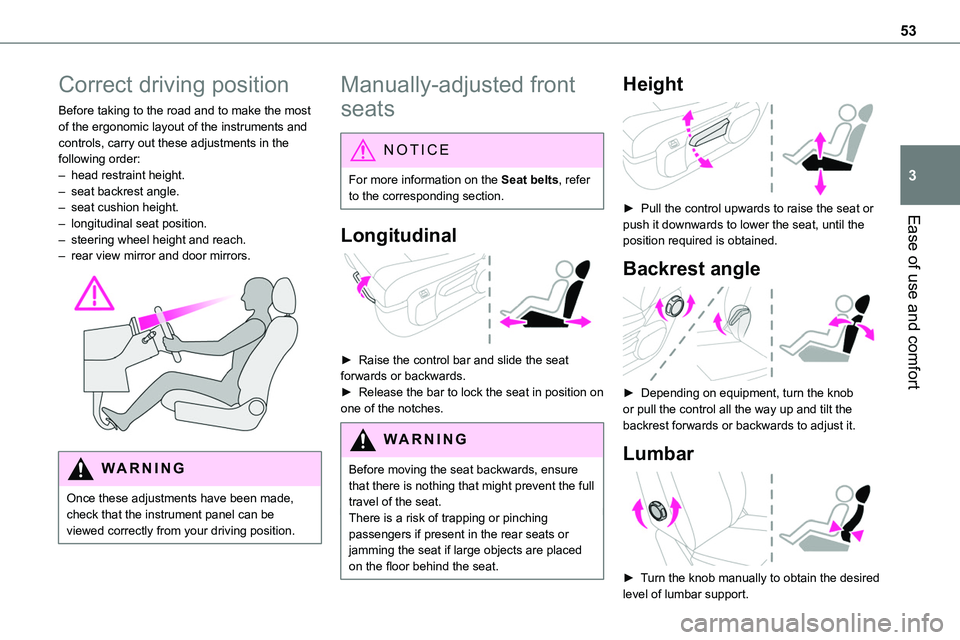
Before taking to the road and to make the most of the ergonomic layout of the instruments and controls, carry out these adjustments in the following order:– head restraint height.– seat backrest angle.– seat cushion height.
– longitudinal seat position.– steering wheel height and reach.– rear view mirror and door mirrors.
WARNI NG
Once these adjustments have been made, check that the instrument panel can be viewed correctly from your driving position.
Manually-adjusted front
seats
NOTIC E
For more information on the Seat belts, refer to the corresponding section.
Longitudinal
► Raise the control bar and slide the seat forwards or backwards.► Release the bar to lock the seat in position on one of the notches.
WARNI NG
Before moving the seat backwards, ensure that there is nothing that might prevent the full travel of the seat.There is a risk of trapping or pinching
passengers if present in the rear seats or jamming the seat if large objects are placed on the floor behind the seat.
Height
► Pull the control upwards to raise the seat or
push it downwards to lower the seat, until the position required is obtained.
Backrest angle
► Depending on equipment, turn the knob or pull the control all the way up and tilt the backrest forwards or backwards to adjust it.
Lumbar
► Turn the knob manually to obtain the desired
level of lumbar support.
Page 58 of 360
58
Steering wheel
adjustment
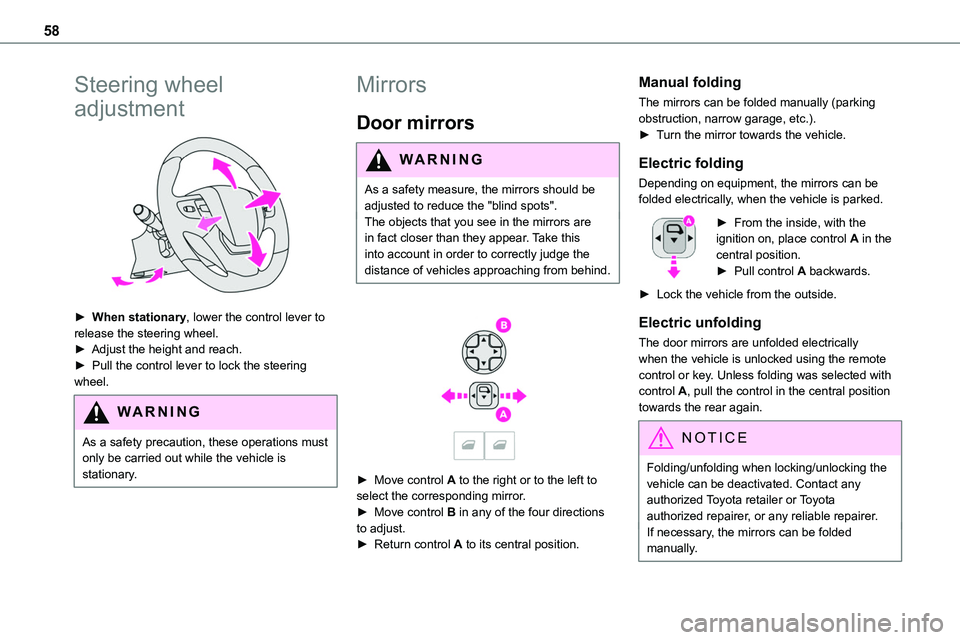
► When stationary, lower the control lever to release the steering wheel.► Adjust the height and reach.► Pull the control lever to lock the steering wheel.
WARNI NG
As a safety precaution, these operations must only be carried out while the vehicle is stationary.
Mirrors
Door mirrors
WARNI NG
As a safety measure, the mirrors should be adjusted to reduce the "blind spots".The objects that you see in the mirrors are
in fact closer than they appear. Take this into account in order to correctly judge the distance of vehicles approaching from behind.
► Move control A to the right or to the left to select the corresponding mirror.► Move control B in any of the four directions to adjust.
► Return control A to its central position.
Manual folding
The mirrors can be folded manually (parking obstruction, narrow garage, etc.).► Turn the mirror towards the vehicle.
Electric folding
Depending on equipment, the mirrors can be folded electrically, when the vehicle is parked.
► From the inside, with the ignition on, place control A in the central position.► Pull control A backwards.
► Lock the vehicle from the outside.
Electric unfolding
The door mirrors are unfolded electrically when the vehicle is unlocked using the remote control or key. Unless folding was selected with control A, pull the control in the central position towards the rear again.
NOTIC E
Folding/unfolding when locking/unlocking the vehicle can be deactivated. Contact any authorized Toyota retailer or Toyota authorized repairer, or any reliable repairer.If necessary, the mirrors can be folded manually.
Page 78 of 360
78
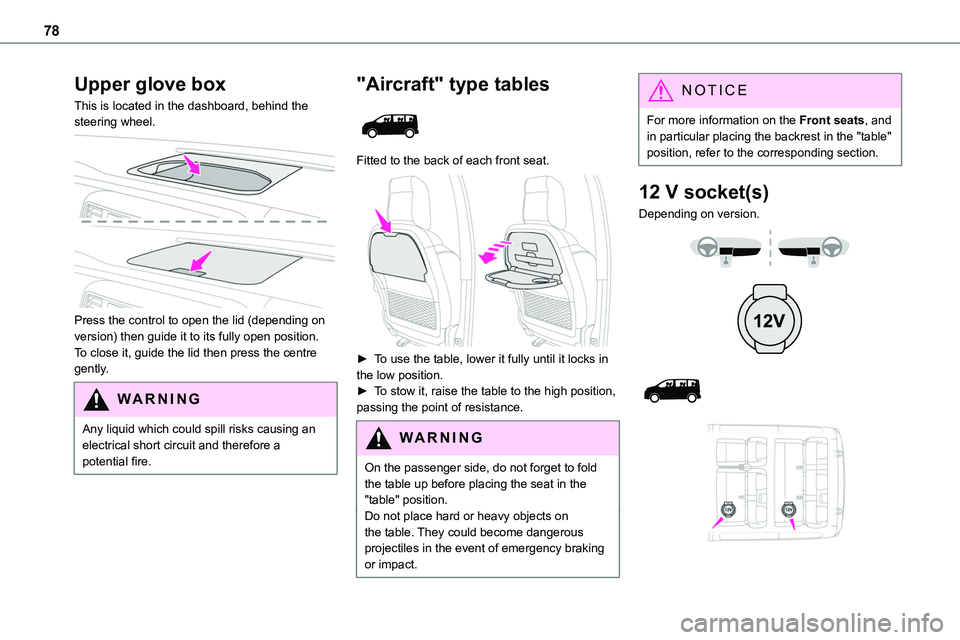
Upper glove box
This is located in the dashboard, behind the steering wheel.
Press the control to open the lid (depending on version) then guide it to its fully open position.To close it, guide the lid then press the centre gently.
WARNI NG
Any liquid which could spill risks causing an electrical short circuit and therefore a potential fire.
"Aircraft" type tables
Fitted to the back of each front seat.
► To use the table, lower it fully until it locks in the low position.► To stow it, raise the table to the high position, passing the point of resistance.
WARNI NG
On the passenger side, do not forget to fold the table up before placing the seat in the "table" position.Do not place hard or heavy objects on the table. They could become dangerous projectiles in the event of emergency braking or impact.
NOTIC E
For more information on the Front seats, and in particular placing the backrest in the "table" position, refer to the corresponding section.
12 V socket(s)
Depending on version.
Page 81 of 360
81
Ease of use and comfort
3
Use the stowing rings on the rear floor to secure loads.As a safety precaution in case of sharp braking, we recommend placing heavy objects as far forwards as possible (i.e. near the cab).We recommend using the stowing rings on the floor to firmly secure the load.
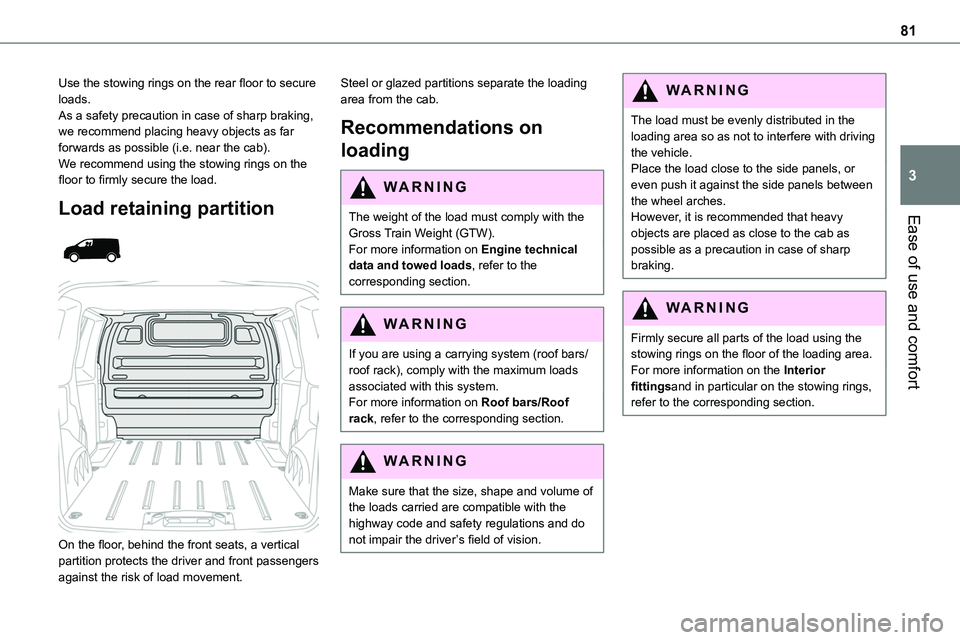
Load retaining partition
On the floor, behind the front seats, a vertical partition protects the driver and front passengers against the risk of load movement.
Steel or glazed partitions separate the loading area from the cab.
Recommendations on
loading
WARNI NG
The weight of the load must comply with the
Gross Train Weight (GTW).For more information on Engine technical data and towed loads, refer to the corresponding section.
WARNI NG
If you are using a carrying system (roof bars/roof rack), comply with the maximum loads associated with this system.For more information on Roof bars/Roof rack, refer to the corresponding section.
WARNI NG
Make sure that the size, shape and volume of the loads carried are compatible with the highway code and safety regulations and do not impair the driver’s field of vision.
WARNI NG
The load must be evenly distributed in the loading area so as not to interfere with driving the vehicle.Place the load close to the side panels, or even push it against the side panels between the wheel arches.However, it is recommended that heavy
objects are placed as close to the cab as possible as a precaution in case of sharp braking.
WARNI NG
Firmly secure all parts of the load using the stowing rings on the floor of the loading area.For more information on the Interior fittingsand in particular on the stowing rings, refer to the corresponding section.
Page 89 of 360
89
Ease of use and comfort
3
NOTIC E
Servicing the ventilation and air conditioning system► Ensure that the passenger compartment filter is in good condition and have the filter elements replaced regularly.We recommend using a composite passenger compartment filter. Its specific active additive
helps protect against polluting gases and bad smells.► To ensure correct operation of the air conditioning system, have it checked according to the recommendations in the Manufacturer's service schedule.
Contains R134A fluorinated greenhouse gasesDepending on version and country of sale, the air conditioning system may contain R134A fluorinated greenhouse gases.Gas capacity 0.5 kg (+/- 0.025 kg), GWP index 1430 (CO2 equivalent: 0.715 t).
NOTIC E
Stop & StartThe heating and air conditioning systems only operate when the engine is running.Temporarily deactivate the Stop & Start system to maintain a comfortable temperature in the passenger compartment.For more information on the Stop & Start,
refer to the corresponding section.
NOTIC E
ECO driving modeSelecting this mode reduces electrical energy consumption, but restricts the performance of the heating and air conditioning systems, although it does not deactivate them.
Heating
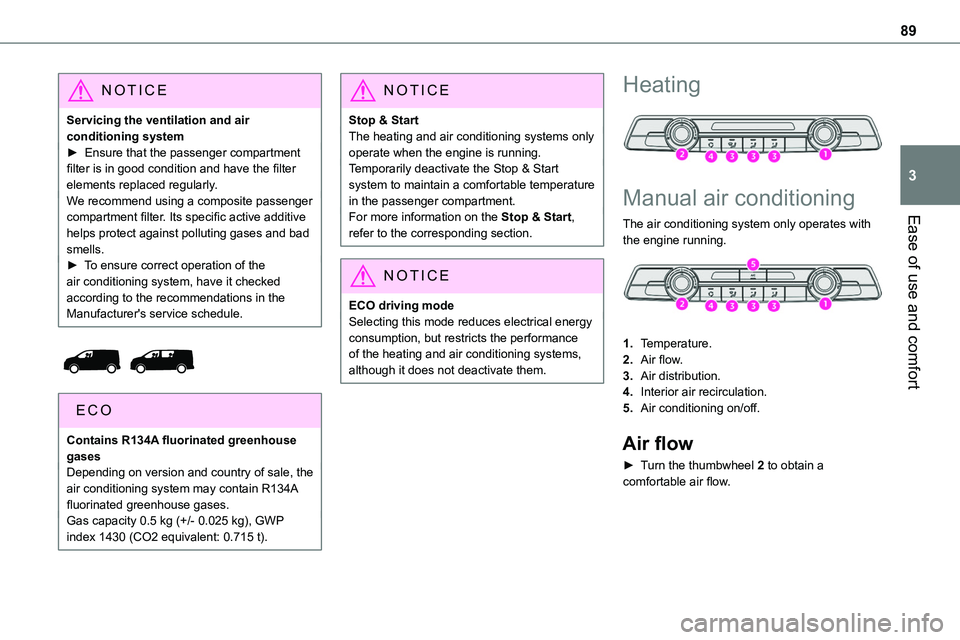
Manual air conditioning
The air conditioning system only operates with the engine running.
1.Temperature.
2.Air flow.
3.Air distribution.
4.Interior air recirculation.
5.Air conditioning on/off.
Air flow
► Turn the thumbwheel 2 to obtain a
comfortable air flow.
Page 90 of 360
90
NOTIC E
If you set the air flow control to the minimum position (off), the temperature in the vehicle will no longer be controlled. A slight air flow can still be felt however, resulting from the forward movement of the vehicle.
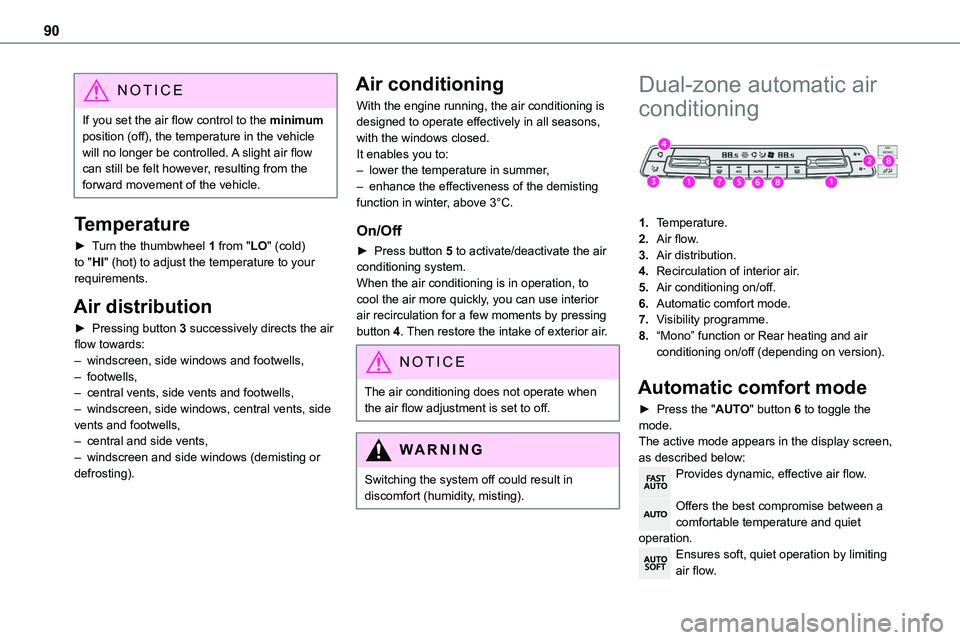
Temperature
► Turn the thumbwheel 1 from "LO" (cold) to "HI" (hot) to adjust the temperature to your requirements.
Air distribution
► Pressing button 3 successively directs the air flow towards:– windscreen, side windows and footwells, – footwells,– central vents, side vents and footwells,– windscreen, side windows, central vents, side vents and footwells,– central and side vents, – windscreen and side windows (demisting or defrosting).
Air conditioning
With the engine running, the air conditioning is designed to operate effectively in all seasons, with the windows closed.It enables you to:– lower the temperature in summer,– enhance the effectiveness of the demisting function in winter, above 3°C.
On/Off
► Press button 5 to activate/deactivate the air conditioning system.When the air conditioning is in operation, to cool the air more quickly, you can use interior air recirculation for a few moments by pressing button 4. Then restore the intake of exterior air.
NOTIC E
The air conditioning does not operate when the air flow adjustment is set to off.
WARNI NG
Switching the system off could result in discomfort (humidity, misting).
Dual-zone automatic air
conditioning
1.Temperature.
2.Air flow.
3.Air distribution.
4.Recirculation of interior air.
5.Air conditioning on/off.
6.Automatic comfort mode.
7.Visibility programme.
8.“Mono” function or Rear heating and air conditioning on/off (depending on version).
Automatic comfort mode
► Press the "AUTO" button 6 to toggle the mode.The active mode appears in the display screen, as described below:Provides dynamic, effective air flow.
Offers the best compromise between a comfortable temperature and quiet operation.Ensures soft, quiet operation by limiting air flow.
Page 94 of 360
94
Rear heating - air
conditioning
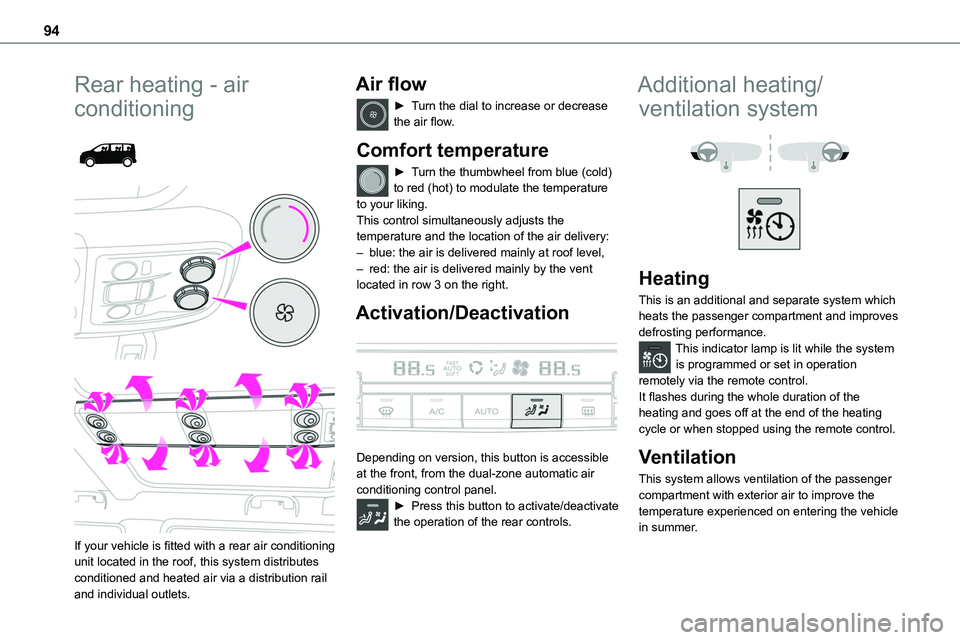
If your vehicle is fitted with a rear air conditioning unit located in the roof, this system distributes conditioned and heated air via a distribution rail and individual outlets.
Air flow
► Turn the dial to increase or decrease the air flow.
Comfort temperature
► Turn the thumbwheel from blue (cold) to red (hot) to modulate the temperature to your liking.This control simultaneously adjusts the
temperature and the location of the air delivery:– blue: the air is delivered mainly at roof level,– red: the air is delivered mainly by the vent located in row 3 on the right.
Activation/Deactivation
Depending on version, this button is accessible at the front, from the dual-zone automatic air conditioning control panel.► Press this button to activate/deactivate the operation of the rear controls.
Additional heating/
ventilation system
Heating
This is an additional and separate system which heats the passenger compartment and improves defrosting performance.This indicator lamp is lit while the system is programmed or set in operation remotely via the remote control.It flashes during the whole duration of the heating and goes off at the end of the heating cycle or when stopped using the remote control.
Ventilation
This system allows ventilation of the passenger compartment with exterior air to improve the temperature experienced on entering the vehicle in summer.
Page 114 of 360
11 4
CountryContact information
[email protected]
[email protected]
[email protected]
[email protected]
Great [email protected]
[email protected]
[email protected]
[email protected]
[email protected]
Netherlandswww.toyota.nl/klantenservice
[email protected]
[email protected]
[email protected]
[email protected]
[email protected]
[email protected] / [email protected]
[email protected]
CountryContact information
[email protected]
Horn
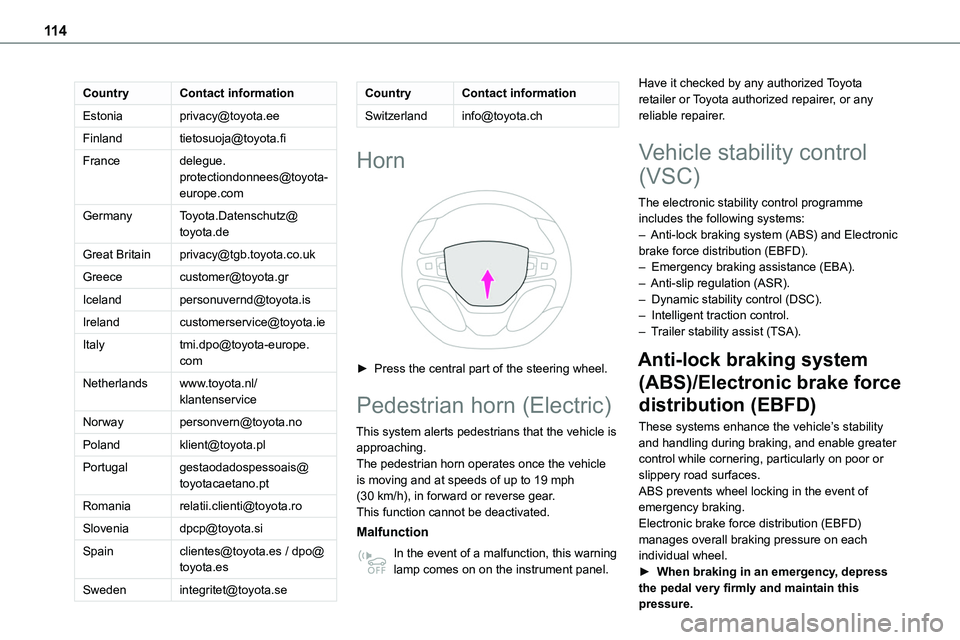
► Press the central part of the steering wheel.
Pedestrian horn (Electric)
This system alerts pedestrians that the vehicle is approaching.The pedestrian horn operates once the vehicle is moving and at speeds of up to 19 mph (30 km/h), in forward or reverse gear.This function cannot be deactivated.
Malfunction
In the event of a malfunction, this warning lamp comes on on the instrument panel.
Have it checked by any authorized Toyota retailer or Toyota authorized repairer, or any reliable repairer.
Vehicle stability control
(VSC)
The electronic stability control programme includes the following systems:
– Anti-lock braking system (ABS) and Electronic brake force distribution (EBFD).– Emergency braking assistance (EBA).– Anti-slip regulation (ASR).– Dynamic stability control (DSC).– Intelligent traction control.– Trailer stability assist (TSA).
Anti-lock braking system
(ABS)/Electronic brake force
distribution (EBFD)
These systems enhance the vehicle’s stability and handling during braking, and enable greater control while cornering, particularly on poor or slippery road surfaces.ABS prevents wheel locking in the event of emergency braking.Electronic brake force distribution (EBFD) manages overall braking pressure on each individual wheel.► When braking in an emergency, depress the pedal very firmly and maintain this pressure.