remote start TOYOTA PROACE VERSO 2023 Owner's Guide
[x] Cancel search | Manufacturer: TOYOTA, Model Year: 2023, Model line: PROACE VERSO, Model: TOYOTA PROACE VERSO 2023Pages: 360, PDF Size: 70.22 MB
Page 208 of 360
208
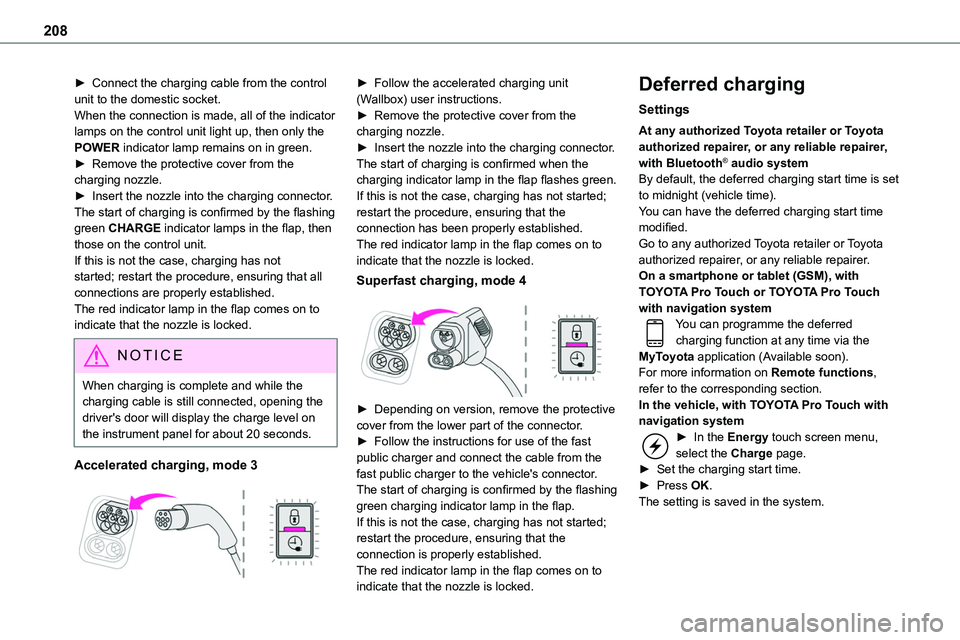
► Connect the charging cable from the control unit to the domestic socket.When the connection is made, all of the indicator lamps on the control unit light up, then only the POWER indicator lamp remains on in green.► Remove the protective cover from the charging nozzle.► Insert the nozzle into the charging connector.The start of charging is confirmed by the flashing
green CHARGE indicator lamps in the flap, then those on the control unit.If this is not the case, charging has not started; restart the procedure, ensuring that all connections are properly established.The red indicator lamp in the flap comes on to indicate that the nozzle is locked.
NOTIC E
When charging is complete and while the charging cable is still connected, opening the driver's door will display the charge level on the instrument panel for about 20 seconds.
Accelerated charging, mode 3
► Follow the accelerated charging unit (Wallbox) user instructions.► Remove the protective cover from the charging nozzle.► Insert the nozzle into the charging connector.The start of charging is confirmed when the charging indicator lamp in the flap flashes green.If this is not the case, charging has not started; restart the procedure, ensuring that the
connection has been properly established.The red indicator lamp in the flap comes on to indicate that the nozzle is locked.
Superfast charging, mode 4
► Depending on version, remove the protective cover from the lower part of the connector.
► Follow the instructions for use of the fast public charger and connect the cable from the fast public charger to the vehicle's connector.The start of charging is confirmed by the flashing green charging indicator lamp in the flap.If this is not the case, charging has not started; restart the procedure, ensuring that the connection is properly established.The red indicator lamp in the flap comes on to indicate that the nozzle is locked.
Deferred charging
Settings
At any authorized Toyota retailer or Toyota authorized repairer, or any reliable repairer, with Bluetooth® audio systemBy default, the deferred charging start time is set to midnight (vehicle time).You can have the deferred charging start time
modified.Go to any authorized Toyota retailer or Toyota authorized repairer, or any reliable repairer.On a smartphone or tablet (GSM), with TOYOTA Pro Touch or TOYOTA Pro Touch with navigation systemYou can programme the deferred charging function at any time via the MyToyota application (Available soon).For more information on Remote functions, refer to the corresponding section.In the vehicle, with TOYOTA Pro Touch with navigation system► In the Energy touch screen menu, select the Charge page.► Set the charging start time.► Press OK.The setting is saved in the system.
Page 215 of 360
215
Practical information
7
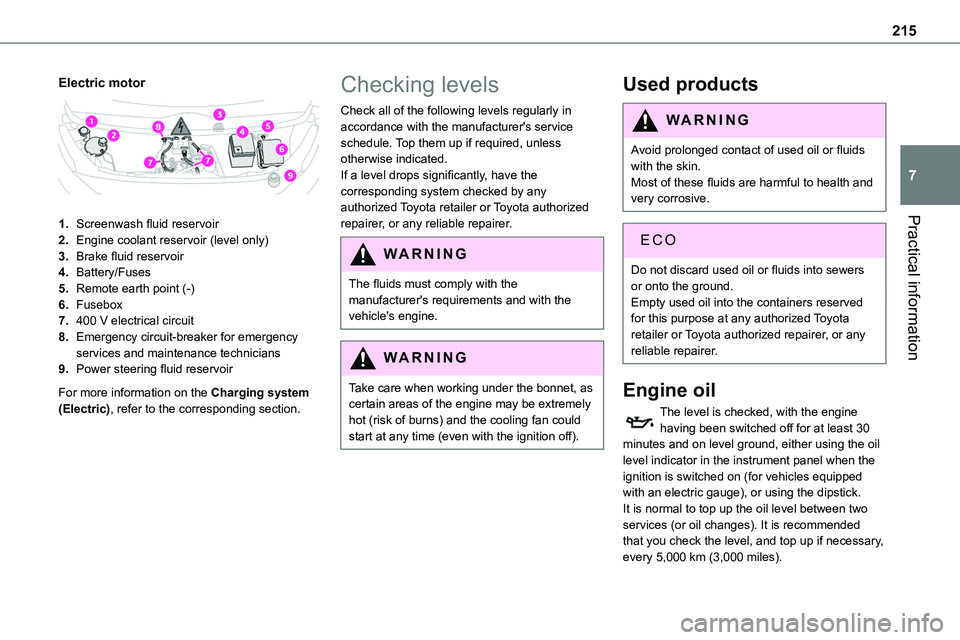
Electric motor
1.Screenwash fluid reservoir
2.Engine coolant reservoir (level only)
3.Brake fluid reservoir
4.Battery/Fuses
5.Remote earth point (-)
6.Fusebox
7.400 V electrical circuit
8.Emergency circuit-breaker for emergency services and maintenance technicians
9.Power steering fluid reservoir
For more information on the Charging system (Electric), refer to the corresponding section.
Checking levels
Check all of the following levels regularly in accordance with the manufacturer's service schedule. Top them up if required, unless otherwise indicated.If a level drops significantly, have the corresponding system checked by any authorized Toyota retailer or Toyota authorized
repairer, or any reliable repairer.
WARNI NG
The fluids must comply with the manufacturer's requirements and with the vehicle's engine.
WARNI NG
Take care when working under the bonnet, as certain areas of the engine may be extremely hot (risk of burns) and the cooling fan could start at any time (even with the ignition off).
Used products
WARNI NG
Avoid prolonged contact of used oil or fluids with the skin.Most of these fluids are harmful to health and very corrosive.
ECO
Do not discard used oil or fluids into sewers or onto the ground.Empty used oil into the containers reserved for this purpose at any authorized Toyota retailer or Toyota authorized repairer, or any reliable repairer.
Engine oil
The level is checked, with the engine having been switched off for at least 30 minutes and on level ground, either using the oil level indicator in the instrument panel when the ignition is switched on (for vehicles equipped with an electric gauge), or using the dipstick.It is normal to top up the oil level between two services (or oil changes). It is recommended that you check the level, and top up if necessary, every 5,000 km (3,000 miles).
Page 246 of 360
246
Fuse N°Rating(Amps)Functions
F1930Windscreen wiper motor.
F2015Front and rear screenwash pump.
F2215Horn.
F2315Right-hand main beam headlamp.
F2415Left-hand main beam headlamp.
12 V battery / Accessory
battery
Procedure for starting the engine using another battery or charging a discharged battery.
Lead-acid starter batteries
ECO
Batteries contain harmful substances such as sulphuric acid and lead.They must be disposed of in accordance with regulations and must not, in any circumstances, be discarded with household waste.Take used remote control batteries and vehicle batteries to a special collection point.
WARNI NG
Protect your eyes and face before handling the battery.All operations on the battery must be carried out in a well ventilated area and away from naked flames and sources of sparks, so as to avoid the risk of explosion or fire.Wash your hands afterwards.
Electric motor
NOTIC E
Flat accessory batteryIt is no longer possible to start the motor or recharge the traction battery.
WARNI NG
Precautions before working on the accessory batterySelect mode P, switch off the ignition, check that the instrument panel is off and that the vehicle is not plugged in.
WARNI NG
Jump-starting another vehicleDo not use the accessory battery to jump-start another vehicle or to charge another vehicle's battery.
WARNI NG
Always replace the battery with one of equivalent specification.
Page 247 of 360
247
In the event of a breakdown
8
Access to the battery
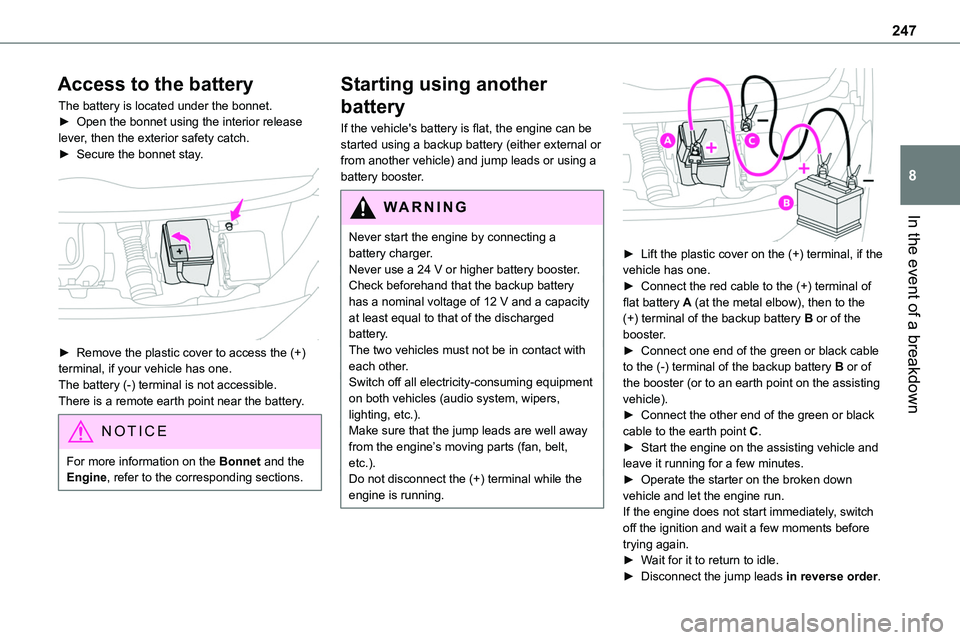
The battery is located under the bonnet.► Open the bonnet using the interior release lever, then the exterior safety catch.► Secure the bonnet stay.
► Remove the plastic cover to access the (+) terminal, if your vehicle has one.The battery (-) terminal is not accessible.There is a remote earth point near the battery.
NOTIC E
For more information on the Bonnet and the Engine, refer to the corresponding sections.
Starting using another
battery
If the vehicle's battery is flat, the engine can be started using a backup battery (either external or from another vehicle) and jump leads or using a battery booster.
WARNI NG
Never start the engine by connecting a battery charger.Never use a 24 V or higher battery booster.Check beforehand that the backup battery has a nominal voltage of 12 V and a capacity at least equal to that of the discharged battery.The two vehicles must not be in contact with each other.Switch off all electricity-consuming equipment on both vehicles (audio system, wipers, lighting, etc.).Make sure that the jump leads are well away from the engine’s moving parts (fan, belt, etc.).Do not disconnect the (+) terminal while the engine is running.
► Lift the plastic cover on the (+) terminal, if the vehicle has one.► Connect the red cable to the (+) terminal of flat battery A (at the metal elbow), then to the (+) terminal of the backup battery B or of the booster.► Connect one end of the green or black cable to the (-) terminal of the backup battery B or of the booster (or to an earth point on the assisting vehicle).► Connect the other end of the green or black
cable to the earth point C.► Start the engine on the assisting vehicle and leave it running for a few minutes.► Operate the starter on the broken down vehicle and let the engine run.If the engine does not start immediately, switch off the ignition and wait a few moments before trying again.► Wait for it to return to idle.► Disconnect the jump leads in reverse order.
Page 250 of 360
250
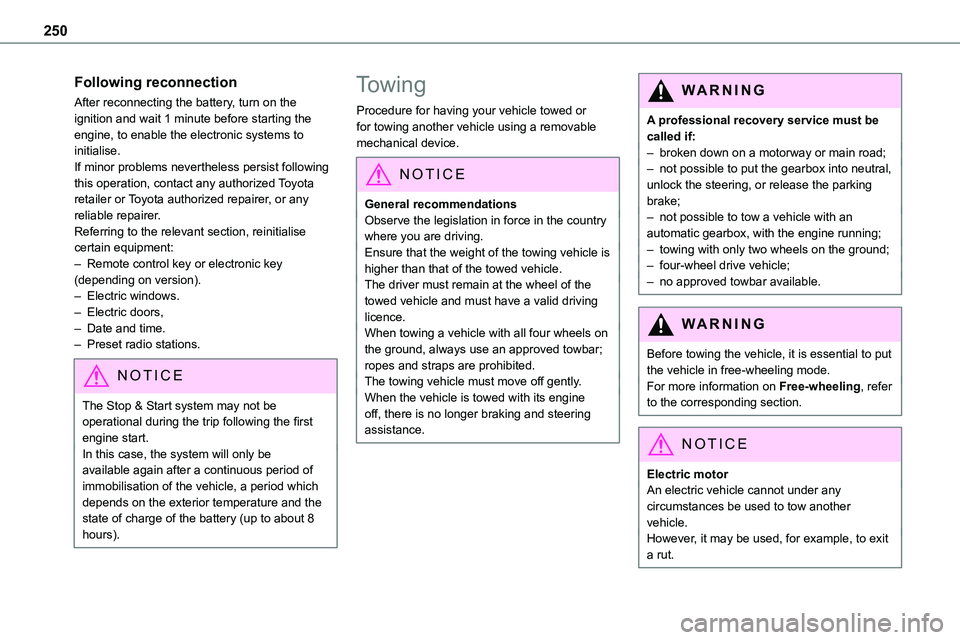
Following reconnection
After reconnecting the battery, turn on the ignition and wait 1 minute before starting the engine, to enable the electronic systems to initialise.If minor problems nevertheless persist following this operation, contact any authorized Toyota retailer or Toyota authorized repairer, or any reliable repairer.
Referring to the relevant section, reinitialise certain equipment:– Remote control key or electronic key (depending on version).– Electric windows.– Electric doors,– Date and time.– Preset radio stations.
NOTIC E
The Stop & Start system may not be operational during the trip following the first engine start.In this case, the system will only be available again after a continuous period of immobilisation of the vehicle, a period which depends on the exterior temperature and the state of charge of the battery (up to about 8 hours).
Towing
Procedure for having your vehicle towed or for towing another vehicle using a removable mechanical device.
NOTIC E
General recommendationsObserve the legislation in force in the country
where you are driving.Ensure that the weight of the towing vehicle is higher than that of the towed vehicle.The driver must remain at the wheel of the towed vehicle and must have a valid driving licence.When towing a vehicle with all four wheels on the ground, always use an approved towbar; ropes and straps are prohibited.The towing vehicle must move off gently.When the vehicle is towed with its engine off, there is no longer braking and steering assistance.
WARNI NG
A professional recovery service must be called if:– broken down on a motorway or main road;– not possible to put the gearbox into neutral, unlock the steering, or release the parking brake;– not possible to tow a vehicle with an
automatic gearbox, with the engine running;– towing with only two wheels on the ground;– four-wheel drive vehicle;– no approved towbar available.
WARNI NG
Before towing the vehicle, it is essential to put the vehicle in free-wheeling mode.For more information on Free-wheeling, refer to the corresponding section.
NOTIC E
Electric motorAn electric vehicle cannot under any circumstances be used to tow another vehicle.
However, it may be used, for example, to exit a rut.
Page 324 of 360
324
Hill start assist 158–159Histogramme, fuel consumption 27–28Horn 11 2
I
Ignition 153–154, 312
Ignition on 154Immobiliser, electronic 150Indicator, AdBlue® range 20Indicator, coolant temperature 18–19Indicator, engine oil level 19–20Indicator lamps, operation 99Indicators, direction 100Inflating tyres 219, 262Inflating tyres and accessories (using the kit) 229–232Information, vehicle 318Infrared camera 170Instrument panel 10, 171Intelligent Traction Control 11 4Internet browser 301, 304ISOFIX 142, 142–143
J
Jack 233Jump starting 247
K
Key 30–34, 36–37Key, electronic 30, 154Keyless Entry and Starting 30–36, 151, 153–154Key not recognised 154Key with remote control 34–35
Kit, hands-free 271, 285–286, 310Kit, puncture repair 230–232Kit, temporary puncture repair 229–232
L
Labels 6, 62Labels, identification 262Lane Departure Warning System (LDWS) 186–187Leather (care) 226Level, AdBlue® 217Level, brake fluid 216Level, Diesel additive 217–218Level, engine coolant 18–19, 216Level, engine oil 19–20, 215Level, headlamp wash 106Level, power steering fluid 216Levels and checks 214–217Level, screenwash fluid 106, 217Lighting 99Lighting dimmer 24Lighting, exterior 99, 102
Lighting, guide-me home 101Lighting, interior 96, 104Lighting, mood 104Lighting, welcome 101–102Loading 79, 212Loading area fittings 78Load reduction mode 210Load restraint 79
Locating your vehicle 31Locking 30–31, 34–35Locking from the inside 39Locking the doors 39–40Low fuel level 196–198Lumbar 52, 55–56
M
Mains socket (domestic network) 201Maintenance (advice) 199, 224Maintenance, routine 171, 217, 220Manoeuvring aids (recommendations) 169Map reading lamps 96Markings, identification 262Massage function 55–56Mat 74–75, 171Memorising a speed 172Menu 284Menu, main 27, 265Menus (audio) 278–279, 293–294Menu short cuts 27Messages 312
Page 326 of 360
326
Replacing the air filter 218Replacing the oil filter 218Replacing the passenger compartment filter 218Reservoir, screenwash 217Resetting the trip recorder 23Reversing camera 170, 192, 195Reversing lamp 241, 243
Roof bars 212Running out of fuel (Diesel) 227
S
Safety, children 120, 123–125, 127, 133–134, 142, 142–143, 142–143Saturation of the particle filter (Diesel) 218Screen, instrument panel 24Screen menu map 284Screen, multifunction (with audio system) 265Screenwash, front 106Screenwash, rear 107SCR (Selective Catalytic Reduction) 21, 220Seat and bench seat, rear, fixed 62, 65–66Seat and bench seat, rear, on rails 62, 67–68Seat angle 52Seat belts 11 6–11 9, 126Seat belts, rear 11 8Seat, bench front, 2-seat 54, 11 8Seat, rear bench 62Seats, electric 53Seats, front 52–53
Seats, heated 55Seat(s), individual, rear, on rails 69–71, 11 8Seats, rear 63–68, 124Selector, gear 160Sensors (warnings) 170Serial number, vehicle 262Service indicator 18Servicing 18, 217, 220
Settings, equipment 26–27Settings, system 287, 314Sidelamps 99, 238, 240–241, 243Side repeater 240Silent vehicle warning sound (Electric) 11 2, 149Sliding side door, electric 34–36, 40–44Sliding side door, hands-free 44–46Sliding side window 81Smart Cargo 58–60Smart Entry & Start 30–31, 151, 153–154Smartphone 28Snow chains 168, 210–2 11, 234Snow chains, link 210, 234Socket, 12 V accessory 74, 76Socket, 220 V 77Speed limiter 172, 174–177Speed limit recognition 173–174, 176, 179, 182–184Speedometer 171Sport mode 165Stability control (ESC) 11 3–11 6Starting a Diesel engine 196Starting the engine 150, 153
Starting the vehicle 151, 154, 158, 160–163Starting using another battery 154, 247Station, radio 265, 280, 306–307Stay, bonnet 214Steering mounted controls, audio 264, 277–278, 292Steering wheel, adjustment 56Stickers, customising ~ Stickers,
expressive 226Stopping the vehicle 153–154, 160–163Stop & Start 26, 87, 166–167, 196, 213, 218, 250Storage 54, 61–62, 72–73, 75Storage compartments 75–76Storage wells 72–73, 75Stowing rings 78Sunshine sensor 86Super-fast charging (Electric) 207, 209, 258Suspension 220Switching off the engine 150, 152–153Synchronising the remote control 38
T
Table of weights 254Table position 53Table, retractable sliding 82–85Tables, aircraft 76Tables of engines 258Tables of fuses 243–245Table top, working 61–62