rearward TOYOTA PROACE VERSO EV 2023 Owners Manual
[x] Cancel search | Manufacturer: TOYOTA, Model Year: 2023, Model line: PROACE VERSO EV, Model: TOYOTA PROACE VERSO EV 2023Pages: 360, PDF Size: 70.22 MB
Page 16 of 360

16
Press the button to reactivate it.The DSC/ASR system is activated automatically when the vehicle is started, and from around 50 km/h (30 mph).
Under-inflationFixed, accompanied by an audible signal and a message.The pressure in one or more wheels is too low.Check the pressure of the tyres as soon as
possible.Reinitialise the detection system after adjusting the pressure.Under-inflation warning lamp flashing then fixed and Service warning lamp fixed.The tyre pressure monitoring system is faulty.Under-inflation detection is no longer monitored.Check the tyre pressures as soon as possible and carry out (3).
Engine pre-heating (Diesel)Temporarily on(up to approximately 30 seconds in severe weather conditions).When switching on the ignition, if the weather conditions and the engine temperature make it necessary.Wait until the warning lamp goes off before starting.When the warning lamp goes off, starting will occur immediately if you press and hold:– the clutch pedal with a manual gearbox.– the brake pedal with an automatic gearbox.
If the engine does not start, make the engine starting request again, while keeping your foot on the pedal.
Front passenger airbag (ON)Fixed.The front passenger airbag is activated.The control is in the "ON" position.In this case, do NOT install a "rearward facing" child seat on the front passenger seat
- Risk of serious injury!
Front passenger airbag (OFF)Fixed.The front passenger airbag is deactivated.The control is in the "OFF" position.You can install a "rearward facing" child seat, unless there is a fault with the airbags (airbag warning lamp on).
AirbagsFixed.One of the airbags or seat belt pyrotechnic pretensioners is faulty.Carry out (3).
Low fuel levelor Fixed (warning lamp or LED) and needle in the red zone (depending on version), accompanied by an audible signal and a message.The audible signal and the message are repeated with increasing frequency as the fuel level drops towards zero.When it first comes on, there remains less than 8 litres of fuel in the tank.
Refuel without delay to avoid running out of fuel.Never drive until completely empty, this could damage the emission control and injection systems.
Low traction battery level (Electric)
0 %
100
Fixed LED and needle in the red zone, accompanied by an audible signal and a message.The state of charge of the traction battery is low.
View the remaining range.Put the vehicle on charge as soon as possible.
Tortoise mode with limited driving range (Electric)Fixed.The state of charge of the traction battery is critical.The engine power gradually decreases.You must put the vehicle on charge.If the warning lamp remains lit, carry out (2).
Pedestrian horn (Electric)Fixed.Horn fault detected.Carry out (3).
Presence of water in diesel filterFixed (with LCD instrument panel).The diesel filter contains water.Risk of damage to the injection system : carry out (2) without delay.
Page 37 of 360

37
Access
2
► Turn the key rearwards again within 5 seconds to deadlock the vehicle.
NOTIC E
If the vehicle is fitted with an alarm, it will not be activated when locking with the key.If the alarm is activated, the siren sounds when the door is opened; switch on the ignition to stop it.
NOTIC E
If the vehicle is unlocked with the key in the lock after locking it with the remote control or the Smart Entry & Start system, all doors and the boot are unlocked.If the vehicle is unlocked with the key in the lock after locking it with the key, only the doors (front door and sliding side door(s)) are unlocked. The side-hinged doors and tailgate are not unlocked. Switching on the ignition unlocks them.
Central locking not
functioning
Use these procedures in the following cases:
– Central locking malfunction.– Battery disconnected or discharged.
WARNI NG
In the event of a malfunction of the central locking system, the battery must be disconnected to ensure that the vehicle is locked fully.
Front left-hand door
► Insert the key into the door lock.► Turn the key towards the rear of the vehicle to lock it, or towards the front to unlock it.
Front passenger door and sliding
side door
Unlocking► Pull the interior door opening handle.Locking► Open the door.► For the side door, check that the child lock is not on. Refer to the corresponding section.
Front passenger door
Sliding side door► Remove the black cap on the edge of the door, using the key.► Insert the key in the aperture without forcing it, then without turning it, move the latch sideways towards the inside of the door.► Remove the key and refit the black cap.► Close the doors and check from the outside that the vehicle is locked.
Side-hinged doors
Unlocking► Use the interior opening handle.Locking► If fitted to your vehicle, check that the electric child lock is not on.► Open the left-hand side-hinged door.
► Insert the key into the latch aperture on the edge of the door (without forcing it) and slide the assembly upwards.► Remove the key.► Close the door and check from the outside that the vehicle is locked.
Page 53 of 360

53
Ease of use and comfort
3
Table position of the driver's
On the driver's side, this position allows rear passengers to be helped out of the vehicle (by the emergency services).
WARNI NG
Check that there is no object that could interfere with the movement of a seat, both above and below.
► Place the head restraint in the low position, and if fitted to your vehicle, raise the armrest and fold the table fitted to the back of the seat.
► Pull the control fully up and tip the backrest forward.
To return to the normal position, pull the control up to release the backrest, then pull the backrest up to its raised position.
Electric front seat
NOTIC E
To avoid discharging the battery, carry out these adjustments with the engine running.
NOTIC E
For more information on the Seat belts, refer to the corresponding section.
Longitudinal
► Push the control forwards or rearwards to slide the seat.
WARNI NG
Before moving the seat backwards, ensure that there is nothing that might prevent the full travel of the seat.There is a risk of trapping or pinching passengers if present in the rear seats or jamming the seat if large objects are placed on the floor behind the seat.
Seat cushion height
► Tilt the control upwards or downwards to obtain the desired height.
Backrest angle
► Tilt the control forwards or rearwards to adjust the angle of the backrest.
Page 69 of 360

69
Ease of use and comfort
3
NOTIC E
Before refitting the seat or bench seat in the vehicle, pull the strap fully to ensure that the latching mechanism has engaged.
WARNI NG
Do not use the strap to lift the seat or bench seat.
(example of an individual seat)► Check that nothing is obstructing the rails.
► Place the front part of the guides on the rails.► Tip the seat to align the rear of the guides in the rails.► Slide the seat forwards or backwards until it engages in the notches.► Raise the backrest.
NOTIC E
Check that the seat has correctly locked on the floor when returned to the seating position.
Individual rear seat(s) on
rails
PROACE VERSO
The different equipment and settings described hereafter vary according to the version and the configuration of your vehicle.
The individual seat is fitted with a three-point inertia reel seat belt.It can be placed facing forwards or facing
rearwards.
NOTIC E
If there is an individual seat facing rearwards in row 2, ensure that the seat in row 1 (driver or passenger) is not set too far back, in order to avoid contact between the two seats.This could cause significant wear of the parts which are in contact.
Page 124 of 360

124
WARNI NG
Additional protectionsTo prevent accidental opening of the doors and rear windows, use the "Child lock".Take care not to open the rear windows by more than one third.To protect young children from the rays of the sun, fit side blinds on the rear windows.
As a safety precaution, do not leave:– a child alone and unattended in a vehicle,– a child or an animal in a vehicle which is exposed to the sun, with the windows closed,– the keys within reach of children inside the vehicle.
Child seat at the rear
Row 2
Forward-facing or rearward-facing
► Move the vehicle's front seat forward and straighten the backrest so that the legs of the child in the forward-facing or rearward-facing child seat itself do not touch the vehicle's front seat.► Check that the backrest of the forward-facing child seat is as close as possible to the backrest of the vehicle's rear seat, and ideally in contact with it.► Adjust the rear seat to the fully back longitudinal position, with the backrest straightened.
NOTIC E
Ensure that the seat belt is correctly tensioned.For child seats with a support leg, ensure
that the support leg is in firm and steady contact with the floor. If necessary, adjust the vehicle's front seat.
Row 3
If a child seat is installed on a passenger seat in the third row, move the seats in the second row forward and straighten the backrests so that the child seat and the child's legs do not touch the seats in the second row.
Child seat at the front
► Adjust the front passenger seat to the highest and fully back longitudinal position, with the backrest straightened.
"Forward facing"
Page 125 of 360

125
Safety
5
WARNI NG
You must leave the front passenger airbag active.
"Rearward facing"
WARNI NG
The front passenger airbag must be deactivated before installing a rearward facing child seat. Otherwise, the child risks being seriously injured or killed if the airbag deploys.
Warning label - Front passenger airbag
You must comply with the following instruction, as reminded by the warning label on both sides of the passenger sun visor:
NEVER use a rearward facing child restraint on a seat protected by an ACTIVE AIRBAG in front of it, DEATH or SERIOUS INJURY to the CHILD can occur.
Deactivating the front
passenger airbag
WARNI NG
To ensure the safety of the child, the front passenger airbag MUST be deactivated when
a "rearward facing" child seat is installed on the front passenger seat. Otherwise, the child risks being seriously injured or killed in the event of deployment of the airbag.
WARNI NG
Vehicles not equipped with a deactivation/reactivation controlInstalling a "rearward facing" child seat on the front passenger seat or bench seat is strictly prohibited - risk of death or serious injury in the event of airbag deployment!
Deactivating/Reactivating the front
passenger airbag
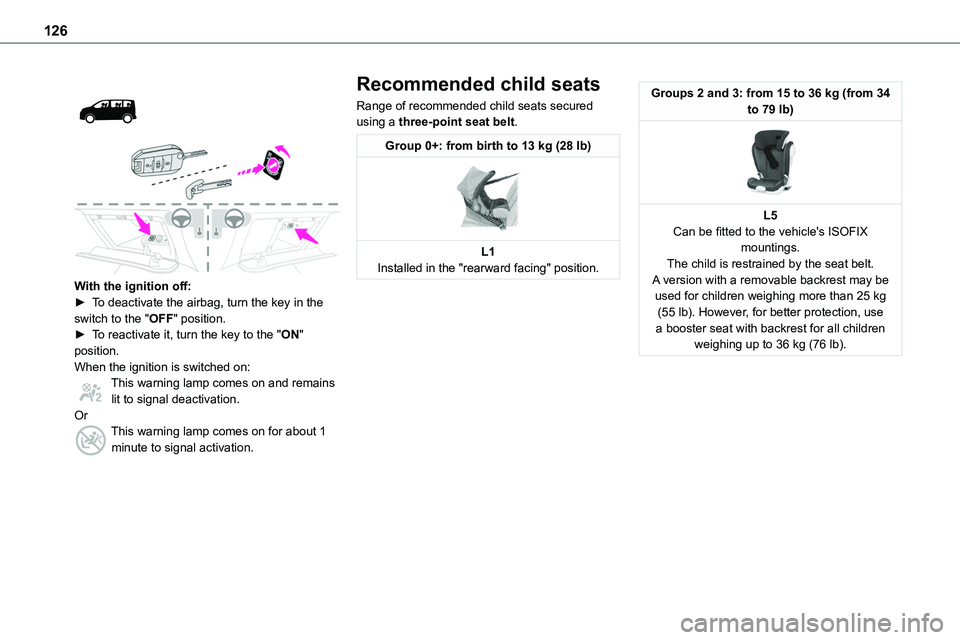
For vehicles on which it is fitted, the switch is located inside the glove box.
Page 126 of 360
126
With the ignition off:► To deactivate the airbag, turn the key in the switch to the "OFF" position. ► To reactivate it, turn the key to the "ON" position.When the ignition is switched on:This warning lamp comes on and remains lit to signal deactivation.OrThis warning lamp comes on for about 1 minute to signal activation.
Recommended child seats
Range of recommended child seats secured using a three-point seat belt.
Group 0+: from birth to 13 kg (28 lb)
L1Installed in the "rearward facing" position.
Groups 2 and 3: from 15 to 36 kg (from 34 to 79 lb)
L5Can be fitted to the vehicle's ISOFIX mountings.The child is restrained by the seat belt.A version with a removable backrest may be used for children weighing more than 25 kg (55 lb). However, for better protection, use a booster seat with backrest for all children weighing up to 36 kg (76 lb).
Page 130 of 360
130
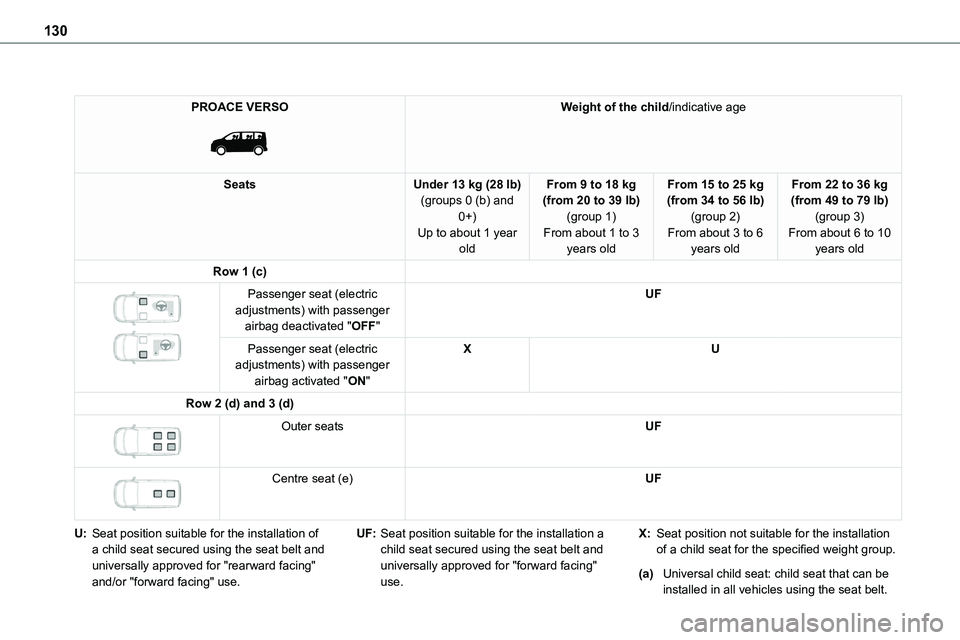
PROACE VERSO
Weight of the child/indicative age
SeatsUnder 13 kg (28 lb)(groups 0 (b) and 0+)
Up to about 1 year old
From 9 to 18 kg (from 20 to 39 lb)(group 1)
From about 1 to 3 years old
From 15 to 25 kg (from 34 to 56 lb)(group 2)
From about 3 to 6 years old
From 22 to 36 kg (from 49 to 79 lb)(group 3)
From about 6 to 10 years old
Row 1 (c)
Passenger seat (electric adjustments) with passenger airbag deactivated "OFF"
UF
Passenger seat (electric adjustments) with passenger airbag activated "ON"
XU
Row 2 (d) and 3 (d)
Outer seatsUF
Centre seat (e)UF
U:Seat position suitable for the installation of a child seat secured using the seat belt and universally approved for "rearward facing" and/or "forward facing" use.
UF:Seat position suitable for the installation a child seat secured using the seat belt and universally approved for "forward facing" use.
X:Seat position not suitable for the installation of a child seat for the specified weight group.
(a)Universal child seat: child seat that can be installed in all vehicles using the seat belt.
Page 131 of 360

131
Safety
5
(b)Group 0: from birth to 10 kg. Carrycots and "car" infant carriers cannot be installed on the front passenger seat(s) or the seats in row 3.
(c)Refer to the current legislation in the country in which you are driving before placing a child in this seat position.
(d)To install a "rearward facing" or "forward facing" child seat on a rear seat, move the seats in front of it forward, then straighten their backrests to allow sufficient room for the child seat and the child's legs.
(e)The seat can be installed centrally in the vehicle; it then prevents the use of the outer seats.
(f)When a "rearward facing" child seat is installed on the front passenger seat, the front passenger airbag must be deactivated. Otherwise, the child risks being severely injured or killed if the airbag is deployed.
"ISOFIX" mountings and
i-Size
PROACE VERSO
The vehicle has been approved in accordance with the latest ISOFIX and i-Size regulations.If fitted to the vehicle, approved ISOFIX and i-Size fixings can be identified by the labels attached to them.There are three rings for each seat:– Two front rings A, located between the vehicle seat backrest and cushion, indicated by an "ISOFIX" or "i-Size" marking,– If fitted to your vehicle, a rear ring B, called a Top Tether, is located behind the vehicle's seat and is used to secure the upper strap and is indicated by a "Top Tether" marking.The Top Tether secures the upper strap of child seats fitted with them. In case of frontal impact, this device limits the extent to which the child seat can tilt forward.
Page 132 of 360

132
This ISOFIX and i-Size mounting system provides fast, reliable and safe fitting of a child seat inside the vehicle.ISOFIX and i-Size child seats are fitted with two latches which are secured to the two front rings A.Some child seats also have an upper strap which is attached to rear ring B.To secure the child seat to the Top Tether:
– remove and stow the head restraint before installing a child seat on this seat (refit it once the child seat has been removed),– pass the strap of the child seat over the top of the seat backrest, centring it between the openings for the head restraint rods,– attach the hook of the upper strap to rear ring B,– tighten the upper strap.
WARNI NG
Incorrect installation of a child seat in a vehicle can compromise a child's safety in the event of an accident.Strictly follow the fitting instructions provided in the installation guide supplied with the child seat.
NOTIC E
For information on the various options for
installing ISOFIX child seats in your vehicle, refer to the summary table.
Recommended ISOFIX child
seats
NOTIC E
Also consult the user guide from the child seat’s manufacturer to find out how to install and remove the seat.
Group 0+: from birth to 13 kg (28 lb)(size category: E)
Installed "rearward facing" using an ISOFIX base which is attached to rings A.The base has a support leg, height-adjustable, which rests on the vehicle's floor.This child seat can also be secured with a seat belt. In this case, only the shell is used
and attached to the vehicle seat using the three-point seat belt.
Group 1: from 9 to 18 kg (from 20 to 39 lb)(size category: B1)
Suitable for forward-facing installation only.Attached to rings A and ring B, referred to as TOP TETHER, using an upper strap.Three seat body angles: sitting, reclining, lying down.This child seat can also be used in seat positions not equipped with ISOFIX mountings. In this case, it must be secured to the vehicle's seat by the three-point seat belt. Adjust the front seat of the vehicle so that the child's feet do not touch the backrest.