clock TOYOTA RAV4 2013 XA40 / 4.G User Guide
[x] Cancel search | Manufacturer: TOYOTA, Model Year: 2013, Model line: RAV4, Model: TOYOTA RAV4 2013 XA40 / 4.GPages: 624, PDF Size: 9.82 MB
Page 396 of 624
396
RAV4_OM_OM42809U_(U)
5-5. Other interior features
Clock
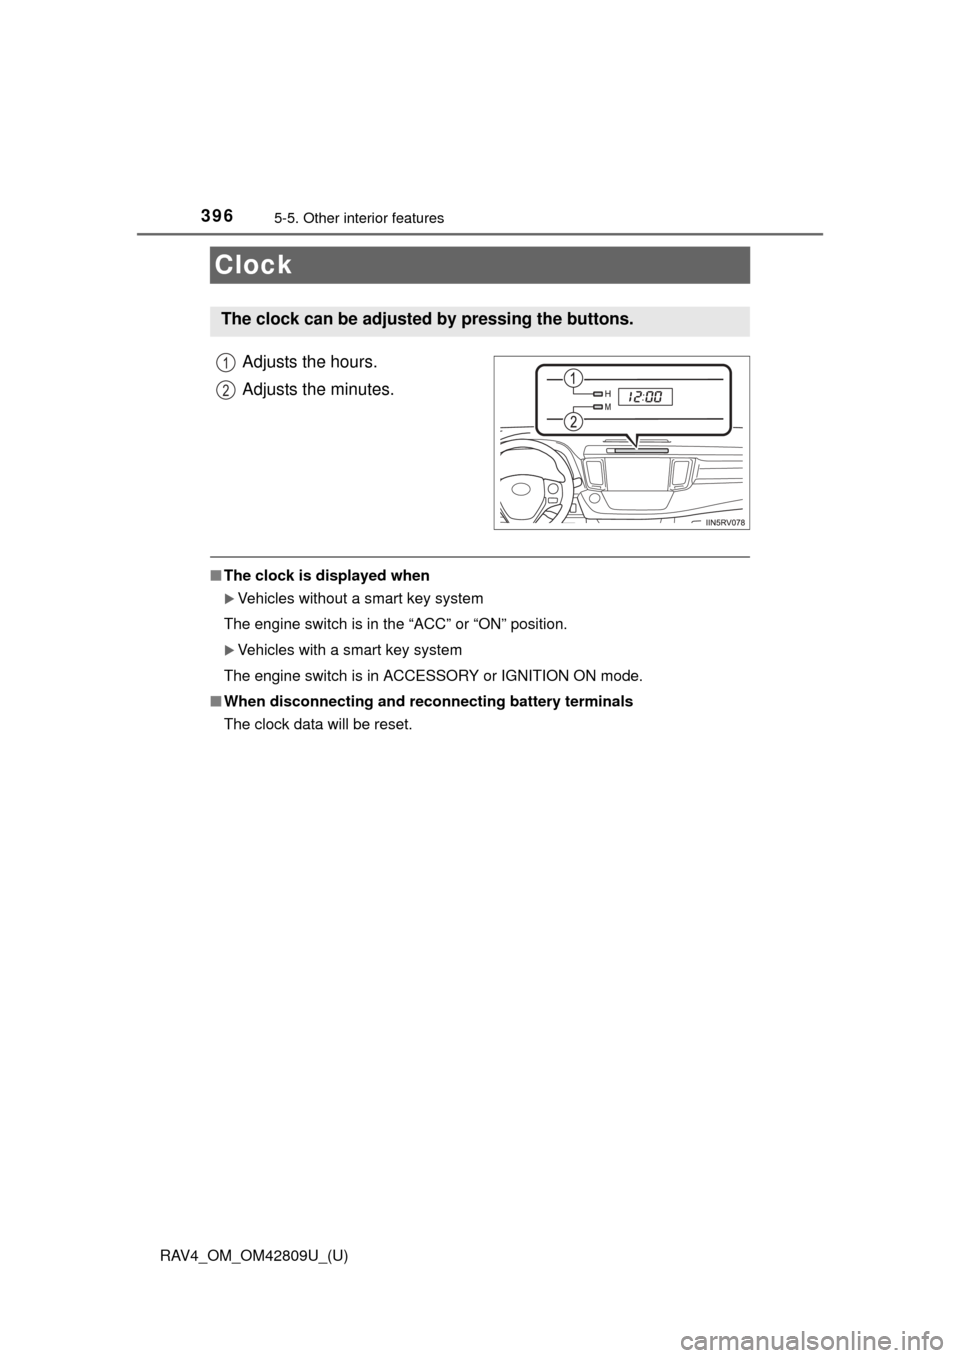
Adjusts the hours.
Adjusts the minutes.
■The clock is displayed when
Vehicles without a smart key system
The engine switch is in the “ACC” or “ON” position.
Vehicles with a smart key system
The engine switch is in ACCESSORY or IGNITION ON mode.
■ When disconnecting and reco nnecting battery terminals
The clock data will be reset.
The clock can be adjusted by pressing the buttons.
1
2
Page 432 of 624
432
RAV4_OM_OM42809U_(U)
6-3. Do-it-yourself maintenance
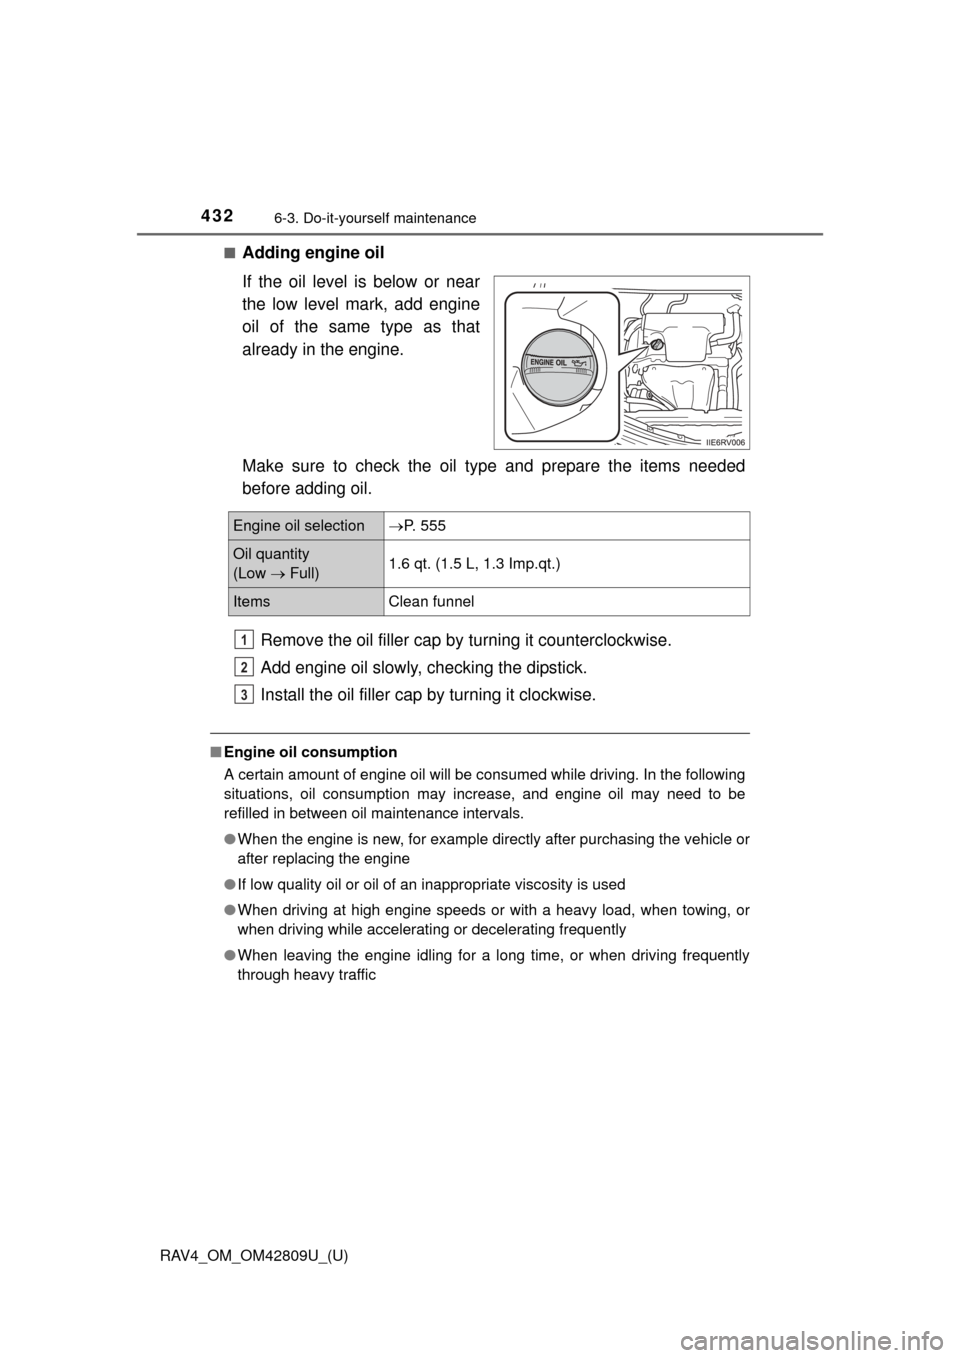
■Adding engine oil
If the oil level is below or near
the low level mark, add engine
oil of the same type as that
already in the engine.
Make sure to check the oil type and prepare the items needed
before adding oil.Remove the oil filler cap by turning it counterclockwise.
Add engine oil slowly, checking the dipstick.
Install the oil filler cap by turning it clockwise.
■ Engine oil consumption
A certain amount of engine oil will be consumed while driving. In the following
situations, oil consumption may increase, and engine oil may need to be
refilled in between oil maintenance intervals.
●When the engine is new, for example directly after purchasing the vehicle or
after replacing the engine
● If low quality oil or oil of an inappropriate viscosity is used
● When driving at high engine speeds or with a heavy load, when towing, or
when driving while accelerating or decelerating frequently
● When leaving the engine idling for a long time, or when driving frequently
through heavy traffic
Engine oil selection P. 555
Oil quantity
(Low Full) 1.6 qt. (1.5 L, 1.3 Imp.qt.)
Items
Clean funnel
1
2
3
Page 468 of 624
468
RAV4_OM_OM42809U_(U)
6-3. Do-it-yourself maintenance
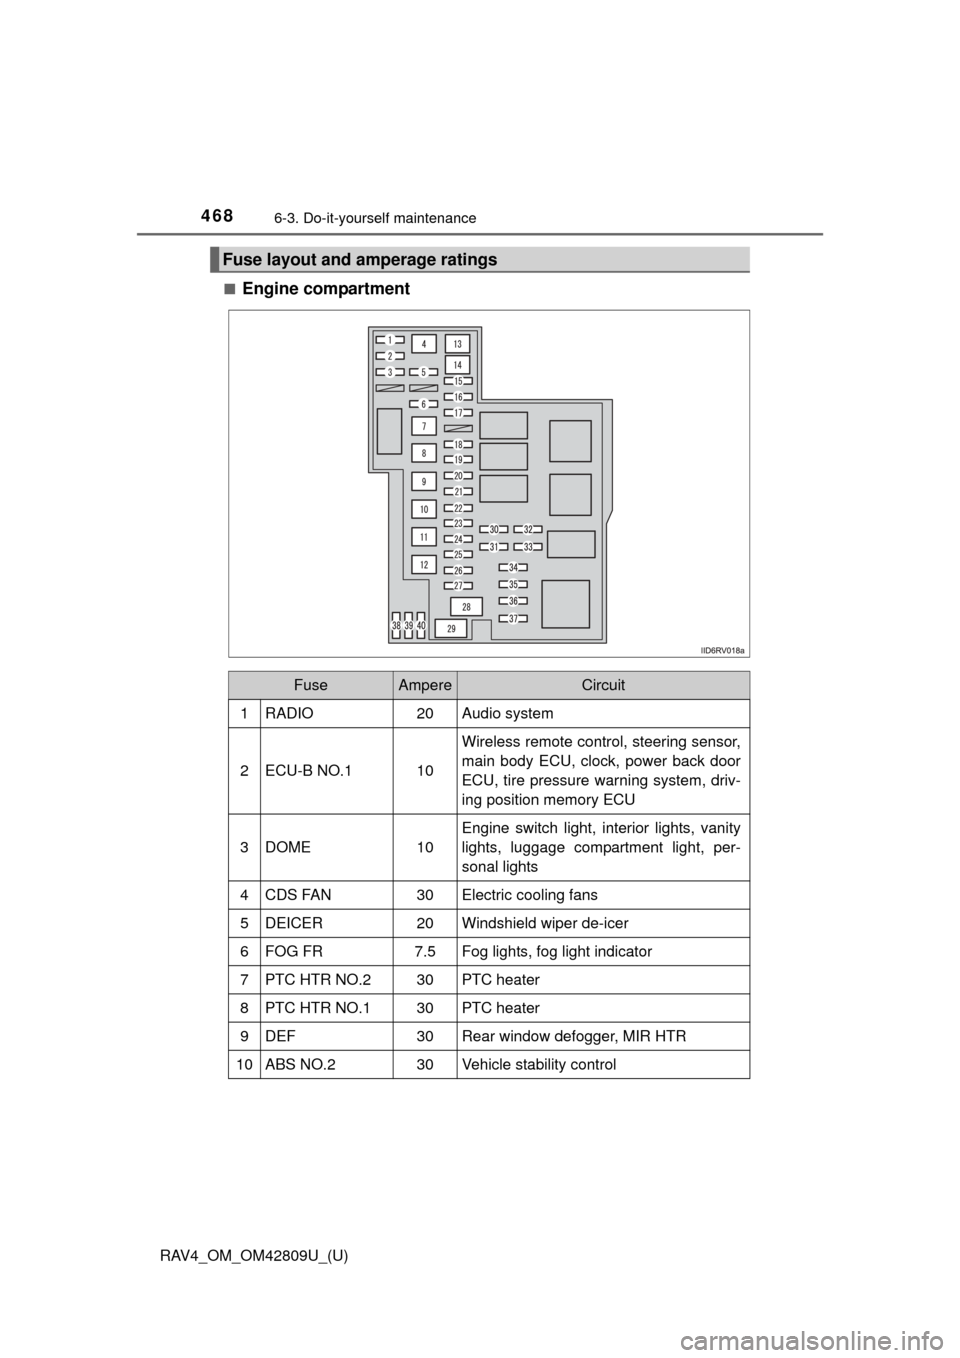
■Engine compartment
Fuse layout and amperage ratings
FuseAmpereCircuit
1RADIO20Audio system
2ECU-B NO.110
Wireless remote control, steering sensor,
main body ECU, clock, power back door
ECU, tire pressure warning system, driv-
ing position memory ECU
3DOME10
Engine switch light, interior lights, vanity
lights, luggage compartment light, per-
sonal lights
4CDS FAN30Electric cooling fans
5DEICER20Windshield wiper de-icer
6FOG FR7.5Fog lights, fog light indicator
7PTC HTR NO.230PTC heater
8PTC HTR NO.130PTC heater
9DEF30Rear window defogger, MIR HTR
10ABS NO.230Vehicle stability control
Page 472 of 624
472
RAV4_OM_OM42809U_(U)
6-3. Do-it-yourself maintenance
18ACC7.5
Power outlets, audio system, outside rear
view mirrors, main body ECU, clock,
electric current sensor
19PA N E L7.5
VSC OFF switch, instrument cluster (indi-
cators and warning lights), BSM main
switch, all-wheel drive lock switch, wind-
shield wiper de-icer switch, multiport fuel
injection system/sequential multiport fuel
injection system, intuitive parking assist
ECU, seat heater switches, power out-
lets, power back door switches, air condi-
tioning system switches, rear window
defogger switch, audio system, cup
holder light, steering switches, driver
module switch
20TA I L10Parking lights, tail lights, license plate
lights, side marker lights, fog lights
21EPS-IG5Electric power steering
22ECU-IG NO.110
Dynamic Torque Control AWD system
ECU, steering sensor, instrument cluster
(indicators and warning lights), shift con-
trol switch
23ECU-IG NO.25
Main body ECU, wireless remote control,
shift lock system ECU, smart key system,
moon roof ECU, audio system, power
back door ECU, tire pressure warning
system, LDA system, Blind Spot Monitor
system
24HTR-IG7.5
Air conditioning system ECU, air condi-
tioning system switches, rear window
defogger switch
25S-HTR LH10Left-hand seat heater
26S-HTR RH10Right-hand seat heater
27IGN7.5
Fuel pump, multiport fuel injection sys-
tem/sequential multiport fuel injection
system, stop lights, steering lock system
ECU
FuseAmpereCircuit
Page 478 of 624
478
RAV4_OM_OM42809U_(U)
6-3. Do-it-yourself maintenance
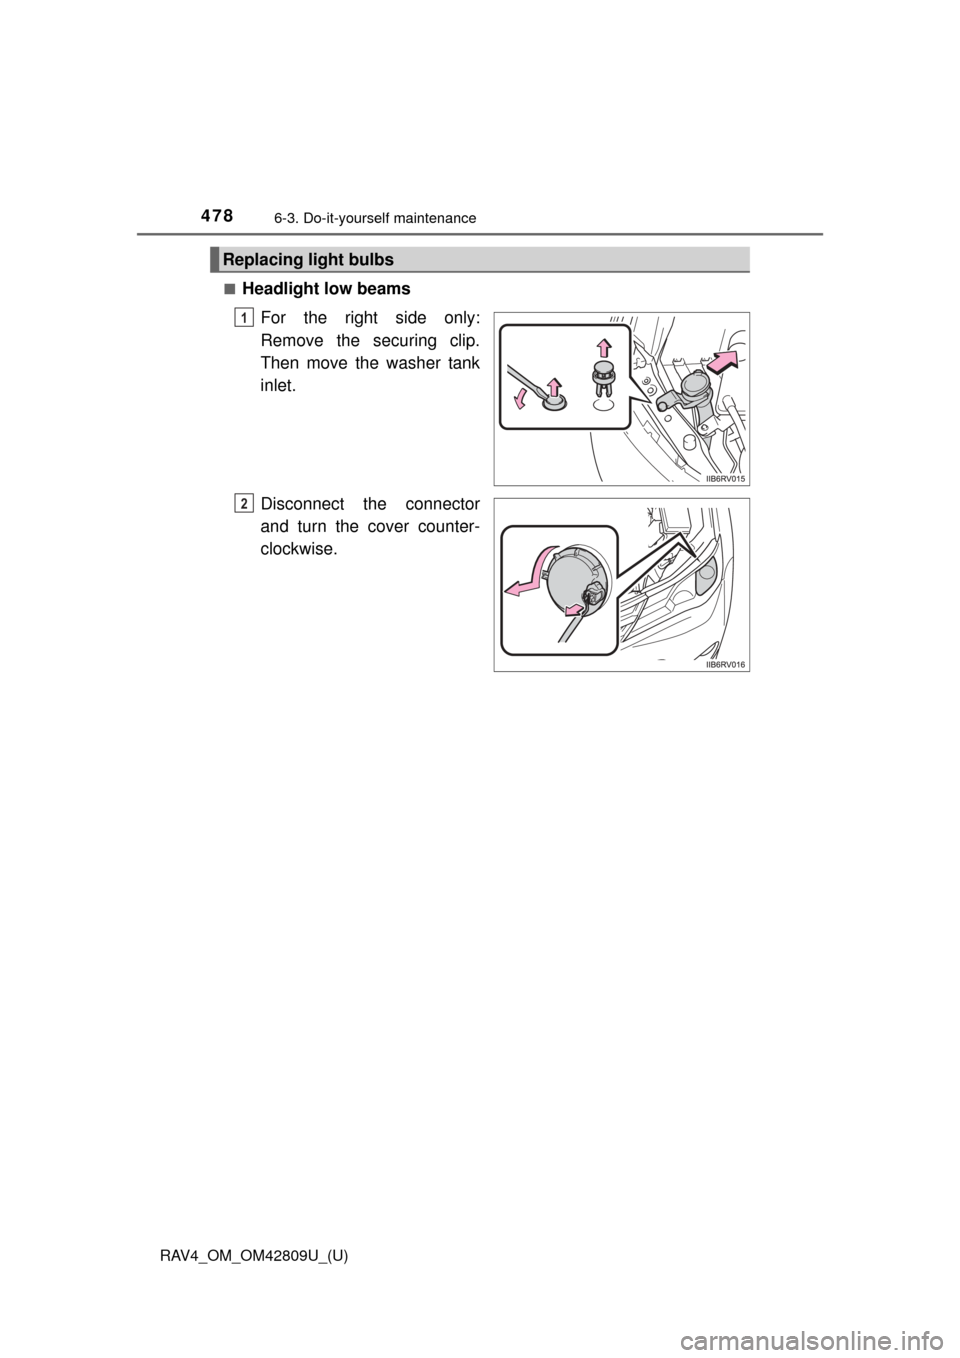
■Headlight low beamsFor the right side only:
Remove the securing clip.
Then move the washer tank
inlet.
Disconnect the connector
and turn the cover counter-
clockwise.
Replacing light bulbs
1
2
Page 479 of 624
RAV4_OM_OM42809U_(U)
4796-3. Do-it-yourself maintenance
6
Maintenance and care
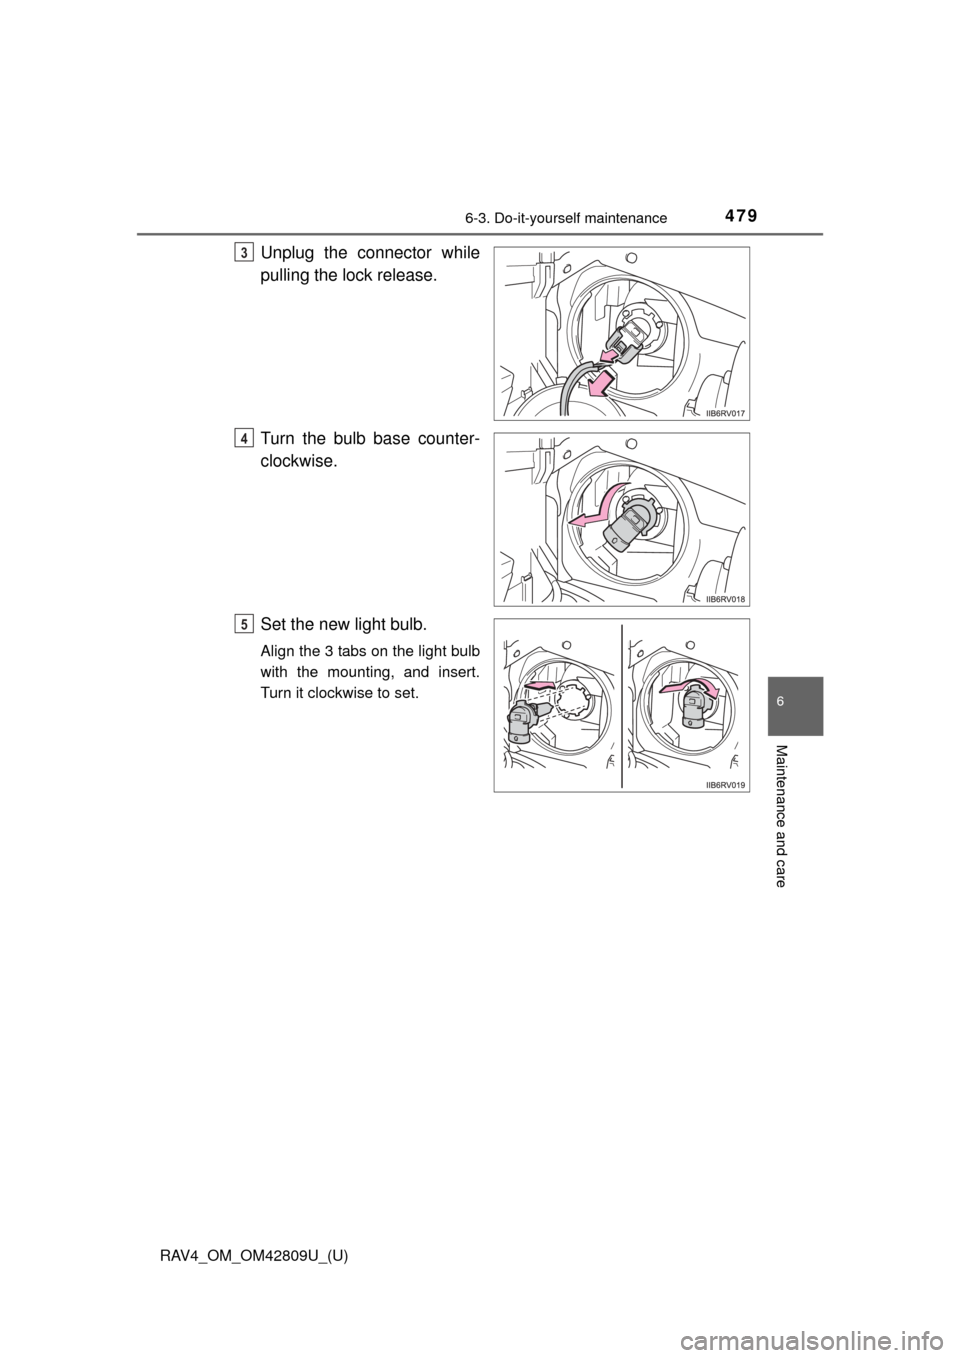
Unplug the connector while
pulling the lock release.
Turn the bulb base counter-
clockwise.
Set the new light bulb.
Align the 3 tabs on the light bulb
with the mounting, and insert.
Turn it clockwise to set.
3
4
5
Page 480 of 624
480
RAV4_OM_OM42809U_(U)
6-3. Do-it-yourself maintenance
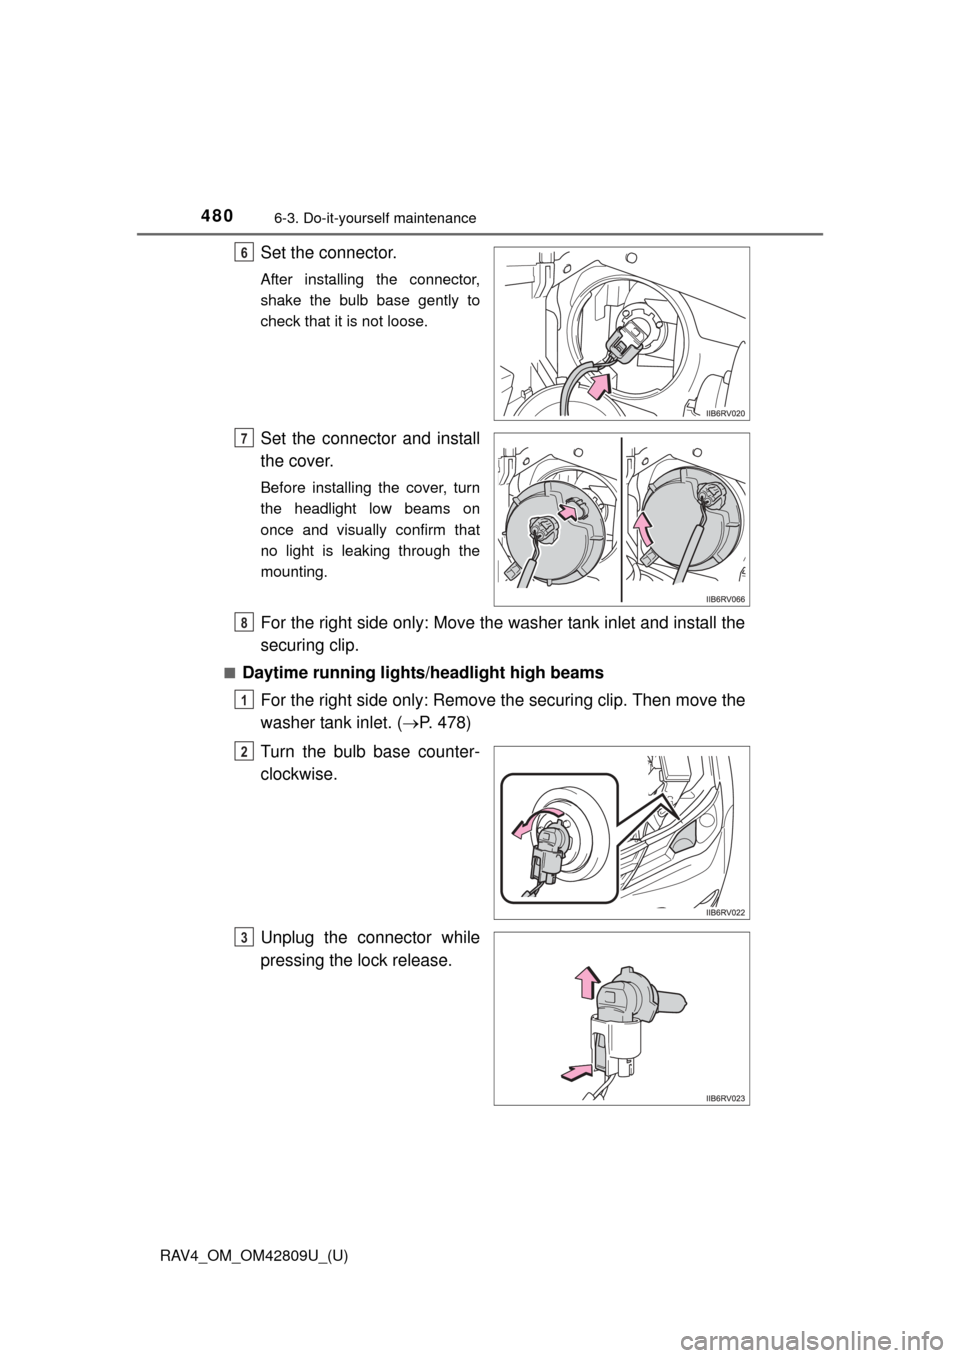
Set the connector.
After installing the connector,
shake the bulb base gently to
check that it is not loose.
Set the connector and install
the cover.
Before installing the cover, turn
the headlight low beams on
once and visually confirm that
no light is leaking through the
mounting.
For the right side only: Move the washer tank inlet and install the
securing clip.
■Daytime running lights/headlight high beamsFor the right side only: Remove the securing clip. Then move the
washer tank inlet. ( P. 478)
Turn the bulb base counter-
clockwise.
Unplug the connector while
pressing the lock release.
6
7
8
1
2
3
Page 482 of 624
482
RAV4_OM_OM42809U_(U)
6-3. Do-it-yourself maintenance
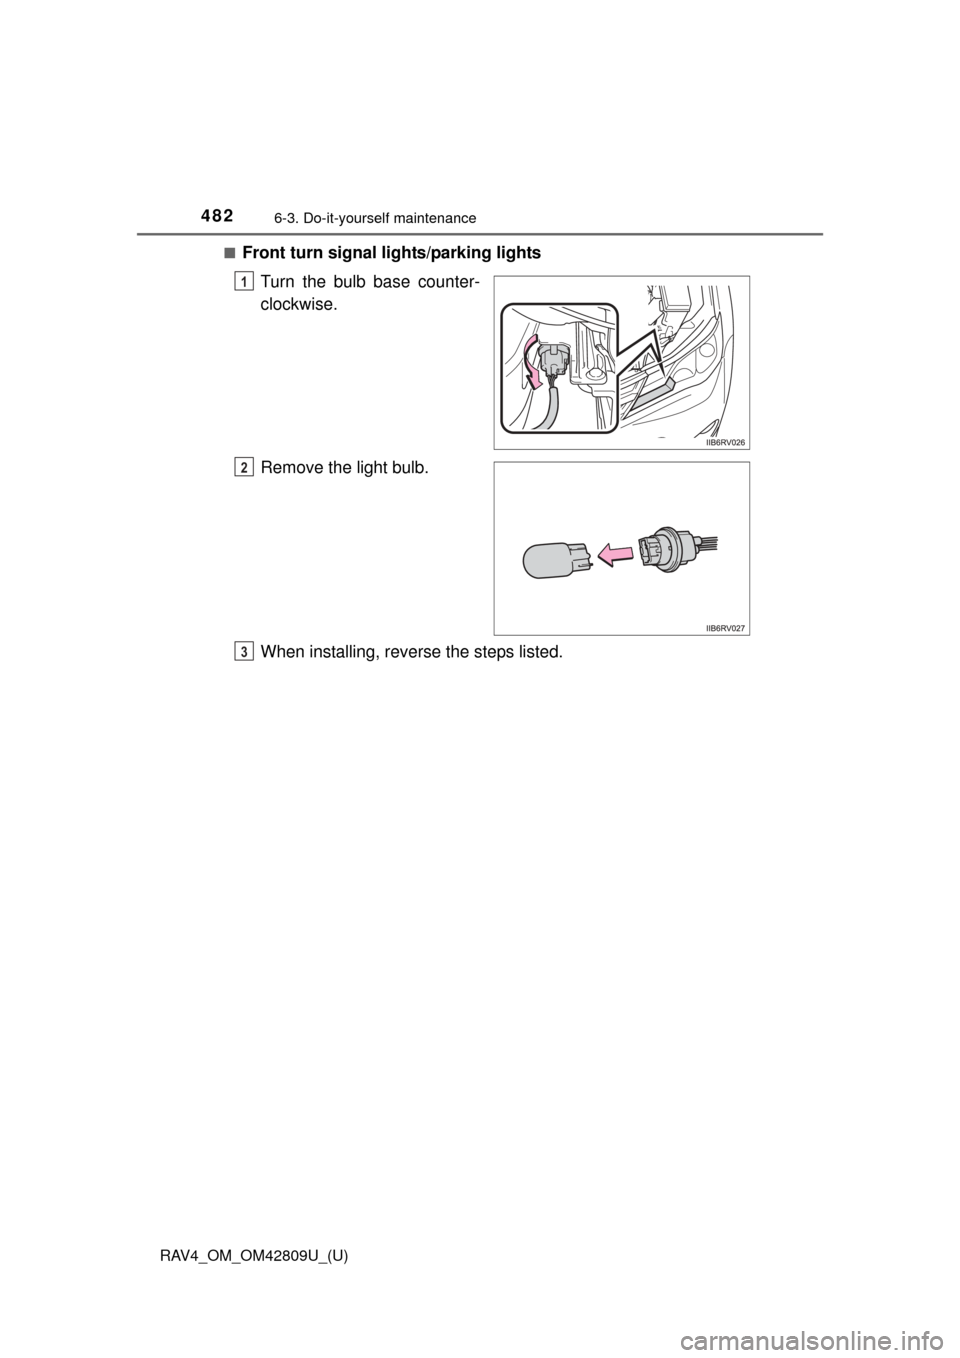
■Front turn signal lights/parking lights
Turn the bulb base counter-
clockwise.
Remove the light bulb.
When installing, reverse the steps listed.
1
2
3
Page 483 of 624
RAV4_OM_OM42809U_(U)
4836-3. Do-it-yourself maintenance
6
Maintenance and care
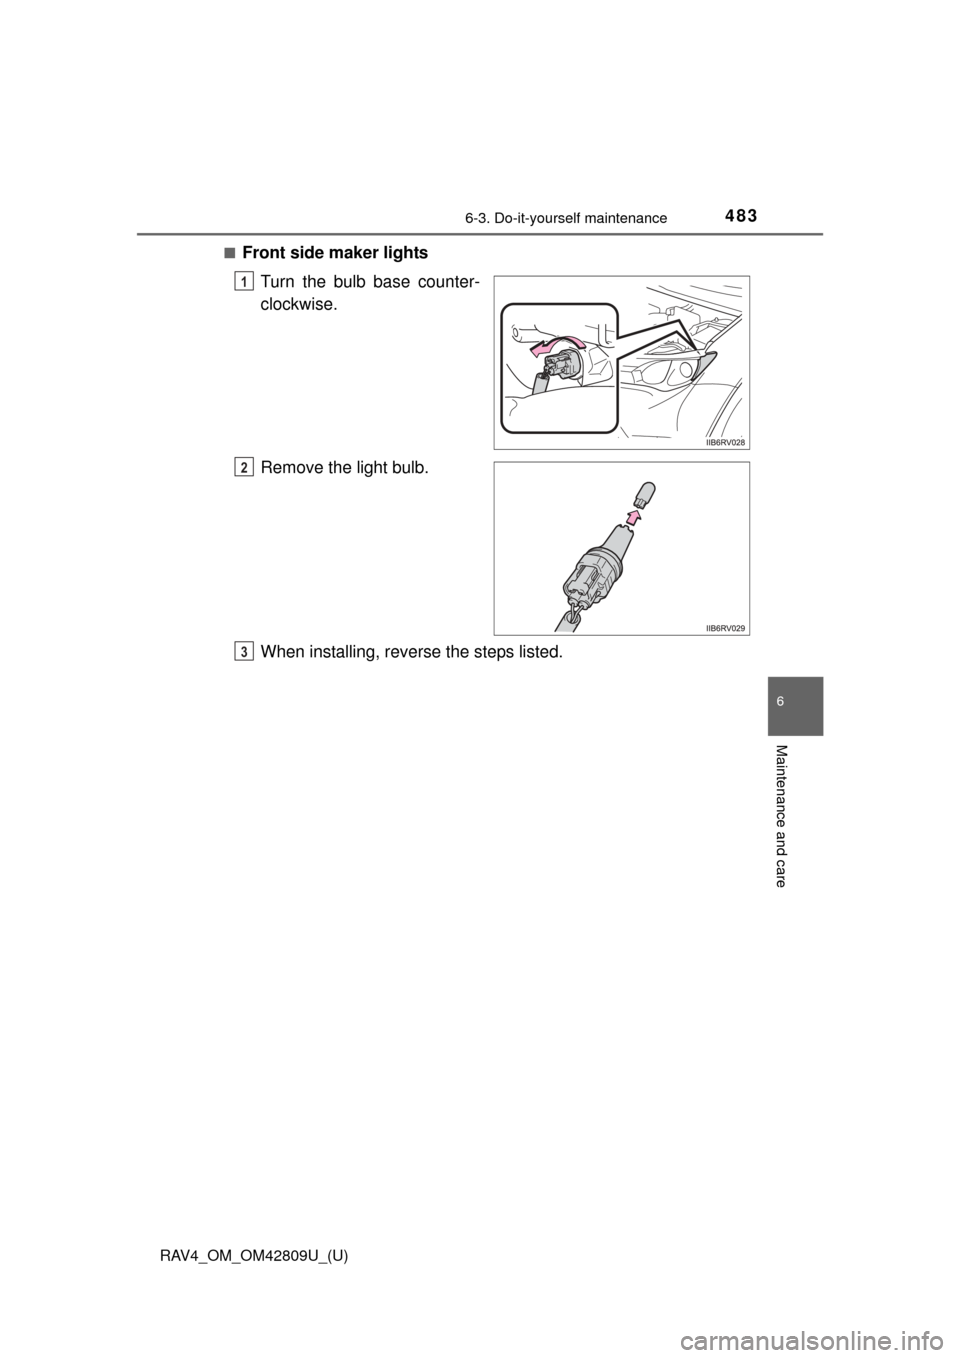
■Front side maker lightsTurn the bulb base counter-
clockwise.
Remove the light bulb.
When installing, reverse the steps listed.
1
2
3
Page 484 of 624
484
RAV4_OM_OM42809U_(U)
6-3. Do-it-yourself maintenance
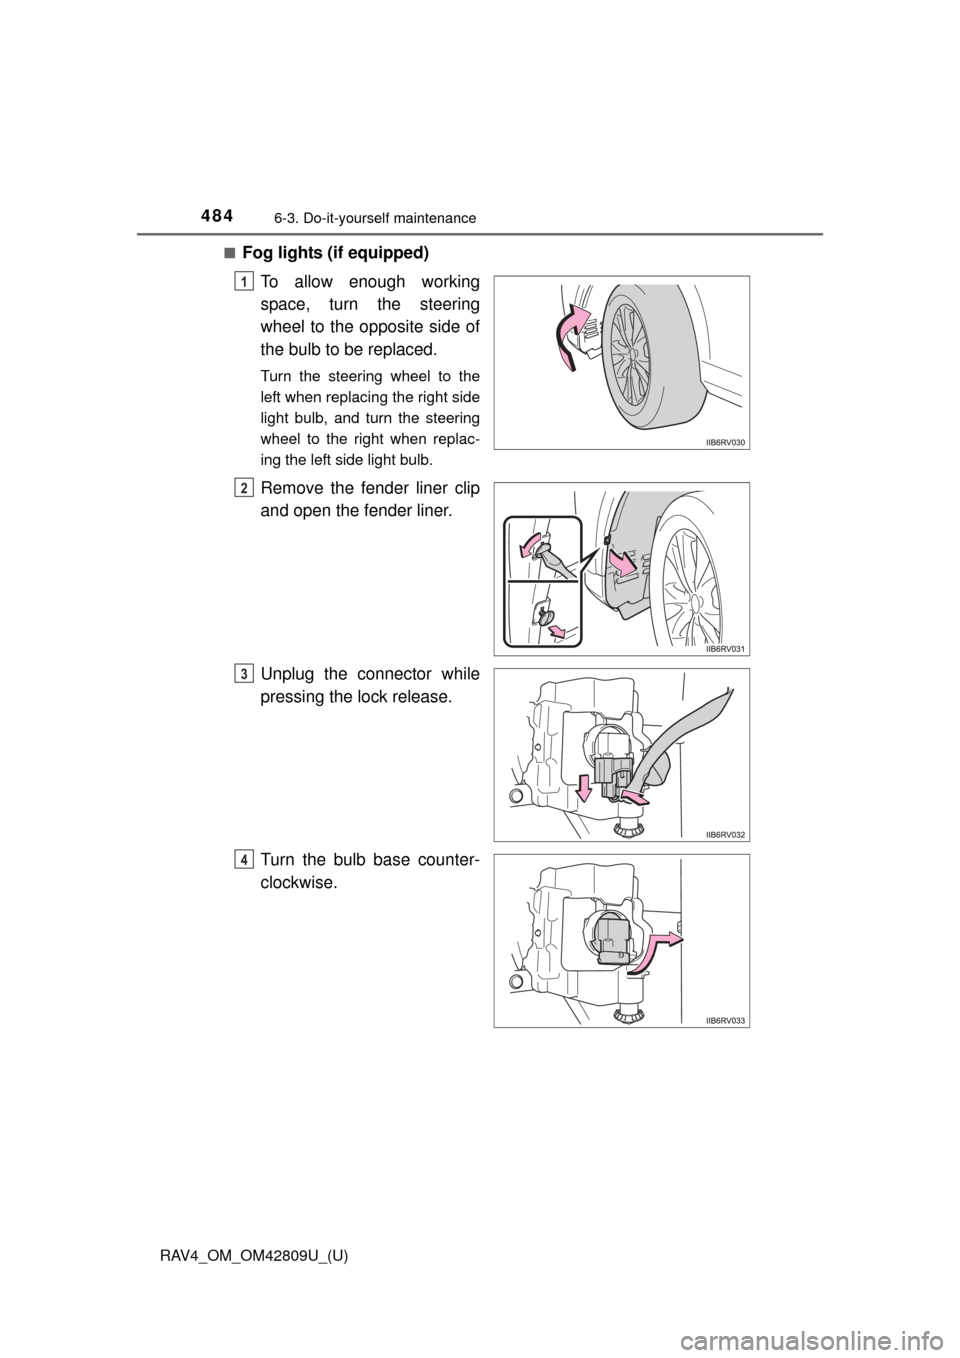
■Fog lights (if equipped)To allow enough working
space, turn the steering
wheel to the opposite side of
the bulb to be replaced.
Turn the steering wheel to the
left when replacing the right side
light bulb, and turn the steering
wheel to the right when replac-
ing the left side light bulb.
Remove the fender liner clip
and open the fender liner.
Unplug the connector while
pressing the lock release.
Turn the bulb base counter-
clockwise.
1
2
3
4