TOYOTA RAV4 2017 XA40 / 4.G Owners Manual
RAV4 2017 XA40 / 4.G
TOYOTA
TOYOTA
https://www.carmanualsonline.info/img/14/6717/w960_6717-0.png
TOYOTA RAV4 2017 XA40 / 4.G Owners Manual
Trending: fuse, oil temperature, tow bar, climate control, brake, emergency towing, interior lights
Page 511 of 741
510
RAV4_OM_OM0R005U_(U)
6-3. Using the storage features
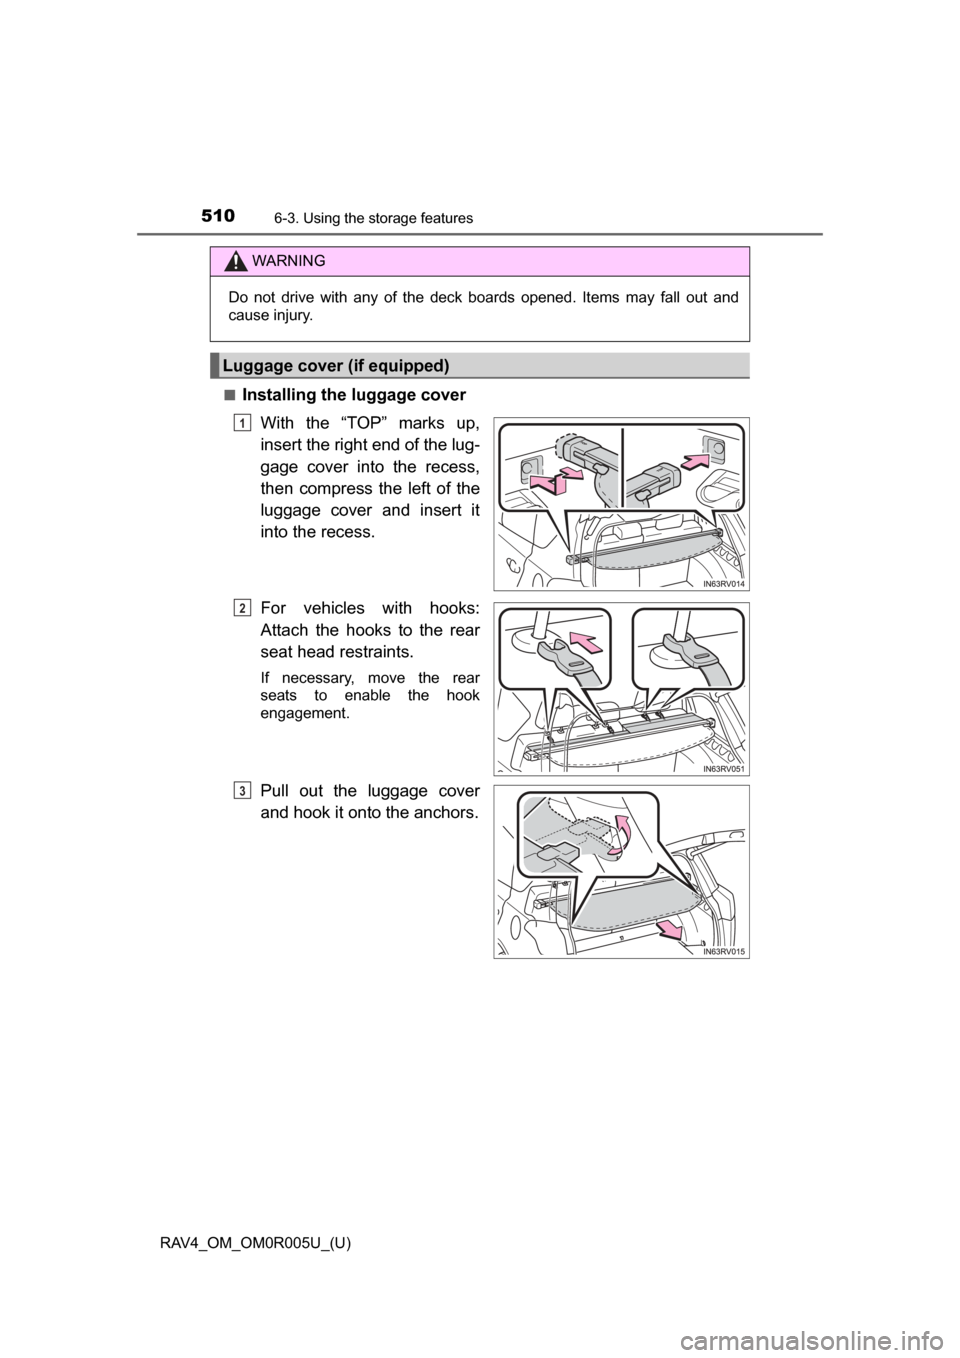
■Installing the luggage coverWith the “TOP” marks up,
insert the right end of the lug-
gage cover into the recess,
then compress the left of the
luggage cover and insert it
into the recess.
For vehicles with hooks:
Attach the hooks to the rear
seat head restraints.
If necessary, move the rear
seats to enable the hook
engagement.
Pull out the luggage cover
and hook it onto the anchors.
WARNING
Do not drive with any of the deck boards opened. Items may fall out and
cause injury.
Luggage cover (if equipped)
1
2
3
Page 512 of 741
RAV4_OM_OM0R005U_(U)
5116-3. Using the storage features
6
Interior features
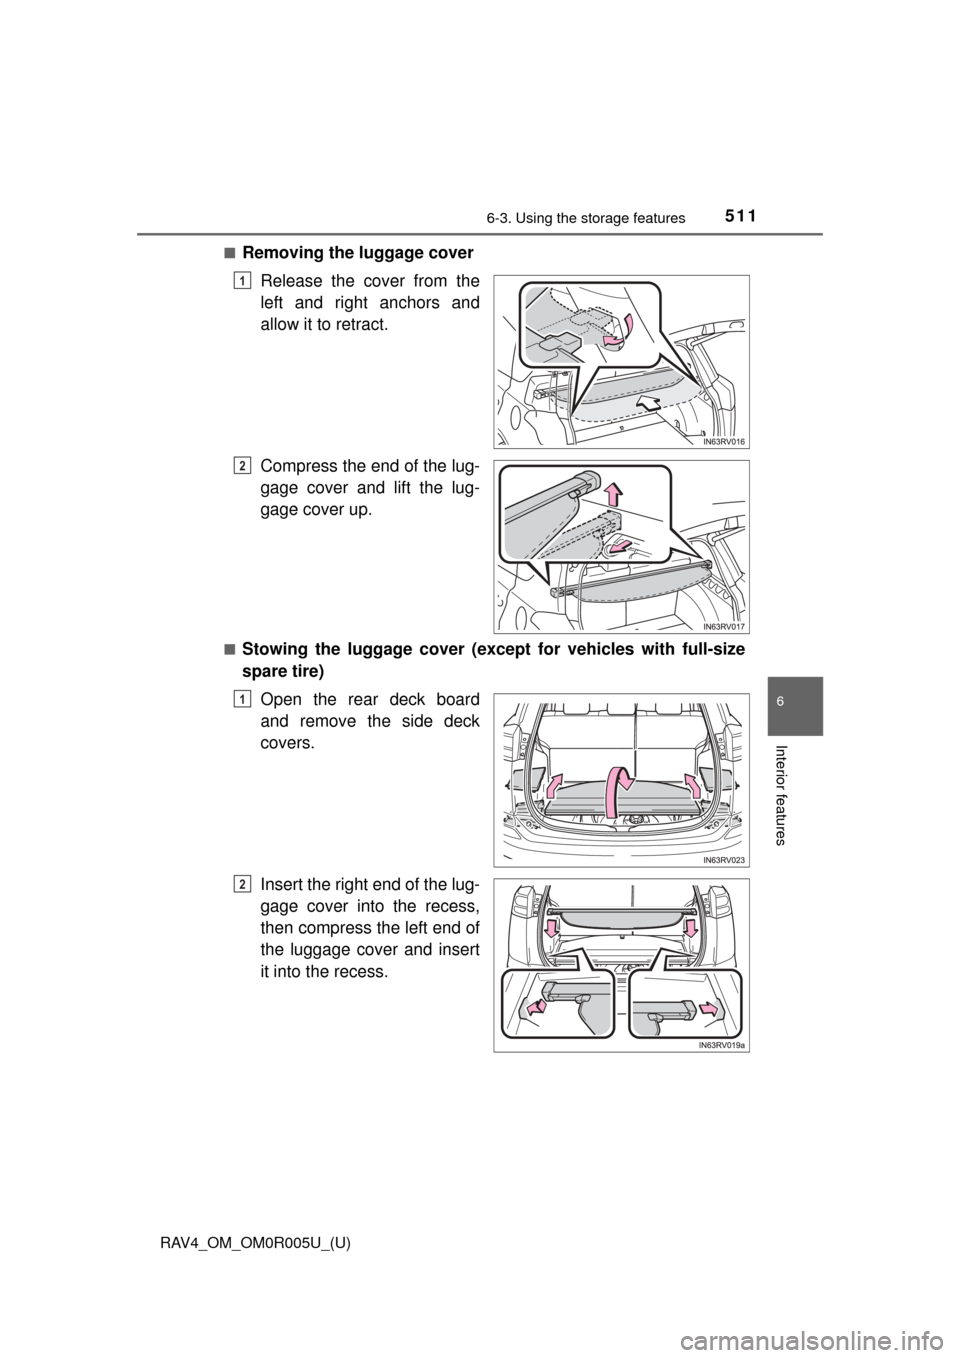
■Removing the luggage coverRelease the cover from the
left and right anchors and
allow it to retract.
Compress the end of the lug-
gage cover and lift the lug-
gage cover up.
■Stowing the luggage cover (except for vehicles with full-size
spare tire)
Open the rear deck board
and remove the side deck
covers.
Insert the right end of the lug-
gage cover into the recess,
then compress the left end of
the luggage cover and insert
it into the recess.
1
2
1
2
Page 513 of 741
512
RAV4_OM_OM0R005U_(U)
6-3. Using the storage features
WARNING
●When installing/stowing the luggage cover, make sure that the luggage
cover is securely installed/stowed. Failure to do so may result in serious
injury in the event of sudden braking or a collision.
● Do not place anything on the luggage cover to avoid death or serious
injury.
● Do not allow children to climb on the luggage cover. Climbing on the lug-
gage cover could result in damage to the luggage cover, possibly causing
death or serious injury to the child.
NOTICE
● Do not put heavy items on the luggage cover.
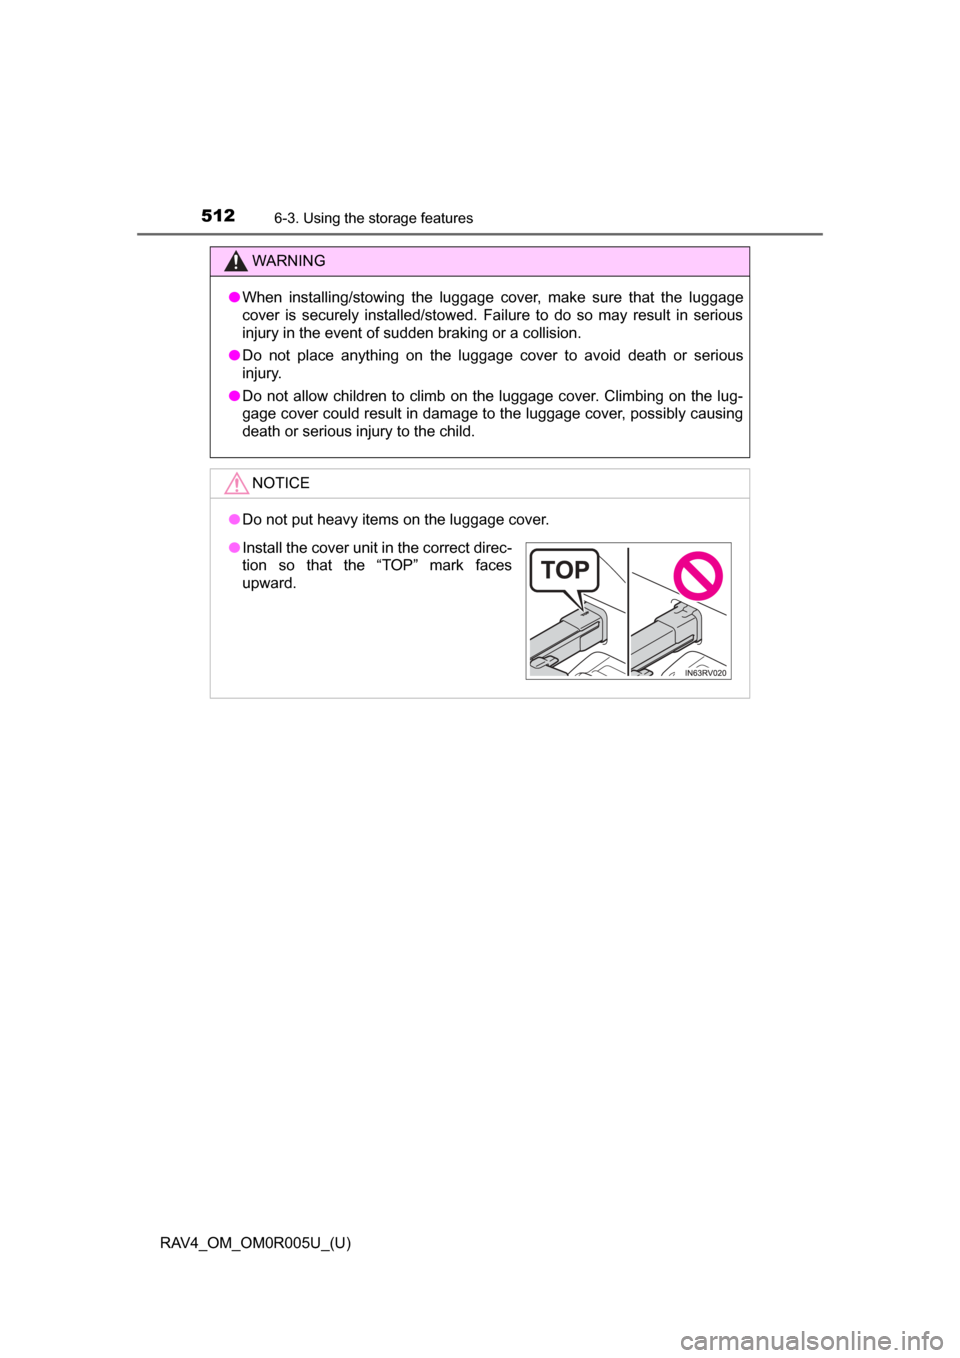
●Install the cover unit in the correct direc-
tion so that the “TOP” mark faces
upward.
Page 514 of 741
RAV4_OM_OM0R005U_(U)
5136-3. Using the storage features
6
Interior features
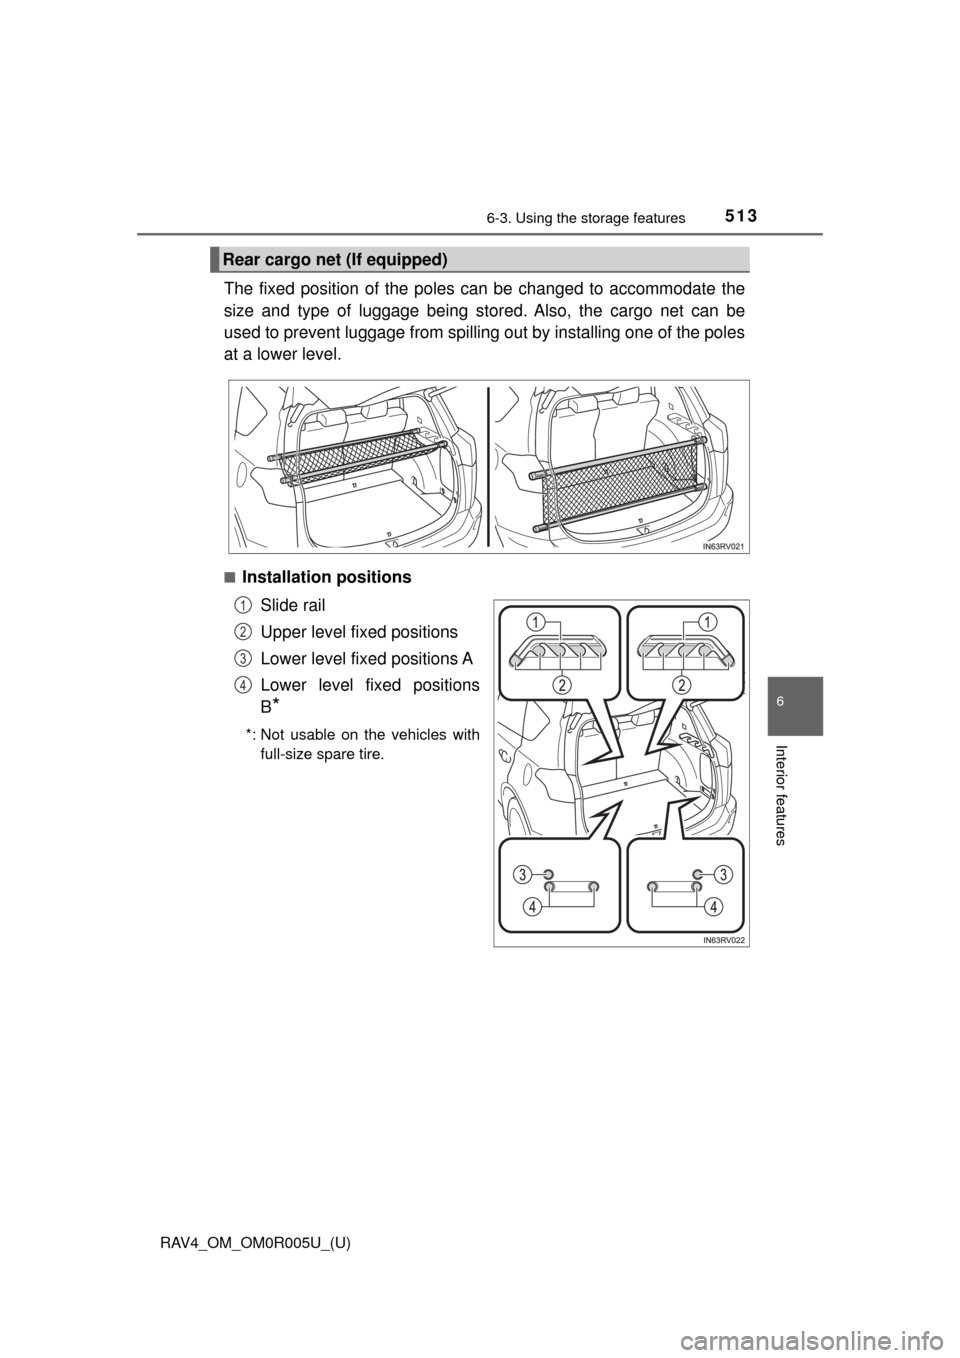
The fixed position of the poles can be changed to accommodate the
size and type of luggage being stored. Also, the cargo net can be
used to prevent luggage from spilling out by installing one of the poles
at a lower level.
■Installation positions
Slide rail
Upper level fixed positions
Lower level fixed positions A
Lower level fixed positions
B
*
*: Not usable on the vehicles withfull-size spare tire.
Rear cargo net (If equipped)
1
2
3
4
Page 515 of 741
514
RAV4_OM_OM0R005U_(U)
6-3. Using the storage features
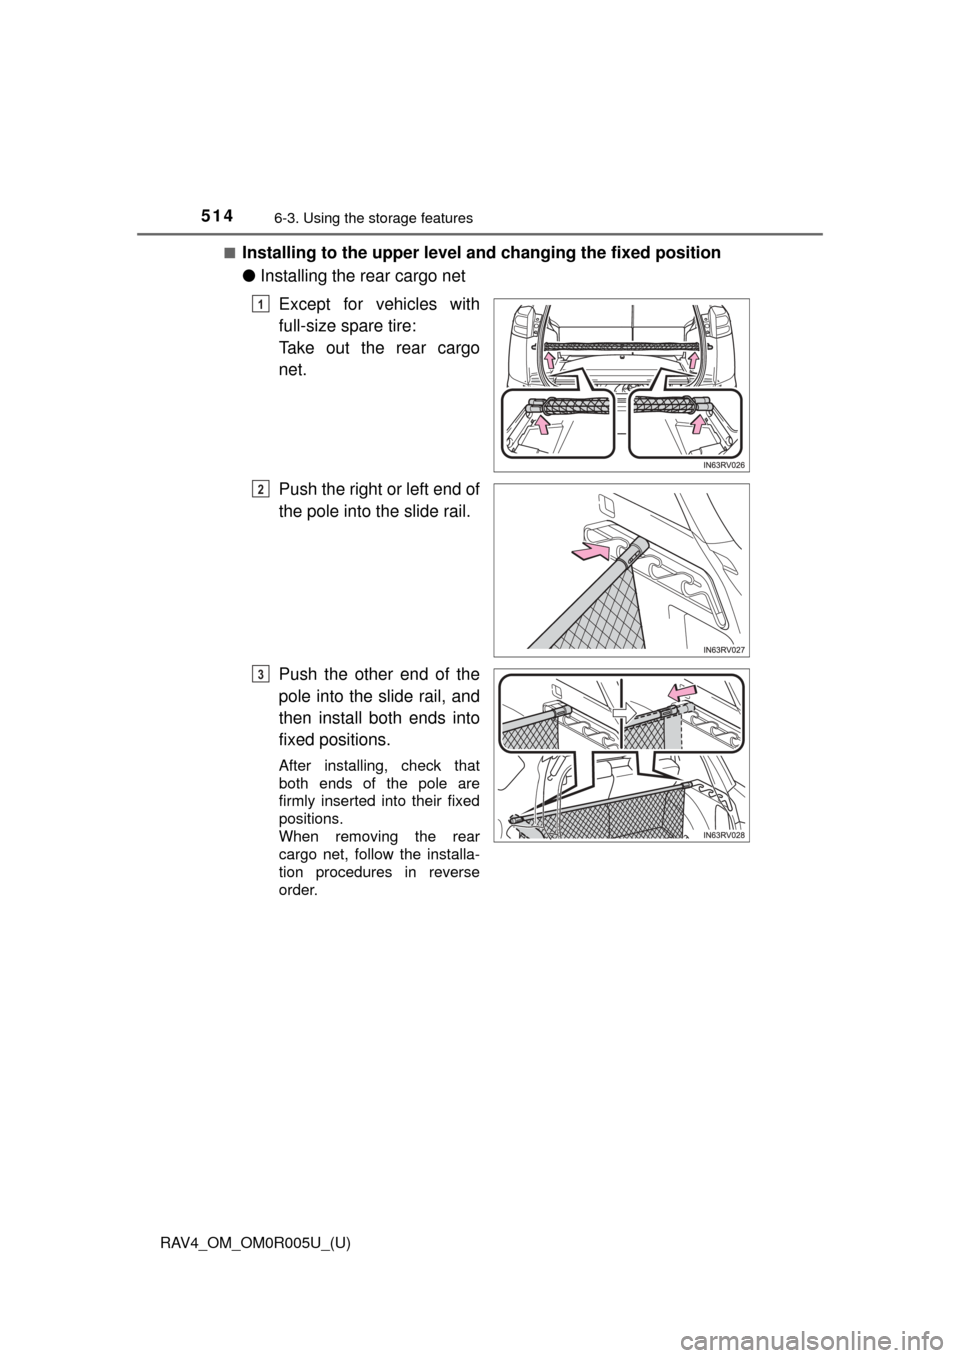
■Installing to the upper level and changing the fixed position
●Installing the rear cargo net
Except for vehicles with
full-size spare tire:
Take out the rear cargo
net.
Push the right or left end of
the pole into the slide rail.
Push the other end of the
pole into the slide rail, and
then install both ends into
fixed positions.
After installing, check that
both ends of the pole are
firmly inserted into their fixed
positions.
When removing the rear
cargo net, follow the installa-
tion procedures in reverse
order.
1
2
3
Page 516 of 741
RAV4_OM_OM0R005U_(U)
5156-3. Using the storage features
6
Interior features
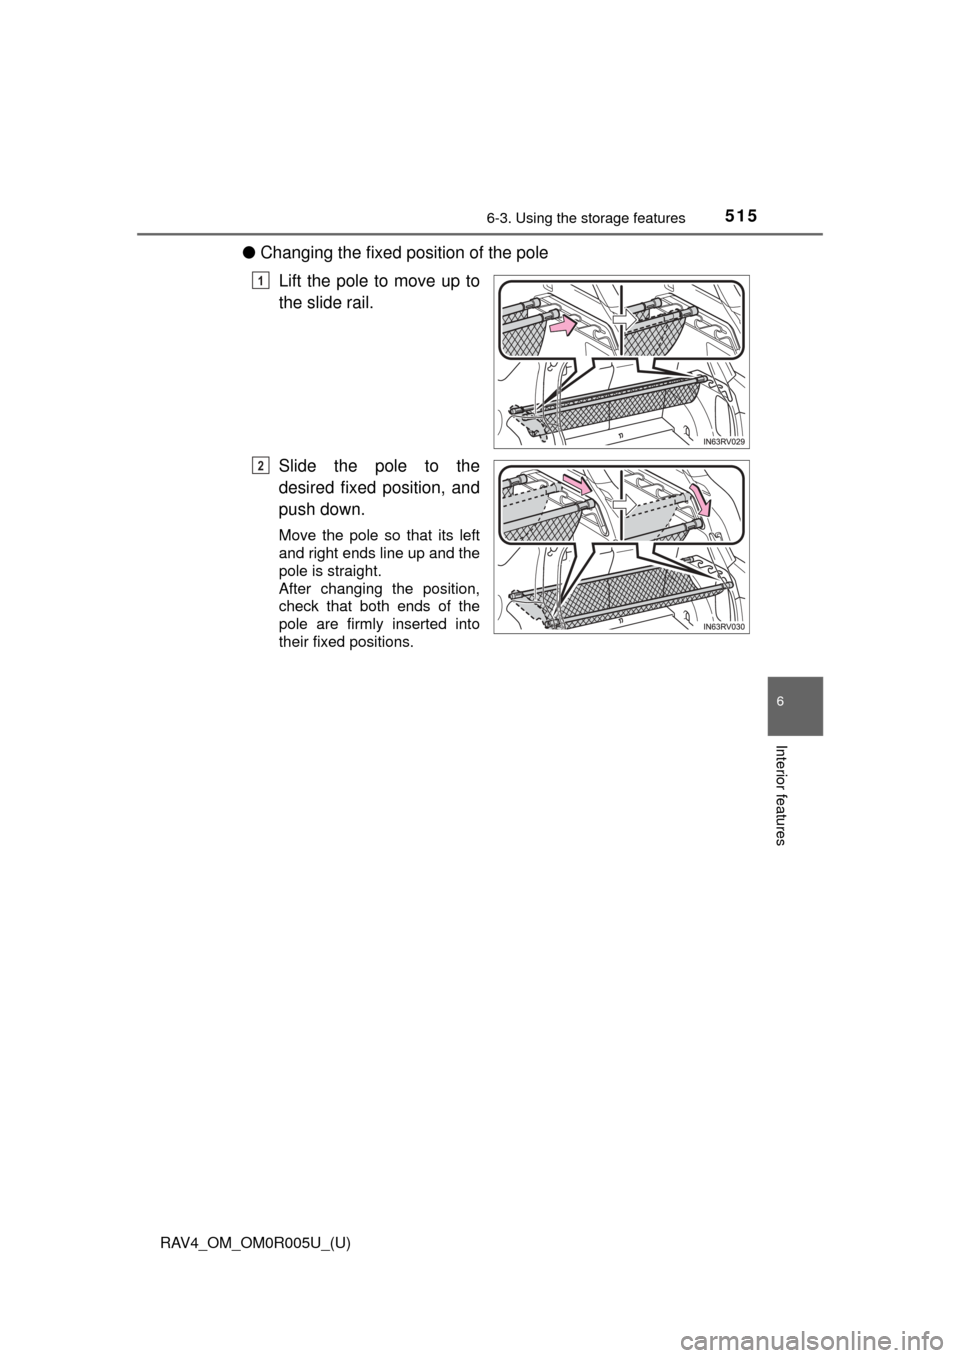
●Changing the fixed position of the pole
Lift the pole to move up to
the slide rail.
Slide the pole to the
desired fixed position, and
push down.
Move the pole so that its left
and right ends line up and the
pole is straight.
After changing the position,
check that both ends of the
pole are firmly inserted into
their fixed positions.
1
2
Page 517 of 741
516
RAV4_OM_OM0R005U_(U)
6-3. Using the storage features
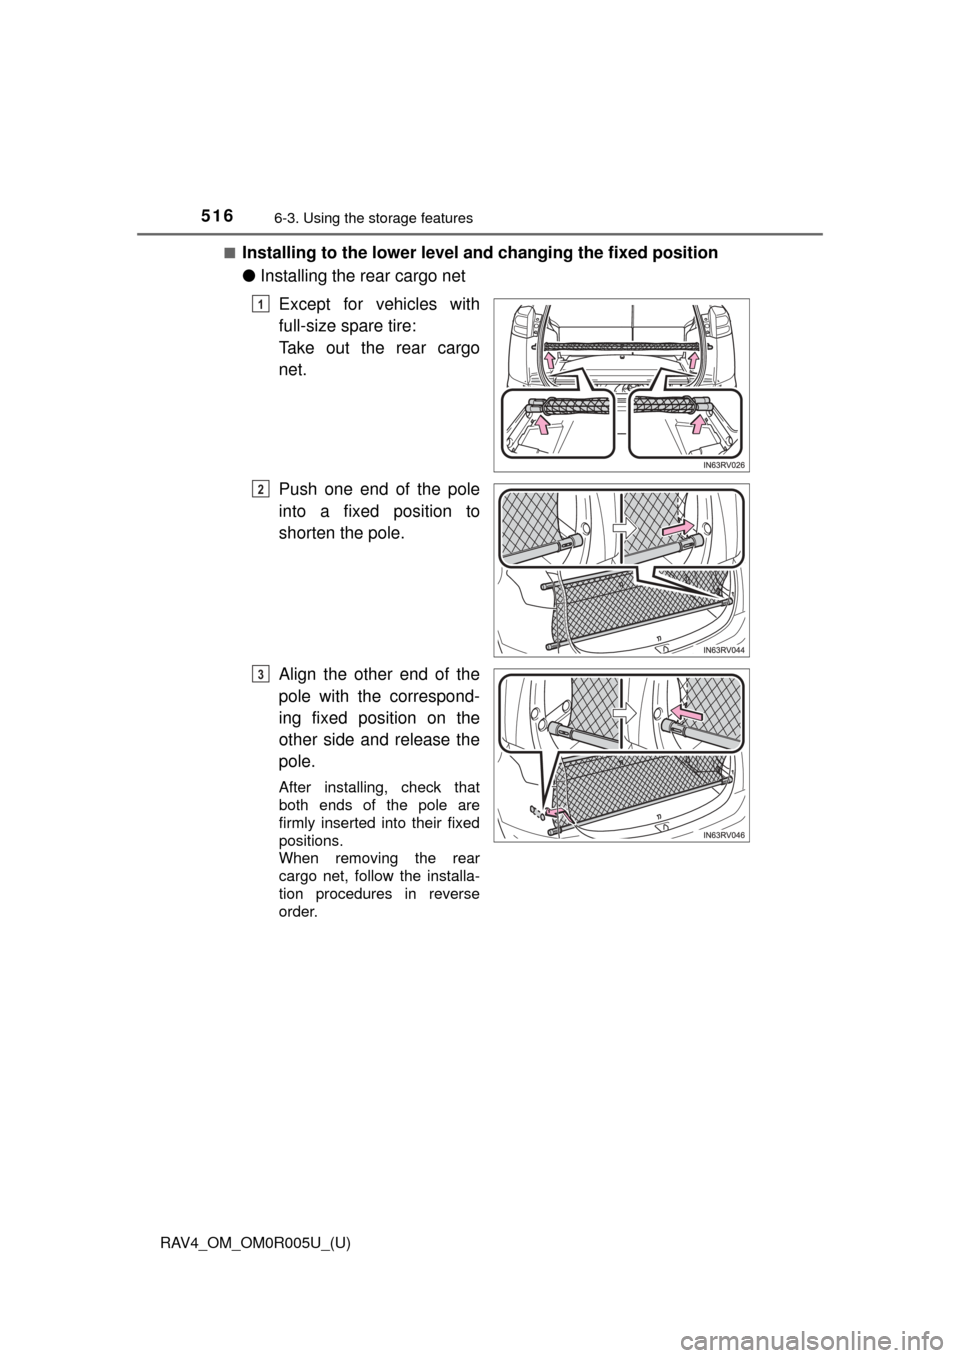
■Installing to the lower level and changing the fixed position
● Installing the rear cargo net
Except for vehicles with
full-size spare tire:
Take out the rear cargo
net.
Push one end of the pole
into a fixed position to
shorten the pole.
Align the other end of the
pole with the correspond-
ing fixed position on the
other side and release the
pole.
After installing, check that
both ends of the pole are
firmly inserted into their fixed
positions.
When removing the rear
cargo net, follow the installa-
tion procedures in reverse
order.
1
2
3
Page 518 of 741
RAV4_OM_OM0R005U_(U)
5176-3. Using the storage features
6
Interior features
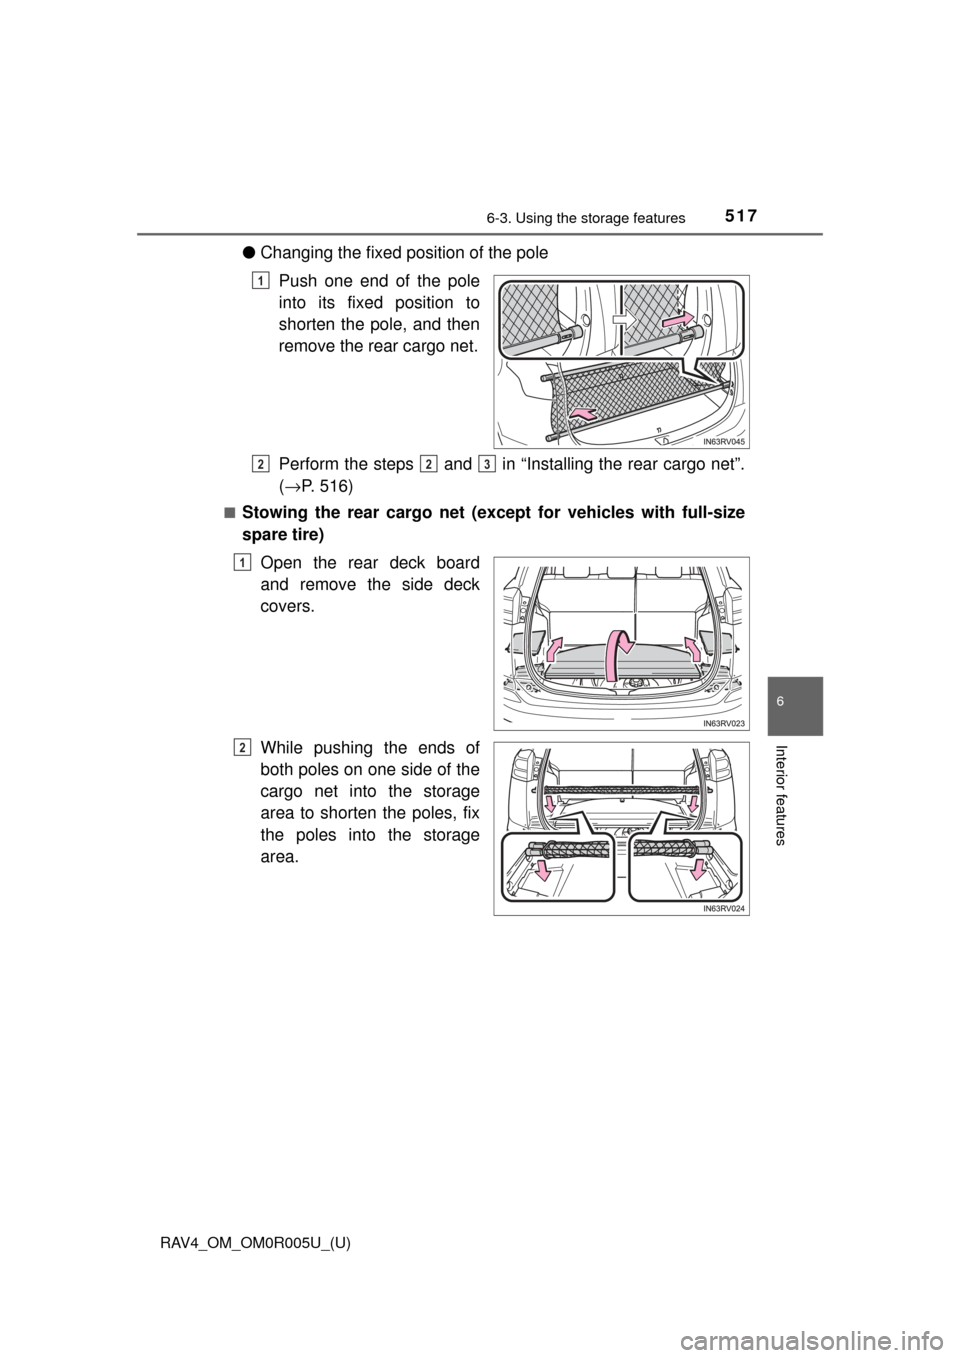
●Changing the fixed position of the pole
Push one end of the pole
into its fixed position to
shorten the pole, and then
remove the rear cargo net.
Perform the steps and in “Installing the rear cargo net”.
(→ P. 516)
■Stowing the rear cargo net (except for vehicles with full-size
spare tire)
Open the rear deck board
and remove the side deck
covers.
While pushing the ends of
both poles on one side of the
cargo net into the storage
area to shorten the poles, fix
the poles into the storage
area.
1
223
1
2
Page 519 of 741
518
RAV4_OM_OM0R005U_(U)
6-3. Using the storage features
WARNING
Make sure to observe the following precautions. Failure to observe these
precautions may result in death or serious injury.
●Do not allow children to climb or ride on the rear cargo net.
● Do not load any luggage into the rear cargo net that extends beyond the
height of the pole.
● When installing the rear cargo net to the vehicle, check that both ends of
the pole are securely inserted into their fixed positions.
● When stowing the rear cargo net, securely fix it into the storage area.
NOTICE
● Do not place luggage weighing approximately 22.1 lb. (10 kg) or more
onto the rear cargo net.
● Install the pole to matching fixed positions on the left and right sides so
that the pole is straight. If the pole is installed at an angle, the rear cargo
net may come loose.
● Do not use the rear cargo net with only one pole installed. The pole may
move while the vehicle is in motion, resulting in damage to the rear cargo
net pole or other equipment in the luggage compartment.
Page 520 of 741
519
RAV4_OM_OM0R005U_(U)
6-4. Using the other interior features
6
Interior features
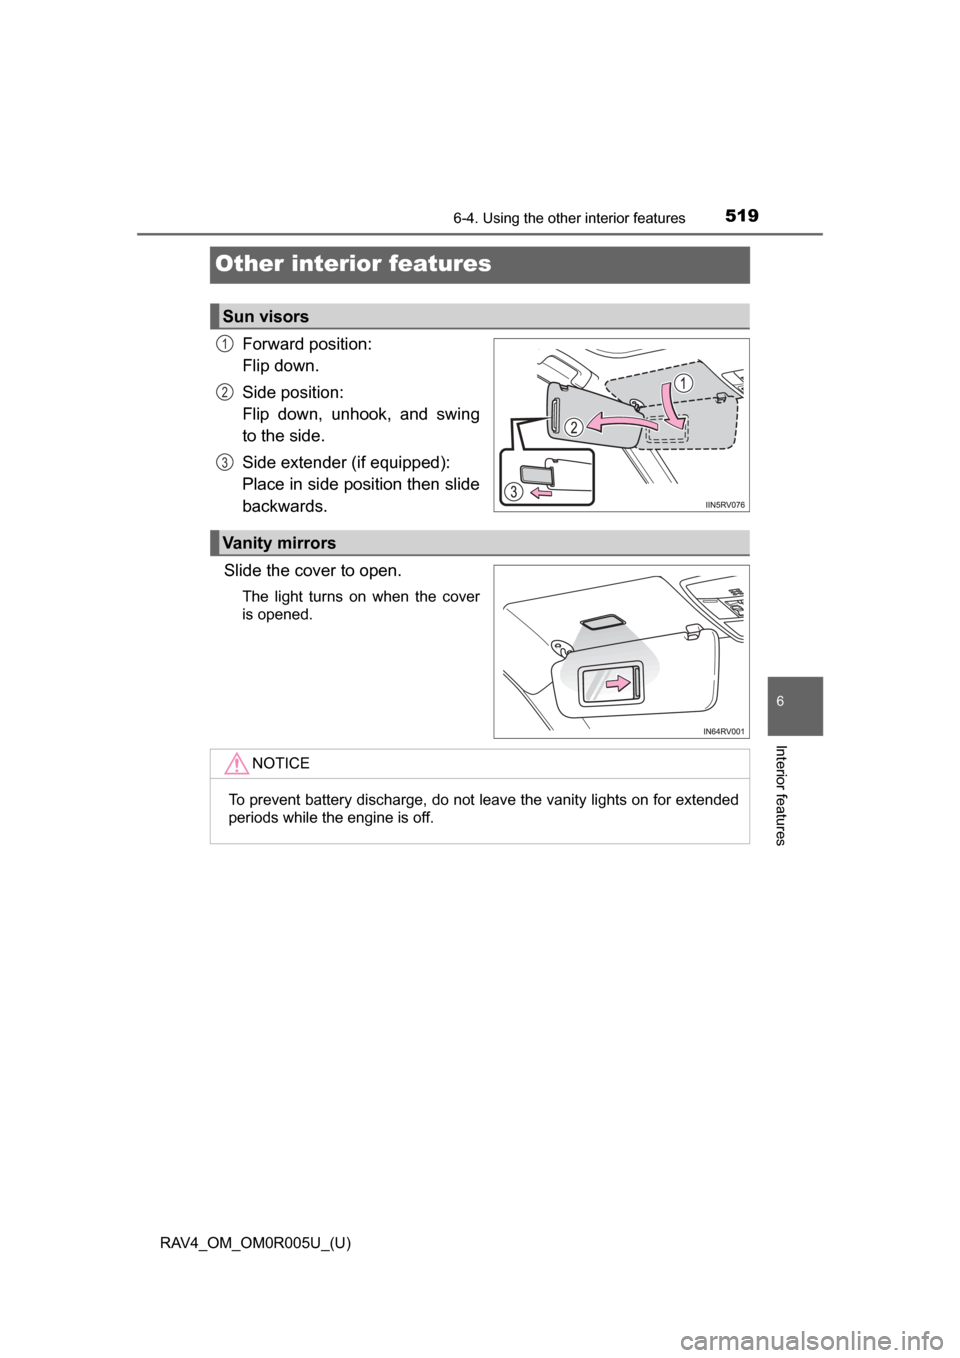
Other interior features
Forward position:
Flip down.
Side position:
Flip down, unhook, and swing
to the side.
Side extender (if equipped):
Place in side position then slide
backwards.
Slide the cover to open.
The light turns on when the cover
is opened.
Sun visors
1
2
3
Vanity mirrors
NOTICE
To prevent battery discharge, do not leave the vanity lights on for extended
periods while the engine is off.
Trending: service schedule, brakes, oil level, open gas tank, load capacity, engine oil, oil change
