start stop button TOYOTA RAV4 2023 Owners Manual
[x] Cancel search | Manufacturer: TOYOTA, Model Year: 2023, Model line: RAV4, Model: TOYOTA RAV4 2023Pages: 574, PDF Size: 17.31 MB
Page 210 of 574

2104-2. Driving procedures
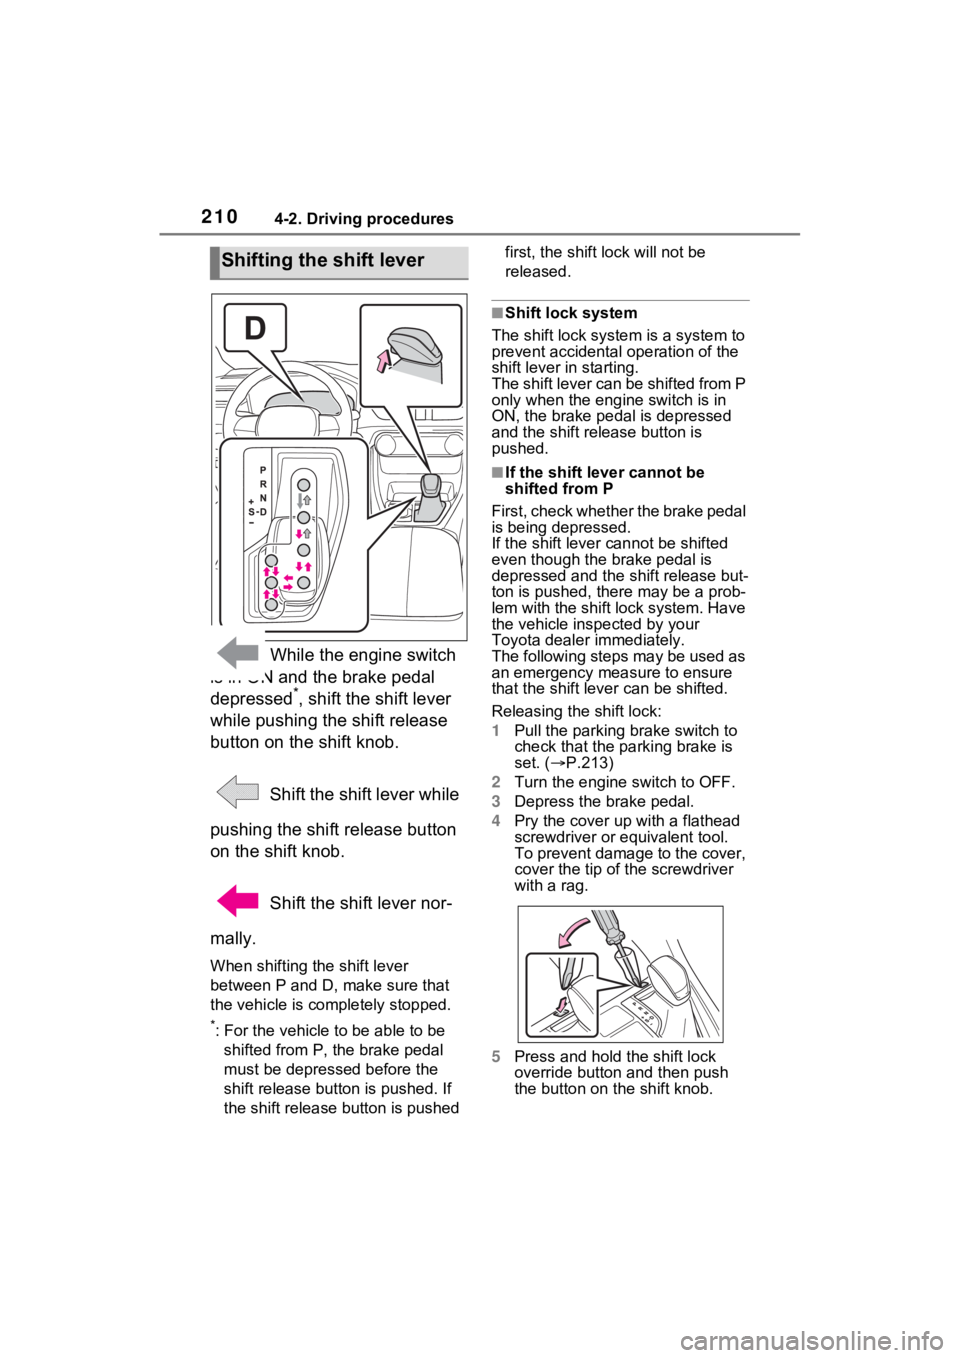
While the engine switch
is in ON and the brake pedal
depressed
*, shift the shift lever
while pushing the shift release
button on the shift knob.
Shift the shift lever while
pushing the shift release button
on the shift knob.
Shift the shift lever nor-
mally.
When shifting the shift lever
between P and D, make sure that
the vehicle is completely stopped.
*: For the vehicle to be able to be
shifted from P, the brake pedal
must be depresse d before the
shift release button is pushed. If
the shift release button is pushed first, the shift lock will not be
released.
■Shift lock system
The shift lock syste m is a system to
prevent accidental operation of the
shift lever in starting.
The shift lever can be shifted from P
only when the engi ne switch is in
ON, the brake pedal is depressed
and the shift release button is
pushed.
■If the shift lever cannot be
shifted from P
First, check whether the brake pedal
is being depressed.
If the shift lever cannot be shifted
even though the brake pedal is
depressed and the shift release but-
ton is pushed, the re may be a prob-
lem with the shift lock system. Have
the vehicle inspected by your
Toyota dealer immediately.
The following steps may be used as
an emergency measure to ensure
that the shift lev er can be shifted.
Releasing the shift lock:
1 Pull the parking brake switch to
check that the parking brake is
set. ( P.213)
2 Turn the engine switch to OFF.
3 Depress the brake pedal.
4 Pry the cover up with a flathead
screwdriver or equivalent tool.
To prevent damage to the cover,
cover the tip of the screwdriver
with a rag.
5 Press and hold the shift lock
override button and then push
the button on the shift knob.
Shifting the shift lever
Page 217 of 574

2174-2. Driving procedures
4
Driving
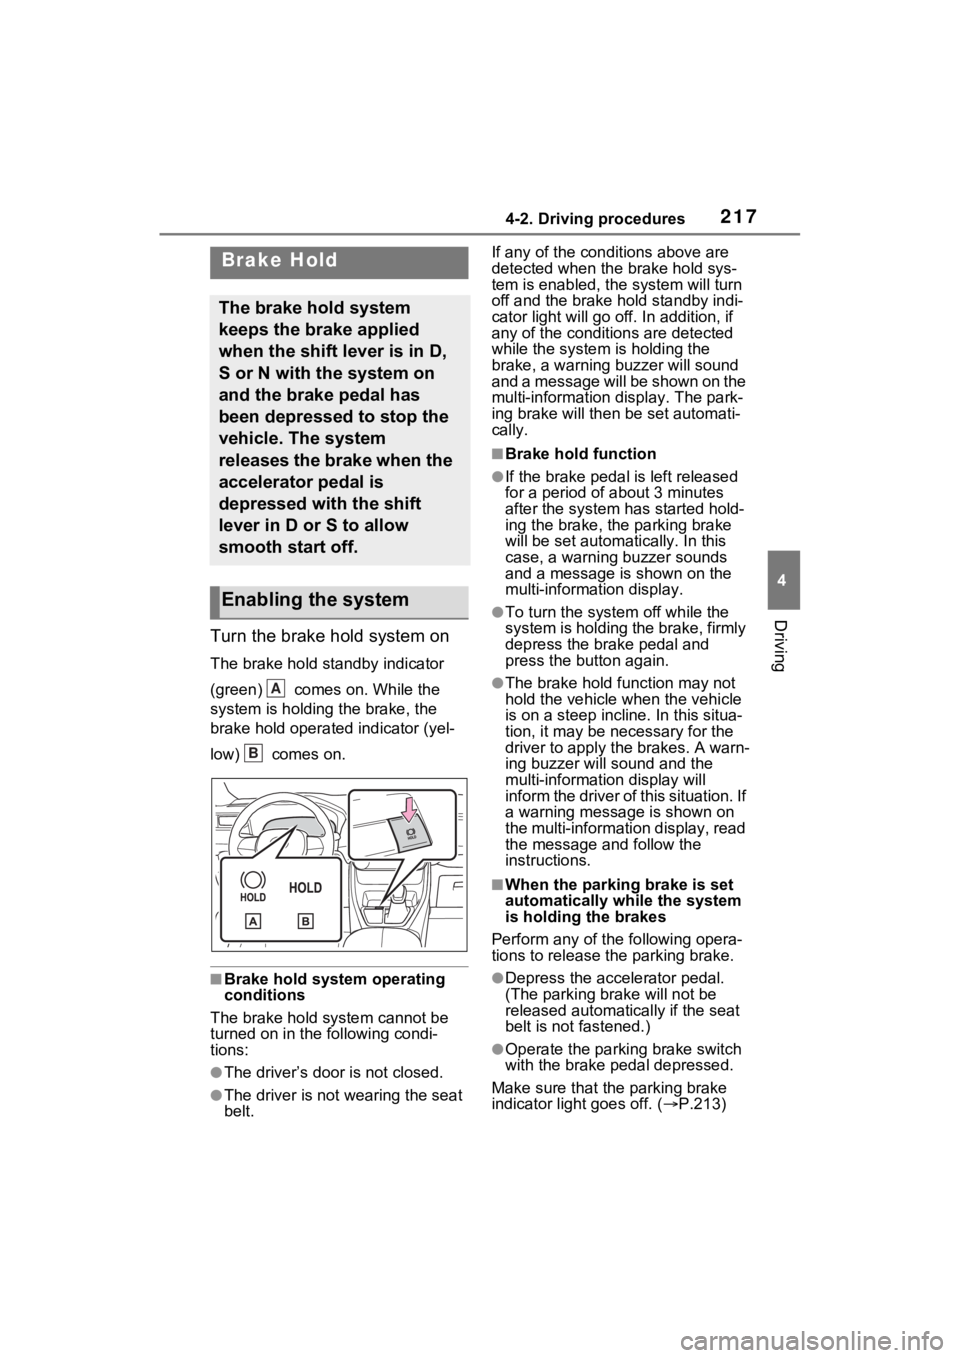
Turn the brake hold system on
The brake hold standby indicator
(green) comes on. While the
system is holding the brake, the
brake hold operated indicator (yel-
low) comes on.
■Brake hold system operating
conditions
The brake hold system cannot be
turned on in the following condi-
tions:
●The driver’s doo r is not closed.
●The driver is not wearing the seat
belt. If any of the cond
itions above are
detected when the brake hold sys-
tem is enabled, the system will turn
off and the brake hold standby indi-
cator light will go off. In addition, if
any of the conditions are detected
while the system is holding the
brake, a warning buzzer will sound
and a message will be shown on the
multi-information display. The park-
ing brake will then be set automati-
cally.
■Brake hold function
●If the brake pedal is left released
for a period of about 3 minutes
after the system has started hold-
ing the brake, the parking brake
will be set automatically. In this
case, a warning buzzer sounds
and a message is shown on the
multi-information display.
●To turn the syste m off while the
system is holding the brake, firmly
depress the brake pedal and
press the button again.
●The brake hold function may not
hold the vehicle when the vehicle
is on a steep incline. In this situa-
tion, it may be ne cessary for the
driver to apply the brakes. A warn-
ing buzzer will sound and the
multi-information display will
inform the driver of this situation. If
a warning message is shown on
the multi-information display, read
the message and follow the
instructions.
■When the parking brake is set
automatically while the system
is holding the brakes
Perform any of the following opera-
tions to release the parking brake.
●Depress the accelerator pedal.
(The parking brake will not be
released automatically if the seat
belt is not fastened.)
●Operate the parkin g brake switch
with the brake pedal depressed.
Make sure that the parking brake
indicator light goes off. ( P.213)
Brake Hold
The brake hold system
keeps the brake applied
when the shift lever is in D,
S or N with the system on
and the brake pedal has
been depressed to stop the
vehicle. The system
releases the brake when the
accelerator pedal is
depressed with the shift
lever in D or S to allow
smooth start off.
Enabling the system
A
B
Page 374 of 574

3745-4. Using the other interior features
if the garage door opener
motor is trained to
HomeLink
®, both garage
door operation indicators will
flash rapidly (green) and the
light on the garage door
opener motor will blink twice,
indicating that 2-way commu-
nication is enabled.
If the indicators do not flash, per-
form 2 and 3 within the first 10
presses of the HomeLink
® button
after programming has been com-
pleted.
2 Press a programmed
HomeLink
® button to oper-
ate a garage door.
3 Within 1 minute of pressing
the HomeLink
® button, after
the garage door operation
has stopped, press the
“Learn” or “Smart” button on
the garage door opener
motor. Within 5 seconds of
the establishment of 2-way
communication with the
garage door opener, both
garage door operation indica-
tors in the vehicle will flash
rapidly (green) and the light
on the garage door opener
motor will blink twice, indicat-
ing that 2-way communica-
tion is enabled.
■Reprogramming a single
HomeLink
® button
When the following procedure is
performed, buttons which
already have devices registered to them can be overwritten:
1
Press and hold the desired
HomeLink
® button.
2 When the HomeLink
® indica-
tor starts flashing orange,
release the HomeLink
® but-
ton and perform “Program-
ming HomeLink
®” 1 (it takes
20 seconds for the
HomeLink
® indicator to start
flashing).
■Before programming
●Install a new battery in the trans-
mitter.
●The battery side of the transmitter
must be pointed away from the
HomeLink
® buttons.
Press the appropriate
HomeLink® button. The
HomeLink® indicator light
should turn on.
The status of the opening and
closing of a garage door is
shown by the garage door oper-
ation indicators.
Operating HomeLink®
Page 551 of 574

Alphabetical Index553
Side auxiliary box ................... 356
Side doors ............................... 119
Side marker lightsLight switch .......................... 219
Replacing light bulbs ............ 432
Wattage ................................ 496
Side mirrors ............................ 165 Adjustment ........................... 165
BSM (Blind Spot Monitor)..... 275
Folding ................................. 166
Heaters......................... 333, 340
RCTA (Rear Cross Traffic Alert) function............................... 289
Side turn signal lights Replacing light bulbs ............ 432
Turn signal lever................... 212
Side windows ...... ................... 167
Smart key system ................... 139 Antenna location .................. 139
Entry functions ............. 119, 127
Starting the engine ............... 204
Warning message ................ 459
Snow mode switch ................. 315
Snow tires ............................... 325
Spare tire Storage location ................... 464
Spark plug ............................... 490
Specifications ......................... 486
Speedometer ...................... 83, 88
Sport mode ............................. 310
Steering lock Column lock release............. 203
Steering wheel Adjustment ........................... 153
Heated steering wheel ......... 345
Meter control switches ... 94, 103
Stop lights Replacing light bulbs ............ 432
Stop & Start system Function ............................... 304
Replacing the battery ........... 478
Storage feature ....................... 350 Storage precaution
s ...............350
Stuck If the vehicle becomes stuck 482
Sunglass holder.... ..................352
Sunshade ........................170, 173
Sun visors ...............................359
Switches “ODO TRIP” switch ...........86, 92
“SOS” button ..........................65
Automatic High Beam switch 222
Brake hold switch .................217
Digital Rear-view Mirror control switches..............................156
Door lock switch ...................123
Driving mode select switch ...310
Driving position memory switches..............................147
Dynamic radar cruise control with full-speed range ..........264
Electronic sunshade switch ..173
Emergency flashers switch...440
Engine switch ...............203, 204
Fog light switch .....................226
Garage door opener switches ...........................................370
Heated steering wheel..........346
Ignition switch (Engine switch) ...................................203, 204
Instrument panel light control switches..........................87, 93
Light switch...........................219
LTA switch ............................255
Meter control switches....94, 103
Moon roof switches ..............170
Outside rear v iew mirror
switches..............................165
Panoramic moon roof switches ...........................................173
Parking brake switch ............213
Power back door switch129, 130
Power door lock switch.........123
Power window switch ...........167