TOYOTA RAV4 EV 2013 1.G Owners Manual
RAV4 EV 2013 1.G
TOYOTA
TOYOTA
https://www.carmanualsonline.info/img/14/6725/w960_6725-0.png
TOYOTA RAV4 EV 2013 1.G Owners Manual
Trending: washer fluid, low beam, fuses, service schedule, fuel pressure, wheel torque, steering wheel adjustment
Page 451 of 520
5
When trouble arises
451
5-2. Steps to take in an emergency
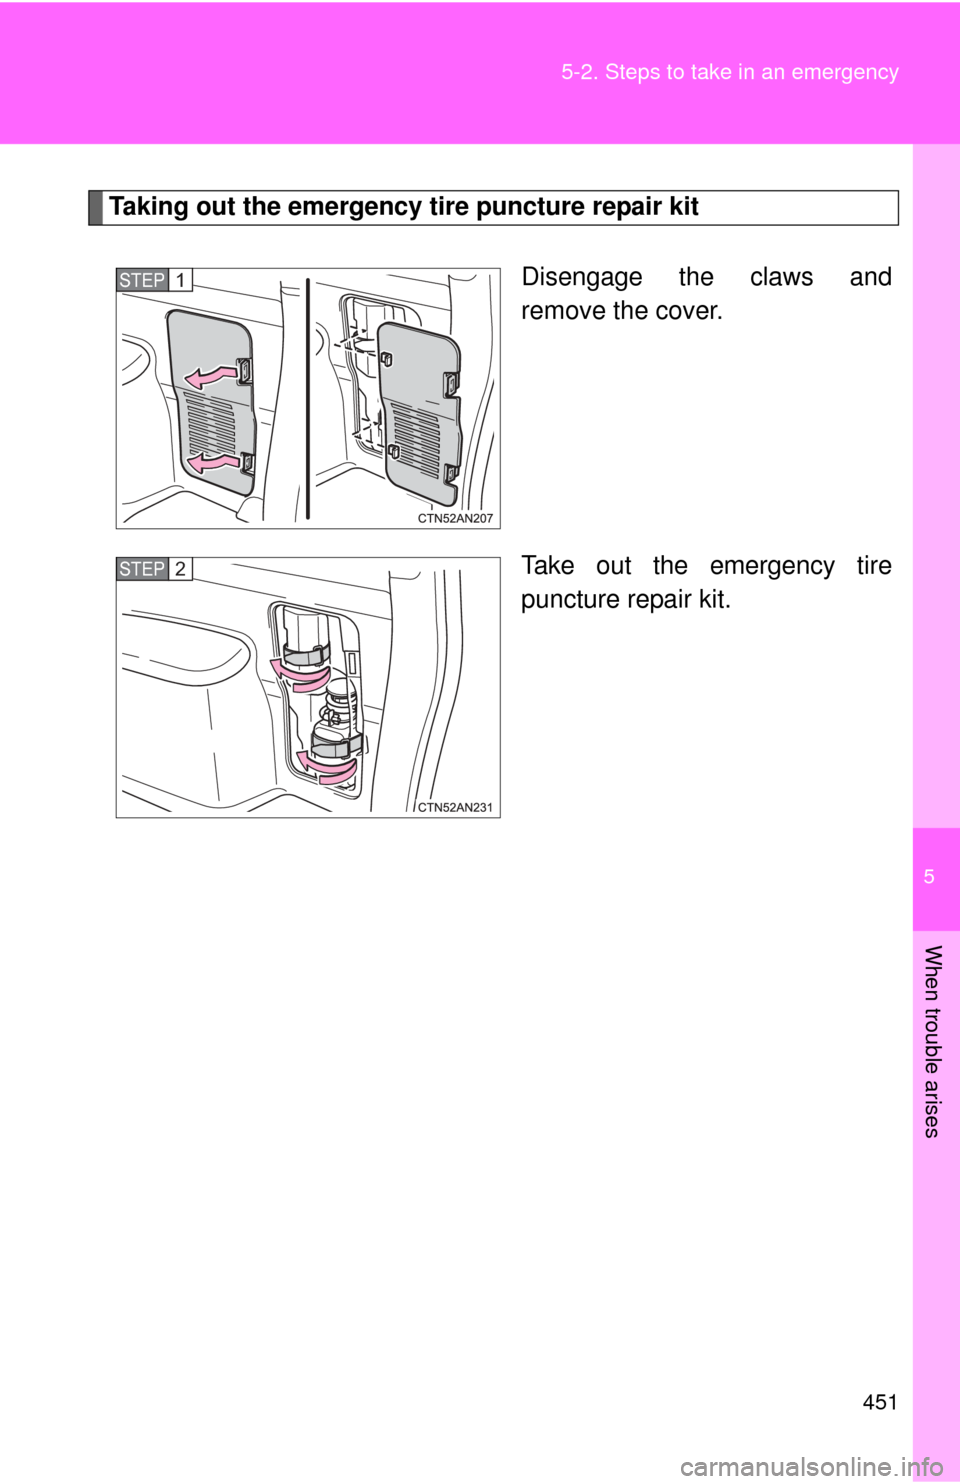
Taking out the emergency tire puncture repair kit
Disengage the claws and
remove the cover.
Take out the emergency tire
puncture repair kit.
STEP 1
STEP 2
Page 452 of 520
452 5-2. Steps to take in an emergency
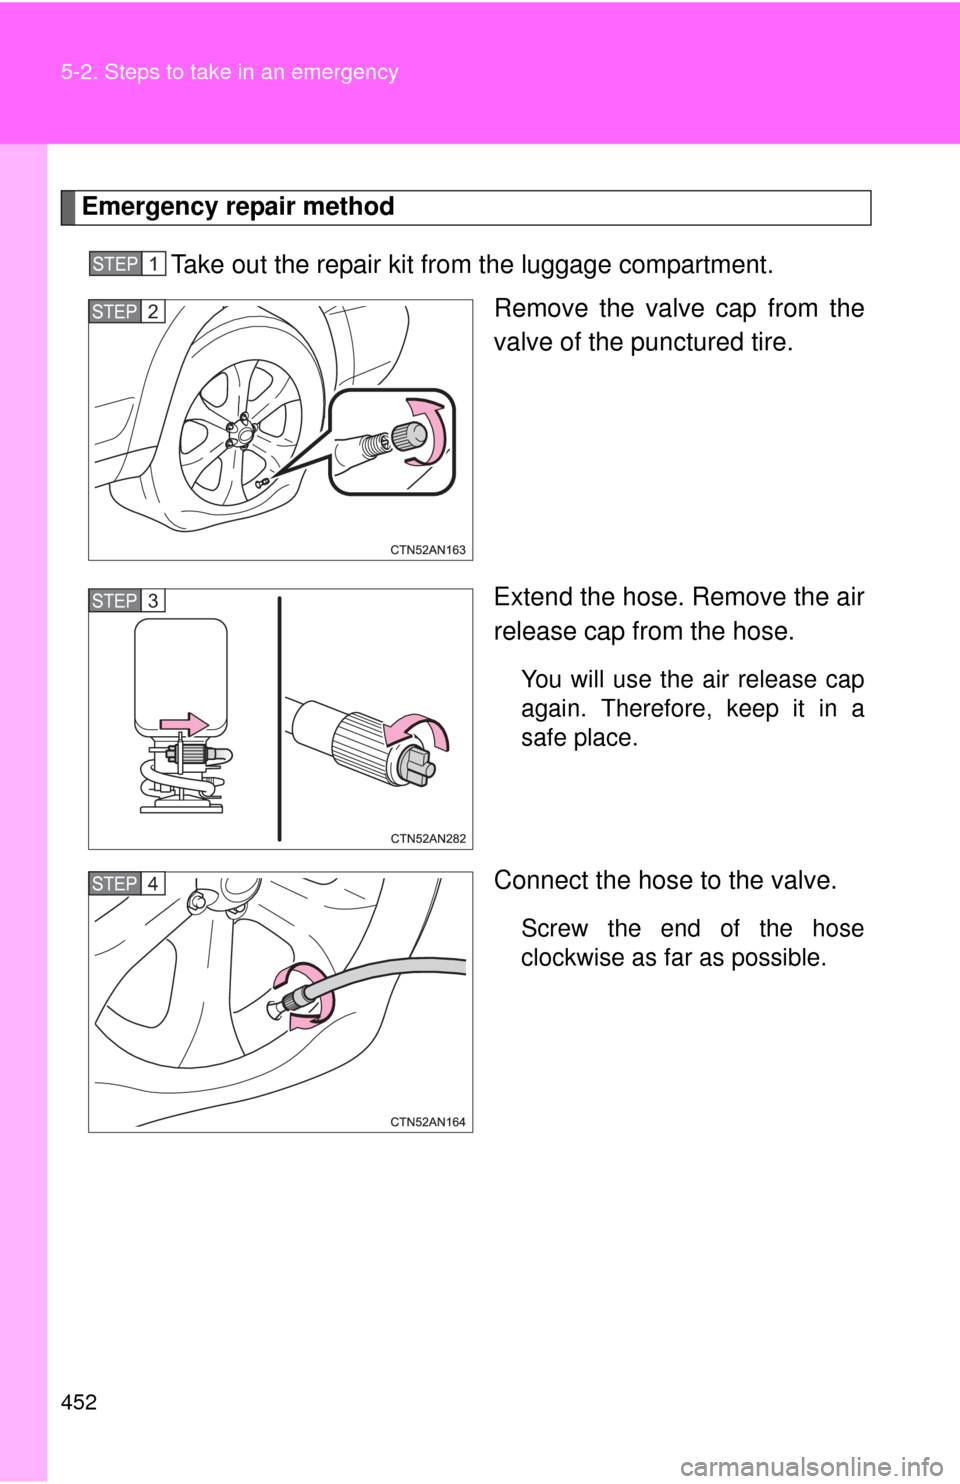
Emergency repair methodTake out the repair kit from the luggage compartment. Remove the valve cap from the
valve of the punctured tire.
Extend the hose. Remove the air
release cap from the hose.
You will use the air release cap
again. Therefore, keep it in a
safe place.
Connect the hose to the valve.
Screw the end of the hose
clockwise as far as possible.
STEP 1
STEP 2
STEP 3
STEP 4
Page 453 of 520
5
When trouble arises
453
5-2. Steps to take in an emergency
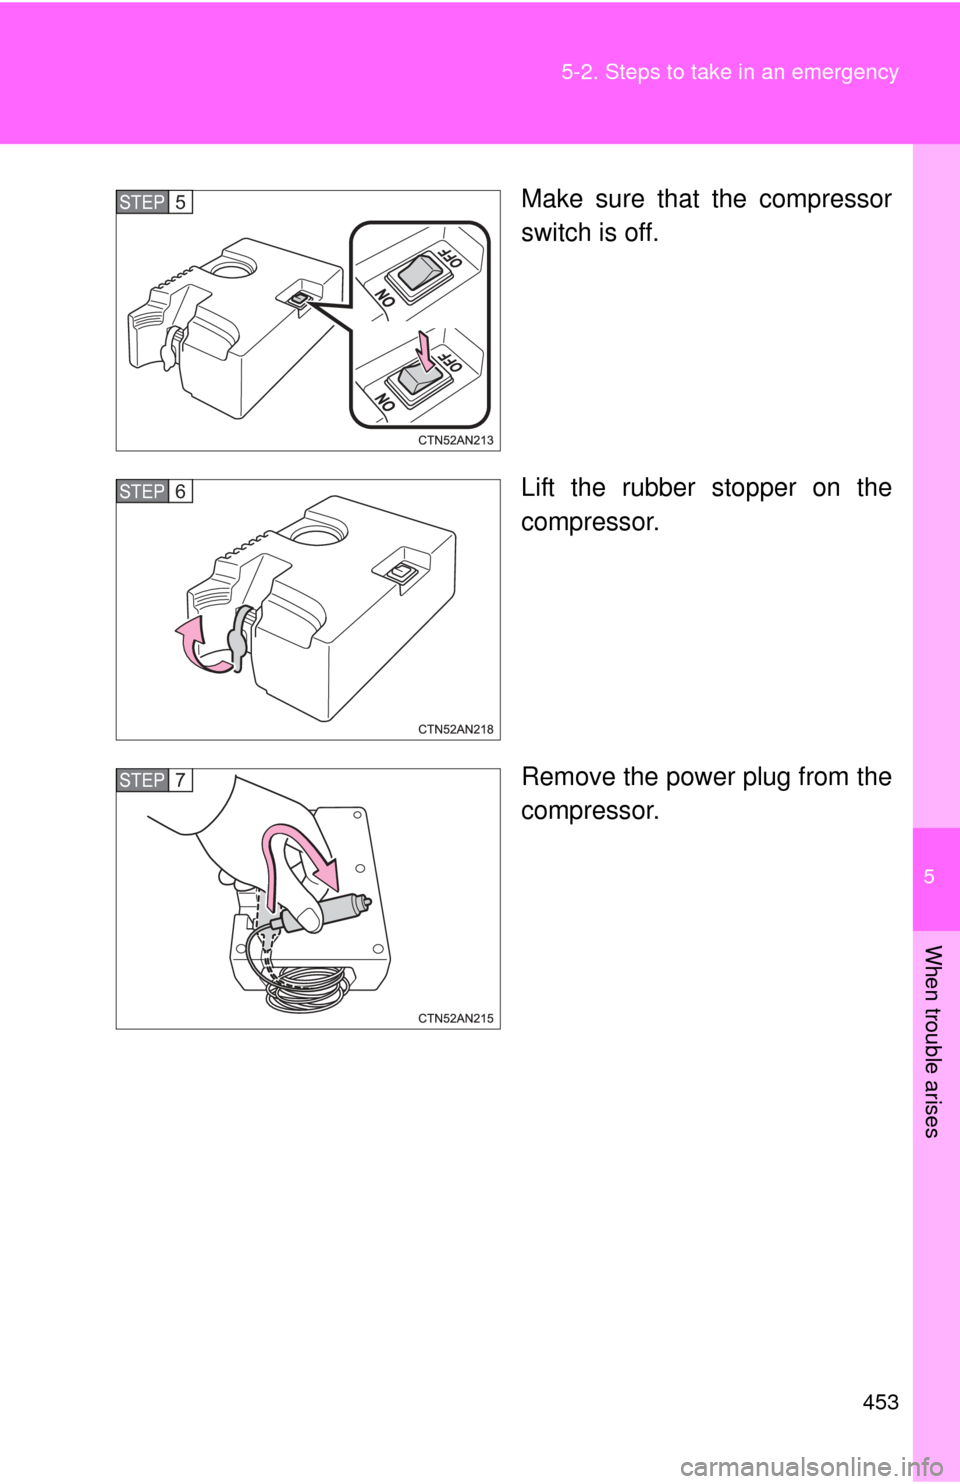
Make sure that the compressor
switch is off.
Lift the rubber stopper on the
compressor.
Remove the power plug from the
compressor.STEP 5
STEP 6
STEP 7
Page 454 of 520
454 5-2. Steps to take in an emergency
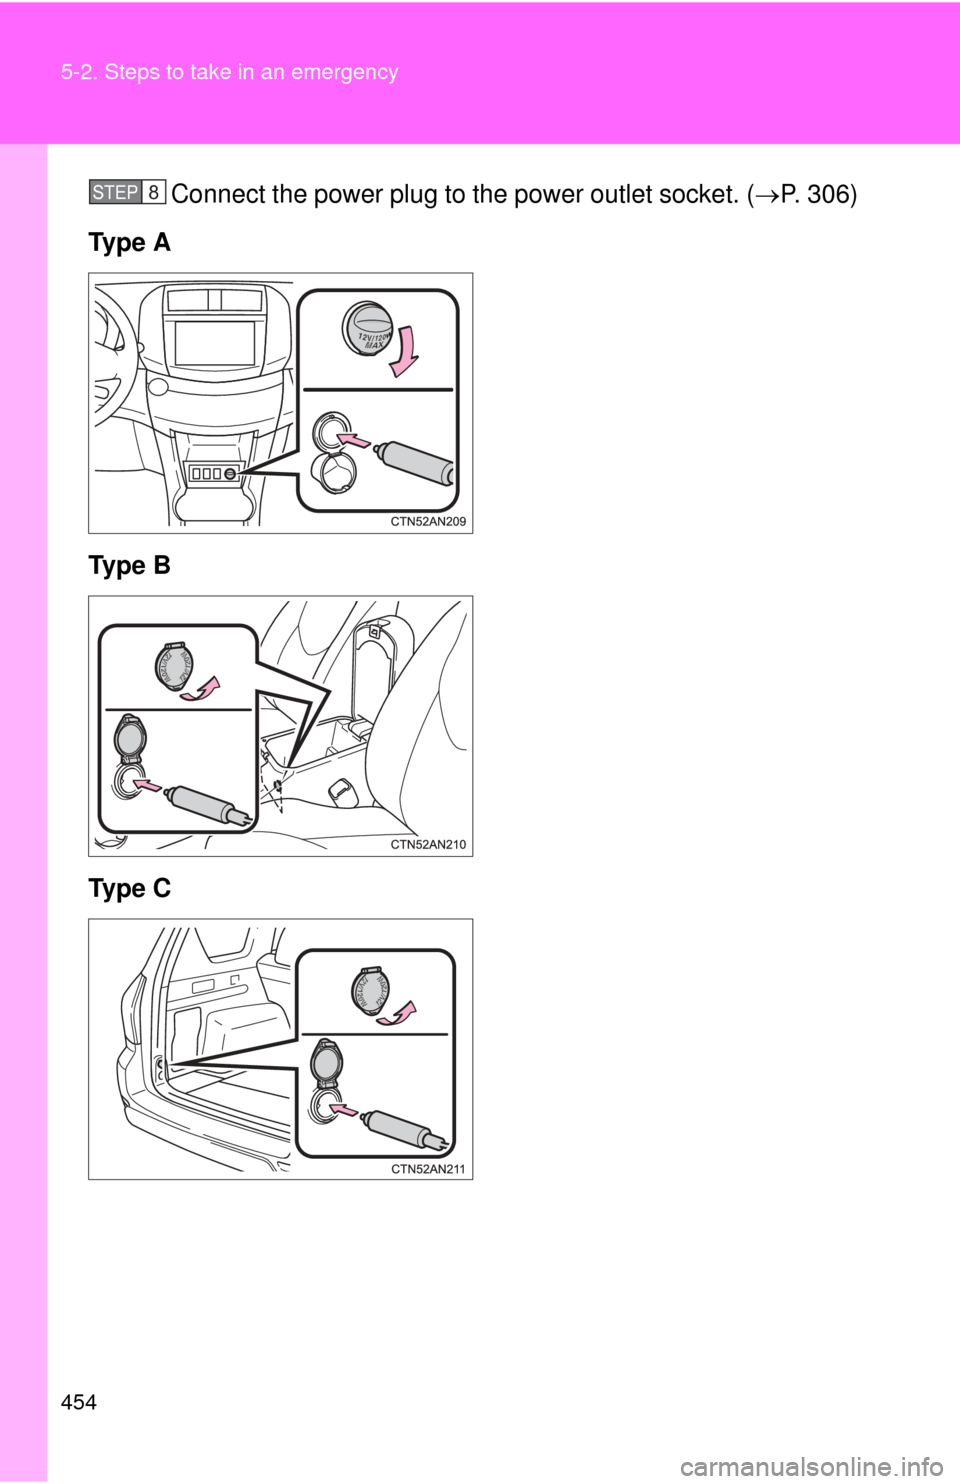
Connect the power plug to the power outlet socket. (P. 306)
Ty p e A
Ty p e B
Ty p e CSTEP 8
Page 455 of 520
5
When trouble arises
455
5-2. Steps to take in an emergency
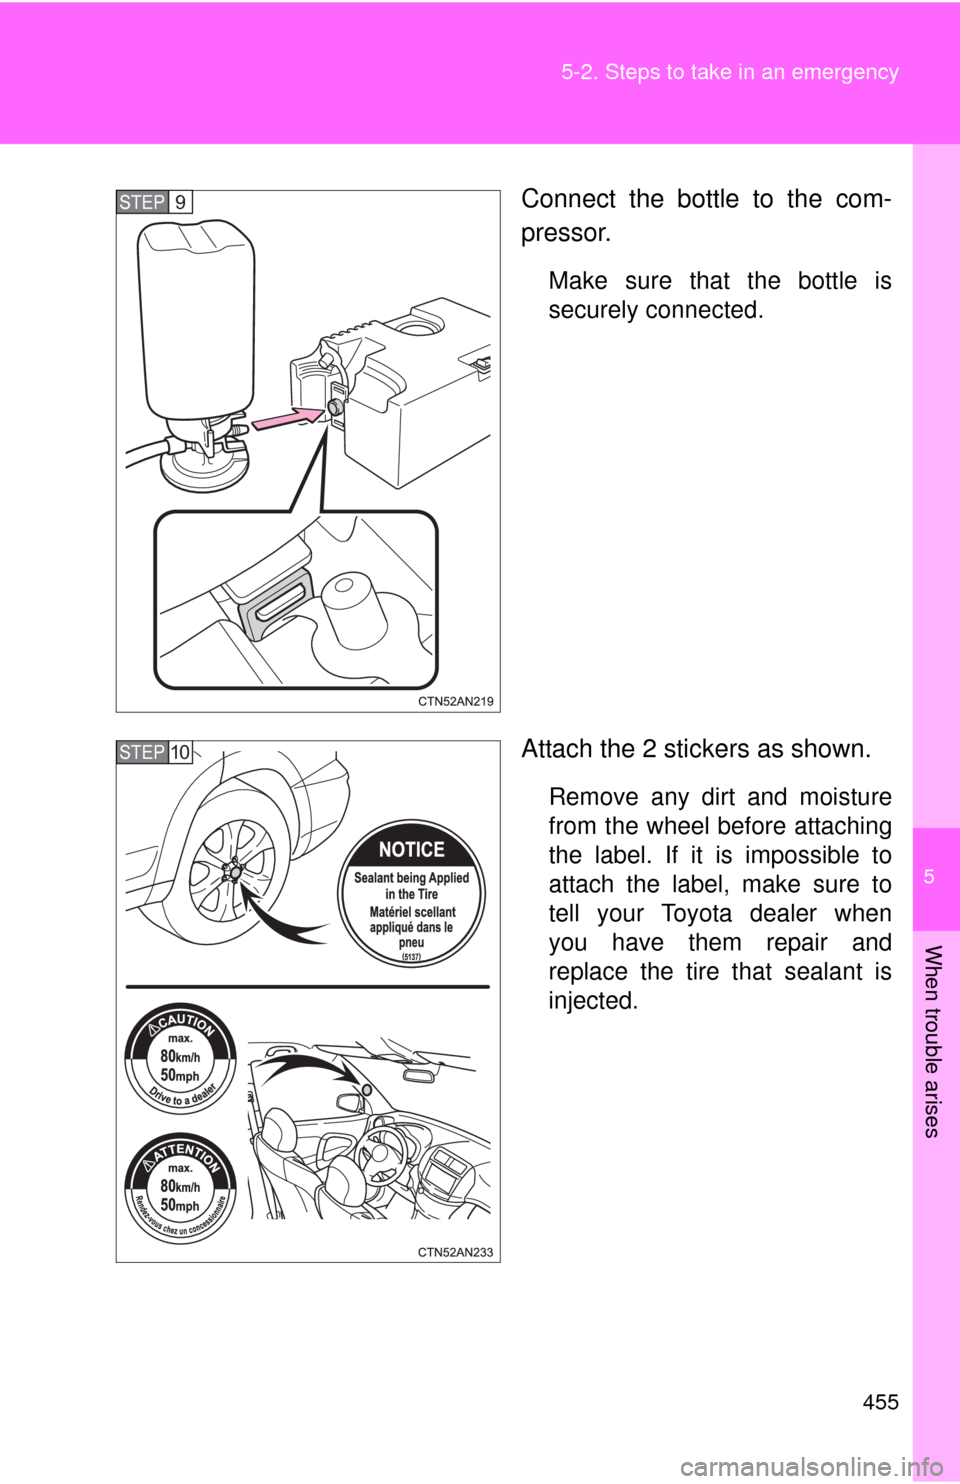
Connect the bottle to the com-
pressor.
Make sure that the bottle is
securely connected.
Attach the 2 stickers as shown.
Remove any dirt and moisture
from the wheel before attaching
the label. If it is impossible to
attach the label, make sure to
tell your Toyota dealer when
you have them repair and
replace the tire that sealant is
injected.
STEP 9
STEP 10
Page 456 of 520
456 5-2. Steps to take in an emergency
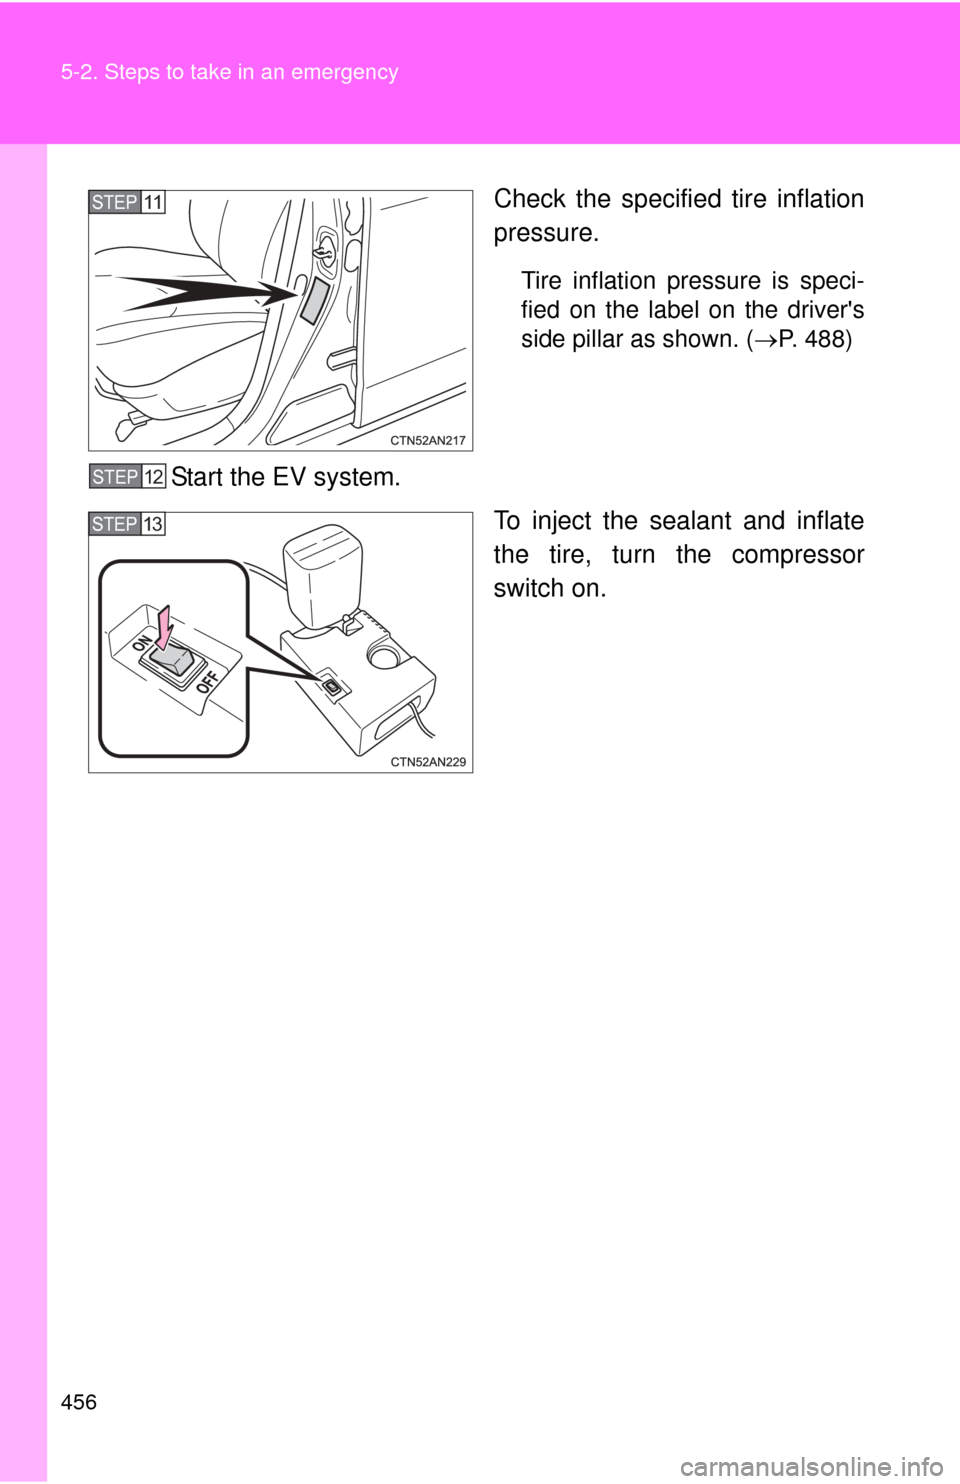
Check the specified tire inflation
pressure.
Tire inflation pressure is speci-
fied on the label on the driver's
side pillar as shown. (P. 488)
Start the EV system.
To inject the sealant and inflate
the tire, turn the compressor
switch on.
STEP11
STEP12
STEP13
Page 457 of 520
5
When trouble arises
457
5-2. Steps to take in an emergency
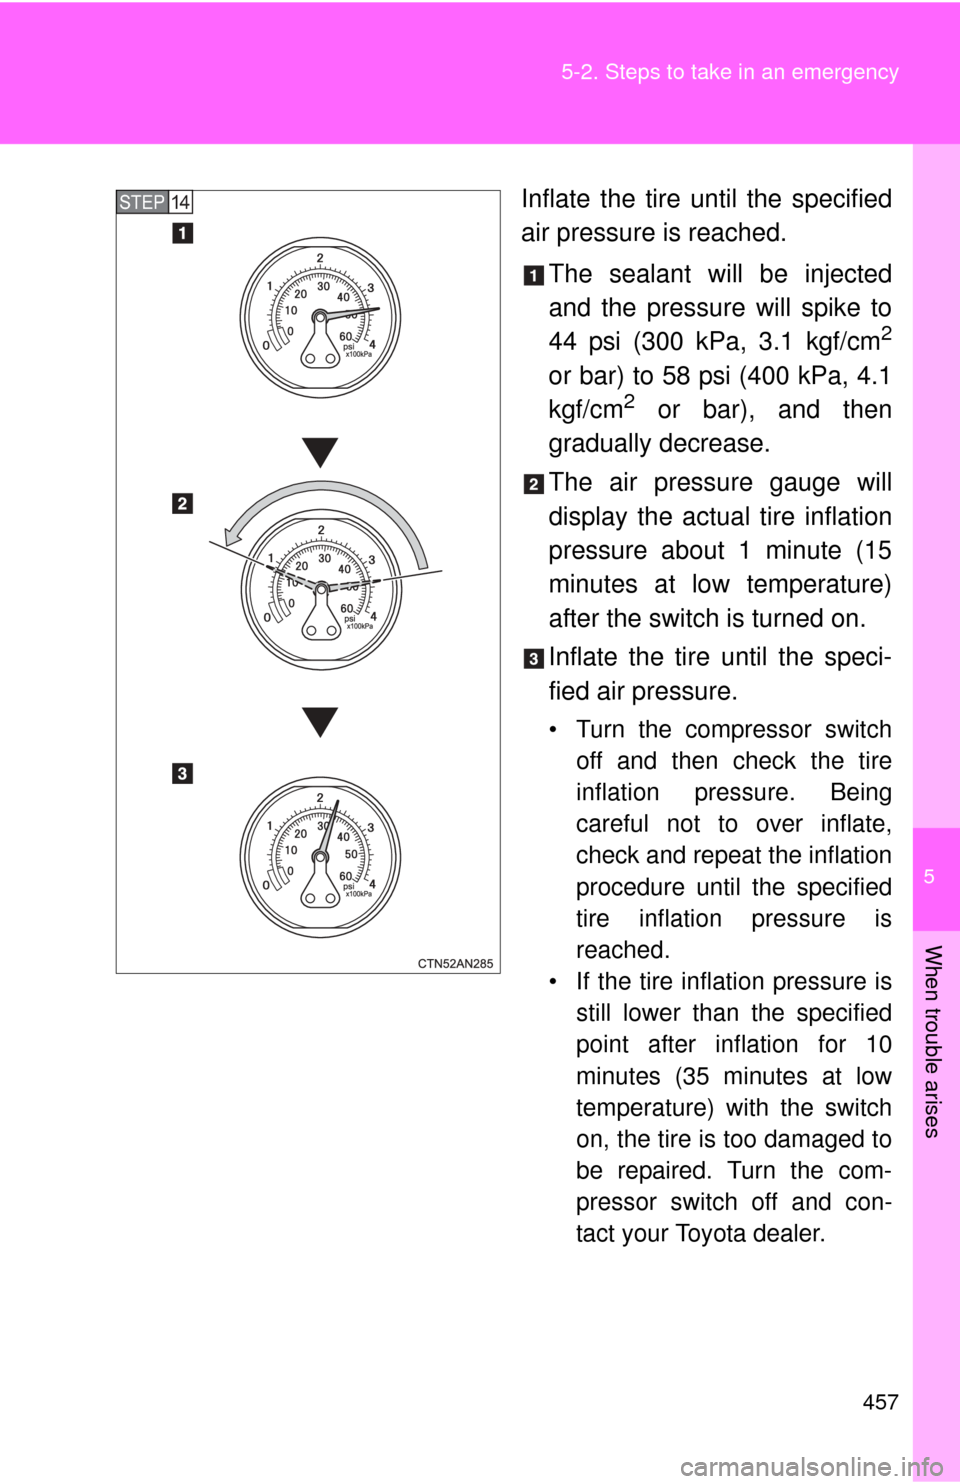
Inflate the tire until the specified
air pressure is reached.
The sealant will be injected
and the pressure will spike to
44 psi (300 kPa, 3.1 kgf/cm
2
or bar) to 58 psi (400 kPa, 4.1
kgf/cm2 or bar), and then
gradually decrease.
The air pressure gauge will
display the actual tire inflation
pressure about 1 minute (15
minutes at low temperature)
after the switch is turned on.
Inflate the tire until the speci-
fied air pressure.
• Turn the compressor switch off and then check the tire
inflation pressure. Being
careful not to over inflate,
check and repeat the inflation
procedure until the specified
tire inflation pressure is
reached.
• If the tire inflation pressure is still lower than the specified
point after inflation for 10
minutes (35 minutes at low
temperature) with the switch
on, the tire is too damaged to
be repaired. Turn the com-
pressor switch off and con-
tact your Toyota dealer.
STEP14
Page 458 of 520
458 5-2. Steps to take in an emergency
• If the tire inflation pressureexceeds the specified air
pressure, let out some air to
adjust the tire inflation pres-
sure. ( P. 460, 488)
With the compressor switch off, disconnect the hose from the
valve on the tire and then pull out the power plug from the
power outlet socket.
Some sealant may leak when the hose is removed.
Install the valve cap onto the valve of the emergency repaired
tire.
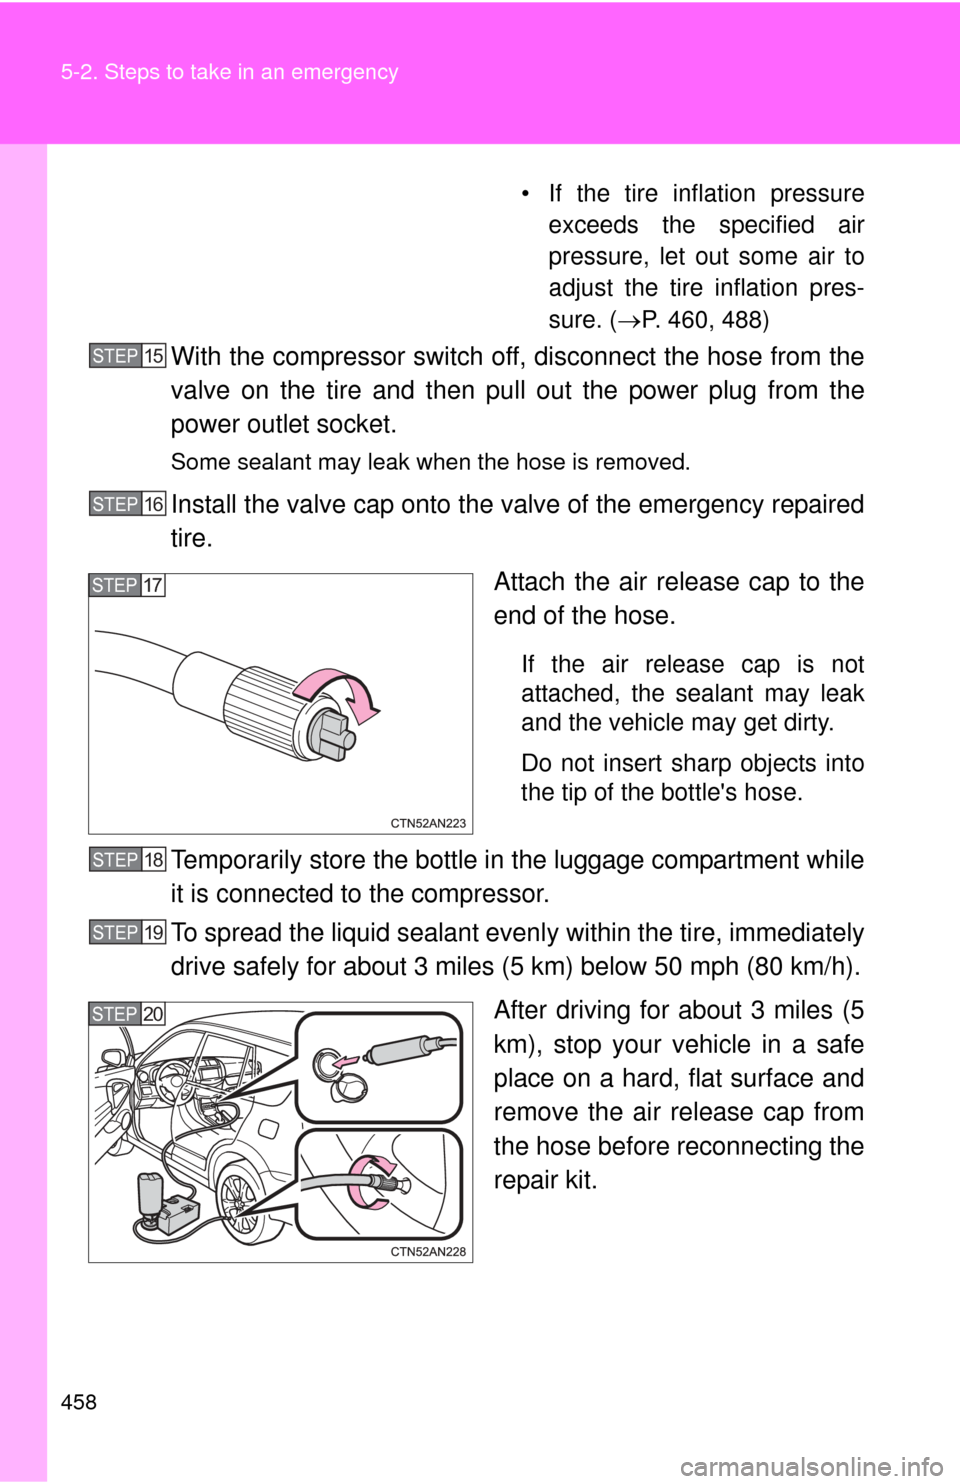
Attach the air release cap to the
end of the hose.
If the air release cap is not
attached, the sealant may leak
and the vehicle may get dirty.
Do not insert sharp objects into
the tip of the bottle's hose.
Temporarily store the bottle in the luggage compartment while
it is connected to the compressor.
To spread the liquid sealant evenl y within the tire, immediately
drive safely for about 3 miles (5 km) below 50 mph (80 km/h).
After driving for about 3 miles (5
km), stop your vehicle in a safe
place on a hard, flat surface and
remove the air release cap from
the hose before reconnecting the
repair kit.
STEP15
STEP16
STEP17
STEP18
STEP19
STEP20
Page 459 of 520
5
When trouble arises
459
5-2. Steps to take in an emergency
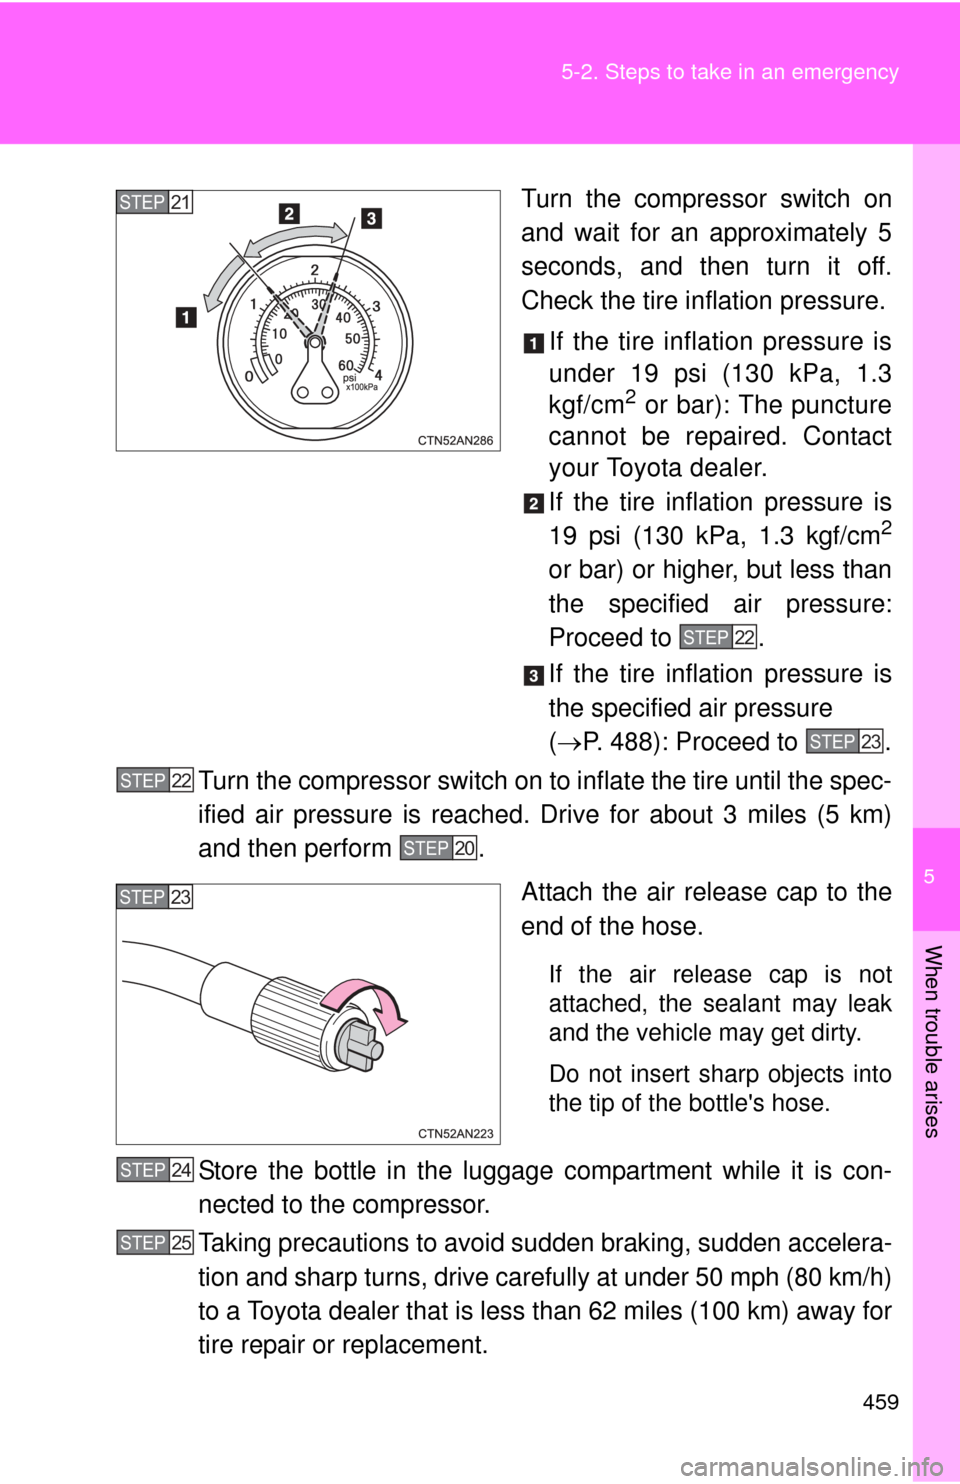
Turn the compressor switch on
and wait for an approximately 5
seconds, and then turn it off.
Check the tire inflation pressure.
If the tire inflation pressure is
under 19 psi (130 kPa, 1.3
kgf/cm
2 or bar): The puncture
cannot be repaired. Contact
your Toyota dealer.
If the tire inflation pressure is
19 psi (130 kPa, 1.3 kgf/cm
2
or bar) or higher, but less than
the specified air pressure:
Proceed to .
If the tire inflation pressure is
the specified air pressure
( P. 488): Proceed to .
Turn the compressor switch on to inflate the tire until the spec-
ified air pressure is reached. Drive for about 3 miles (5 km)
and then perform .
Attach the air release cap to the
end of the hose.
If the air release cap is not
attached, the sealant may leak
and the vehicle may get dirty.
Do not insert sharp objects into
the tip of the bottle's hose.
Store the bottle in the luggage compartment while it is con-
nected to the compressor.
Taking precautions to avoid sudden braking, sudden accelera-
tion and sharp turns, drive care fully at under 50 mph (80 km/h)
to a Toyota dealer that is less than 62 miles (100 km) away for
tire repair or replacement.
STEP21
STEP22
STEP23
STEP22
STEP20
STEP23
STEP24
STEP25
Page 460 of 520
460 5-2. Steps to take in an emergency
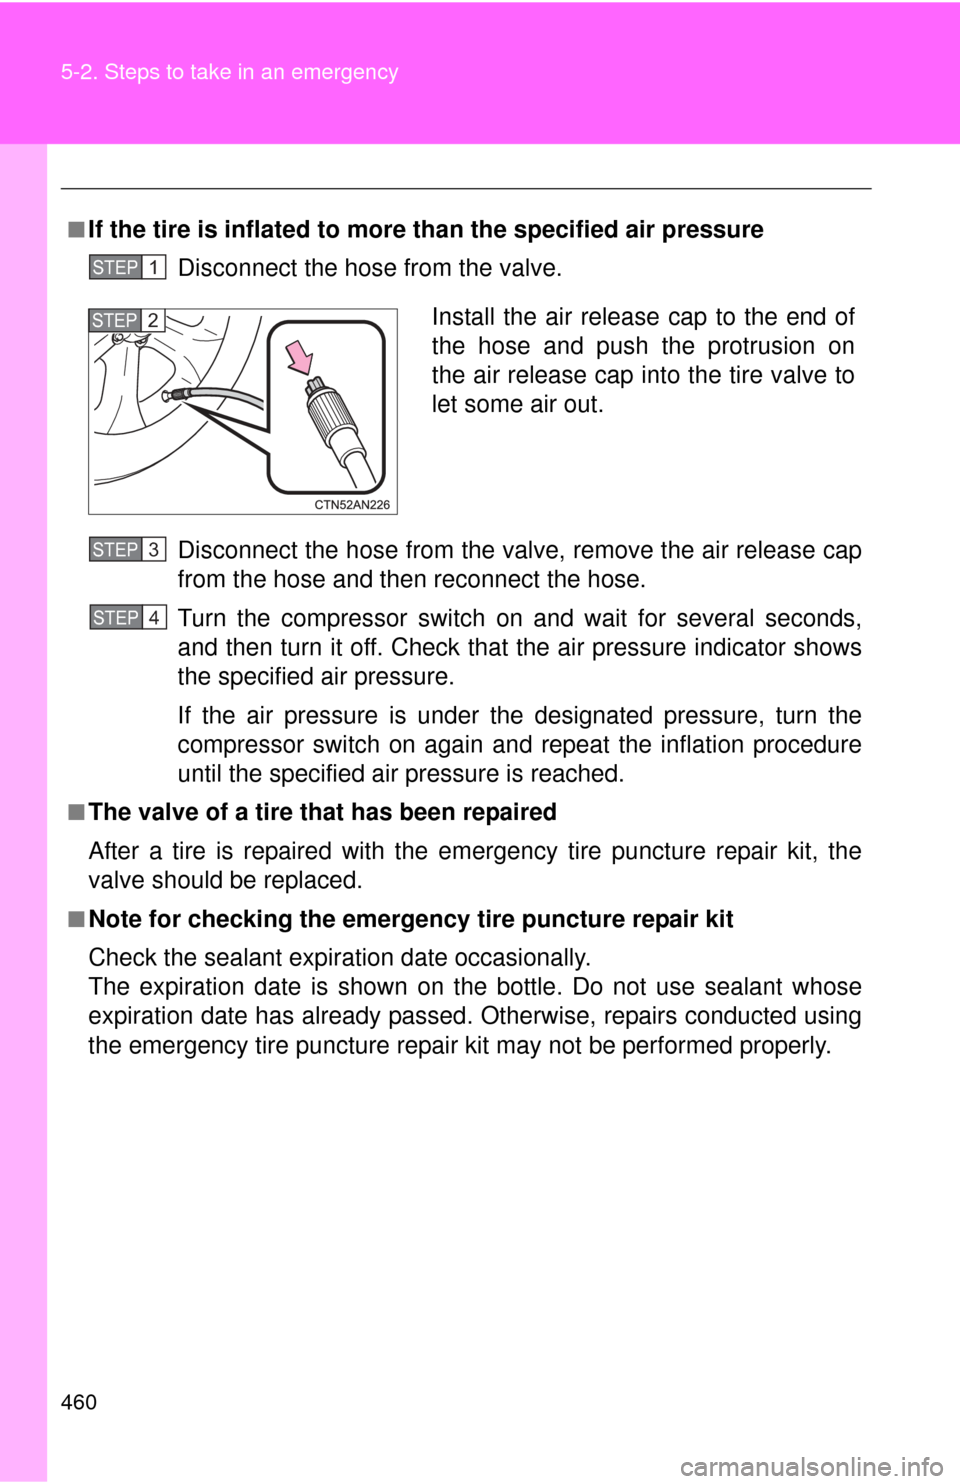
■If the tire is inflated to more than the specified air pressureDisconnect the hose from the valve.
Disconnect the hose from the valve, remove the air release cap
from the hose and then reconnect the hose.
Turn the compressor switch on and wait for several seconds,
and then turn it off. Check that the air pressure indicator shows
the specified air pressure.
If the air pressure is under the designated pressure, turn the
compressor switch on again and repeat the inflation procedure
until the specified air pressure is reached.
■The valve of a tire that has been repaired
After a tire is repaired with the emergency tire puncture repair kit, the
valve should be replaced.
■Note for checking the emergency tire puncture repair kit
Check the sealant expiration date occasionally.
The expiration date is shown on th e bottle. Do not use sealant whose
expiration date has already passed. Otherwise, repairs conducted using
the emergency tire puncture repair kit may not be performed properly.
STEP 1
Install the air release cap to the end of
the hose and push the protrusion on
the air release cap into the tire valve to
let some air out.STEP 2
STEP 3
STEP 4
Trending: boot, winter tires, fuse, transmission, emergency towing, CD player, torque
