TOYOTA RAV4 HYBRID 2023 Owners Manual
Manufacturer: TOYOTA, Model Year: 2023, Model line: RAV4 HYBRID, Model: TOYOTA RAV4 HYBRID 2023Pages: 586, PDF Size: 17.55 MB
Page 481 of 586

4797-2. Steps to take in an emergency
7
When trouble arises
WARNING
■Speed limit when using the
compact spare tire
Do not drive at speeds in excess
of 50 mph (80 km/h) when a com-
pact spare tire is installed on the
vehicle.
The compact spare tire is not
designed for driving at high
speeds. Failure to observe this
precaution may lead to an acci-
dent causing death or serious
injury.
■After using the tools and jack
Before driving, make sure all the
tools and jack are securely in
place in their storage location to
reduce the possibility of personal
injury during a co llision or sudden
braking.
NOTICE
■Be careful when driving over
bumps with the compact
spare tire installed on the
vehicle
The vehicle height may become
lower when driving with the com-
pact spare tire compared to when
driving with standard tires. Be
careful when driving over uneven
road surfaces.
■Driving with tire chains and
the compact spare tire
Do not fit tire chains to the com-
pact spare tire.
Tire chains may damage the vehi-
cle body and adversely affect driv-
ing performance.
■When replacing the tires
(vehicles with tire pressure
warning system)
When removing or fitting the
wheels, tires or th e tire pressure
warning valve and transmitter,
contact your Toyota dealer as the
tire pressure warning valve and
transmitter may be damaged if not
handled correctly.
Page 482 of 586
4807-2. Steps to take in an emergency
One of the following may be the
cause of the problem:
The electronic key may not be
functioning properly.
( P.483)
There may not be sufficient
fuel in the vehicle’s tank.
Refuel the vehicle. ( P.249)
There may be a malfunction
in the immobilizer system.
( P.80)
The hybrid system may be
malfunctioning due to an elec-
trical problem such as elec-
tronic key battery depletion or
a blown fuse. However,
depending on the type of mal-
function, an interim measure
is available to start the hybrid
system. ( P.481)
There is a possibility that the
temperature of the hybrid bat- tery (traction battery) is
extremely low (approximately
below -22°F [-30°C]). (
P.76,
217, 220)
One of the following may be the
cause of the problem:
The 12-volt battery may be
discharged. ( P.485)
The 12-volt battery terminal
connections may be loose or
corroded. ( P.408)
One of the following may be the
cause of the problem:
The 12-volt battery may be
discharged. ( P.485)
One or both of the 12-volt bat-
tery terminals may be discon-
nected. ( P.408)
Contact your Toyota dealer if
the problem cannot be repaired,
or if repair procedures are
unknown.
If the hybrid system
will not start
Reasons for the hybrid sys-
tem not starting vary
depending on the situation.
Check the following and
perform the appropriate
procedure:
The hybrid system will not
start even though the cor-
rect starting procedure is
being followed ( P.217,
219)
The interior lights and
headlights are dim, or the
horn does not sound or
sounds at a low volume
The interior lights and
headlights do not turn on,
or the horn does not
sound
Page 483 of 586
4817-2. Steps to take in an emergency
7
When trouble arises
When the hybrid system does
not start, the following steps can
be used as an interim measure
to start the hybrid system if the
power switch is functioning nor-
mally.
Do not use this starting proce-
dure except in cases of emer-
gency.
1Pull the parking brake switch
to check that the parking
brake is set. ( P.231)
Parking brake indicator will come
on.
2 Shift the shift lever to P.
3 Turn the power switch to
ACC.
4 Press and hold the power
switch for about 15 seconds
while depressing the brake
pedal firmly.
Even if the hybrid system can be
started using the above steps,
the system may be malfunction-
ing. Have the vehicle inspected
by your Toyota dealer.
Starting the hybrid sys-
tem in an emergencyIf you lose your keys
New genuine keys can be
made by your Toyota dealer
using the other key and the
key number stamped on
your key number plate.
Keep the plate in a safe
place such as your wallet,
not in the vehicle.
NOTICE
■When an electronic key is lost
(if equipped)
If the electronic key remains lost,
the risk of vehicle theft increases
significantly. Visit your Toyota
dealer immediately with all
remaining electronic keys that
were provided with your vehicle.
Page 484 of 586

4827-2. Steps to take in an emergency
1Remove the cover inside the
luggage compartment by
inserting a screwdriver.
When removing the cover, to pre-
vent damage, cover the tip of the
screwdriver with a rag.
2 Pull the lever.If the fuel filler door
cannot be opened
If the fuel filler door opener
switch cannot be operated,
contact your Toyota dealer
to service the vehicle. In
case where refueling is
urgently necessary, the fol-
lowing procedure can be
used to open the fuel filler
door.
Opening the fuel filler
door
NOTICE
■When opening the fuel filler
door manually
●Do not open the fuel filler door
manually except in an emer-
gency. Fuel may overflow.
●Using the lever to open the fuel
filler door may not allow for an
adequate reduction in fuel tank
pressure before refueling. To
prevent fuel from spilling out,
turn the cap slowly when remov-
ing it.
●During refueling, fuel may spill
out from the filler opening due to
air being discharged from inside
the fuel tank. Therefore, fill the
fuel tank carefully and slowly.
Page 485 of 586
4837-2. Steps to take in an emergency
7
When trouble arises
■When the electronic key does
not work properly
●Make sure that the smart key sys-
tem has not been deactivated in
the customization setting. If it is
off, turn the function on.
(Customizable features: P.523)
●Check if battery-saving mode is
set. If it is set, cancel the function.
( P.157)
●The electronic key function may
have stopped. ( P.157)
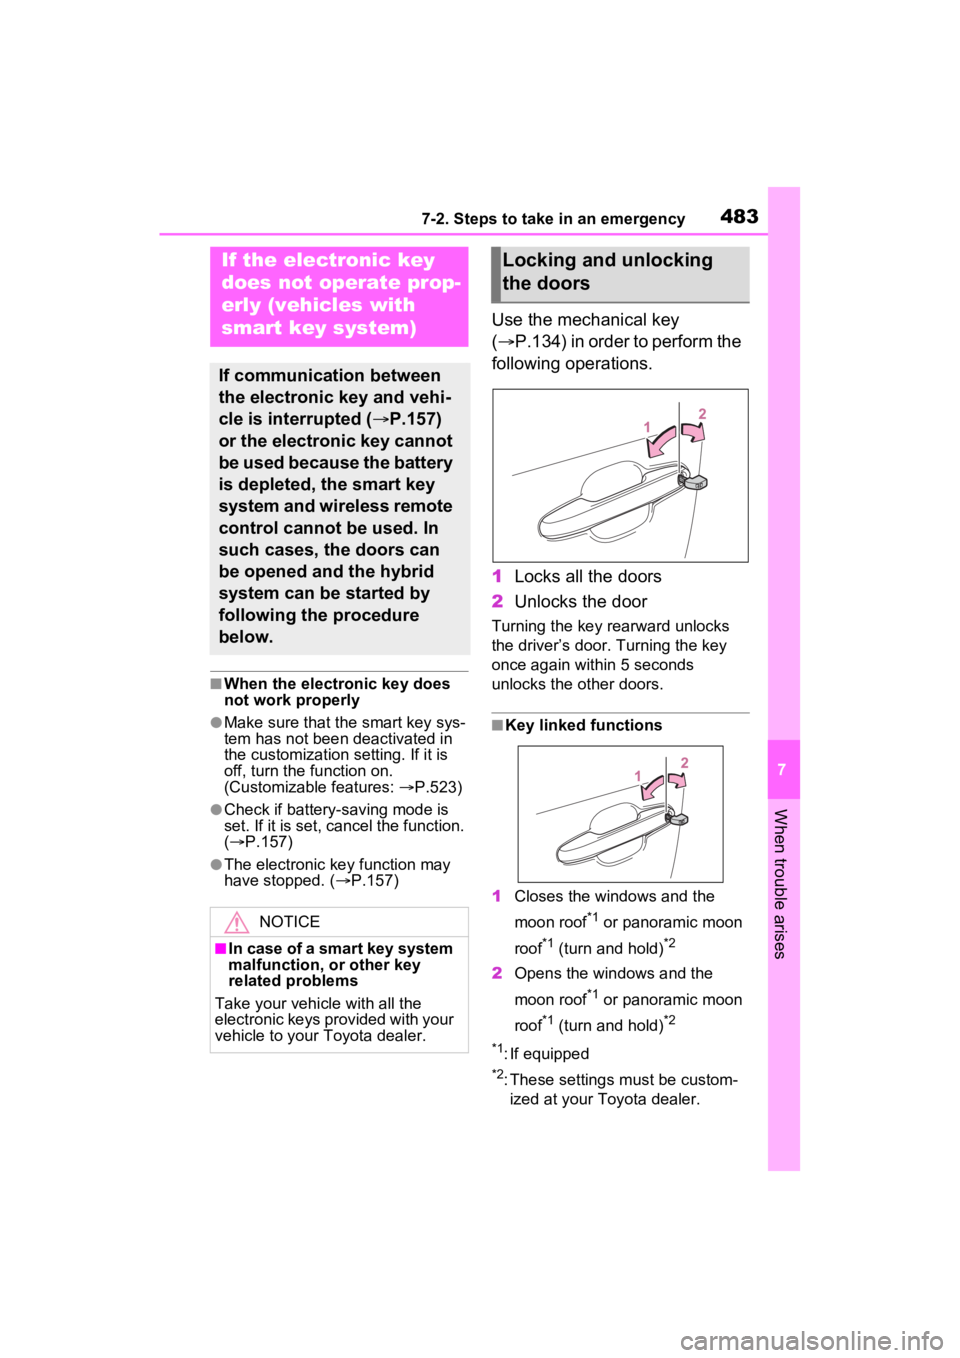
Use the mechanical key
( P.134) in order to perform the
following operations.
1 Locks all the doors
2 Unlocks the door
Turning the key rearward unlocks
the driver’s door. Turning the key
once again within 5 seconds
unlocks the other doors.
■Key linked functions
1 Closes the windows and the
moon roof
*1 or panoramic moon
roof
*1 (turn and hold)*2
2 Opens the windows and the
moon roof
*1 or panoramic moon
roof
*1 (turn and hold)*2
*1
: If equipped
*2: These settings must be custom- ized at your Toyota dealer.
If the electronic key
does not op erate prop-
erly (vehicles with
smart key system)
If communication between
the electronic key and vehi-
cle is interrupted ( P.157)
or the electronic key cannot
be used because the battery
is depleted, the smart key
system and wireless remote
control cannot be used. In
such cases, the doors can
be opened and the hybrid
system can be started by
following the procedure
below.
NOTICE
■In case of a smart key system
malfunction, or other key
related problems
Take your vehicle with all the
electronic keys provided with your
vehicle to your Toyota dealer.
Locking and unlocking
the doors
Page 486 of 586
4847-2. Steps to take in an emergency
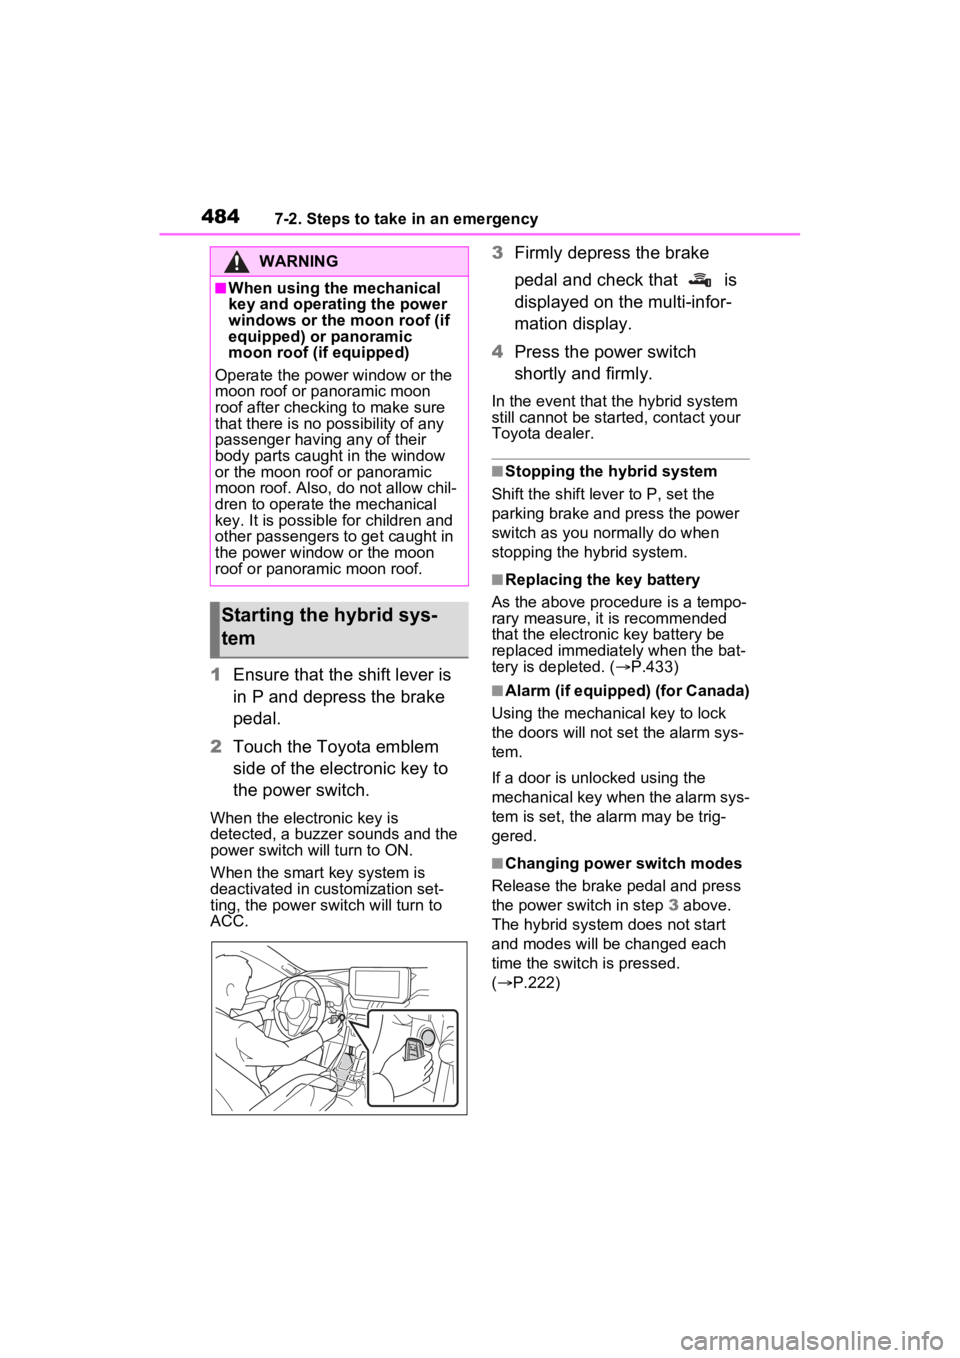
1Ensure that the shift lever is
in P and depress the brake
pedal.
2 Touch the Toyota emblem
side of the electronic key to
the power switch.
When the electronic key is
detected, a buzzer sounds and the
power switch will turn to ON.
When the smart key system is
deactivated in customization set-
ting, the power switch will turn to
ACC.
3Firmly depress the brake
pedal and check that is
displayed on the multi-infor-
mation display.
4 Press the power switch
shortly and firmly.
In the event that t he hybrid system
still cannot be started, contact your
Toyota dealer.
■Stopping the hybrid system
Shift the shift lever to P, set the
parking brake and press the power
switch as you normally do when
stopping the hybrid system.
■Replacing the key battery
As the above proce dure is a tempo-
rary measure, it is recommended
that the electronic key battery be
replaced immediately when the bat-
tery is depleted. ( P.433)
■Alarm (if equipped) (for Canada)
Using the mechanical key to lock
the doors will not set the alarm sys-
tem.
If a door is unl ocked using the
mechanical key when the alarm sys-
tem is set, the alarm may be trig-
gered.
■Changing power switch modes
Release the brake pedal and press
the power switch in step 3 above.
The hybrid system does not start
and modes will be changed each
time the switch is pressed.
( P.222)
WARNING
■When using the mechanical
key and operating the power
windows or the moon roof (if
equipped) or panoramic
moon roof (if equipped)
Operate the power window or the
moon roof or panoramic moon
roof after checking to make sure
that there is no possibility of any
passenger having any of their
body parts caught in the window
or the moon roof or panoramic
moon roof. Also, do not allow chil-
dren to operate the mechanical
key. It is possible for children and
other passengers to get caught in
the power window or the moon
roof or panoramic moon roof.
Starting the hybrid sys-
tem
Page 487 of 586
4857-2. Steps to take in an emergency
7
When trouble arises
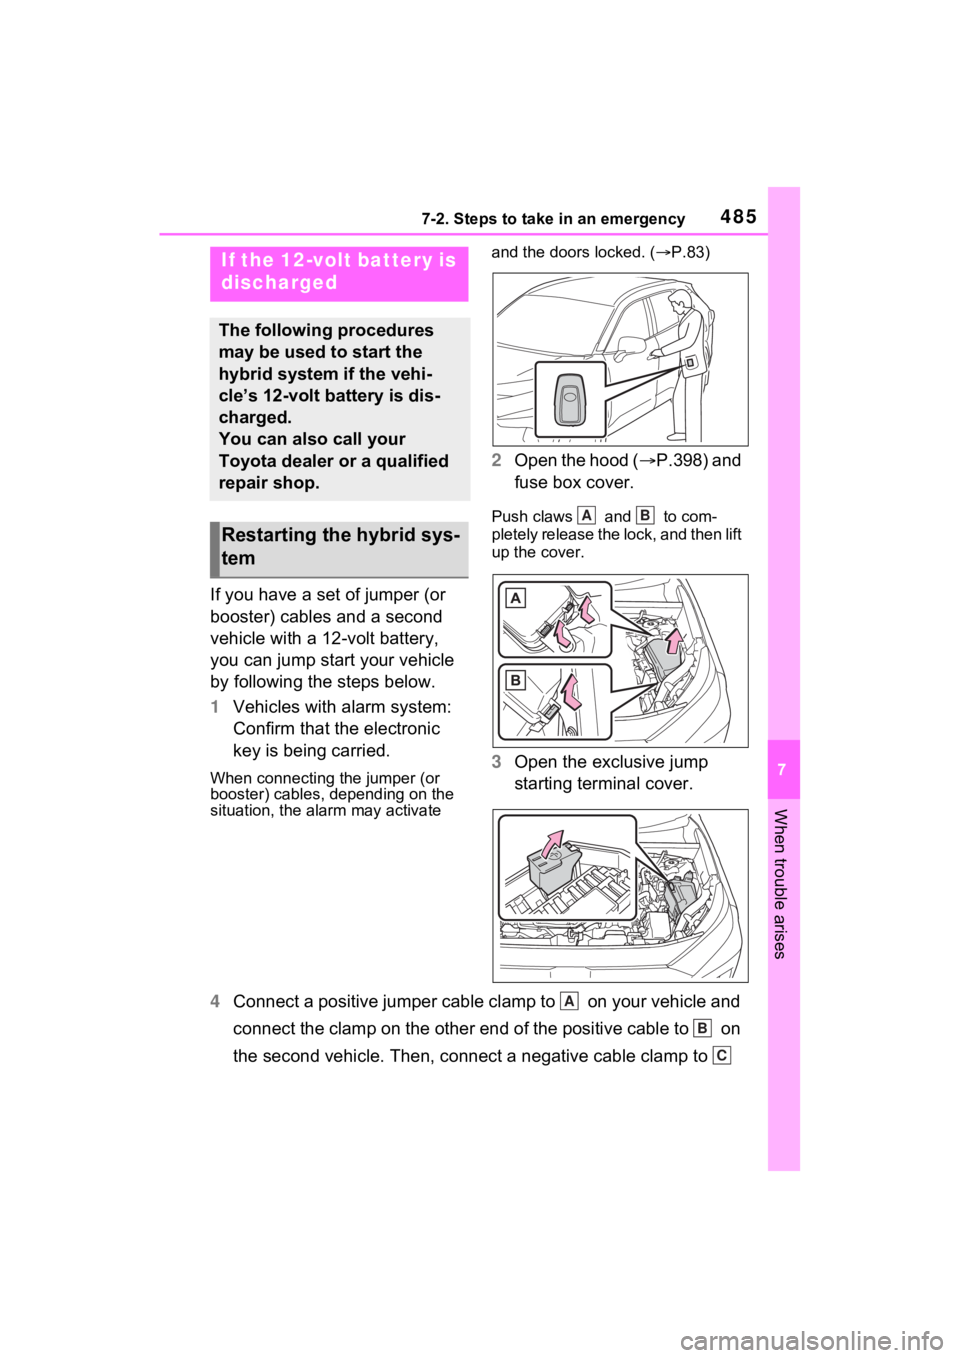
If you have a set of jumper (or
booster) cables and a second
vehicle with a 12-volt battery,
you can jump start your vehicle
by following the steps below.
1Vehicles with alarm system:
Confirm that the electronic
key is being carried.
When connecting the jumper (or
booster) cables, depending on the
situation, the ala rm may activate and the doors locked. (
P.83)
2 Open the hood ( P.398) and
fuse box cover.
Push claws and to com-
pletely release the lock, and then lift
up the cover.
3 Open the exclusive jump
starting terminal cover.
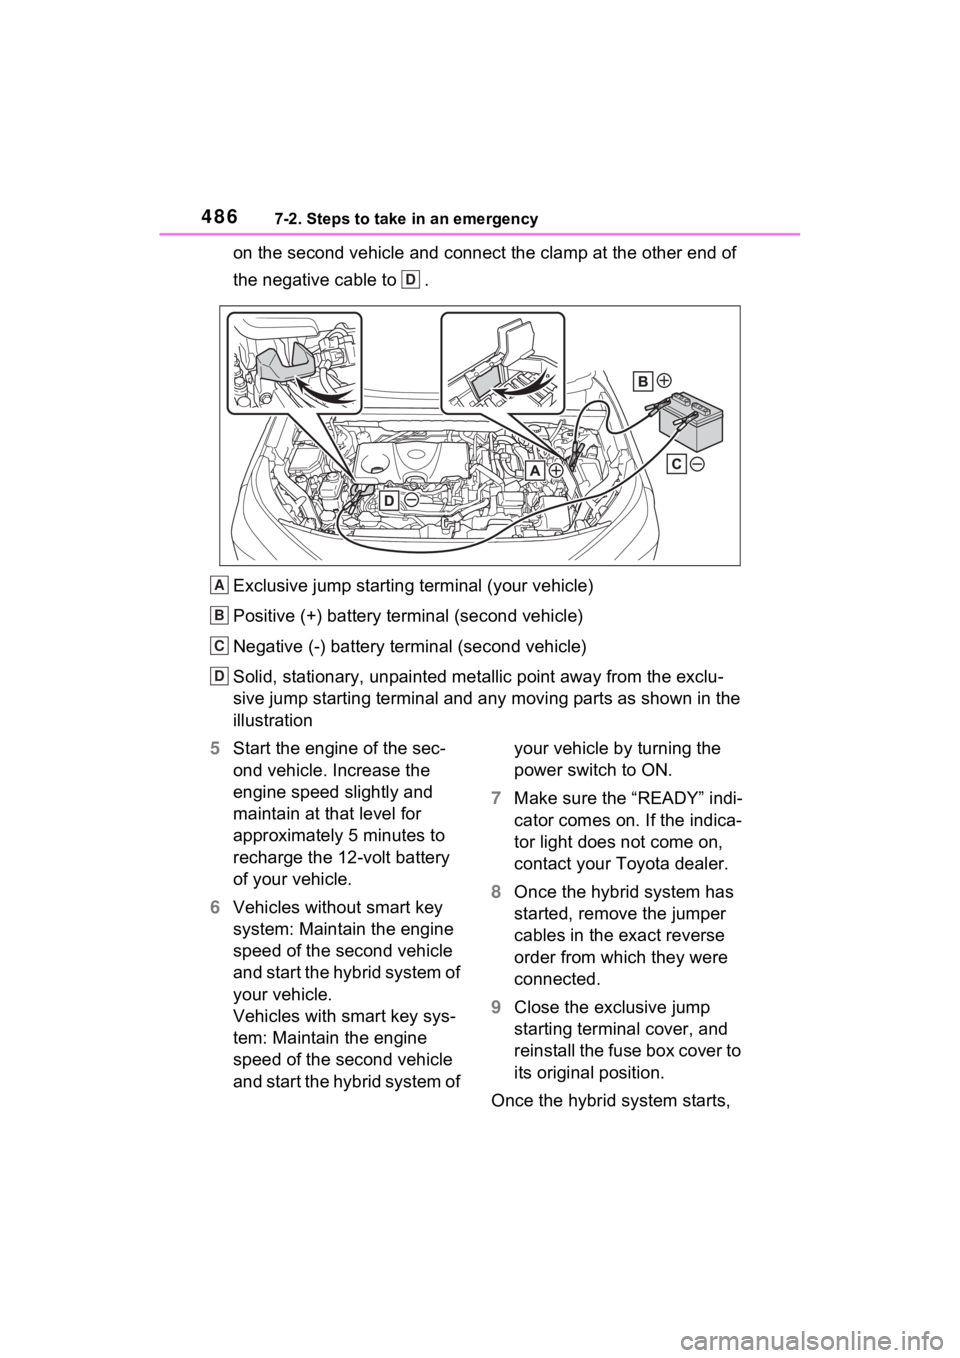
4 Connect a positive jumper cable clamp to on your vehicle and
connect the clamp on the other end of the positive cable to on
the second vehicle. Then, connect a negative cable clamp to
If the 12-volt battery is
discharged
The following procedures
may be used to start the
hybrid system if the vehi-
cle’s 12-volt battery is dis-
charged.
You can also call your
Toyota dealer or a qualified
repair shop.
Restarting the hybrid sys-
tem
AB
A
B
C
Page 488 of 586
4867-2. Steps to take in an emergency
on the second vehicle and connect the clamp at the other end of
the negative cable to .
Exclusive jump starting terminal (your vehicle)
Positive (+) battery terminal (second vehicle)
Negative (-) battery term inal (second vehicle)
Solid, stationary, unpainted metallic point away from the exclu -
sive jump starting terminal and any moving parts as shown in th e
illustration
5 Start the engine of the sec-
ond vehicle. Increase the
engine speed slightly and
maintain at that level for
approximately 5 minutes to
recharge the 12-volt battery
of your vehicle.
6 Vehicles without smart key
system: Maintain the engine
speed of the second vehicle
and start the hybrid system of
your vehicle.
Vehicles with smart key sys-
tem: Maintain the engine
speed of the second vehicle
and start the hybrid system of your vehicle by turning the
power switch to ON.
7 Make sure the “READY” indi-
cator comes on. If the indica-
tor light does not come on,
contact your Toyota dealer.
8 Once the hybrid system has
started, remove the jumper
cables in the exact reverse
order from which they were
connected.
9 Close the exclusive jump
starting terminal cover, and
reinstall the fuse box cover to
its original position.
Once the hybrid system starts,
D
A
B
C
D
Page 489 of 586
4877-2. Steps to take in an emergency
7
When trouble arises
have the vehicle inspected at
your Toyota dealer as soon as
possible.
■Starting the hybrid system
when the 12-volt battery is dis-
charged
The hybrid system cannot be
started by push-starting.
■To prevent 12-vol t battery dis-
charge
●Turn off the headlights and the
audio system while the hybrid sys-
tem is off.
●Turn off any unnec essary electri-
cal components when the vehicle
is running at a low speed for an
extended period, such as in heavy
traffic.
■When the 12-volt battery is
removed or discharged
●Information stor ed in the ECU is
cleared. When the 12-volt battery
is depleted, have the vehicle
inspected at your Toyota dealer.
●Some systems may require initial-
ization. ( P.531)
■When removing the 12-volt bat-
tery terminals
When the 12-volt battery terminals
are removed, the information stored
in the ECU is cleared. Before
removing the 12-volt battery termi-
nals, contact your Toyota dealer.
■Charging the 1 2-volt battery
The electricity stor ed in the 12-volt
battery will discharge gradually even
when the vehicle is not in use, due
to natural discharge and the drain-
ing effects of certa in electrical appli-
ances. If the vehicle is left for a long
time, the 12-volt battery may dis-
charge, and the hybrid system may
be unable to start. (The 12-volt bat-
tery recharges aut omatically while
the hybrid system is operating.)
■When recharging or replacing
the 12-volt battery (vehicles
without smart key system)
The hybrid system may not start on
the first attempt after the 12-volt bat-
tery has recharged but will start nor-
mally after the second attempt. This
is not a malfunction.
■When recharging or replacing
the 12-volt battery (vehicles
with smart key system)
●In some cases, it may not be pos-
sible to unlock the doors using the
smart key system when the 12-
volt battery is discharged. Use the
wireless remote c ontrol or the
mechanical key to lock or unlock
the doors.
●The hybrid syste m may not start
on the first attempt after the 12-
volt battery has recharged but will
start normally after the second
attempt. This is n ot a malfunction.
●The power switch mode is memo-
rized by the vehicle. When the 12-
volt battery is reconnected, the
system will return to the mode it
was in before the 12-volt battery
was discharged. Before discon-
necting the 12-volt battery, turn
the power switch to OFF.
If you are unsure what mode the
power switch was in before the
12-volt battery discharged, be
especially careful when recon-
necting the 12-volt battery.
■When replacing t he 12-volt bat-
tery
●Use a 12-volt battery that con-
forms to European regulations.
Type A:
Use a battery that the case size is
same as the previous one (LN1), 20
hours rate capacity (20HR) is equiv-
alent (45Ah) or greater, and perfor-
mance rating (CCA) is equivalent
(285A) or greater.
Type B:
Page 490 of 586
4887-2. Steps to take in an emergency
Use a battery that the case size is
same as the previous one (LN1), 20
hours rate capacity (20HR) is equiv-
alent (45Ah) or greater, and perfor-
mance rating (CCA) is equivalent
(286A) or greater.
Type C:
Use a battery that the case size is
same as the previous one (LN2), 20
hours rate capacity (20HR) is equiv-
alent (55Ah) or greater, and perfor-
mance rating (CCA) is equivalent
(345A) or greater.
• If the sizes differ, the 12-volt bat-
tery cannot be properly secured.
• If the 20 hour rate capacity is low,
even if the time period where the
vehicle is not used is a short time,
the 12-volt battery may discharge
and hybrid system may not be
able to start.
●Use a ventilation t ype calcium bat-
tery
●Use a 12-volt battery with a han-
dle. If a 12-volt b attery without a
handle is used, removal is more
difficult.
●When removing the 12-volt bat-
tery: P.408
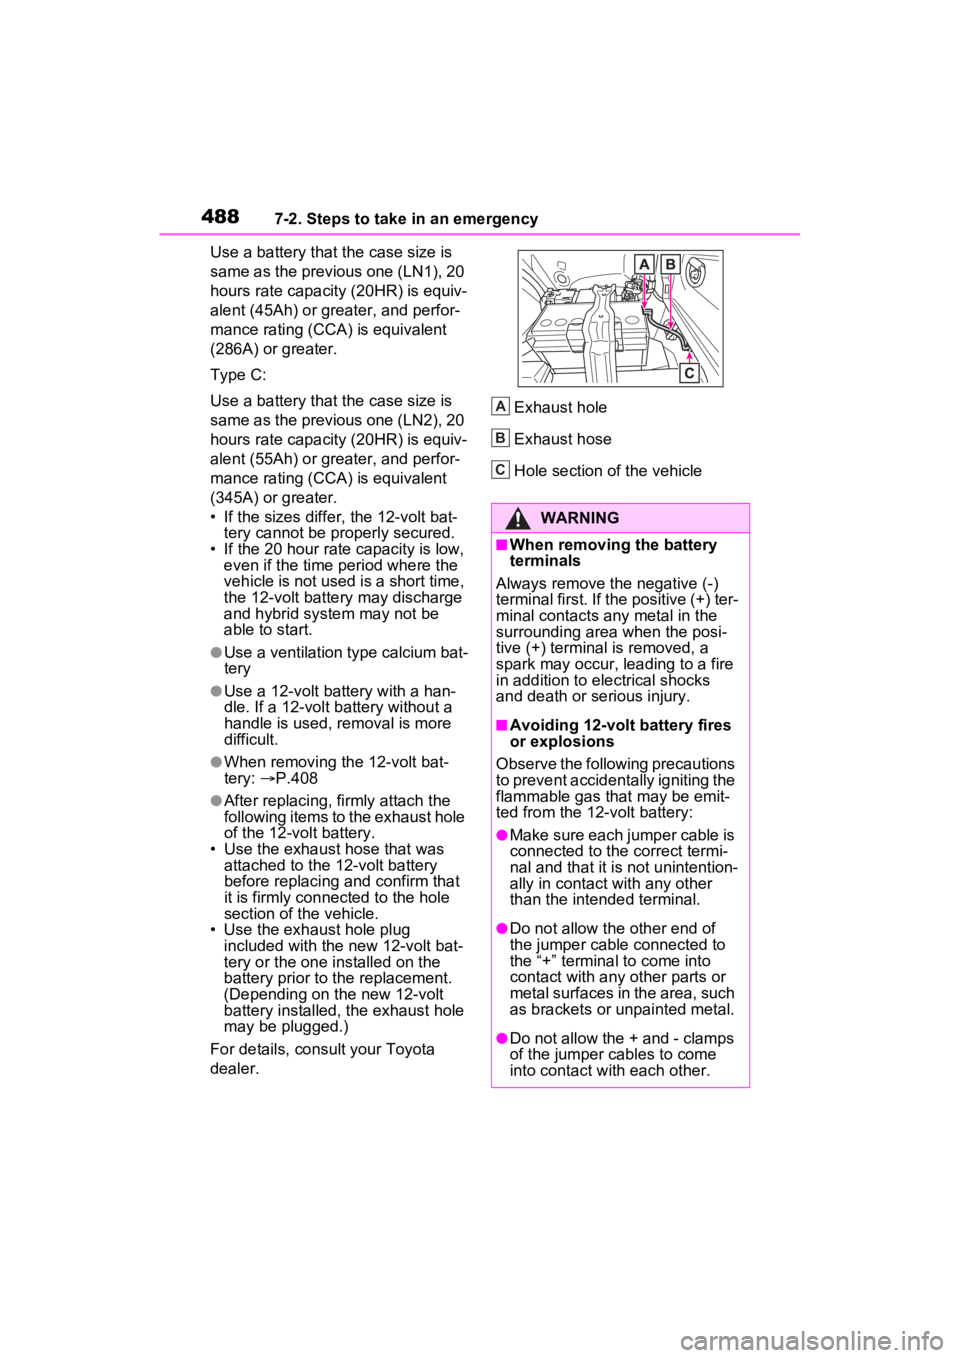
●After replacing, firmly attach the
following items to the exhaust hole
of the 12-volt battery.
• Use the exhaust hose that was attached to the 12-volt battery
before replacing an d confirm that
it is firmly connected to the hole
section of t he vehicle.
• Use the exhaust hole plug included with the new 12-volt bat-
tery or the one installed on the
battery prior to t he replacement.
(Depending on the new 12-volt
battery installed, the exhaust hole
may be plugged.)
For details, consult your Toyota
dealer. Exhaust hole
Exhaust hose
Hole section of the vehicle
WARNING
■When removing the battery
terminals
Always remove the negative (-)
terminal first. If the positive (+) ter-
minal contacts any metal in the
surrounding area when the posi-
tive (+) terminal is removed, a
spark may occur, leading to a fire
in addition to ele ctrical shocks
and death or serious injury.
■Avoiding 12-volt battery fires
or explosions
Observe the following precautions
to prevent accidentally igniting the
flammable gas that may be emit-
ted from the 12-volt battery:
●Make sure each jumper cable is
connected to the correct termi-
nal and that it is not unintention-
ally in contact with any other
than the intended terminal.
●Do not allow the other end of
the jumper cable connected to
the “+” terminal to come into
contact with any other parts or
metal surfaces in the area, such
as brackets or unpainted metal.
●Do not allow the + and - clamps
of the jumper cables to come
into contact with each other.
A
B
C