puncture repair TOYOTA RAV4 PHEV 2021 Owners Manual
[x] Cancel search | Manufacturer: TOYOTA, Model Year: 2021, Model line: RAV4 PHEV, Model: TOYOTA RAV4 PHEV 2021Pages: 666, PDF Size: 161.28 MB
Page 310 of 666
3085-1. Before driving
■Tire information
●Increase the tire inflation pressure to
20.0 kPa (0.2 kgf/cm2 or bar, 3 psi) greater than the recommended value
when towing. ( →P.624)
●Increase the air pressure of the trailer
tires in accordance with the total
trailer weight and according to the val - ues recommended by the manufac -
turer of your trailer.
■Safety checks before towing
●Check that the maximum load limit for
the towing hitch/bracket and hitch ball
is not exceeded. Bear in mind that the coupling weight of the trailer will add
to the load exerted on the vehicle.
Also make sure tha t the total load exerted on the vehi cle is within the
range of the weight limits. ( →P.309)
●Ensure that the trailer load is secure.
●Supplementary outside rear view mir- rors should be added to the vehicle if
the traffic behind c annot be clearly
seen with standard mirrors. Adjust the extending arms of these mirrors on
both sides of the vehicle so that they
always provide maxi mum visibility of the road behind.
Trailer towing
Your vehicle is designed pri -
marily as a passenger carry -
ing vehicle. Towing a trailer
will have an adverse effect on
handling, performance, brak -
ing, durability, and fuel con -
sumption. Your safety and
satisfaction depend on the
proper use of correct equip -
ment and cautious driving hab -
its. For your safety and the
safety of others, do not over -
load the vehicle or trailer.
To tow a trailer safely, use
extreme care and drive the
vehicle in accordance with the
trailer’s characteristics and
operating conditions.
Toyota warranties do not apply
to damage or malfunction
caused by towing a trailer for
commercial purposes.
Ask your local authorized
Toyota retailer or Toyota
authorized repairer, or any reli -
able repairer for further details
before towing, as there are
additional legal requirements
in some countries.
WARNING
Follow all the instructions described in
this section.
Failure to do so could cause an acci - dent resulting in death or serious
injury.
■Trailer towing precautions
When towing, make sure that none of
the weight limits are exceeded.
( →P.309)
■To avoid accident or injury
●Vehicles with compact spare tire: Do not tow a trailer when the com -
pact spare tire is installed on your
vehicle.
●Vehicles with emergency tire punc -
ture repair kit: Do not tow a traile r when the tire
installed is repa ired with the emer-
gency tire puncture repair kit.
Page 359 of 666
357
5
5-5. Using the driving support systems
Driving
■Enabling/disabling the pre-col -
lision system
The pre-collisio n system can be
enabled/disabled on the screen
( →P.186) of the multi-information
display.
The system is automa tically enabled
each time the power switch is turned to
ON.
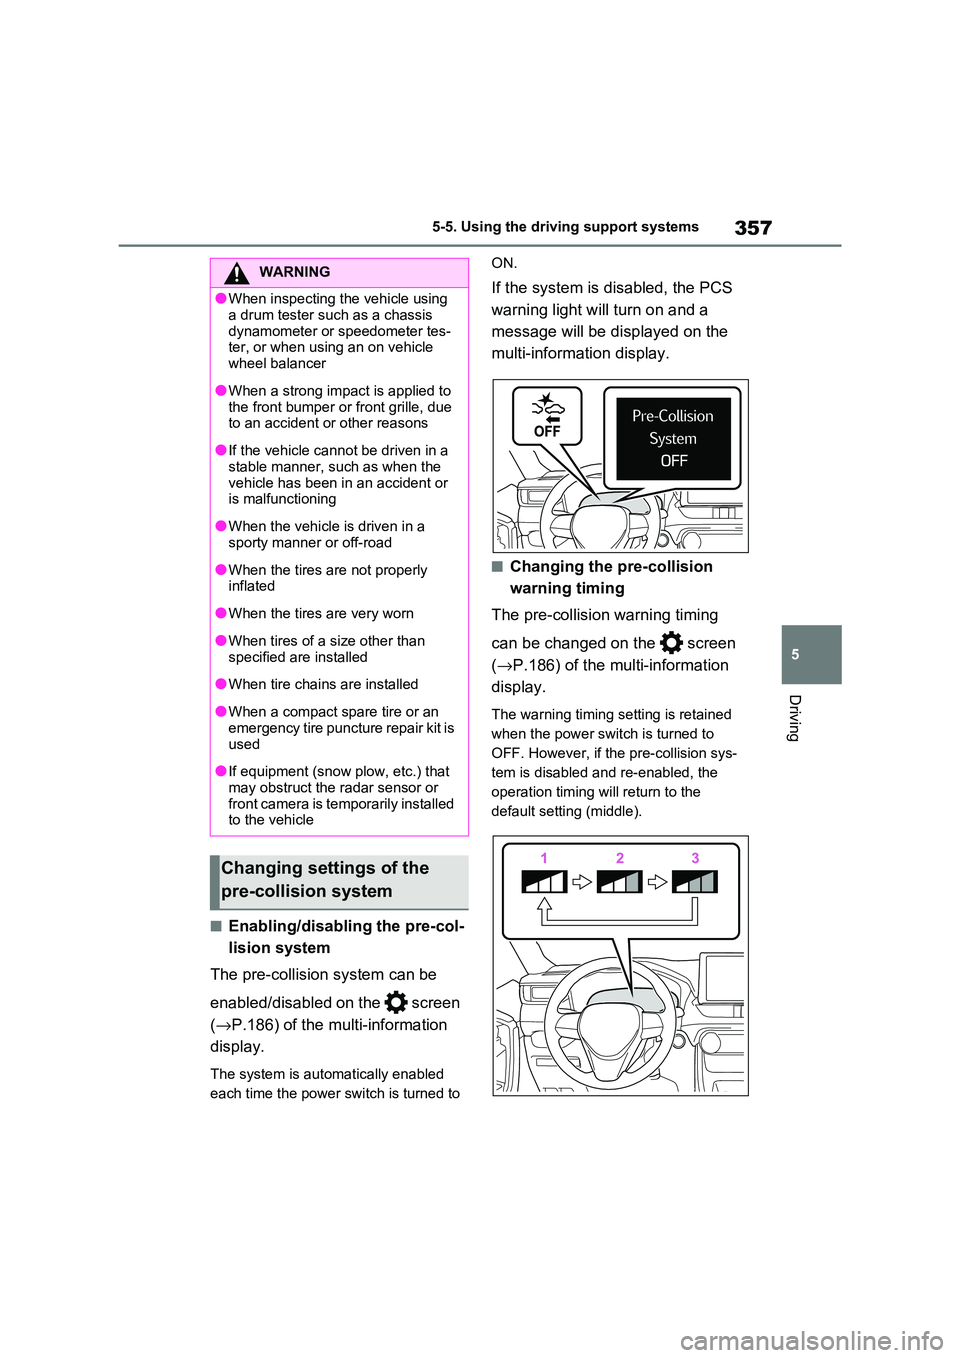
If the system is disabled, the PCS
warning light will turn on and a
message will be di splayed on the
multi-information display.
■Changing the pre-collision
warning timing
The pre-collision warning timing
can be changed on the screen
( →P.186) of the multi-information
display.
The warning timing setting is retained
when the power switch is turned to
OFF. However, if the pre-collision sys-
tem is disabled and re-enabled, the
operation timing will return to the
default setting (middle).
WARNING
●When inspecting the vehicle using
a drum tester su ch as a chassis
dynamometer or speedometer tes- ter, or when using an on vehicle
wheel balancer
●When a strong impact is applied to
the front bumper or front grille, due
to an accident or other reasons
●If the vehicle cannot be driven in a
stable manner, such as when the
vehicle has been in an accident or is malfunctioning
●When the vehicle is driven in a sporty manner or off-road
●When the tires are not properly inflated
●When the tires are very worn
●When tires of a size other than
specified are installed
●When tire chains are installed
●When a compact spare tire or an
emergency tire puncture repair kit is
used
●If equipment (snow p low, etc.) that
may obstruct the radar sensor or front camera is tem porarily installed
to the vehicle
Changing settings of the
pre-collision system
Page 512 of 666
5107-3. Do-it-yourself maintenance
molded into the sidewall of each tire.
Replace the tires if the treadwear indi -
cators are showing on a tire.
■When to replace your vehicle’s
tires
Tires should be replaced if:
●The treadwear indicators are showing on a tire.
●You have tire damage such as cuts, splits, cracks deep enough to expose
the fabric, and bulges indicating inter -
nal damage.
●A tire goes flat repeatedly or cannot
be properly repaired due to the size or location of a cut or other damage.
If you are not sure, consult with any
authorized Toyota retailer or Toyota authorized repairer, or any reliable
repairer.
■Tire life
Any tire over 6 y ears old must be checked by a qualified technician even if
it has seldom or never been used or
damage is not obvious.
■If the tread on snow tires wears down below 4 mm (0.16 in.)
The effectiveness of t he tires as snow
tires is lost.
Rotate the tires in the order shown.
To equalize tire wear and help extend
tire life, Toyota re commends that tire
rotation is carried out approximately
WARNING
■When inspecting or replacing tires
Observe the following precautions to
prevent accidents. Failure to do so may cause damage
to parts of the driv e train as well as
dangerous handling c haracteristics, which may lead to an accident result -
ing in death or serious injury.
●Do not mix tires of different makes, models or tread patterns.
Also, do not mix tires of remarkably
different treadwear.
●Do not use tire sizes other than those recommended by Toyota.
●Do not mix differently constructed tires (radial, bias-belted or bias-ply
tires).
●Do not mix summer, all season and
snow tires.
●Do not use tires that have been
used on another vehicle.
Do not use tires if you do not know how they were used previously.
●Vehicles with compact spare tire: Do not tow if your vehicle has a
compact spare tire installed.
●Vehicles with emergency tire punc -
ture repair kit: Do not tow anything
if a tire that has been repaired using the emergency tire puncture repair
kit is installed. The load on the tire
may cause unexpec ted damage to the tire.
NOTICE
■Driving on rough roads
Take particular care when driving on
roads with loose sur faces or potholes. These conditions may cause losses in
tire inflation pressure, reducing the
cushioning ability of the tires. In addi - tion, driving on rough roads may
cause damage to the tires them -
selves, as well as the vehicle’s wheels and body.
■If tire inflation pressure of each tire becomes low while driving
Do not continue drivi ng, or your tires
and/or wheels may be ruined.
Tire rotation
Page 578 of 666
5768-2. Steps to take in an emergency
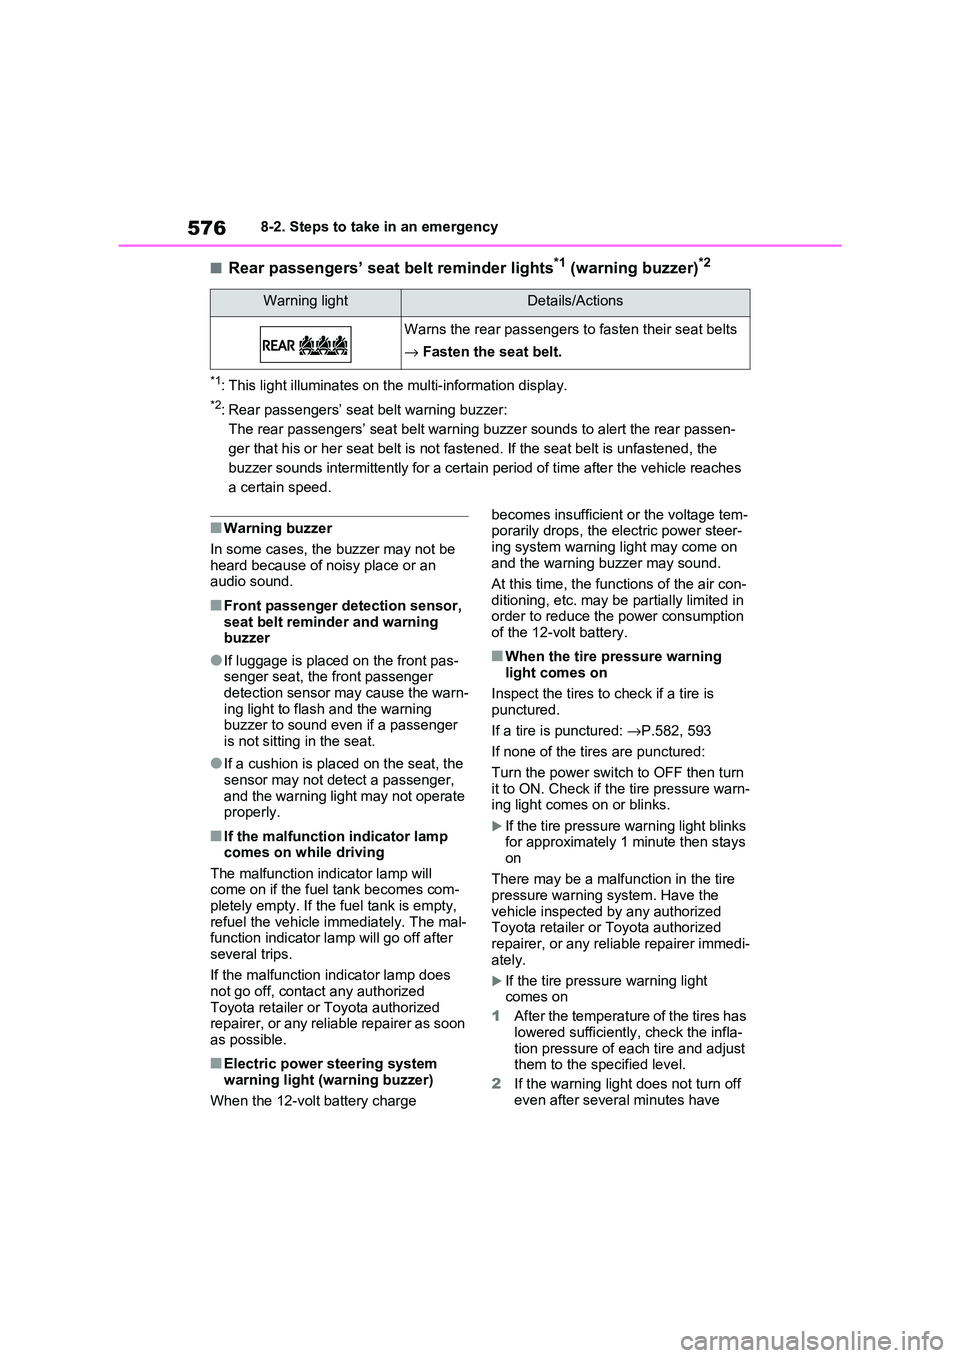
■Rear passengers’ seat belt reminder lights*1 (warning buzzer)*2
*1: This light illuminates on the multi-information display.
*2: Rear passengers’ seat belt warning buzzer:
The rear passengers’ seat belt warning buzzer sounds to alert the rear passen-
ger that his or her seat belt is not fastened. If the seat belt is unfastened, the
buzzer sounds intermittently for a certain period of time after the vehicle reaches
a certain speed.
■Warning buzzer
In some cases, the b uzzer may not be heard because of noisy place or an
audio sound.
■Front passenger detection sensor,
seat belt reminder and warning buzzer
●If luggage is place d on the front pas-
senger seat, the front passenger detection sensor may cause the warn -
ing light to flash and the warning
buzzer to sound even if a passenger is not sitting in the seat.
●If a cushion is place d on the seat, the sensor may not detect a passenger,
and the warning light may not operate
properly.
■If the malfunction indicator lamp comes on while driving
The malfunction indicator lamp will
come on if the fuel tank becomes com- pletely empty. If the fuel tank is empty,
refuel the vehicle i mmediately. The mal-
function indicator lamp will go off after several trips.
If the malfunction in dicator lamp does
not go off, contact any authorized Toyota retailer or Toyota authorized
repairer, or any reliable repairer as soon
as possible.
■Electric power steering system warning light (warning buzzer)
When the 12-volt battery charge
becomes insufficien t or the voltage tem-
porarily drops, the electric power steer -
ing system warning light may come on and the warning buzzer may sound.
At this time, the func tions of the air con-
ditioning, etc. may be partially limited in order to reduce the power consumption
of the 12-volt battery.
■When the tire pressure warning
light comes on
Inspect the tires to check if a tire is
punctured.
If a tire is punctured: →P.582, 593
If none of the tires are punctured:
Turn the power switch to OFF then turn
it to ON. Check if the tire pressure warn - ing light comes on or blinks.
If the tire pressure warning light blinks
for approximately 1 minute then stays
on
There may be a malfunction in the tire
pressure warning system. Have the
vehicle inspected by any authorized Toyota retailer or Toyota authorized
repairer, or any reliable repairer immedi -
ately.
If the tire pressure warning light
comes on
1 After the temperature of the tires has
lowered sufficiently, check the infla - tion pressure of each tire and adjust
them to the specified level.
2 If the warning light does not turn off
even after several minutes have
Warning lightDetails/Actions
Warns the rear passengers to fasten their seat belts
→ Fasten the seat belt.
Page 584 of 666
5828-2. Steps to take in an emergency
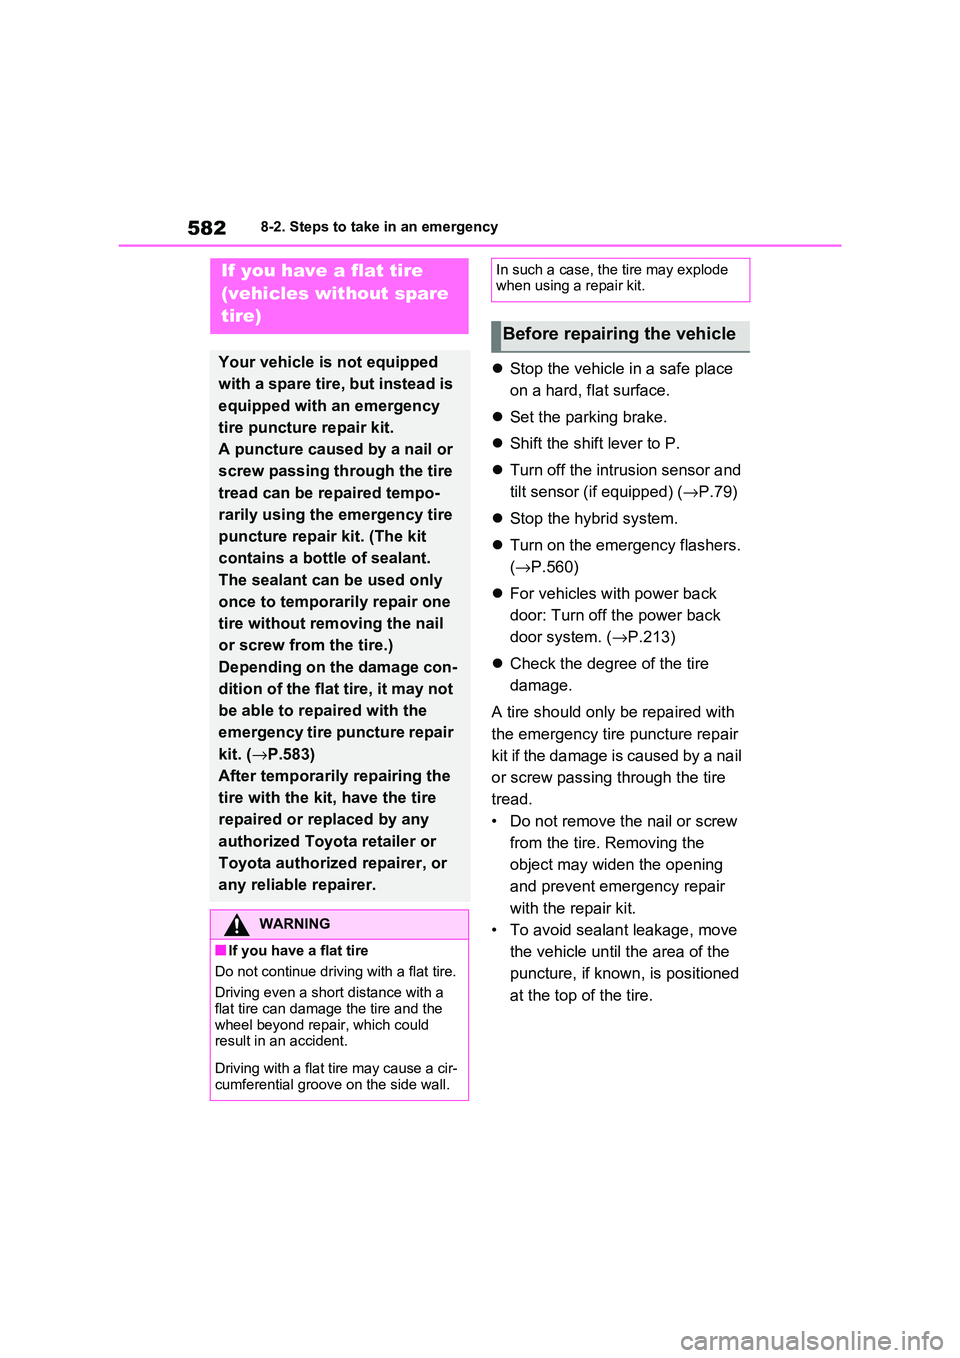
Stop the vehicle in a safe place
on a hard, flat surface.
Set the parking brake.
Shift the shift lever to P.
Turn off the intrusion sensor and
tilt sensor (if equipped) ( →P.79)
Stop the hybrid system.
Turn on the emergency flashers.
( →P.560)
For vehicles with power back
door: Turn off the power back
door system. ( →P.213)
Check the degree of the tire
damage.
A tire should only be repaired with
the emergency tire puncture repair
kit if the damage is caused by a nail
or screw passing through the tire
tread.
• Do not remove the nail or screw
from the tire. Removing the
object may widen the opening
and prevent emergency repair
with the repair kit.
• To avoid sealant leakage, move
the vehicle unt il the area of the
puncture, if known, is positioned
at the top of the tire.
If you have a flat tire
(vehicles without spare
tire)
Your vehicle is not equipped
with a spare tire, but instead is
equipped with an emergency
tire puncture repair kit.
A puncture caused by a nail or
screw passing through the tire
tread can be repaired tempo -
rarily using the emergency tire
puncture repair kit. (The kit
contains a bottle of sealant.
The sealant can be used only
once to temporarily repair one
tire without removing the nail
or screw from the tire.)
Depending on the damage con -
dition of the flat tire, it may not
be able to repaired with the
emergency tire puncture repair
kit. ( →P.583)
After temporarily repairing the
tire with the kit , have the tire
repaired or replaced by any
authorized Toyota retailer or
Toyota authorized repairer, or
any reliable repairer.
WARNING
■If you have a flat tire
Do not continue drivi ng with a flat tire.
Driving even a shor t distance with a
flat tire c an damage the tire and the
wheel beyond repair, which could result in an accident.
Driving with a flat tire may cause a cir - cumferential groove on the side wall.
In such a case, the tire may explode when using a repair kit.
Before repairing the vehicle
Page 585 of 666
583
8
8-2. Steps to take in an emergency
When trouble arises
■A flat tire that c annot be repaired with the emergency tire puncture
repair kit
In the following cases, the tire cannot be repaired with the emergency tire punc -
ture repair kit. Con tact any authorized
Toyota retailer or Toyota authorized
repairer, or any reliable repairer.
●When the tire is damaged due to driv -
ing without sufficient air pressure
●When the tire lost a ir pressure due to
a crack or damage in the tire sidewall
●Whe n t he t ir e is v is ibl y se par a ted fr o m
the wheel
●When the cut or damage to the tread
is 4 mm (0.16 in .) long or more
●When the wheel is damaged
●When two or more tires have been punctured
●When there is more than one hole or cut in the damaged tire
●When the sealant has expired
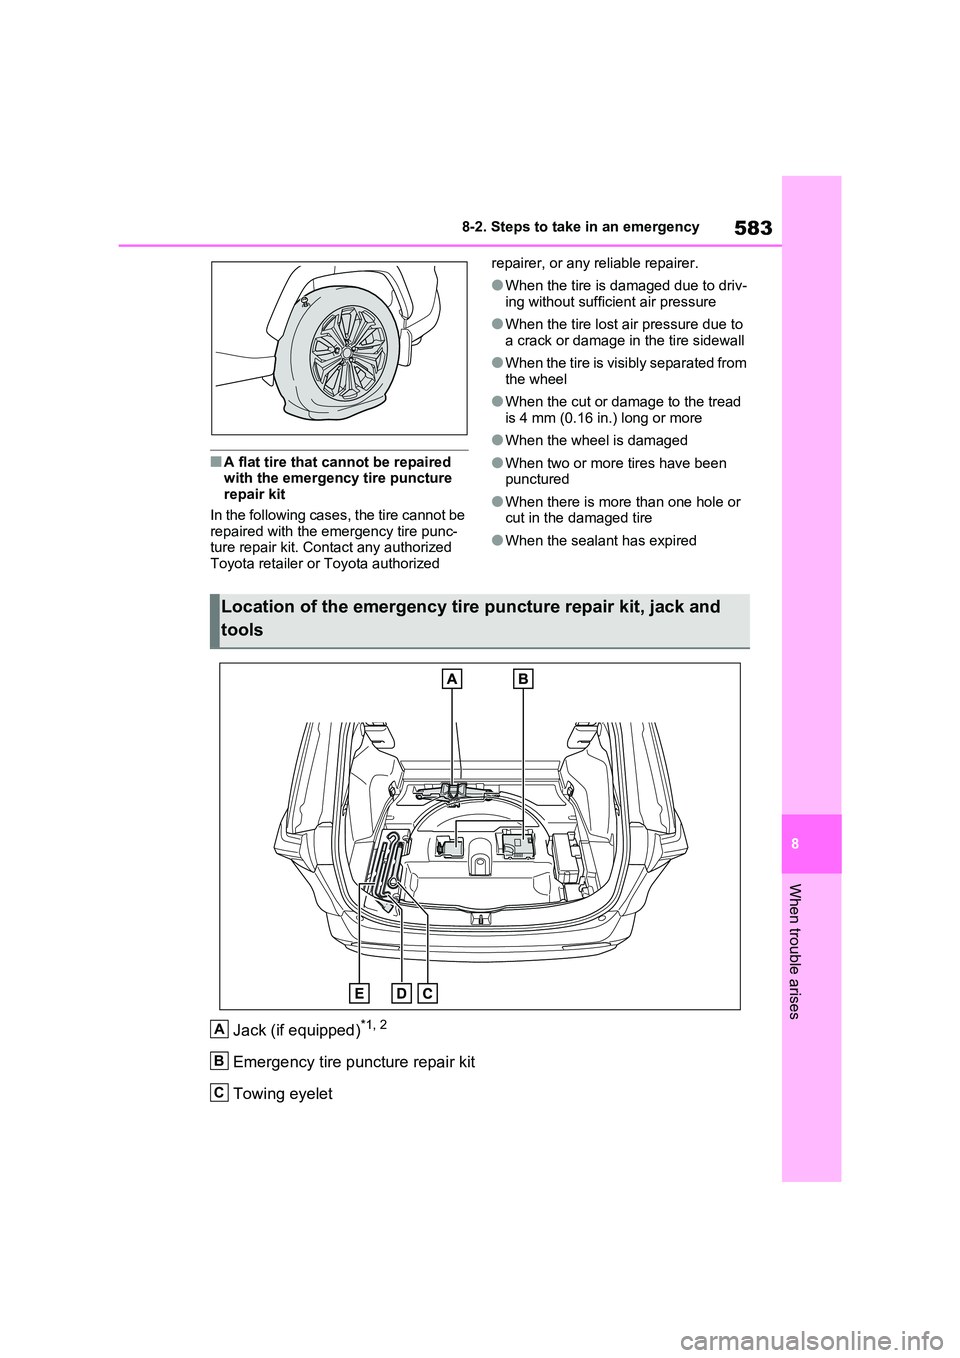
Jack (if equipped)*1, 2
Emergency tire puncture repair kit
Towing eyelet
Location of the emergency tire puncture repair kit, jack and
tools
A
B
C
Page 586 of 666
5848-2. Steps to take in an emergency
Jack handle (if equipped)
Wheel nut wrench (if equipped)
*1: Taking out the jack (→P.590)
*2: Use of the jack (→P.596)
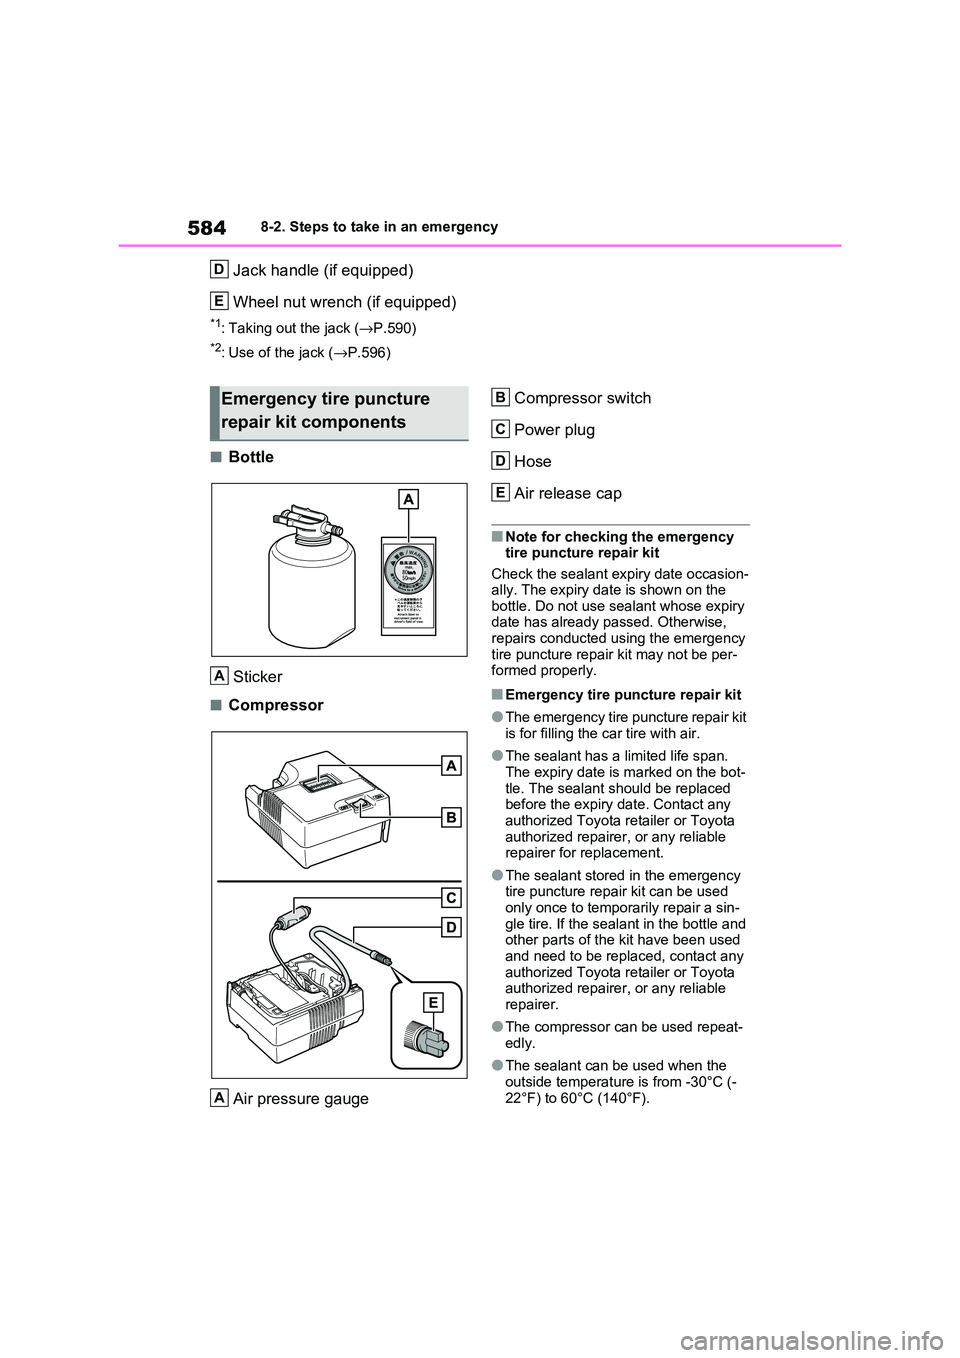
■Bottle
Sticker
■Compressor
Air pressure gauge
Compressor switch
Power plug
Hose
Air release cap
■Note for checking the emergency tire puncture repair kit
Check the sealant e xpiry date occasion-
ally. The expiry date is shown on the bottle. Do not use sealant whose expiry
date has already passed. Otherwise,
repairs conducted using the emergency tire puncture repair kit may not be per -
formed properly.
■Emergency tire puncture repair kit
●The emergency tire puncture repair kit
is for filling the car tire with air.
●The sealant has a limited life span.
The expiry date is marked on the bot-
tle. The sealant s hould be replaced before the expiry date. Contact any
authorized Toyota r etailer or Toyota
authorized repairer , or any reliable
repairer for replacement.
●The sealant stored in the emergency
tire puncture repair kit can be used only once to temporarily repair a sin -
gle tire. If the sealant in the bottle and
other parts of the kit have been used and need to be replaced, contact any
authorized Toyota r etailer or Toyota
authorized repairer , or any reliable repairer.
●The compressor ca n be used repeat- edly.
●The sealant can be used when the outside temperature is from -30°C (-
22°F) to 60°C (140°F).
D
E
Emergency tire puncture
repair kit components
A
A
B
C
D
E
Page 587 of 666
585
8
8-2. Steps to take in an emergency
When trouble arises
●The kit is exclusively designed for size
and type of tires originally installed on your vehicle. Do not use it for tires that
a different size than the original ones,
or for any other purposes.
●If the sealant gets on your clothes, it
may stain.
●If the sealant adheres to a wheel or
the surface of the vehicle body, the stain may not be remo vable if it is not
cleaned at once. Immediately wipe
away the sealant with a wet cloth.
●During operation of the repair kit, a
loud operation noise is produced. This does not indicate a malfunction.
●Do not use to check or to adjust the tire pressure.
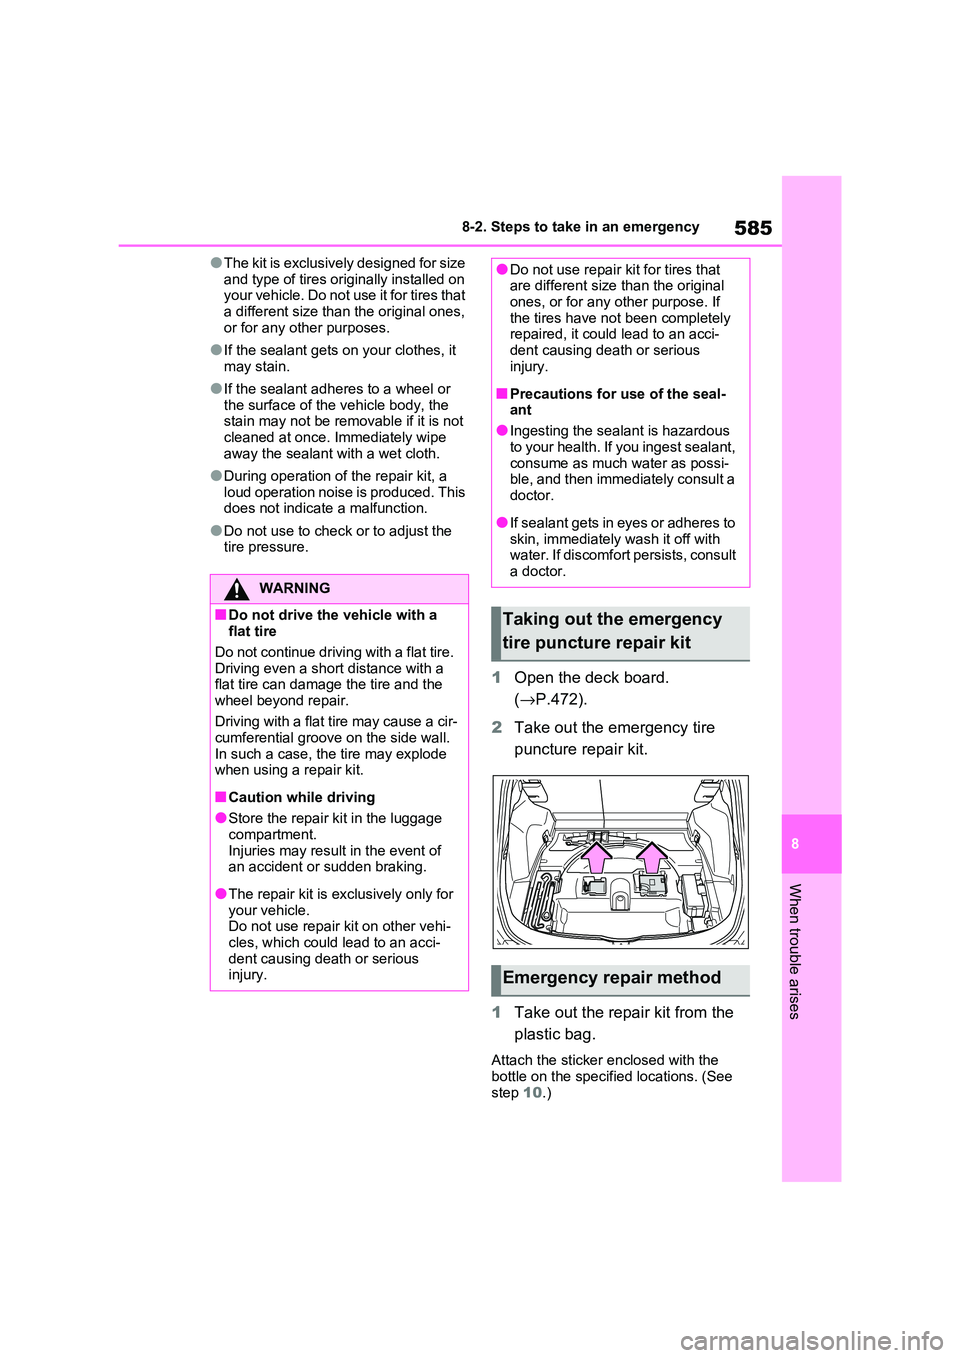
1 Open the deck board.
( →P.472).
2 Take out the emergency tire
puncture repair kit.
1 Take out the repair kit from the
plastic bag.
Attach the sticker enclosed with the
bottle on the specified locations. (See step 10.)
WARNING
■Do not drive the vehicle with a
flat tire
Do not continue driving with a flat tire. Driving even a shor t distance with a
flat tire c an damage the tire and the
wheel beyond repair.
Driving with a flat tire may cause a cir -
cumferential groove on the side wall.
In such a case, the tire may explode when using a repair kit.
■Caution while driving
●Store the repair k it in the luggage
compartment.
Injuries may result in the event of an accident or sudden braking.
●The repair kit is e xclusively only for your vehicle.
Do not use repair kit on other vehi -
cles, which could lead to an acci - dent causing death or serious
injury.
●Do not use repair kit for tires that are different size than the original
ones, or for any other purpose. If
the tires have not been completely repaired, it could lead to an acci -
dent causing death or serious
injury.
■Precautions for use of the seal -
ant
●Ingesting the seal ant is hazardous
to your health. If you ingest sealant,
consume as much water as possi - ble, and then immediately consult a
doctor.
●If sealant gets in eyes or adheres to
skin, immediately wash it off with
water. If discomfort persists, consult a doctor.
Taking out the emergency
tire puncture repair kit
Emergency repair method
Page 589 of 666
587
8
8-2. Steps to take in an emergency
When trouble arises
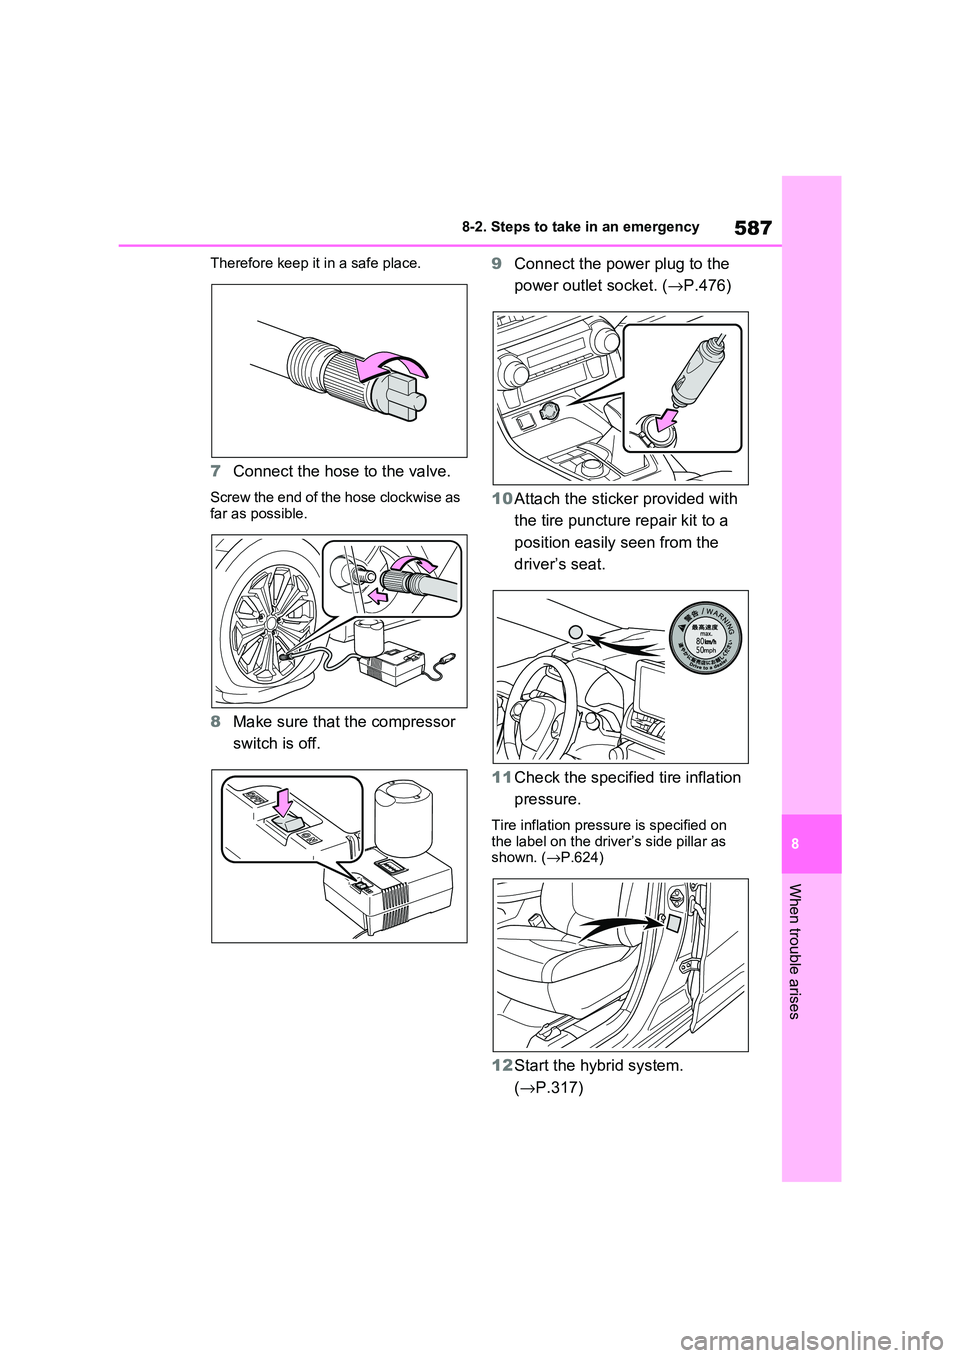
Therefore keep it in a safe place.
7 Connect the hose to the valve.
Screw the end of the hose clockwise as
far as possible.
8 Make sure that the compressor
switch is off.
9 Connect the power plug to the
power outlet socket. ( →P.476)
10 Attach the sticker provided with
the tire puncture repair kit to a
position easily seen from the
driver’s seat.
11 Check the specified tire inflation
pressure.
Tire inflation pressu re is specified on
the label on the driv er’s side pillar as
shown. ( →P.624)
12Start the hybrid system.
( →P.317)
Page 591 of 666
589
8
8-2. Steps to take in an emergency
When trouble arises
may get dirty.
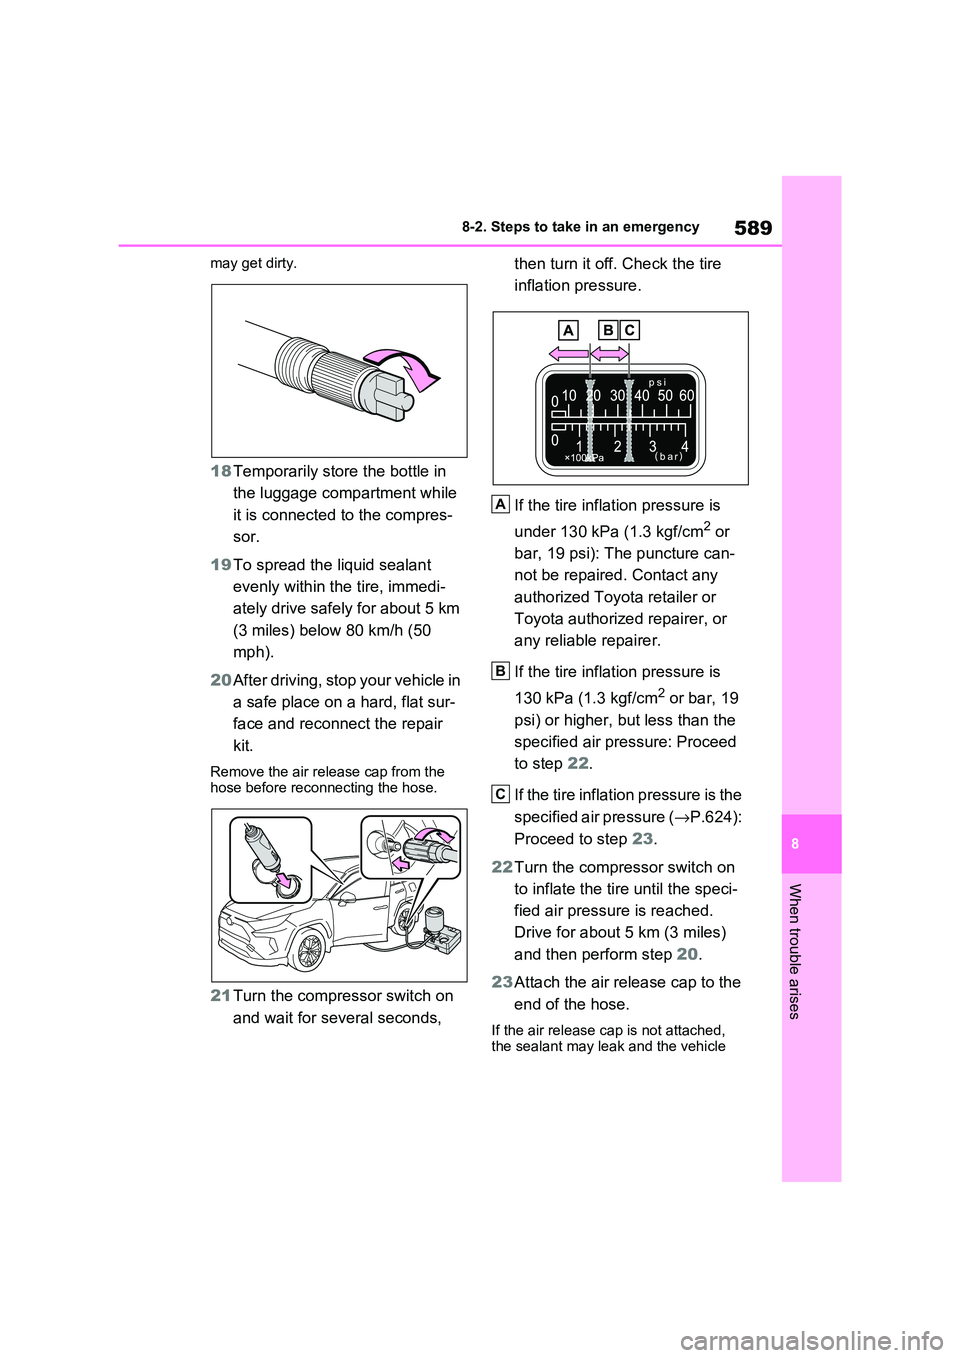
18 Temporarily store the bottle in
the luggage compartment while
it is connected to the compres -
sor.
19 To spread the liquid sealant
evenly within the tire, immedi -
ately drive safely for about 5 km
(3 miles) below 80 km/h (50
mph).
20 After driving, stop your vehicle in
a safe place on a hard, flat sur-
face and reconnect the repair
kit.
Remove the air rel ease cap from the hose before reconnecting the hose.
21 Turn the compressor switch on
and wait for several seconds,
then turn it off. Check the tire
inflation pressure.
If the tire infla tion pressure is
under 130 kPa (1.3 kgf/cm2 or
bar, 19 psi): The puncture can -
not be repaired . Contact any
authorized Toyota retailer or
Toyota authorized repairer, or
any reliable repairer.
If the tire infla tion pressure is
130 kPa (1.3 kgf/cm2 or bar, 19
psi) or higher, but less than the
specified air pr essure: Proceed
to step 22.
If the tire inflation pressure is the
specified air pressure ( →P.624):
Proceed to step 23.
22 Turn the compressor switch on
to inflate the tire until the speci -
fied air pressure is reached.
Drive for about 5 km (3 miles)
and then perform step 20.
23 Attach the air release cap to the
end of the hose.
If the air release c ap is not attached,
the sealant may leak and the vehicle
A
B
C