tow TOYOTA SEQUOIA 2011 2.G User Guide
[x] Cancel search | Manufacturer: TOYOTA, Model Year: 2011, Model line: SEQUOIA, Model: TOYOTA SEQUOIA 2011 2.GPages: 688, PDF Size: 14.76 MB
Page 82 of 688
82
1-3. Adjustable components (seats, mirrors, steering wheel)
Steering wheel (power-adjustable type)
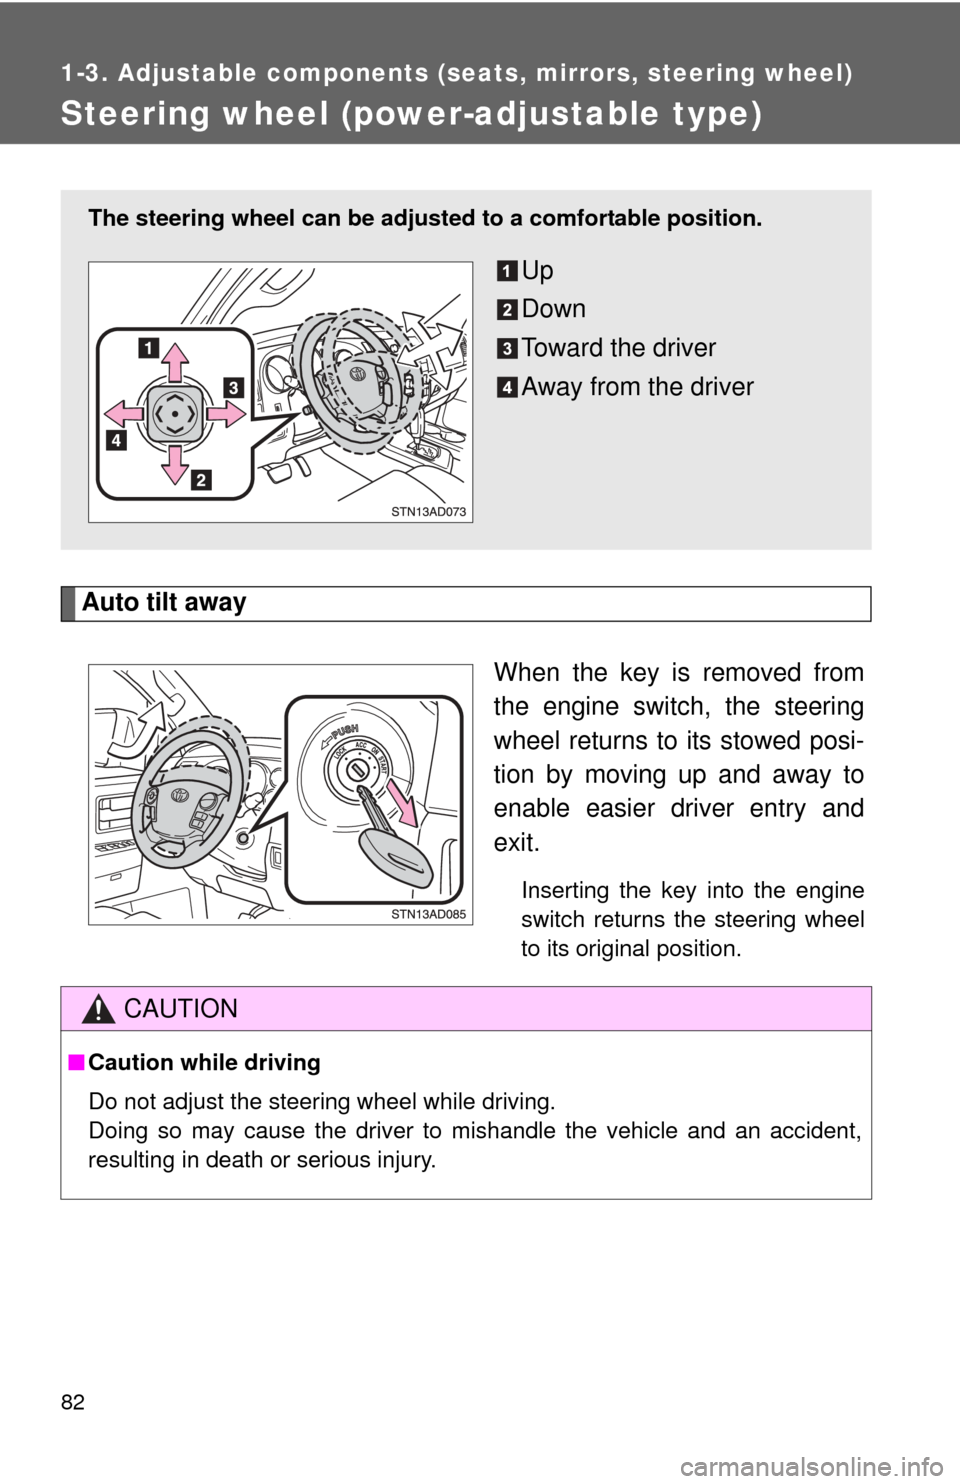
Auto tilt awayWhen the key is removed from
the engine switch, the steering
wheel returns to its stowed posi-
tion by moving up and away to
enable easier driver entry and
exit.
Inserting the key into the engine
switch returns the steering wheel
to its original position.
The steering wheel can be adjusted to a comfortable position.
Up
Down
Toward the driver
Away from the driver
CAUTION
■Caution while driving
Do not adjust the steering wheel while driving.
Doing so may cause the driver to mishandle the vehicle and an accident,
resulting in death or serious injury.
Page 86 of 688
86
1-3. Adjustable components (seats, mirrors, steering wheel)
Outside rear view mirrors
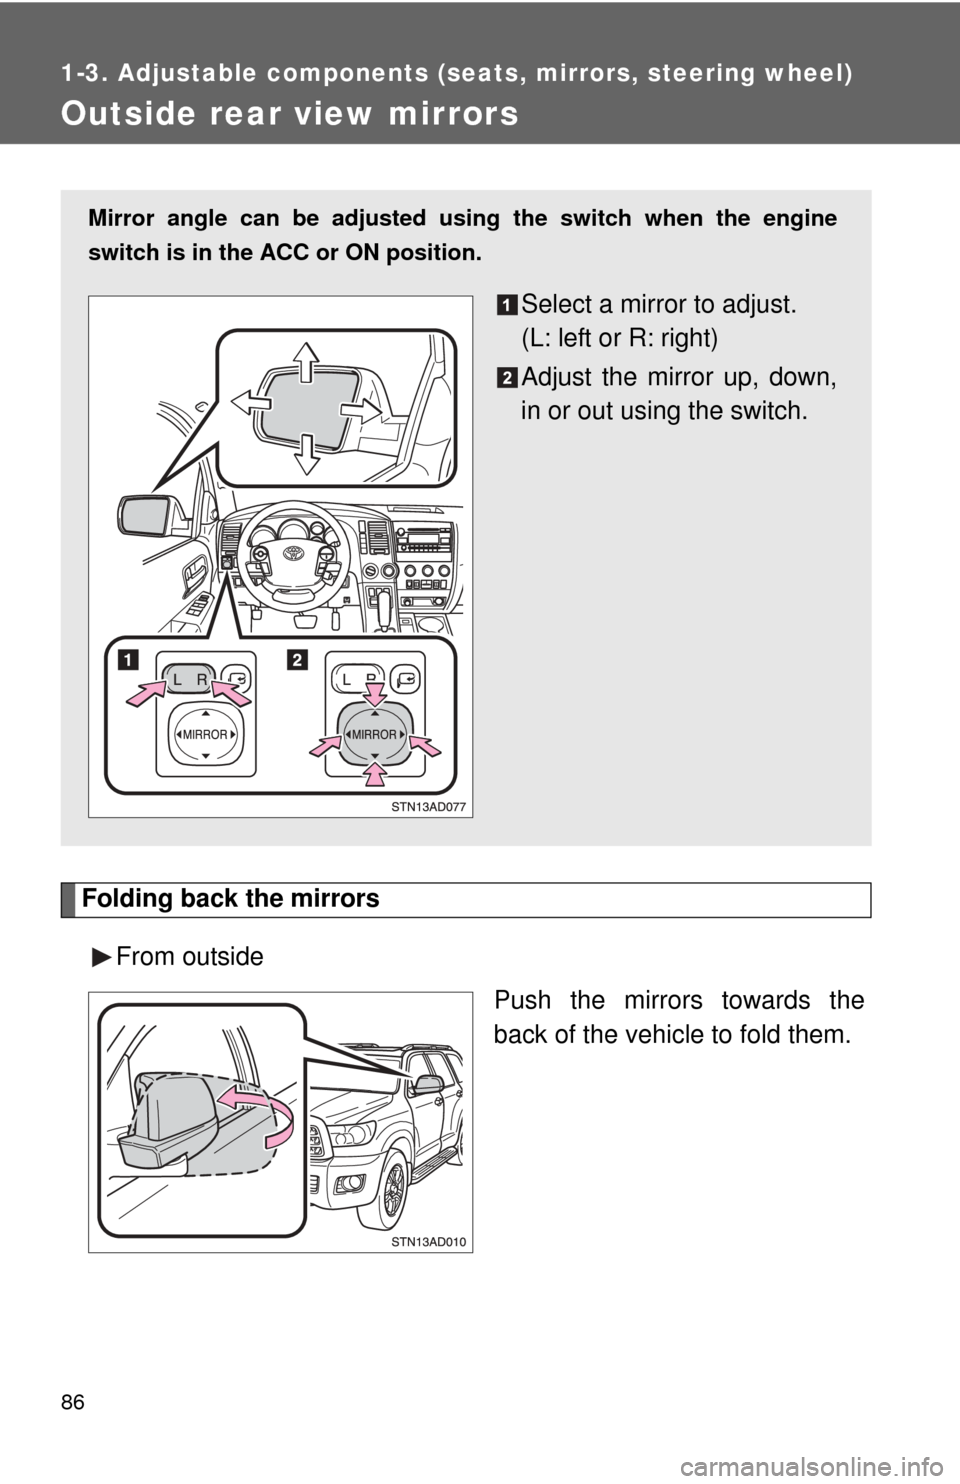
Folding back the mirrorsFrom outside Push the mirrors towards the
back of the vehicle to fold them.
Mirror angle can be adjusted using the switch when the engine
switch is in the ACC or ON position.
Select a mirror to adjust.
(L: left or R: right)
Adjust the mirror up, down,
in or out using the switch.
Page 118 of 688

118 1-7. Safety information
CAUTION
■SRS airbag precautions
Observe the following precautions regarding the airbags.
Failure to do so may cause death or serious injury.
●The driver and all passengers in the vehicle must wear their seat belts
properly.
The SRS airbags are supplemental devices to be used with the seat belts.
● The SRS driver airbag deploys with considerable force, and can cause
death or serious injury especially if the driver is very close to the airbag.
The National Highway Traffic Safety Administration (“NHTSA”) advises:
Since the risk zone for the driver’s airbag is the first 2 - 3 in. (50 - 75 mm)
of inflation, placing yourself 10 in. (250 mm) from your driver airbag pro-
vides you with a clear margin of safety. This distance is measured from the
center of the steering wheel to your breastbone. If you now sit less than 10
in. (250 mm) away, you can change your driving position in several ways:
• Move your seat to the rear as far as you can while still reaching the pedals comfortably.
• Slightly recline the back of the seat. Although vehicle designs vary, many drivers can achieve the 10 in.
(250 mm) distance, even with the driver seat all the way forward, sim-
ply by reclining the back of the seat somewhat. If reclining the back of
your seat makes it hard to see the road, raise yourself by using a firm,
non-slippery cushion, or raise the seat if your vehicle has that feature\
.
• If your steering wheel is adjustable, tilt it downward. This points the air- bag toward your chest instead of your head and neck.
The seat should be adjusted as recommended by NHTSA above, while still
maintaining control of the foot pedals and steering wheel, and your view of
the instrument panel controls.
Page 120 of 688
120 1-7. Safety information
CAUTION
■SRS airbag precautions
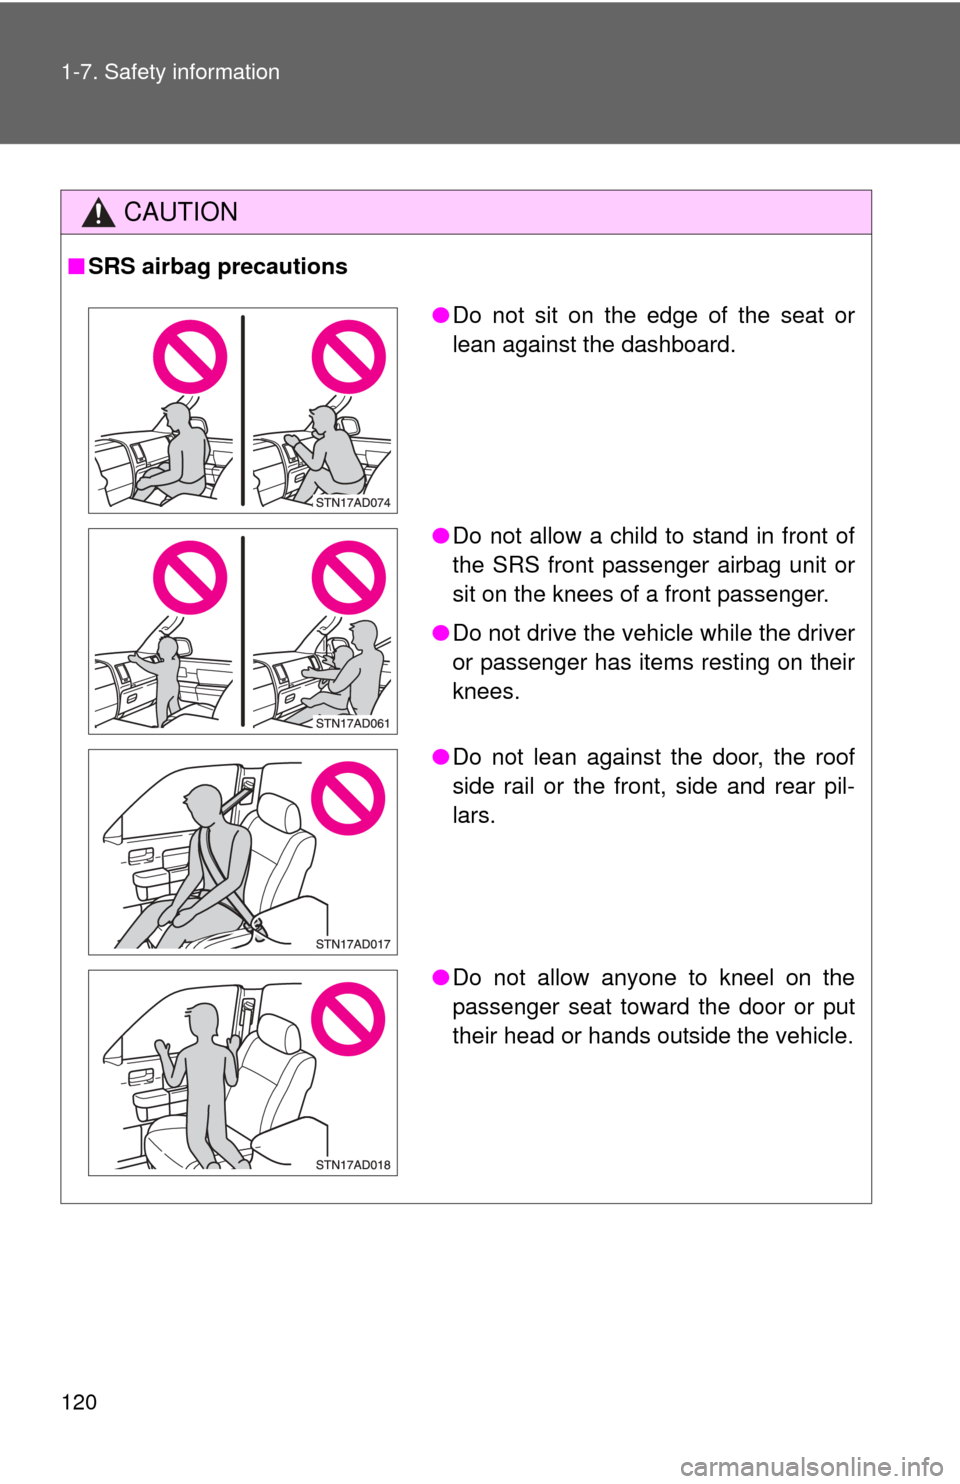
●Do not sit on the edge of the seat or
lean against the dashboard.
● Do not allow a child to stand in front of
the SRS front passenger airbag unit or
sit on the knees of a front passenger.
● Do not drive the vehicle while the driver
or passenger has items resting on their
knees.
● Do not lean against the door, the roof
side rail or the front, side and rear pil-
lars.
● Do not allow anyone to kneel on the
passenger seat toward the door or put
their head or hands outside the vehicle.
Page 147 of 688
When driving2
147
2-1. Driving proceduresDriving the vehicle............ 148
Engine (ignition) switch .... 157
Automatic transmission .... 160
Turn signal lever .............. 164
Parking brake ................... 165
Horn ................................. 166
2-2. Instrument cluster Gauges and meters ......... 167
Indicators and warninglights .............................. 172
Multi-information display............................ 177
Accessory meter .............. 183
2-3. Operating the lights and wipers
Headlight switch ............... 186
Fog light switch ................ 190
Windshield wipers and washer ........................... 191
Rear window wiper and washer ........................... 193
Headlight cleaner switch ............................. 194 2-4. Using other driving systems
Cruise control ................... 195
Dynamic laser cruisecontrol ............................ 198
Intuitive parking assist...... 209
Rear view monitor system ........................... 216
Electronically modulated air suspension ................ 223
AVS (Adaptive Variable Suspension System) ...... 228
Four-wheel drive system ........................... 229
AUTO LSD system........... 234
Driving assist systems ..... 236
2-5. Driving information Off-road precautions ........ 242
Cargo and luggage .......... 247
Vehicle load limits ............ 251
Winter driving tips ............ 253
Trailer towing ................... 257
Dinghy towing .................. 277
Page 149 of 688

149
2-1. Driving procedures
2
When driving
■
Driving in the rain
●Drive carefully when it is raining, because visibility will be reduced, the
windows may become fogged-up, and the road will be slippery.
● Drive carefully when it starts to rain, because the road surface will be
especially slippery.
● Refrain from high speeds when driving on an expressway in the rain,
because there may be a layer of water between the tires and the road
surface, preventing the steering and brakes from operating properly.
■ Breaking in your new Toyota
To extend the life of the vehicle, the following precautions are recommended
to observe:
●For the first 200 miles (300 km):
Avoid sudden stops.
● For the first 500 miles (800 km):
Do not tow a trailer.
● For the first 1000 miles (1600 km):
• Do not drive at extremely high speeds.
• Avoid sudden acceleration.
• Do not drive continuously in the low gears.
• Do not drive at a constant speed for extended periods.
■ Drum-in disc type parking brake system
Your vehicle has a drum-in-disc type parking brake system. This type of
brake system needs bedding-down of the brake shoes periodically or when-
ever the parking brake shoes and/or drum are replaced. Have your Toyota
dealer perform the bedding down.
■ Operating your vehicle in a foreign country
Comply with the relevant vehicle registration laws and confirm the availability
of the correct fuel. ( P. 626)
Page 162 of 688
162 2-1. Driving procedures
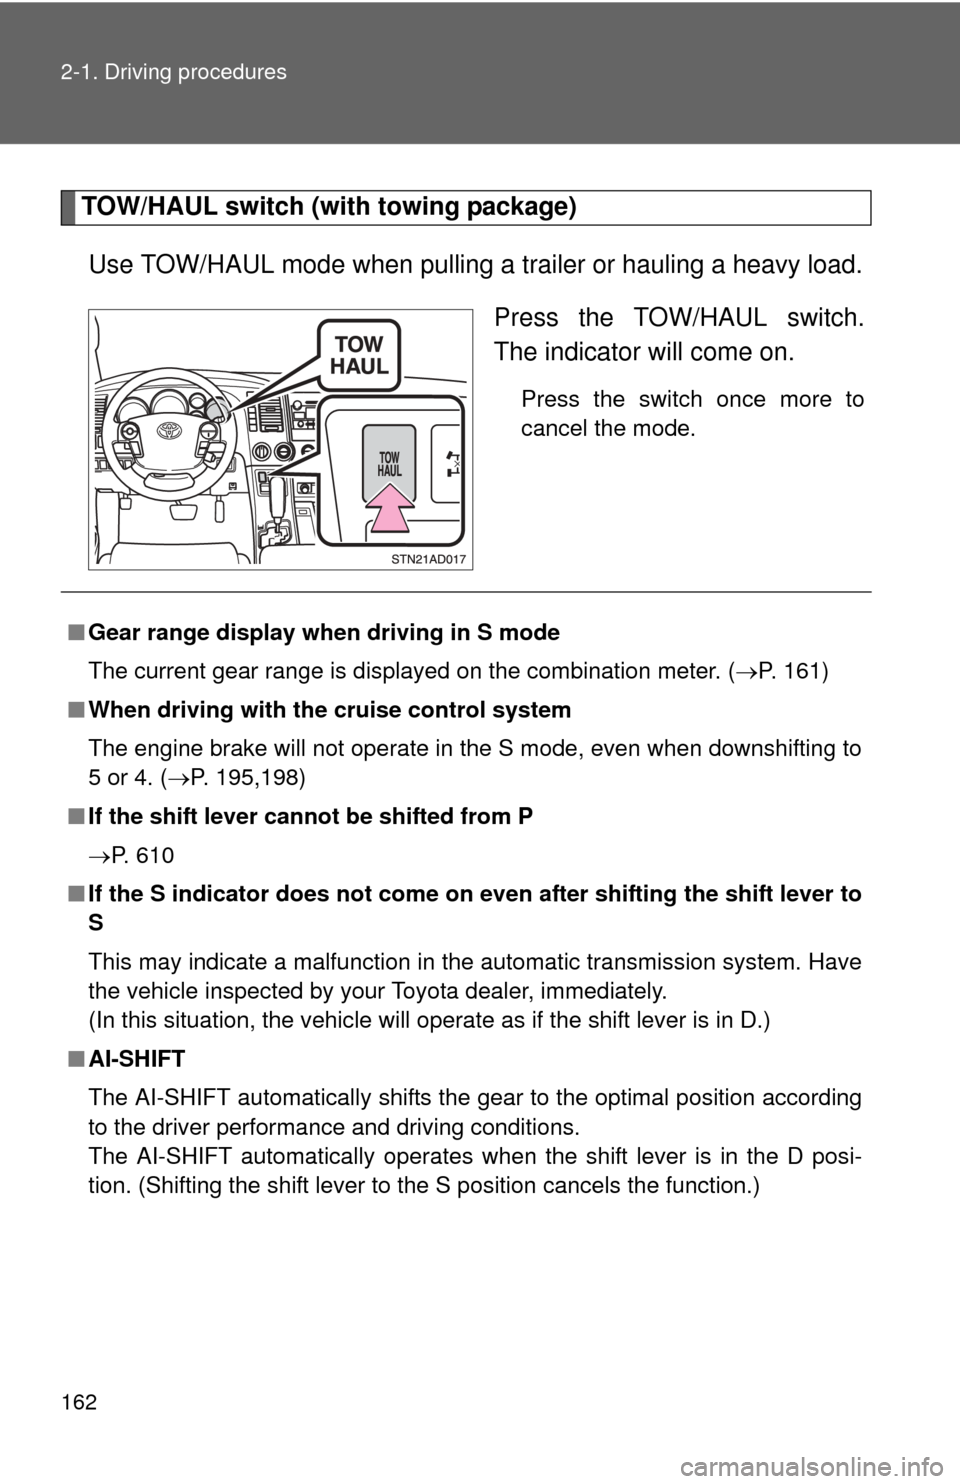
TOW/HAUL switch (with towing package)Use TOW/HAUL mode when pulling a trailer or hauling a heavy load. Press the TOW/HAUL switch.
The indicator will come on.
Press the switch once more to
cancel the mode.
■Gear range display when driving in S mode
The current gear range is displayed on the combination meter. ( P. 161)
■ When driving with the cruise control system
The engine brake will not operate in the S mode, even when downshifting to
5 or 4. ( P. 195,198)
■ If the shift lever cannot be shifted from P
P. 610
■ If the S indicator does not come on even after shifting the shift lever to
S
This may indicate a malfunction in the automatic transmission system. Have
the vehicle inspected by your Toyota dealer, immediately.
(In this situation, the vehicle will operate as if the shift lever is in D.)
■ AI-SHIFT
The AI-SHIFT automatically shifts the gear to the optimal position according
to the driver performance and driving conditions.
The AI-SHIFT automatically operates when the shift lever is in the D posi-
tion. (Shifting the shift lever to the S position cancels the function.)
Page 174 of 688
174 2-2. Instrument cluster
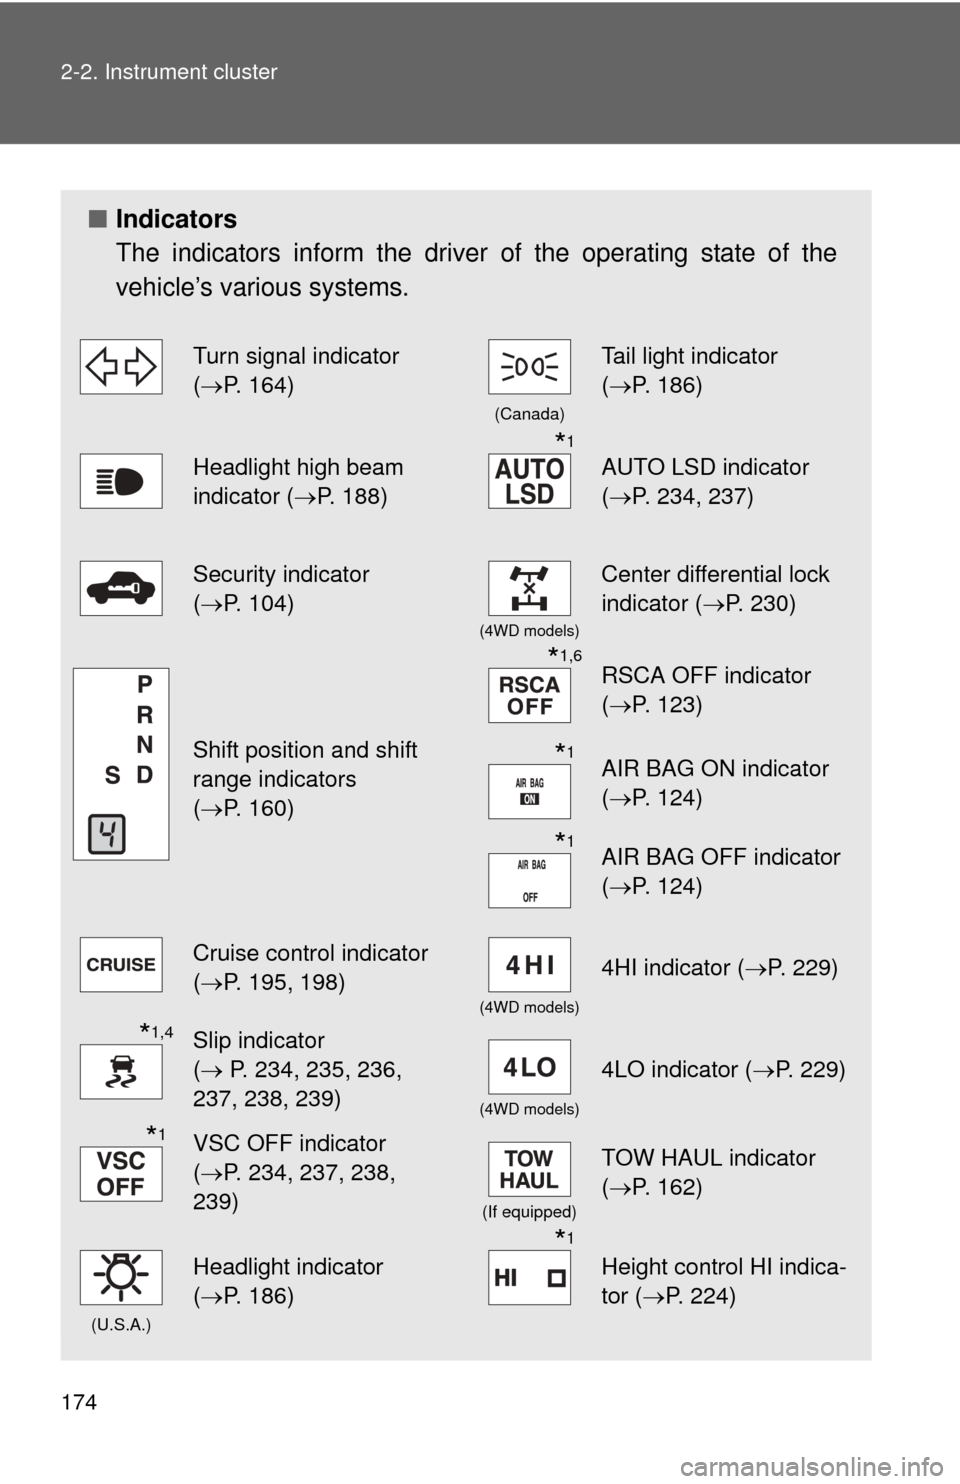
■Indicators
The indicators inform the driver of the operating state of the
vehicle’s various systems.
Turn signal indicator
(P. 164)
(Canada)
Tail light indicator
( P. 186)
Headlight high beam
indicator ( P. 188)*1
AUTO LSD indicator
(P. 234, 237)
Security indicator
(P. 104)
(4WD models)
Center differential lock
indicator ( P. 230)
Shift position and shift
range indicators
(P. 160)
*1,6RSCA OFF indicator
( P. 123)
*1AIR BAG ON indicator
(P. 124)
*1AIR BAG OFF indicator
(P. 124)
Cruise control indicator
(P. 195, 198)
(4WD models)
4HI indicator ( P. 229)
*1,4Slip indicator
( P. 234, 235, 236,
237, 238, 239)
(4WD models)
4LO indicator ( P. 229)
*1VSC OFF indicator
(P. 234, 237, 238,
239)
(If equipped)
TOW HAUL indicator
( P. 162)
(U.S.A.)
Headlight indicator
(P. 186)*1
Height control HI indica-
tor (P. 224)
Page 188 of 688
188 2-3. Operating the lights and wipers
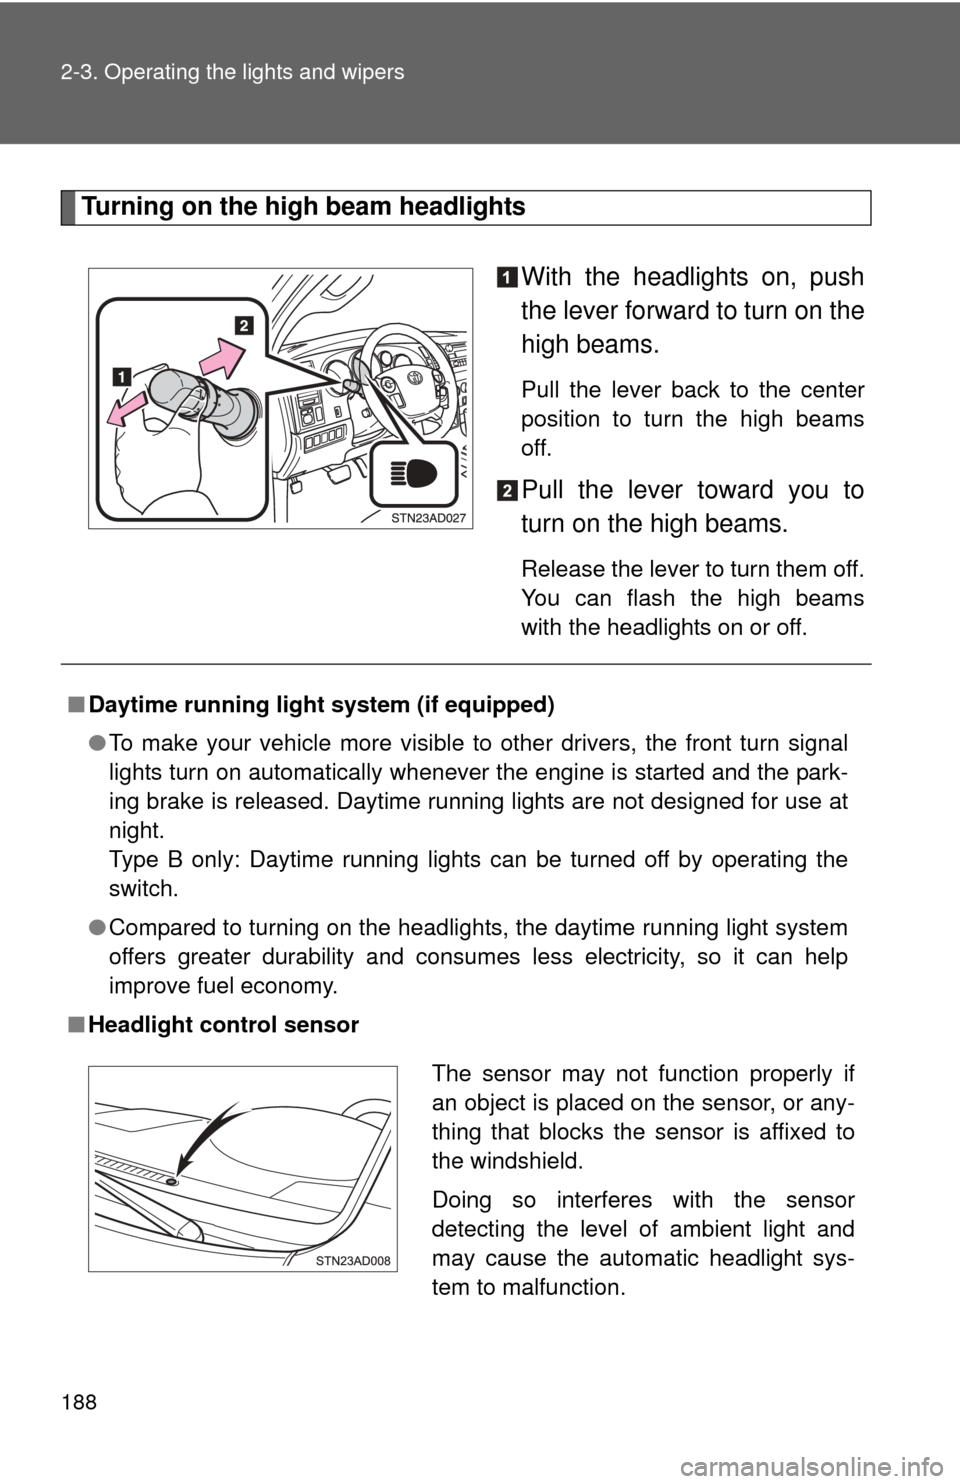
Turning on the high beam headlightsWith the headlights on, push
the lever forward to turn on the
high beams.
Pull the lever back to the center
position to turn the high beams
off.
Pull the lever toward you to
turn on the high beams.
Release the lever to turn them off.
You can flash the high beams
with the headlights on or off.
■Daytime running light system (if equipped)
●To make your vehicle more visible to other drivers, the front turn signal
lights turn on automatically whenever the engine is started and the park-
ing brake is released. Daytime running lights are not designed for use at
night.
Type B only: Daytime running lights can be turned off by operating the
switch.
● Compared to turning on the headlights, the daytime running light system
offers greater durability and consumes less electricity, so it can help
improve fuel economy.
■ Headlight control sensor
The sensor may not function properly if
an object is placed on the sensor, or any-
thing that blocks the sensor is affixed to
the windshield.
Doing so interferes with the sensor
detecting the level of ambient light and
may cause the automatic headlight sys-
tem to malfunction.
Page 192 of 688

192 2-3. Operating the lights and wipers
■The windshield wiper and washer can be operated when
The engine switch must be in the ON position.
■ If no windshield washer fluid sprays
Check that the washer nozzles are not blocked and if there is washer fluid in
the windshield washer fluid reservoir.
NOTICE
■When the windshield is dry
Do not use the wipers, as they may damage the windshield.
■ When there is no washer fluid spray from the nozzle
Damage to the washer fluid pump may be caused if the lever is pulled
toward you and held continually.
■ When a nozzle becomes blocked
In this case, contact your Toyota dealer.
Do not try to clear it with a pin or other object. The nozzle will be damaged.
Washer/wiper dual opera-
tion
Wipers will automatically oper-
ate a couple of times after the
washer squirts.