TOYOTA SEQUOIA 2011 2.G Owners Manual
Manufacturer: TOYOTA, Model Year: 2011, Model line: SEQUOIA, Model: TOYOTA SEQUOIA 2011 2.GPages: 688, PDF Size: 14.76 MB
Page 211 of 688
211
2-4. Using other
driving systems
2
When driving
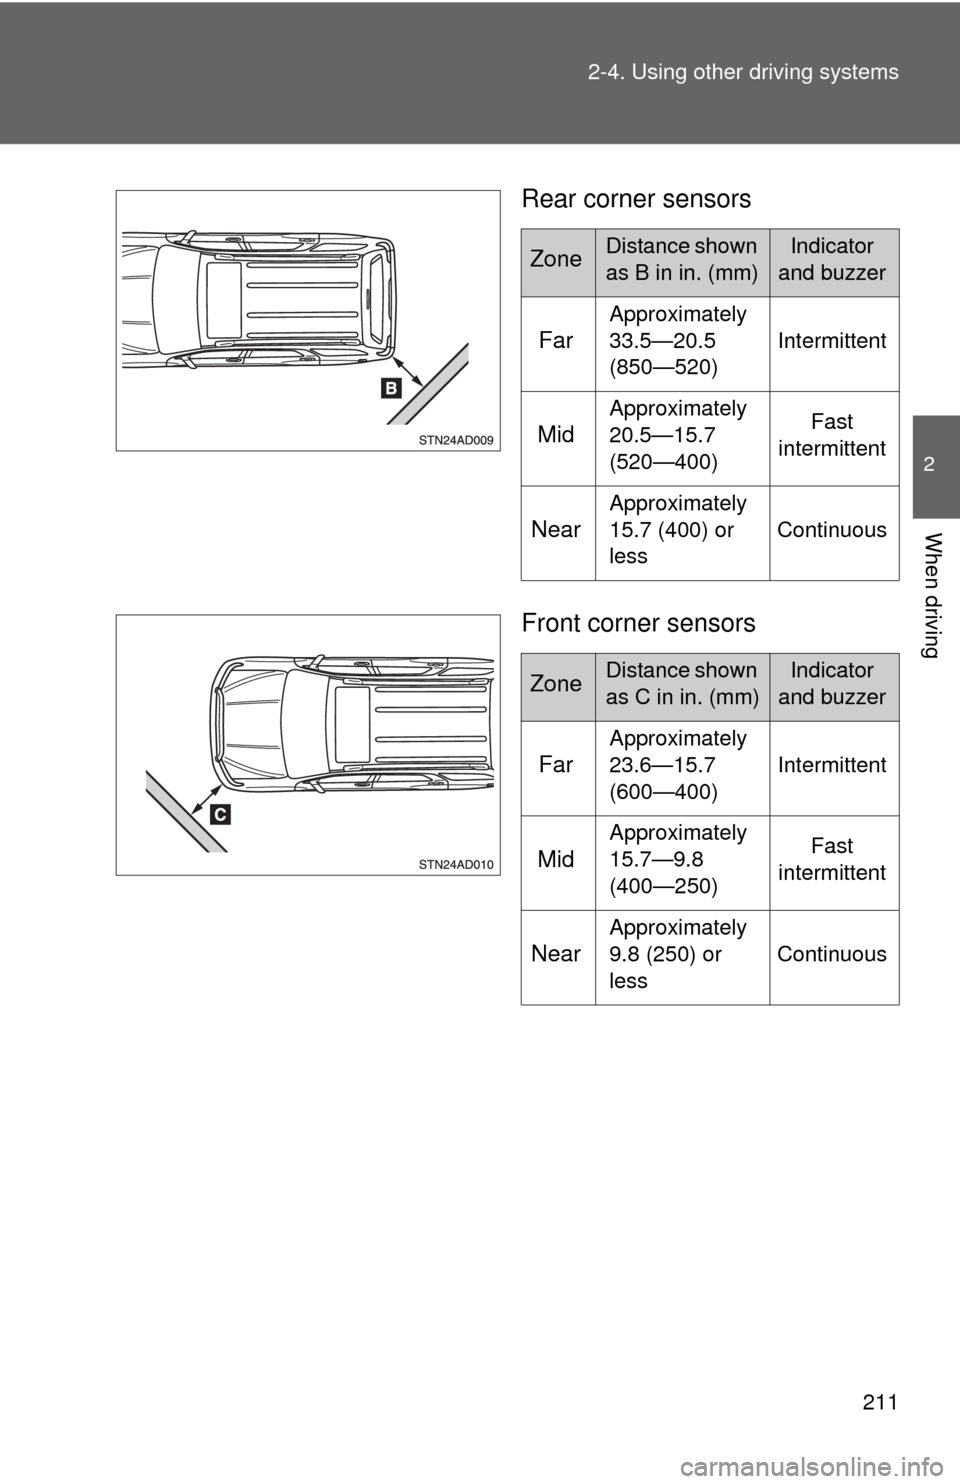
Rear corner sensors
Front corner sensors
ZoneDistance shown
as B in in. (mm)Indicator
and buzzer
Far
Approximately
33.5—20.5
(850—520) Intermittent
Mid
Approximately
20.5—15.7
(520—400) Fast
intermittent
Near
Approximately
15.7 (400) or
less Continuous
ZoneDistance shown
as C in in. (mm)Indicator
and buzzer
Far
Approximately
23.6—15.7
(600—400) Intermittent
Mid
Approximately
15.7—9.8
(400—250) Fast
intermittent
Near
Approximately
9.8 (250) or
less Continuous
Page 212 of 688
212 2-4. Using other driving systems
■When two or more obstacles are detected simultaneously
The buzzer system responds to the nearest zone.
■ When multiple obstacles are detected in front and behind the
vehicle at the same time
The buzzer will change in the following manner.
● If an obstacle has been detected within 15.7 in. (400 mm) of the
front or 33.5 (850 mm) in rear of the vehicle (a continuous
buzzer is sounding), and a new obstacle is detected at the other
end of the vehicle, the buzzer will sound 7 times then one contin-
uous buzzer.
● If an obstacle has been detected within 15.7 in. (400 mm) of the
front or 33.5 in. (850 mm) in rear of the vehicle (a continuous
buzzer is sounding), and a new ob stacle is detected at the same
way at the other end of the vehicle, the buzzer will sound 3 times
then one continuous buzzer.
Page 213 of 688
213
2-4. Using other
driving systems
2
When driving
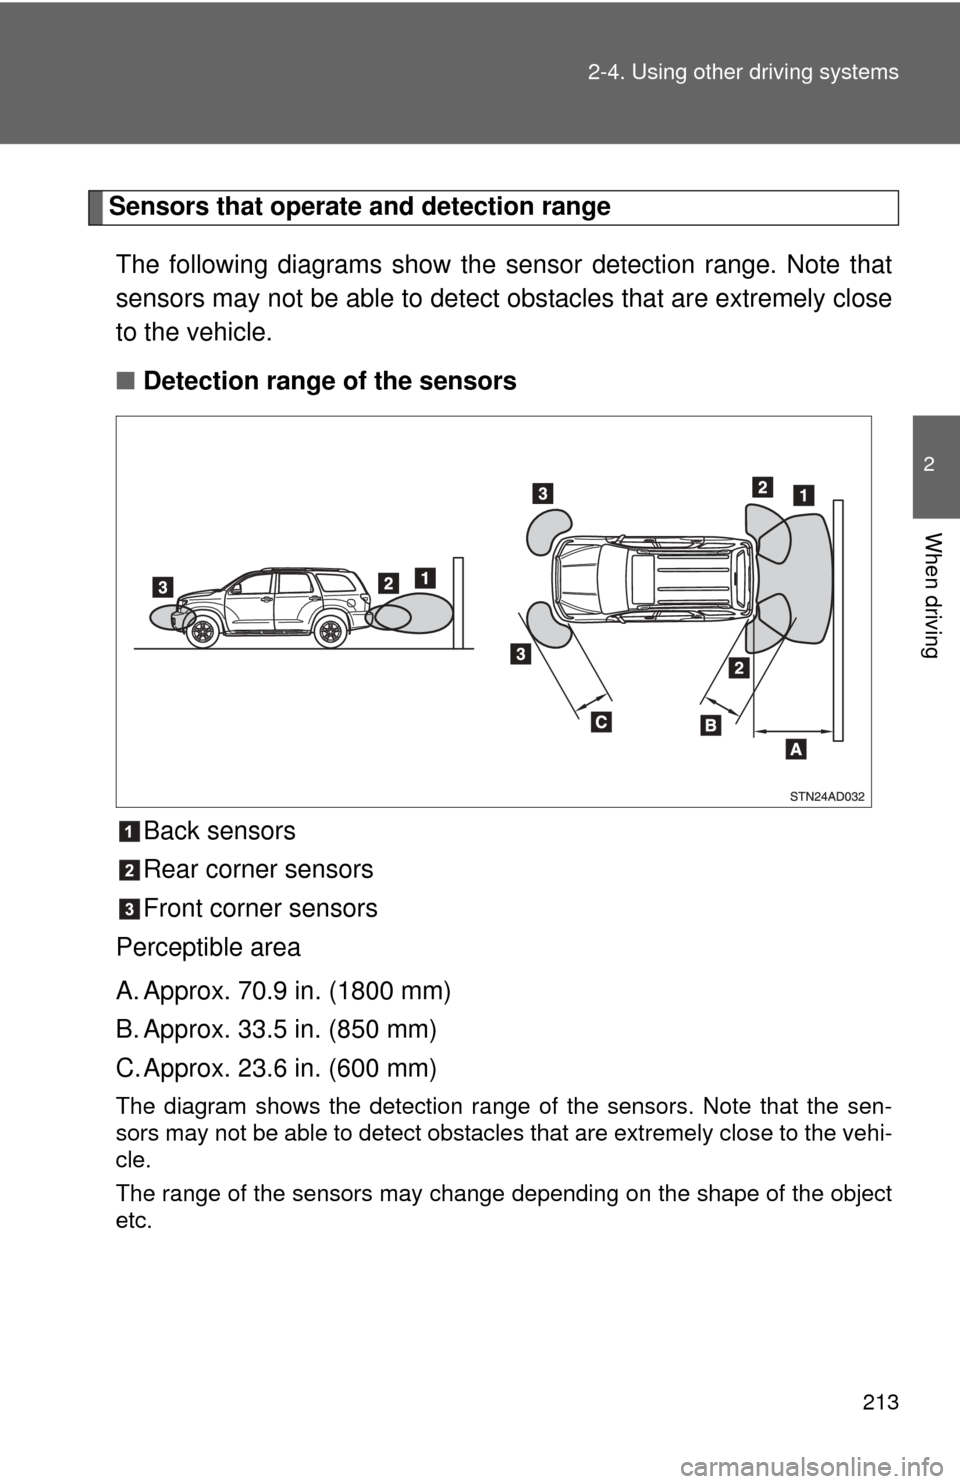
Sensors that operate and detection range
The following diagrams show the se nsor detection range. Note that
sensors may not be able to detect obstacles that are extremely close
to the vehicle.
■ Detection range of the sensors
Back sensors
Rear corner sensors
Front corner sensors
Perceptible area
A. Approx. 70.9 in. (1800 mm)
B. Approx. 33.5 in. (850 mm)
C. Approx. 23.6 in. (600 mm)
The diagram shows the detection range of the sensors. Note that the sen-
sors may not be able to detect obstacles that are extremely close to the vehi-
cle.
The range of the sensors may change depending on the shape of the object
etc.
Page 214 of 688
214 2-4. Using other driving systems
■Sensor detection information
●Certain vehicle conditions and the surrounding environment may affect
the ability of a sensor to correctly detect an obstacle. Particular instances
where this may occur are listed below.
• There is dirt, snow or ice on a sensor.
• A sensor is frozen.
• A sensor is covered in any way.
• The vehicle is leaning considerably to one side.
• On an extremely bumpy road, on an incline, on gravel, or on grass.
• The vicinity of the vehicle is noisy due to vehicle horns, motorcycle
engines, air brakes of large vehicles, or other loud noises producing
ultrasonic waves.
• There is another vehicle equipped with parking assist sensors in the vicinity.
• A sensor is coated with a sheet of spray or heavy rain.
• The vehicle is equipped with a fender pole or radio antenna.
• A bumper or sensor receives a strong impact.
• The vehicle is approaching a tall or right-angled curb.
• In harsh sunlight or intense cold weather.
• The area directly under the bumpers is not detected. Objects lower than the sensors or thin stakes etc. may be detected ini-
tially, but as they draw closer, they may cease to be detected.
• A towing hitch is mounted to the vehicle.
• A non-genuine Toyota suspension (lowered suspension etc.) is installed.
• When attaching a two-way radio antenna.
• When a towing eyelet is mounted on your vehicle.
• When the bumper is damaged.
In addition to the examples above, there are instances in which, because of
their shapes, signs and other objects may be judged by a sensor to be closer
than they are.
● The shape of the obstacle may prevent a sensor from detecting it. Pay
particular attention to the following obstacles:
• Wires, fences, ropes, etc.
• Cotton, snow and other materials that absorb sound waves
• Sharply-angled objects
• Low obstacles
Page 215 of 688
215
2-4. Using other
driving systems
2
When driving
• Tall obstacles with upper sections projecting outwards in the direction
of your vehicle
• A person near the vehicle (depending on the type of clothes worn)
• When the bumper is damaged.
■ Certification (Canada only)
This ISM device complies with Canadian ICES-001.
■ If the indicator is continuously on
Have the vehicle inspected by your Toyota dealer.
■ If the indicator remains blinking but do not sound the buzzer
Clean the sensors with soft cloth.
CAUTION
■Caution when using the intuitive parking assist
Observe the following precautions.
Failure to do so may result in the vehicle being unable to be driven safely
and possibly cause an accident.
●Do not use the sensor at speeds in excess of 6 mph (10 km/h).
● Do not attach any accessories within the sensor range.
NOTICE
■Notes when washing the vehicle
Do not apply intensive bursts of water or steam to the sensor area.
Doing so may result in the sensor malfunctioning.
Page 216 of 688
216
2-4. Using other driving systems
Rear view monitor system
: If equipped
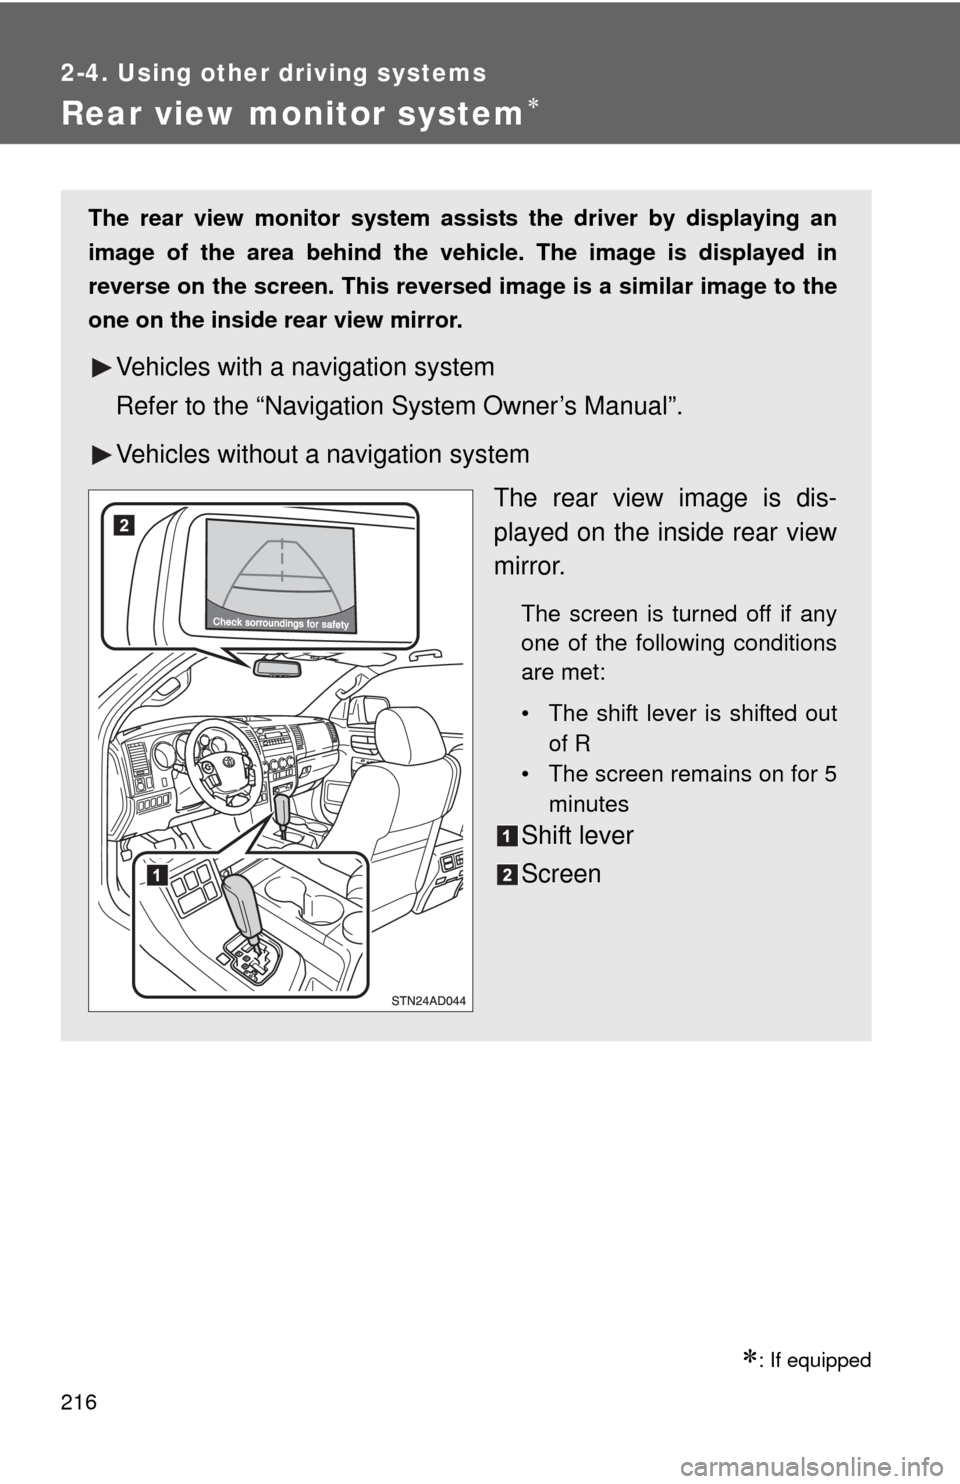
The rear view monitor system assists the driver by displaying an
image of the area behind the vehicle. The image is displayed in
reverse on the screen. This reversed im age is a similar image to the
one on the inside rear view mirror.
Vehicles with a navigation system
Refer to the “Navigation System Owner’s Manual”.
Vehicles without a navigation system
The rear view image is dis-
played on the inside rear view
mirror.
The screen is turned off if any
one of the following conditions
are met:
• The shift lever is shifted outof R
• The screen remains on for 5
minutes
Shift lever
Screen
Page 217 of 688
217
2-4. Using other
driving systems
2
When driving
■Rear view monitor guide lines
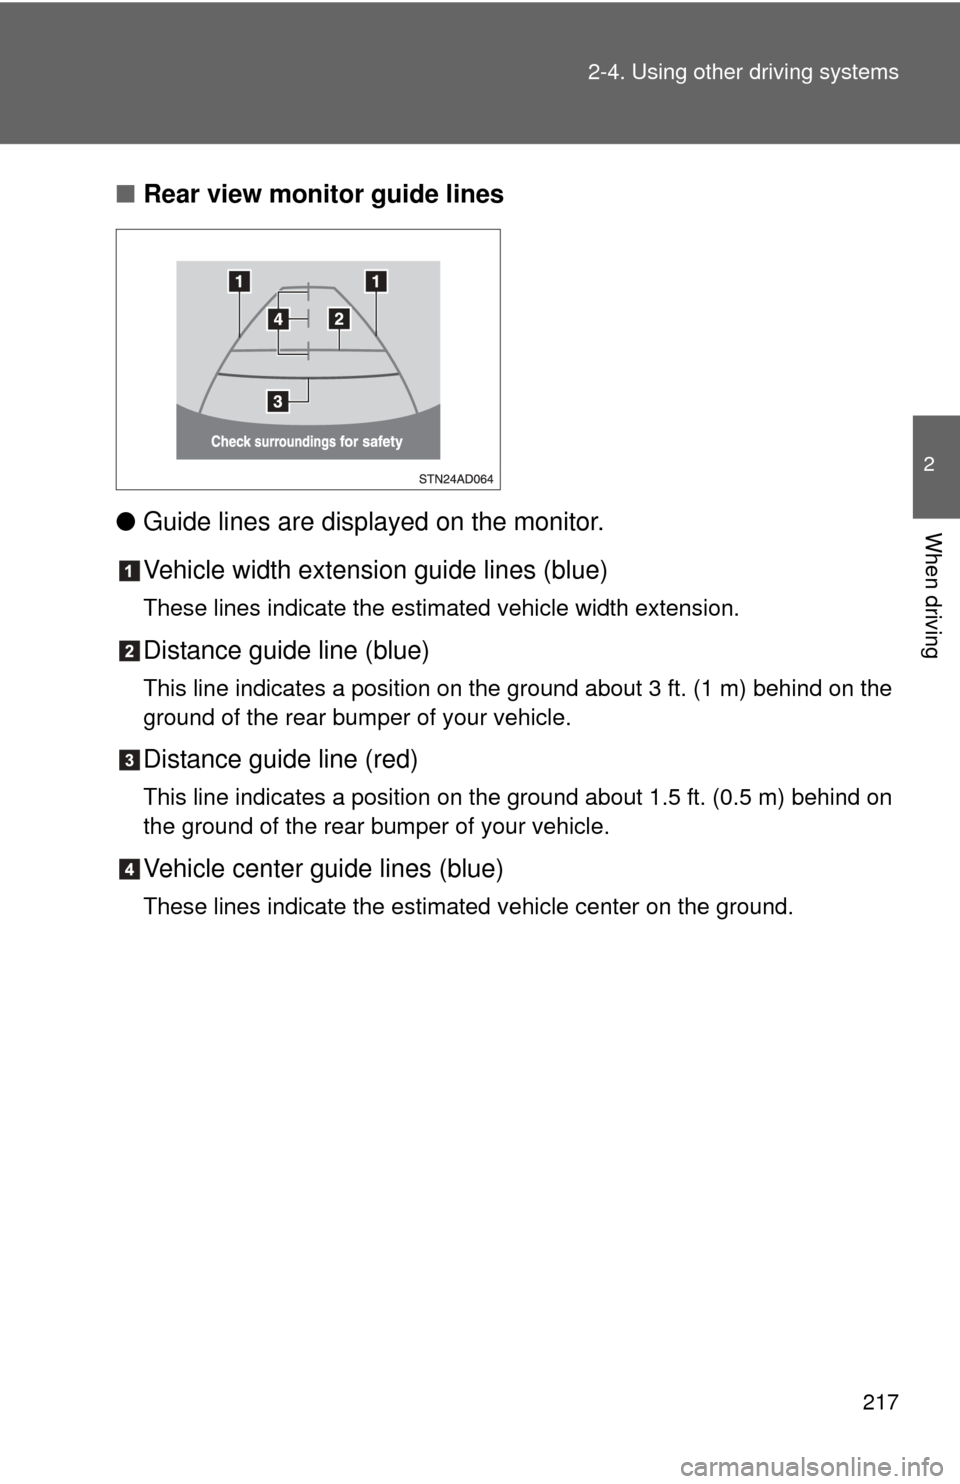
● Guide lines are displayed on the monitor.
Vehicle width extension guide lines (blue)
These lines indicate the estimated vehicle width extension.
Distance guide line (blue)
This line indicates a position on the ground about 3 ft. (1 m) behind on the
ground of the rear bumper of your vehicle.
Distance guide line (red)
This line indicates a position on the ground about 1.5 ft. (0.5 m) behind on
the ground of the rear bumper of your vehicle.
Vehicle center guide lines (blue)
These lines indicate the estimated vehicle center on the ground.
Page 218 of 688
218 2-4. Using other driving systems
■The rear view monitor system can be operated when
The shift lever is in R and the engine switch is ON.
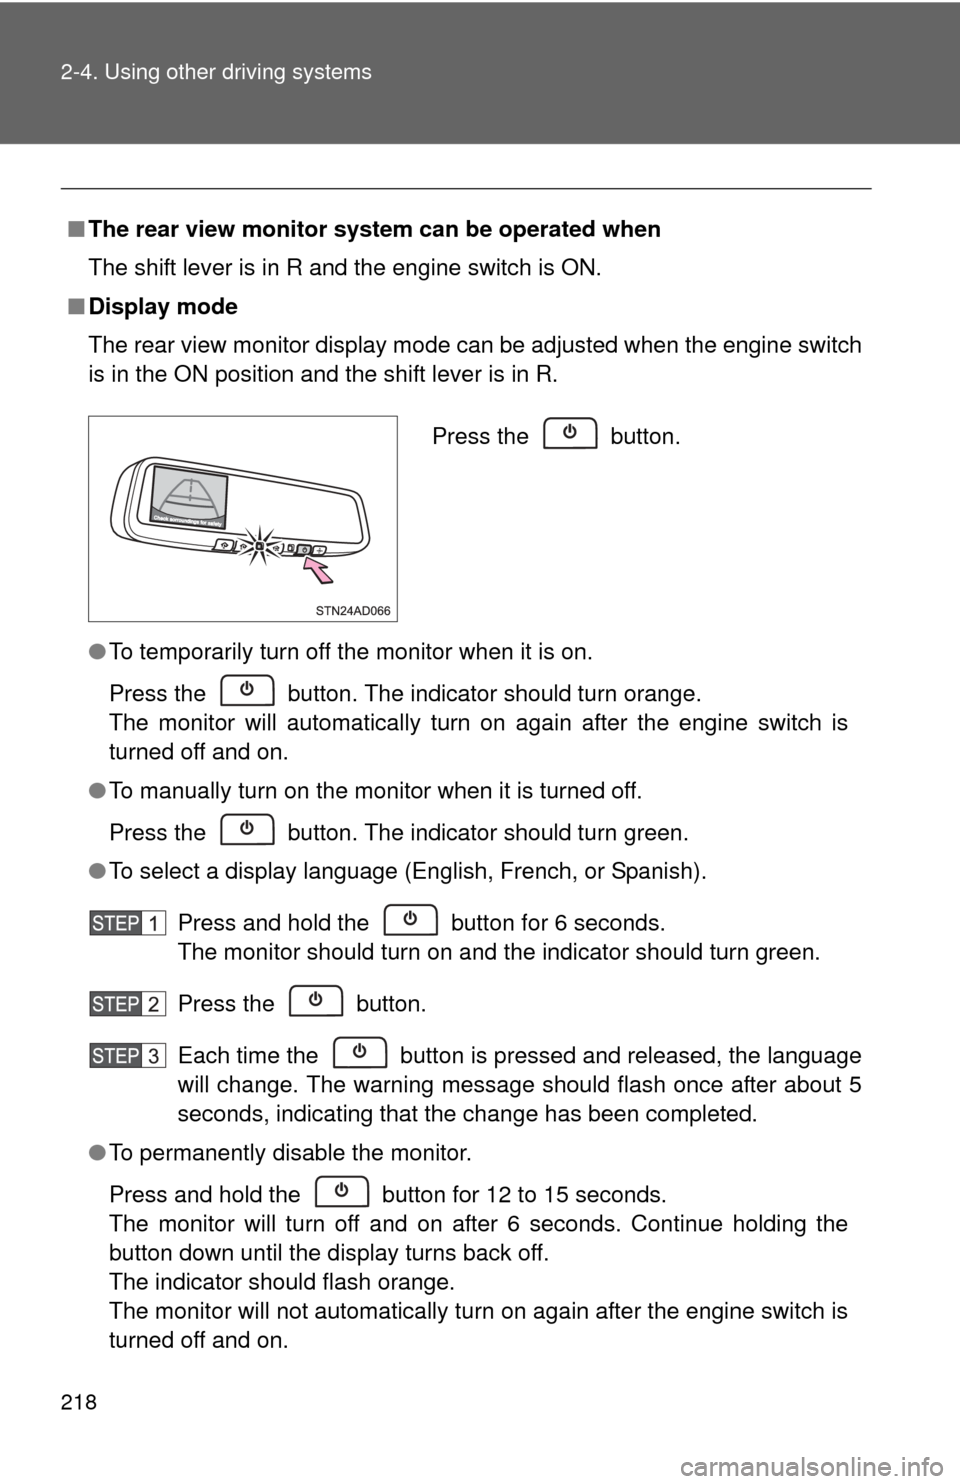
■ Display mode
The rear view monitor display mode can be adjusted when the engine switc\
h
is in the ON position and the shift lever is in R.
●To temporarily turn off the monitor when it is on.
Press the button. The indicator should turn orange.
The monitor will automatically turn on again after the engine switch is
turned off and on.
● To manually turn on the monitor when it is turned off.
Press the button. The indicator should turn green.
● To select a display language (English, French, or Spanish).
Press and hold the button for 6 seconds.
The monitor should turn on and the indicator should turn green.
Press the button.
Each time the button is pressed and released, the language
will change. The warning message should flash once after about 5
seconds, indicating that the change has been completed.
● To permanently disable the monitor.
Press and hold the button for 12 to 15 seconds.
The monitor will turn off and on after 6 seconds. Continue holding the
button down until the display turns back off.
The indicator should flash orange.
The monitor will not automatically turn on again after the engine switch is
turned off and on.
Press the button.
Page 219 of 688
219
2-4. Using other
driving systems
2
When driving
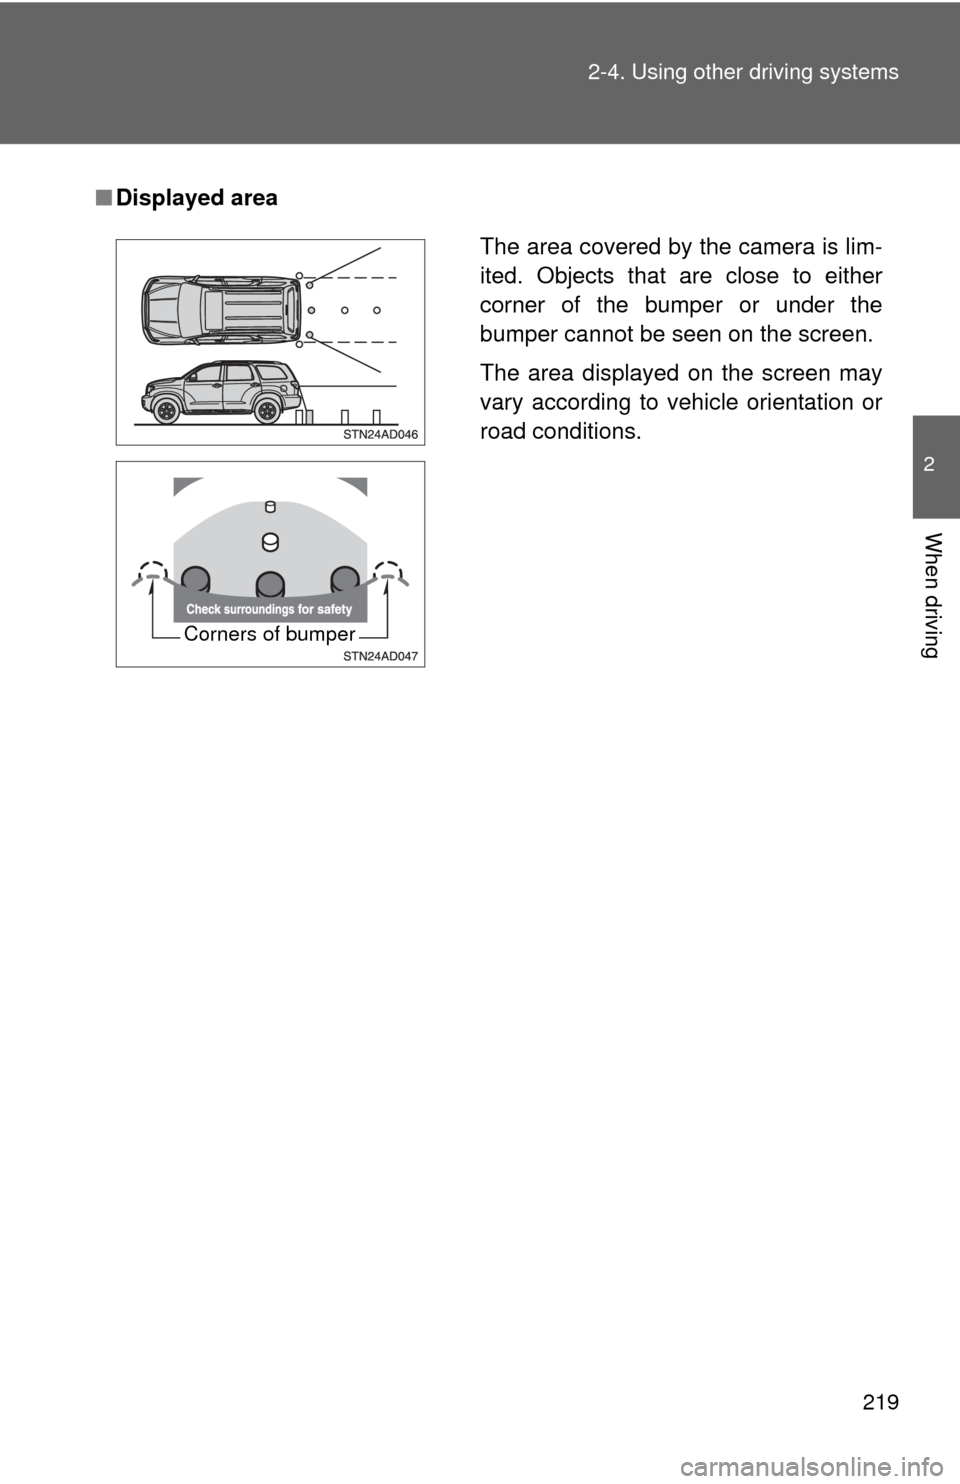
■Displayed area
The area covered by the camera is lim-
ited. Objects that are close to either
corner of the bumper or under the
bumper cannot be seen on the screen.
The area displayed on the screen may
vary according to vehicle orientation or
road conditions.
Corners of bumper
Page 220 of 688
220 2-4. Using other driving systems
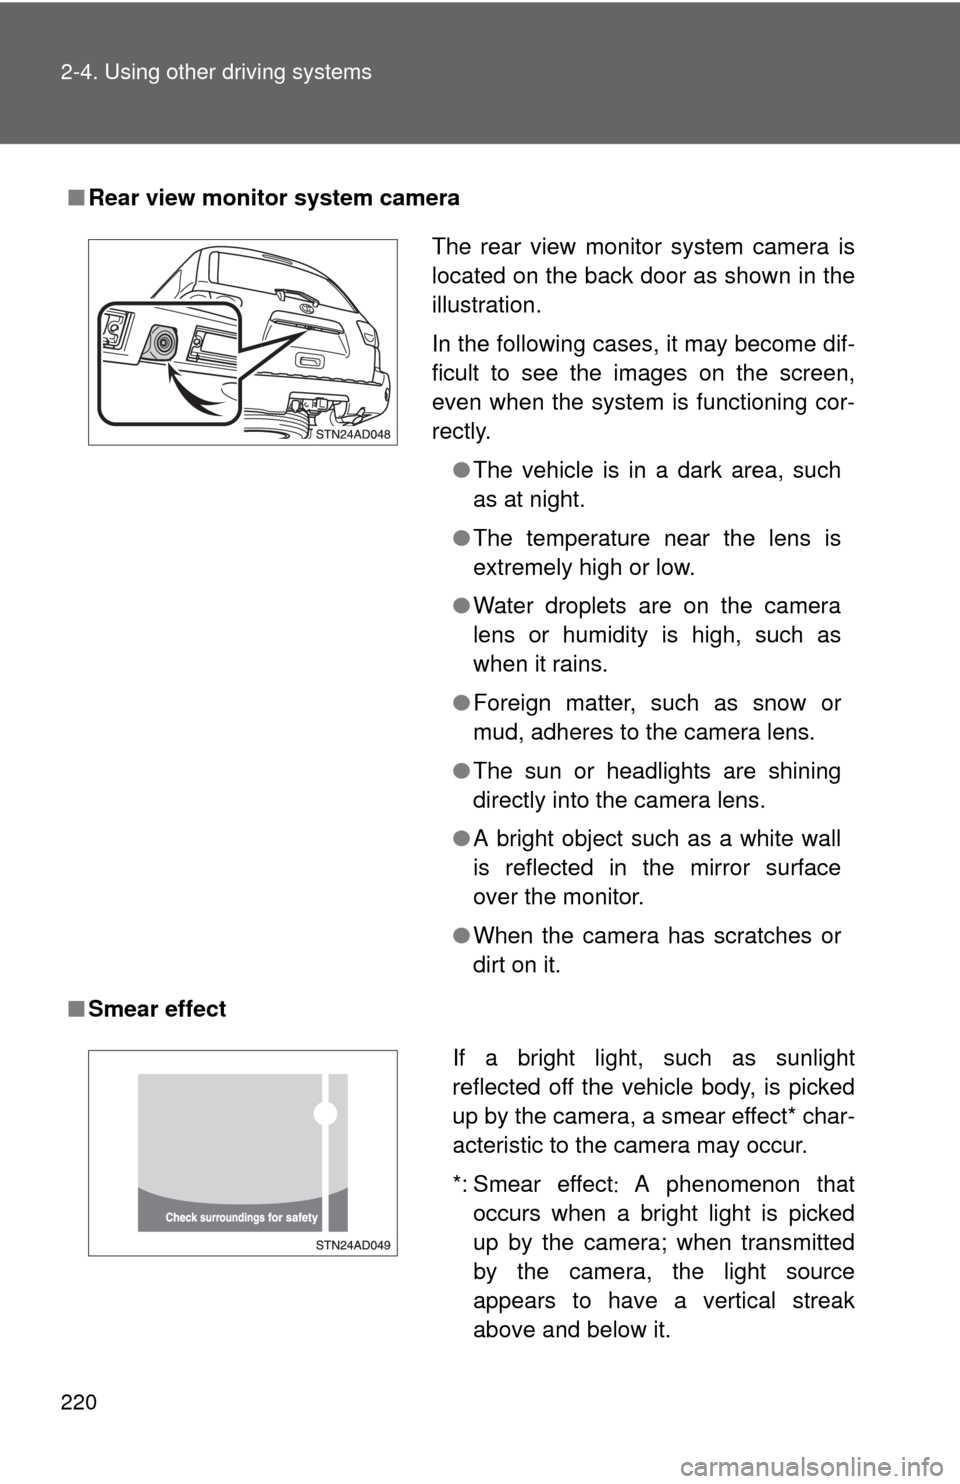
■Rear view monitor system camera
■ Smear effect
The rear view monitor system camera is
located on the back door as shown in the
illustration.
In the following cases, it may become dif-
ficult to see the images on the screen,
even when the system is functioning cor-
rectly.
●The vehicle is in a dark area, such
as at night.
● The temperature near the lens is
extremely high or low.
● Water droplets are on the camera
lens or humidity is high, such as
when it rains.
● Foreign matter, such as snow or
mud, adheres to the camera lens.
● The sun or headlights are shining
directly into the camera lens.
● A bright object such as a white wall
is reflected in the mirror surface
over the monitor.
● When the camera has scratches or
dirt on it.
If a bright light, such as sunlight
reflected off the vehicle body, is picked
up by the camera, a smear effect* char-
acteristic to the camera may occur.
*: Smear effect A phenomenon that
occurs when a bright light is picked
up by the camera; when transmitted
by the camera, the light source
appears to have a vertical streak
above and below it.