change time TOYOTA SEQUOIA 2013 2.G Navigation Manual
[x] Cancel search | Manufacturer: TOYOTA, Model Year: 2013, Model line: SEQUOIA, Model: TOYOTA SEQUOIA 2013 2.GPages: 328, PDF Size: 8.3 MB
Page 230 of 328

230
1. AUDIO/VIDEO SYSTEM OPERATION
When playing back files recorded as VBR
(Variable Bit Rate) files, the play time will
not be correctly displayed if the fast for-
ward or reverse operations are used.
It is not possible to check folders that do
not include MP3/WMA files.
MP3/WMA files in folders up to 8 levels
deep can be played. However, the start of
playback may be delayed when using
discs containing numerous levels of fold-
ers. For this reason, we recommend creat-
ing discs with no more than two levels of
folders.
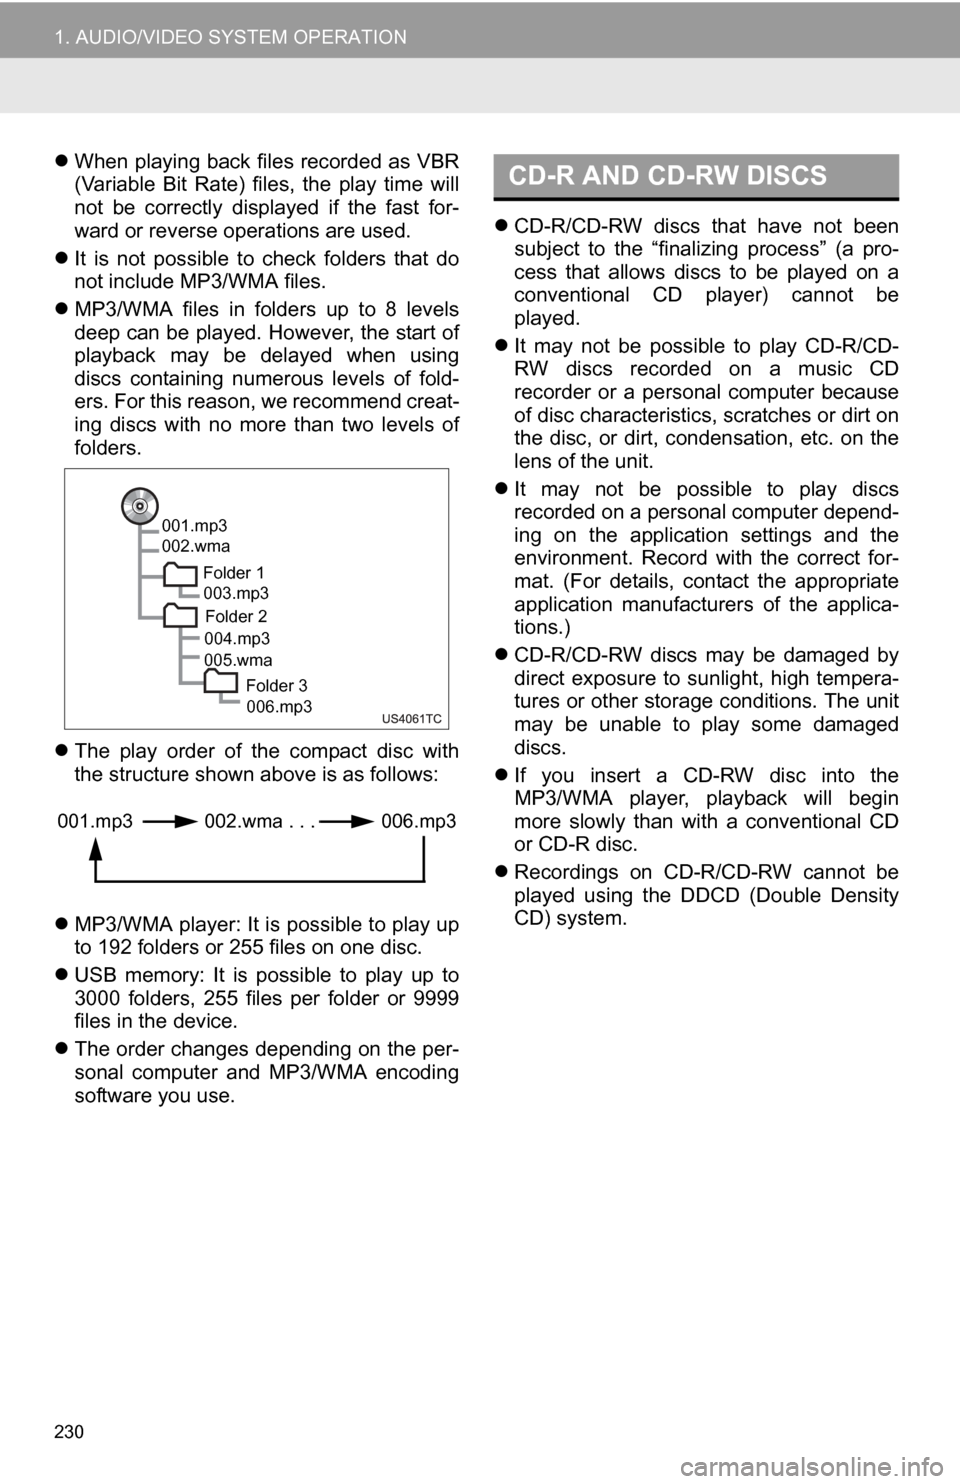
The play order of the compact disc with
the structure shown above is as follows:
MP3/WMA player: It is possible to play up
to 192 folders or 255 files on one disc.
USB memory: It is possible to play up to
3000 folders, 255 files per folder or 9999
files in the device.
The order changes depending on the per-
sonal computer and MP3/WMA encoding
software you use.
CD-R/CD-RW discs that have not been
subject to the “finalizing process” (a pro-
cess that allows discs to be played on a
conventional CD player) cannot be
played.
It may not be possible to play CD-R/CD-
RW discs recorded on a music CD
recorder or a personal computer because
of disc characteristics, scratches or dirt on
the disc, or dirt, condensation, etc. on the
lens of the unit.
It may not be possible to play discs
recorded on a personal computer depend-
ing on the application settings and the
environment. Record with the correct for-
mat. (For details, contact the appropriate
application manufacturers of the applica-
tions.)
CD-R/CD-RW discs may be damaged by
direct exposure to sunlight, high tempera-
tures or other storage conditions. The unit
may be unable to play some damaged
discs.
If you insert a CD-RW disc into the
MP3/WMA player, playback will begin
more slowly than with a conventional CD
or CD-R disc.
Recordings on CD-R/CD-RW cannot be
played using the D DCD (Double Density
CD) system.
001.mp3
002.wma
Folder 1003.mp3
Folder 2
004.mp3
005.wma
Folder 3006.mp3
001.mp3 002.wma . . . 006.mp3
CD-R AND CD-RW DISCS
Page 233 of 328

233
1. AUDIO/VIDEO SYSTEM OPERATION
5
AUDIO/VIDEO SYSTEM
You agree that your non-exclusive li-
cense to use the Gracenote Data, the
Gracenote Software, and Gracenote
Servers will terminate if you violate
these restrictions. If your license termi-
nates, you agree to cease any and all
use of the Gracenote Data, the
Gracenote Software, and Gracenote
Servers. Gracenote reserves all rights
in Gracenote Data, the Gracenote
Software, and the Gracenote Servers,
including all ownership rights. Under
no circumstances will Gracenote be-
come liable for any payment to you for
any information that you provide. You
agree that Gracenote, Inc. may en-
force its rights under this Agreement
against you directly in its own name.
The Gracenote service uses a unique
identifier to track queries for statistical
purposes. The purpose of a randomly
assigned numeric identifier is to allow
the Gracenote service to count que-
ries without knowing anything about
who you are. For more information,
see the web page for the Gracenote
Privacy Policy for the Gracenote ser-
vice.The Gracenote Software and each
item of Gracenote Data are licensed to
you “AS IS.” Gracenote makes no rep-
resentations or warranties, express or
implied, regarding the accuracy of any
Gracenote Data from in the Gracenote
Servers. Gracenote reserves the right
to delete data from the Gracenote
Servers or to change data categories
for any cause that Gracenote deems
sufficient. No warranty is made that
the Gracenote Software or Gracenote
Servers are error-free or that function-
ing of Gracenote Software or
Gracenote Servers will be uninterrupt-
ed. Gracenote is not obligated to pro-
vide you with new enhanced or
additional data types or categories
that Gracenote may provide in the fu-
ture and is free to discontinue its ser-
vices at any time.
GRACENOTE DISCLAIMS ALL
WARRANTIES EXPRESS OR IM-
PLIED, INCLUDING, BUT NOT LIM-
ITED TO, IMPLIED WARRANTIES
OF MERCHANTABILITY, FITNESS
FOR A PARTICULAR PURPOSE, TI-
TLE, AND NON-INFRINGEMENT.
GRACENOTE DOES NOT WAR-
RANT THE RESULTS THAT WILL BE
OBTAINED BY YOUR USE OF THE
GRACENOTE SOFTWARE OR ANY
GRACENOTE SERVER. IN NO
CASE WILL GRACENOTE BE LIA-
BLE FOR ANY CONSEQUENTIAL
OR INCIDENTAL DAMAGES OR
FOR ANY LOST PROFITS OR LOST
REVENUES.
copyright
© 2000 to present
Gracenote
Page 239 of 328

239
1. VOICE COMMAND SYSTEM OPERATION
6
VOICE COMMAND SYSTEM
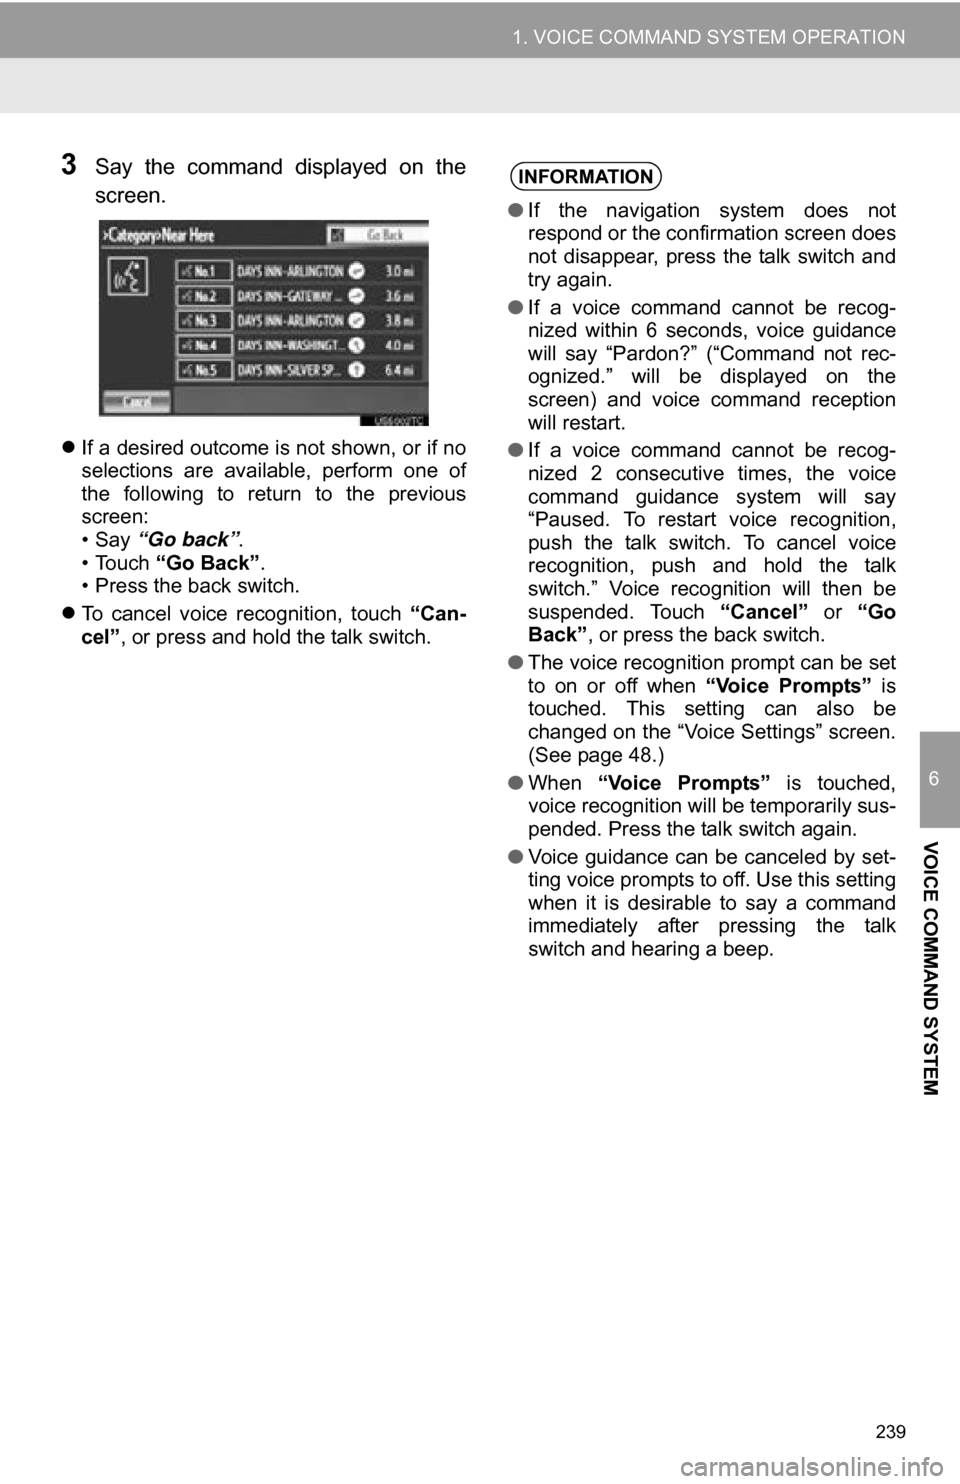
3Say the command displayed on the
screen.
If a desired outcome is not shown, or if no
selections are available, perform one of
the following to return to the previous
screen:
•Say “Go back” .
• Touch “Go Back” .
• Press the back switch.
To cancel voice recognition, touch “Can-
cel”, or press and hold the talk switch.
INFORMATION
● If the navigation system does not
respond or the confirmation screen does
not disappear, press the talk switch and
try again.
● If a voice command cannot be recog-
nized within 6 seconds, voice guidance
will say “Pardon?” (“Command not rec-
ognized.” will be displayed on the
screen) and voice command reception
will restart.
● If a voice command cannot be recog-
nized 2 consecutive times, the voice
command guidance system will say
“Paused. To restart voice recognition,
push the talk switch. To cancel voice
recognition, push and hold the talk
switch.” Voice recognition will then be
suspended. Touch “Cancel” or “Go
Back” , or press the back switch.
● The voice recognition prompt can be set
to on or off when “Voice Prompts” is
touched. This setting can also be
changed on the “Voice Settings” screen.
(See page 48.)
● When “Voice Prompts” is touched,
voice recognition will be temporarily sus-
pended. Press the talk switch again.
● Voice guidance can be canceled by set-
ting voice prompts to off. Use this setting
when it is desirable to say a command
immediately after pressing the talk
switch and hearing a beep.
Page 254 of 328

254
3. XM FUNCTION OPERATION
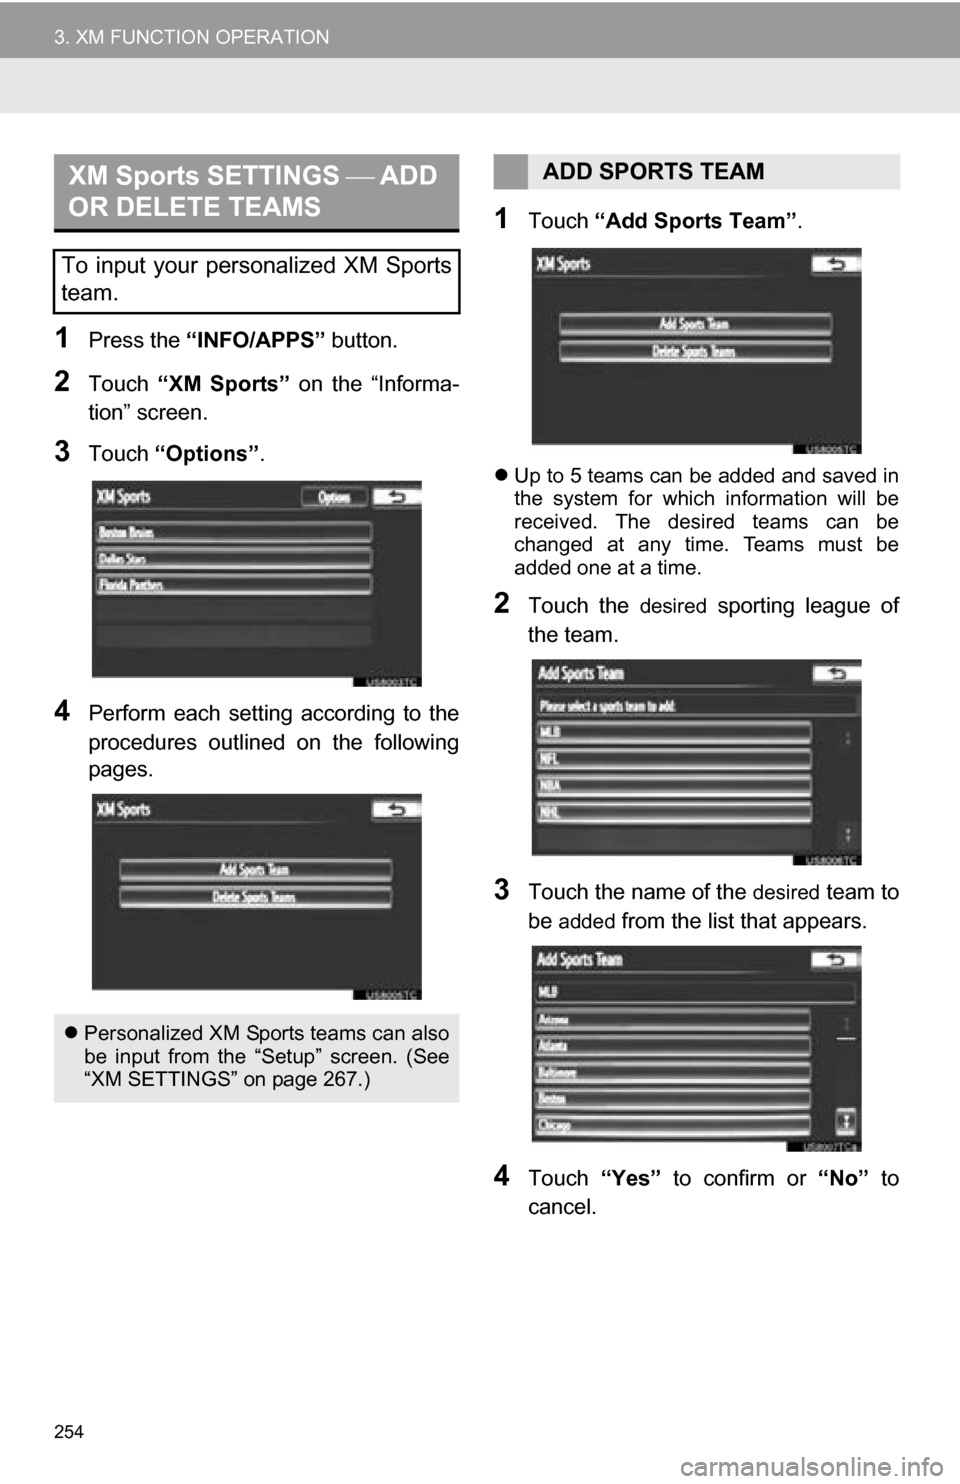
1Press the “INFO/APPS” button.
2Touch “XM Sports” on the “Informa-
tion” screen.
3Touch “Options”.
4Perform each setting according to the
procedures outlined on the following
pages.
1Touch “Add Sports Team” .
Up to 5 teams can be added and saved in
the system for which information will be
received. The desired teams can be
changed at any time. Teams must be
added one at a time.
2Touch the desired sporting league of
the team.
3Touch the name of the desired team to
be
added from the list that appears.
4Touch “Yes” to confirm or “No” to
cancel.
XM Sports SETTINGS ADD
OR DELETE TEAMS
To input your personalized XM Sports
team.
Personalized XM Sports teams can also
be input from the “Setup” screen. (See
“XM SETTINGS” on page 267.)
ADD SPORTS TEAM
Page 297 of 328

297
R
Radio ..................................................... 175Listening to the radio .......................... 175
Presetting a station ............................ 175
Radio broadcast data system............. 176
Selecting a station .............................. 176
Traffic announcement ........................ 177
Radio broadcast data system ................. 176
RADIO button ......................................... 168
Rear view monitor system ..................... 282
Receive on the Bluetooth
® phone ......... 131
Register a Bluetooth® phone ................. 121
Connecting a Bluetooth® phone......... 122
Reconnecting the Bluetooth®
phone.............................................. 124
Registering home..................................... 12
Registering preset destinations ............... 14
Reordering destinations ........................... 76
Resuming guidance ................................. 81
Route guidance......................................... 66
Route guidance screen ............................ 69
Route overview ........................................ 79
Route preference ..................................... 80
Route trace .............................................. 85
S
Satellite radio (SAT) ................................ 171
Screen adjustment ................................... 30
Screen Off ................................................. 30
Screen scroll operation ............................ 32
Screen settings adjustment...................... 30
Screens for navigation settings ................ 86
SEEK/TRACK button .............................. 168
Setting home as the destination............... 17
Setting up the “Address Book” ................. 91
Setting up the “Areas to Avoid” ................ 95
Setting up the “Home” .............................. 86
Setting up the “Preset Destinations” ........ 88
SETUP button ................................... 10, 168
“Setup” screen ......................................... 22
Show on map ........................................... 82
SMS/MMS message ....................... 130, 134
Speed dial ............................................... 127
Standard map icons ................................. 39
Starting route guidance ............................ 66
Steering switches .................... 118, 223, 238
Surround ................................................. 172
Switching the screens .............................. 36
T
Talk on the Bluetooth® phone ................ 132
Incoming call waiting .......................... 133
Time zone ................................................. 41
Tire change calibration............................ 104
Tone ........................................................ 198
Tone and balance .................................. 172
Touch screen operation ........................... 27
Traffic incidents ....................................... 264
TUNE·SCROLL knob .............................. 168
Typical voice guidance prompts............... 72