TOYOTA SEQUOIA 2013 2.G Owners Manual
SEQUOIA 2013 2.G
TOYOTA
TOYOTA
https://www.carmanualsonline.info/img/14/6770/w960_6770-0.png
TOYOTA SEQUOIA 2013 2.G Owners Manual
Trending: USB port, power steering, transmission fluid, lane assist, air condition, open gas tank, air filter
Page 611 of 740
611
4-3. Do-it-yourself maintenance
4
Maintenance and care
Light bulbs
You may replace the following bulbs yourself. The difficulty level of
replacement varies depending on the bulb. If necessary bulb
replacement seems difficult to perfor m, contact your Toyota dealer.
For more information about replacing other light bulbs, contact your
Toyota dealer.
■ Prepare a replacement light bulb.
Check the wattage of the light bulb being replaced. ( P. 686)
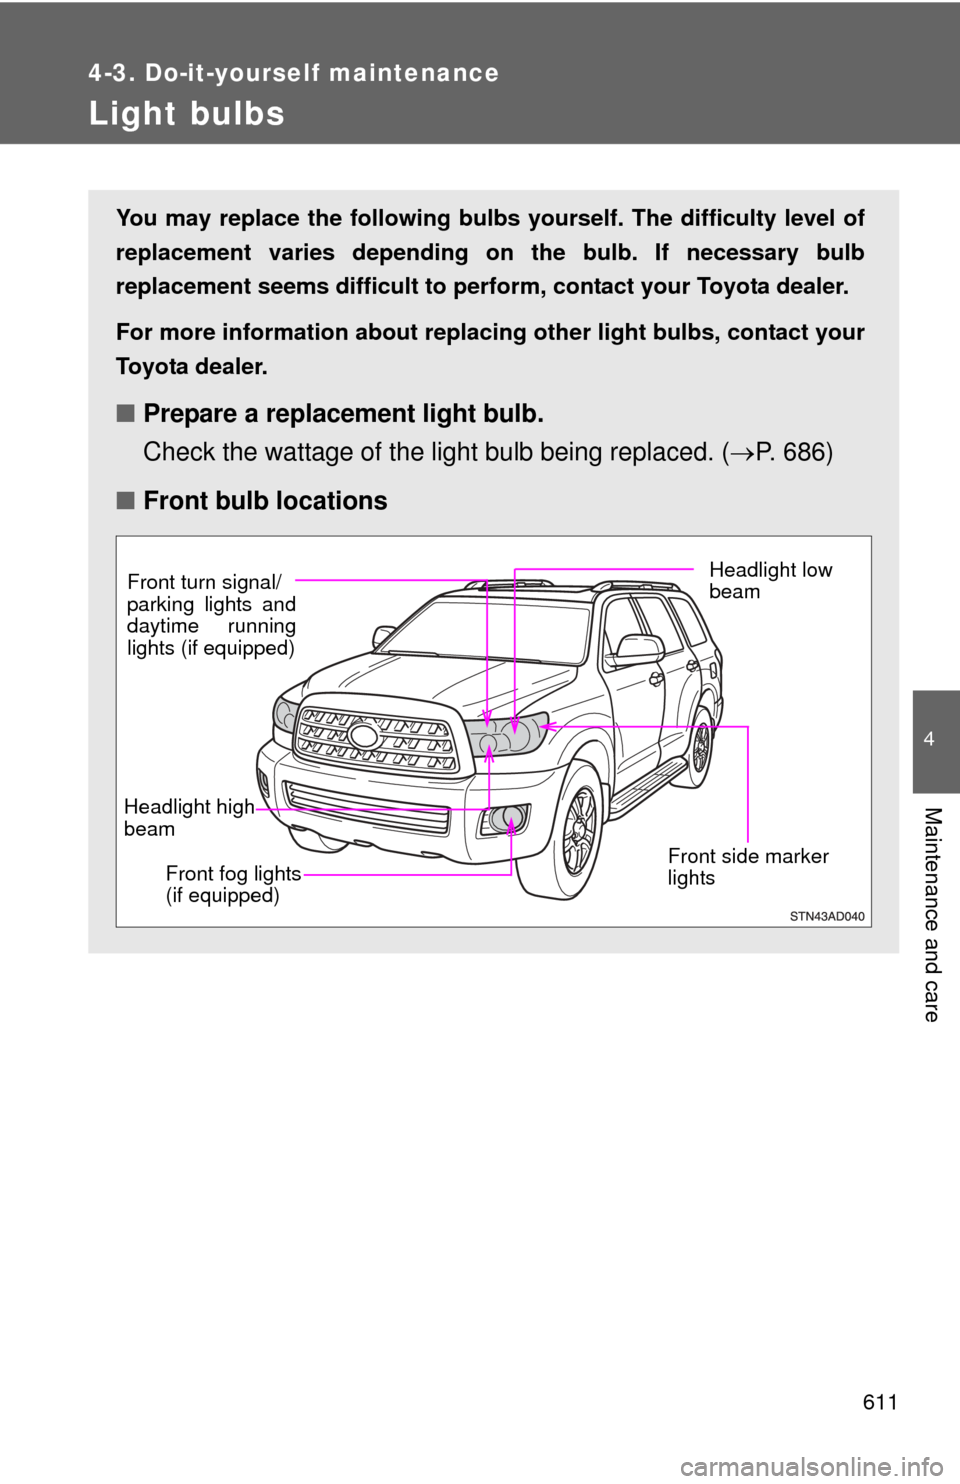
■ Front bulb locations
Headlight low
beam
Front side marker
lights
Headlight high
beam Front fog lights
(if equipped)
Front turn signal/
parking lights and
daytime running
lights (if equipped)
Page 612 of 740
612 4-3. Do-it-yourself maintenance
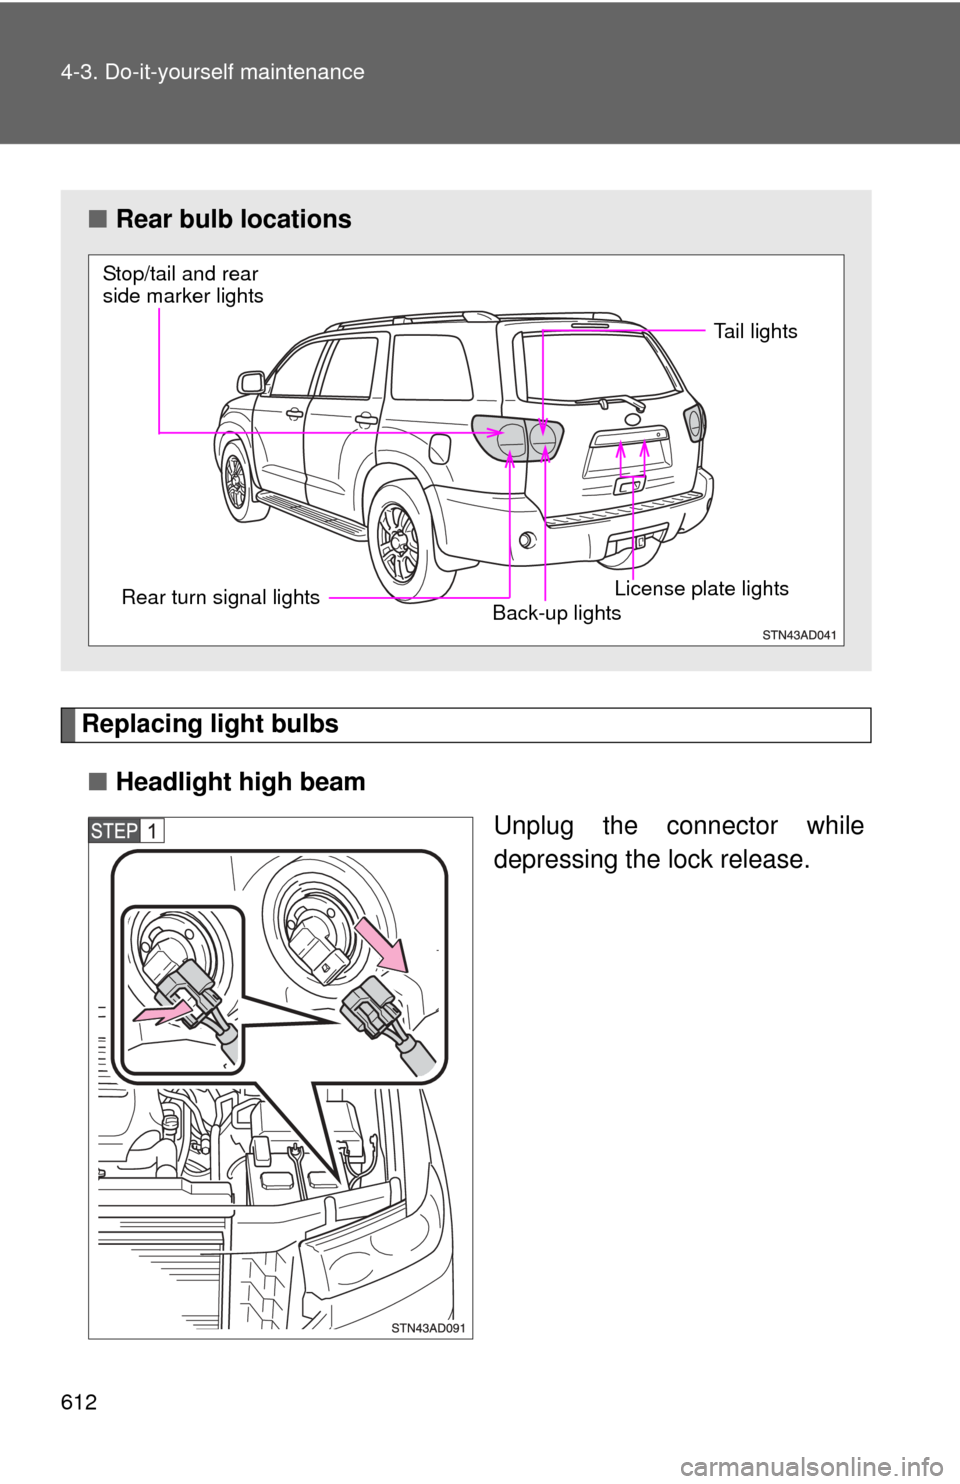
Replacing light bulbs■ Headlight high beam
Unplug the connector while
depressing the lock release.
■Rear bulb locations
Stop/tail and rear
side marker lights
Rear turn signal lights
License plate lightsBack-up lights
Tail lights
Page 613 of 740
613
4-3. Do-it-yourself maintenance
4
Maintenance and care
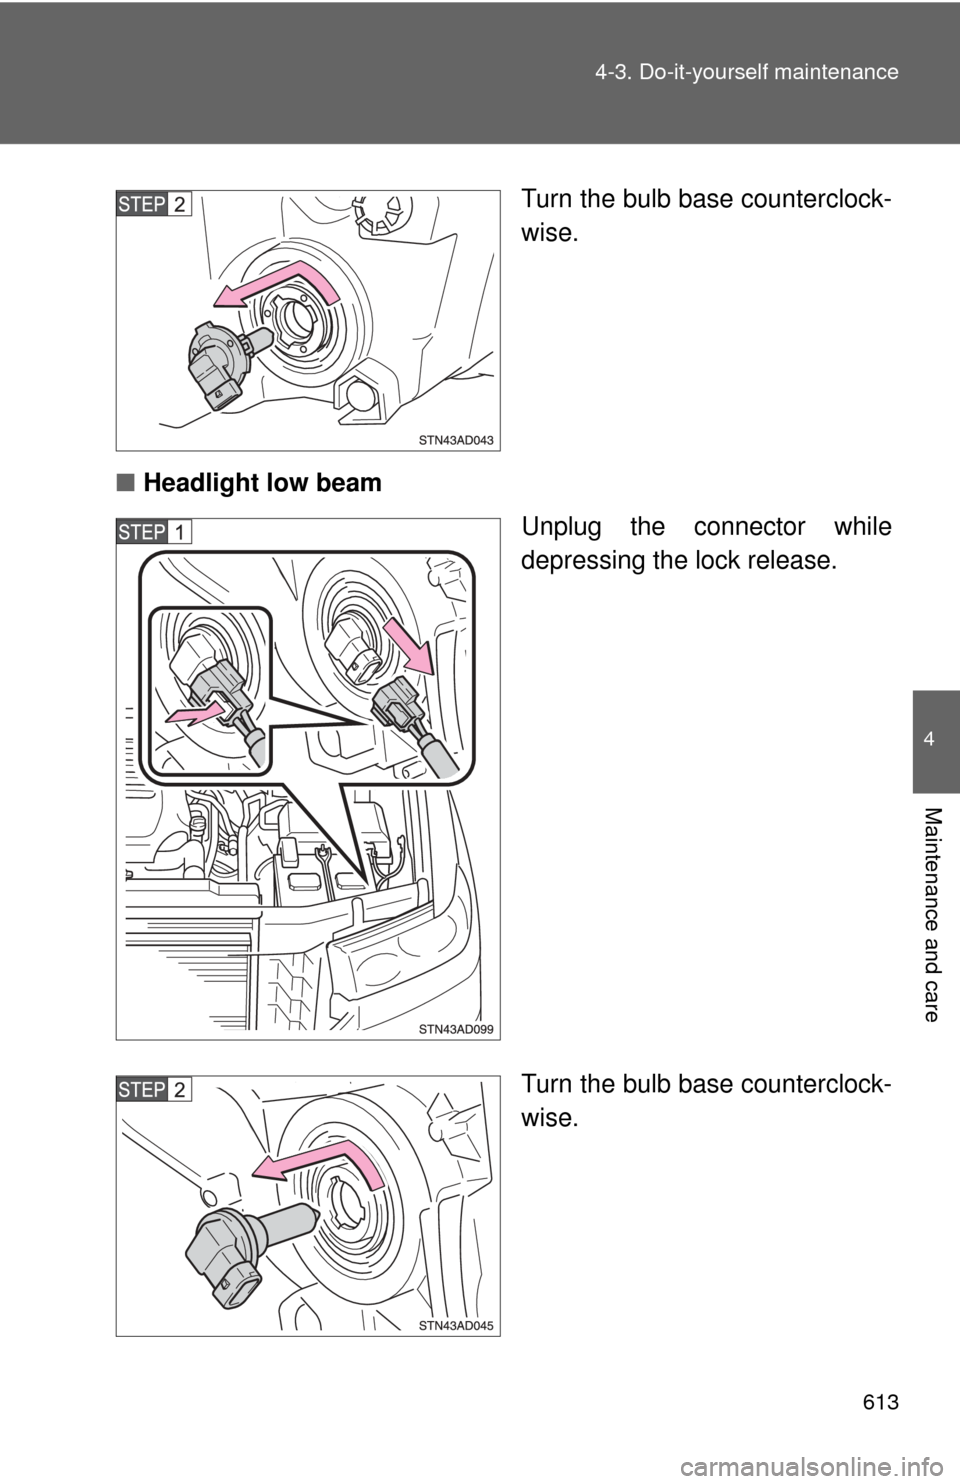
Turn the bulb base counterclock-
wise.
■ Headlight low beam
Unplug the connector while
depressing the lock release.
Turn the bulb base counterclock-
wise.
Page 614 of 740
614 4-3. Do-it-yourself maintenance
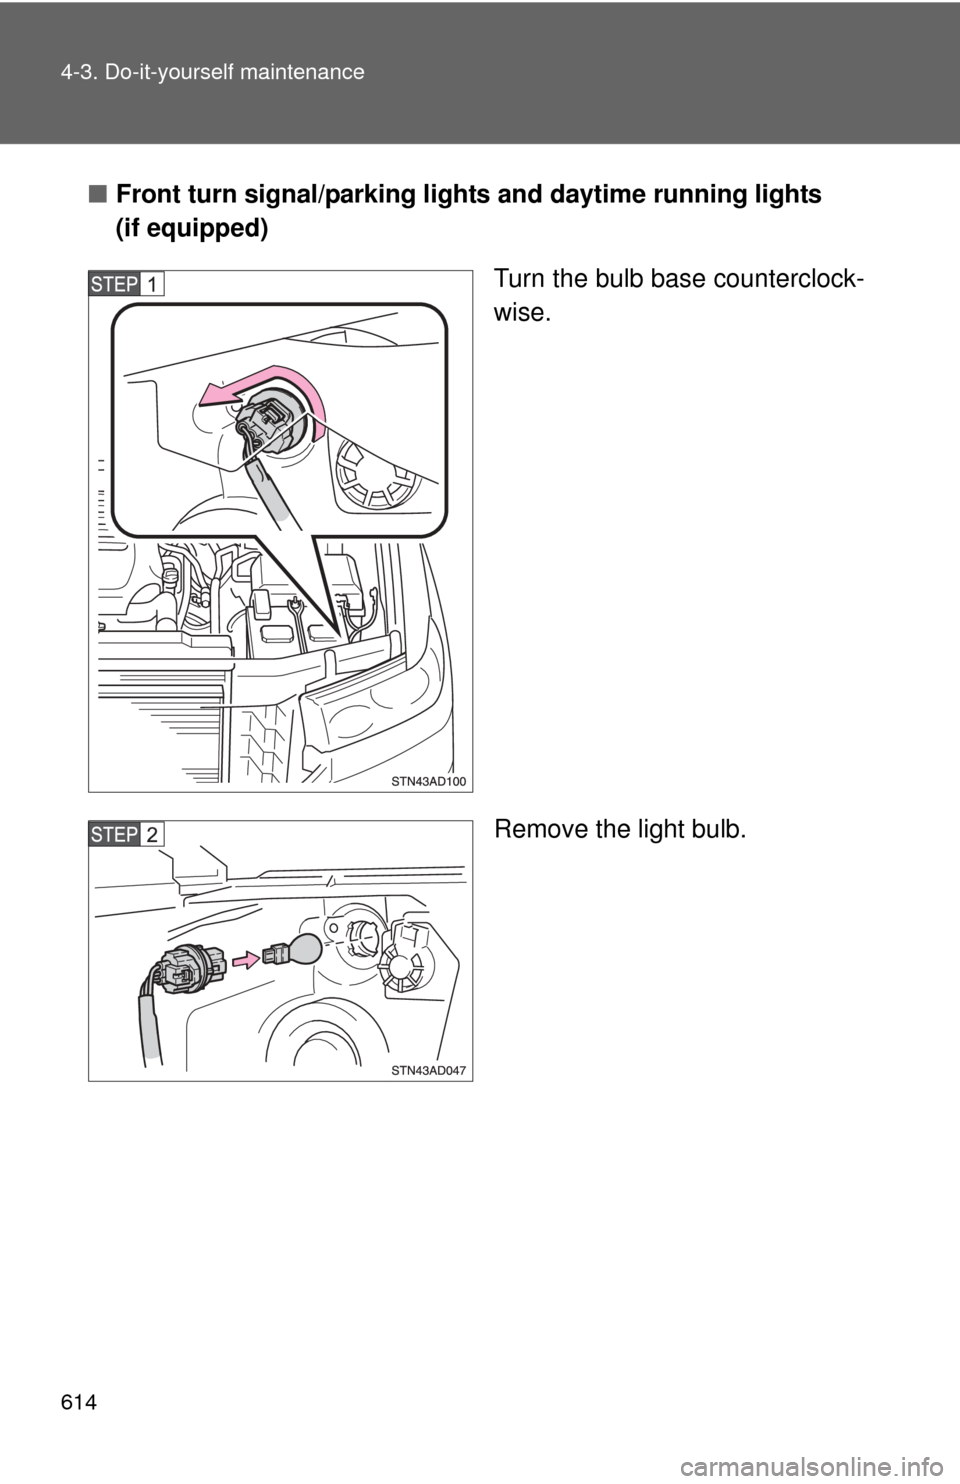
■Front turn signal/parking lights and daytime running lights
(if equipped)
Turn the bulb base counterclock-
wise.
Remove the light bulb.
Page 615 of 740
615
4-3. Do-it-yourself maintenance
4
Maintenance and care
■
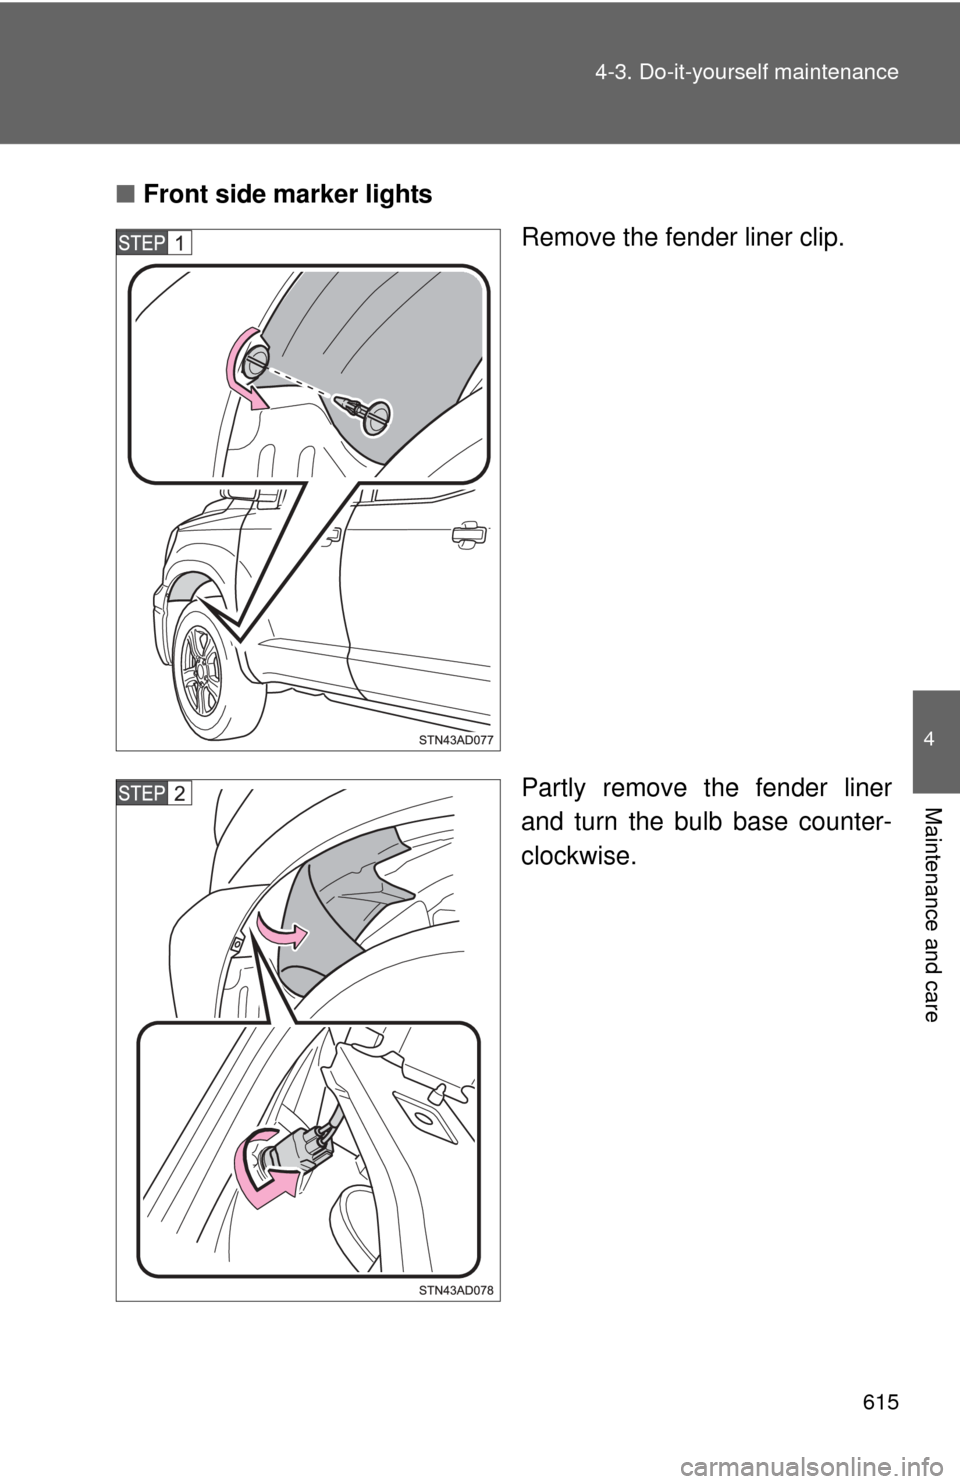
Front side marker lights
Remove the fender liner clip.
Partly remove the fender liner
and turn the bulb base counter-
clockwise.
Page 616 of 740
616 4-3. Do-it-yourself maintenance
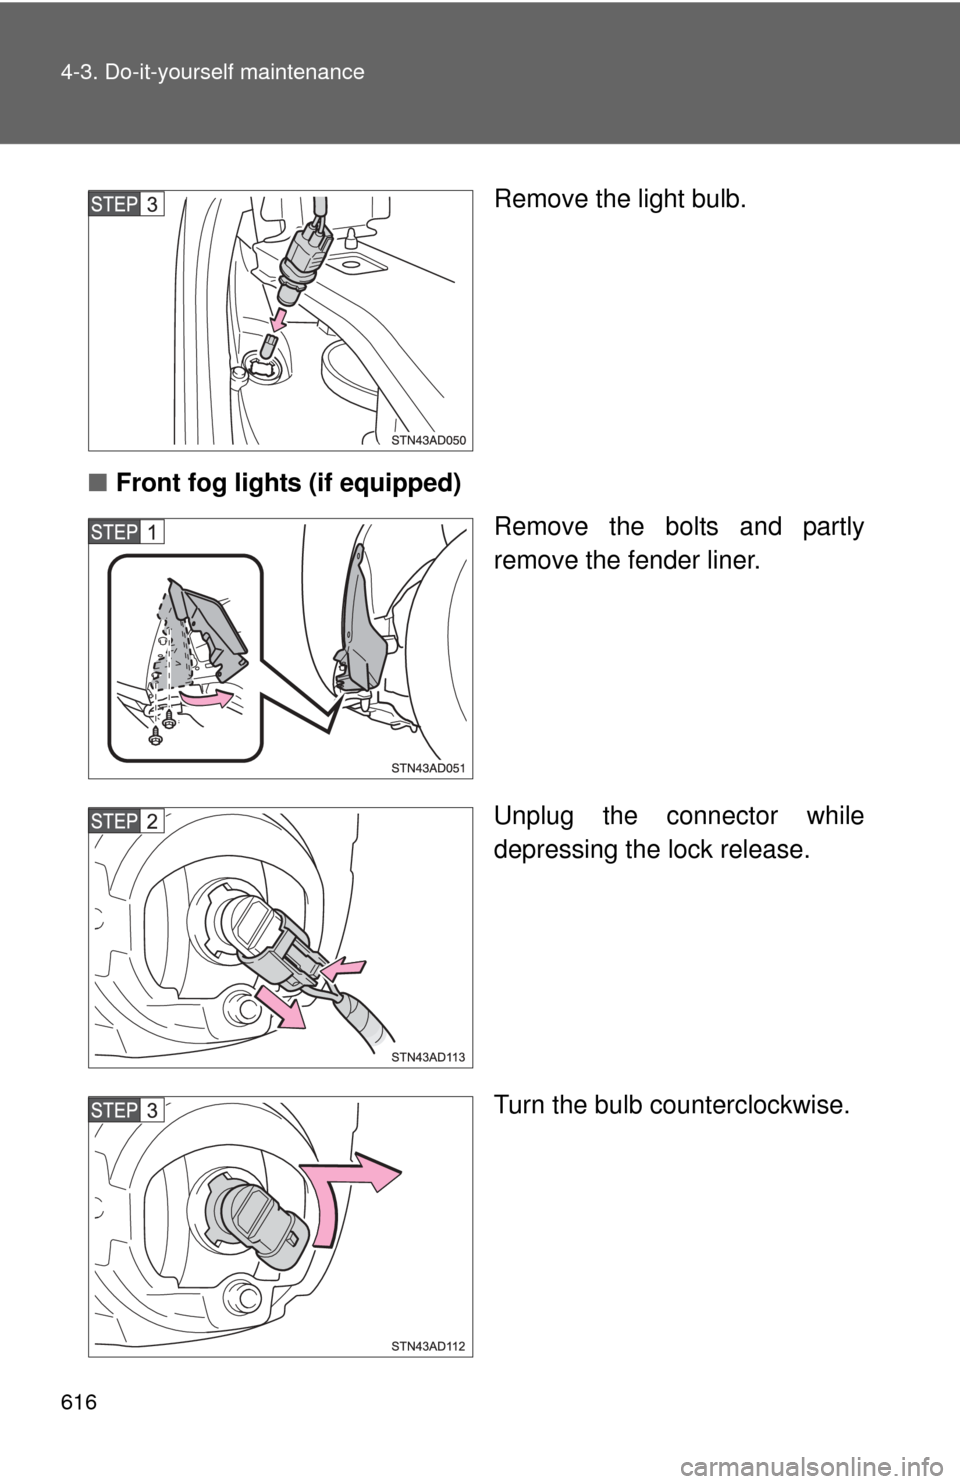
Remove the light bulb.
■ Front fog lights (if equipped)
Remove the bolts and partly
remove the fender liner.
Unplug the connector while
depressing the lock release.
Turn the bulb counterclockwise.
Page 617 of 740
617
4-3. Do-it-yourself maintenance
4
Maintenance and care
■
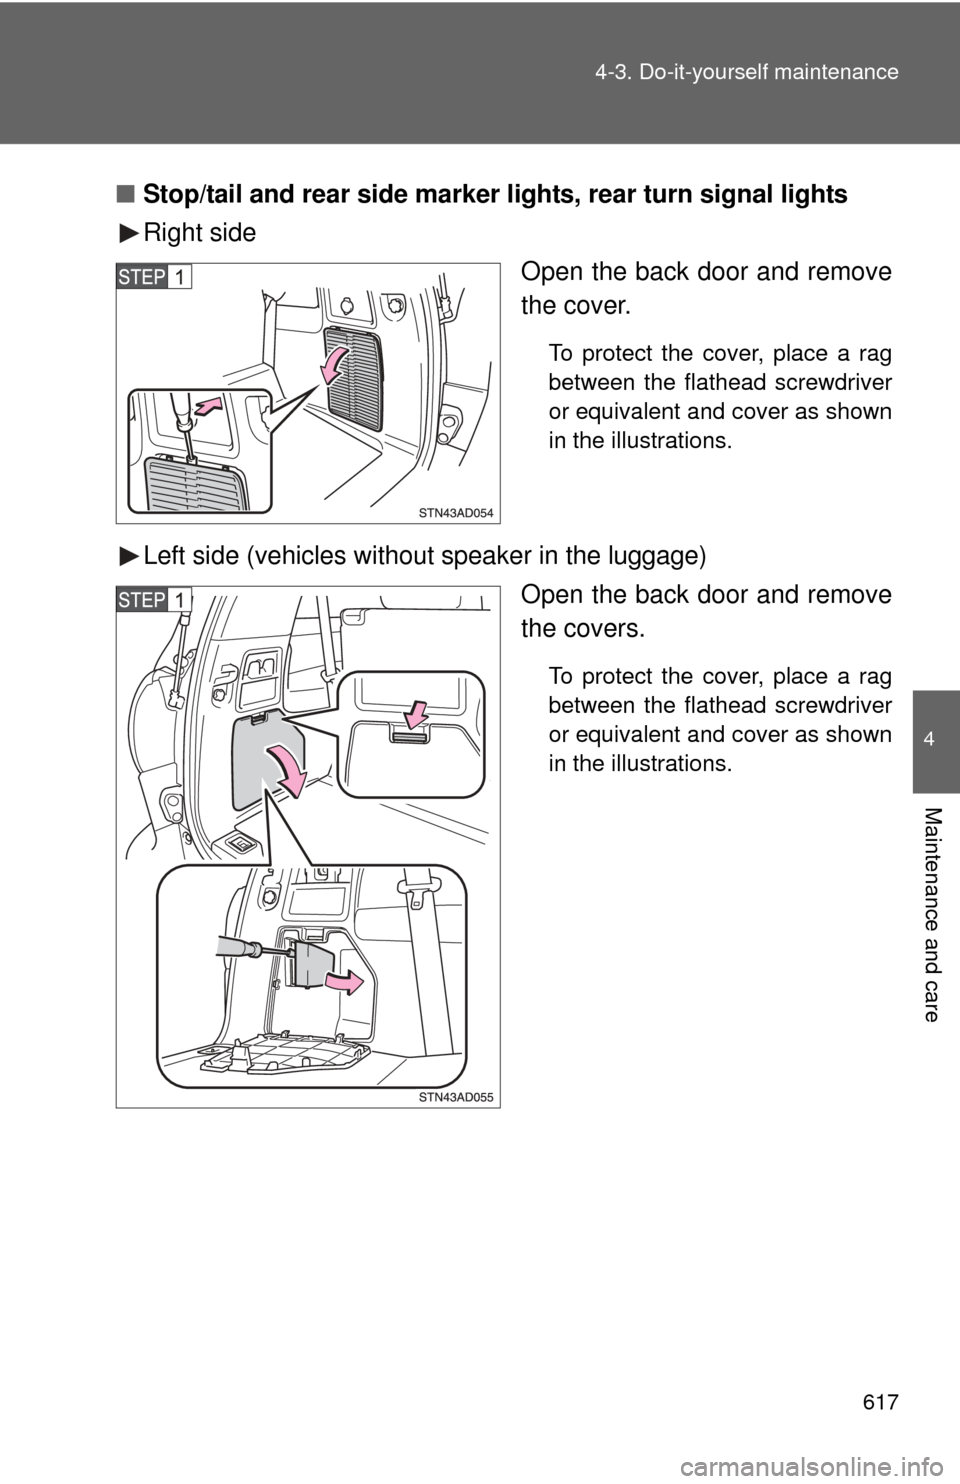
Stop/tail and rear side marker lights, rear turn signal lights
Right side
Open the back door and remove
the cover.
To protect the cover, place a rag
between the flathead screwdriver
or equivalent and cover as shown
in the illustrations.
Left side (vehicles without speaker in the luggage)Open the back door and remove
the covers.
To protect the cover, place a rag
between the flathead screwdriver
or equivalent and cover as shown
in the illustrations.
Page 618 of 740
618 4-3. Do-it-yourself maintenance
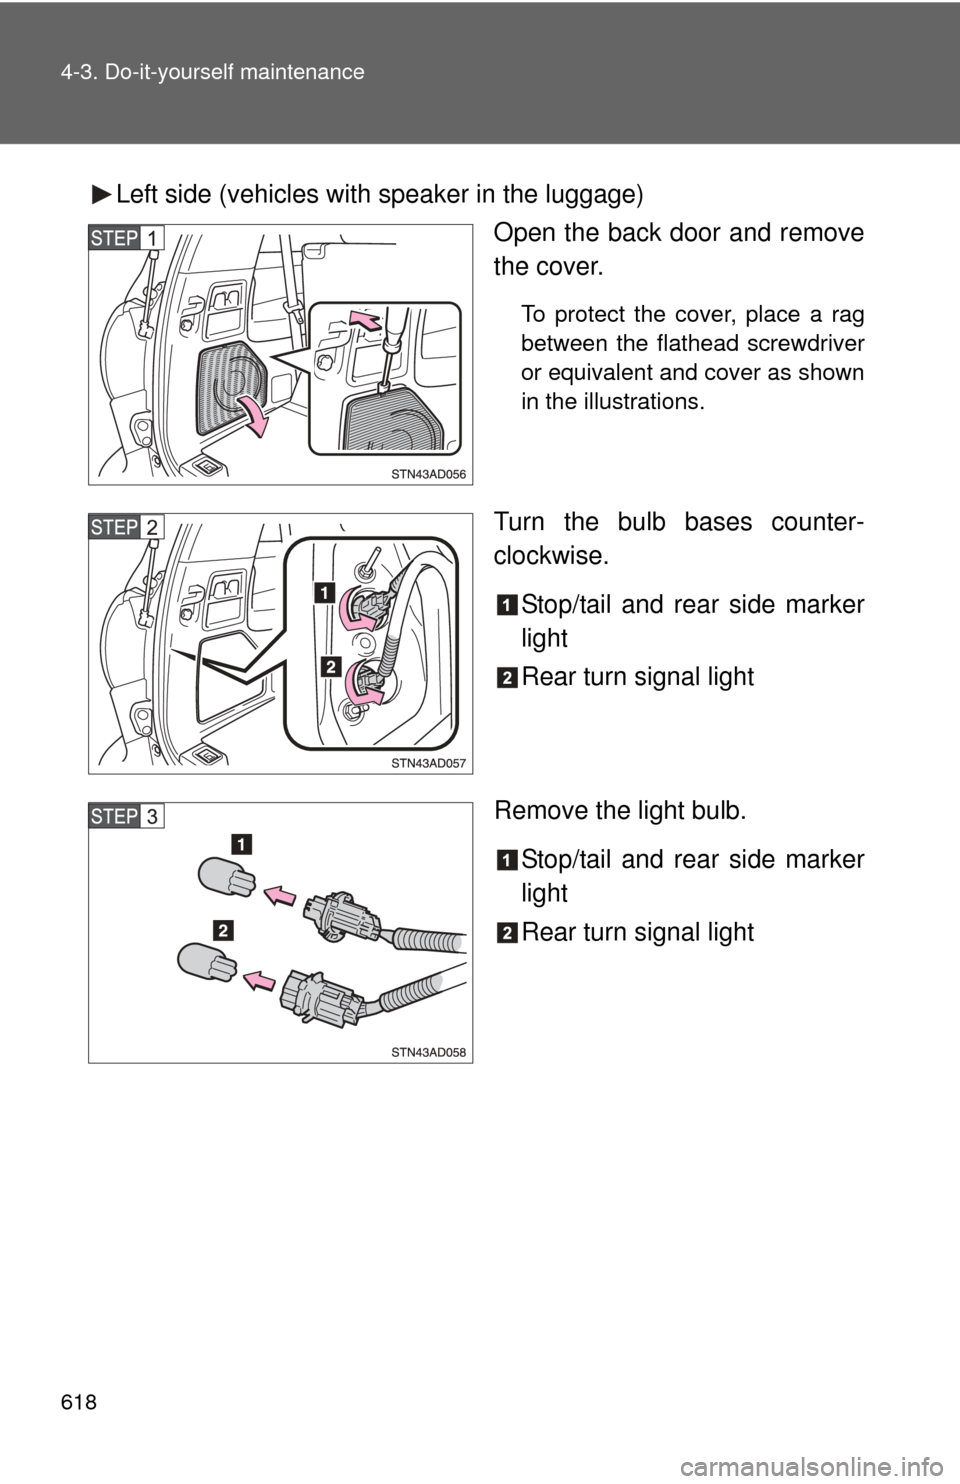
Left side (vehicles with speaker in the luggage)Open the back door and remove
the cover.
To protect the cover, place a rag
between the flathead screwdriver
or equivalent and cover as shown
in the illustrations.
Turn the bulb bases counter-
clockwise.
Stop/tail and rear side marker
light
Rear turn signal light
Remove the light bulb. Stop/tail and rear side marker
light
Rear turn signal light
Page 619 of 740
619
4-3. Do-it-yourself maintenance
4
Maintenance and care
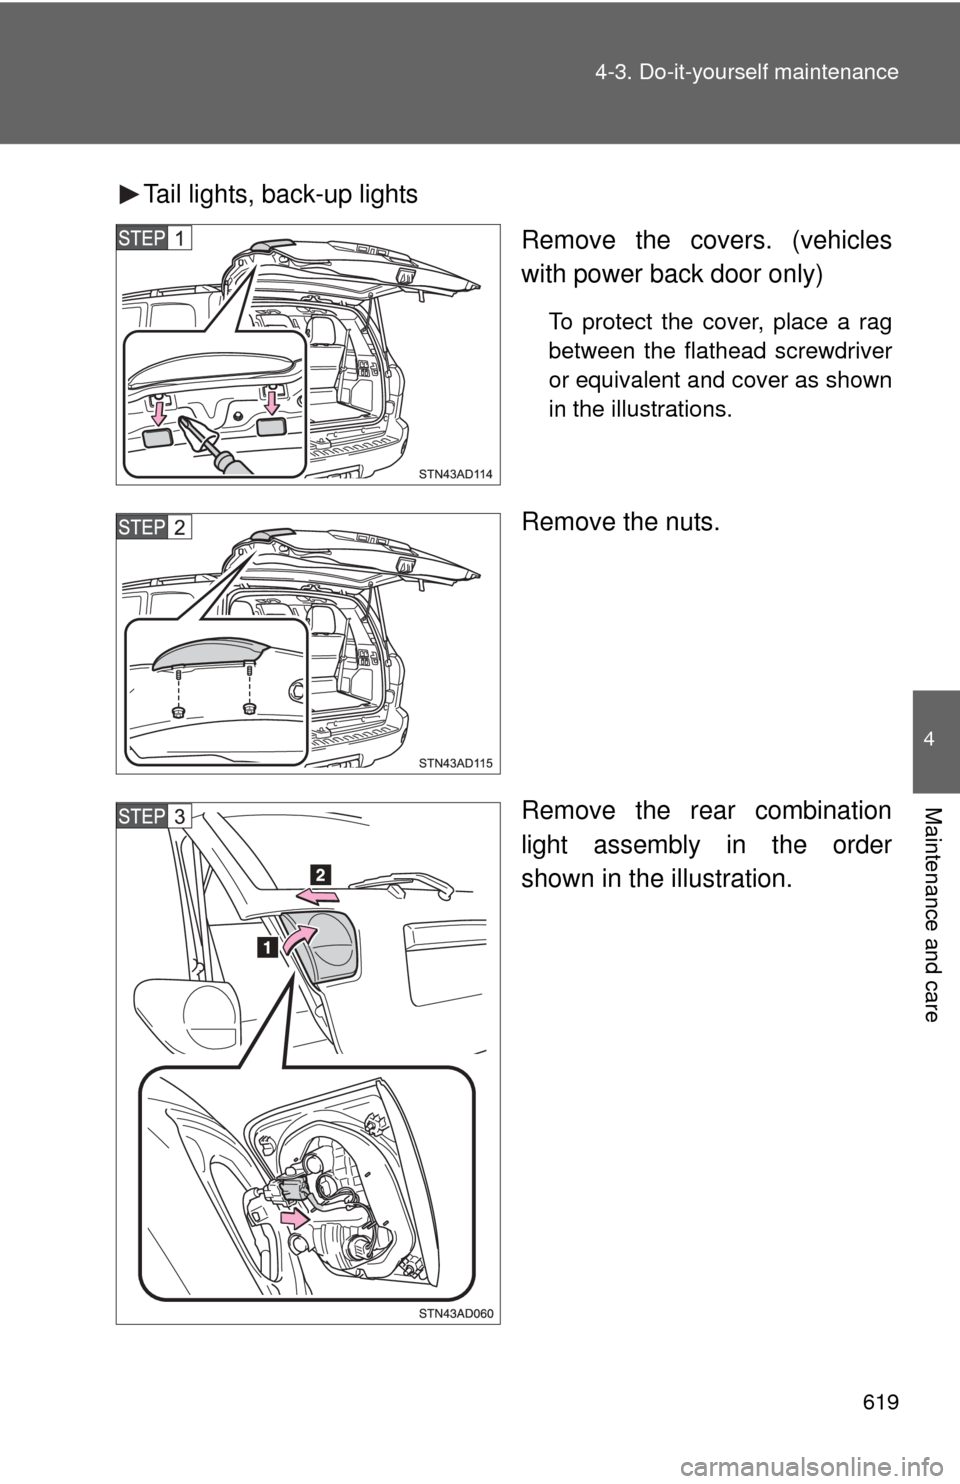
Tail lights, back-up lights
Remove the covers. (vehicles
with power back door only)
To protect the cover, place a rag
between the flathead screwdriver
or equivalent and cover as shown
in the illustrations.
Remove the nuts.
Remove the rear combination
light assembly in the order
shown in the illustration.
Page 620 of 740
620 4-3. Do-it-yourself maintenance
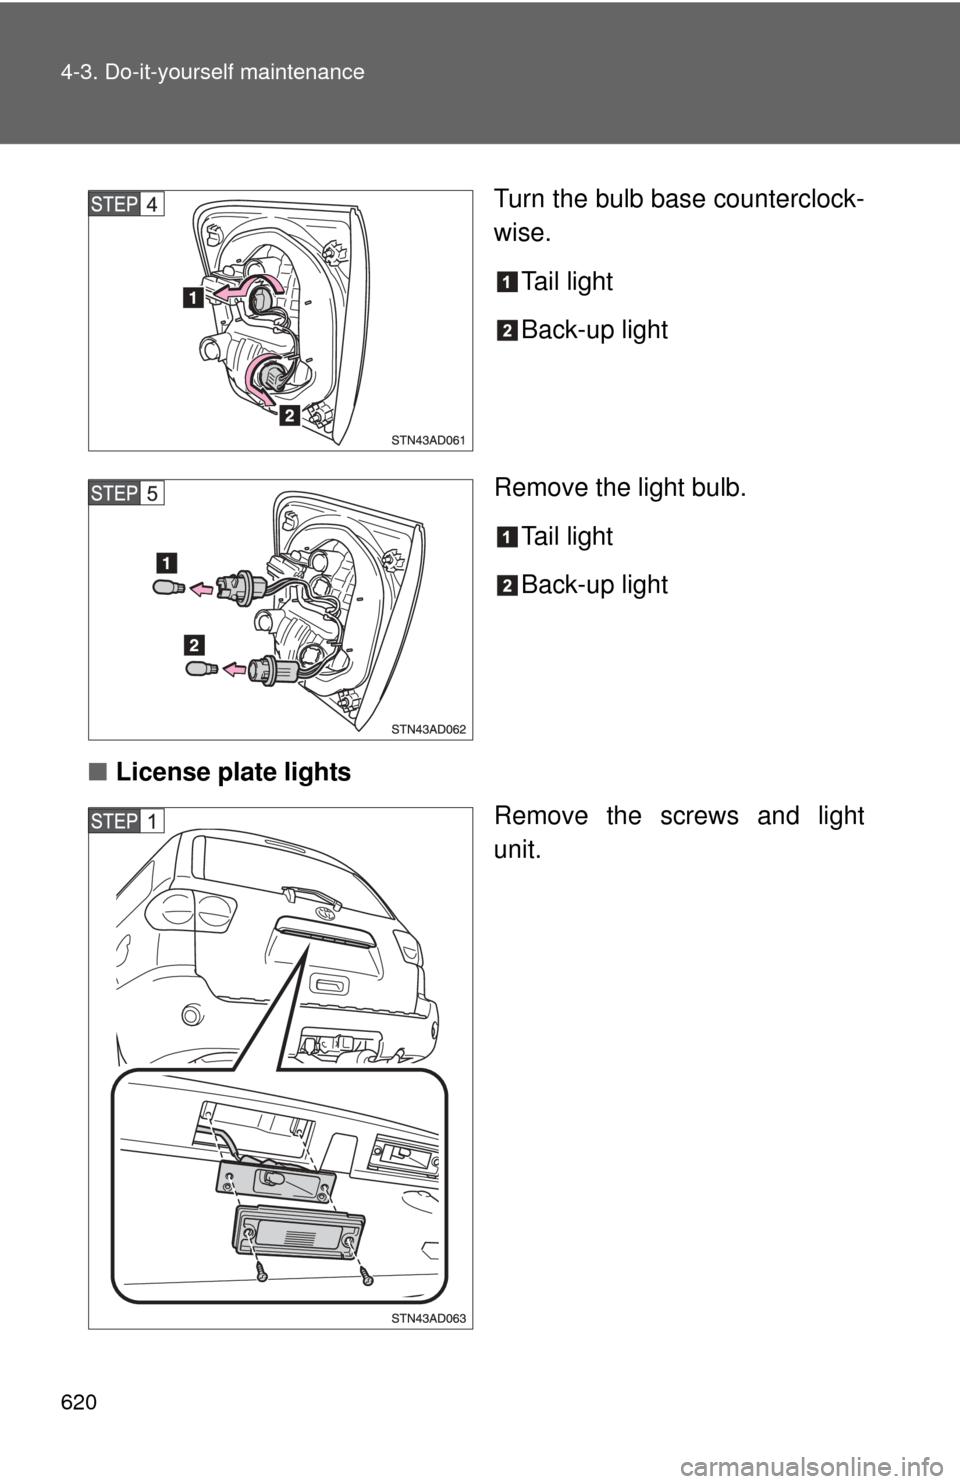
Turn the bulb base counterclock-
wise.Tail light
Back-up light
Remove the light bulb. Tail light
Back-up light
■ License plate lights
Remove the screws and light
unit.
Trending: fuel filter, tire pressure, open gas tank, battery location, phone, trailer, park assist
