USB TOYOTA SEQUOIA 2014 2.G Navigation Manual
[x] Cancel search | Manufacturer: TOYOTA, Model Year: 2014, Model line: SEQUOIA, Model: TOYOTA SEQUOIA 2014 2.GPages: 316, PDF Size: 26.31 MB
Page 8 of 316

TABLE OF CONTENTS
8
1. CONTROLS AND FEATURES ........ 12
OVERVIEW BUTTONS ......................... 12
“Apps” SCREEN .................................... 14
“Home” SCREEN ................................... 16
“Setup” SCREEN ................................... 20
2. NAVIGATION OPERATION ............ 22
REGISTERING HOME .......................... 22
REGISTERING PRESET
DESTINATIONS .................................. 24
OPERATION FLOW:
GUIDING THE ROUTE ....................... 25
SETTING HOME AS
THE DESTINATION ............................ 26
3. FUNCTION INDEX ........................... 27
FUNCTION INDEX ................................ 27
1. BASIC INFORMATION
BEFORE OPERATION .................. 30
INITIAL SCREEN ................................... 30
TOUCH SCREEN GESTURES ............. 32
TOUCH SCREEN OPERATION ............ 33
“Home” SCREEN OPERATION ............. 34
“Apps” SCREEN OPERATION .............. 35
ENTERING LETTERS AND NUMBERS/
LIST SCREEN OPERATION............... 36
SCREEN ADJUSTMENT ....................... 39
2. Bluetooth® SETTINGS.................... 41
REGISTERING/CONNECTING
Bluetooth® DEVICE............................. 41
SETTING Bluetooth® DETAILS ............. 46
3. OTHER SETTINGS .......................... 53
GENERAL SETTINGS ........................... 53
VOICE SETTINGS ................................. 58
DRIVER SETTINGS .............................. 60
MAINTENANCE .................................... 61
1. BASIC OPERATION ....................... 68
QUICK REFERENCE ............................. 68
SOME BASICS....................................... 70
2. RADIO OPERATION ....................... 75
AM/FM RADIO............................................... 75
XM Satellite Radio .................................. 84
INTERNET RADIO ................................. 90
3. MEDIA OPERATION ....................... 91
CD .......................................................... 91
USB MEMORY ....................................... 94
iPod ........................................................ 98
Bluetooth
® AUDIO................................ 102
AUX.......................................................... 106
4. AUDIO REMOTE CONTROLS...... 108
STEERING SWITCHES ....................... 108
5. SETUP ........................................... 109
AUDIO SETTINGS ............................... 109
6. TIPS FOR OPERATING
THE AUDIO SYSTEM.................. 111
OPERATING INFORMATION .............. 111
7. REAR SEAT ENTERTAINMENT
SYSTEM OPERATION ................ 120
REAR SEAT ENTERTAINMENT
SYSTEM FEATURES ........................ 120
PLAYING A Blu-ray Disc™ (BD) AND
DVD DISCS ....................................... 133
PLAYING AN AUDIO CD AND
MP3/WMA DISCS.............................. 148
PLAYING AN SD CARD....................... 151
USING THE VIDEO MODE .................. 156
1QUICK GUIDE
2BASIC FUNCTION
3AUDIO SYSTEM
Page 56 of 316
56
3. OTHER SETTINGS
■TRANSFERRING IMAGES
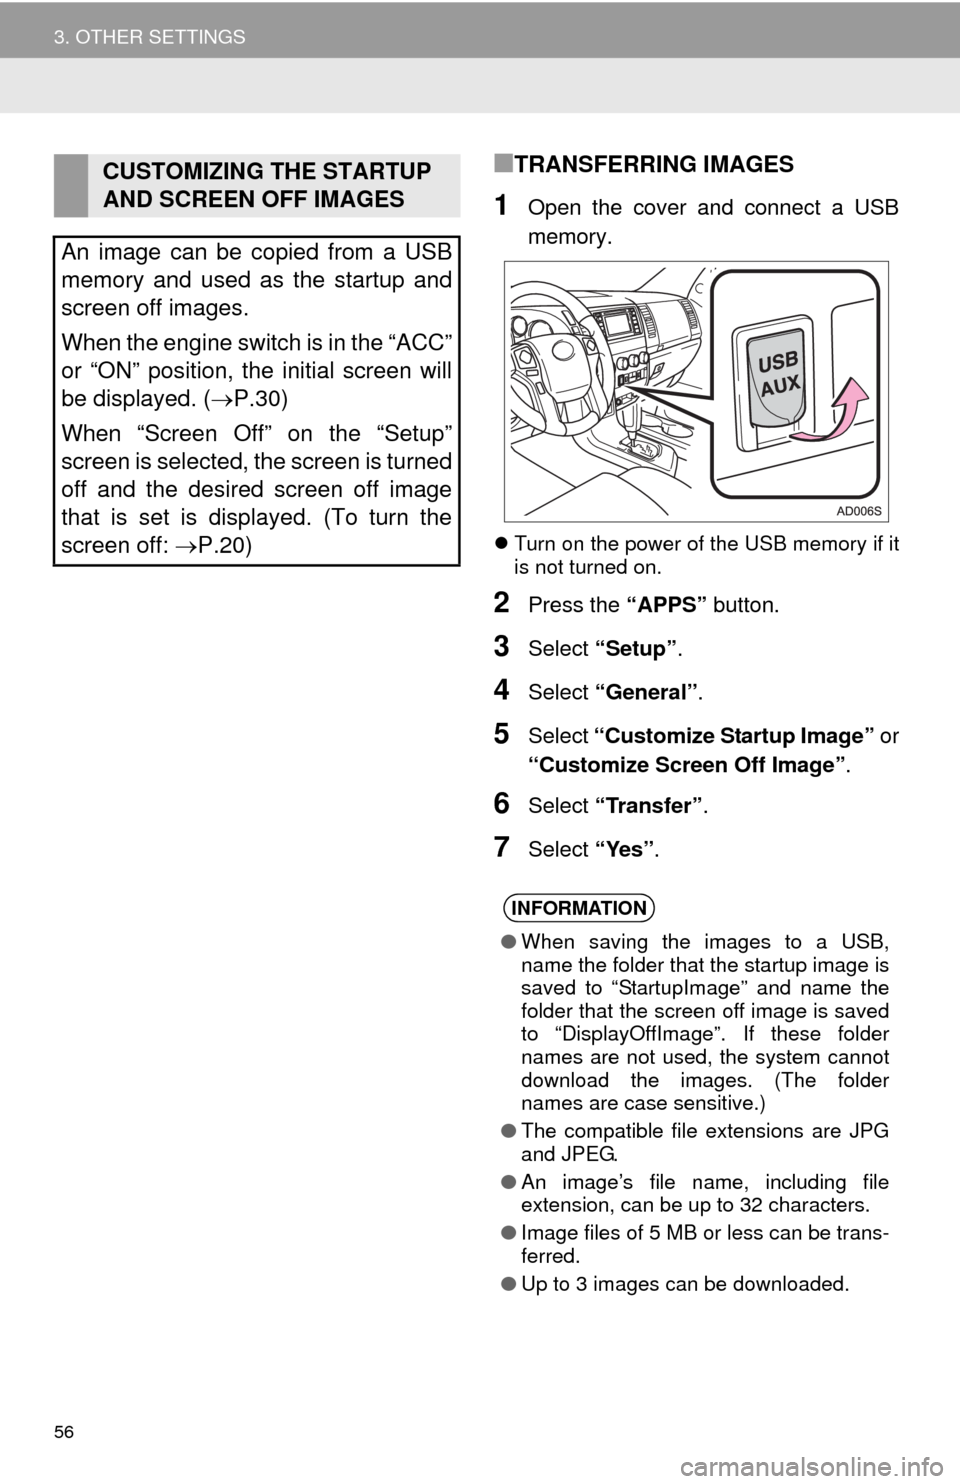
1Open the cover and connect a USB
memory.
Turn on the power of the USB memory if it
is not turned on.
2Press the “APPS” button.
3Select “Setup”.
4Select “General”.
5Select “Customize Startup Image” or
“Customize Screen Off Image”.
6Select “Transfer”.
7Select “Yes”.
CUSTOMIZING THE STARTUP
AND SCREEN OFF IMAGES
An image can be copied from a USB
memory and used as the startup and
screen off images.
When the engine switch is in the “ACC”
or “ON” position, the initial screen will
be displayed. (P.30)
When “Screen Off” on the “Setup”
screen is selected, the screen is turned
off and the desired screen off image
that is set is displayed. (To turn the
screen off: P.20)
INFORMATION
●When saving the images to a USB,
name the folder that the startup image is
saved to “StartupImage” and name the
folder that the screen off image is saved
to “DisplayOffImage”. If these folder
names are not used, the system cannot
download the images. (The folder
names are case sensitive.)
●The compatible file extensions are JPG
and JPEG.
●An image’s file name, including file
extension, can be up to 32 characters.
●Image files of 5 MB or less can be trans-
ferred.
●Up to 3 images can be downloaded.
Page 65 of 316
3
65
1
2
4
3
5
6
7
8
9
1. QUICK REFERENCE ..................... 68
2. SOME BASICS .............................. 70
TURNING THE SYSTEM
ON AND OFF ...................................... 70
SELECTING AN AUDIO SOURCE ....... 71
DISC SLOT ............................................ 72
USB/AUX PORT .................................... 72
SOUND SETTINGS............................... 73
VOICE COMMAND SYSTEM ................ 74
1. AM/FM RADIO...................................... 75
OVERVIEW............................................ 75
PRESETTING A STATION .................... 77
SELECTING A STATION
FROM THE LIST ................................. 77
CACHING A RADIO PROGRAM
(ENTUNE PREMIUM AUDIO
ONLY) ................................................. 78
RADIO BROADCAST DATA
SYSTEM .............................................. 79
TRAFFIC ANNOUNCEMENT
(FM RADIO) ........................................ 80
USING HD Radio™ TECHNOLOGY ..... 80
AVAILABLE HD Radio™
TECHNOLOGY ................................... 81
TROUBLESHOOTING GUIDE .............. 83
2. XM Satellite Radio ........................ 84
OVERVIEW............................................ 84
HOW TO SUBSCRIBE
TO XM Satellite Radio ......................... 86
DISPLAYING THE RADIO ID ................ 88
PRESETTING A CHANNEL .................. 88
SELECTING A CHANNEL
FROM THE LIST ................................. 88
IF THE SATELLITE RADIO TUNER
MALFUNCTIONS ................................ 89
3. INTERNET RADIO ........................ 90
LISTENING TO INTERNET RADIO....... 90
1BASIC OPERATION2RADIO OPERATION
AUDIO SYSTEM
Page 66 of 316
66
1. CD................................................... 91
OVERVIEW............................................ 91
PLAYING AN AUDIO CD ....................... 93
PLAYING AN MP3/WMA/AAC DISC ..... 93
2. USB MEMORY ............................... 94
OVERVIEW............................................ 94
PLAYING A USB AUDIO ....................... 97
3. iPod ................................................ 98
OVERVIEW............................................ 98
PLAYING AN iPod ............................... 101
4. Bluetooth® AUDIO ...................... 102
OVERVIEW.......................................... 102
CONNECTING A Bluetooth®
DEVICE ............................................. 105
LISTENING TO Bluetooth
® AUDIO ..... 105
5.AUX ................................................. 106
OVERVIEW.......................................... 106
1. STEERING SWITCHES ............... 108
1. AUDIO SETTINGS....................... 109
“Audio Settings” SCREEN .................... 109
1. OPERATING INFORMATION ..... 111
RADIO .................................................. 111
CD PLAYER AND DISC ....................... 112
iPod ...................................................... 114
FILE INFORMATION............................ 115
TERMS ................................................. 118
ERROR MESSAGES ........................... 119
3MEDIA OPERATION4AUDIO REMOTE CONTROLS
5SETUP
6TIPS FOR OPERATING
THE AUDIO SYSTEM
Page 69 of 316
69
1. BASIC OPERATION
3
AUDIO SYSTEM
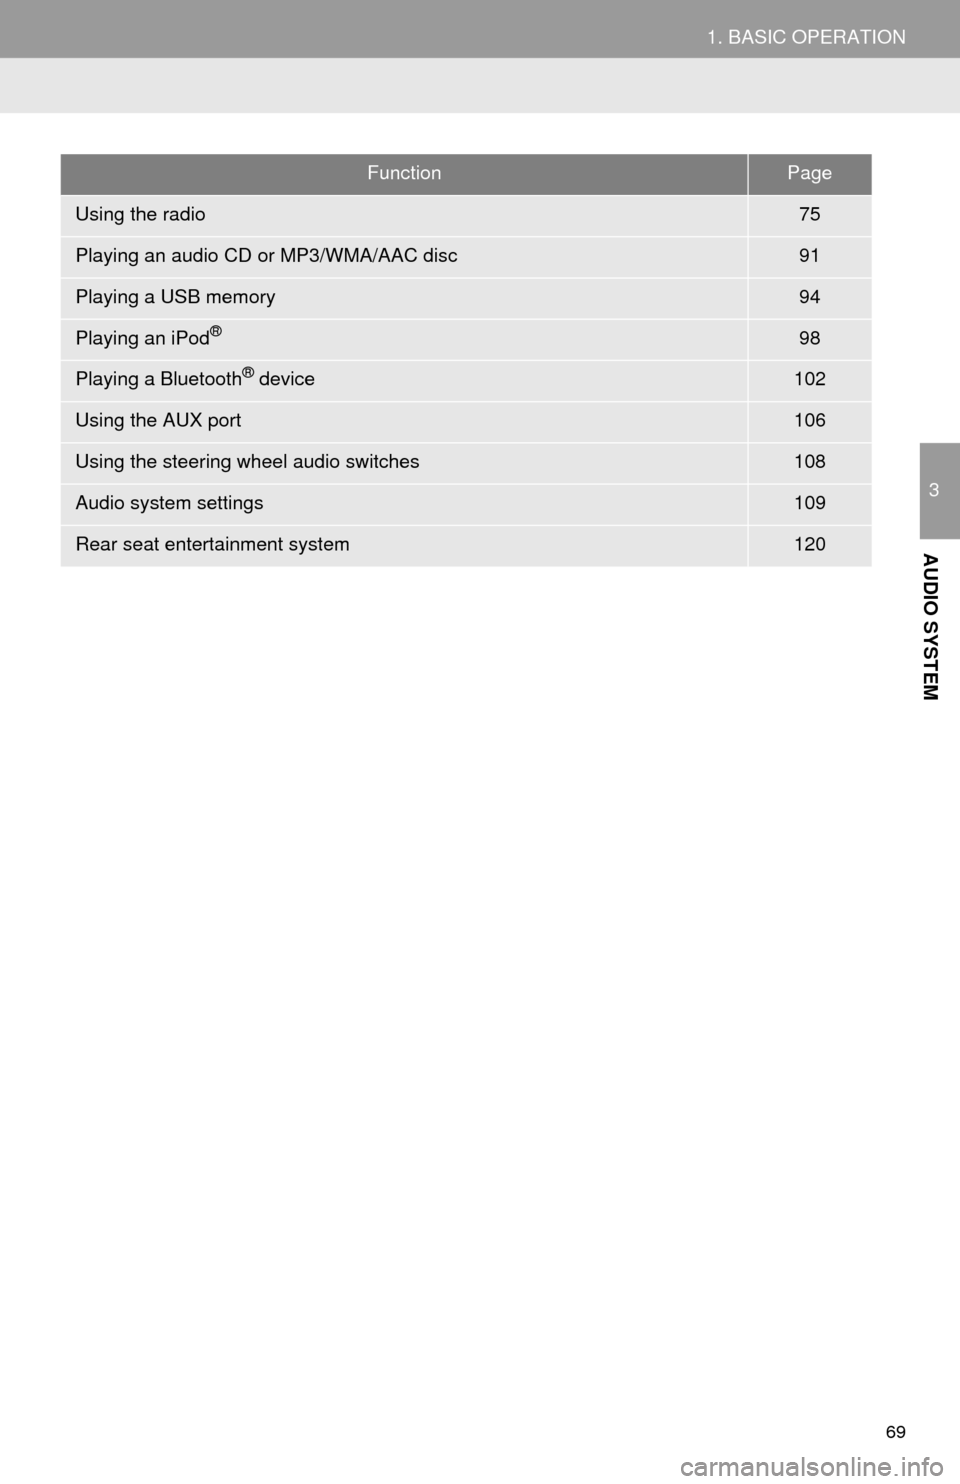
FunctionPage
Using the radio75
Playing an audio CD or MP3/WMA/AAC disc91
Playing a USB memory94
Playing an iPod®98
Playing a Bluetooth® device102
Using the AUX port106
Using the steering wheel audio switches108
Audio system settings109
Rear seat entertainment system120
Page 72 of 316
72
1. BASIC OPERATION
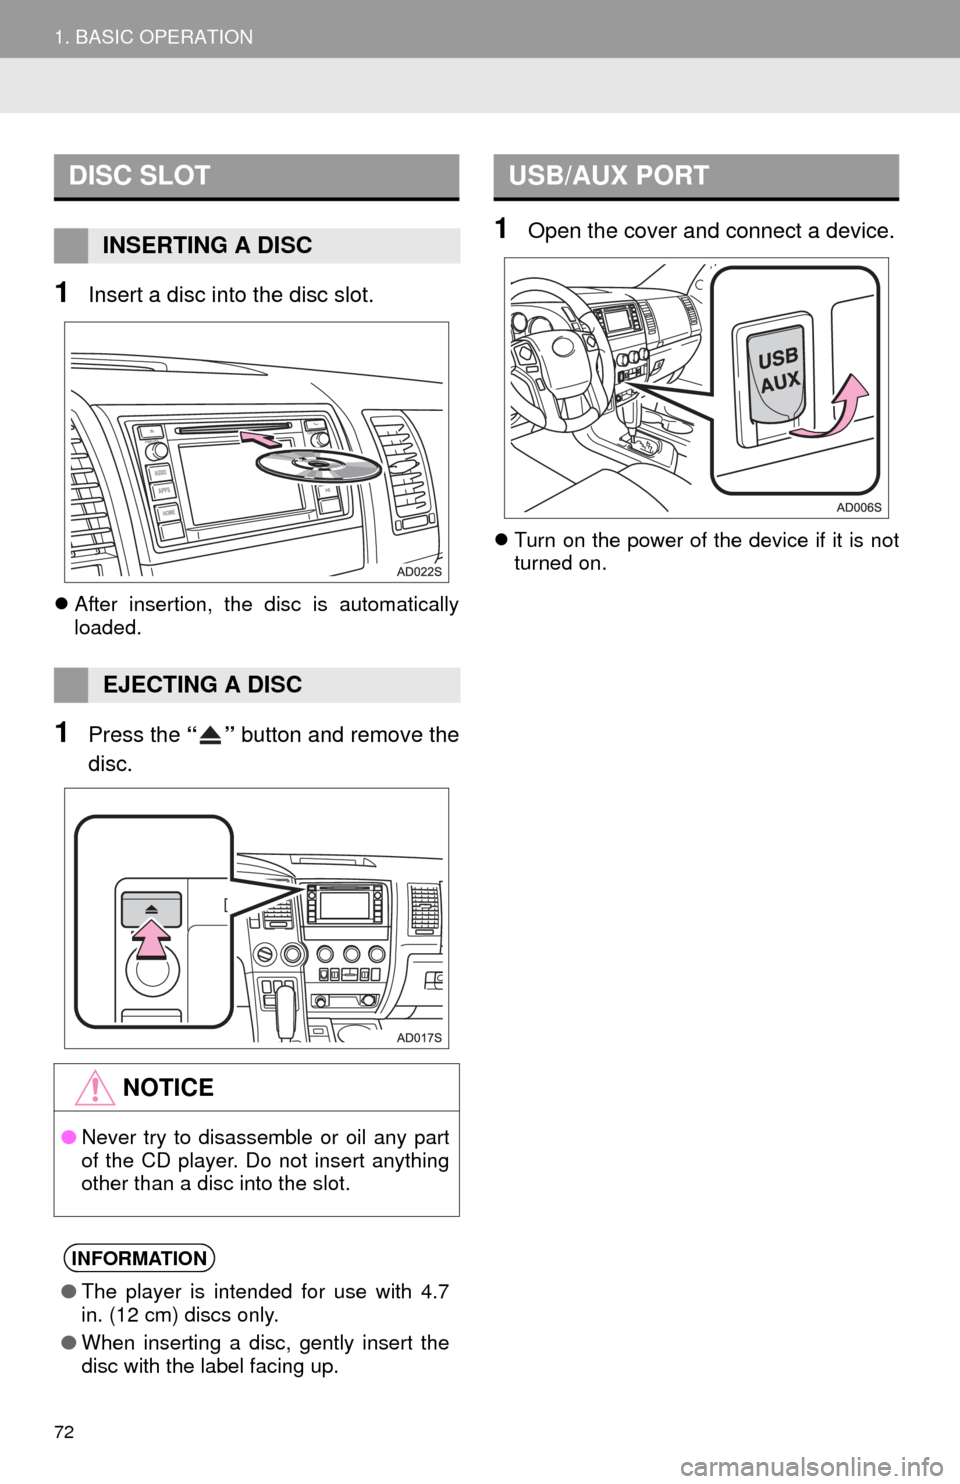
1Insert a disc into the disc slot.
After insertion, the disc is automatically
loaded.
1Press the “” button and remove the
disc.
1Open the cover and connect a device.
Turn on the power of the device if it is not
turned on.
DISC SLOT
INSERTING A DISC
EJECTING A DISC
NOTICE
●Never try to disassemble or oil any part
of the CD player. Do not insert anything
other than a disc into the slot.
INFORMATION
●The player is intended for use with 4.7
in. (12 cm) discs only.
●When inserting a disc, gently insert the
disc with the label facing up.
USB/AUX PORT
Page 90 of 316
90
2. RADIO OPERATION
3. INTERNET RADIO*
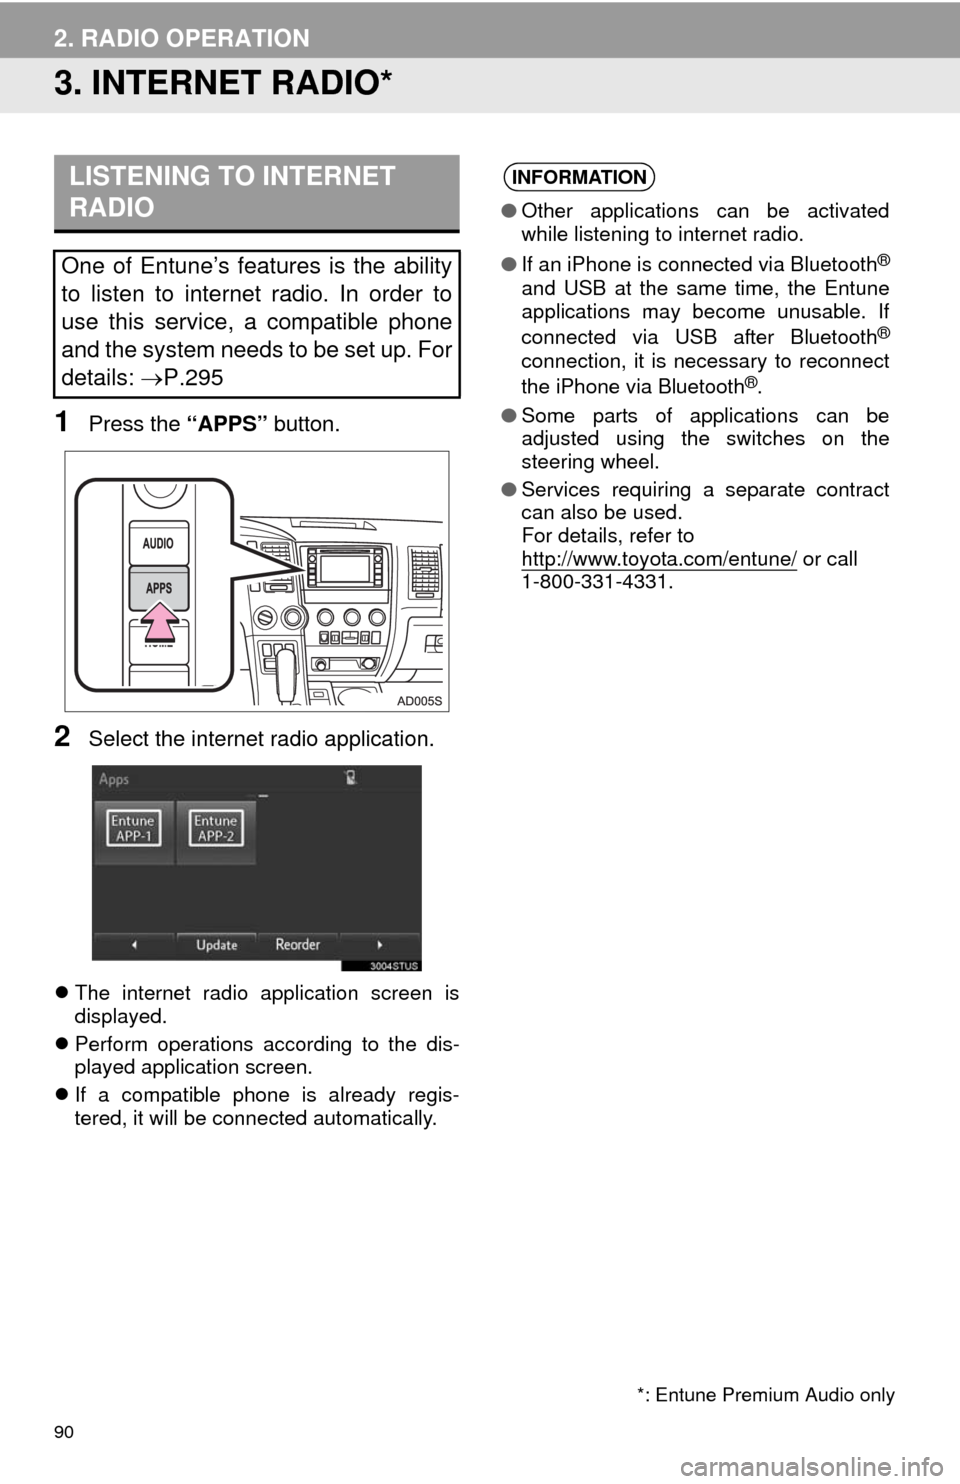
1Press the “APPS” button.
2Select the internet radio application.
The internet radio application screen is
displayed.
Perform operations according to the dis-
played application screen.
If a compatible phone is already regis-
tered, it will be connected automatically.
LISTENING TO INTERNET
RADIO
One of Entune’s features is the ability
to listen to internet radio. In order to
use this service, a compatible phone
and the system needs to be set up. For
details: P.295
INFORMATION
●Other applications can be activated
while listening to internet radio.
●If an iPhone is connected via Bluetooth
®
and USB at the same time, the Entune
applications may become unusable. If
connected via USB after Bluetooth
®
connection, it is necessary to reconnect
the iPhone via Bluetooth®.
●Some parts of applications can be
adjusted using the switches on the
steering wheel.
●Services requiring a separate contract
can also be used.
For details, refer to
http://www.toyota.com/entune/
or call
1-800-331-4331.
*: Entune Premium Audio only
Page 94 of 316
94
3. MEDIA OPERATION
2. USB MEMORY
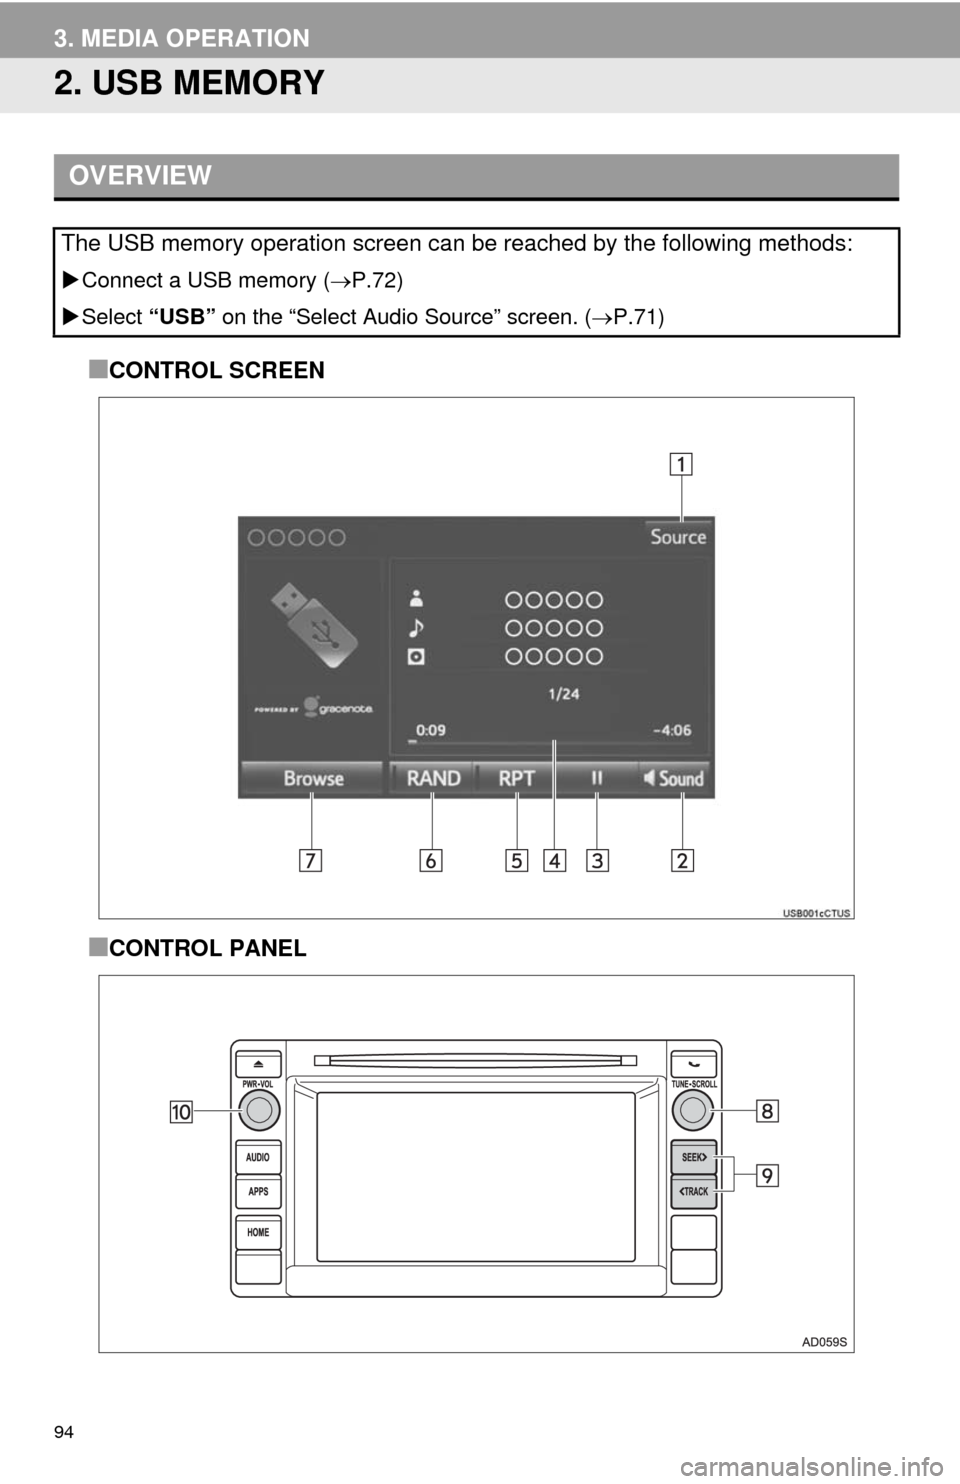
■CONTROL SCREEN
■CONTROL PANEL
OVERVIEW
The USB memory operation screen can be reached by the following methods:
Connect a USB memory (P.72)
Select “USB” on the “Select Audio Source” screen. (P.71)
Page 96 of 316
96
3. MEDIA OPERATION
CAUTION
●Do not operate the player’s controls or connect the USB memory while driving.
NOTICE
●Do not leave your portable player in the car. In particular, high temperatures inside the
vehicle may damage the portable player.
●Do not push down on or apply unnecessary pressure to the portable player while it is con-
nected as this may damage the portable player or its terminal.
●Do not insert foreign objects into the port as this may damage the portable player or its
terminal.
INFORMATION
●If tag information exists, the file names will be changed to track names.
Page 97 of 316
97
3. MEDIA OPERATION
3
AUDIO SYSTEM
1Select the repeat button to change on/
off.
1Select the random button to change
on/off.
PLAYING A USB AUDIO
REPEATING
The file/track or folder/album currently
being listened to can be repeated.
RANDOM ORDER
Files/tracks or folders/albums can be
automatically and randomly selected.