lock TOYOTA SEQUOIA 2015 2.G Navigation Manual
[x] Cancel search | Manufacturer: TOYOTA, Model Year: 2015, Model line: SEQUOIA, Model: TOYOTA SEQUOIA 2015 2.GPages: 316, PDF Size: 6.4 MB
Page 86 of 316
86
2. RADIO OPERATION
HOW TO SUBSCRIBE TO XM
Satellite Radio
To listen to a satellite radio broadcast
in the vehicle, a subscription to the XM
Satellite Radio service is necessary.
An XM Satellite Radio is a tuner de-
signed exclusively to receive broad-
casts provided under a separate
subscription. Availability is limited to
the 48 contiguous U.S. states and
some Canadian provinces.
HOW TO SUBSCRIBE
It is necessary to enter into a separate
service agreement with XM Satellite
Radio in order to receive satellite
broadcast programming in the vehicle.
Additional activation and service sub-
scription fees apply that are not includ-
ed in the purchase price of the vehicle
and digital satellite tuner.
For complete information on subscrip-
tion rates and terms, or to subscribe to
XM Satellite Radio:
U.S.A.
Refer to
www.siriusxm.com or call
1-800-967-2346.
Canada
Refer to www.xmradio.ca
or call
1-877-209-0079.
NOTICE
● XM Radio Services Legal Disclaimers
and Warnings
• Fees and Taxes Subscription fee,
taxes, one time activation fee, and
other fees may apply. Subscription fee
is consumer only. All fees and pro-
gramming subject to change.
Subscriptions subject to Customer
Agreement available at www.siri-
usxm.com. (U.S.A.) or www.xmra-
dio.ca (Canada) XM service only
available in the 48 contiguous United
States and Canada.
Explicit Language Notice Channels
with frequent explicit language are indi-
cated with an “XL” preceding the chan-
nel name. Channel blocking is
available for XM Satellite Radio receiv-
ers by notifying XM at;
U.S.A. Customers:
Visit www.siriusxm.com or calling
1-800-967-2346
Canadian Customers:
Visit www.xmradio.ca or calling
1-877-209-0079
● It is prohibited to copy, decompile, disas-
semble, reverse engineer, hack, manip-
ulate, or otherwise make available any
technology or software incorporated in
receivers compatible with the XM Satel-
lite Radio System or that support the XM
website, the Online Service or any of its
content. Furthermore, the AMBE
® voice
compression software included in this
product is protected by intellectual prop-
erty rights including patent rights, copy-
rights, and trade secrets of Digital Voice
Systems, Inc.
● Note: this applies to XM receivers only
and not XM Ready devices.
Page 111 of 316
111
AUDIO SYSTEM
3
6. TIPS FOR OPERATING THE AUDIO SYSTEM
1. OPERATING INFORMATION
Fading and drifting stations: Generally, the
effective range of FM is about 25 miles (40
km). Once outside this range, you may no-
tice fading and drifting, which increase with
the distance from the radio transmitter.
They are often accompanied by distortion.
Multi-path: FM signals are reflective, mak-
ing it possible for 2 signals to reach the ve-
hicle’s antenna at the same time. If this
happens, the signals will cancel each other
out, causing a momentary flutter or loss of
reception.
Static and fluttering: These occur when
signals are blocked by buildings, trees or
other large objects. Increasing the bass
level may reduce static and fluttering.
Station swapping: If the FM signal being
listened to is interrupted or weakened, and
there is another st rong station nearby on
the FM band, the radio may tune in the
second station until the original signal can
be picked up again.
Fading: AM broadcasts are reflected by
the upper atmosphere — especially at
night. These reflected signals can interfere
with those received directly from the radio
station, causing the radio station to sound
alternately strong and weak.
Station interference: When a reflected sig-
nal and a signal received directly from a ra-
dio station are very nearly the same
frequency, they can interfere with each
other, making it difficult to hear the broad-
cast.
Static: AM is easily affected by external
sources of electrical noise, such as high
tension power lines, lightening or electrical
motors. This results in static.
NOTICE
● To avoid damage to the audio system:
• Be careful not to spill beverages over
the audio system.
• Do not put anything other than an appropriate disc into the disc slot.
INFORMATION
● The use of a cellular phone inside or
near the vehicle may cause a noise from
the speakers of the audio system which
you are listening to. However, this does
not indicate a malfunction.
RADIO
Usually, a problem with radio reception
does not mean there is a problem with
the radio — it is just the normal result
of conditions outside the vehicle.
For example, nearby buildings and ter-
rain can interfere with FM reception.
Power lines or phone wires can inter-
fere with AM signals. And of course, ra-
dio signals have a limited range. The
farther the vehicle is from a station, the
weaker its signal will be. In addition, re-
ception conditions change constantly
as the vehicle moves.
Here, some common reception prob-
lems that probably do not indicate a
problem with the radio are described.
FM
AM
Page 121 of 316
121
7. REAR SEAT ENTERTAINMENT SYSTEM OPERATION
AUDIO SYSTEM
3
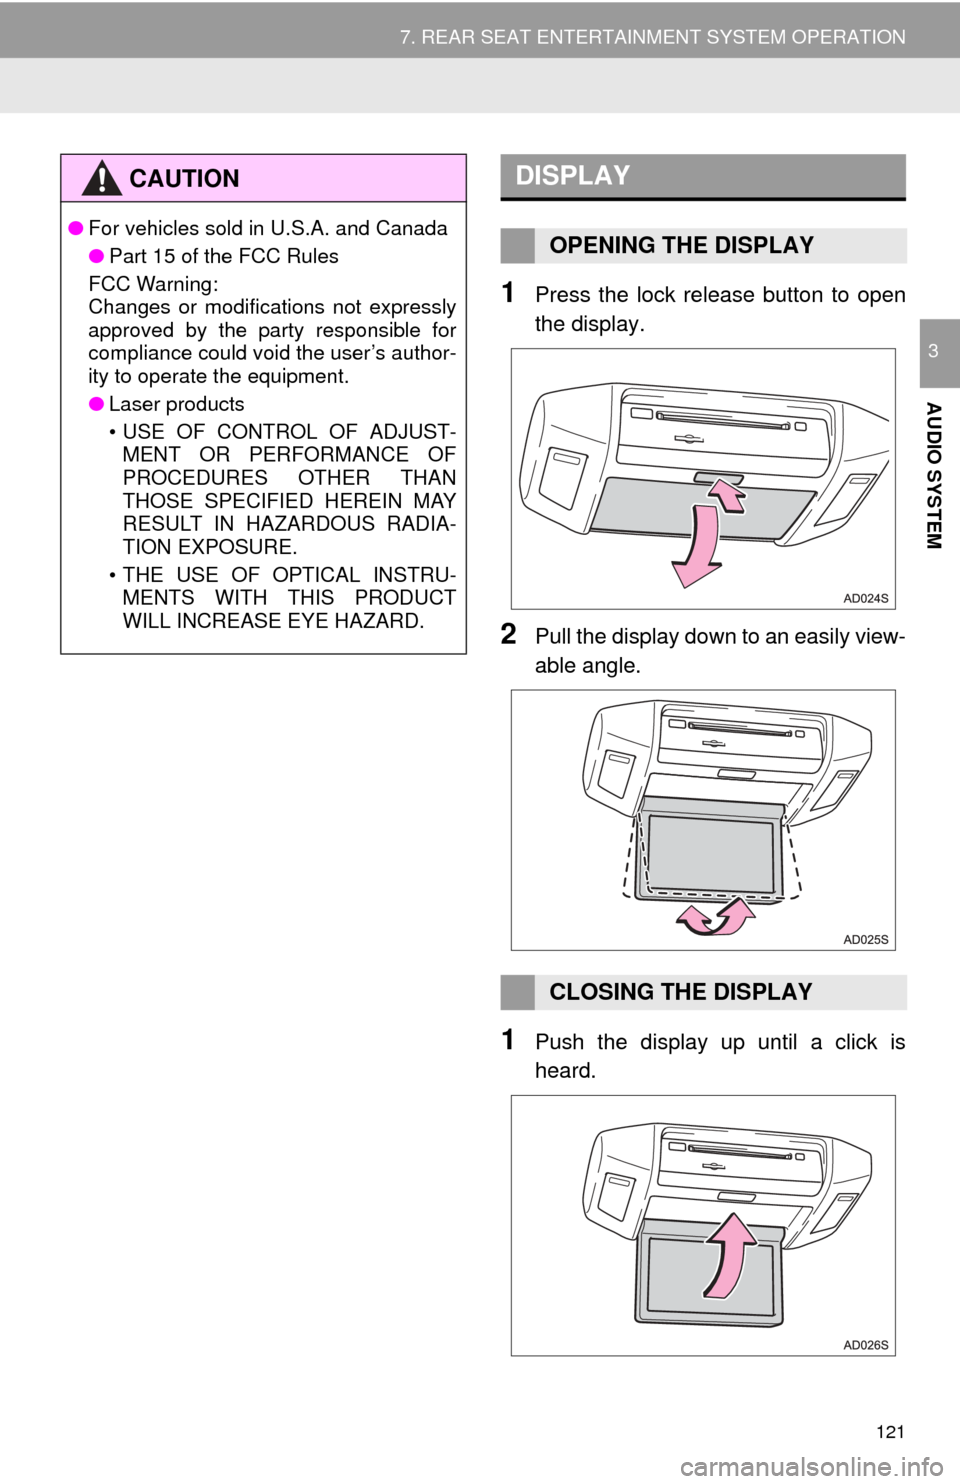
1Press the lock release button to open
the display.
2Pull the display down to an easily view-
able angle.
1Push the display up until a click is
heard.
CAUTION
●For vehicles sold in U.S.A. and Canada
●Part 15 of the FCC Rules
FCC Warning:
Changes or modifications not expressly
approved by the party responsible for
compliance could void the user’s author-
ity to operate the equipment.
● Laser products
• USE OF CONTROL OF ADJUST-
MENT OR PERFORMANCE OF
PROCEDURES OTHER THAN
THOSE SPECIFIED HEREIN MAY
RESULT IN HAZARDOUS RADIA-
TION EXPOSURE.
• THE USE OF OPTICAL INSTRU- MENTS WITH THIS PRODUCT
WILL INCREASE EYE HAZARD.
DISPLAY
OPENING THE DISPLAY
CLOSING THE DISPLAY
Page 128 of 316
128
7. REAR SEAT ENTERTAINMENT SYSTEM OPERATION
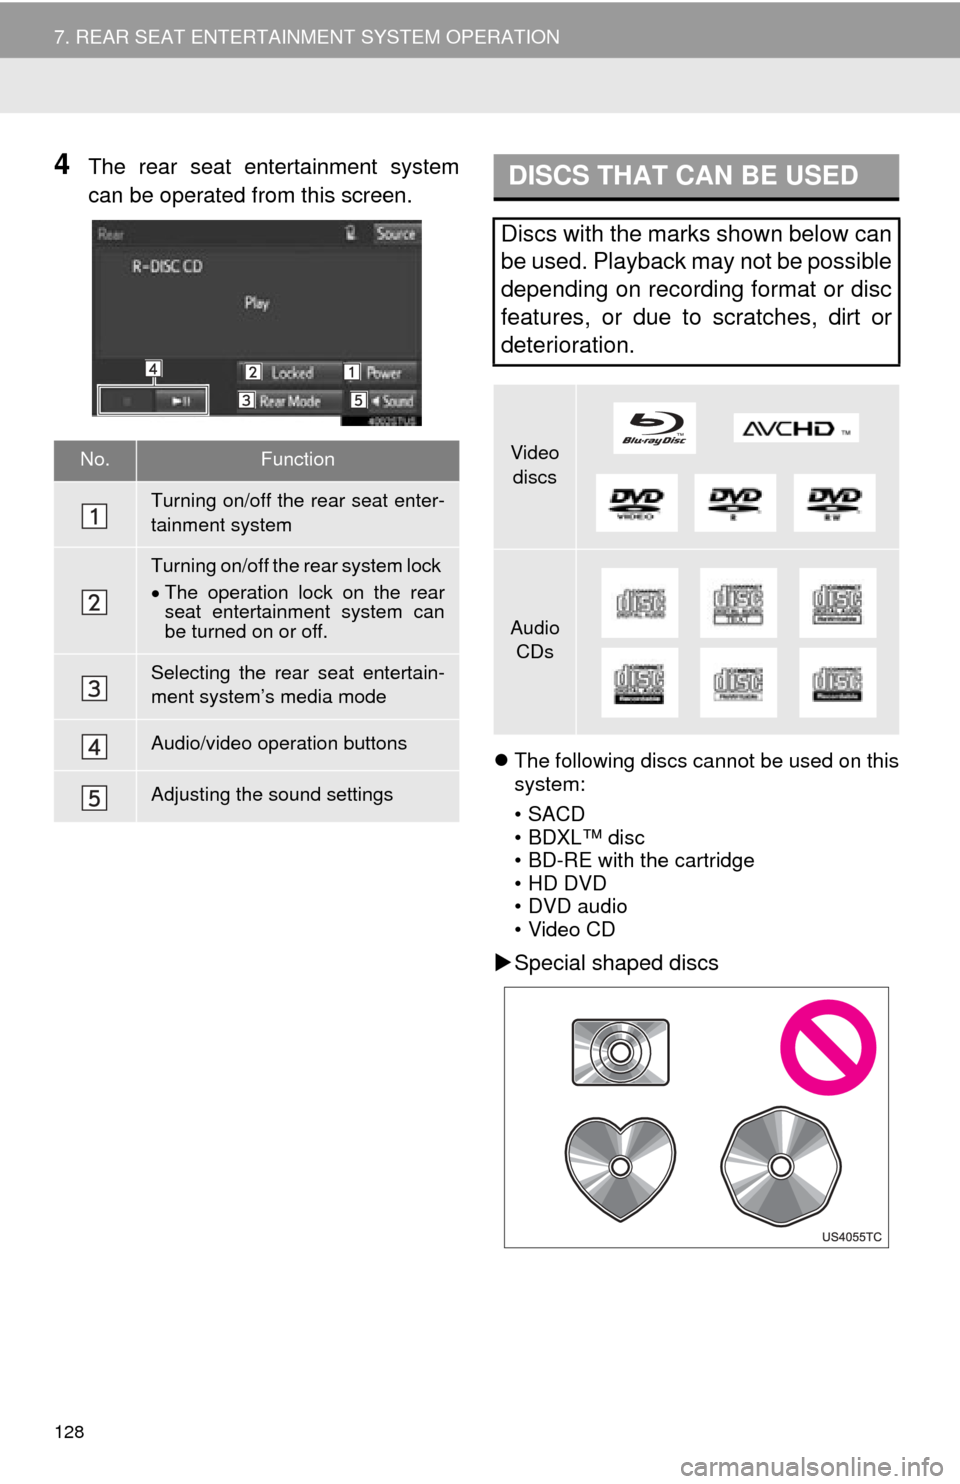
4The rear seat entertainment system
can be operated from this screen.
The following discs cannot be used on this
system:
•SACD
•BDXL™ disc
• BD-RE with the cartridge
• HD DVD
• DVD audio
• Video CD
Special shaped discs
No.Function
Turning on/off the rear seat enter-
tainment system
Turning on/off the rear system lock
The operation lock on the rear
seat entertainment system can
be turned on or off.
Selecting the rear seat entertain-
ment system’s media mode
Audio/video operation buttons
Adjusting the sound settings
DISCS THAT CAN BE USED
Discs with the marks shown below can
be used. Playback may not be possible
depending on recording format or disc
features, or due to scratches, dirt or
deterioration.
Video
discs
Audio CDs
Page 140 of 316
140
7. REAR SEAT ENTERTAINMENT SYSTEM OPERATION
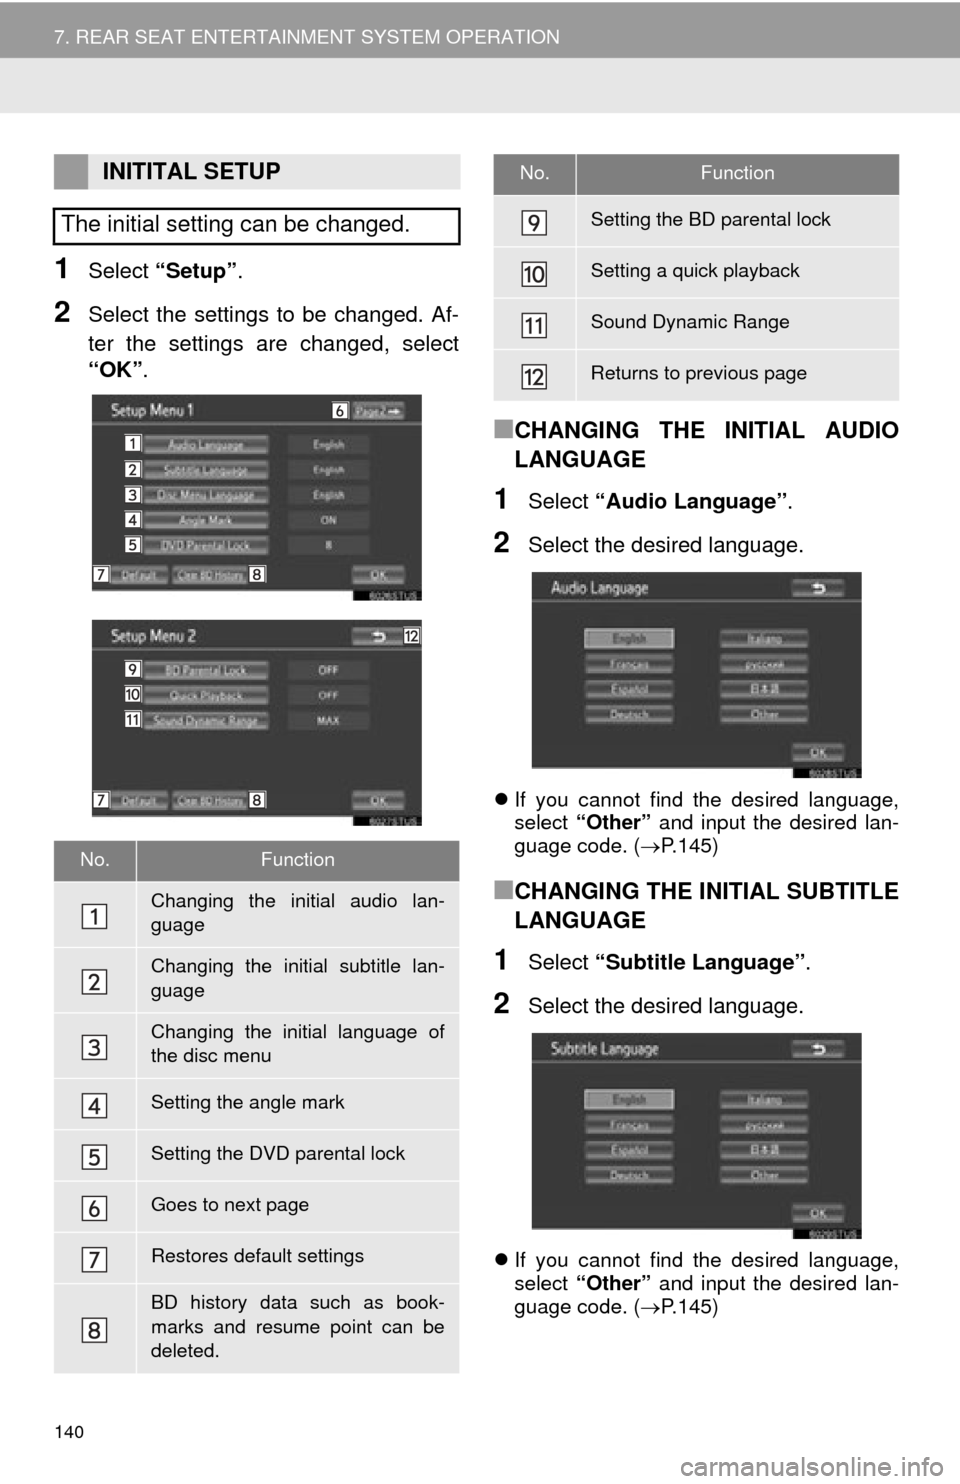
1Select “Setup” .
2Select the settings to be changed. Af-
ter the settings are changed, select
“OK”.
■CHANGING THE INITIAL AUDIO
LANGUAGE
1Select “Audio Language” .
2Select the desired language.
If you cannot find the desired language,
select “Other” and input the desired lan-
guage code. ( P.145)
■CHANGING THE INITIAL SUBTITLE
LANGUAGE
1Select “Subtitle Language” .
2Select the desired language.
If you cannot find the desired language,
select “Other” and input the desired lan-
guage code. ( P.145)
INITITAL SETUP
The initial setting can be changed.
No.Function
Changing the initial audio lan-
guage
Changing the initial subtitle lan-
guage
Changing the initial language of
the disc menu
Setting the angle mark
Setting the DVD parental lock
Goes to next page
Restores default settings
BD history data such as book-
marks and resume point can be
deleted.
Setting the BD parental lock
Setting a quick playback
Sound Dynamic Range
Returns to previous page
No.Function
Page 141 of 316
141
7. REAR SEAT ENTERTAINMENT SYSTEM OPERATION
AUDIO SYSTEM
3
■CHANGING THE INITIAL LAN-
GUAGE OF THE DISC MENU
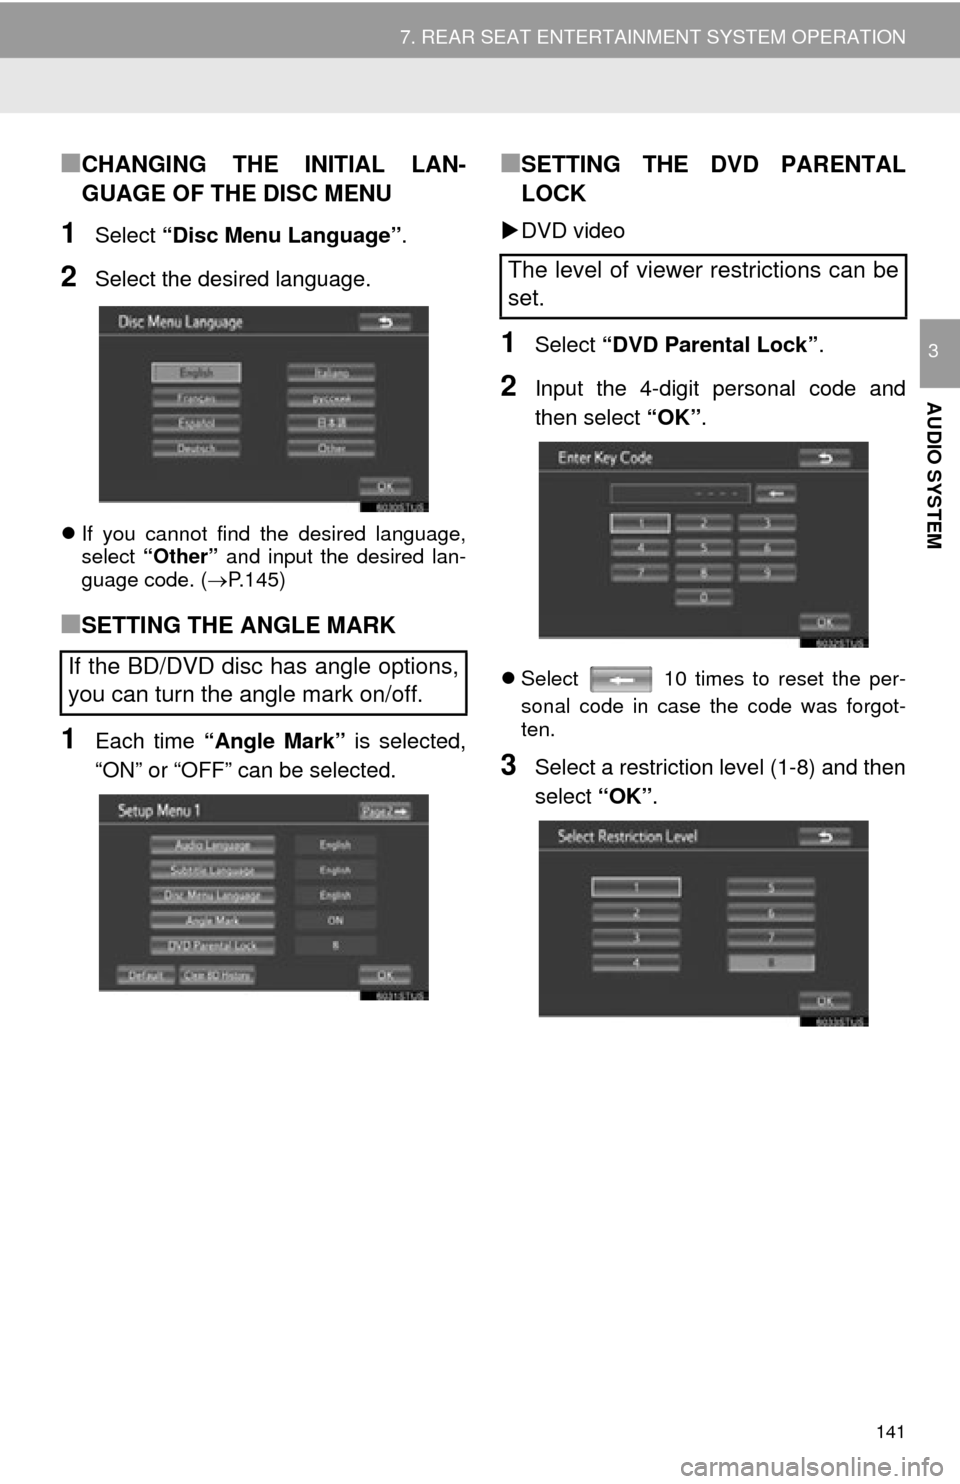
1Select “Disc Menu Language” .
2Select the desired language.
If you cannot find the desired language,
select “Other” and input the desired lan-
guage code. ( P.145)
■SETTING THE ANGLE MARK
1Each time “Angle Mark” is selected,
“ON” or “OFF” can be selected.
■SETTING THE DVD PARENTAL
LOCK
DVD video
1Select “DVD Parental Lock” .
2Input the 4-digit personal code and
then select “OK”.
Select 10 times to reset the per-
sonal code in case the code was forgot-
ten.
3Select a restriction level (1-8) and then
select “OK”.
If the BD/DVD disc has angle options,
you can turn the angle mark on/off.
The level of viewer restrictions can be
set.
Page 142 of 316
142
7. REAR SEAT ENTERTAINMENT SYSTEM OPERATION
■SETTING THE BD PARENTAL
LOCK
BD video
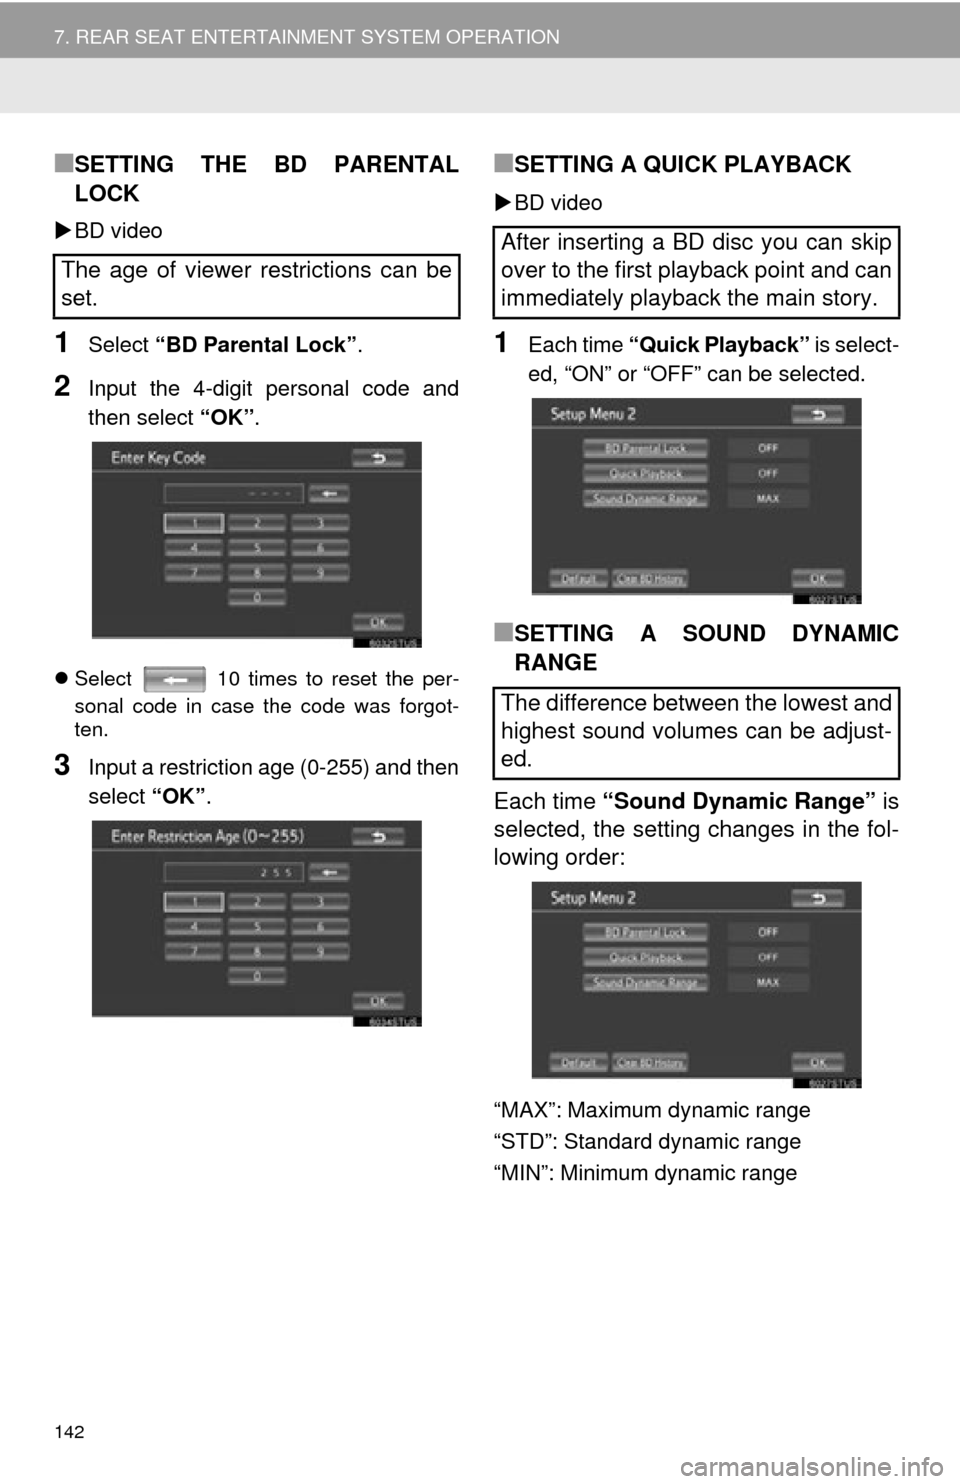
1Select “BD Parental Lock” .
2Input the 4-digit personal code and
then select “OK”.
Select 10 times to reset the per-
sonal code in case the code was forgot-
ten.
3Input a restriction age (0-255) and then
select “OK”.
■SETTING A QUICK PLAYBACK
BD video
1Each time “Quick Playback” is select-
ed, “ON” or “OFF” can be selected.
■SETTING A SOUND DYNAMIC
RANGE
Each time “Sound Dynamic Range” is
selected, the setting changes in the fol-
lowing order:
“MAX”: Maximum dynamic range
“STD”: Standard dynamic range
“MIN”: Minimum dynamic range
The age of viewer restrictions can be
set.
After inserting a BD disc you can skip
over to the first playback point and can
immediately playback the main story.
The difference between the lowest and
highest sound volumes can be adjust-
ed.
Page 152 of 316
152
7. REAR SEAT ENTERTAINMENT SYSTEM OPERATION
1Select “Format SD Card” .
2Select “Yes” to format the SD card.
If the SD card is formatted, all data on the
card will be erased.
1Select “Clear BD Data” .
2Select “Yes” to delete the BD history
data.
Compatible files
The following files can be displayed.
Picture file format: JPEG
• Picture resolution: between 34 34
and 8192 8192 pixels
• Gray scale JPEG is not supported
Video file format: AVCHD
Compatible formats
This system is compatible with SD memory
cards that meet SD card specifications
FAT16 formats, SDHC memory cards in
FAT32 format, and SD XC memory cards in
exFAT format.
An SD card is not provided with the rear
seat entertainment system and needs to
be purchased separately.
The Panasonic SD memory card format
software version 4.0 or higher is recom-
mended.
Data stored in an SD card may be lost.
Before playing back pictures and videos
stored in an SD card, make certain to back
up the data.
Before an SD card that contains any kind
of data is played, slide the lock switch on
the SD card to “LOCK” in order to prevent
any data from being accidentally deleted
or overwritten.
FORMATTING THE SD CARD
DELETING THE BD HISTORY
DATA
The BD history data such as book-
marks and resume information can be
deleted.
SD CARD INFORMATION