TOYOTA SEQUOIA 2015 2.G Owners Manual
SEQUOIA 2015 2.G
TOYOTA
TOYOTA
https://www.carmanualsonline.info/img/14/6778/w960_6778-0.png
TOYOTA SEQUOIA 2015 2.G Owners Manual
Trending: fuel type, jump start, weight, turn signal, trailer, wiring, garage door opener
Page 571 of 664
5
When trouble arises
571
5-2. Steps to take in an emergency
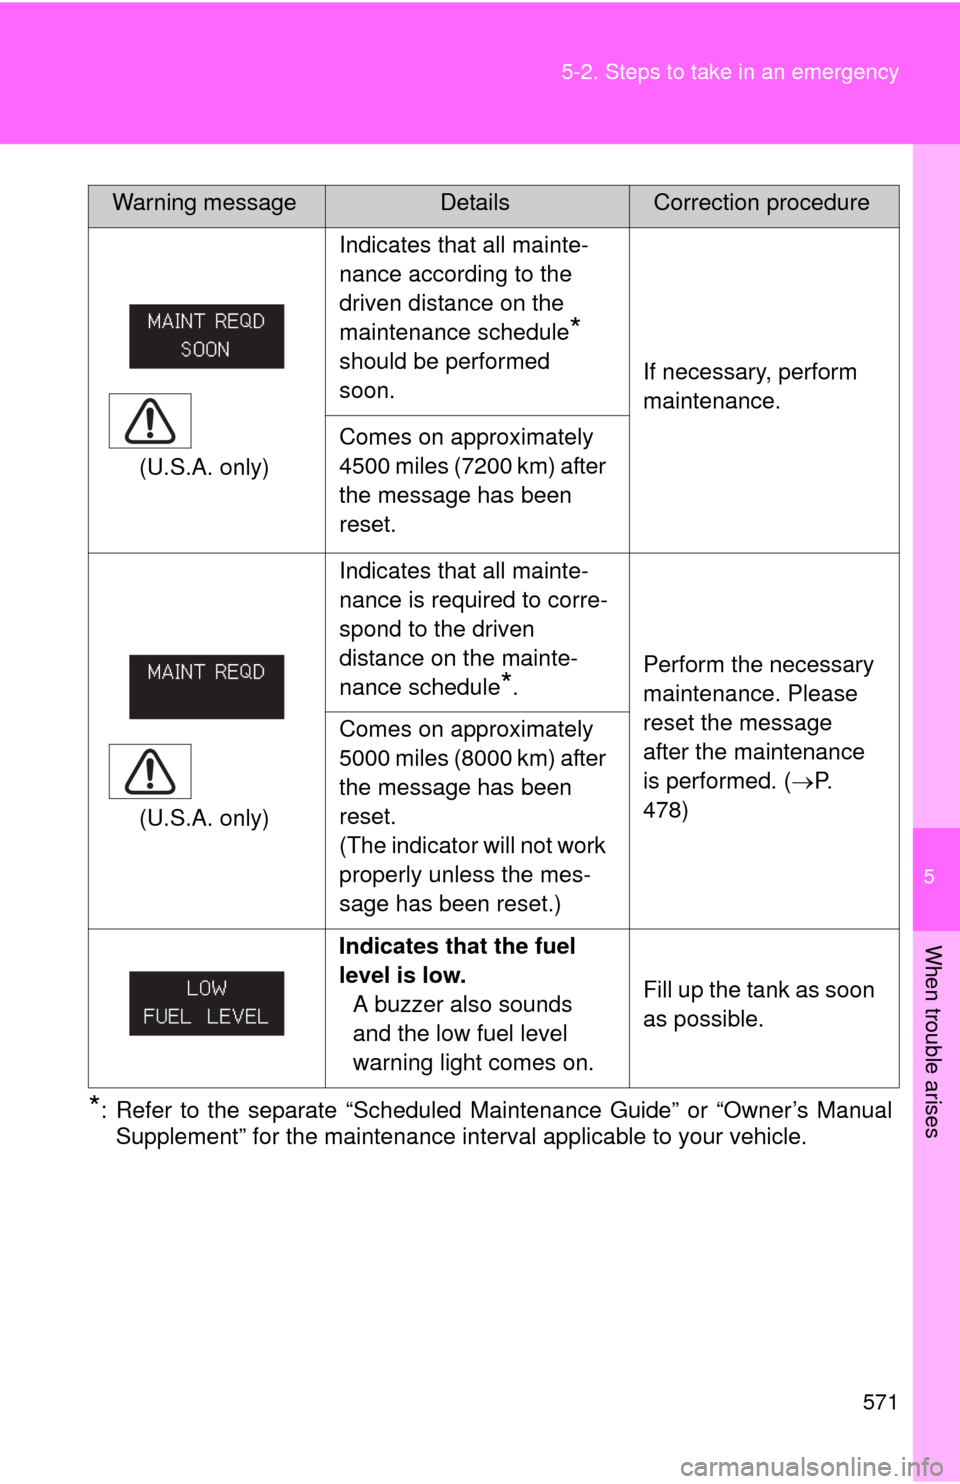
*: Refer to the separate “Scheduled Maintenance Guide” or “Owner’s Manual
Supplement” for the maintenance interval applicable to your vehicle. (U.S.A. only)
Indicates that all mainte-
nance according to the
driven distance on the
maintenance schedule
*
should be performed
soon. If necessary, perform
maintenance.
Comes on approximately
4500 miles (7200 km) after
the message has been
reset.
(U.S.A. only) Indicates that all mainte-
nance is required to corre-
spond to the driven
distance on the mainte-
nance schedule
*.
Perform the necessary
maintenance. Please
reset the message
after the maintenance
is performed. (
P.
478)
Comes on approximately
5000 miles (8000 km) after
the message has been
reset.
(The indicator will not work
properly unless the mes-
sage has been reset.)
Indicates that the fuel
level is low.
A buzzer also sounds
and the low fuel level
warning light comes on. Fill up the tank as soon
as possible.
Warning messageDetailsCorrection procedure
Page 572 of 664
572 5-2. Steps to take in an emergency
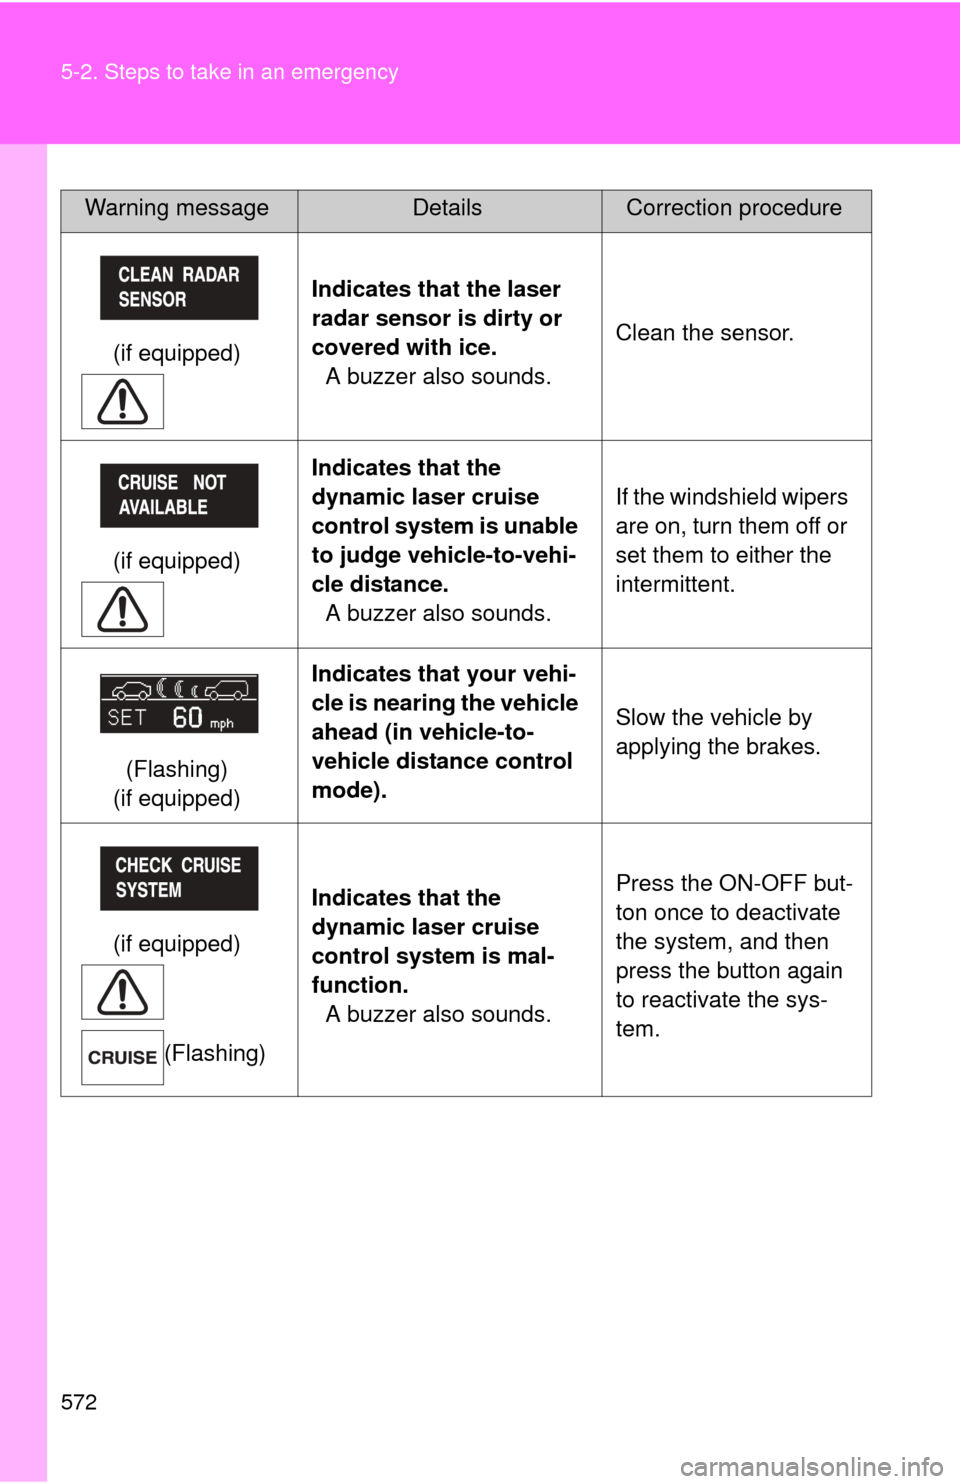
Warning messageDetailsCorrection procedure
(if equipped) Indicates that the laser
radar sensor is dirty or
covered with ice.
A buzzer also sounds. Clean the sensor.
(if equipped) Indicates that the
dynamic laser cruise
control system is unable
to judge vehicle-to-vehi-
cle distance.
A buzzer also sounds. If the windshield wipers
are on, turn them off or
set them to either the
intermittent.
(Flashing)
(if equipped) Indicates that your vehi-
cle is nearing the vehicle
ahead (in vehicle-to-
vehicle distance control
mode).
Slow the vehicle by
applying the brakes.
(if equipped) (Flashing) Indicates that the
dynamic laser cruise
control system is mal-
function.
A buzzer also sounds. Press the ON-OFF but-
ton once to deactivate
the system, and then
press the button again
to reactivate the sys-
tem.
Page 573 of 664
5
When trouble arises
573
5-2. Steps to take in an emergency
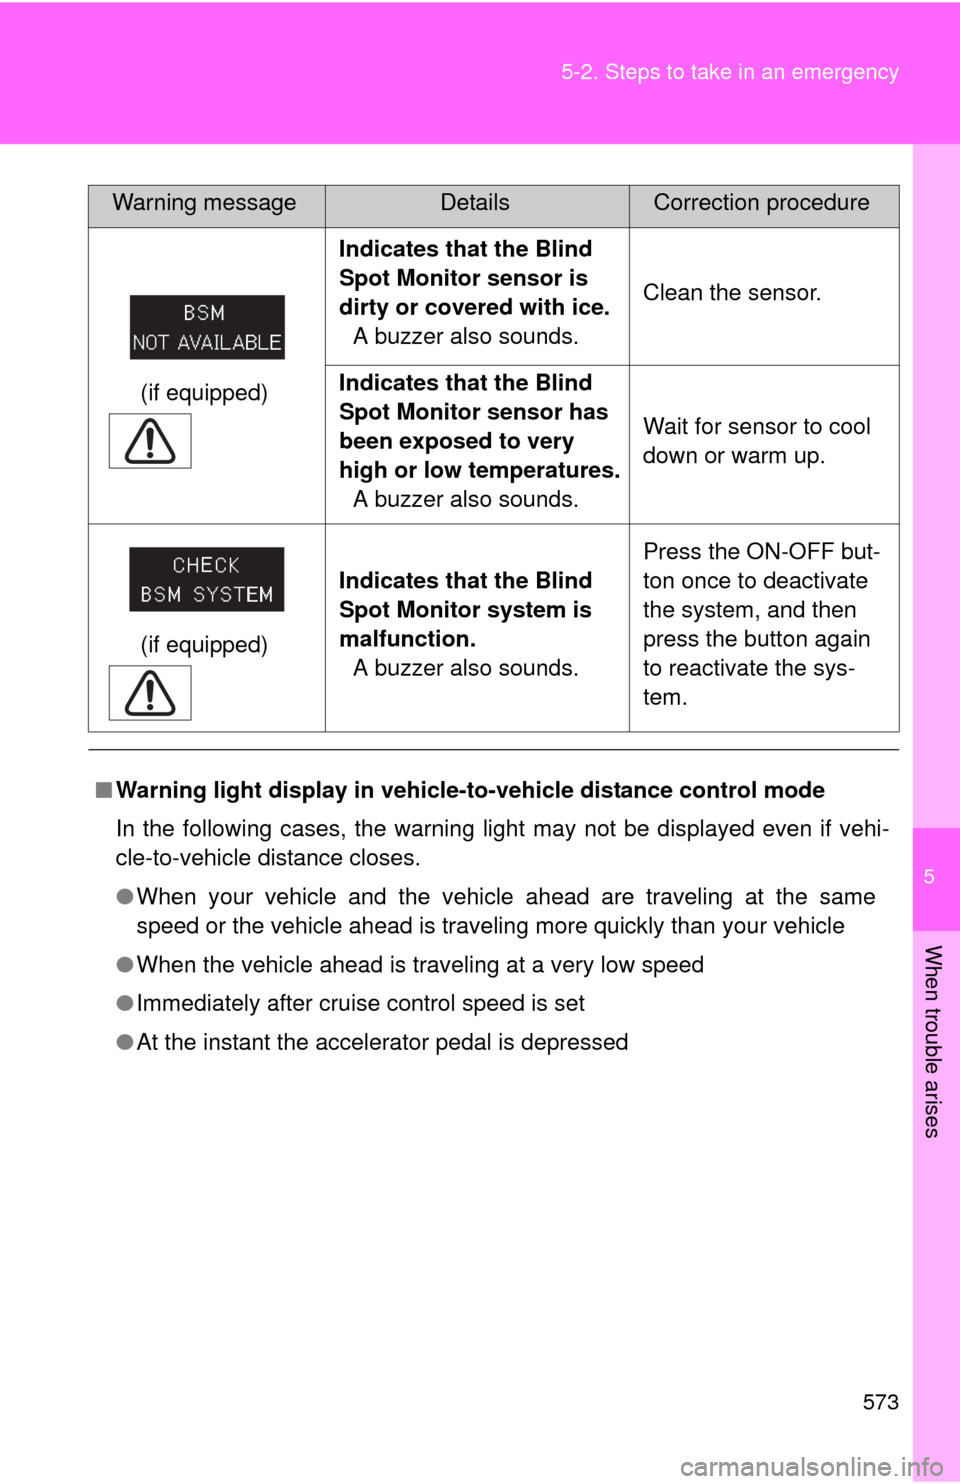
(if equipped)
Indicates that the Blind
Spot Monitor sensor is
dirty or covered with ice.
A buzzer also sounds. Clean the sensor.
Indicates that the Blind
Spot Monitor sensor has
been exposed to very
high or low temperatures. A buzzer also sounds. Wait for sensor to cool
down or warm up.
(if equipped) Indicates that the Blind
Spot Monitor system is
malfunction.
A buzzer also sounds. Press the ON-OFF but-
ton once to deactivate
the system, and then
press the button again
to reactivate the sys-
tem.
■ Warning light display in vehicle -to-vehicle distance control mode
In the following cases, the warning light may not be displayed even if vehi-
cle-to-vehicle distance closes.
● When your vehicle and the vehicle ahead are traveling at the same
speed or the vehicle ahead is traveling more quickly than your vehicle
● When the vehicle ahead is traveling at a very low speed
● Immediately after cruise control speed is set
● At the instant the accelerator pedal is depressed
Warning messageDetailsCorrection procedure
Page 574 of 664
574
5-2. Steps to take in an emergency
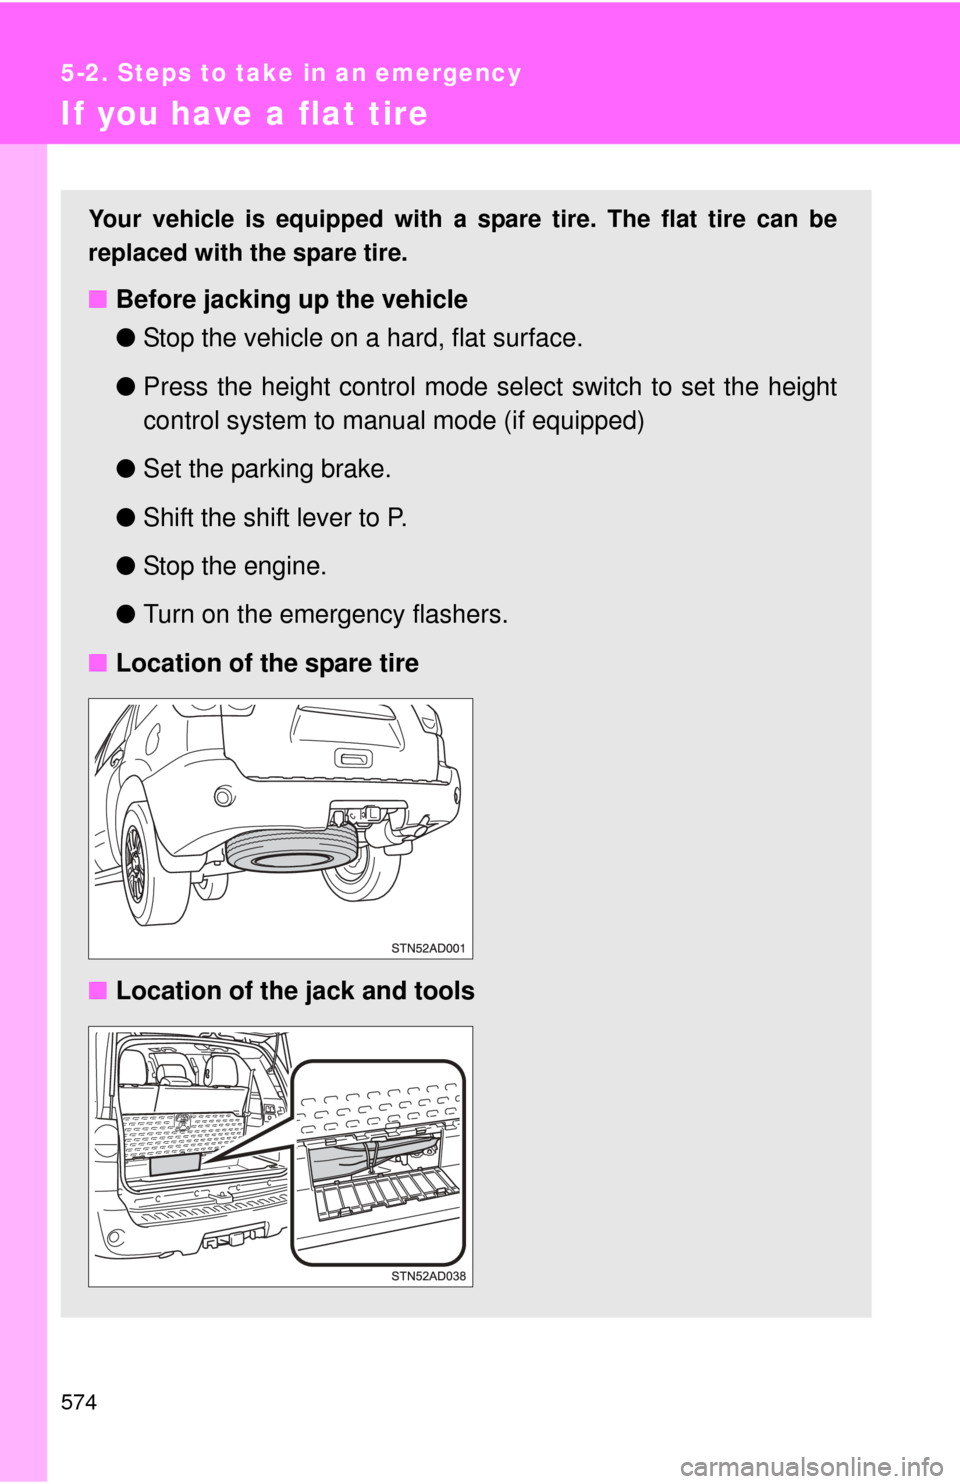
If you have a flat tire
Your vehicle is equipped with a spare tire. The flat tire can be
replaced with the spare tire.
■Before jacking up the vehicle
●Stop the vehicle on a hard, flat surface.
● Press the height control mode select switch to set the height
control system to manual mode (if equipped)
● Set the parking brake.
● Shift the shift lever to P.
● Stop the engine.
● Turn on the emergency flashers.
■ Location of the spare tire
■ Location of the jack and tools
Page 575 of 664
5
When trouble arises
575
5-2. Steps to take in an emergency
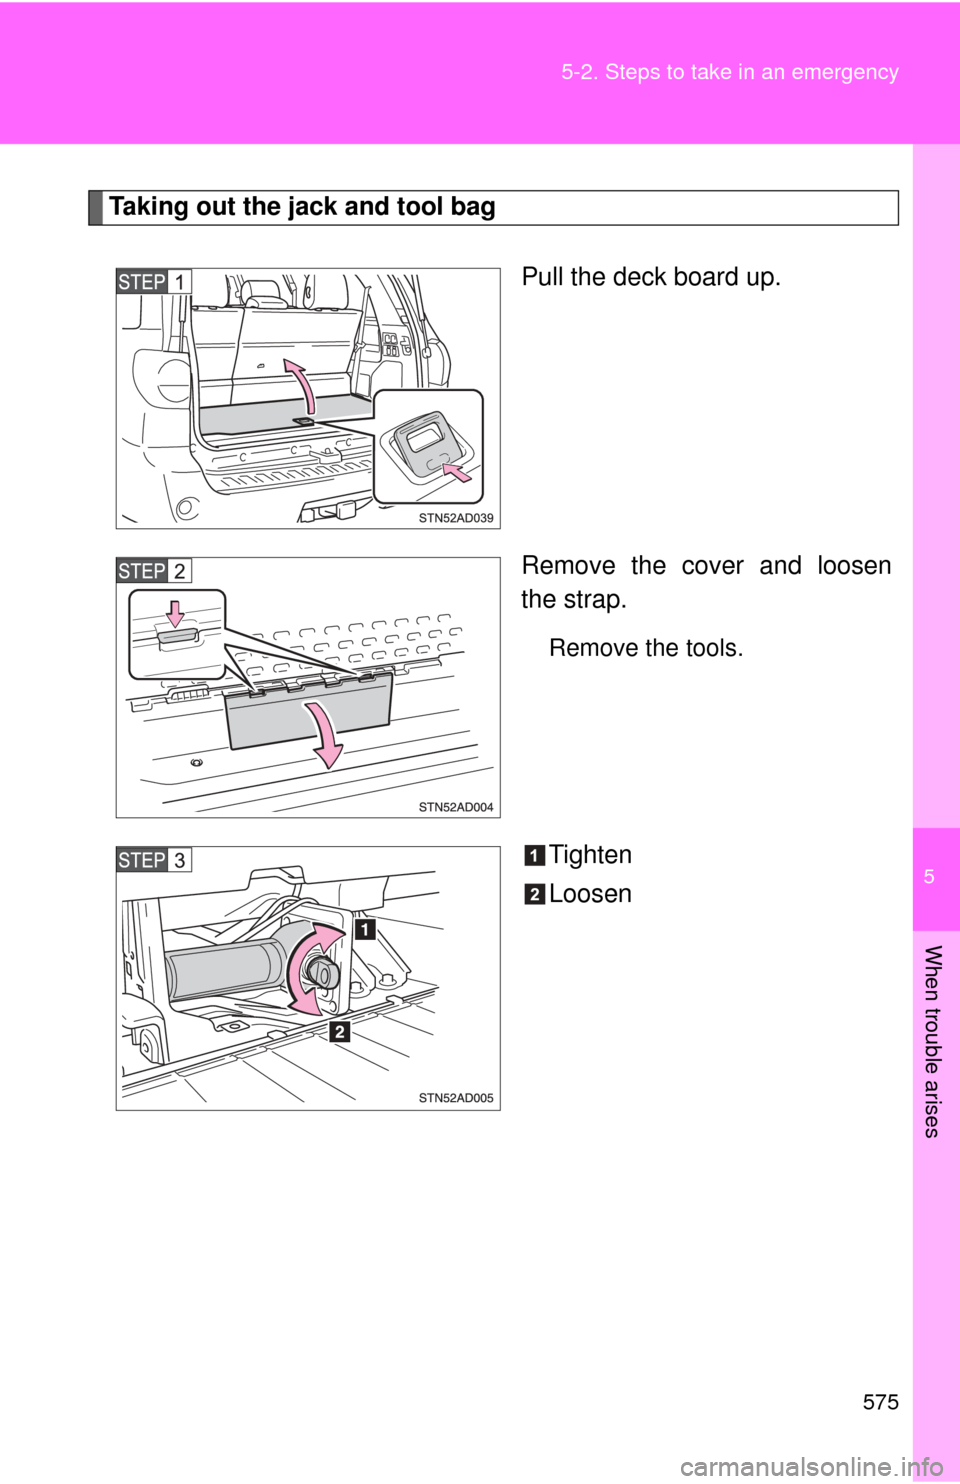
Taking out the jack and tool bag
Pull the deck board up.
Remove the cover and loosen
the strap.
Remove the tools.
Tighten
Loosen
Page 576 of 664
576 5-2. Steps to take in an emergency
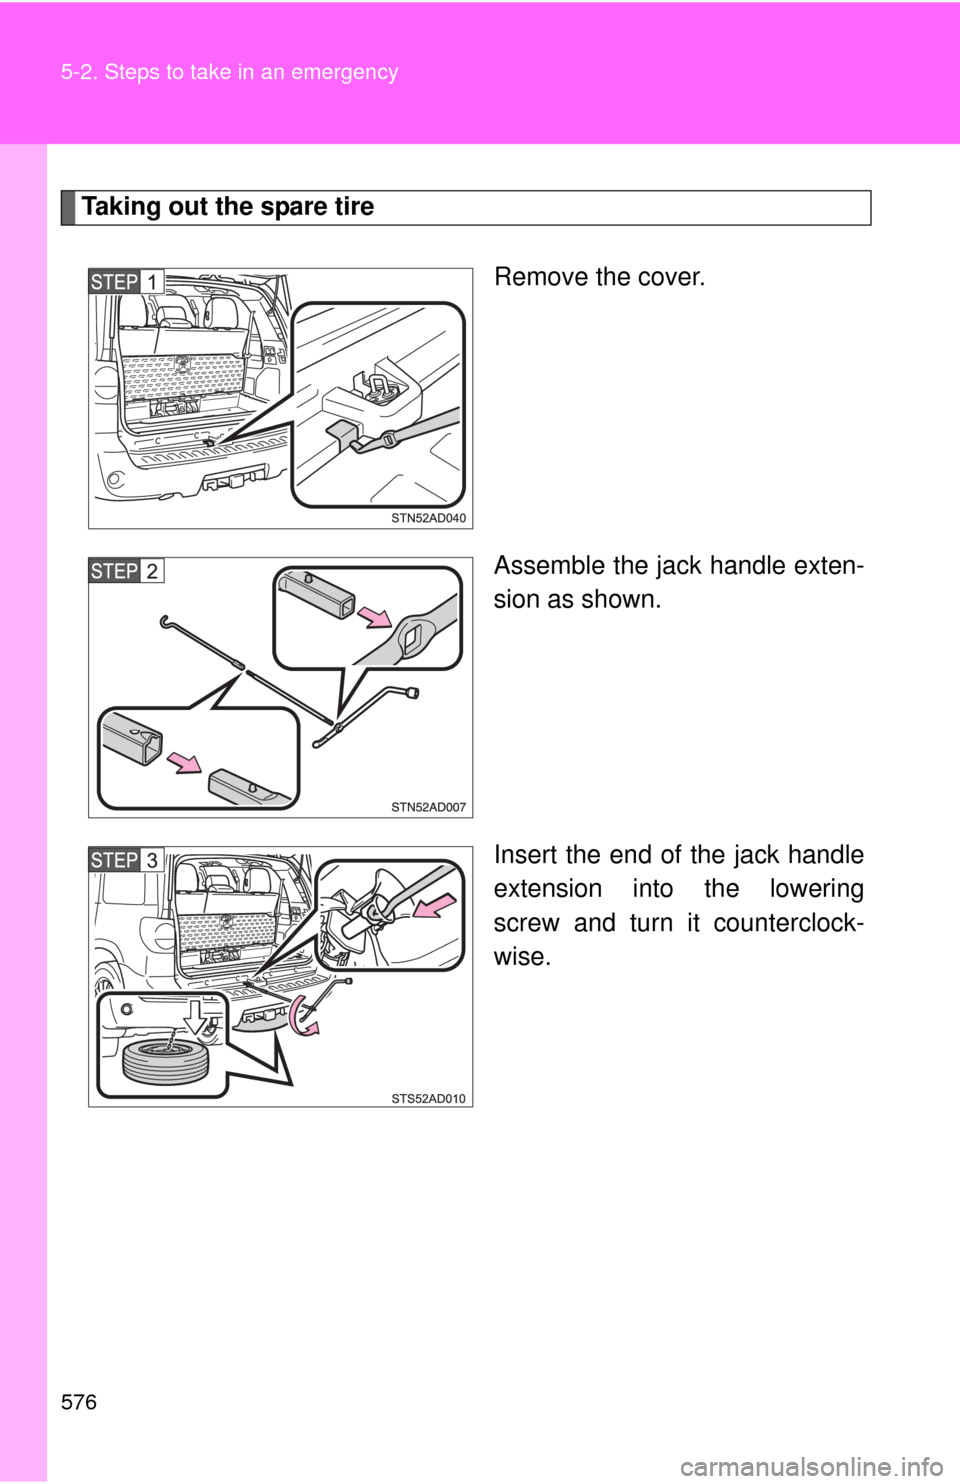
Taking out the spare tireRemove the cover.
Assemble the jack handle exten-
sion as shown.
Insert the end of the jack handle
extension into the lowering
screw and turn it counterclock-
wise.
Page 577 of 664
5
When trouble arises
577
5-2. Steps to take in an emergency
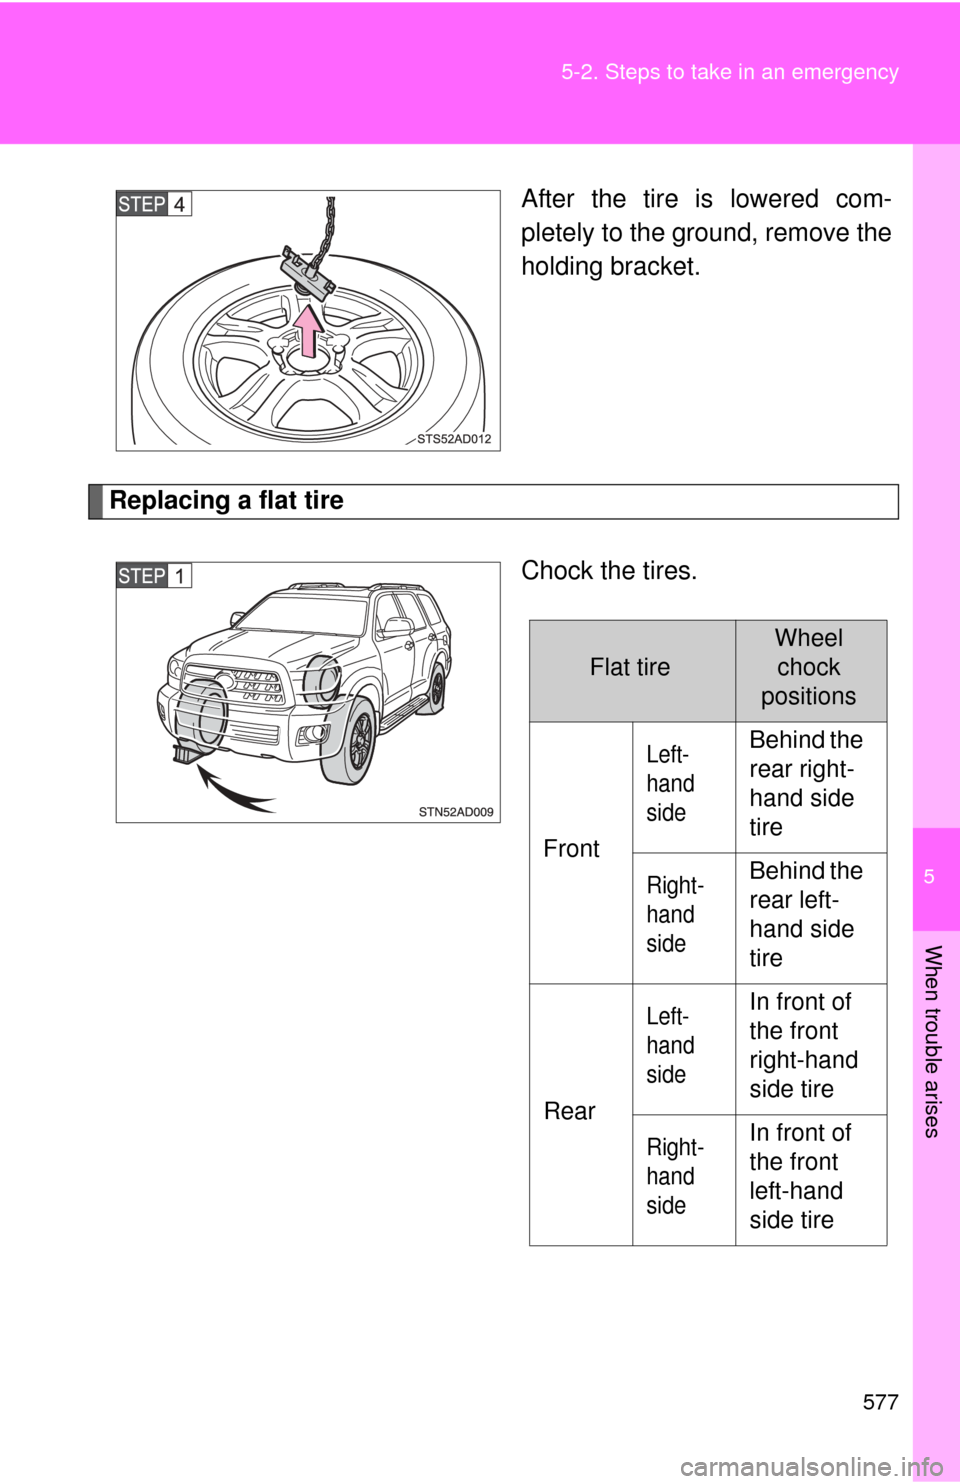
After the tire is lowered com-
pletely to the ground, remove the
holding bracket.
Replacing a flat tire
Chock the tires.
Flat tire
Wheelchock
positions
Front
Left-
hand
sideBehind the
rear right-
hand side
tire
Right-
hand
sideBehind the
rear left-
hand side
tire
Rear
Left-
hand
sideIn front of
the front
right-hand
side tire
Right-
hand
sideIn front of
the front
left-hand
side tire
Page 578 of 664
578 5-2. Steps to take in an emergency
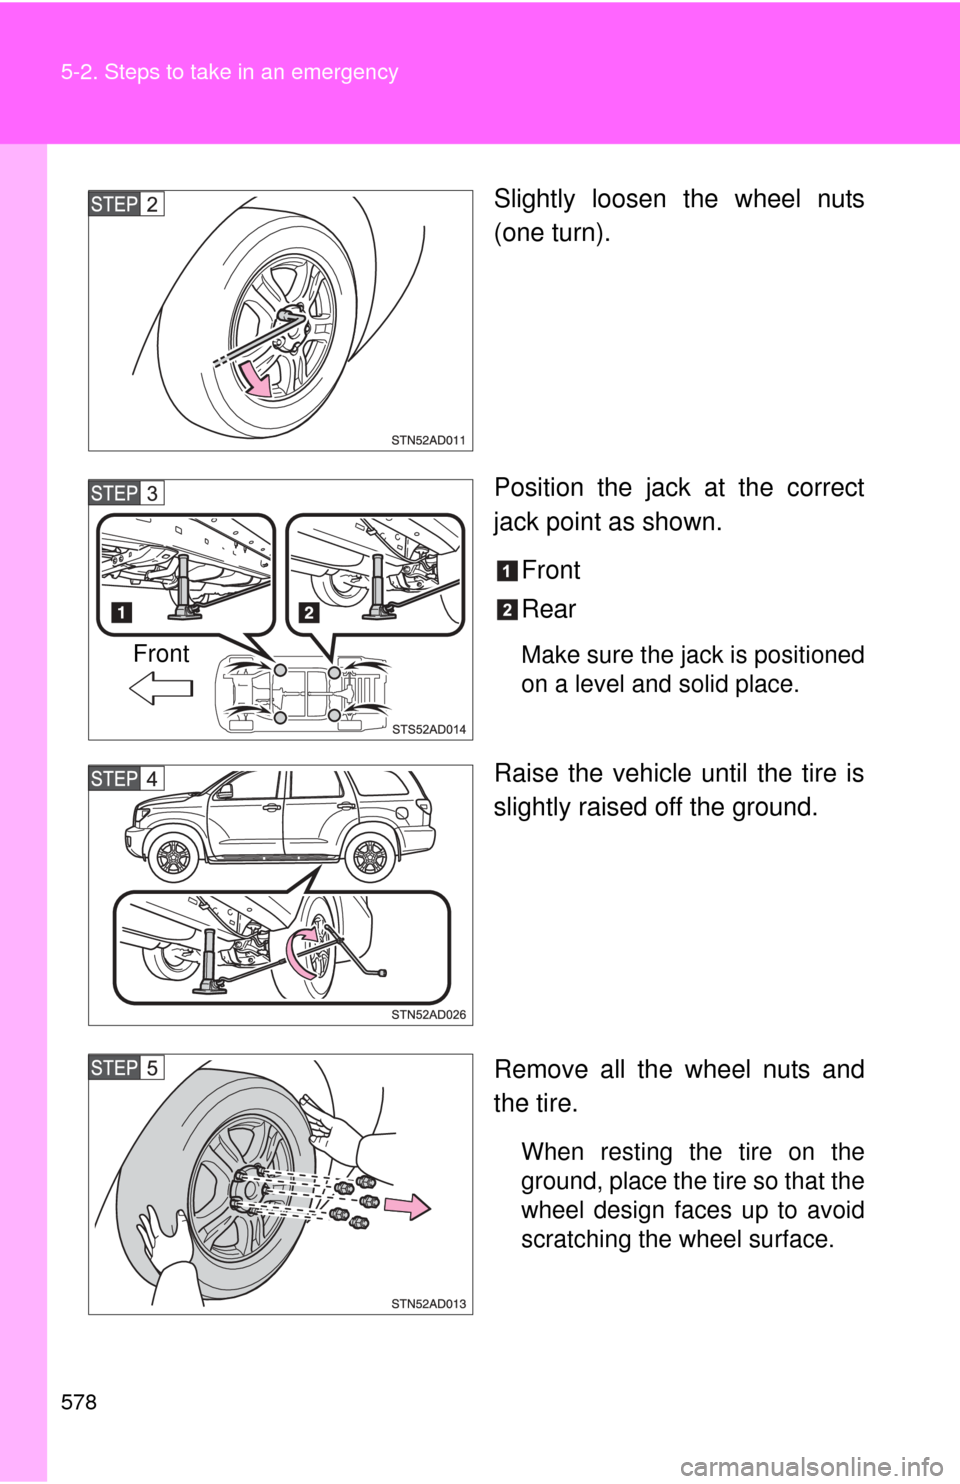
Slightly loosen the wheel nuts
(one turn).
Position the jack at the correct
jack point as shown.Front
Rear
Make sure the jack is positioned
on a level and solid place.
Raise the vehicle until the tire is
slightly raised off the ground.
Remove all the wheel nuts and
the tire.
When resting the tire on the
ground, place the tire so that the
wheel design faces up to avoid
scratching the wheel surface.
Front
Page 579 of 664
5
When trouble arises
579
5-2. Steps to take in an emergency
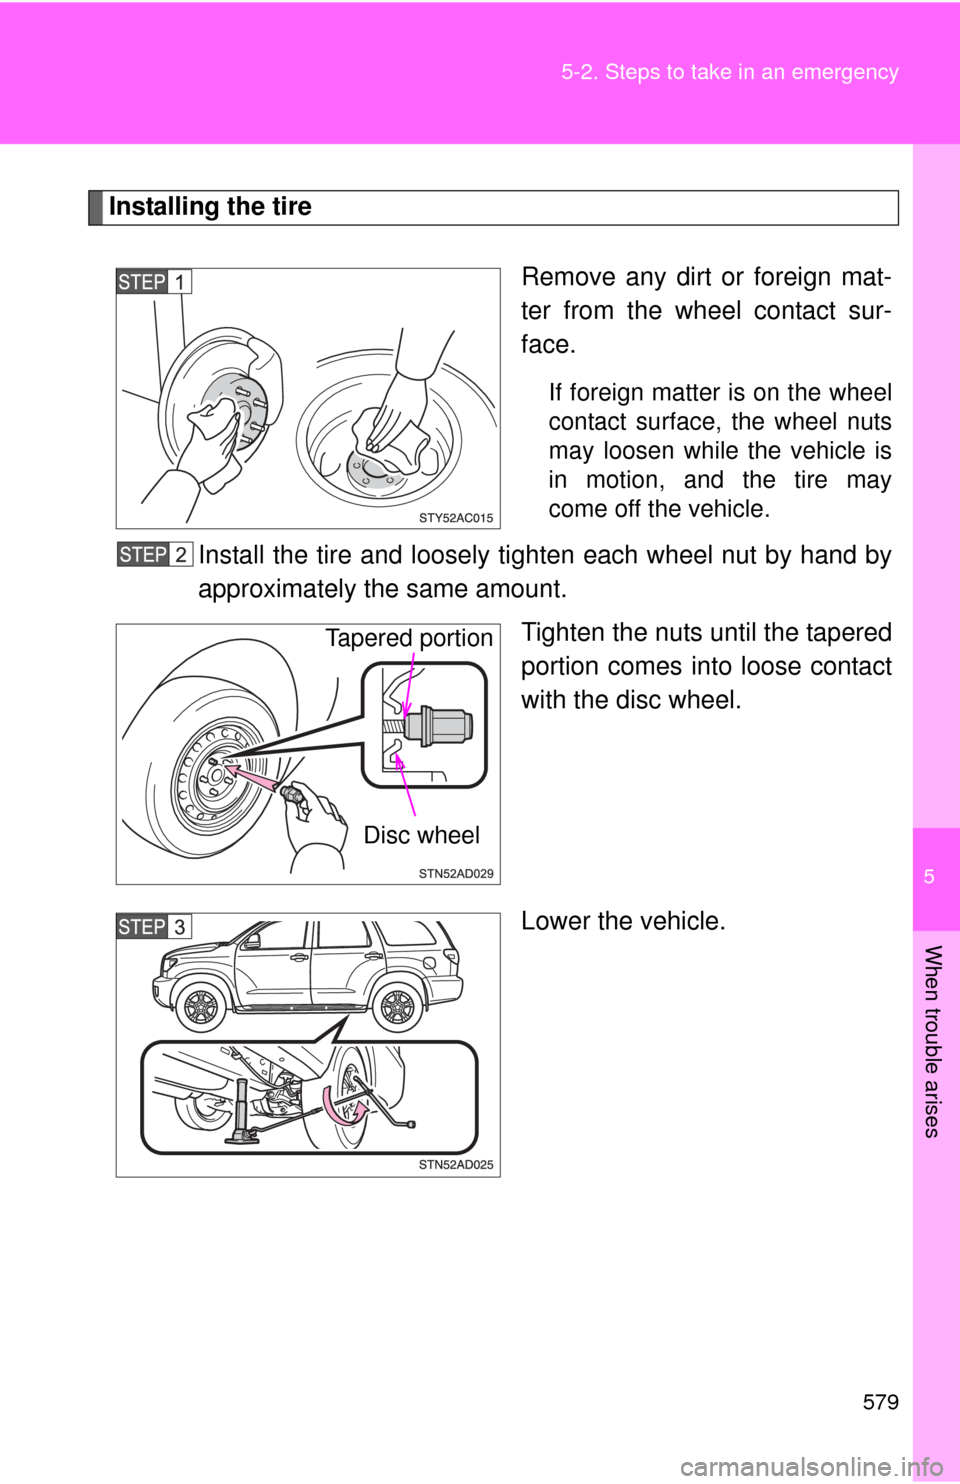
Installing the tire
Remove any dirt or foreign mat-
ter from the wheel contact sur-
face.
If foreign matter is on the wheel
contact surface, the wheel nuts
may loosen while the vehicle is
in motion, and the tire may
come off the vehicle.
Install the tire and loosely tighten each wheel nut by hand by
approximately the same amount.
Tighten the nuts until the tapered
portion comes into loose contact
with the disc wheel.
Lower the vehicle.
Tapered portion
Disc wheel
Page 580 of 664
580 5-2. Steps to take in an emergency
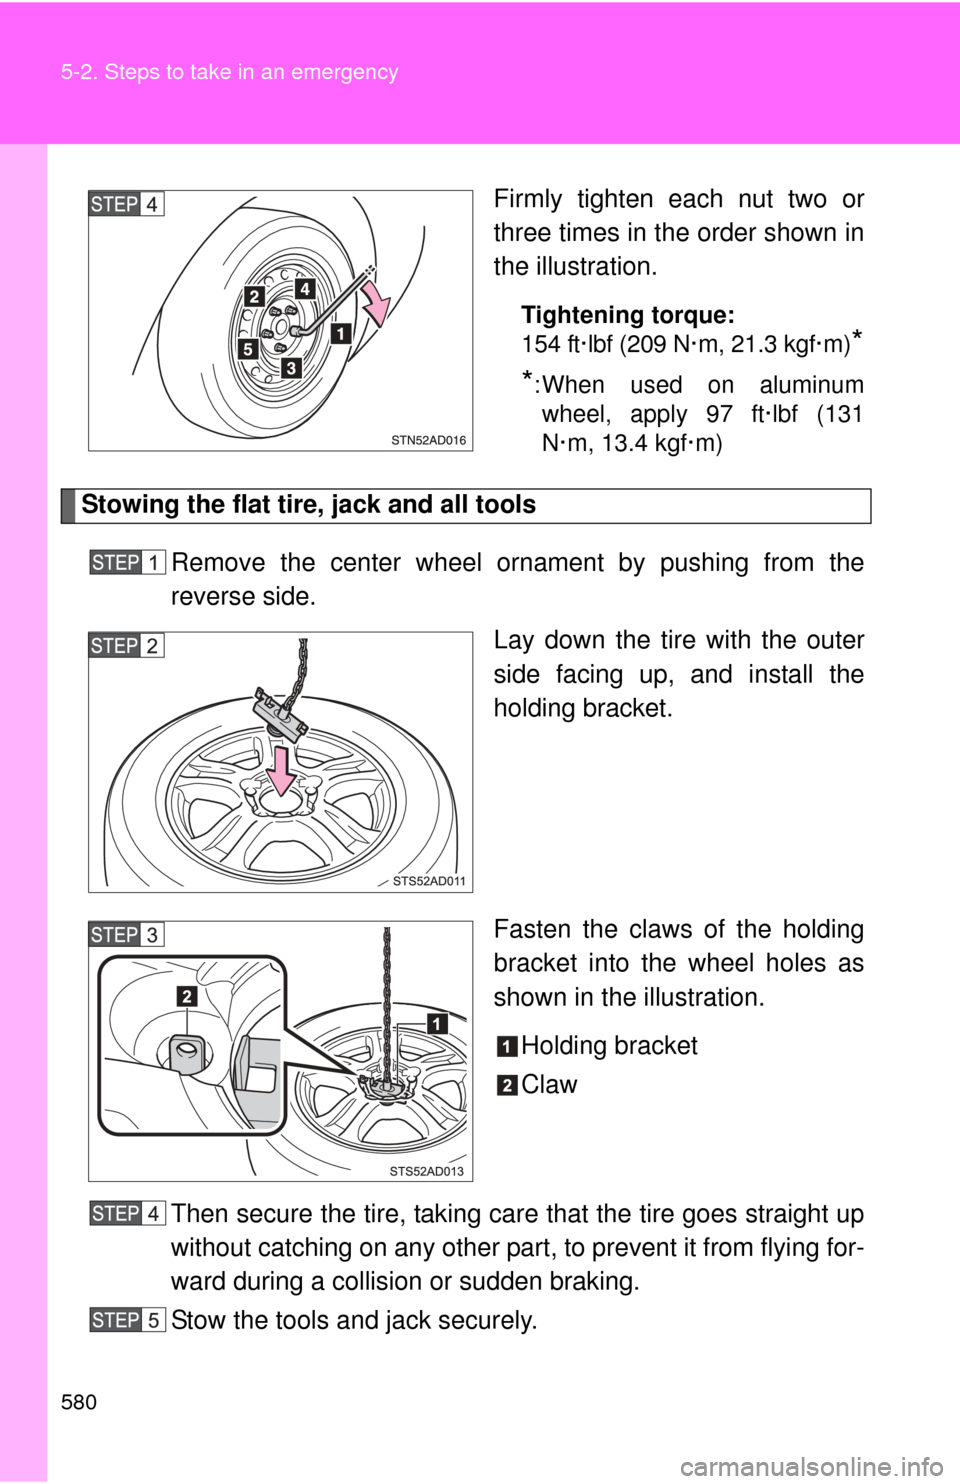
Firmly tighten each nut two or
three times in the order shown in
the illustration.
Tightening torque:
154 ft·lbf (209 N·m, 21.3 kgf·m)
*
*
: When used on aluminum wheel, apply 97 ft·lbf (131
N·m, 13.4 kgf·m)
Stowing the flat tire, jack and all tools
Remove the center wheel ornament by pushing from the
reverse side. Lay down the tire with the outer
side facing up, and install the
holding bracket.
Fasten the claws of the holding
bracket into the wheel holes as
shown in the illustration.
Holding bracket
Claw
Then secure the tire, taking care that the tire goes straight up
without catching on any other part , to prevent it from flying for-
ward during a collision or sudden braking.
Stow the tools and jack securely.
Trending: cooling, windshield wipers, 4WD, fuel filter, seat adjustment, fuel type, service reset

