ECU TOYOTA SEQUOIA 2016 2.G Quick Reference Guide
[x] Cancel search | Manufacturer: TOYOTA, Model Year: 2016, Model line: SEQUOIA, Model: TOYOTA SEQUOIA 2016 2.GPages: 52, PDF Size: 4.88 MB
Page 28 of 52

26
FEATURES/OPERATIONS
Distance control mode will cruise at a set speed, decelerate to maintain selected
distance from a slower vehicle traveling in front of you, and accelerate back up
to the selected speed if the vehicle traveling in front of you changes lanes or
speeds up.
(1) To select distance control mode Push the ON-OFF button. The “CRUISE”
indicator will come on.
(2) To set, cancel and resume a speed Refer to instructions for Cruise Control in this guide.
NOTE: Once vehicle speed is set, pushing lever up toward “+ RES” will increase
speed to the nearest 5 mph, and then in 5 mph increments. Pushing lever down
toward “- SET” will reduce speed in the same way.
(3) To change the vehicle-to-vehicle distance
Push the distance button to cycle through the settings, which will change
progressively from LONG to MIDDLE to SHORT.
Dynamic Laser Cruise Control (if equipped)
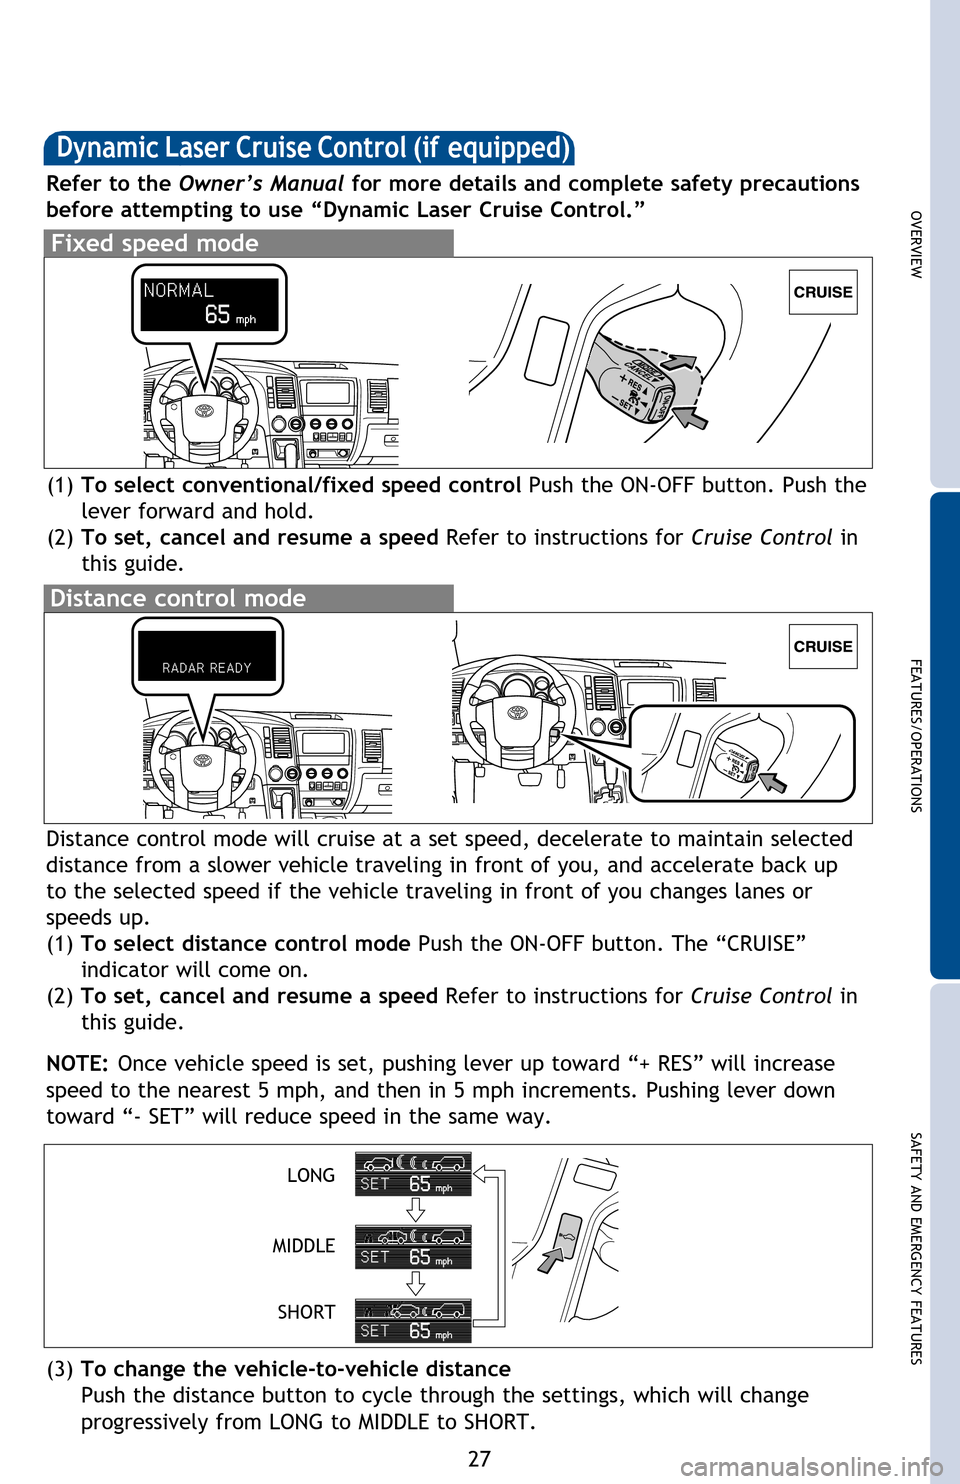
(1) To select conventional/fixed speed control Push the ON-OFF button. Push the
lever forward and hold.
(2) To set, cancel and resume a speed Refer to instructions for Cruise Control in this guide.
Fixed speed mode
Refer to the Owner’s Manual for more details and complete safety precautions
before attempting to use “Dynamic Laser Cruise Control.”
Distance control mode
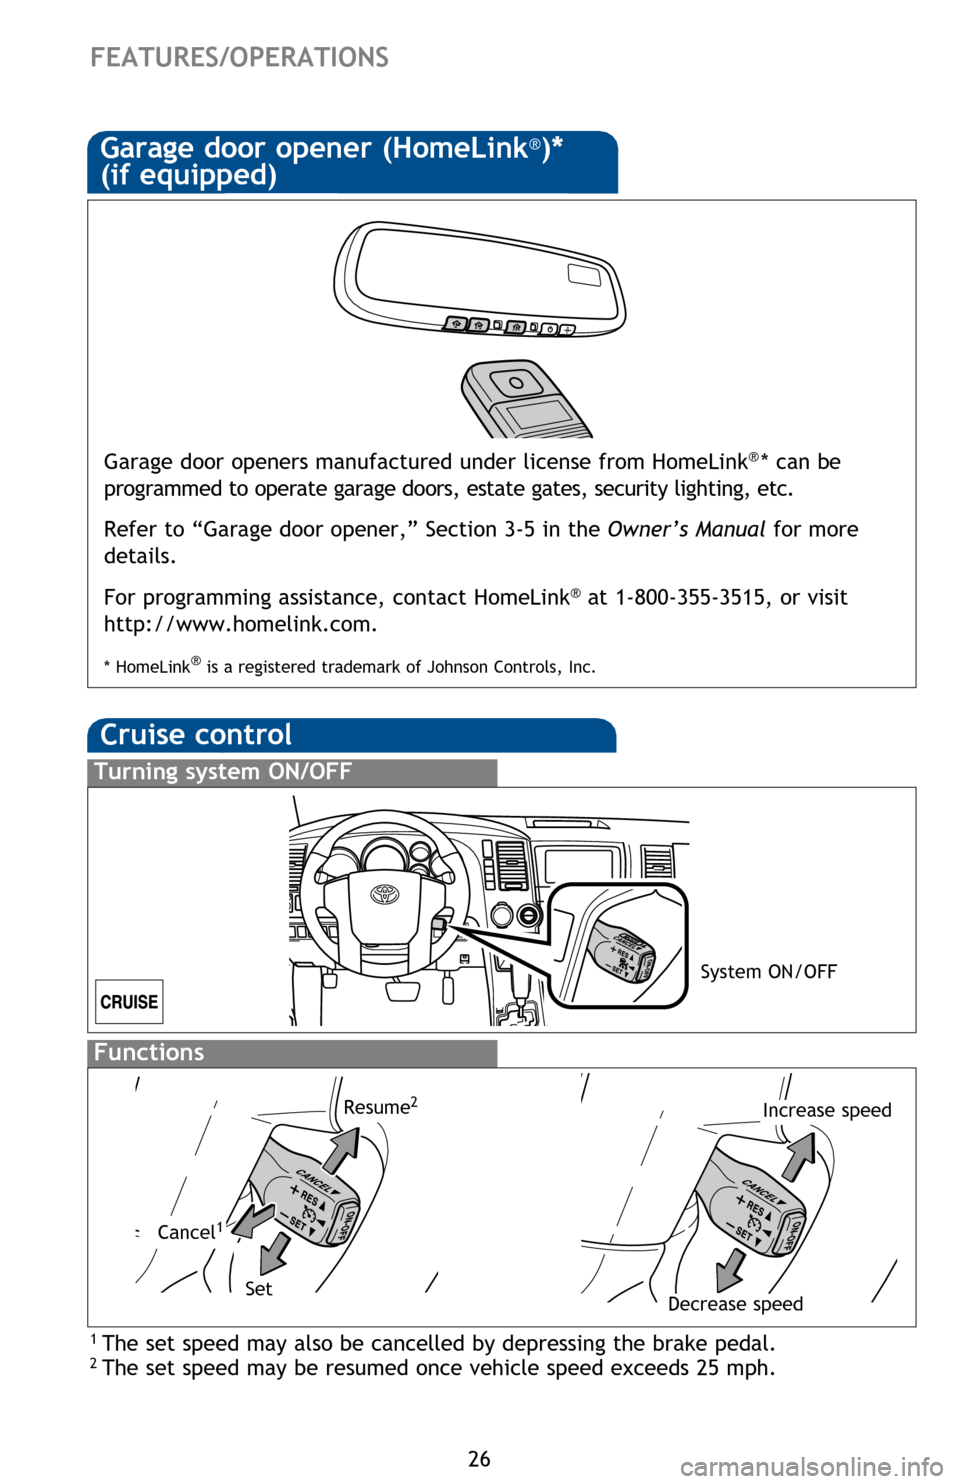
Garage door openers manufactured under license from HomeLink®* can be
programmed to operate garage doors, estate gates, security lighting, etc\
.
Refer to “Garage door opener,” Section 3-5 in the Owner’s Manual for more
details.
For programming assistance, contact HomeLink
® at 1-800-355-3515, or visit
http://www.homelink.com.
* HomeLink® is a registered trademark of Johnson Controls, Inc.
Garage door opener (HomeLink®)*
(if equipped)
Cruise control
1 The set speed may also be cancelled by depressing the brake pedal.2 The set speed may be resumed once vehicle speed exceeds 25 mph.
Turning system ON/OFF
Functions
Increase speed
Decrease speed
Cancel1
Resume2
Set
System ON/OFF
2016_Sequoia_QRG.indd 267/6/15 8:10 PM
Page 29 of 52

OVERVIEW
FEATURES/OPERATIONS
SAFETY AND EMERGENCY FEATURES
27
Distance control mode will cruise at a set speed, decelerate to maintain selected
distance from a slower vehicle traveling in front of you, and accelerate back up
to the selected speed if the vehicle traveling in front of you changes lanes or
speeds up.
(1) To select distance control mode Push the ON-OFF button. The “CRUISE”
indicator will come on.
(2) To set, cancel and resume a speed Refer to instructions for Cruise Control in
this guide.
NOTE: Once vehicle speed is set, pushing lever up toward “+ RES” will increase
speed to the nearest 5 mph, and then in 5 mph increments. Pushing lever down
toward “- SET” will reduce speed in the same way.
(3) To change the vehicle-to-vehicle distance
Push the distance button to cycle through the settings, which will change
progressively from LONG to MIDDLE to SHORT.
Dynamic Laser Cruise Control (if equipped)
(1) To select conventional/fixed speed control Push the ON-OFF button. Push the
lever forward and hold.
(2) To set, cancel and resume a speed Refer to instructions for Cruise Control in
this guide.
Fixed speed mode
Refer to the Owner’s Manual for more details and complete safety precautions
before attempting to use “Dynamic Laser Cruise Control.”
Distance control mode
LONG
MIDDLE SHORT
Garage door openers manufactured under license from HomeLink®* can be
programmed to operate garage doors, estate gates, security lighting, etc\
.
Refer to “Garage door opener,” Section 3-5 in the Owner’s Manual for more
details.
For programming assistance, contact HomeLink
® at 1-800-355-3515, or visit
http://www.homelink.com.
* HomeLink® is a registered trademark of Johnson Controls, Inc.
1 The set speed may also be cancelled by depressing the brake pedal.2 The set speed may be resumed once vehicle speed exceeds 25 mph.
Increase speed
2016_Sequoia_QRG.indd 277/6/15 8:10 PM
Page 34 of 52

32
SAFETY AND EMERGENCY FEATURES
Keep as low on
hips as possible
Take up slack
Too high
Seat belts
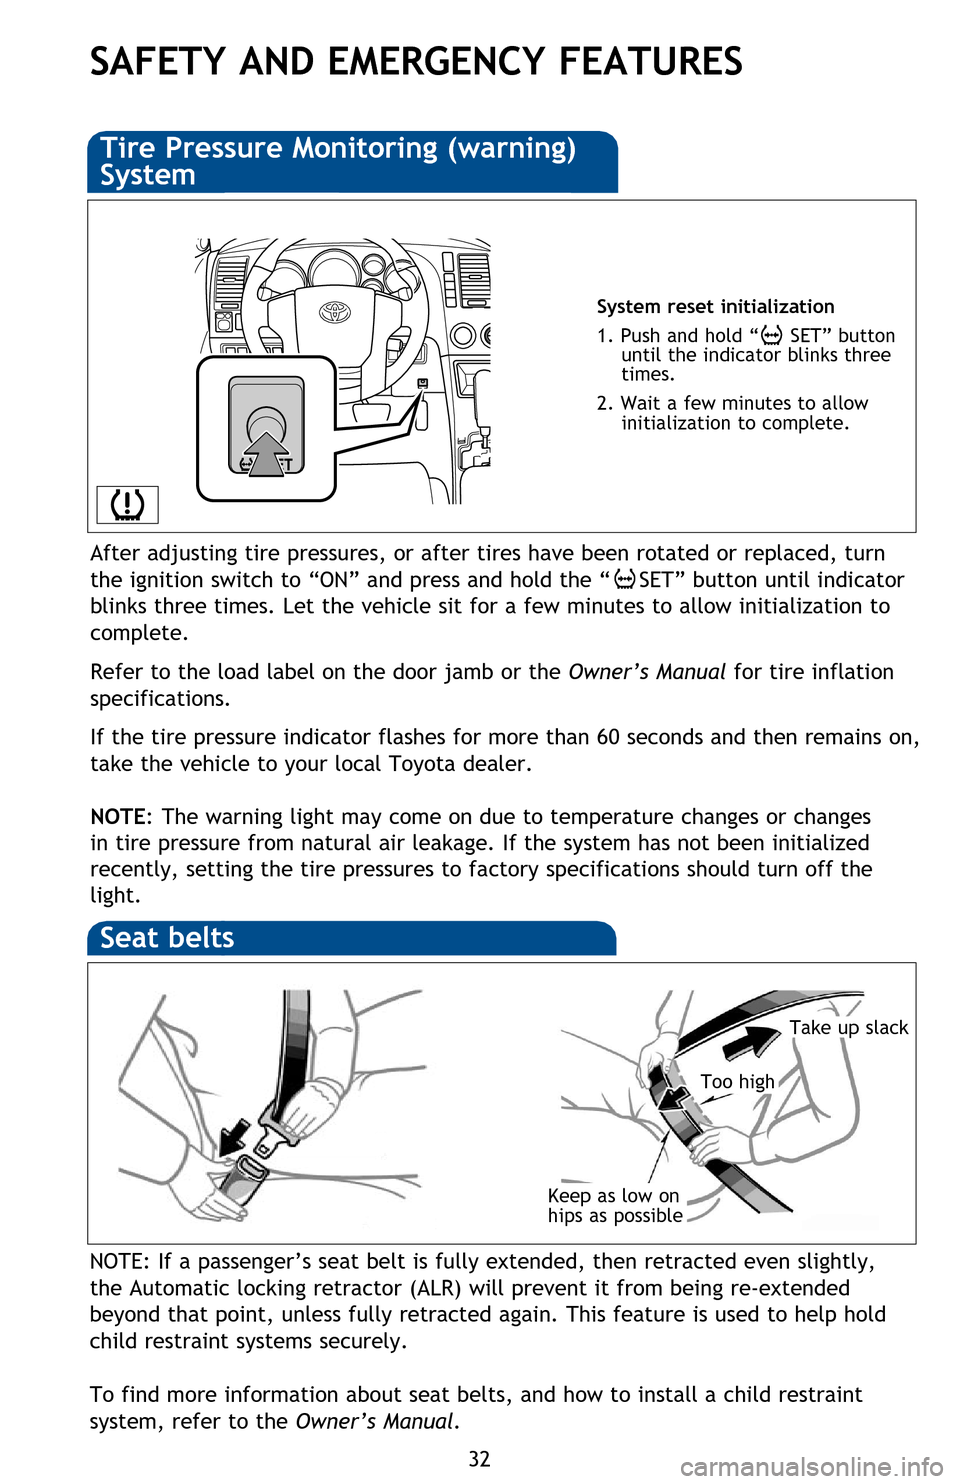
System reset initialization
1. Push and hold “
SET” button
until the indicator blinks three
times.
2. Wait a few minutes to allow initialization to complete.
Tire Pressure Monitoring (warning)
System
After adjusting tire pressures, or after tires have been rotated or replaced, turn
the ignition switch to “ON” and press and hold the “
SET” button until indicator
blinks three times. Let the vehicle sit for a few minutes to allow initialization to
complete.
Refer to the load label on the door jamb or the Owner’s Manual for tire inflation
specifications.
If the tire pressure indicator flashes for more than 60 seconds and then remains on,
take the vehicle to your local Toyota dealer.
NOTE: The warning light may come on due to temperature changes or changes
in tire pressure from natural air leakage. If the system has not been initialized
recently, setting the tire pressures to factory specifications should turn off the
light.
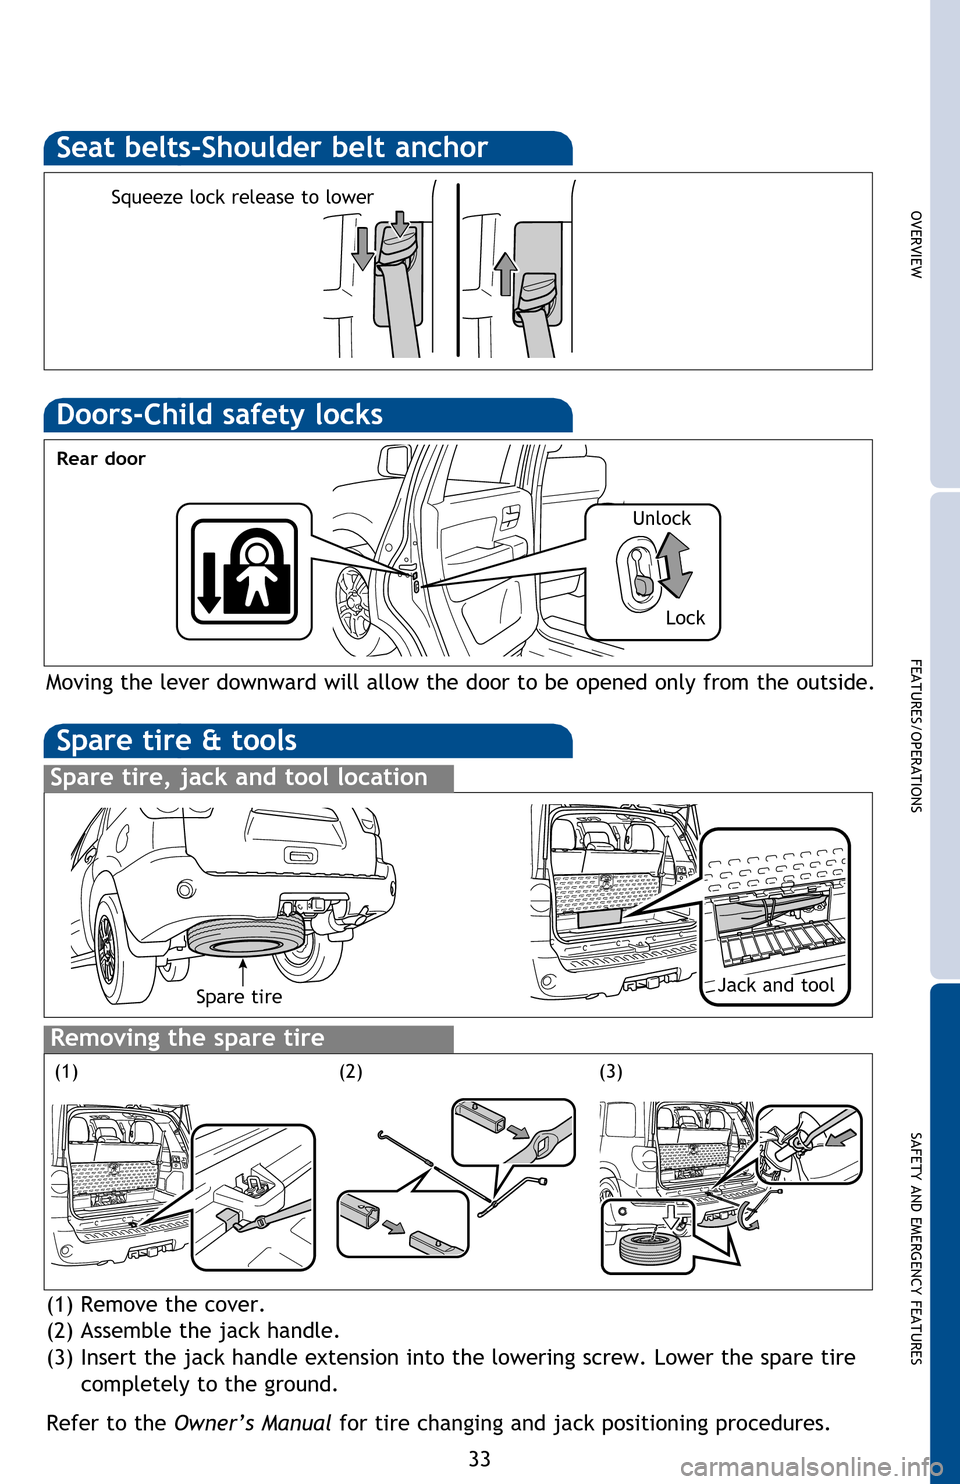
Seat belts-Shoulder belt anchor
Spare tire & tools
Spare tire, jack and tool location
Removing the spare tire
(1) Remove the cover.
(2) Assemble the jack handle.
(3) Insert the jack handle extension into the lowering screw. Lower the spare tire
completely to the ground.
Refer to the Owner’s Manual for tire changing and jack positioning procedures.
Moving the lever downward will allow the door to be opened only from the outside.
Rear door
Doors-Child safety locks
(1)
NOTE: If a passenger’s seat belt is fully extended, then retracted even slightly,
the Automatic locking retractor (ALR) will prevent it from being re-extended
beyond that point, unless fully retracted again. This feature is used to help hold
child restraint systems securely.
To find more information about seat belts, and how to install a child restraint
system, refer to the Owner’s Manual.
2016_Sequoia_QRG.indd 327/6/15 8:11 PM
Page 35 of 52

OVERVIEW
FEATURES/OPERATIONS
SAFETY AND EMERGENCY FEATURES
33
Take up slack
System reset initialization
1. Push and hold “
SET” button
until the indicator blinks three
times.
2. Wait a few minutes to allow initialization to complete.
After adjusting tire pressures, or after tires have been rotated or replaced, turn
the ignition switch to “ON” and press and hold the “
SET” button until indicator
blinks three times. Let the vehicle sit for a few minutes to allow initialization to
complete.
Refer to the load label on the door jamb or the Owner’s Manual for tire inflation
specifications.
If the tire pressure indicator flashes for more than 60 seconds and then remains on,
take the vehicle to your local Toyota dealer.
NOTE: The warning light may come on due to temperature changes or changes
in tire pressure from natural air leakage. If the system has not been initialized
recently, setting the tire pressures to factory specifications should turn off the
light.
Seat belts-Shoulder belt anchor
Squeeze lock release to lower
Spare tire & tools
Spare tire, jack and tool location
Removing the spare tire
(1) Remove the cover.
(2) Assemble the jack handle.
(3) Insert the jack handle extension into the lowering screw. Lower the spare tire
completely to the ground.
Refer to the Owner’s Manual for tire changing and jack positioning procedures.
Moving the lever downward will allow the door to be opened only from the outside.
Rear door
Doors-Child safety locks
(2)(3)
Spare tireJack and tool
(1) Unlock
Lock
NOTE: If a passenger’s seat belt is fully extended, then retracted even slightly,
the Automatic locking retractor (ALR) will prevent it from being re-extended
beyond that point, unless fully retracted again. This feature is used to help hold
child restraint systems securely.
To find more information about seat belts, and how to install a child restraint
system, refer to the Owner’s Manual.
2016_Sequoia_QRG.indd 337/6/15 8:11 PM