Vin number TOYOTA SEQUOIA HYBRID 2023 Owners Manual
[x] Cancel search | Manufacturer: TOYOTA, Model Year: 2023, Model line: SEQUOIA HYBRID, Model: TOYOTA SEQUOIA HYBRID 2023Pages: 628, PDF Size: 14.27 MB
Page 112 of 628
1123-1. Key information
Owners Manual_USA_M0C043_en
3-1.Key information
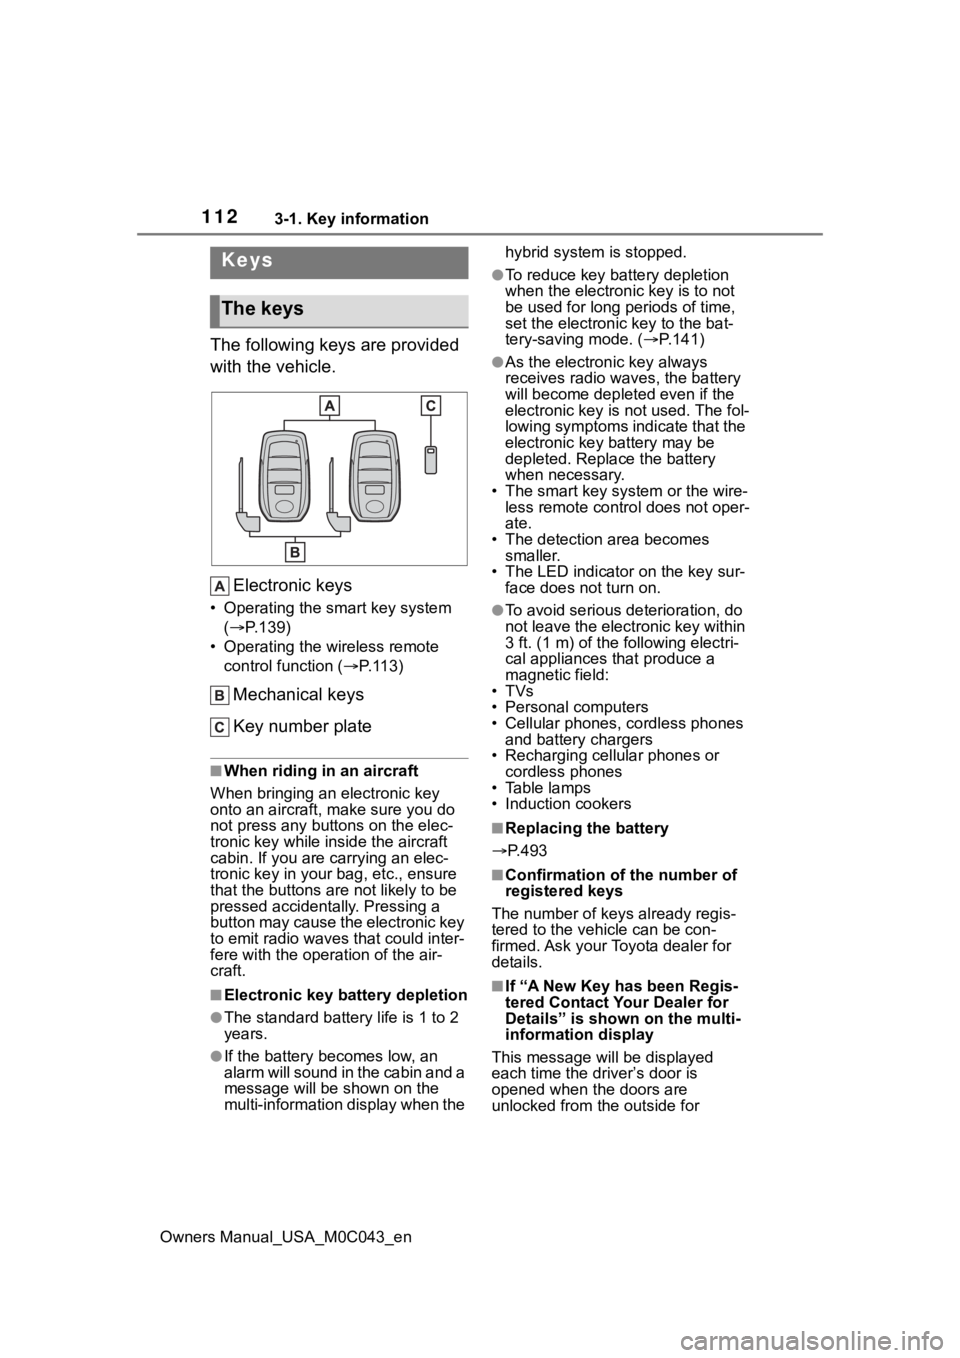
The following keys are provided
with the vehicle.Electronic keys
• Operating the smart key system ( P.139)
• Operating the wireless remote control function ( P. 1 1 3 )
Mechanical keys
Key number plate
■When riding in an aircraft
When bringing an electronic key
onto an aircraft, make sure you do
not press any buttons on the elec-
tronic key while inside the aircraft
cabin. If you are carrying an elec-
tronic key in your bag, etc., ensure
that the buttons are not likely to be
pressed accidentally. Pressing a
button may cause the electronic key
to emit radio waves that could inter-
fere with the oper ation of the air-
craft.
■Electronic key battery depletion
●The standard battery life is 1 to 2
years.
●If the battery becomes low, an
alarm will sound in the cabin and a
message will be s hown on the
multi-information display when the hybrid system is stopped.
●To reduce key battery depletion
when the electronic key is to not
be used for long periods of time,
set the electronic key to the bat-
tery-saving mode. (
P.141)
●As the electronic key always
receives radio waves, the battery
will become depleted even if the
electronic key is not used. The fol-
lowing symptoms indicate that the
electronic key battery may be
depleted. Replace the battery
when necessary.
• The smart key system or the wire- less remote contro l does not oper-
ate.
• The detection area becomes smaller.
• The LED indicator on the key sur- face does not turn on.
●To avoid serious deterioration, do
not leave the electronic key within
3 ft. (1 m) of the following electri-
cal appliances that produce a
magnetic field:
•TVs
• Personal computers
• Cellular phones, cordless phones and battery chargers
• Recharging cellular phones or cordless phones
• Table lamps
• Induction cookers
■Replacing the battery
P.493
■Confirmation of the number of
registered keys
The number of keys already regis-
tered to the vehi cle can be con-
firmed. Ask your Toyota dealer for
details.
■If “A New Key has been Regis-
tered Contact Your Dealer for
Details” is shown on the multi-
information display
This message will be displayed
each time the driver’s door is
opened when the doors are
unlocked from the outside for
Keys
The keys
Page 195 of 628
1954-1. Before driving
Owners Manual_USA_M0C043_en
4
Driving
be C lb. (kg) as follows:
B
*2 lb. (kg) - A*1 lb. (kg) = C*3 lb.
(kg)
*1: A =Weight of people
*2: B =Total load capacity
*3: C =Available cargo and luggage load
In this condition, if 3 more passen-
gers with the combined weight of D
lb. (kg) get on, the available cargo
and luggage load will be reduced E
lb. (kg) as follows:
C lb. (kg) - D*4 lb. (kg) = E*5 lb.
(kg)
*4: D =Additional weight of people
*5: E =Available cargo and luggage load
As shown in the example above,
if the number of occupants
increases, the cargo and lug-
gage load will be reduced by an
amount that equals the
increased weight due to the
additional occupants. In other
words, if an increase in the num-
ber of occupants causes an
excess of the total load capacity
(combined weight of occupants
plus cargo and luggage load),
you must reduce the cargo and
luggage on your vehicle.
WARNING
■Things that must not be car-
ried in the luggage compart-
ment
The following things may cause a
fire if loaded in the luggage com-
partment:
●Receptacles containing gaso-
line
●Aerosol cans
■Storage precautions
Observe the following precau-
tions.
Failure to do so may prevent the
pedals from being depressed
properly, may block the driver’s
vision, or may res ult in items hit-
ting the driver or passengers, pos-
sibly causing an accident.
●Stow cargo and luggage in the
luggage compartment when-
ever possible.
●Do not stack cargo and luggage
in the luggage compartment
higher than the seatbacks.
●Do not place cargo or luggage
in or on the follo wing locations.
• At the feet of the driver
• On the front passenger or rear seats (when stacking items)
• On the instrument panel
• On the dashboard
• On the auxiliary b ox or tray that
has no lid
●Secure all items in the occupant
compartment.
●When you fold down the rear
seats, long items should not be
placed directly behind the front
seats.
Page 197 of 628
1974-1. Before driving
Owners Manual_USA_M0C043_en
4
Driving
WARNING
●If driving for a long distance, on
rough roads, or at high speeds,
stop the vehicle now and then
during the trip to make sure the
cross rails are fixed securely
and that the cargo remains in its
place.
●Vehicles with cross bars: Do not
exceed 154 lb. (70 kg) cargo
weight on the roof luggage car-
rier.
●Vehicles with roof rack: Do not
exceed 104 lb. (47 kg) cargo
weight on the roof luggage car-
rier.
Vehicle load limits
Vehicle load limits include
total load capacity, seating
capacity, TWR (Trailer
Weight Rating) and cargo
capacity.
Total load capacity (vehicle
capacity weight): P.549
Total load capacity means the
combined weight of occu-
pants, cargo and luggage.
Seating capacity: P.549
Seating capacity means the
maximum number of occu-
pants whose estimated aver-
age weight is 150 lb. (68 kg)
per person.
Even if the number of occu-
pants are within the seating
capacity, do not exceed the
total load capacity.
TWR (Trailer Weight Rat-
ing): P.203
TWR means the maximum
gross trailer weight (trailer
weight plus its cargo weight)
that your vehicle is able to tow.
Cargo capacity
Cargo capacity may increase
or decrease depending on the
weight and the number of
occupants.
Page 229 of 628

2294-3. Operating the lights and wipers
Owners Manual_USA_M0C043_en
4
Driving
and may cause the automatic head-
light system to malfunction.
■Automatic light off system
●When the headlights are on: The
headlights and tail lights turn off
30 seconds after the driver’s door
is opened and clos ed if the power
switch is turned to ACC or off.
(The lights turn off immediately if
on the key is pressed after all
the doors are closed.)
●When only the tail lights are on:
The tail lights tu rn off automati-
cally if the power switch is turned
to ACC or OFF and the driver’s
door is opened.
To turn the lights on again, turn the
power switch to ON, or turn the light
switch off once and then back to or .
■Light reminder buzzer
A buzzer sounds when the power
switch is turned to ACC or OFF and
the driver’s door is opened while the
lights are turned on.
■When unlock the doors (wel-
come lamp) (If equipped)
When the doors are unlocked using
the entry function or wireless remote
control, the front parking lights and
tail lights turn o n automatically.
When the light switch is in the AUTO
position and the surrounding area is
dark, this function will operate.
■Automatic headlight leveling
system (if equipped)
The level of the headlights is auto-
matically adjusted according to the
number of passengers and the load-
ing condition of the vehicle to
ensure that the headlights do not
interfere with other road users.
■Windshield wiper linked head-
light illumination
When driving during daytime with
the headlight swit ch turned to , if the windshield wipers are
used, the headlights will turn on
automatically after several seconds
to help enhance the visibility of your
vehicle.
■12-volt battery-saving function
In order to prevent the 12-volt bat-
tery of the vehicle from discharging,
if the headlights and/or tail lights are
on when the power switch is turned
to OFF the 12-volt battery-saving
function will operate and automati-
cally turn off all the lights after
approximately 20 minutes. When
the power switch is turned to ON,
the 12-volt battery-saving function
will be disabled.
When any of the following are per-
formed, the 12-volt battery-saving
function is canceled once and then
reactivated. All the lights will turn off
automatically 20 minutes after the
12-volt battery-saving function has
been reactivated:
●When the headlight switch is oper-
ated
●When a door is opened or closed
■Customization
Some functions can be customized.
( P.570)
NOTICE
■To prevent 12-volt battery dis-
charge
Do not leave the lights on longer
than necessary when the hybrid
system is not operating.
Page 317 of 628
3174-5. Using the driving support systems
Owners Manual_USA_M0C043_en
4
Driving
*: If equipped
●The screen illustrations used in
this text are intended as exam-
ples, and may differ from the
image that is actually displayed on
the screen.
The panoramic view monitor is a
supplemental device intended to
assist the driver when checking
around the vehicle. When using,
be sure to visually check all
around the vehicle both directly
and using the mirrors before
proceeding. If you do not, you
may hit another vehicle or possi- bly cause an accident.
Pay attention to the following
precautions when using the
panoramic view monitor.
Panoramic view moni-
tor*
Panoramic view monitor
assists the driver in viewing
the surroundings, when
operating at low speeds, by
combining the front, side
and rear cameras and dis-
playing a complete vehicle
overhead image on the
screen.
When you press the camera
switch or shift the shift lever
to R while the power switch
is in ON, the panoramic
view monitor operates.
The monitor displays vari-
ous views of the position
and surroundings of the
vehicle.
Driving precautions
WARNING
●Never depend on the panoramic
view monitor entirely. The
image and the position of the
guide lines displayed on the
screen may differ from the
actual state. Use caution just as
you would when driving any
other vehicle.
●Always make sure to check all
around the vehicle with your
own eyes when driving.
●Never drive while looking only at
the screen as the image on the
screen is different from actual
conditions. If you are driving
while looking only at the screen,
you may hit a
person or an
object, resulting in an accident.
When driving, be sure to check
the vehicle’s surroundings with
your own eyes and the vehicle’s
mirrors.
●Depending on the circum-
stances of the vehicle (number
of passengers, amount of lug-
gage, etc.), the position of the
guide lines displayed on the
screen may change. Be sure to
check visually around the vehi-
cle before proceeding.
Page 335 of 628
3354-5. Using the driving support systems
Owners Manual_USA_M0C043_en
4
Driving
●The display position of the intuitive parking assist and the po sition of
obstacles displayed in the camera image do not match.
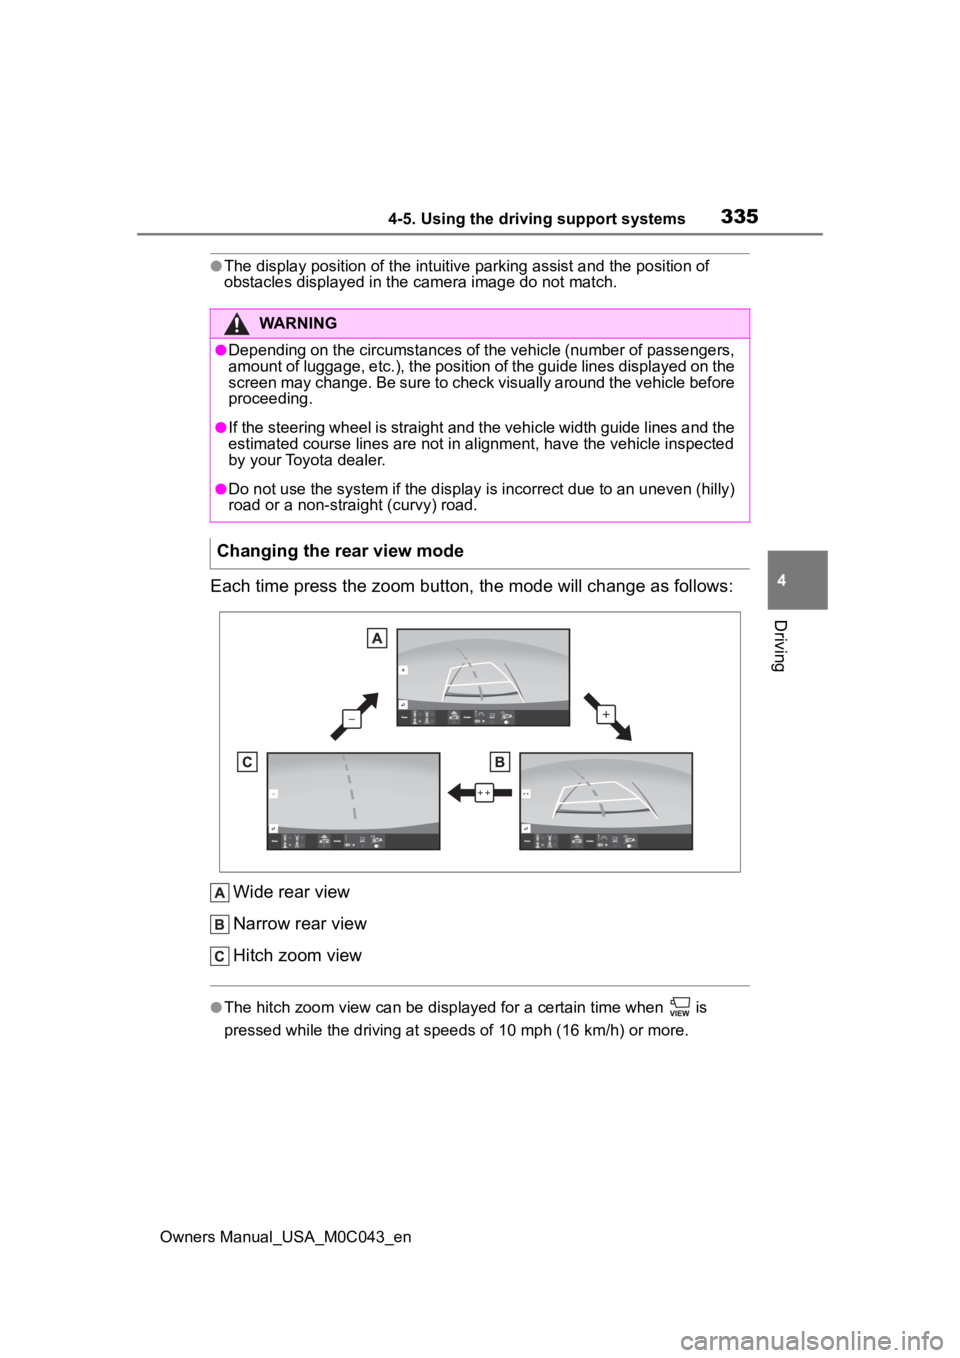
Each time press the zoom button, the mode will change as follow s:
Wide rear view
Narrow rear view
Hitch zoom view
●The hitch zoom view can be displayed for a certain time when i s
pressed while the driving at speeds of 10 mp h (16 km/h) or more.
WARNING
●Depending on the circumstances of the vehicle (number of passen gers,
amount of luggage, etc.), the position of the guide lines displ ayed on the
screen may change. Be sure to check visually around the vehicle before
proceeding.
●If the steering wheel is straight and the vehicle width guide l ines and the
estimated course lines are not in alignment, have the vehicle i nspected
by your Toyota dealer.
●Do not use the system if the display is incorrect due to an une ven (hilly)
road or a non-straight (curvy) road.
Changing the rear view mode
Page 340 of 628
3404-5. Using the driving support systems
Owners Manual_USA_M0C043_enon the standard of a flat road surface; the panoramic view/movi
ng
view/see through view may be displayed as follows.
• Objects may look collapsed; thinner or bigger than usual.
• An object with a higher position than the road surface may look farther
away than it actually is or may not appear at all.
• Tall objects may appear protrudi ng from the non-displayed areas of the
image.
●Variations in the brightness of the image may appear for every camera.
●The displayed image may be shift ed by inclination of the vehicle body,
change in vehicle height, etc., d epending on the number of pass engers,
amount of luggage, fuel quantity, etc.
●If the front door s or back door are not c ompletely closed; neither the
image nor the guide lines are displayed.
●The position relations of the vehicle icon and the road surface or obstacle
may differ from the actual positions.
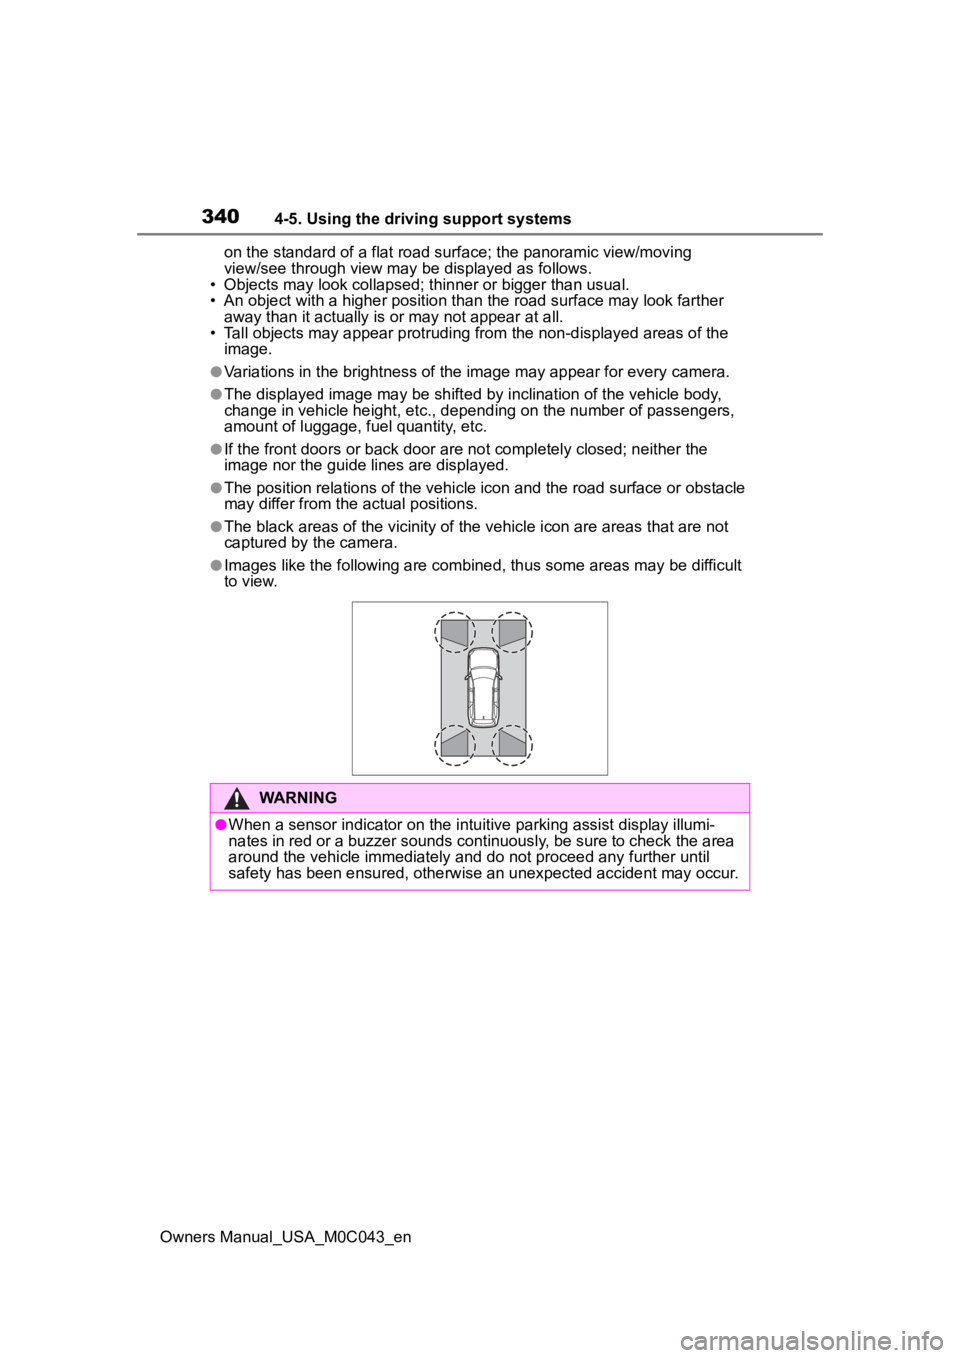
●The black areas of the vicinity of the vehicle icon are areas t hat are not
captured by the camera.
●Images like the following are combined, thus some areas may be difficult
to view.
WARNING
●When a sensor indicator on the in tuitive parking assist display illumi-
nates in red or a buzzer sounds continuously, be sure to check the area
around the vehicle immediately a nd do not proceed any further until
safety has been ensured, otherwise an unexpected accident may o ccur.
Page 345 of 628
3454-5. Using the driving support systems
Owners Manual_USA_M0C043_en
4
Driving
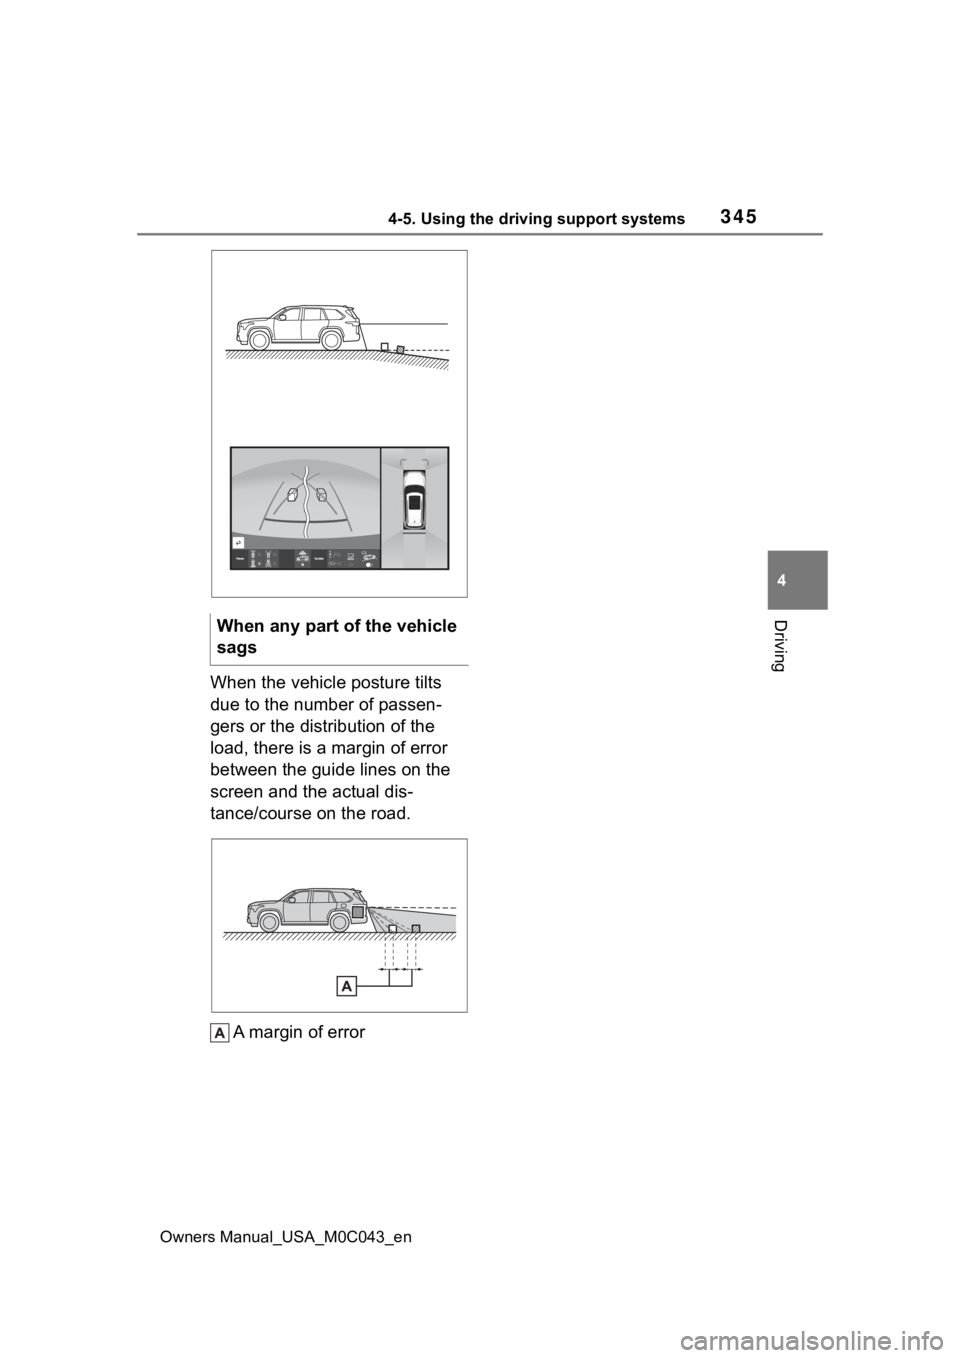
When the vehicle posture tilts
due to the number of passen-
gers or the distribution of the
load, there is a margin of error
between the guide lines on the
screen and the actual dis-
tance/course on the road. A margin of error
When any part of the vehicle
sags
Page 361 of 628
3614-5. Using the driving support systems
Owners Manual_USA_M0C043_en
4
Driving
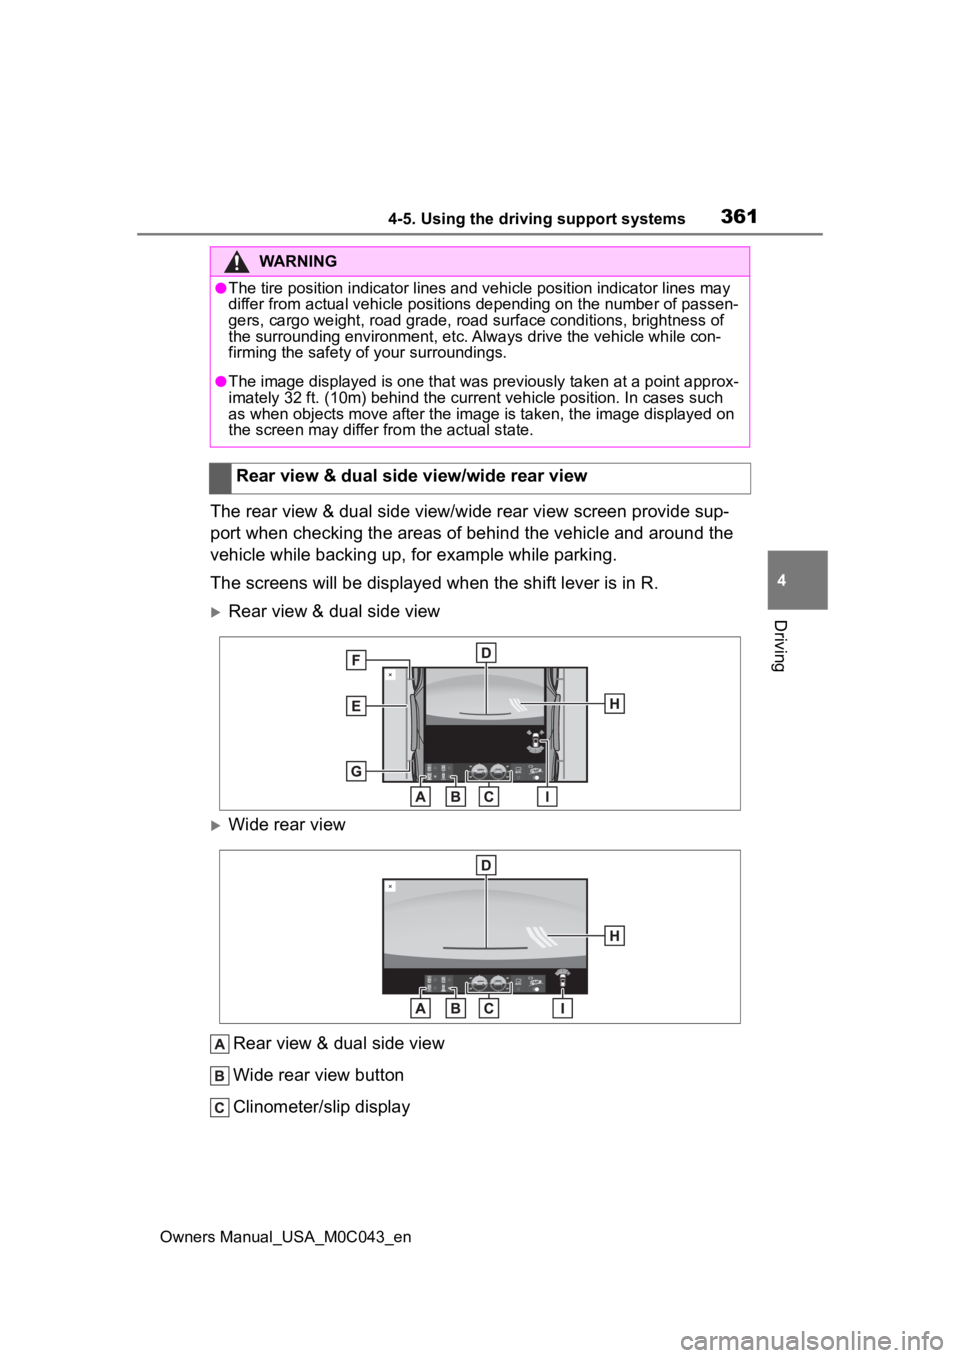
The rear view & dual side view/wide rear view screen provide sup- port when checking the areas of behind the vehicle and around t he
vehicle while backing up, for example while parking.
The screens will be displayed when the shift lever is in R.
Rear view & dual side view
Wide rear view
Rear view & dual side view
Wide rear view button
Clinometer/slip display
WARNING
●The tire position indicator lines and vehicle pos ition indicator lines may
differ from actual vehicle positions depending on the number of passen-
gers, cargo weight, road grade, r oad surface conditions, brightness of
the surrounding environment, etc. Always drive the vehicle whil e con-
firming the safety of your surroundings.
●The image displayed is one that was previously taken at a point approx-
imately 32 ft. (10m) behind the current vehicle position. In cases such
as when objects move after the im age is taken, the image displayed on
the screen may differ from the actual state.
Rear view & dual side view/wide rear view
Page 362 of 628
3624-5. Using the driving support systems
Owners Manual_USA_M0C043_enDisplays the vehicle’s estimate
d degree of incline or indicates a tire slip-
page. ( P.357, 358)
1.5 ft. (0.5 m) distance guide line (red)
Show distance in rear of the vehicle.
• Display points approximately 1.5 ft. (0.5 m) fr om the edge of the bumper.
Vehicle width guide lines (blue)
Displays a guide path w hen the vehicle is being backed straight up.
Front tire contact line (blue)
Shows guide lines of where the front tire touches the ground.
Rear tire contact line (blue)
Shows guide lines of where the rear tire touches the ground.
Rear Cross Traffic Alert
When a sensor detects a vehicle approaching from the rear, the direction of
the vehicle approaching from the r ear is displayed and the buzzer sounds.
Intuitive parking assist
When a sensor detects an obstacle, the direction of and the app roximate
distance to the obsta cle are displayed and the buzzer sounds.
●The screen can be displayed when the shift lever is in R.
●For details about the Rear C ross Traffic Alert function. (P.301)
●If the back door is not closed, guide lines will not be display ed. If the guide
lines do not display e ven when the back door is closed, have th e vehicle
inspected at you r Toyota dealer.
P.339
P.350
WARNING
●The tire position indicator lines and vehicle pos ition indicator lines may
differ from actual vehicle positions depending on the number of passen-
gers, cargo weight, road grade, r oad surface conditions, brightness of
the surrounding environment, etc. Always drive the vehicle whil e con-
firming the safety of your surroundings.
Multi-terrain Monitor pre-
cautions
Things you should know