clock TOYOTA SEQUOIA HYBRID 2023 Owners Manual
[x] Cancel search | Manufacturer: TOYOTA, Model Year: 2023, Model line: SEQUOIA HYBRID, Model: TOYOTA SEQUOIA HYBRID 2023Pages: 628, PDF Size: 14.27 MB
Page 93 of 628
932-1. Instrument cluster
Owners Manual_USA_M0C043_en
2
Vehicle status information and indicators
The units used on the meter and display may differ depending on the target
region.
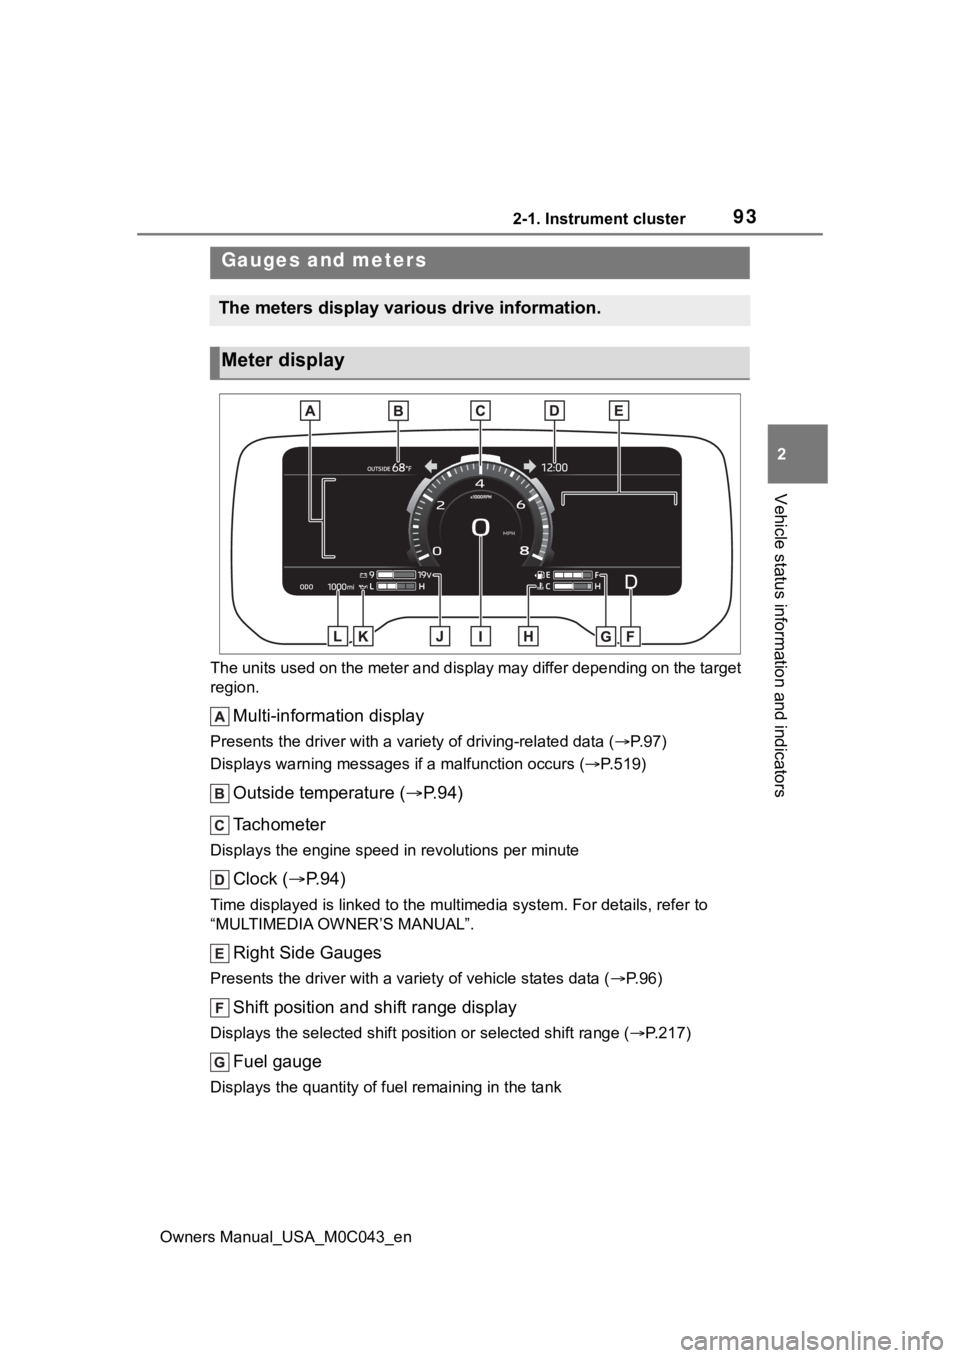
Multi-information display
Presents the driver with a variety of driving-related data ( P. 9 7 )
Displays warning messages if a malfunction occurs (P.519)
Outside temperature ( P. 9 4 )
Tachometer
Displays the engine speed in revolutions per minute
Clock ( P. 9 4 )
Time displayed is linked to the multimedia system. For details, refer to
“MULTIMEDIA OWNER’S MANUAL”.
Right Side Gauges
Presents the driver with a variety of vehicle states data ( P. 9 6 )
Shift position and shift range display
Displays the selected shift posit ion or selected shift range (P.217)
Fuel gauge
Displays the quantity of fu el remaining in the tank
Gauges and meters
The meters display various drive information.
Meter display
Page 94 of 628
942-1. Instrument cluster
Owners Manual_USA_M0C043_en
Engine coolant temperature gauge
Displays the engine coolant temperature
Speedometer
Displays the vehicle speed
Voltmeter
Displays the charge state
Engine oil pressure gauge
Displays the engine oil pressure
Odometer and trip meter ( P.95)
■The meters and display illumi-
nate when
The power swit ch is in ON.
■Tachometer needle feature
The tachometer needle will fade in
or out during the engine starting or
stopping, respectively.
The needle is completely visible
after the engine is turned on or
turned off.
■Clock settings screen
If clock setting item is displayed
when is selected on the multi-
information display, the system may
be malfunctioning. Have the vehicle
inspected by your Toyota dealer.
■Outside temperature display
●In the following si tuations, the cor-
rect outside tempe rature may not
be displayed, or the display may
take longer than normal to
change.
• When stopped, or driving at low
speeds (less than 12 mph [20
km/h])
• When the outside temperature
has changed suddenly (at the
entrance/exit of a garage, tunnel,
etc.)
●When “--” or “E” is displayed, the
system may be malfunctioning.
Take your vehicle to your Toyota
dealer.
●Displays the outsi de temperature
within the range of -40°F (-40°C)
to 122°F (50°C).
●When the outside temperature is
approximately 37°F (3°C) or
lower, the indicator will flash
for approximately 10 seconds,
then stay on.
■Liquid crystal display
P. 9 8
■Customization
Settings (e. g. mete r display) can be
changed on screen of the multi-
information display. ( P.101)
WARNING
■The information display at
low temperatures
Allow the interior of the vehicle to
warm up before using the liquid
crystal information display. At
extremely low temperatures, the
information disp lay monitor may
respond slowly, and display
changes may be delayed.
Page 467 of 628
4676-3. Do-it-yourself maintenance
Owners Manual_USA_M0C043_en
6
Maintenance and care
Items
Clean funnel
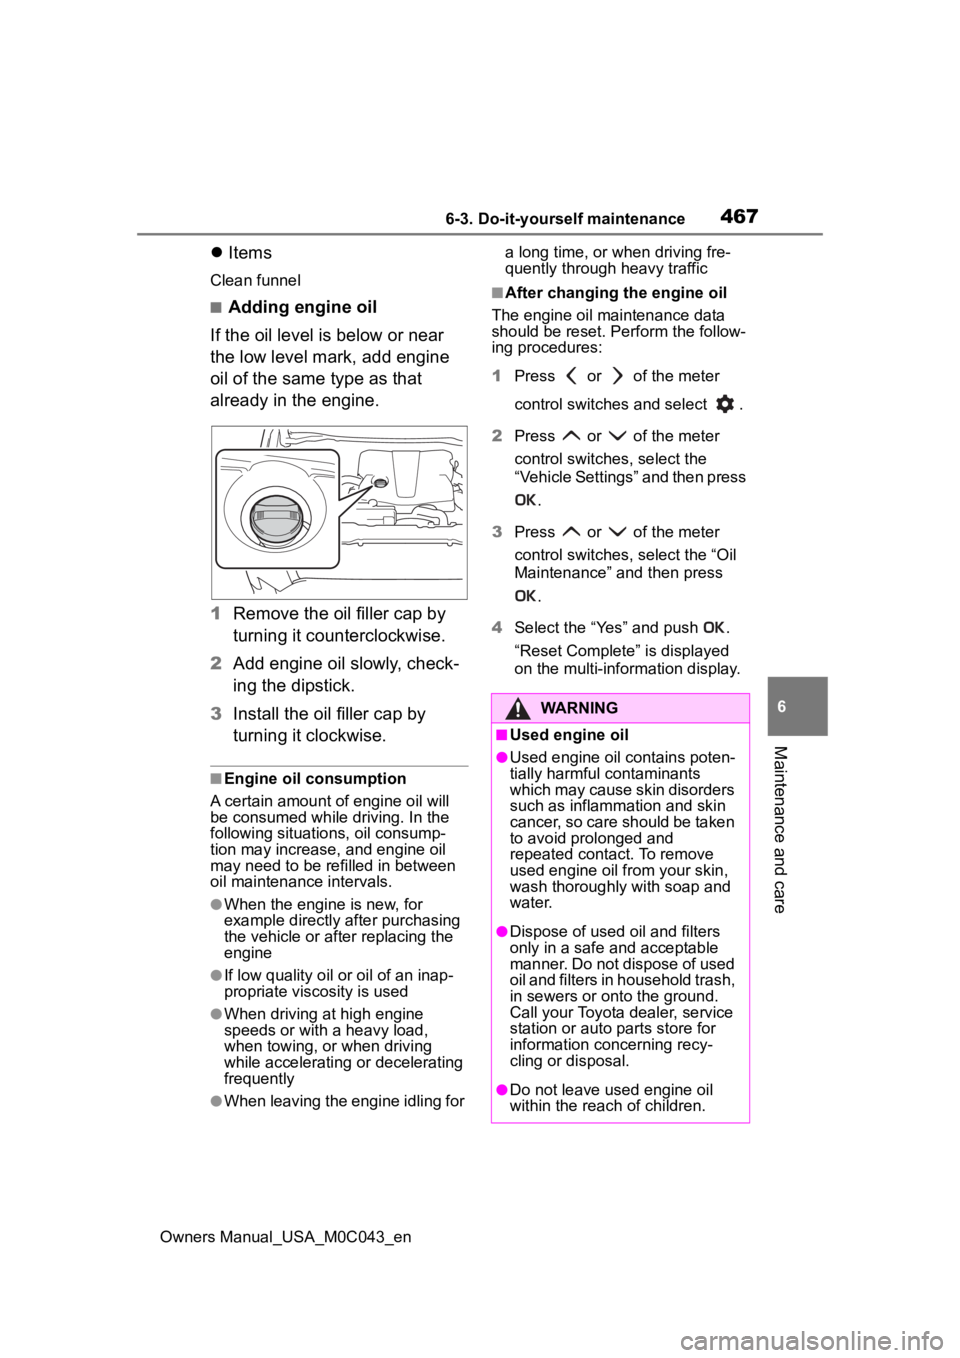
■Adding engine oil
If the oil level is below or near
the low level mark, add engine
oil of the same type as that
already in the engine.
1 Remove the oil filler cap by
turning it counterclockwise.
2 Add engine oil slowly, check-
ing the dipstick.
3 Install the oil filler cap by
turning it clockwise.
■Engine oil consumption
A certain amount of engine oil will
be consumed while driving. In the
following situatio ns, oil consump-
tion may increase, and engine oil
may need to be ref illed in between
oil maintenance intervals.
●When the engine is new, for
example directly after purchasing
the vehicle or after replacing the
engine
●If low quality oil or oil of an inap-
propriate viscosity is used
●When driving at high engine
speeds or with a heavy load,
when towing, or when driving
while accelerating o r decelerating
frequently
●When leaving the engine idling for a long time, or when driving fre-
quently through heavy traffic
■After changing the engine oil
The engine oil maintenance data
should be reset. Pe rform the follow-
ing procedures:
1 Press or of the meter
control switches and select .
2 Press or of the meter
control switches, select the
“Vehicle Settings” and then press
.
3 Press or of the meter
control switches, select the “Oil
Maintenance” and then press
.
4 Select the “Yes” and push .
“Reset Complete” is displayed
on the multi-info rmation display.
WARNING
■Used engine oil
●Used engine oil contains poten-
tially harmful contaminants
which may cause skin disorders
such as inflammation and skin
cancer, so care should be taken
to avoid prolonged and
repeated contact. To remove
used engine oil from your skin,
wash thoroughly with soap and
water.
●Dispose of used oil and filters
only in a safe and acceptable
manner. Do not dispose of used
oil and filters in h ousehold trash,
in sewers or onto the ground.
Call your Toyota dealer, service
station or auto parts store for
information concerning recy-
cling or disposal.
●Do not leave used engine oil
within the reach of children.
Page 499 of 628
4996-3. Do-it-yourself maintenance
Owners Manual_USA_M0C043_en
6
Maintenance and care
Contact your Toyota dealer for more
information in the following situa-
tions:
●Large drops of water have built up
on the inside of the lens.
●Water has built up inside the
headlight.
■When replacing light bulbs
P. 4 9 7
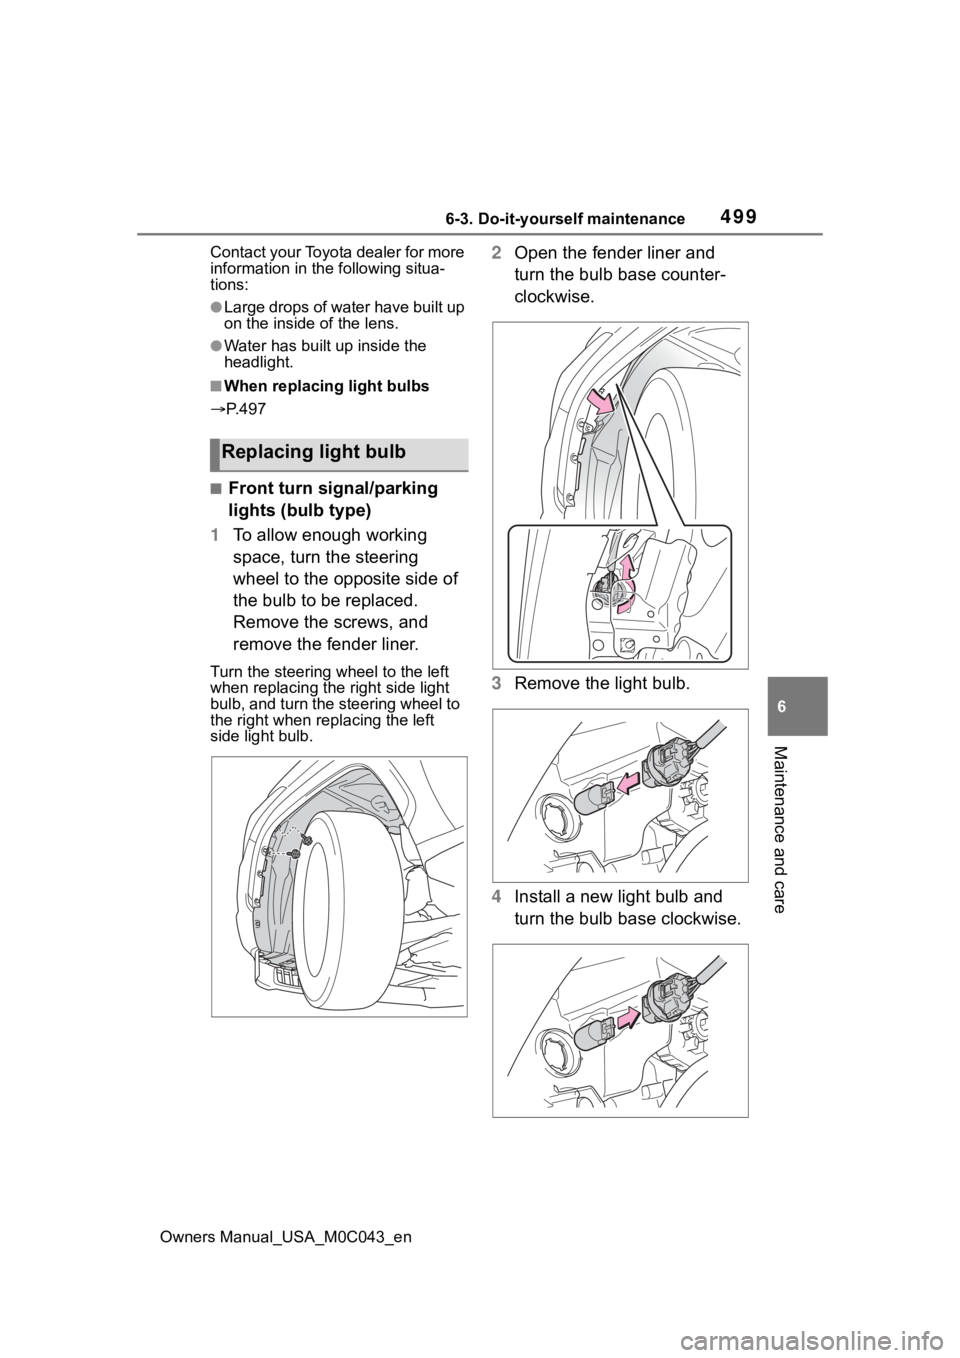
■Front turn signal/parking
lights (bulb type)
1 To allow enough working
space, turn the steering
wheel to the opposite side of
the bulb to be replaced.
Remove the screws, and
remove the fender liner.
Turn the steering wheel to the left
when replacing the right side light
bulb, and turn the steering wheel to
the right when rep lacing the left
side light bulb.
2 Open the fender liner and
turn the bulb base counter-
clockwise.
3 Remove the light bulb.
4 Install a new light bulb and
turn the bulb base clockwise.
Replacing light bulb
Page 526 of 628
5267-2. Steps to take in an emergency
Owners Manual_USA_M0C043_en
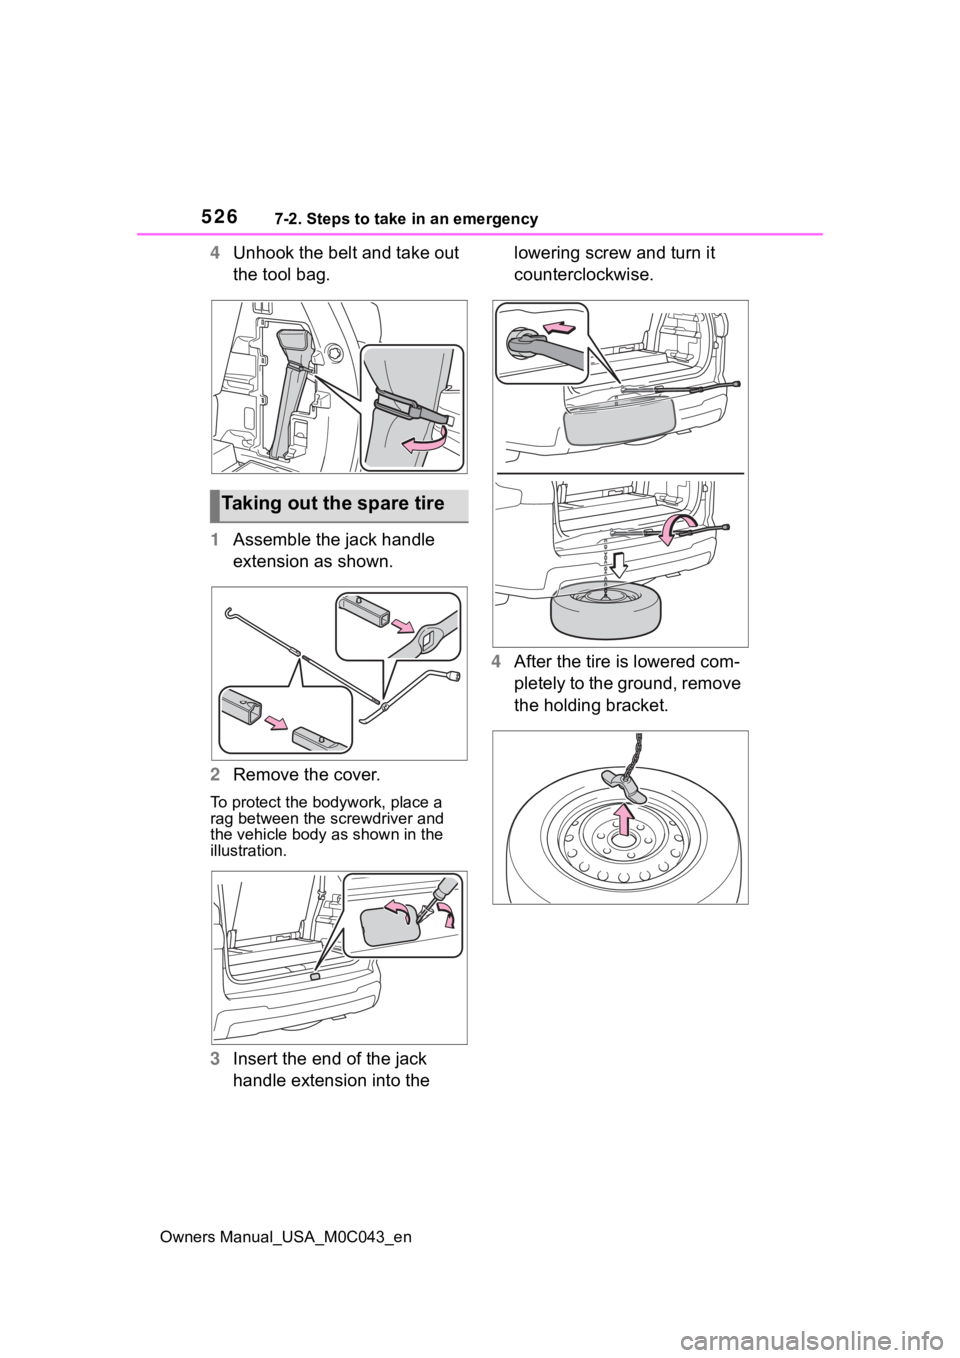
4Unhook the belt and take out
the tool bag.
1 Assemble the jack handle
extension as shown.
2 Remove the cover.
To protect the bod ywork, place a
rag between the screwdriver and
the vehicle body as shown in the
illustration.
3 Insert the end of the jack
handle extension into the lowering screw and turn it
counterclockwise.
4 After the tire is lowered com-
pletely to the ground, remove
the holding bracket.
Taking out the spare tire
Page 530 of 628
5307-2. Steps to take in an emergency
Owners Manual_USA_M0C043_en
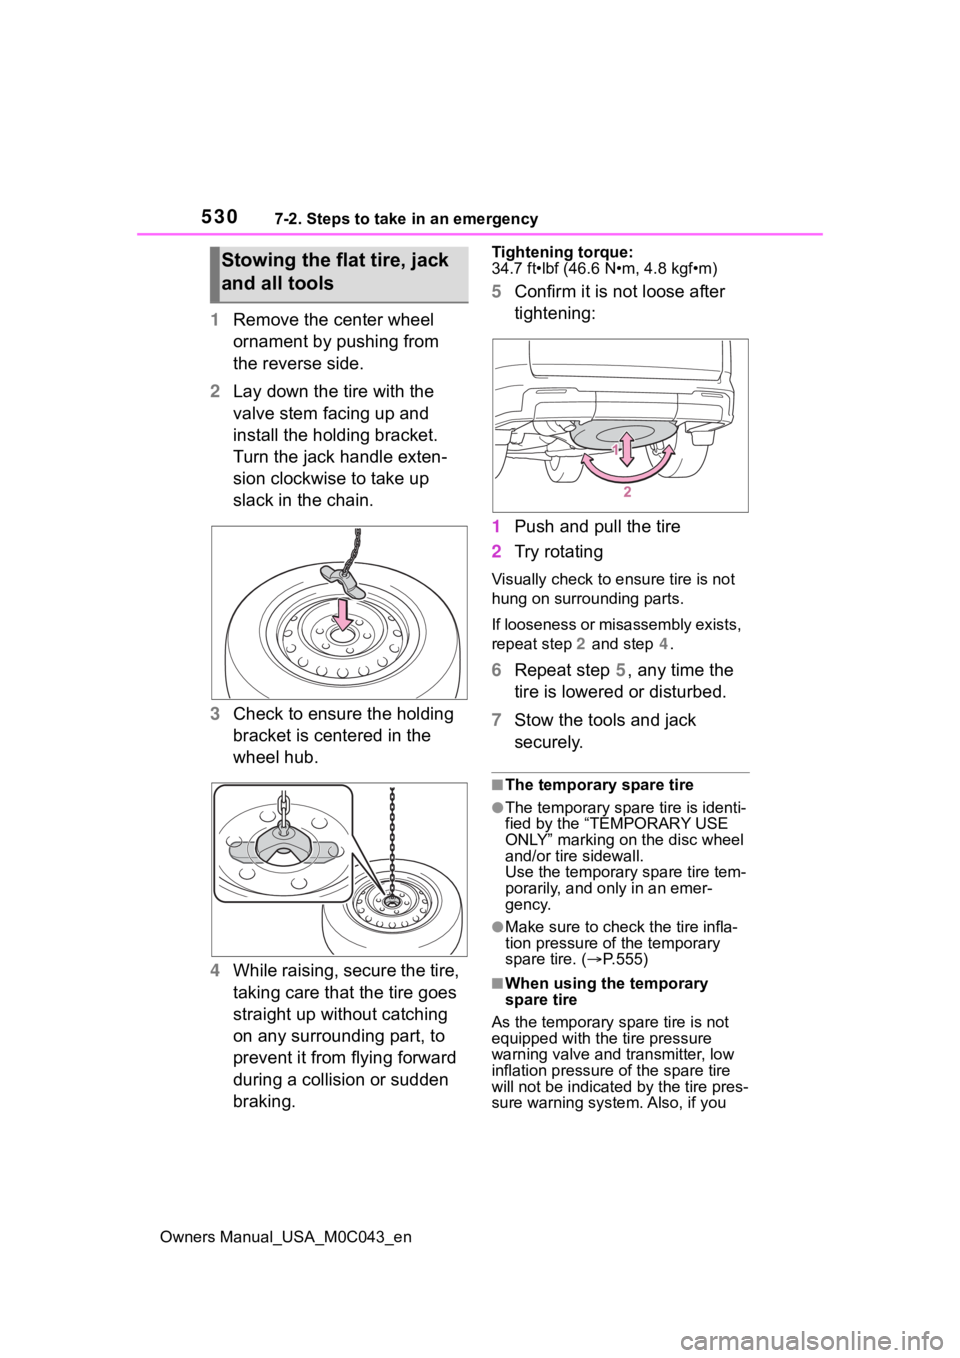
1Remove the center wheel
ornament by pushing from
the reverse side.
2 Lay down the tire with the
valve stem facing up and
install the holding bracket.
Turn the jack handle exten-
sion clockwise to take up
slack in the chain.
3 Check to ensure the holding
bracket is centered in the
wheel hub.
4 While raising, secure the tire,
taking care that the tire goes
straight up without catching
on any surrounding part, to
prevent it from flying forward
during a collision or sudden
braking.
Tightening torque:
34.7 ft•lbf (46.6 N•m, 4.8 kgf•m)
5Confirm it is not loose after
tightening:
1 Push and pull the tire
2 Try rotating
Visually check to e nsure tire is not
hung on surrounding parts.
If looseness or misassembly exists,
repeat step 2 and step 4.
6 Repeat step 5, any time the
tire is lowered or disturbed.
7 Stow the tools and jack
securely.
■The temporary spare tire
●The temporary spare tire is identi-
fied by the “TEMPORARY USE
ONLY” marking on the disc wheel
and/or tire sidewall.
Use the temporary spare tire tem-
porarily, and only in an emer-
gency.
●Make sure to check the tire infla-
tion pressure of the temporary
spare tire. ( P.555)
■When using the temporary
spare tire
As the temporary spare tire is not
equipped with the tire pressure
warning valve and transmitter, low
inflation pressure of the spare tire
will not be indicated by the tire pres-
sure warning system. Also, if you
Stowing the flat tire, jack
and all tools
Page 601 of 628

Owners Manual_USA_M0C043_en
Alphabetical Index601
Panoramic moon roof ........... 182
Power window lock switch.... 176
Power window precautions .. 175
Rear door child-protectors.... 118
Removed electronic key battery precautions......................... 494
Seat belt extender precautions ............................................. 30
Seat belt precautions ............. 53
Child-protectors .. ................... 118
Cleaning .......................... 450, 453 Aluminum wheel ornaments . 450
Aluminum wheels ................. 450
Digital Rear-view Mirror........ 165
Exterior ................................. 450
Interior .................................. 453
Radar sensor........................ 245
Seat belts ............................. 453
Clock ......................................... 93
Coat hooks .............................. 434
Condenser .............................. 469
Console box ............................ 424
Console box light ................... 418
Consumption screen.............. 108
Coolant .................................... 468 Checking .............................. 468
Cooling system ...................... 468 Engine overheating .............. 543
Coussins gonflables Modification et é limination en fin
de vie des coussins gonflables ........................................... 593
Crawl Control .......................... 373
Cruise control Dynamic radar cruise control with full-speed range .......... 275
Cup holders ............................ 422
Current fuel consumption ....... 99
Curtain shield airbags ............. 37
Customizable features ........... 570D
DAC ..........................................380
Daytime running light system228
Daytime running lights Replacing light bulbs ............498
Deck divider ............................426
Defogger Outside rear view mirrors .....408
Rear window.........................408
Windshield ............................407
Differential ...............................554
Digital Rear-view Mirror .........160
Dimension ...............................548
Dinghy towing ......................... 211
Display Dynamic radar cruise control with full-speed range ..........275
Head-up display ...................104
Intuitive parking assist ..........294
LTA (Lane Tracing Assist) .....267
Multi-information display.........97
Warning messages ...............519
Display change button .............95
Distance until next engine oil change .....................................95
Do-it-yourself maintenance ...457
Door courtesy lights...............418
Door lock Back door .............................122
Side doors ............................ 115
Smart key system .................139
Wireless remote control........ 113
Page 606 of 628

606Alphabetical Index
Owners Manual_USA_M0C043_en
L
Lane Tracing Assist (LTA)...... 261 Operation ............................. 261
Warning lights....................... 512
Warning messages............... 271
Language (multi-information dis- play) ....................................... 101
LATCH anchors ........................ 64
Lever Auxiliary catch lever ............. 464
Hood lock release lever........ 464
Shift lever ............................. 218
Turn signal lever ................... 221
Wiper lever ........................... 235
License plate lights Light switch .......................... 228
Replacing light bulbs ............ 498
Light bulbs Replacing ............................. 498
Lights Ambient lights....................... 419
Automatic High Beam system........................................... 231
Fog light switch .................... 231
Headlight switch ................... 228
Interior lights................. 418, 419
Luggage compartment light 125, 129
Personal lights...................... 419
Replacing light bulbs ............ 498
Trailering light ....................... 173
Turn signal lever ................... 221
Vanity lights .......................... 440
Wattage ................................ 557
LTA (Lane Tracing Assist) ...... 261 Operation ............................. 261
Warning lights....................... 512
Warning messages............... 271 Luggage compartment features
...............................................425Bed hooks ............................425
Deck divider..........................426
Luggage compartment light 125, 129
M
Maintenance Do-it-yourself maintenance ..462
General maintenance ...........457
Maintenance data .................548
Maintenance requirements ...456
Malfunction indicator lamp ....510
Manual headlight leveling dial ...............................................230
Menu icons ................................98
Meter Boost Meter ............................96
Clock ......................................93
Engine oil pressure gauge......93
Hybrid Power Meter ................96
Indicators ................................91
Instrument panel light control .96
Meter control switches............98
Meters ....................................93
Multi-information display.........97
Pitch and roll gauges ..............96
Settings ................................101
Tow gauges ............................96
Voltmeter ................................93
Warning lights .................89, 509
Warning messages ...............519
Meter control switches.............98